C#/VB.NET: Convert Word to XML
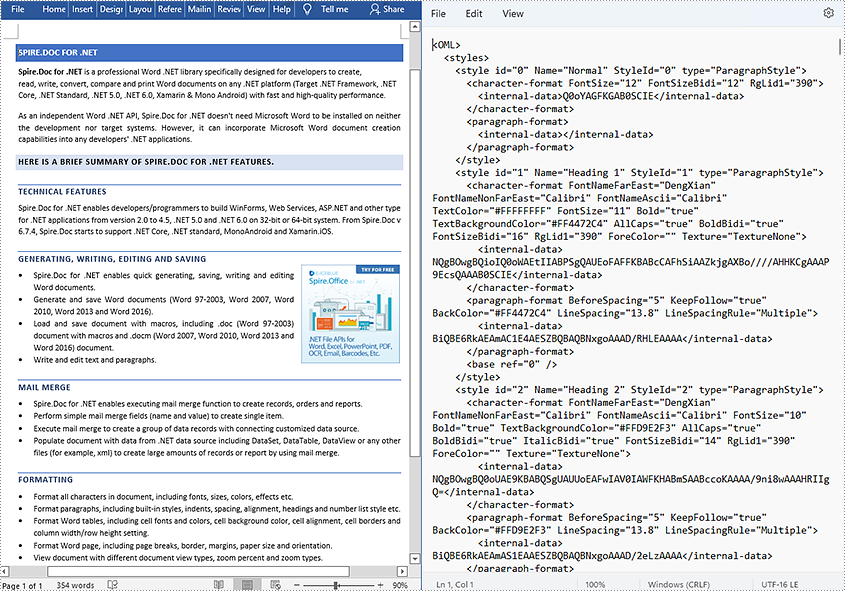
XML is a markup language and file format designed mainly to store and transmit arbitrary content. XML files have the feature of simplicity, generality, and usability, making them popular, especially among web servers. XML and HTML are two important markup languages on the web, but XML focuses on storing and transmitting data while HTML focuses on displaying webpages. This article demonstrates how to convert Word documents to XML files with the help of Spire.Doc for .NET.
Install Spire.Doc for .NET
To begin with, you need to add the DLL files included in the Spire.Doc for .NET package as references in your .NET project. The DLL files can be either downloaded from this link or installed via NuGet.
PM> Install-Package Spire.Doc
Convert a Word Document to an XML File
The detailed steps are as follows:
- Create an object of Document class.
- Load the Word document from disk using Document.LoadFromFile().
- Save the Word document as an XML file using Document.SaveToFile().
- C#
- VB.NET
using System;
using Spire.Doc;

namespace WordtoXML
{
    internal class Program
    {
        static void Main(string[] args)
        {
            //Create an object of Document class
            Document document = new Document();

            //Load a Word document from disk
            document.LoadFromFile(@"D:\testp\test.docx");

            //Save the Word document as an XML file
            document.SaveToFile("Sample.xml", FileFormat.Xml);
        }
    }
}
Apply for a Temporary License
If you'd like to remove the evaluation message from the generated documents, or to get rid of the function limitations, please request a 30-day trial license for yourself.
C#/VB.NET: Insert Hyperlinks to Word Documents
A hyperlink within a Word document enables readers to jump from its location to a different place within the document, or to a different file or website, or to a new email message. Hyperlinks make it quick and easy for readers to navigate to related information. This article demonstrates how to add hyperlinks to text or images in C# and VB.NET using Spire.Doc for .NET.
Install Spire.Doc for .NET
To begin with, you need to add the DLL files included in the Spire.Doc for.NET package as references in your .NET project. The DLL files can be either downloaded from this link or installed via NuGet.
PM> Install-Package Spire.Doc
Insert Hyperlinks When Adding Paragraphs to Word
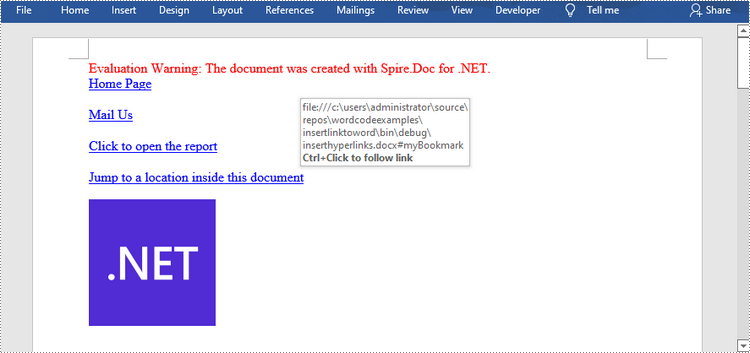
Spire.Doc offers the Paragraph.AppendHyperlink() method to add a web link, an email link, a file link, or a bookmark link to a piece of text or an image inside a paragraph. The following are the detailed steps.
- Create a Document object.
- Add a section and a paragraph to it.
- Insert a hyperlink based on text using Paragraph.AppendHyerplink(string link, string text, HyperlinkType type) method.
- Add an image to the paragraph using Paragraph.AppendPicture() method.
- Insert a hyperlink based on the image using Paragraph.AppendHyerplink(string link, Spire.Doc.Fields.DocPicture picture, HyperlinkType type) method.
- Save the document using Document.SaveToFile() method.
- C#
- VB.NET
using Spire.Doc;
using Spire.Doc.Documents;
using System.Drawing;

namespace InsertHyperlinks
{
    class Program
    {
        static void Main(string[] args)
        {
            //Create a Word document
            Document doc = new Document();

            //Add a section
            Section section = doc.AddSection();

            //Add a paragraph
            Paragraph paragraph = section.AddParagraph();
            paragraph.AppendHyperlink("https://www-iceblue.com/", "Home Page", HyperlinkType.WebLink);

            //Append line breaks
            paragraph.AppendBreak(BreakType.LineBreak);
            paragraph.AppendBreak(BreakType.LineBreak);

            //Add an email link
            paragraph.AppendHyperlink("mailto:support@e-iceblue.com", "Mail Us", HyperlinkType.EMailLink);

            //Append line breaks
            paragraph.AppendBreak(BreakType.LineBreak);
            paragraph.AppendBreak(BreakType.LineBreak);

            //Add a file link
            string filePath = @"C:\Users\Administrator\Desktop\report.xlsx";
            paragraph.AppendHyperlink(filePath, "Click to open the report", HyperlinkType.FileLink);

            //Append line breaks
            paragraph.AppendBreak(BreakType.LineBreak);
            paragraph.AppendBreak(BreakType.LineBreak);

            //Add another section and create a bookmark
            Section section2 = doc.AddSection();
            Paragraph bookmarkParagrapg = section2.AddParagraph();
            bookmarkParagrapg.AppendText("Here is a bookmark");
            BookmarkStart start = bookmarkParagrapg.AppendBookmarkStart("myBookmark");
            bookmarkParagrapg.Items.Insert(0, start);
            bookmarkParagrapg.AppendBookmarkEnd("myBookmark");

            //Link to the bookmark
            paragraph.AppendHyperlink("myBookmark", "Jump to a location inside this document", HyperlinkType.Bookmark);

            //Append line breaks
            paragraph.AppendBreak(BreakType.LineBreak);
            paragraph.AppendBreak(BreakType.LineBreak);

            //Add an image link
            Image image = Image.FromFile(@"C:\Users\Administrator\Desktop\logo.png");
            Spire.Doc.Fields.DocPicture picture = paragraph.AppendPicture(image);
            paragraph.AppendHyperlink("https://docs.microsoft.com/en-us/dotnet/", picture, HyperlinkType.WebLink);

            //Save to file
            doc.SaveToFile("InsertHyperlinks.docx", FileFormat.Docx2013);
        }
    }
}
Add Hyperlinks to Existing Text in Word
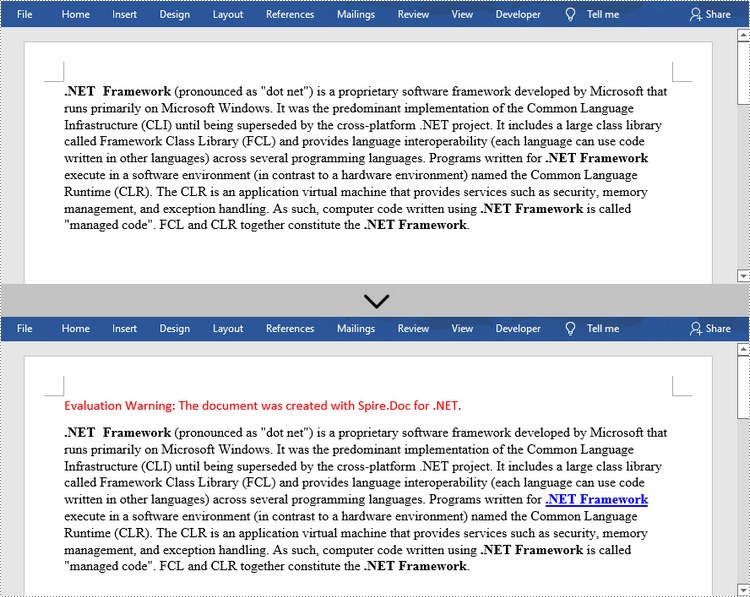
Adding hyperlinks to existing text in a document is a bit more complicated. You’ll need to find the target string first, and then replace it in the paragraph with a hyperlink field. The following are the steps.
- Create a Document object.
- Load a Word file using Document.LoadFromFile() method.
- Find all the occurrences of the target string in the document using Document.FindAllString() method, and get the specific one by its index from the collection.
- Get the string’s own paragraph and its position in it.
- Remove the string from the paragraph.
- Create a hyperlink field and insert it to position where the string is located.
- Save the document to another file using Document.SaveToFle() method.
- C#
- VB.NET
using Spire.Doc;
using Spire.Doc.Documents;
using Spire.Doc.Fields;
using Spire.Doc.Interface;

namespace AddHyperlinksToExistingText
{
    class Program
    {
        static void Main(string[] args)
        {
            //Create a Document object
            Document document = new Document();

            //Load a Word file
            document.LoadFromFile(@"C:\Users\Administrator\Desktop\sample.docx");

            //Find all the occurrences of the string ".NET Framework" in the document
            TextSelection[] selections = document.FindAllString(".NET Framework", true, true);

            //Get the second occurrence
            TextRange range = selections[1].GetAsOneRange();

            //Get its owner paragraph
            Paragraph parapgraph = range.OwnerParagraph;

            //Get its position in the paragraph
            int index = parapgraph.Items.IndexOf(range);

            //Remove it from the paragraph
            parapgraph.Items.Remove(range);

            //Create a hyperlink field
            Spire.Doc.Fields.Field field = new Spire.Doc.Fields.Field(document);
            field.Type = Spire.Doc.FieldType.FieldHyperlink;
            Hyperlink hyperlink = new Hyperlink(field);
            hyperlink.Type = HyperlinkType.WebLink;
            hyperlink.Uri = "https://en.wikipedia.org/wiki/.NET_Framework";
            parapgraph.Items.Insert(index, field);

            //Insert a field mark "start" to the paragraph
            IParagraphBase start = document.CreateParagraphItem(ParagraphItemType.FieldMark);
            (start as FieldMark).Type = FieldMarkType.FieldSeparator;
            parapgraph.Items.Insert(index + 1, start);

            //Insert a text range between two field marks
            ITextRange textRange = new Spire.Doc.Fields.TextRange(document);
            textRange.Text = ".NET Framework";
            textRange.CharacterFormat.Font = range.CharacterFormat.Font;
            textRange.CharacterFormat.TextColor = System.Drawing.Color.Blue;
            textRange.CharacterFormat.UnderlineStyle = UnderlineStyle.Single;
            parapgraph.Items.Insert(index + 2, textRange);

            //Insert a field mark "end" to the paragraph
            IParagraphBase end = document.CreateParagraphItem(ParagraphItemType.FieldMark);
            (end as FieldMark).Type = FieldMarkType.FieldEnd;
            parapgraph.Items.Insert(index + 3, end);

            //Save to file
            document.SaveToFile("AddHyperlink.docx", Spire.Doc.FileFormat.Docx);
        }
    }
}
Apply for a Temporary License
If you'd like to remove the evaluation message from the generated documents, or to get rid of the function limitations, please request a 30-day trial license for yourself.
Encrypt Word with Custom Password in C#, VB.NET
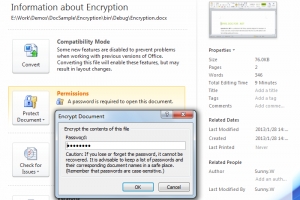
Word encryption, one method to protect Word document, requires users to give the document a password. Without the password, encrypted document cannot be opened. Solution in this guide demonstrates how to encrypt Word document with custom password in C# and VB.NET via Spire.Doc for .NET.
Spire.Doc for .NET, specializing in performing Word processing tasks for .NET, provides a Document.Encrypt method which enables users to encrypt Word. The overload passed to this method is string password. Firstly, load the Word document which is needed to protect. Secondly, invoke Document.Encrypt method to encrypt with password. Thirdly, save the encrypt document and launch for viewing. After debugging, a dialog box pops up and requires the password. Enter the password to open the document and the document information will be shown as following to tell users that it is encrypted.
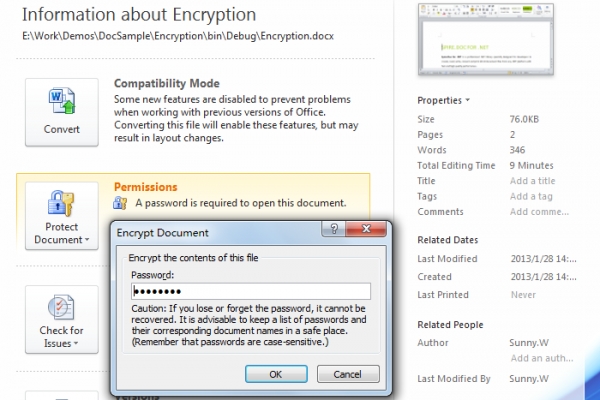
Download and install Spire.Doc for .NET and use the following code to encrypt Word.
using Spire.Doc;

namespace Encryption
{
    class Program
    {
        static void Main(string[] args)
        {
            //Load Document
            Document document = new Document();
            document.LoadFromFile(@"E:\Work\Documents\WordDocuments\Spire.Doc for .NET.docx");

            //Encrypt
            document.Encrypt("eiceblue");

            //Save and Launch
            document.SaveToFile("Encryption.docx", FileFormat.Docx);
            System.Diagnostics.Process.Start("Encryption.docx");
        }
    }
}
Imports Spire.Doc

Namespace Encryption
    Friend Class Program
        Shared Sub Main(ByVal args() As String)
            'Load Document
            Dim document As New Document()
            document.LoadFromFile("E:\Work\Documents\WordDocuments\Spire.Doc for .NET.docx")

            'Encrypt
            document.Encrypt("eiceblue")

            'Save and Launch
            document.SaveToFile("Encryption.docx", FileFormat.Docx)
            System.Diagnostics.Process.Start("Encryption.docx")
        End Sub
    End Class
End Namespace
Spire.Doc, an easy-to-use component to operate Word document, allows developers to fast generate, write, edit and save Word (Word 97-2003, Word 2007, Word 2010) in C# and VB.NET for .NET, Silverlight and WPF.
C#/VB.NET: Add or Remove Cell Borders in Excel
Cell borders refer to lines that can be added around a cell or range of cells. They can be used to serve different purposes, such as to separate sections in a worksheet, draw readers' attention to important cells, or make the worksheet look more presentable. This article will introduce how to add or remove cell borders in Excel in C# and VB.NET using Spire.XLS for .NET.
Install Spire.XLS for .NET
To begin with, you need to add the DLL files included in the Spire.XLS for .NET package as references in your .NET project. The DLL files can be either downloaded from this link or installed via NuGet.
PM> Install-Package Spire.XLS
Add Cell Borders in Excel in C# and VB.NET
Spire.XLS for .NET allows adding various kinds of borders to cells in Excel, such as left border, right border, top border, bottom border, diagonal borders, inside borders and outside borders.
You can add a specific border or multiple borders to individual cells or ranges of cells. In addition, you can also set different line styles and line colors for the borders. The following are the main steps to apply different kinds of cell borders with different line styles and line colors:
- Initialize an instance of the Workbook class.
- Get a specific worksheet by its index through Workbook.Worksheets[int] property.
- Get a specific cell range by its name through Worksheet.Range[string] property.
- Get specific borders (such as left, right, top, bottom and diagonal) from the Borders collection of the cell range through CellRange.Borders[BordersLineType] property.
- Set the line styles of the specific borders through IBorder.LineStyle property.
- Set the line colors of the specific borders through IBorder.Color property.
- Get a specific cell range by its name through Worksheet.Range[string] property.
- Add outside borders and/or inside borders to the cell range using CellRange.BorderAround(LineStyleType, Color) method and/or CellRange.BorderInside(LineStyleType, Color) method. Note that inside borders cannot be applied to a single cell.
- Get a specific cell range by its name through Worksheet.Range[string] property.
- Set the line styles and line colors for borders of the cell range through BordersCollection.LineStyle and BordersCollection.Color properties, then set the line style and color for diagonal borders of the cell range.
- Save the result file using Workbook.SaveToFile() method.
- C#
- VB.NET
using Spire.Xls;
using Spire.Xls.Core;
using System.Drawing;

namespace AddCellBorders
{
    class Program
    {
        static void Main(string[] args)
        {
            //Create a Workbook instance
            Workbook workbook = new Workbook();
            //Get the first worksheet
            Worksheet sheet = workbook.Worksheets[0];

            //Set left, right, top, bottom and diagonal up borders for cell B2
            CellRange range = sheet.Range["B2"];
            IBorder leftBorder = range.Borders[BordersLineType.EdgeLeft];
            leftBorder.LineStyle = LineStyleType.MediumDashDotDot;
            leftBorder.Color = Color.Red;
            IBorder rightBorder = range.Borders[BordersLineType.EdgeRight];
            rightBorder.LineStyle = LineStyleType.MediumDashed;
            rightBorder.Color = Color.Red;
            IBorder topBorder = range.Borders[BordersLineType.EdgeTop];
            topBorder.LineStyle = LineStyleType.Medium;
            topBorder.Color = Color.Red;
            IBorder bottomBorder = range.Borders[BordersLineType.EdgeBottom];
            bottomBorder.LineStyle = LineStyleType.Medium;
            bottomBorder.Color = Color.Red;
            IBorder diagonalUpBorder = range.Borders[BordersLineType.DiagonalUp];
            diagonalUpBorder.LineStyle = LineStyleType.Thin;
            diagonalUpBorder.Color = Color.Red;

            //Set diagonal borders for cell C4
            range = sheet.Range["C4"];
            diagonalUpBorder = range.Borders[BordersLineType.DiagonalUp];
            diagonalUpBorder.LineStyle = LineStyleType.Double;
            diagonalUpBorder.Color = Color.Blue;
            IBorder diagonalDownBorder = range.Borders[BordersLineType.DiagonalDown];
            diagonalDownBorder.LineStyle = LineStyleType.Double;
            diagonalDownBorder.Color = Color.Blue;

            //Set outside borders for cell D6
            range = sheet.Range["D6"];
            range.BorderAround(LineStyleType.Double, Color.Green);

            //Set inside borders for cell range E8:F10
            range = sheet.Range["E8:F10"];
            range.BorderInside(LineStyleType.MediumDashed, Color.DarkGray);

            //Set inside and outside borders for cell range F12:G14
            range = sheet.Range["F12:G14"];
            range.BorderInside(LineStyleType.MediumDashed, Color.Pink);
            range.BorderAround(LineStyleType.Medium, Color.Magenta);

            //Set borders for cell range G16:H18
            range = sheet.Range["G16:H18"];
            range.Borders.LineStyle = LineStyleType.Thick;
            range.Borders.Color = Color.Cyan;
            //Set line style and line color of diagonal borders for cell range G16:H18
            diagonalUpBorder = range.Borders[BordersLineType.DiagonalUp];
            diagonalUpBorder.LineStyle = LineStyleType.Dotted;
            diagonalUpBorder.Color = Color.DarkGray;
            diagonalDownBorder = range.Borders[BordersLineType.DiagonalDown];
            diagonalDownBorder.LineStyle = LineStyleType.Dotted;
            diagonalDownBorder.Color = Color.DarkGray;

            //Save the result file
            workbook.SaveToFile("AddBorders.xlsx", ExcelVersion.Version2013);
        }
    }
}
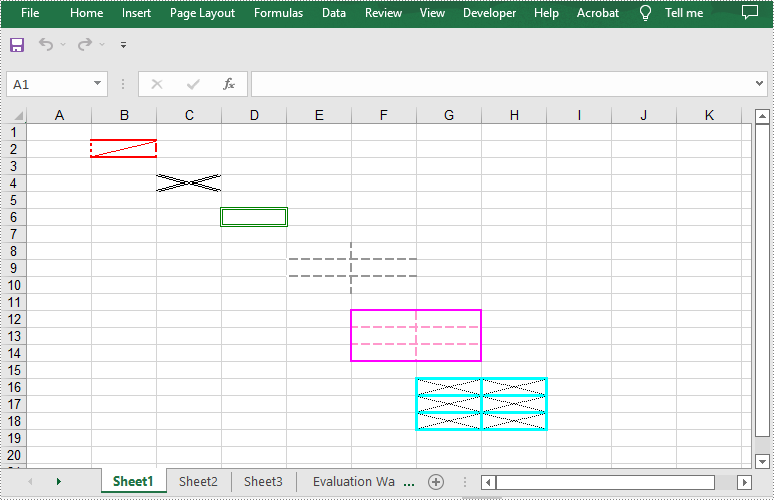
Remove Cell Borders in Excel in C# and VB.NET
You can remove all borders of a cell or range of cells by setting the CellRange.Borders.LineStyle property as LineStyleType.None. The following are the details steps:
- Initialize an instance of the Workbook class.
- Load an Excel file using Workbook.LoadFromFile() method.
- Get a specific worksheet by its index through Workbook.Worksheets[int] property.
- Get a specific cell range by its name through Worksheet.Range[string] property.
- Remove the borders of the cell range by setting CellRange.Borders.LineStyle property as LineStyleType.None.
- Save the result file using Workbook.SaveToFile() method.
- C#
- VB.NET
using Spire.Xls;

namespace RemoveCellBorders
{
    class Program
    {
        static void Main(string[] args)
        {
            //Create a Workbook instance
            Workbook workbook = new Workbook();
            //Load an Excel file
            workbook.LoadFromFile("AddBorders.xlsx");

            //Get the first worksheet
            Worksheet sheet = workbook.Worksheets[0];

            //Remove borders of cell range G16:H18
            CellRange range = sheet.Range["G16:H18"];
            range.Borders.LineStyle = LineStyleType.None;

            workbook.SaveToFile("RemoveBorders.xlsx", ExcelVersion.Version2013);
        }
    }
}
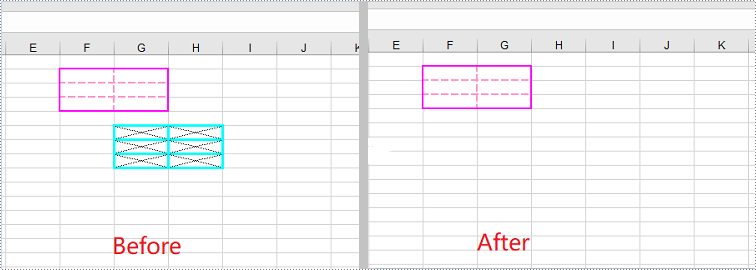
Apply for a Temporary License
If you'd like to remove the evaluation message from the generated documents, or to get rid of the function limitations, please request a 30-day trial license for yourself.
C#/VB.NET: Apply Fonts to Excel Cells
When you’re creating or reviewing a worksheet, you may want to format text in some specific cells using font styles in order to make them stand out. For example, you can change the font type, font color, font size and make text bold. This article will show you how to apply fonts to individual cells or cell ranges by using Spire.XLS for .NET.
- Apply Different Fonts to Different Cells
- Appy Multiple Fonts in a Single Cell
- Apply a Font to a Cell Range
Install Spire.XLS for .NET
To begin with, you need to add the DLL files included in the Spire.XLS for.NET package as references in your .NET project. The DLL files can be either downloaded from this link or installed via NuGet.
PM> Install-Package Spire.XLS
Apply Different Fonts to Different Cells
Spire.XLS provides the CellRange.Style.Font property which you can use to set or change the font name, color, size and style in a cell easily. The following are the steps to apply a font style to a specific cell using Spire.XLS for .NET.
- Create a Workbook object.
- Get the first worksheet using Workbook.Worksheets[index] property.
- Get a specific cell using Worksheet.Range[int Row, int Column] property.
- Set the value of the cell using CellRange.Value property.
- Set the font name, color, size and style of the cell value through the properties under the CellRange.Value.Font object.
- Save the workbook to an Excel file using Workbook.SaveToFile() method.
- C#
- VB.NET
using Spire.Xls;
using System.Drawing;

namespace ApplySingleFontInCellRange
{
    class Program
    {
        static void Main(string[] args)
        {
            //Create a Workbook object
            Workbook workbook = new Workbook();

            //Get the first worksheet
            Worksheet sheet = workbook.Worksheets[0];

            //Set font name
            int row = 1;
            sheet.Range[row, 1].Value = "Font Name";
            sheet.Range[row, 2].Value = "Arial Black";
            sheet.Range[row, 2].Style.Font.FontName = "Arial Black";

            //Set font size
            sheet.Range[row += 2, 1].Value = "Font Size";
            sheet.Range[row, 2].Value = "15";
            sheet.Range[row, 2].Style.Font.Size = 15;

            //Set font color
            sheet.Range[row += 2, 1].Value = "Font Color";
            sheet.Range[row, 2].Value = "Red";
            sheet.Range[row, 2].Style.Font.Color = Color.Red;

            //Make text bold
            sheet.Range[row += 2, 1].Value = "Bold";
            sheet.Range[row, 2].Value = "Bold";
            sheet.Range[row, 2].Style.Font.IsBold = true;

            //Make text italic
            sheet.Range[row += 2, 1].Value = "Italic";
            sheet.Range[row, 2].Value = "Italic";
            sheet.Range[row, 2].Style.Font.IsItalic = true;

            //Underline text
            sheet.Range[row += 2, 1].Value = "Underline";
            sheet.Range[row, 2].Value = "Underline";
            sheet.Range[row, 2].Style.Font.Underline = FontUnderlineType.Single;

            //Strikethrough text
            sheet.Range[row += 2, 1].Value = "Strikethrough ";
            sheet.Range[row, 2].Value = "Strikethrough ";
            sheet.Range[row, 2].Style.Font.IsStrikethrough = true;

            //Auto fit column width
            sheet.AllocatedRange.AutoFitColumns();

            //Save the workbook to an Excel file
            workbook.SaveToFile("ApplySingleFontInCell.xlsx", ExcelVersion.Version2016);
        }
    }
}
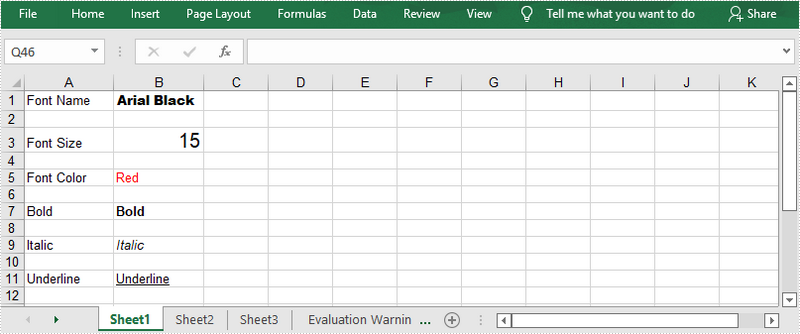
Appy Multiple Fonts in a Single Cell
Mixing fonts in a single cell can help you emphasize some specific characters within the cell. The following are the steps to apply multiple fonts in a cell using Spire.XLS for .NET.
- Create a Workbook object.
- Get the first worksheet using Workbook.Worksheets[index] property.
- Create two ExcelFont objects using Workbook.CreateFont() method.
- Get a specific cell using Worksheet.Range[int Row, int Column] property, and set the rich text content of the cell using CellRange.RichText.Text property.
- Apply the two ExcelFont objects to the rich text using RichText.SetFont() method.
- Save the workbook to an Excel file using Workbook.SaveToFile() method.
- C#
- VB.NET
using Spire.Xls;

namespace ApplyMultipleFontsInACell
{
    class Program
    {
        static void Main(string[] args)
        {
            //Create a Workbook object
            Workbook workbook = new Workbook();

            //Get the first worksheet
            Worksheet sheet = workbook.Worksheets[0];

            //Create a font
            ExcelFont font1 = workbook.CreateFont();
            font1.FontName = "Arial Black";
            font1.KnownColor = ExcelColors.LightBlue;
            font1.IsBold = true;
            font1.Size = 13;

            //Create another font
            ExcelFont font2 = workbook.CreateFont();
            font2.KnownColor = ExcelColors.Red;
            font2.IsBold = true;
            font2.IsItalic = true;
            font2.FontName = "Algerian";
            font2.Size = 15;

            //Returns a RichText object from a specified cell
            RichText richText = sheet.Range["A1"].RichText;

            //Set the text of RichText object
            richText.Text = "Buy One, Get One Free";

            //Apply the first font to specified range of characters
            richText.SetFont(0, 16, font1);

            //Apply the second font to specified range of characters
            richText.SetFont(17, 21, font2);

            //Set column width
            sheet.Columns[0].ColumnWidth = 33;

            //Save the workbook to an Excel file
            workbook.SaveToFile("ApplyMultipleFonts.xlsx", ExcelVersion.Version2016);
        }
    }
}
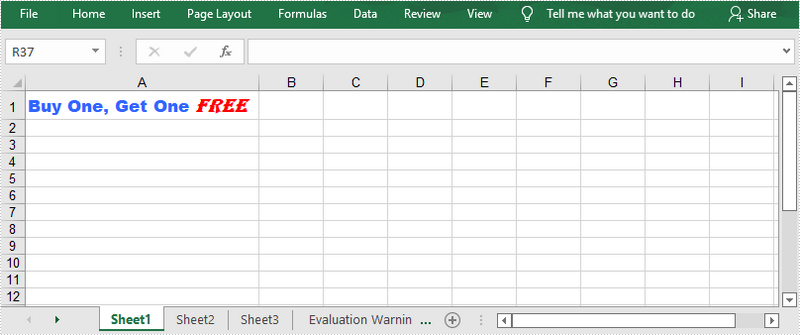
Apply a Font to a Cell Range
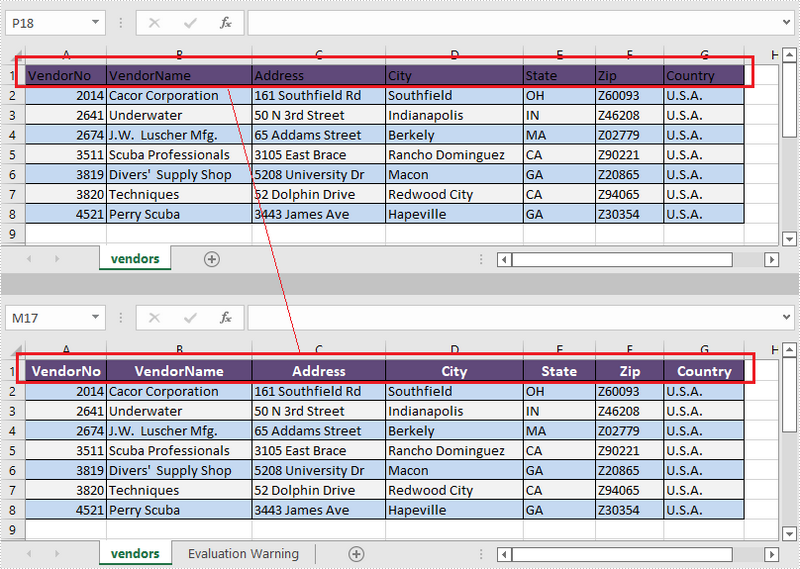
Spire.XLS provides the CellStyle class to manage the cell formatting such as fill color, text alignment and font style. You can create a cell style and apply it to a cell range or the whole worksheet using CellRange.ApplyStyle() method and Worksheet.ApplyStyle() method, respectively. The following are the steps to apply a font to a cell range using Spire.XLS for .NET.
- Create a Workbook object.
- Load a sample Excel file using Workbook.LoadFromFile() method.
- Get the first worksheet using Workbook.Worksheets[index] property.
- Create a CellStyle object using Workbook.Styles.Add() method, and set the font style through the CellStyle.Font property.
- Apply the cell style to a cell range using CellRange.ApplyStyle() method.
- Save the workbook to another Excel file using Workbook.SaveToFile() method.
- C#
- VB.NET
using Spire.Xls;
using System.Drawing;

namespace ApplyFontToCellRange
{
    class Program
    {
        static void Main(string[] args)
        {
            //Create a Workbook object
            Workbook workbook = new Workbook();

            //Load a sample Excel file
            workbook.LoadFromFile(@"C:\Users\Administrator\Desktop\sample.xlsx");

            //Get the first worksheet
            Worksheet sheet = workbook.Worksheets[0];

            //Create a CellStyle object
            CellStyle fontStyle = workbook.Styles.Add("headerFontStyle");

            //Set the font color, size and style
            fontStyle.Font.Color = Color.White;
            fontStyle.Font.IsBold = true;
            fontStyle.Font.Size = 12;
            fontStyle.HorizontalAlignment = HorizontalAlignType.Center;

            //Create a CellStyleFlag object, setting the FontColor, FontBold, FontSize and HorizontalAlignment properties to true
            CellStyleFlag flag = new CellStyleFlag();
            flag.FontColor = true;
            flag.FontBold = true;
            flag.FontSize = true;
            flag.HorizontalAlignment = true;

            //Apply the cell style to header row
            sheet.Range[1, 1, 1, 8].ApplyStyle(fontStyle, flag);

            //Apply the cell style to the whole worksheet
            //sheet.ApplyStyle(fontStyle);

            //Save the workbook to another Excel file
            workbook.SaveToFile("ApplyFontToCellRange.xlsx", ExcelVersion.Version2016);
        }
    }
}
Apply for a Temporary License
If you'd like to remove the evaluation message from the generated documents, or to get rid of the function limitations, please request a 30-day trial license for yourself.
C#/VB.NET: Set Background Color and Pattern for Excel Cells
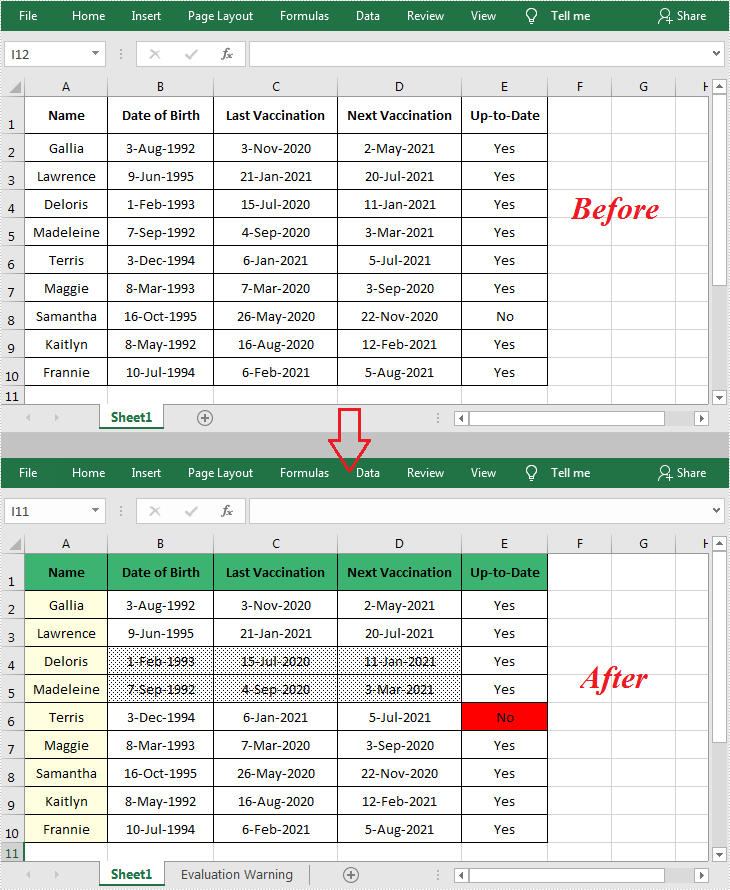
By default, the cells in an Excel document are formatted with a background color of transparent. When you need to emphasize some important data in particular cells, Microsoft Excel provides the "Fill Color" formatting option to change the background color or pattern style of the cells. In this article, you will learn how to programmatically set background color and pattern style for a specified cell or cell range in Excel using Spire.XLS for .NET.
Install Spire.XLS for .NET
To begin with, you need to add the DLL files included in the Spire.XLS for .NET package as references in your .NET project. The DLL files can be either downloaded from this link or installed via NuGet.
PM> Install-Package Spire.XLS
Set Background Color and Pattern for Excel Cells
The detailed steps are as follows.
- Instantiate a Workbook object.
- Load a sample Excel file using Workbook.LoadFromFile() method.
- Get a specified worksheet using Workbook.Worksheets[] property.
- Get a specified cell range using Worksheet.Range[] property.
- Get the style of the specified cell range using CellRange.Style property.
- Set the background color for the specified cell range using CellStyle.Color property.
- Set the fill pattern style for the specified cell range using CellStyle.FillPattern property.
- Save the result file using Workbook.SaveToFile() method.
- C#
- VB.NET
using System.Drawing;
using Spire.Xls;

namespace CellBackground
{
    class Program
    {
        static void Main(string[] args)
        {
            //Instantiate a Workbook object
            Workbook workbook = new Workbook();

            //Load a sample Excel file
            workbook.LoadFromFile(@"C:\Users\Administrator\Desktop\data.xlsx");

            //Get the first worksheet
            Worksheet worksheet = workbook.Worksheets[0];

            //Set background color for Range ["A1:E1"] and ["A2:A10"]
            worksheet.Range["A1:E1"].Style.Color = Color.MediumSeaGreen;
            worksheet.Range["A2:A10"].Style.Color = Color.LightYellow;

            //Set background color for cell E6
            worksheet.Range["E6"].Style.Color = Color.Red;

            //Set pattern style for Range ["B4:D5"]
            worksheet.Range["B4:D5"].Style.FillPattern = ExcelPatternType.Percent125Gray;

            //Save the result file
            workbook.SaveToFile("CellBackground.xlsx", ExcelVersion.Version2013);
        }

    }
}
Apply for a Temporary License
If you'd like to remove the evaluation message from the generated documents, or to get rid of the function limitations, please request a 30-day trial license for yourself.
C#/VB.NET: Add Hyperlinks to Excel
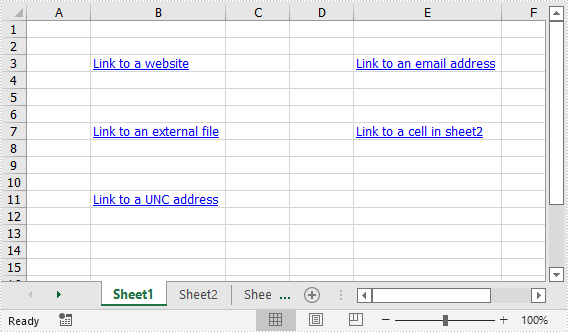
A hyperlink in Excel is a clickable text or an image that navigates to a specific location, such as a webpage, an existing file, an email address, or another cell in the current workbook. This article will demonstrate how to add hyperlinks to Excel in C# and VB.NET using Spire.XLS for .NET library.
Install Spire.XLS for .NET
To begin with, you need to add the DLL files included in the Spire.XLS for .NET package as references in your .NET project. The DLL files can be either downloaded from this link or installed via NuGet.
PM> Install-Package Spire.XLS
Add Text Hyperlinks to Excel in C# and VB.NET
The following are the steps to add a text hyperlink to Excel:
- Create an instance of Workbook class.
- Get the desired worksheet using Workbook.Worksheets[sheetIndex] property.
- Access the specific cell that you want to add hyperlink to using Worksheet.Range[cellName] property.
- Add a hyperlink to the cell using Worksheet.HyperLinks.Add() method.
- Set the type, display text and address for the hyperlink using XlsHyperLink.Type, XlsHyperLink.TextToDisplay and XlsHyperLink.Address properties.
- Autofit column width using XlsWorksheet.AutoFitColumn() method.
- Save the result file using Workbook.SaveToFile() method.
- C#
- VB.NET
using Spire.Xls;

namespace AddTextHyperlinks
{
    class Program
    {
        static void Main(string[] args)
        {
            //Create a Workbook instance
            Workbook workbook = new Workbook();

            //Get the first worksheet
            Worksheet sheet = workbook.Worksheets[0];

            //Add a text hyperlink that leads to a webpage
            CellRange cell1 = sheet.Range["B3"];
            HyperLink urlLink = sheet.HyperLinks.Add(cell1);
            urlLink.Type = HyperLinkType.Url;
            urlLink.TextToDisplay = "Link to a website";
            urlLink.Address = "https://www.google.com/";

            //Add a text hyperlink that leads to an email address
            CellRange cell2 = sheet.Range["E3"];
            HyperLink mailLink = sheet.HyperLinks.Add(cell2);
            mailLink.Type = HyperLinkType.Url;
            mailLink.TextToDisplay = "Link to an email address";
            mailLink.Address = "mailto:abc@outlook.com";

            //Add a text hyperlink that leads to an external file
            CellRange cell3 = sheet.Range["B7"];
            HyperLink fileLink = sheet.HyperLinks.Add(cell3);
            fileLink.Type = HyperLinkType.File;
            fileLink.TextToDisplay = "Link to an external file";
            fileLink.Address = "C:\\Users\\Administrator\\Desktop\\Report.xlsx";

            //Add a text hyperlink that leads to a cell in another sheet
            CellRange cell4 = sheet.Range["E7"];
            HyperLink linkToSheet = sheet.HyperLinks.Add(cell4);
            linkToSheet.Type = HyperLinkType.Workbook;
            linkToSheet.TextToDisplay = "Link to a cell in sheet2";
            linkToSheet.Address = "Sheet2!B5";

            //Add a text hyperlink that leads to a UNC address
            CellRange cell5 = sheet.Range["B11"];
            HyperLink uncLink = sheet.HyperLinks.Add(cell5);
            uncLink.Type = HyperLinkType.Unc;
            uncLink.TextToDisplay = "Link to a UNC address";
            uncLink.Address = "\\\\192.168.0.121";

            //Autofit column width
            sheet.AutoFitColumn(2);
            sheet.AutoFitColumn(5);

            //Save the result file
            workbook.SaveToFile("AddTextHyperlinks.xlsx", ExcelVersion.Version2013);
        }
    }
}
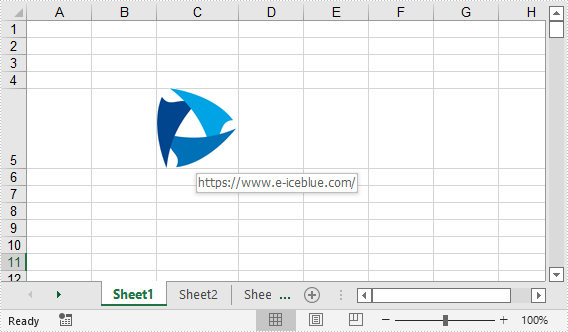
Add Image Hyperlinks to Excel in C# and VB.NET
The following are the steps to add an image hyperlink to Excel:
- Create an instance of Workbook class.
- Get the desired worksheet using Workbook.Worksheets[sheetIndex] property.
- Insert an image into the worksheet using Worksheet.Pictures.Add() method and set column width and row height.
- Add a hyperlink to the image using XlsBitmapShape.SetHyperLink() method.
- Save the result file using Workbook.SaveToFile() method.
- C#
- VB.NET
using Spire.Xls;

namespace AddImageHyperlinks
{
    class Program
    {
        static void Main(string[] args)
        {
            //Create a Workbook instance
            Workbook workbook = new Workbook();
            //Get the first worksheet
            Worksheet sheet = workbook.Worksheets[0];

            //Insert an image into the worksheet
            ExcelPicture picture = sheet.Pictures.Add(5, 3, "Logo.png");
            sheet.Columns[2].ColumnWidth = 11;
            sheet.Rows[4].RowHeight = 60;

            //Add a hyperlink to the image
            picture.SetHyperLink("https://www.e-iceblue.com", true);

            //Save the result file
            workbook.SaveToFile("AddImageHyperlink.xlsx", ExcelVersion.Version2013);
        }
    }
}
Apply for a Temporary License
If you'd like to remove the evaluation message from the generated documents, or to get rid of the function limitations, please request a 30-day trial license for yourself.
Spire.XLS for .NET Program Guide Content

Spire.XLS for .NET is a professional Excel .NET API that can be used to create, read, write, convert and print Excel files in any type of .NET (C#, VB.NET, ASP.NET, .NET Core, .NET 5.0, .NET 6.0, MonoAndroid and Xamarin.iOS) application. Spire.XLS for .NET offers object model Excel API for speeding up Excel programming in .NET platform - create new Excel documents from template, edit existing Excel documents and convert Excel files.
Spire.XLS for .NET enjoys good reputation in both enterprise and individual customers. These customer types include Banks, Data processing houses, Educational institutions, Government organizations, Insurance firms, Legal institutions, Postal/cargo services and etc.


Extract Images from Word Documents Using C#
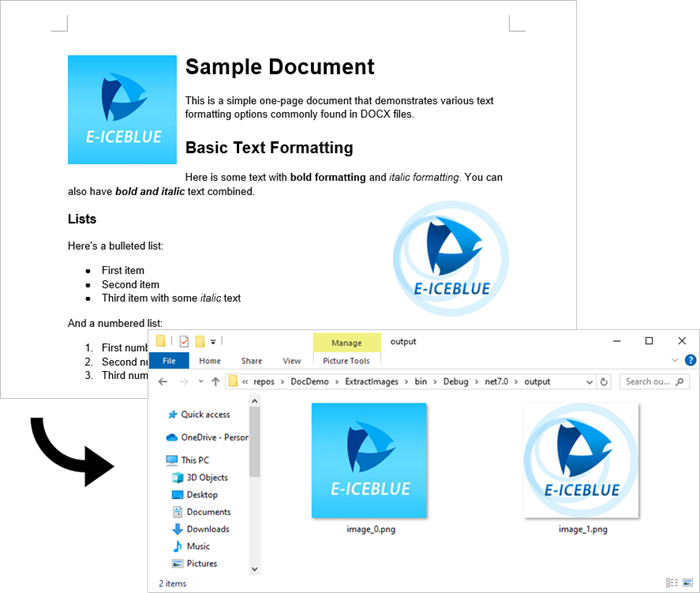
Extracting images from a Word document programmatically can be useful for automating document processing tasks. In this article, we’ll demonstrate how to extract images from a Word file using C# and the Spire.Doc for .NET library. Spire.Doc is a powerful .NET library that enables developers to manipulate Word documents efficiently.
- Getting Started: Installing Spire.Doc
- Steps for Extracting Images from Word
- Using the Code
- Additional Tips & Best Practices
- Conclusion
Getting Started: Installing Spire.Doc
Before you can start extracting images, you need to install Spire.Doc for .NET. Here's how:
- Using NuGet Package Manager:
- Open your Visual Studio project.
- Right-click on the project in the Solution Explorer and select "Manage NuGet Packages."
- Search for "Spire.Doc" and install the latest version.
- Manual Installation:
- Download the Spire.Doc package from the official website.
- Extract the files and reference the DLLs in your project.
Once installed, you're ready to begin.
Steps for Extracting Images from Word
- Import Spire.Doc module.
- Load the Word document.
- Iterate through sections, paragraphs, and child objects.
- Identify images and saving them to a specified location.
Using the Code
The following C# code demonstrates how to extract images from a Word document:
- C#
using Spire.Doc;
using Spire.Doc.Documents;
using Spire.Doc.Fields;

namespace ExtractImages
{
    class Program
    {
        static void Main(string[] args)
        {
            // Initialize a Document object
            Document document = new Document();

            // Load the Word file
            document.LoadFromFile("C:\\Users\\Administrator\\Desktop\\input.docx");

            // Counter for image files
            int index = 0;

            // Loop through each section in the document
            foreach (Section section in document.Sections)
            {
                // Loop through paragraphs in the section
                foreach (Paragraph paragraph in section.Paragraphs)
                {
                    // Loop through objects in the paragraph
                    foreach (DocumentObject docObject in paragraph.ChildObjects)
                    {
                        // Check if the object is an image
                        if (docObject.DocumentObjectType == DocumentObjectType.Picture)
                        {
                            // Save the image as a PNG file
                            DocPicture picture = docObject as DocPicture;
                            picture.Image.Save(string.Format("output/image_{0}.png", index), System.Drawing.Imaging.ImageFormat.Png);
                            index++;
                        }
                    }
                }
            }

            // Dispose resources
            document.Dispose();
        }
    }
}
The extracted images will be saved in the "output" folder with filenames like image_0.png, image_1.png, etc.
Additional Tips & Best Practices
- Handling Different Image Formats:
- Convert images to preferred formats (JPEG, BMP) by changing ImageFormat.Png
- Consider using ImageFormat.Jpeg for smaller file sizes
- Error Handling:
- C#
try { // extraction code } catch (Exception ex) { Console.WriteLine($"Error: {ex.Message}"); } - Performance Optimization:
- For large documents, consider using parallel processing
- Implement progress reporting for user feedback
- Advanced Extraction Scenarios:
- Extract images from headers/footers by checking Section.HeadersFooters
Conclusion
Using Spire.Doc in C# simplifies the process of extracting images from Word documents. This approach is efficient and can be integrated into larger document-processing workflows.
Beyond images, Spire.Doc also supports extracting various other elements from Word documents, including:
- Text
- Metadata
- Tables
- Comments
- Textboxes
- Hyperlinks
- OLE Objects
Whether you're building a document management system or automating report generation, Spire.Doc provides a reliable way to handle Word documents programmatically.
Get a Free License
To fully experience the capabilities of Spire.Doc for .NET without any evaluation limitations, you can request a free 30-day trial license.
How to Traverse a Document Tree
Document Tree Traversal
using System;
using System.Collections.Generic;
using Spire.Doc;
using Spire.Doc.Documents;
using Spire.Doc.Fields;
using Spire.Doc.Interface;
using Spire.Doc.Collections;

namespace ExtractText
{
    class Program
    {
        static void Main(string[] args)
        {
            //Open a word document.
            Document document = new Document("Sample.doc");
            IList<IDocumentObject> nodes = GetAllObjects(document);
            foreach (IDocumentObject node in nodes)
            {
                //Judge the object type.
                if (node.DocumentObjectType == DocumentObjectType.TextRange)
                {
                    TextRange textNode = node as TextRange;
                    Console.WriteLine(textNode.Text);
                }
            }
        }

        private static IList<IDocumentObject> GetAllObjects(Document document)
        {

            //Create a list.
            List<IDocumentObject> nodes = new List<IDocumentObject>();

            //Create a new queue.
            Queue<ICompositeObject> containers = new Queue<ICompositeObject>();

            //Put the document objects in the queue.
            containers.Enqueue(document);
            while (containers.Count > 0)
            {
                ICompositeObject container = containers.Dequeue();
                DocumentObjectCollection docObjects = container.ChildObjects;
                foreach (DocumentObject docObject in docObjects)
                {
                    nodes.Add(docObject);

                    //Judge the docObject.
                    if (docObject is ICompositeObject)
                    {
                        containers.Enqueue(docObject as ICompositeObject);
                    }
                }
            }

            return nodes;
        }
    }
}
Imports System
Imports System.Collections.Generic
Imports Spire.Doc
Imports Spire.Doc.Documents
Imports Spire.Doc.Fields
Imports Spire.Doc.Interface
Imports Spire.Doc.Collections

Module Module1

    Sub Main()
        'Open a word document.
        Dim document As New Document("Sample.doc")
        Dim nodes As IList(Of IDocumentObject)() = GetAllObjects(document)
        Dim containers As New Queue(Of ICompositeObject)()

        For Each node As IDocumentObject In nodes

            'Judge the object type.
            If (node.DocumentObjectType = DocumentObjectType.TextRange) Then
                Dim textNode As TextRange = node
                Console.WriteLine(textNode.Text)

            End If
        Next
    End Sub
    Function GetAllObjects(ByVal document As Document) As IList(Of IDocumentObject)

        'Create a list.
        Dim nodes As New List(Of IDocumentObject)()

        'Create a new queue.
        Dim containers As New Queue(Of ICompositeObject)()

        'Put the document objects in the queue.
        containers.Enqueue(document)
        While (containers.Count > 0)
            Dim container As ICompositeObject = containers.Dequeue()
            Dim docObjects As DocumentObjectCollection = container.ChildObjects
            For Each docObject As DocumentObject In docObjects
                nodes.Add(docObject)

                'Judge the docObject.
                If TypeOf docObject Is ICompositeObject Then
                    containers.Enqueue(TryCast(docObject, ICompositeObject))
                End If
            Next
        End While

        Return nodes
    End Function
End Module