C#/VB.NET: crittografa o decrittografa i file PDF
Sommario
Installato tramite NuGet
PM> Install-Package Spire.PDF
Link correlati
La crittografia dei PDF è un compito cruciale quando si tratta di condividere documenti riservati su Internet. Crittografando i file PDF con password complesse, è possibile proteggere i dati del file dall'accesso da parte di soggetti non autorizzati. In alcuni casi, potrebbe anche essere necessario rimuovere la password per rendere pubblico il documento. In questo articolo imparerai a programmaticamente crittografare o decrittografare un file PDF utilizzando Spire.PDF for .NET.
Installa Spire.PDF for .NET
Per cominciare, è necessario aggiungere i file DLL inclusi nel pacchetto Spire.PDF for.NET come riferimenti nel progetto .NET. I file DLL possono essere scaricati da questo link o installato tramite NuGet.
PM> Install-Package Spire.PDF
Crittografare un file PDF con password
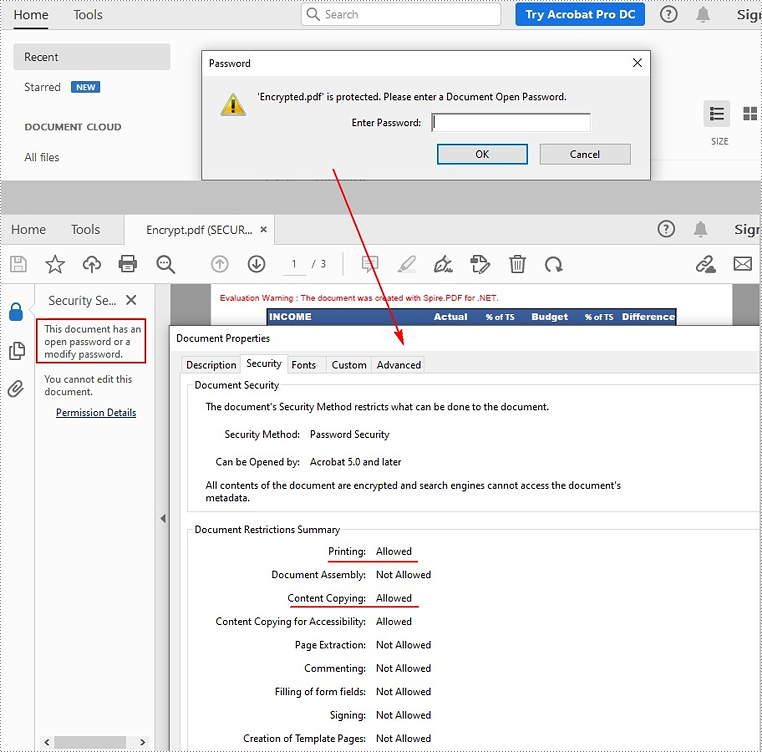
Esistono due tipi di password per crittografare un file PDF: password di apertura e password di autorizzazione. Il primo è impostato per aprire il file PDF, mentre il secondo è impostato per limitare la stampa, la copia dei contenuti, i commenti, ecc. Se un file PDF è protetto con entrambi i tipi di password, può essere aperto con entrambe le password.
Il metodo PdfSecurity.Encrypt(string openPassword, string permissionPassword, PdfPermissionsFlags permissions, PdfEncryptionKeySize keySize) offerto da Spire.PDF for .NET consente di impostare sia la password di apertura che la password di autorizzazione per crittografare i file PDF. I passaggi dettagliati sono i seguenti.
- Creare un oggetto PdfDocument.
- Carica un file PDF di esempio utilizzando il metodo PdfDocument.LoadFromFile().
- Ottiene i parametri di sicurezza del documento utilizzando la proprietà PdfDocument.Security.
- Crittografare il file PDF con password di apertura e password di autorizzazione utilizzando il metodo PdfSecurity.Encrypt(string openPassword, string permissionPassword, PdfPermissionsFlags, PdfEncryptionKeySize keySize).
- Salvare il file dei risultati utilizzando il metodo PdfDocument.SaveToFile().
- C#
- VB.NET
using Spire.Pdf;
    using Spire.Pdf.Security;

    namespace EncryptPDF
    {
        class Program
        {
            static void Main(string[] args)
            {
                //Create a PdfDocument object
                PdfDocument pdf = new PdfDocument();

                //Load a sample PDF file
                pdf.LoadFromFile(@"E:\Files\sample.pdf");

                //Encrypt the PDF file with password
                pdf.Security.Encrypt("open", "permission", PdfPermissionsFlags.Print | PdfPermissionsFlags.CopyContent, PdfEncryptionKeySize.Key128Bit);

                //Save the result file
                pdf.SaveToFile("Encrypt.pdf", FileFormat.PDF);
            }
        }
    }
Rimuovi la password per decrittografare un file PDF
Quando è necessario rimuovere la password da un file PDF, è possibile impostare la password di apertura e la password di autorizzazione su vuoto durante la chiamata al metodo PdfSecurity.Encrypt(string openPassword, string permissionPassword, PdfPermissionsFlags, PdfEncryptionKeySize keySize, string originalPermissionPassword). I passaggi dettagliati sono i seguenti.
- Creare un oggetto PdfDocument.
- Caricare il file PDF crittografato con password utilizzando il metodo PdfDocument.LoadFromFile (nome file stringa, password stringa).
- Ottiene i parametri di sicurezza del documento utilizzando la proprietà PdfDocument.Security.
- Decrittografare il file PDF impostando la password di apertura e la password di autorizzazione su vuoto utilizzando PdfSecurity.Encrypt(string openPassword, string permissionPassword, PdfPermissionsFlags permissions, PdfEncryptionKeySize keySize, string originalPermissionPassword) metodo.
- Salvare il file dei risultati utilizzando il metodo PdfDocument.SaveToFile().
- C#
- VB.NET
using Spire.Pdf;
    using Spire.Pdf.Security;

    namespace DecryptPDF
    {
        class Program
        {
            static void Main(string[] args)
            {
                //Create a PdfDocument object
                PdfDocument pdf = new PdfDocument();

                //Load the encrypted PDF file with password
                pdf.LoadFromFile("Encrypt.pdf", "open");

                //Set the password as empty to decrypt PDF
                pdf.Security.Encrypt(string.Empty, string.Empty, PdfPermissionsFlags.Default, PdfEncryptionKeySize.Key128Bit, "permission");

                //Save the result file
                pdf.SaveToFile("Decrypt.pdf", FileFormat.PDF);
            }
        }
    }
Richiedi una licenza temporanea
Se desideri rimuovere il messaggio di valutazione dai documenti generati o eliminare le limitazioni delle funzioni, per favore richiedere una licenza di prova di 30 giorni per te.
C#/VB.NET : chiffrer ou déchiffrer des fichiers PDF
Table des matières
Installé via NuGet
PM> Install-Package Spire.PDF
Liens connexes
Le cryptage PDF est une tâche cruciale lorsqu'il s'agit de partager des documents confidentiels sur Internet. En cryptant les fichiers PDF avec des mots de passe forts, vous pouvez protéger les données du fichier contre l'accès par des parties non autorisées. Dans certains cas, il peut également être nécessaire de supprimer le mot de passe pour rendre le document public. Dans cet article, vous apprendrez à programmer chiffrer ou déchiffrer un fichier PDF en utilisant Spire.PDF for .NET.
Installer Spire.PDF for .NET
Pour commencer, vous devez ajouter les fichiers DLL inclus dans le package Spire.PDF for .NET en tant que références dans votre projet .NET. Les fichiers DLL peuvent être téléchargés à partir de ce lien ou installés via NuGet.
PM> Install-Package Spire.PDF
Crypter un fichier PDF avec un mot de passe
Il existe deux types de mots de passe pour chiffrer un fichier PDF - ouvrir le mot de passe et le mot de passe d'autorisation. Le premier est configuré pour ouvrir le fichier PDF, tandis que le second est configuré pour restreindre l'impression, la copie de contenu, les commentaires, etc. Si un fichier PDF est sécurisé avec les deux types de mots de passe, il peut être ouvert avec l'un ou l'autre mot de passe.
La méthode PdfSecurity.Encrypt(string openPassword, string permissionPassword, PdfPermissionsFlags permissions, PdfEncryptionKeySize keySize) proposée par Spire.PDF for .NET vous permet de définir à la fois un mot de passe d'ouverture et un mot de passe d'autorisation pour chiffrer les fichiers PDF. Les étapes détaillées sont les suivantes.
- Créez un objet PdfDocument.
- Chargez un exemple de fichier PDF à l'aide de la méthode PdfDocument.LoadFromFile().
- Obtient les paramètres de sécurité du document à l'aide de la propriété PdfDocument.Security.
- Chiffrez le fichier PDF avec un mot de passe ouvert et un mot de passe d'autorisation à l'aide de la méthode PdfSecurity.Encrypt(string openPassword, string permissionPassword, PdfPermissionsFlags permissions, PdfEncryptionKeySize keySize).
- Enregistrez le fichier de résultat à l'aide de la méthode PdfDocument.SaveToFile().
- C#
- VB.NET
using Spire.Pdf;
    using Spire.Pdf.Security;

    namespace EncryptPDF
    {
        class Program
        {
            static void Main(string[] args)
            {
                //Create a PdfDocument object
                PdfDocument pdf = new PdfDocument();

                //Load a sample PDF file
                pdf.LoadFromFile(@"E:\Files\sample.pdf");

                //Encrypt the PDF file with password
                pdf.Security.Encrypt("open", "permission", PdfPermissionsFlags.Print | PdfPermissionsFlags.CopyContent, PdfEncryptionKeySize.Key128Bit);

                //Save the result file
                pdf.SaveToFile("Encrypt.pdf", FileFormat.PDF);
            }
        }
    }
Supprimer le mot de passe pour décrypter un fichier PDF
Lorsque vous devez supprimer le mot de passe d'un fichier PDF, vous pouvez définir le mot de passe d'ouverture et le mot de passe d'autorisation sur vide lors de l'appel de la méthode PdfSecurity.Encrypt(string openPassword, string permissionPassword, PdfPermissionsFlags permissions, PdfEncryptionKeySize keySize, string originalPermissionPassword). Les étapes détaillées sont les suivantes.
- Créez un objet PdfDocument.
- Chargez le fichier PDF crypté avec un mot de passe à l'aide de la méthode PdfDocument.LoadFromFile (nom de fichier de chaîne, mot de passe de chaîne).
- Obtient les paramètres de sécurité du document à l'aide de la propriété PdfDocument.Security.
- Décryptez le fichier PDF en définissant le mot de passe d'ouverture et le mot de passe d'autorisation sur vide à l'aide de la méthode PdfSecurity.Encrypt(string openPassword, string permissionPassword, PdfPermissionsFlags permissions, PdfEncryptionKeySize keySize, string originalPermissionPassword).
- Enregistrez le fichier de résultat à l'aide de la méthode PdfDocument.SaveToFile().
- C#
- VB.NET
using Spire.Pdf;
    using Spire.Pdf.Security;

    namespace DecryptPDF
    {
        class Program
        {
            static void Main(string[] args)
            {
                //Create a PdfDocument object
                PdfDocument pdf = new PdfDocument();

                //Load the encrypted PDF file with password
                pdf.LoadFromFile("Encrypt.pdf", "open");

                //Set the password as empty to decrypt PDF
                pdf.Security.Encrypt(string.Empty, string.Empty, PdfPermissionsFlags.Default, PdfEncryptionKeySize.Key128Bit, "permission");

                //Save the result file
                pdf.SaveToFile("Decrypt.pdf", FileFormat.PDF);
            }
        }
    }
Demander une licence temporaire
Si vous souhaitez supprimer le message d'évaluation des documents générés ou vous débarrasser des limitations de la fonction, veuillez demander une licence d'essai de 30 jours pour toi.
C#/VB.NET: assinar PDF digitalmente com texto ou/e imagem
Índice
Instalado via NuGet
PM> Install-Package Spire.PDF
Links Relacionados
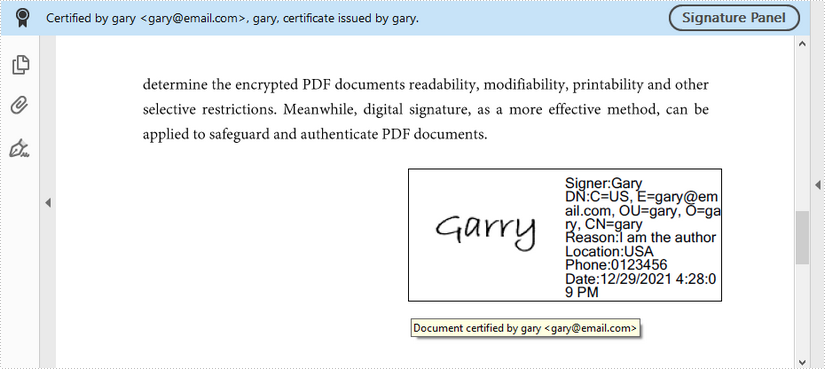
A assinatura digital garante que o documento assinado não pode ser alterado por ninguém que não seja o seu autor. Adicionar assinaturas é a forma mais comum de garantir a autenticidade do conteúdo do documento. Uma assinatura digital visual em um documento PDF pode mostrar texto ou imagem (por exemplo, assinatura manuscrita). Este artigo apresenta como assinar digitalmente PDFs usando o Spire.PDF for .NET a partir dos três aspectos a seguir.
- Assinar digitalmente PDF com texto
- Assinar PDF digitalmente com uma imagem
- Assine PDF digitalmente com texto e uma imagem
Instalar o Spire.PDF for .NET
Para começar, você precisa adicionar os arquivos DLL incluídos no pacote Spire.PDF for.NET como referências em seu projeto .NET. Os arquivos DLL podem ser baixados deste link ou instalados via NuGet.
PM> Install-Package Spire.PDF
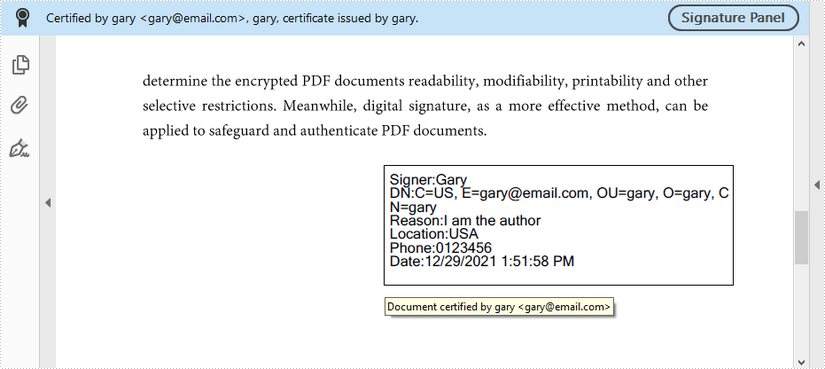
Assinar digitalmente PDF com texto
A seguir estão as etapas para adicionar uma assinatura de texto simples a um documento PDF.
- Crie um objeto PdfDocument e carregue um arquivo PDF de amostra usando o método PdfDocument.LoadFromFile().
- Carregue um arquivo de certificado .pfx ao inicializar o objeto PdfCertificate.
- Crie um objeto PdfSignature, especificando sua posição e tamanho no documento.
- Defina o modo gráfico de assinatura como SignDetail, que mostrará os detalhes da assinatura em texto simples.
- Defina os detalhes da assinatura, incluindo nome, informações de contato, motivo, data etc. por meio das propriedades no objeto PdfSignature.
- Defina as permissões do documento certificado como ForbidChanges e AllowFormFill.
- Salve o documento em outro arquivo usando o método PdfDocument.SaveToFile().
- C#
- VB.NET
using Spire.Pdf;
    using Spire.Pdf.Security;
    using System;
    using System.Drawing;
    using Spire.Pdf.Graphics;

    namespace AddTextSignature
    {
        class Program
        {
            static void Main(string[] args)
            {
                //Create a PdfDocument object
                PdfDocument doc = new PdfDocument();

                //Load a sample PDF file
                doc.LoadFromFile("C:\\Users\\Administrator\\Desktop\\sample.pdf");

                //Load the certificate
                PdfCertificate cert = new PdfCertificate("C:\\Users\\Administrator\\Desktop\\MyCertificate.pfx", "e-iceblue");

                //Create a PdfSignature object and specify its position and size
                PdfSignature signature = new PdfSignature(doc, doc.Pages[doc.Pages.Count-1], cert, "MySignature");
                RectangleF rectangleF = new RectangleF(doc.Pages[0].ActualSize.Width - 340, 150, 290, 100);
                signature.Bounds = rectangleF;
                signature.Certificated = true;

                //Set the graphics mode to sign detail
                signature.GraphicsMode = GraphicMode.SignDetail;

                //Set the signature content
                signature.NameLabel = "Signer:";
                signature.Name = "Gary";
                signature.ContactInfoLabel = "Phone:";
                signature.ContactInfo = "0123456";
                signature.DateLabel = "Date:";
                signature.Date = DateTime.Now;
                signature.LocationInfoLabel = "Location:";
                signature.LocationInfo = "USA";
                signature.ReasonLabel = "Reason:";
                signature.Reason = "I am the author";
                signature.DistinguishedNameLabel = "DN:";
                signature.DistinguishedName = signature.Certificate.IssuerName.Name;

                //Set the signature font
                signature.SignDetailsFont = new PdfTrueTypeFont(new Font("Arial Unicode MS",12f,FontStyle.Regular));

                //Set the document permission to forbid changes but allow form fill
                signature.DocumentPermissions = PdfCertificationFlags.ForbidChanges | PdfCertificationFlags.AllowFormFill;

                //Save to file
                doc.SaveToFile("TextSignature.pdf");
                doc.Close();
            }
        }
    }
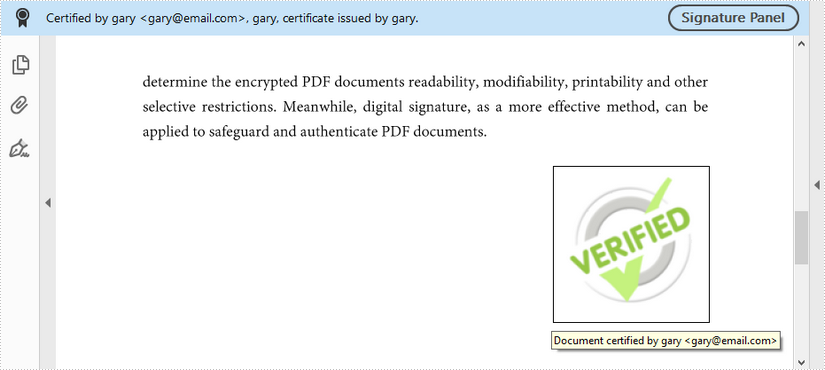
Assinar PDF digitalmente com uma imagem
A seguir estão as etapas para adicionar uma assinatura de imagem a um documento PDF.
- Crie um objeto PdfDocument e carregue um arquivo PDF de amostra usando o método PdfDocument.LoadFromFile().
- Carregue um arquivo de certificado .pfx ao inicializar o objeto PdfCertificate.
- Crie um objeto PdfSignature, especificando sua posição e tamanho no documento.
- Defina o modo gráfico de assinatura como SignImageOnly, que mostrará apenas a imagem da assinatura.
- Defina a imagem da assinatura por meio da propriedade PdfSignature.SignImageSource.
- Defina as permissões do documento certificado como ForbidChanges e AllowFormFill.
- Salve o documento em outro arquivo usando o método PdfDocument.SaveToFile().
- C#
- VB.NET
using Spire.Pdf;
    using Spire.Pdf.Graphics;
    using Spire.Pdf.Security;
    using System.Drawing;

    namespace AddImageSignature
    {
        class Program
        {
            static void Main(string[] args)
            {
                //Create a PdfDocument object
                PdfDocument doc = new PdfDocument();

                //Load a sample PDF file
                doc.LoadFromFile("C:\\Users\\Administrator\\Desktop\\sample.pdf");

                //Load the certificate
                PdfCertificate cert = new PdfCertificate("C:\\Users\\Administrator\\Desktop\\MyCertificate.pfx", "e-iceblue");

                //Create a PdfSignature object and specify its position and size
                PdfSignature signature = new PdfSignature(doc, doc.Pages[doc.Pages.Count - 1], cert, "MySignature");
                RectangleF rectangleF = new RectangleF(doc.Pages[0].ActualSize.Width - 200, 150, 130, 130);
                signature.Bounds = rectangleF;
                signature.Certificated = true;

                //Set the graphics mode to image only
                signature.GraphicsMode = GraphicMode.SignImageOnly;

                //Set the sign image source
                signature.SignImageSource = PdfImage.FromFile("C:\\Users\\Administrator\\Desktop\\verified.png");

                //Set the signature font
                signature.SignDetailsFont = new PdfTrueTypeFont(new Font("Arial Unicode MS", 12f, FontStyle.Regular));

                //Set the document permission to forbid changes but allow form fill
                signature.DocumentPermissions = PdfCertificationFlags.ForbidChanges | PdfCertificationFlags.AllowFormFill;

                //Save to file
                doc.SaveToFile("ImageSignature.pdf");
                doc.Close();
            }
        }
    }
Assine PDF digitalmente com texto e uma imagem
A seguir estão as etapas para assinar digitalmente um documento PDF com texto e uma imagem.
- Crie um objeto PdfDocument e carregue um arquivo PDF de amostra usando o método PdfDocument.LoadFromFile().
- Carregue um arquivo de certificado .pfx ao inicializar o objeto PdfCertificate.
- Crie um objeto PdfSignature, especificando sua posição e tamanho no documento.
- Defina o modo gráfico de assinatura como SignImageAndSignDetail, que mostrará a imagem e os detalhes da assinatura.
- Defina a imagem da assinatura por meio da propriedade PdfSignature.SignImageSource e defina os detalhes da assinatura, incluindo nome, informações de contato, motivo, data etc. por meio de outras propriedades no objeto PdfSignature.
- Defina as permissões do documento certificado como ForbidChanges e AllowFormFill.
- Salve o documento em outro arquivo usando o método PdfDocument.SaveToFile().
- C#
- VB.NET
using Spire.Pdf;
    using Spire.Pdf.Security;
    using System;
    using System.Drawing;
    using Spire.Pdf.Graphics;

    namespace AddTextAndImageSignature
    {
        class Program
        {
            static void Main(string[] args)
            {
                //Create a PdfDocument object
                PdfDocument doc = new PdfDocument();

                //Load a sample PDF file
                doc.LoadFromFile("C:\\Users\\Administrator\\Desktop\\sample.pdf");

                //Load the certificate
                PdfCertificate cert = new PdfCertificate("C:\\Users\\Administrator\\Desktop\\MyCertificate.pfx", "e-iceblue");

                //Create a PdfSignature object and specify its position and size
                PdfSignature signature = new PdfSignature(doc, doc.Pages[doc.Pages.Count - 1], cert, "MySignature");
                RectangleF rectangleF = new RectangleF(doc.Pages[0].ActualSize.Width - 320, 150, 260, 110);
                signature.Bounds = rectangleF;
                signature.Certificated = true;

                //Set the graphics mode to image and sign detail
                signature.GraphicsMode = GraphicMode.SignImageAndSignDetail;

                //Set the signature content
                signature.NameLabel = "Signer:";
                signature.Name = "Gary";
                signature.ContactInfoLabel = "Phone:";
                signature.ContactInfo = "0123456";
                signature.DateLabel = "Date:";
                signature.Date = DateTime.Now;
                signature.LocationInfoLabel = "Location:";
                signature.LocationInfo = "USA";
                signature.ReasonLabel = "Reason:";
                signature.Reason = "I am the author";
                signature.DistinguishedNameLabel = "DN:";
                signature.DistinguishedName = signature.Certificate.IssuerName.Name;

                //Set the signature image source
                signature.SignImageSource = PdfImage.FromFile("C:\\Users\\Administrator\\Desktop\\handSignature.png");

                //Set the signature font
                signature.SignDetailsFont = new PdfTrueTypeFont(new Font("Arial Unicode MS", 12f, FontStyle.Regular));

                //Set the document permission to forbid changes but allow form fill
                signature.DocumentPermissions = PdfCertificationFlags.ForbidChanges | PdfCertificationFlags.AllowFormFill;

                //Save to file
                doc.SaveToFile("TextAndImageSignature.pdf");
                doc.Close();
            }
        }
    }
Solicitar uma licença temporária
Se você deseja remover a mensagem de avaliação dos documentos gerados ou se livrar das limitações de função, por favor solicite uma licença de avaliação de 30 dias para você mesmo.
C#/VB.NET: цифровая подпись PDF с текстом и/или изображением
Оглавление
Установлено через NuGet
PM> Install-Package Spire.PDF
Ссылки по теме
Цифровая подпись гарантирует, что подписанный документ не может быть изменен кем-либо, кроме его автора. Добавление подписей является наиболее распространенным способом обеспечения подлинности содержимого документа. Визуальная цифровая подпись в документе PDF может отображать текст или изображение (например, рукописная подпись). В этой статье рассказывается, как цифровая подпись PDF-файлов использование Spire.PDF for .NET из следующих трех аспектов.
- Цифровая подпись PDF с текстом
- Цифровая подпись PDF с изображением
- Цифровая подпись PDF с текстом и изображением
Установите Spire.PDF for .NET
Для начала вам нужно добавить файлы DLL, включенные в пакет Spire.PDF for .NET, в качестве ссылок в ваш проект .NET. Файлы DLL можно загрузить по этой ссылке или установить через NuGet.
PM> Install-Package Spire.PDF
Цифровая подпись PDF с текстом
Ниже приведены шаги по добавлению простой текстовой подписи в документ PDF.
- Создайте объект PdfDocument и загрузите образец PDF-файла с помощью метода PdfDocument.LoadFromFile().
- Загрузите файл сертификата .pfx при инициализации объекта PdfCertificate.
- Создайте объект PdfSignature, указав его положение и размер в документе.
- Установите для графического режима подписи значение SignDetail, при котором сведения о подписи будут отображаться в виде простого текста.
- Задайте сведения о подписи, включая имя, контактную информацию, причину, дату и т. д., в свойствах объекта PdfSignature.
- Установите разрешения сертифицированного документа на ForbidChanges и AllowFormFill.
- Сохраните документ в другой файл, используя метод PdfDocument.SaveToFile().
- C#
- VB.NET
using Spire.Pdf;
    using Spire.Pdf.Security;
    using System;
    using System.Drawing;
    using Spire.Pdf.Graphics;

    namespace AddTextSignature
    {
        class Program
        {
            static void Main(string[] args)
            {
                //Create a PdfDocument object
                PdfDocument doc = new PdfDocument();

                //Load a sample PDF file
                doc.LoadFromFile("C:\\Users\\Administrator\\Desktop\\sample.pdf");

                //Load the certificate
                PdfCertificate cert = new PdfCertificate("C:\\Users\\Administrator\\Desktop\\MyCertificate.pfx", "e-iceblue");

                //Create a PdfSignature object and specify its position and size
                PdfSignature signature = new PdfSignature(doc, doc.Pages[doc.Pages.Count-1], cert, "MySignature");
                RectangleF rectangleF = new RectangleF(doc.Pages[0].ActualSize.Width - 340, 150, 290, 100);
                signature.Bounds = rectangleF;
                signature.Certificated = true;

                //Set the graphics mode to sign detail
                signature.GraphicsMode = GraphicMode.SignDetail;

                //Set the signature content
                signature.NameLabel = "Signer:";
                signature.Name = "Gary";
                signature.ContactInfoLabel = "Phone:";
                signature.ContactInfo = "0123456";
                signature.DateLabel = "Date:";
                signature.Date = DateTime.Now;
                signature.LocationInfoLabel = "Location:";
                signature.LocationInfo = "USA";
                signature.ReasonLabel = "Reason:";
                signature.Reason = "I am the author";
                signature.DistinguishedNameLabel = "DN:";
                signature.DistinguishedName = signature.Certificate.IssuerName.Name;

                //Set the signature font
                signature.SignDetailsFont = new PdfTrueTypeFont(new Font("Arial Unicode MS",12f,FontStyle.Regular));

                //Set the document permission to forbid changes but allow form fill
                signature.DocumentPermissions = PdfCertificationFlags.ForbidChanges | PdfCertificationFlags.AllowFormFill;

                //Save to file
                doc.SaveToFile("TextSignature.pdf");
                doc.Close();
            }
        }
    }
Цифровая подпись PDF с изображением
Ниже приведены шаги по добавлению подписи изображения в документ PDF.
- Создайте объект PdfDocument и загрузите образец PDF-файла с помощью метода PdfDocument.LoadFromFile().
- Загрузите файл сертификата .pfx при инициализации объекта PdfCertificate.
- Создайте объект PdfSignature, указав его положение и размер в документе.
- Установите для графического режима подписи значение SignImageOnly, при котором будет отображаться только изображение подписи.
- Задайте изображение подписи через свойство PdfSignature.SignImageSource.
- Установите разрешения сертифицированного документа на ForbidChanges и AllowFormFill.
- Сохраните документ в другой файл, используя метод PdfDocument.SaveToFile().
- C#
- VB.NET
using Spire.Pdf;
    using Spire.Pdf.Graphics;
    using Spire.Pdf.Security;
    using System.Drawing;

    namespace AddImageSignature
    {
        class Program
        {
            static void Main(string[] args)
            {
                //Create a PdfDocument object
                PdfDocument doc = new PdfDocument();

                //Load a sample PDF file
                doc.LoadFromFile("C:\\Users\\Administrator\\Desktop\\sample.pdf");

                //Load the certificate
                PdfCertificate cert = new PdfCertificate("C:\\Users\\Administrator\\Desktop\\MyCertificate.pfx", "e-iceblue");

                //Create a PdfSignature object and specify its position and size
                PdfSignature signature = new PdfSignature(doc, doc.Pages[doc.Pages.Count - 1], cert, "MySignature");
                RectangleF rectangleF = new RectangleF(doc.Pages[0].ActualSize.Width - 200, 150, 130, 130);
                signature.Bounds = rectangleF;
                signature.Certificated = true;

                //Set the graphics mode to image only
                signature.GraphicsMode = GraphicMode.SignImageOnly;

                //Set the sign image source
                signature.SignImageSource = PdfImage.FromFile("C:\\Users\\Administrator\\Desktop\\verified.png");

                //Set the signature font
                signature.SignDetailsFont = new PdfTrueTypeFont(new Font("Arial Unicode MS", 12f, FontStyle.Regular));

                //Set the document permission to forbid changes but allow form fill
                signature.DocumentPermissions = PdfCertificationFlags.ForbidChanges | PdfCertificationFlags.AllowFormFill;

                //Save to file
                doc.SaveToFile("ImageSignature.pdf");
                doc.Close();
            }
        }
    }
Цифровая подпись PDF с текстом и изображением
Ниже приведены шаги для цифровой подписи документа PDF с текстом и изображением.
- Создайте объект PdfDocument и загрузите образец PDF-файла с помощью метода PdfDocument.LoadFromFile().
- Загрузите файл сертификата .pfx при инициализации объекта PdfCertificate.
- Создайте объект PdfSignature, указав его положение и размер в документе.
- Установите для графического режима подписи значение SignImageAndSignDetail, в котором будут отображаться как изображение подписи, так и детали.
- Установите изображение подписи с помощью свойства PdfSignature.SignImageSource и задайте сведения о подписи, включая имя, контактную информацию, причину, дату и т. д., с помощью других свойств в объекте PdfSignature.
- Установите разрешения сертифицированного документа на ForbidChanges и AllowFormFill.
- Сохраните документ в другой файл, используя метод PdfDocument.SaveToFile().
- C#
- VB.NET
using Spire.Pdf;
    using Spire.Pdf.Security;
    using System;
    using System.Drawing;
    using Spire.Pdf.Graphics;

    namespace AddTextAndImageSignature
    {
        class Program
        {
            static void Main(string[] args)
            {
                //Create a PdfDocument object
                PdfDocument doc = new PdfDocument();

                //Load a sample PDF file
                doc.LoadFromFile("C:\\Users\\Administrator\\Desktop\\sample.pdf");

                //Load the certificate
                PdfCertificate cert = new PdfCertificate("C:\\Users\\Administrator\\Desktop\\MyCertificate.pfx", "e-iceblue");

                //Create a PdfSignature object and specify its position and size
                PdfSignature signature = new PdfSignature(doc, doc.Pages[doc.Pages.Count - 1], cert, "MySignature");
                RectangleF rectangleF = new RectangleF(doc.Pages[0].ActualSize.Width - 320, 150, 260, 110);
                signature.Bounds = rectangleF;
                signature.Certificated = true;

                //Set the graphics mode to image and sign detail
                signature.GraphicsMode = GraphicMode.SignImageAndSignDetail;

                //Set the signature content
                signature.NameLabel = "Signer:";
                signature.Name = "Gary";
                signature.ContactInfoLabel = "Phone:";
                signature.ContactInfo = "0123456";
                signature.DateLabel = "Date:";
                signature.Date = DateTime.Now;
                signature.LocationInfoLabel = "Location:";
                signature.LocationInfo = "USA";
                signature.ReasonLabel = "Reason:";
                signature.Reason = "I am the author";
                signature.DistinguishedNameLabel = "DN:";
                signature.DistinguishedName = signature.Certificate.IssuerName.Name;

                //Set the signature image source
                signature.SignImageSource = PdfImage.FromFile("C:\\Users\\Administrator\\Desktop\\handSignature.png");

                //Set the signature font
                signature.SignDetailsFont = new PdfTrueTypeFont(new Font("Arial Unicode MS", 12f, FontStyle.Regular));

                //Set the document permission to forbid changes but allow form fill
                signature.DocumentPermissions = PdfCertificationFlags.ForbidChanges | PdfCertificationFlags.AllowFormFill;

                //Save to file
                doc.SaveToFile("TextAndImageSignature.pdf");
                doc.Close();
            }
        }
    }
Подать заявку на временную лицензию
Если вы хотите удалить оценочное сообщение из сгенерированных документов или избавиться от функциональных ограничений, пожалуйста запросить 30-дневную пробную лицензию для себя.
C#/VB.NET: PDF digital mit Text und/oder Bild signieren
Inhaltsverzeichnis
Über NuGet installiert
PM> Install-Package Spire.PDF
verwandte Links
Die digitale Signatur stellt sicher, dass das signierte Dokument von niemand anderem als seinem Autor verändert werden kann. Das Hinzufügen von Signaturen ist die gebräuchlichste Methode, um die Authentizität des Dokumentinhalts sicherzustellen. Eine visuelle digitale Signatur in einem PDF-Dokument kann Text oder ein Bild anzeigen (z. B. eine handschriftliche Unterschrift). In diesem Artikel erfahren Sie, wie das geht PDFs digital signieren Die Verwendung von Spire.PDF for .NET unter den folgenden drei Gesichtspunkten.
- PDF mit Text digital signieren
- PDF mit einem Bild digital signieren
- Signieren Sie PDFs digital mit Text und einem Bild
Installieren Sie Spire.PDF for .NET
Zunächst müssen Sie die im Spire.PDF for.NET-Paket enthaltenen DLL-Dateien als Referenzen in Ihrem .NET-Projekt hinzufügen. Die DLL-Dateien können entweder über diesen Link heruntergeladen oder über NuGet installiert werden.
PM> Install-Package Spire.PDF
PDF mit Text digital signieren
Im Folgenden finden Sie die Schritte zum Hinzufügen einer Nur-Text-Signatur zu einem PDF-Dokument.
- Erstellen Sie ein PdfDocument-Objekt und laden Sie eine Beispiel-PDF-Datei mit der Methode PdfDocument.LoadFromFile().
- Laden Sie eine PFX-Zertifikatdatei, während Sie das PdfCertificate-Objekt initialisieren.
- Erstellen Sie ein PdfSignature-Objekt und geben Sie dessen Position und Größe im Dokument an.
- Stellen Sie den Signaturgrafikmodus auf SignDetail ein, wodurch die Signaturdetails im Klartext angezeigt werden.
- Legen Sie die Signaturdetails, einschließlich Name, Kontaktinformationen, Grund, Datum usw., über die Eigenschaften unter dem PdfSignature-Objekt fest.
- Legen Sie die Berechtigungen des zertifizierten Dokuments auf ForbidChanges und AllowFormFill fest.
- Speichern Sie das Dokument mit der Methode PdfDocument.SaveToFile() in einer anderen Datei.
- C#
- VB.NET
using Spire.Pdf;
    using Spire.Pdf.Security;
    using System;
    using System.Drawing;
    using Spire.Pdf.Graphics;

    namespace AddTextSignature
    {
        class Program
        {
            static void Main(string[] args)
            {
                //Create a PdfDocument object
                PdfDocument doc = new PdfDocument();

                //Load a sample PDF file
                doc.LoadFromFile("C:\\Users\\Administrator\\Desktop\\sample.pdf");

                //Load the certificate
                PdfCertificate cert = new PdfCertificate("C:\\Users\\Administrator\\Desktop\\MyCertificate.pfx", "e-iceblue");

                //Create a PdfSignature object and specify its position and size
                PdfSignature signature = new PdfSignature(doc, doc.Pages[doc.Pages.Count-1], cert, "MySignature");
                RectangleF rectangleF = new RectangleF(doc.Pages[0].ActualSize.Width - 340, 150, 290, 100);
                signature.Bounds = rectangleF;
                signature.Certificated = true;

                //Set the graphics mode to sign detail
                signature.GraphicsMode = GraphicMode.SignDetail;

                //Set the signature content
                signature.NameLabel = "Signer:";
                signature.Name = "Gary";
                signature.ContactInfoLabel = "Phone:";
                signature.ContactInfo = "0123456";
                signature.DateLabel = "Date:";
                signature.Date = DateTime.Now;
                signature.LocationInfoLabel = "Location:";
                signature.LocationInfo = "USA";
                signature.ReasonLabel = "Reason:";
                signature.Reason = "I am the author";
                signature.DistinguishedNameLabel = "DN:";
                signature.DistinguishedName = signature.Certificate.IssuerName.Name;

                //Set the signature font
                signature.SignDetailsFont = new PdfTrueTypeFont(new Font("Arial Unicode MS",12f,FontStyle.Regular));

                //Set the document permission to forbid changes but allow form fill
                signature.DocumentPermissions = PdfCertificationFlags.ForbidChanges | PdfCertificationFlags.AllowFormFill;

                //Save to file
                doc.SaveToFile("TextSignature.pdf");
                doc.Close();
            }
        }
    }
PDF mit einem Bild digital signieren
Im Folgenden finden Sie die Schritte zum Hinzufügen einer Bildsignatur zu einem PDF-Dokument.
- Erstellen Sie ein PdfDocument-Objekt und laden Sie eine Beispiel-PDF-Datei mit der Methode PdfDocument.LoadFromFile().
- Laden Sie eine PFX-Zertifikatdatei, während Sie das PdfCertificate-Objekt initialisieren.
- Erstellen Sie ein PdfSignature-Objekt und geben Sie dessen Position und Größe im Dokument an.
- Stellen Sie den Signaturgrafikmodus auf SignImageOnly ein, wodurch nur das Signaturbild angezeigt wird.
- Legen Sie das Signaturbild über die Eigenschaft PdfSignature.SignImageSource fest.
- Legen Sie die Berechtigungen des zertifizierten Dokuments auf ForbidChanges und AllowFormFill fest.
- Speichern Sie das Dokument mit der Methode PdfDocument.SaveToFile() in einer anderen Datei.
- C#
- VB.NET
using Spire.Pdf;
    using Spire.Pdf.Graphics;
    using Spire.Pdf.Security;
    using System.Drawing;

    namespace AddImageSignature
    {
        class Program
        {
            static void Main(string[] args)
            {
                //Create a PdfDocument object
                PdfDocument doc = new PdfDocument();

                //Load a sample PDF file
                doc.LoadFromFile("C:\\Users\\Administrator\\Desktop\\sample.pdf");

                //Load the certificate
                PdfCertificate cert = new PdfCertificate("C:\\Users\\Administrator\\Desktop\\MyCertificate.pfx", "e-iceblue");

                //Create a PdfSignature object and specify its position and size
                PdfSignature signature = new PdfSignature(doc, doc.Pages[doc.Pages.Count - 1], cert, "MySignature");
                RectangleF rectangleF = new RectangleF(doc.Pages[0].ActualSize.Width - 200, 150, 130, 130);
                signature.Bounds = rectangleF;
                signature.Certificated = true;

                //Set the graphics mode to image only
                signature.GraphicsMode = GraphicMode.SignImageOnly;

                //Set the sign image source
                signature.SignImageSource = PdfImage.FromFile("C:\\Users\\Administrator\\Desktop\\verified.png");

                //Set the signature font
                signature.SignDetailsFont = new PdfTrueTypeFont(new Font("Arial Unicode MS", 12f, FontStyle.Regular));

                //Set the document permission to forbid changes but allow form fill
                signature.DocumentPermissions = PdfCertificationFlags.ForbidChanges | PdfCertificationFlags.AllowFormFill;

                //Save to file
                doc.SaveToFile("ImageSignature.pdf");
                doc.Close();
            }
        }
    }
Signieren Sie PDFs digital mit Text und einem Bild
Im Folgenden finden Sie die Schritte zum digitalen Signieren eines PDF-Dokuments mit Text und einem Bild.
- Erstellen Sie ein PdfDocument-Objekt und laden Sie eine Beispiel-PDF-Datei mit der Methode PdfDocument.LoadFromFile().
- Laden Sie eine PFX-Zertifikatdatei, während Sie das PdfCertificate-Objekt initialisieren.
- Erstellen Sie ein PdfSignature-Objekt und geben Sie dessen Position und Größe im Dokument an.
- Stellen Sie den Signaturgrafikmodus auf SignImageAndSignDetail ein, wodurch sowohl das Signaturbild als auch die Details angezeigt werden.
- Legen Sie das Signaturbild über die Eigenschaft PdfSignature.SignImageSource fest und legen Sie die Signaturdetails, einschließlich Name, Kontaktinformationen, Grund, Datum usw., über andere Eigenschaften unter dem PdfSignature-Objekt fest.
- Legen Sie die Berechtigungen des zertifizierten Dokuments auf ForbidChanges und AllowFormFill fest.
- Speichern Sie das Dokument mit der Methode PdfDocument.SaveToFile() in einer anderen Datei.
- C#
- VB.NET
using Spire.Pdf;
    using Spire.Pdf.Security;
    using System;
    using System.Drawing;
    using Spire.Pdf.Graphics;

    namespace AddTextAndImageSignature
    {
        class Program
        {
            static void Main(string[] args)
            {
                //Create a PdfDocument object
                PdfDocument doc = new PdfDocument();

                //Load a sample PDF file
                doc.LoadFromFile("C:\\Users\\Administrator\\Desktop\\sample.pdf");

                //Load the certificate
                PdfCertificate cert = new PdfCertificate("C:\\Users\\Administrator\\Desktop\\MyCertificate.pfx", "e-iceblue");

                //Create a PdfSignature object and specify its position and size
                PdfSignature signature = new PdfSignature(doc, doc.Pages[doc.Pages.Count - 1], cert, "MySignature");
                RectangleF rectangleF = new RectangleF(doc.Pages[0].ActualSize.Width - 320, 150, 260, 110);
                signature.Bounds = rectangleF;
                signature.Certificated = true;

                //Set the graphics mode to image and sign detail
                signature.GraphicsMode = GraphicMode.SignImageAndSignDetail;

                //Set the signature content
                signature.NameLabel = "Signer:";
                signature.Name = "Gary";
                signature.ContactInfoLabel = "Phone:";
                signature.ContactInfo = "0123456";
                signature.DateLabel = "Date:";
                signature.Date = DateTime.Now;
                signature.LocationInfoLabel = "Location:";
                signature.LocationInfo = "USA";
                signature.ReasonLabel = "Reason:";
                signature.Reason = "I am the author";
                signature.DistinguishedNameLabel = "DN:";
                signature.DistinguishedName = signature.Certificate.IssuerName.Name;

                //Set the signature image source
                signature.SignImageSource = PdfImage.FromFile("C:\\Users\\Administrator\\Desktop\\handSignature.png");

                //Set the signature font
                signature.SignDetailsFont = new PdfTrueTypeFont(new Font("Arial Unicode MS", 12f, FontStyle.Regular));

                //Set the document permission to forbid changes but allow form fill
                signature.DocumentPermissions = PdfCertificationFlags.ForbidChanges | PdfCertificationFlags.AllowFormFill;

                //Save to file
                doc.SaveToFile("TextAndImageSignature.pdf");
                doc.Close();
            }
        }
    }
Beantragen Sie eine temporäre Lizenz
Wenn Sie die Bewertungsmeldung aus den generierten Dokumenten entfernen oder die Funktionseinschränkungen beseitigen möchten, wenden Sie sich bitte an uns Fordern Sie eine 30-Tage-Testlizenz an für sich selbst.
C#/VB.NET: Firme digitalmente PDF con texto o/y imagen
Tabla de contenido
Instalado a través de NuGet
PM> Install-Package Spire.PDF
enlaces relacionados
La firma digital asegura que el documento firmado no puede ser alterado por nadie más que su autor. Agregar firmas es la forma más común de asegurar la autenticidad del contenido del documento. Una firma digital visual en un documento PDF puede mostrar texto o una imagen (por ejemplo, una firma manuscrita). Este artículo presenta cómo firmar digitalmente archivos PDF usando Spire.PDF for .NET desde los siguientes tres aspectos.
- Firme digitalmente PDF con texto
- Firme digitalmente PDF con una imagen
- Firme digitalmente un PDF con texto y una imagen
Instalar Spire.PDF for .NET
Para empezar, debe agregar los archivos DLL incluidos en el paquete Spire.PDF for .NET como referencias en su proyecto .NET. Los archivos DLL se pueden descargar desde este enlace o instalar a través de NuGet.
PM> Install-Package Spire.PDF
Firme digitalmente PDF con texto
Los siguientes son los pasos para agregar una firma de texto sin formato a un documento PDF.
- Cree un objeto PdfDocument y cargue un archivo PDF de muestra utilizando el método PdfDocument.LoadFromFile().
- Cargue un archivo de certificado .pfx mientras inicializa el objeto PdfCertificate.
- Cree un objeto PdfSignature, especificando su posición y tamaño en el documento.
- Establezca el modo de gráficos de firma en SignDetail, que mostrará los detalles de la firma en texto sin formato.
- Establezca los detalles de la firma, incluido el nombre, la información de contacto, el motivo, la fecha, etc. a través de las propiedades del objeto PdfSignature.
- Establezca los permisos del documento certificado en ForbidChanges y AllowFormFill.
- Guarde el documento en otro archivo usando el método PdfDocument.SaveToFile().
- C#
- VB.NET
using Spire.Pdf;
    using Spire.Pdf.Security;
    using System;
    using System.Drawing;
    using Spire.Pdf.Graphics;

    namespace AddTextSignature
    {
        class Program
        {
            static void Main(string[] args)
            {
                //Create a PdfDocument object
                PdfDocument doc = new PdfDocument();

                //Load a sample PDF file
                doc.LoadFromFile("C:\\Users\\Administrator\\Desktop\\sample.pdf");

                //Load the certificate
                PdfCertificate cert = new PdfCertificate("C:\\Users\\Administrator\\Desktop\\MyCertificate.pfx", "e-iceblue");

                //Create a PdfSignature object and specify its position and size
                PdfSignature signature = new PdfSignature(doc, doc.Pages[doc.Pages.Count-1], cert, "MySignature");
                RectangleF rectangleF = new RectangleF(doc.Pages[0].ActualSize.Width - 340, 150, 290, 100);
                signature.Bounds = rectangleF;
                signature.Certificated = true;

                //Set the graphics mode to sign detail
                signature.GraphicsMode = GraphicMode.SignDetail;

                //Set the signature content
                signature.NameLabel = "Signer:";
                signature.Name = "Gary";
                signature.ContactInfoLabel = "Phone:";
                signature.ContactInfo = "0123456";
                signature.DateLabel = "Date:";
                signature.Date = DateTime.Now;
                signature.LocationInfoLabel = "Location:";
                signature.LocationInfo = "USA";
                signature.ReasonLabel = "Reason:";
                signature.Reason = "I am the author";
                signature.DistinguishedNameLabel = "DN:";
                signature.DistinguishedName = signature.Certificate.IssuerName.Name;

                //Set the signature font
                signature.SignDetailsFont = new PdfTrueTypeFont(new Font("Arial Unicode MS",12f,FontStyle.Regular));

                //Set the document permission to forbid changes but allow form fill
                signature.DocumentPermissions = PdfCertificationFlags.ForbidChanges | PdfCertificationFlags.AllowFormFill;

                //Save to file
                doc.SaveToFile("TextSignature.pdf");
                doc.Close();
            }
        }
    }
Firme digitalmente PDF con una imagen
Los siguientes son los pasos para agregar una firma de imagen a un documento PDF.
- Cree un objeto PdfDocument y cargue un archivo PDF de muestra utilizando el método PdfDocument.LoadFromFile().
- Cargue un archivo de certificado .pfx mientras inicializa el objeto PdfCertificate.
- Cree un objeto PdfSignature, especificando su posición y tamaño en el documento.
- Establezca el modo de gráficos de la firma en SignImageOnly, que mostrará solo la imagen de la firma.
- Establezca la imagen de la firma a través de la propiedad PdfSignature.SignImageSource.
- Establezca los permisos del documento certificado en ForbidChanges y AllowFormFill.
- Guarde el documento en otro archivo usando el método PdfDocument.SaveToFile().
- C#
- VB.NET
using Spire.Pdf;
    using Spire.Pdf.Graphics;
    using Spire.Pdf.Security;
    using System.Drawing;

    namespace AddImageSignature
    {
        class Program
        {
            static void Main(string[] args)
            {
                //Create a PdfDocument object
                PdfDocument doc = new PdfDocument();

                //Load a sample PDF file
                doc.LoadFromFile("C:\\Users\\Administrator\\Desktop\\sample.pdf");

                //Load the certificate
                PdfCertificate cert = new PdfCertificate("C:\\Users\\Administrator\\Desktop\\MyCertificate.pfx", "e-iceblue");

                //Create a PdfSignature object and specify its position and size
                PdfSignature signature = new PdfSignature(doc, doc.Pages[doc.Pages.Count - 1], cert, "MySignature");
                RectangleF rectangleF = new RectangleF(doc.Pages[0].ActualSize.Width - 200, 150, 130, 130);
                signature.Bounds = rectangleF;
                signature.Certificated = true;

                //Set the graphics mode to image only
                signature.GraphicsMode = GraphicMode.SignImageOnly;

                //Set the sign image source
                signature.SignImageSource = PdfImage.FromFile("C:\\Users\\Administrator\\Desktop\\verified.png");

                //Set the signature font
                signature.SignDetailsFont = new PdfTrueTypeFont(new Font("Arial Unicode MS", 12f, FontStyle.Regular));

                //Set the document permission to forbid changes but allow form fill
                signature.DocumentPermissions = PdfCertificationFlags.ForbidChanges | PdfCertificationFlags.AllowFormFill;

                //Save to file
                doc.SaveToFile("ImageSignature.pdf");
                doc.Close();
            }
        }
    }
Firme digitalmente un PDF con texto y una imagen
Los siguientes son los pasos para firmar digitalmente un documento PDF con texto y una imagen.
- Cree un objeto PdfDocument y cargue un archivo PDF de muestra utilizando el método PdfDocument.LoadFromFile().
- Cargue un archivo de certificado .pfx mientras inicializa el objeto PdfCertificate.
- Cree un objeto PdfSignature, especificando su posición y tamaño en el documento.
- Establezca el modo de gráficos de la firma en SignImageAndSignDetail, que mostrará tanto la imagen como los detalles de la firma.
- Configure la imagen de la firma a través de la propiedad PdfSignature.SignImageSource y configure los detalles de la firma, incluidos el nombre, la información de contacto, el motivo, la fecha, etc. a través de otras propiedades en el objeto PdfSignature.
- Establezca los permisos del documento certificado en ForbidChanges y AllowFormFill.
- Guarde el documento en otro archivo usando el método PdfDocument.SaveToFile().
- C#
- VB.NET
using Spire.Pdf;
    using Spire.Pdf.Security;
    using System;
    using System.Drawing;
    using Spire.Pdf.Graphics;

    namespace AddTextAndImageSignature
    {
        class Program
        {
            static void Main(string[] args)
            {
                //Create a PdfDocument object
                PdfDocument doc = new PdfDocument();

                //Load a sample PDF file
                doc.LoadFromFile("C:\\Users\\Administrator\\Desktop\\sample.pdf");

                //Load the certificate
                PdfCertificate cert = new PdfCertificate("C:\\Users\\Administrator\\Desktop\\MyCertificate.pfx", "e-iceblue");

                //Create a PdfSignature object and specify its position and size
                PdfSignature signature = new PdfSignature(doc, doc.Pages[doc.Pages.Count - 1], cert, "MySignature");
                RectangleF rectangleF = new RectangleF(doc.Pages[0].ActualSize.Width - 320, 150, 260, 110);
                signature.Bounds = rectangleF;
                signature.Certificated = true;

                //Set the graphics mode to image and sign detail
                signature.GraphicsMode = GraphicMode.SignImageAndSignDetail;

                //Set the signature content
                signature.NameLabel = "Signer:";
                signature.Name = "Gary";
                signature.ContactInfoLabel = "Phone:";
                signature.ContactInfo = "0123456";
                signature.DateLabel = "Date:";
                signature.Date = DateTime.Now;
                signature.LocationInfoLabel = "Location:";
                signature.LocationInfo = "USA";
                signature.ReasonLabel = "Reason:";
                signature.Reason = "I am the author";
                signature.DistinguishedNameLabel = "DN:";
                signature.DistinguishedName = signature.Certificate.IssuerName.Name;

                //Set the signature image source
                signature.SignImageSource = PdfImage.FromFile("C:\\Users\\Administrator\\Desktop\\handSignature.png");

                //Set the signature font
                signature.SignDetailsFont = new PdfTrueTypeFont(new Font("Arial Unicode MS", 12f, FontStyle.Regular));

                //Set the document permission to forbid changes but allow form fill
                signature.DocumentPermissions = PdfCertificationFlags.ForbidChanges | PdfCertificationFlags.AllowFormFill;

                //Save to file
                doc.SaveToFile("TextAndImageSignature.pdf");
                doc.Close();
            }
        }
    }
Solicitar una Licencia Temporal
Si desea eliminar el mensaje de evaluación de los documentos generados o deshacerse de las limitaciones de la función, por favor solicitar una licencia de prueba de 30 días para ti.
C#/VB.NET: 텍스트 또는/및 이미지로 PDF에 디지털 서명
NuGet을 통해 설치됨
PM> Install-Package Spire.PDF
관련된 링크들
디지털 서명은 서명된 문서를 작성자 이외의 다른 사람이 변경할 수 없도록 합니다. 서명을 추가하는 것은 문서 내용의 신뢰성을 보장하는 가장 일반적인 방법입니다. PDF 문서의 시각적 디지털 서명은 텍스트 또는 이미지(예: 자필 서명)를 표시할 수 있습니다. 이 문서에서는 방법을 소개합니다 PDF에 디지털 서명 다음 세 가지 측면에서 Spire.PDF for .NET 사용합니다.
Spire.PDF for .NET 설치
먼저 Spire.PDF for .NET 패키지에 포함된 DLL 파일을 .NET 프로젝트의 참조로 추가해야 합니다. DLL 파일은 이 링크에서 다운로드하거나 NuGet을 통해 설치할 수 있습니다.
PM> Install-Package Spire.PDF
텍스트로 PDF에 디지털 서명
다음은 PDF 문서에 일반 텍스트 서명을 추가하는 단계입니다.
- PdfDocument 개체를 만들고 PdfDocument.LoadFromFile() 메서드를 사용하여 샘플 PDF 파일을 로드합니다.
- PdfCertificate 개체를 초기화하는 동안 .pfx 인증서 파일을 로드합니다.
- 문서에서 위치와 크기를 지정하여 PdfSignature 객체를 만듭니다.
- 서명 그래픽 모드를 SignDetail로 설정하면 서명 세부 정보가 일반 텍스트로 표시됩니다.
- PdfSignature 개체 아래의 속성을 통해 이름, 연락처 정보, 이유, 날짜 등 서명 세부 정보를 설정합니다.
- 인증된 문서의 권한을 ForbidChanges 및 AllowFormFill로 설정합니다.
- PdfDocument.SaveToFile() 메서드를 사용하여 문서를 다른 파일로 저장합니다.
- C#
- VB.NET
using Spire.Pdf;
    using Spire.Pdf.Security;
    using System;
    using System.Drawing;
    using Spire.Pdf.Graphics;

    namespace AddTextSignature
    {
        class Program
        {
            static void Main(string[] args)
            {
                //Create a PdfDocument object
                PdfDocument doc = new PdfDocument();

                //Load a sample PDF file
                doc.LoadFromFile("C:\\Users\\Administrator\\Desktop\\sample.pdf");

                //Load the certificate
                PdfCertificate cert = new PdfCertificate("C:\\Users\\Administrator\\Desktop\\MyCertificate.pfx", "e-iceblue");

                //Create a PdfSignature object and specify its position and size
                PdfSignature signature = new PdfSignature(doc, doc.Pages[doc.Pages.Count-1], cert, "MySignature");
                RectangleF rectangleF = new RectangleF(doc.Pages[0].ActualSize.Width - 340, 150, 290, 100);
                signature.Bounds = rectangleF;
                signature.Certificated = true;

                //Set the graphics mode to sign detail
                signature.GraphicsMode = GraphicMode.SignDetail;

                //Set the signature content
                signature.NameLabel = "Signer:";
                signature.Name = "Gary";
                signature.ContactInfoLabel = "Phone:";
                signature.ContactInfo = "0123456";
                signature.DateLabel = "Date:";
                signature.Date = DateTime.Now;
                signature.LocationInfoLabel = "Location:";
                signature.LocationInfo = "USA";
                signature.ReasonLabel = "Reason:";
                signature.Reason = "I am the author";
                signature.DistinguishedNameLabel = "DN:";
                signature.DistinguishedName = signature.Certificate.IssuerName.Name;

                //Set the signature font
                signature.SignDetailsFont = new PdfTrueTypeFont(new Font("Arial Unicode MS",12f,FontStyle.Regular));

                //Set the document permission to forbid changes but allow form fill
                signature.DocumentPermissions = PdfCertificationFlags.ForbidChanges | PdfCertificationFlags.AllowFormFill;

                //Save to file
                doc.SaveToFile("TextSignature.pdf");
                doc.Close();
            }
        }
    }
이미지로 PDF에 디지털 서명
다음은 PDF 문서에 이미지 서명을 추가하는 단계입니다.
- PdfDocument 개체를 만들고 PdfDocument.LoadFromFile() 메서드를 사용하여 샘플 PDF 파일을 로드합니다.
- PdfCertificate 개체를 초기화하는 동안 .pfx 인증서 파일을 로드합니다.
- 문서에서 위치와 크기를 지정하여 PdfSignature 객체를 만듭니다.
- 서명 그래픽 모드를 SignImageOnly로 설정하면 서명 이미지만 표시됩니다.
- PdfSignature.SignImageSource 속성을 통해 서명 이미지를 설정합니다.
- 인증된 문서의 권한을 ForbidChanges 및 AllowFormFill로 설정합니다.
- PdfDocument.SaveToFile() 메서드를 사용하여 문서를 다른 파일로 저장합니다.
- C#
- VB.NET
using Spire.Pdf;
    using Spire.Pdf.Graphics;
    using Spire.Pdf.Security;
    using System.Drawing;

    namespace AddImageSignature
    {
        class Program
        {
            static void Main(string[] args)
            {
                //Create a PdfDocument object
                PdfDocument doc = new PdfDocument();

                //Load a sample PDF file
                doc.LoadFromFile("C:\\Users\\Administrator\\Desktop\\sample.pdf");

                //Load the certificate
                PdfCertificate cert = new PdfCertificate("C:\\Users\\Administrator\\Desktop\\MyCertificate.pfx", "e-iceblue");

                //Create a PdfSignature object and specify its position and size
                PdfSignature signature = new PdfSignature(doc, doc.Pages[doc.Pages.Count - 1], cert, "MySignature");
                RectangleF rectangleF = new RectangleF(doc.Pages[0].ActualSize.Width - 200, 150, 130, 130);
                signature.Bounds = rectangleF;
                signature.Certificated = true;

                //Set the graphics mode to image only
                signature.GraphicsMode = GraphicMode.SignImageOnly;

                //Set the sign image source
                signature.SignImageSource = PdfImage.FromFile("C:\\Users\\Administrator\\Desktop\\verified.png");

                //Set the signature font
                signature.SignDetailsFont = new PdfTrueTypeFont(new Font("Arial Unicode MS", 12f, FontStyle.Regular));

                //Set the document permission to forbid changes but allow form fill
                signature.DocumentPermissions = PdfCertificationFlags.ForbidChanges | PdfCertificationFlags.AllowFormFill;

                //Save to file
                doc.SaveToFile("ImageSignature.pdf");
                doc.Close();
            }
        }
    }
텍스트와 이미지로 PDF에 디지털 서명
다음은 텍스트와 이미지가 포함된 PDF 문서에 디지털 서명하는 단계입니다.
- PdfDocument 개체를 만들고 PdfDocument.LoadFromFile() 메서드를 사용하여 샘플 PDF 파일을 로드합니다.
- PdfCertificate 개체를 초기화하는 동안 .pfx 인증서 파일을 로드합니다.
- 문서에서 위치와 크기를 지정하여 PdfSignature 객체를 만듭니다.
- 서명 그래픽 모드를 SignImageAndSignDetail로 설정하면 서명 이미지와 세부 정보가 모두 표시됩니다.
- PdfSignature.SignImageSource 속성을 통해 서명 이미지를 설정하고, PdfSignature 객체 아래의 다른 속성을 통해 이름, 연락처, 이유, 날짜 등의 서명 세부 정보를 설정합니다.
- 인증된 문서의 권한을 ForbidChanges 및 AllowFormFill로 설정합니다.
- PdfDocument.SaveToFile() 메서드를 사용하여 문서를 다른 파일로 저장합니다.
- C#
- VB.NET
using Spire.Pdf;
    using Spire.Pdf.Security;
    using System;
    using System.Drawing;
    using Spire.Pdf.Graphics;

    namespace AddTextAndImageSignature
    {
        class Program
        {
            static void Main(string[] args)
            {
                //Create a PdfDocument object
                PdfDocument doc = new PdfDocument();

                //Load a sample PDF file
                doc.LoadFromFile("C:\\Users\\Administrator\\Desktop\\sample.pdf");

                //Load the certificate
                PdfCertificate cert = new PdfCertificate("C:\\Users\\Administrator\\Desktop\\MyCertificate.pfx", "e-iceblue");

                //Create a PdfSignature object and specify its position and size
                PdfSignature signature = new PdfSignature(doc, doc.Pages[doc.Pages.Count - 1], cert, "MySignature");
                RectangleF rectangleF = new RectangleF(doc.Pages[0].ActualSize.Width - 320, 150, 260, 110);
                signature.Bounds = rectangleF;
                signature.Certificated = true;

                //Set the graphics mode to image and sign detail
                signature.GraphicsMode = GraphicMode.SignImageAndSignDetail;

                //Set the signature content
                signature.NameLabel = "Signer:";
                signature.Name = "Gary";
                signature.ContactInfoLabel = "Phone:";
                signature.ContactInfo = "0123456";
                signature.DateLabel = "Date:";
                signature.Date = DateTime.Now;
                signature.LocationInfoLabel = "Location:";
                signature.LocationInfo = "USA";
                signature.ReasonLabel = "Reason:";
                signature.Reason = "I am the author";
                signature.DistinguishedNameLabel = "DN:";
                signature.DistinguishedName = signature.Certificate.IssuerName.Name;

                //Set the signature image source
                signature.SignImageSource = PdfImage.FromFile("C:\\Users\\Administrator\\Desktop\\handSignature.png");

                //Set the signature font
                signature.SignDetailsFont = new PdfTrueTypeFont(new Font("Arial Unicode MS", 12f, FontStyle.Regular));

                //Set the document permission to forbid changes but allow form fill
                signature.DocumentPermissions = PdfCertificationFlags.ForbidChanges | PdfCertificationFlags.AllowFormFill;

                //Save to file
                doc.SaveToFile("TextAndImageSignature.pdf");
                doc.Close();
            }
        }
    }
임시 면허 신청
생성된 문서에서 평가 메시지를 제거하거나 기능 제한을 제거하려면 다음을 수행하십시오 30일 평가판 라이선스 요청 자신을 위해.
C#/VB.NET: firma digitale PDF con testo e/o immagine
Sommario
Installato tramite NuGet
PM> Install-Package Spire.PDF
Link correlati
La firma digitale assicura che il documento firmato non possa essere alterato da nessuno che non sia il suo autore. L'aggiunta di firme è il modo più comune per garantire l'autenticità del contenuto del documento. Una firma digitale visiva in un documento PDF può mostrare testo o un'immagine (ad esempio, firma scritta a mano). Questo articolo introduce come firmare digitalmente i PDF utilizzando Spire.PDF for .NET dai seguenti tre aspetti.
- Firma digitalmente PDF con testo
- Firma digitalmente PDF con un'immagine
- Firma digitalmente PDF con testo e un'immagine
Installa Spire.PDF for .NET
Per cominciare, è necessario aggiungere i file DLL inclusi nel pacchetto Spire.PDF for.NET come riferimenti nel progetto .NET. I file DLL possono essere scaricati da questo link o installato tramite NuGet.
PM> Install-Package Spire.PDF
Firma digitalmente PDF con testo
Di seguito sono riportati i passaggi per aggiungere una firma in testo normale a un documento PDF.
- Creare un oggetto PdfDocument e caricare un file PDF di esempio utilizzando il metodo PdfDocument.LoadFromFile().
- Carica un file di certificato .pfx durante l'inizializzazione dell'oggetto PdfCertificate.
- Crea un oggetto PdfSignature, specificandone la posizione e le dimensioni nel documento.
- Imposta la modalità grafica della firma su SignDetail, che mostrerà i dettagli della firma in testo normale.
- Imposta i dettagli della firma, inclusi nome, informazioni di contatto, motivo, data, ecc. tramite le proprietà sotto l'oggetto PdfSignature.
- Impostare le autorizzazioni del documento certificato su ForbidChanges e AllowFormFill.
- Salvare il documento in un altro file utilizzando il metodo PdfDocument.SaveToFile().
- C#
- VB.NET
using Spire.Pdf;
    using Spire.Pdf.Security;
    using System;
    using System.Drawing;
    using Spire.Pdf.Graphics;

    namespace AddTextSignature
    {
        class Program
        {
            static void Main(string[] args)
            {
                //Create a PdfDocument object
                PdfDocument doc = new PdfDocument();

                //Load a sample PDF file
                doc.LoadFromFile("C:\\Users\\Administrator\\Desktop\\sample.pdf");

                //Load the certificate
                PdfCertificate cert = new PdfCertificate("C:\\Users\\Administrator\\Desktop\\MyCertificate.pfx", "e-iceblue");

                //Create a PdfSignature object and specify its position and size
                PdfSignature signature = new PdfSignature(doc, doc.Pages[doc.Pages.Count-1], cert, "MySignature");
                RectangleF rectangleF = new RectangleF(doc.Pages[0].ActualSize.Width - 340, 150, 290, 100);
                signature.Bounds = rectangleF;
                signature.Certificated = true;

                //Set the graphics mode to sign detail
                signature.GraphicsMode = GraphicMode.SignDetail;

                //Set the signature content
                signature.NameLabel = "Signer:";
                signature.Name = "Gary";
                signature.ContactInfoLabel = "Phone:";
                signature.ContactInfo = "0123456";
                signature.DateLabel = "Date:";
                signature.Date = DateTime.Now;
                signature.LocationInfoLabel = "Location:";
                signature.LocationInfo = "USA";
                signature.ReasonLabel = "Reason:";
                signature.Reason = "I am the author";
                signature.DistinguishedNameLabel = "DN:";
                signature.DistinguishedName = signature.Certificate.IssuerName.Name;

                //Set the signature font
                signature.SignDetailsFont = new PdfTrueTypeFont(new Font("Arial Unicode MS",12f,FontStyle.Regular));

                //Set the document permission to forbid changes but allow form fill
                signature.DocumentPermissions = PdfCertificationFlags.ForbidChanges | PdfCertificationFlags.AllowFormFill;

                //Save to file
                doc.SaveToFile("TextSignature.pdf");
                doc.Close();
            }
        }
    }
Firma digitalmente PDF con un'immagine
Di seguito sono riportati i passaggi per aggiungere una firma immagine a un documento PDF.
- Creare un oggetto PdfDocument e caricare un file PDF di esempio utilizzando il metodo PdfDocument.LoadFromFile().
- Carica un file di certificato .pfx durante l'inizializzazione dell'oggetto PdfCertificate.
- Crea un oggetto PdfSignature, specificandone la posizione e le dimensioni nel documento.
- Imposta la modalità grafica della firma su SignImageOnly, che mostrerà solo l'immagine della firma.
- Impostare l'immagine della firma tramite la proprietà PdfSignature.SignImageSource.
- Impostare le autorizzazioni del documento certificato su ForbidChanges e AllowFormFill.
- Salvare il documento in un altro file utilizzando il metodo PdfDocument.SaveToFile().
- C#
- VB.NET
using Spire.Pdf;
    using Spire.Pdf.Graphics;
    using Spire.Pdf.Security;
    using System.Drawing;

    namespace AddImageSignature
    {
        class Program
        {
            static void Main(string[] args)
            {
                //Create a PdfDocument object
                PdfDocument doc = new PdfDocument();

                //Load a sample PDF file
                doc.LoadFromFile("C:\\Users\\Administrator\\Desktop\\sample.pdf");

                //Load the certificate
                PdfCertificate cert = new PdfCertificate("C:\\Users\\Administrator\\Desktop\\MyCertificate.pfx", "e-iceblue");

                //Create a PdfSignature object and specify its position and size
                PdfSignature signature = new PdfSignature(doc, doc.Pages[doc.Pages.Count - 1], cert, "MySignature");
                RectangleF rectangleF = new RectangleF(doc.Pages[0].ActualSize.Width - 200, 150, 130, 130);
                signature.Bounds = rectangleF;
                signature.Certificated = true;

                //Set the graphics mode to image only
                signature.GraphicsMode = GraphicMode.SignImageOnly;

                //Set the sign image source
                signature.SignImageSource = PdfImage.FromFile("C:\\Users\\Administrator\\Desktop\\verified.png");

                //Set the signature font
                signature.SignDetailsFont = new PdfTrueTypeFont(new Font("Arial Unicode MS", 12f, FontStyle.Regular));

                //Set the document permission to forbid changes but allow form fill
                signature.DocumentPermissions = PdfCertificationFlags.ForbidChanges | PdfCertificationFlags.AllowFormFill;

                //Save to file
                doc.SaveToFile("ImageSignature.pdf");
                doc.Close();
            }
        }
    }
Firma digitalmente PDF con testo e un'immagine
Di seguito sono riportati i passaggi per firmare digitalmente un documento PDF con testo e un'immagine.
- Creare un oggetto PdfDocument e caricare un file PDF di esempio utilizzando il metodo PdfDocument.LoadFromFile().
- Carica un file di certificato .pfx durante l'inizializzazione dell'oggetto PdfCertificate.
- Crea un oggetto PdfSignature, specificandone la posizione e le dimensioni nel documento.
- Imposta la modalità grafica della firma su SignImageAndSignDetail, che mostrerà sia l'immagine della firma che i dettagli.
- Impostare l'immagine della firma tramite la proprietà PdfSignature.SignImageSource e impostare i dettagli della firma, inclusi nome, informazioni di contatto, motivo, data e così via tramite altre proprietà nell'oggetto PdfSignature.
- Impostare le autorizzazioni del documento certificato su ForbidChanges e AllowFormFill.
- Salvare il documento in un altro file utilizzando il metodo PdfDocument.SaveToFile().
- C#
- VB.NET
using Spire.Pdf;
    using Spire.Pdf.Security;
    using System;
    using System.Drawing;
    using Spire.Pdf.Graphics;

    namespace AddTextAndImageSignature
    {
        class Program
        {
            static void Main(string[] args)
            {
                //Create a PdfDocument object
                PdfDocument doc = new PdfDocument();

                //Load a sample PDF file
                doc.LoadFromFile("C:\\Users\\Administrator\\Desktop\\sample.pdf");

                //Load the certificate
                PdfCertificate cert = new PdfCertificate("C:\\Users\\Administrator\\Desktop\\MyCertificate.pfx", "e-iceblue");

                //Create a PdfSignature object and specify its position and size
                PdfSignature signature = new PdfSignature(doc, doc.Pages[doc.Pages.Count - 1], cert, "MySignature");
                RectangleF rectangleF = new RectangleF(doc.Pages[0].ActualSize.Width - 320, 150, 260, 110);
                signature.Bounds = rectangleF;
                signature.Certificated = true;

                //Set the graphics mode to image and sign detail
                signature.GraphicsMode = GraphicMode.SignImageAndSignDetail;

                //Set the signature content
                signature.NameLabel = "Signer:";
                signature.Name = "Gary";
                signature.ContactInfoLabel = "Phone:";
                signature.ContactInfo = "0123456";
                signature.DateLabel = "Date:";
                signature.Date = DateTime.Now;
                signature.LocationInfoLabel = "Location:";
                signature.LocationInfo = "USA";
                signature.ReasonLabel = "Reason:";
                signature.Reason = "I am the author";
                signature.DistinguishedNameLabel = "DN:";
                signature.DistinguishedName = signature.Certificate.IssuerName.Name;

                //Set the signature image source
                signature.SignImageSource = PdfImage.FromFile("C:\\Users\\Administrator\\Desktop\\handSignature.png");

                //Set the signature font
                signature.SignDetailsFont = new PdfTrueTypeFont(new Font("Arial Unicode MS", 12f, FontStyle.Regular));

                //Set the document permission to forbid changes but allow form fill
                signature.DocumentPermissions = PdfCertificationFlags.ForbidChanges | PdfCertificationFlags.AllowFormFill;

                //Save to file
                doc.SaveToFile("TextAndImageSignature.pdf");
                doc.Close();
            }
        }
    }
Richiedi una licenza temporanea
Se desideri rimuovere il messaggio di valutazione dai documenti generati o eliminare le limitazioni delle funzioni, per favore richiedere una licenza di prova di 30 giorni per te.
C#/VB.NET: assinar PDF digitalmente com texto ou/e imagem
Table des matières
Installé via NuGet
PM> Install-Package Spire.PDF
Liens connexes
La signature numérique garantit que le document signé ne peut être modifié par personne d'autre que son auteur. L'ajout de signatures est le moyen le plus courant de garantir l'authenticité du contenu du document. Une signature numérique visuelle dans un document PDF peut afficher du texte ou une image (par exemple, une signature manuscrite). Cet article explique comment signer numériquement des PDF en utilisant Spire.PDF for .NET à partir des trois aspects suivants.
- Signer numériquement un PDF avec du texte
- Signer numériquement un PDF avec une image
- Signer numériquement un PDF avec du texte et une image
Installer Spire.PDF for .NET
Pour commencer, vous devez ajouter les fichiers DLL inclus dans le package Spire.PDF for .NET en tant que références dans votre projet .NET. Les fichiers DLL peuvent être téléchargés à partir de ce lien ou installés via NuGet.
PM> Install-Package Spire.PDF
Signer numériquement un PDF avec du texte
Voici les étapes pour ajouter une signature en texte brut à un document PDF.
- Créez un objet PdfDocument et chargez un exemple de fichier PDF à l'aide de la méthode PdfDocument.LoadFromFile().
- Chargez un fichier de certificat .pfx lors de l'initialisation de l'objet PdfCertificate.
- Créez un objet PdfSignature, en spécifiant sa position et sa taille dans le document.
- Définissez le mode graphique de la signature sur SignDetail, qui affichera les détails de la signature en texte brut.
- Définissez les détails de la signature, y compris le nom, les informations de contact, la raison, la date, etc. via les propriétés sous l'objet PdfSignature.
- Définissez les autorisations du document certifié sur ForbidChanges et AllowFormFill.
- Enregistrez le document dans un autre fichier à l'aide de la méthode PdfDocument.SaveToFile().
- C#
- VB.NET
using Spire.Pdf;
    using Spire.Pdf.Security;
    using System;
    using System.Drawing;
    using Spire.Pdf.Graphics;

    namespace AddTextSignature
    {
        class Program
        {
            static void Main(string[] args)
            {
                //Create a PdfDocument object
                PdfDocument doc = new PdfDocument();

                //Load a sample PDF file
                doc.LoadFromFile("C:\\Users\\Administrator\\Desktop\\sample.pdf");

                //Load the certificate
                PdfCertificate cert = new PdfCertificate("C:\\Users\\Administrator\\Desktop\\MyCertificate.pfx", "e-iceblue");

                //Create a PdfSignature object and specify its position and size
                PdfSignature signature = new PdfSignature(doc, doc.Pages[doc.Pages.Count-1], cert, "MySignature");
                RectangleF rectangleF = new RectangleF(doc.Pages[0].ActualSize.Width - 340, 150, 290, 100);
                signature.Bounds = rectangleF;
                signature.Certificated = true;

                //Set the graphics mode to sign detail
                signature.GraphicsMode = GraphicMode.SignDetail;

                //Set the signature content
                signature.NameLabel = "Signer:";
                signature.Name = "Gary";
                signature.ContactInfoLabel = "Phone:";
                signature.ContactInfo = "0123456";
                signature.DateLabel = "Date:";
                signature.Date = DateTime.Now;
                signature.LocationInfoLabel = "Location:";
                signature.LocationInfo = "USA";
                signature.ReasonLabel = "Reason:";
                signature.Reason = "I am the author";
                signature.DistinguishedNameLabel = "DN:";
                signature.DistinguishedName = signature.Certificate.IssuerName.Name;

                //Set the signature font
                signature.SignDetailsFont = new PdfTrueTypeFont(new Font("Arial Unicode MS",12f,FontStyle.Regular));

                //Set the document permission to forbid changes but allow form fill
                signature.DocumentPermissions = PdfCertificationFlags.ForbidChanges | PdfCertificationFlags.AllowFormFill;

                //Save to file
                doc.SaveToFile("TextSignature.pdf");
                doc.Close();
            }
        }
    }
Signer numériquement un PDF avec une image
Voici les étapes pour ajouter une signature d'image à un document PDF.
- Créez un objet PdfDocument et chargez un exemple de fichier PDF à l'aide de la méthode PdfDocument.LoadFromFile().
- Chargez un fichier de certificat .pfx lors de l'initialisation de l'objet PdfCertificate.
- Créez un objet PdfSignature, en spécifiant sa position et sa taille dans le document.
- Définissez le mode graphique de la signature sur SignImageOnly, qui n'affichera que l'image de la signature.
- Définissez l'image de la signature via la propriété PdfSignature.SignImageSource.
- Définissez les autorisations du document certifié sur ForbidChanges et AllowFormFill.
- Enregistrez le document dans un autre fichier à l'aide de la méthode PdfDocument.SaveToFile().
- C#
- VB.NET
using Spire.Pdf;
    using Spire.Pdf.Graphics;
    using Spire.Pdf.Security;
    using System.Drawing;

    namespace AddImageSignature
    {
        class Program
        {
            static void Main(string[] args)
            {
                //Create a PdfDocument object
                PdfDocument doc = new PdfDocument();

                //Load a sample PDF file
                doc.LoadFromFile("C:\\Users\\Administrator\\Desktop\\sample.pdf");

                //Load the certificate
                PdfCertificate cert = new PdfCertificate("C:\\Users\\Administrator\\Desktop\\MyCertificate.pfx", "e-iceblue");

                //Create a PdfSignature object and specify its position and size
                PdfSignature signature = new PdfSignature(doc, doc.Pages[doc.Pages.Count - 1], cert, "MySignature");
                RectangleF rectangleF = new RectangleF(doc.Pages[0].ActualSize.Width - 200, 150, 130, 130);
                signature.Bounds = rectangleF;
                signature.Certificated = true;

                //Set the graphics mode to image only
                signature.GraphicsMode = GraphicMode.SignImageOnly;

                //Set the sign image source
                signature.SignImageSource = PdfImage.FromFile("C:\\Users\\Administrator\\Desktop\\verified.png");

                //Set the signature font
                signature.SignDetailsFont = new PdfTrueTypeFont(new Font("Arial Unicode MS", 12f, FontStyle.Regular));

                //Set the document permission to forbid changes but allow form fill
                signature.DocumentPermissions = PdfCertificationFlags.ForbidChanges | PdfCertificationFlags.AllowFormFill;

                //Save to file
                doc.SaveToFile("ImageSignature.pdf");
                doc.Close();
            }
        }
    }
Signer numériquement un PDF avec du texte et une image
Voici les étapes pour signer numériquement un document PDF avec du texte et une image.
- Créez un objet PdfDocument et chargez un exemple de fichier PDF à l'aide de la méthode PdfDocument.LoadFromFile().
- Chargez un fichier de certificat .pfx lors de l'initialisation de l'objet PdfCertificate.
- Créez un objet PdfSignature, en spécifiant sa position et sa taille dans le document.
- Définissez le mode graphique de la signature sur SignImageAndSignDetail, qui affichera à la fois l'image et les détails de la signature.
- Définissez l'image de la signature via la propriété PdfSignature.SignImageSource et définissez les détails de la signature, y compris le nom, les informations de contact, la raison, la date, etc. via d'autres propriétés sous l'objet PdfSignature.
- Définissez les autorisations du document certifié sur ForbidChanges et AllowFormFill.
- Enregistrez le document dans un autre fichier à l'aide de la méthode PdfDocument.SaveToFile().
- C#
- VB.NET
using Spire.Pdf;
    using Spire.Pdf.Security;
    using System;
    using System.Drawing;
    using Spire.Pdf.Graphics;

    namespace AddTextAndImageSignature
    {
        class Program
        {
            static void Main(string[] args)
            {
                //Create a PdfDocument object
                PdfDocument doc = new PdfDocument();

                //Load a sample PDF file
                doc.LoadFromFile("C:\\Users\\Administrator\\Desktop\\sample.pdf");

                //Load the certificate
                PdfCertificate cert = new PdfCertificate("C:\\Users\\Administrator\\Desktop\\MyCertificate.pfx", "e-iceblue");

                //Create a PdfSignature object and specify its position and size
                PdfSignature signature = new PdfSignature(doc, doc.Pages[doc.Pages.Count - 1], cert, "MySignature");
                RectangleF rectangleF = new RectangleF(doc.Pages[0].ActualSize.Width - 320, 150, 260, 110);
                signature.Bounds = rectangleF;
                signature.Certificated = true;

                //Set the graphics mode to image and sign detail
                signature.GraphicsMode = GraphicMode.SignImageAndSignDetail;

                //Set the signature content
                signature.NameLabel = "Signer:";
                signature.Name = "Gary";
                signature.ContactInfoLabel = "Phone:";
                signature.ContactInfo = "0123456";
                signature.DateLabel = "Date:";
                signature.Date = DateTime.Now;
                signature.LocationInfoLabel = "Location:";
                signature.LocationInfo = "USA";
                signature.ReasonLabel = "Reason:";
                signature.Reason = "I am the author";
                signature.DistinguishedNameLabel = "DN:";
                signature.DistinguishedName = signature.Certificate.IssuerName.Name;

                //Set the signature image source
                signature.SignImageSource = PdfImage.FromFile("C:\\Users\\Administrator\\Desktop\\handSignature.png");

                //Set the signature font
                signature.SignDetailsFont = new PdfTrueTypeFont(new Font("Arial Unicode MS", 12f, FontStyle.Regular));

                //Set the document permission to forbid changes but allow form fill
                signature.DocumentPermissions = PdfCertificationFlags.ForbidChanges | PdfCertificationFlags.AllowFormFill;

                //Save to file
                doc.SaveToFile("TextAndImageSignature.pdf");
                doc.Close();
            }
        }
    }
Demander une licence temporaire
Si vous souhaitez supprimer le message d'évaluation des documents générés ou vous débarrasser des limitations de la fonction, veuillez demander une licence d'essai de 30 jours pour toi.
C#/VB.NET: Converter PDF para XPS ou XPS para PDF
Índice
Instalado via NuGet
PM> Install-Package Spire.PDF
Links Relacionados
XPS é um formato semelhante ao PDF, mas usa XML no layout, aparência e informações de impressão de um arquivo. O formato XPS foi desenvolvido pela Microsoft e é suportado nativamente pelos sistemas operacionais Windows. Se você deseja trabalhar com seus arquivos PDF em um computador com Windows sem instalar outro software, pode convertê-lo para o formato XPS. Da mesma forma, se você precisar compartilhar um arquivo XPS com um usuário de Mac ou usá-lo em vários dispositivos, é mais recomendável convertê-lo em PDF. Este artigo demonstrará como programaticamente converta PDF para XPS ou XPS para PDF usando Spire.PDF for .NET.
Instalar o Spire.PDF for .NET
Para começar, você precisa adicionar os arquivos DLL incluídos no pacote Spire.PDF for.NET como referências em seu projeto .NET. Os arquivos DLL podem ser baixados deste link ou instalados via NuGet.
PM> Install-Package Spire.PDF
Converta PDF para XPS em C# e VB.NET
O Spire.PDF for .NET oferece suporte à conversão de PDF para vários formatos de arquivo e, para obter a conversão de PDF para XPS, você só precisa de três linhas de código principal. A seguir estão as etapas detalhadas.
- Crie uma instância PdfDocument.
- Carregue um documento PDF de amostra usando o método PdfDocument.LoadFromFile().
- Converta o documento PDF em um arquivo XPS usando o método PdfDocument.SaveToFile (string filename, FileFormat.XPS).
- C#
- VB.NET
using Spire.Pdf;

    namespace ConvertPdfToXps
    {
        class Program
        {
            static void Main(string[] args)
            {
                //Create a PdfDocument instance
                PdfDocument pdf = new PdfDocument();

                //Load sample PDF document
                pdf.LoadFromFile("sample.pdf");

                //Save it to XPS format
                pdf.SaveToFile("ToXPS.xps", FileFormat.XPS);
                pdf.Close();
            }
        }
    }
Converter XPS para PDF em C# e VB.NET
A conversão de XPS para PDF também pode ser obtida com o Spire.PDF for .NET. Durante a conversão, você pode definir para manter a imagem de alta qualidade no arquivo PDF gerado usando o método PdfDocument.ConvertOptions.SetXpsToPdfOptions(). A seguir estão as etapas detalhadas.
- Crie uma instância PdfDocument.
- Carregue um arquivo XPS usando o método PdfDocument.LoadFromFile(string filename, FileFormat.XPS) ou o método PdfDocument.LoadFromXPS().
- Durante a conversão, defina as opções de conversão de XPS para PDF para manter imagens de alta qualidade usando o método PdfDocument.ConvertOptions.SetXpsToPdfOptions().
- Salve o arquivo XPS em um arquivo PDF usando o método PdfDocument.SaveToFile(string filename, FileFormat.PDF).
- C#
- VB.NET
using Spire.Pdf;

    namespace ConvertXPStoPDF
    {
        class Program
        {
            static void Main(string[] args)
            {
                //Create a PdfDocument instance
                PdfDocument pdf = new PdfDocument();

                //Load a sample XPS file
                pdf.LoadFromFile("Sample.xps", FileFormat.XPS);
                //pdf.LoadFromXPS("Sample.xps");

                //Keep high quality images when converting XPS to PDF
                pdf.ConvertOptions.SetXpsToPdfOptions(true);

                //Save the XPS file to PDF
                pdf.SaveToFile("XPStoPDF.pdf", FileFormat.PDF);
            }
        }
    }
Solicitar uma licença temporária
Se você deseja remover a mensagem de avaliação dos documentos gerados ou se livrar das limitações de função, por favor solicite uma licença de avaliação de 30 dias para você mesmo.