Section breaks in Microsoft Word are incredibly useful for controlling page layouts, headers, footers, and page numbering across different parts of your document. However, they can become frustrating when you no longer need them or they appear unexpectedly. Learning how to delete section breaks in Word is an essential skill that saves time and prevents formatting headaches.
In this guide, we'll walk you through every method to remove section breaks in Word safely, explain what happens to your formatting afterward, and troubleshoot common issues.
- What Is a Section Break in Word?
- Why You Might Want to Delete a Section Break
- Method 1: Delete a Section Break in Word Using Show/Hide
- Method 2: Remove All Section Breaks with Find and Replace
- Method 3: Delete Section Breaks Using VBA
- Method 4: Programmatically Delete Section Breaks Using C#
- Troubleshooting: Why Can't I Delete My Section Break?
What Is a Section Break in Word?
A section break is a formatting marker that divides your document into separate sections. Each section can have its own:
- Page orientation (portrait or landscape)
- Margins and paper size
- Headers and footers
- Page numbering sequence
- Column layouts
- Line numbering
Think of sections as separate mini-documents within one file. While this flexibility enables complex layouts, leftover or unintended section breaks often create unwanted blank pages or disrupt document flow.
Why You Might Want to Delete a Section Break
There are several common reasons to remove section breaks:
- Unwanted blank pages at the end of your document
- Formatting conflicts between sections
- Header and footer issues that won’t sync properly
- Simplifying a document that no longer needs complex sectioning
⚠️ Important Warning: Deleting a section break merges the sections on either side of the marker. The combined section will adopt the formatting settings of the section preceding the break. You may lose custom headers, footers, margin settings, or page orientation. Always review your document after deletion.
Method 1: Delete a Section Break in Word Using Show/Hide
This is the most straightforward for deleting individual section breaks. By revealing all formatting marks, you can see exactly where section breaks are and delete them like any other character.
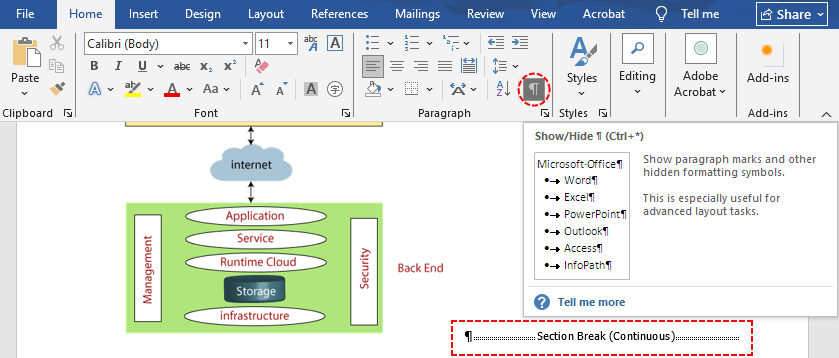
Step 1: Show Hidden Formatting Marks
Section breaks are invisible by default. To view them:
- Navigate to the Home tab on the Word ribbon
- Click the Show/Hide ¶ button (the paragraph symbol icon)
- Or use the keyboard shortcut Ctrl + Shift + * (asterisk) on Windows
All non-printing characters will appear, including section breaks, which display as a double-dotted line with the words Section Break clearly labeled.
Step 2: Locate the Section Break
Scroll through your document until you find the break you want to remove.
Step 3: Select and Delete the Break
- Place your cursor just before the section break.
- Press the Delete key on your keyboard.
- The section break disappears immediately, and the two sections merge into one.
Pro Tip: If the break won’t delete, try switching to Draft View (click the View tab and select Draft). This makes section breaks easier to select and delete.
Method 2: Remove All Section Breaks with Find and Replace
For documents with dozens of scattered section breaks, deleting them one by one is inefficient. Word’s built-in Find and Replace tool lets you remove all section breaks in Word in seconds.
Here’s how to eliminate section breaks in Word:
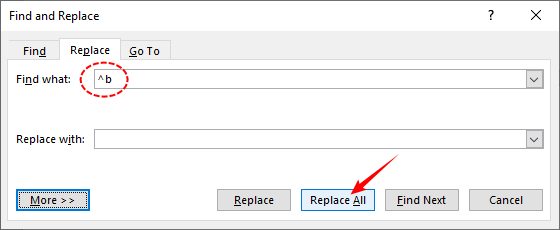
Step 1: Press Ctrl + H on Windows to open the Find and Replace dialog box.
Step 2: Click More >> to expand advanced search options.
Step 3: In the Find what field, click Special and select Section Break. The code ^b will be automatically populated in the field.
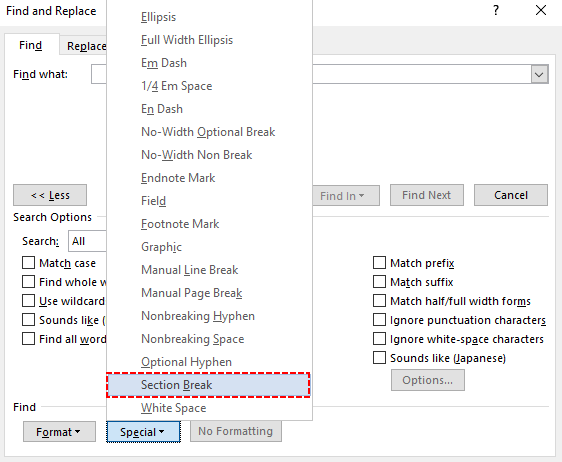
Step 4: Leave the Replace with field completely empty.
Step 5: Click Replace All to remove every section break in your document at once.
After mastering the Find and Replace method for removing section breaks, you can apply this same logic to other types of separators, such as how to remove all page breaks in Word.
Method 3: Delete Section Breaks Using VBA
In some cases, such as section breaks embedded near tables, inside protected content, or in documents converted from PDF, the standard Find and Replace method may fail to detect breaks. A VBA (Visual Basic for Applications) macro can reliably remove all section breaks in these edge cases and is ideal for automating the process across multiple files.
How to Use the VBA Macro:
- Press Alt + F11 to open the Visual Basic for Applications window
- In the top menu, click Insert > Module.
- Paste the following code to remove all section breaks:
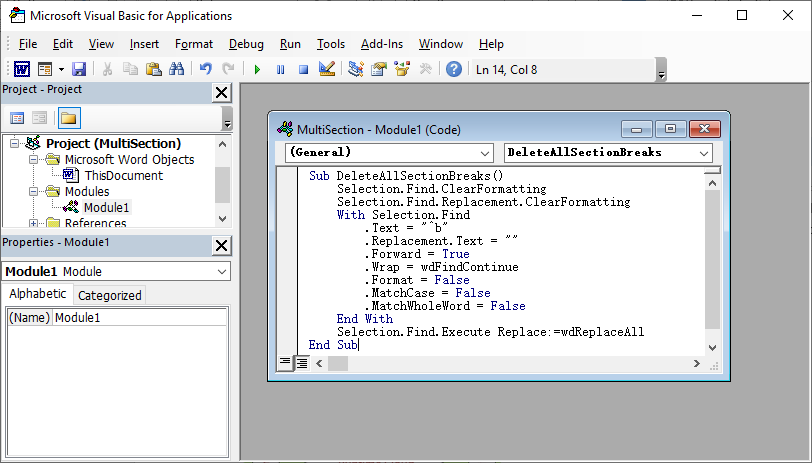
Sub DeleteAllSectionBreaks()
    Selection.Find.ClearFormatting
    Selection.Find.Replacement.ClearFormatting
    With Selection.Find
        .Text = "^b"
        .Replacement.Text = ""
        .Forward = True
        .Wrap = wdFindContinue
        .Format = False
        .MatchCase = False
        .MatchWholeWord = False
    End With
    Selection.Find.Execute Replace:=wdReplaceAll
End Sub
- Press F5 to run the code
When to Use VBA
- Find and Replace with ^b doesn't work
- You have hundreds of section breaks to remove
- Section breaks do not appear even with Show/Hide ¶ enabled
- You need to automate the process across multiple documents
Method 4: Programmatically Delete Section Breaks Using C#
For developers processing large volumes of Word documents, or for teams that need to automate document cleanup workflows, manual removal is impractical. The Free Spire.Doc for .NET library can be used for removing sections in Word without requiring Microsoft Office to be installed on the machine.
Prerequisites
- A .NET project (Console, ASP.NET, desktop, etc.)
- The Spire.Doc NuGet package installed (run Install-Package FreeSpire.Doc in the Package Manager Console, or install via NuGet Package Manager)
C# Code to Delete Section Breaks
using Spire.Doc;

namespace DeleteSectionBreak
{
    class Program
    {
        static void Main(string[] args)
        {
            // Define input and output file paths (adjust as needed)
            string inputFile = "MultiSection.docx";
            string outputFile = "RemoveSections.docx";


            // Load the document with proper resource management
            Document doc = new Document();
            doc.LoadFromFile(inputFile);

            // Use the first section as the master container for all content
            Section masterSection = doc.Sections[0];

            // Merge all other sections into the master section
            while (doc.Sections.Count > 1)
            {
                // The second section is always the next one to merge
                Section sectionToMerge = doc.Sections[1];

                // Clone every child object (paragraphs, tables, images, etc.)
                // and append them to the master section's body
                for (int i = 0; i < sectionToMerge.Body.ChildObjects.Count; i++)
                {
                    DocumentObject obj = sectionToMerge.Body.ChildObjects[i];
                    masterSection.Body.ChildObjects.Add(obj.Clone());
                }

                // Remove the now-empty section (breaks are automatically discarded)
                doc.Sections.Remove(sectionToMerge);
            }

            // Save the cleaned document
            doc.SaveToFile(outputFile, FileFormat.Docx);
        }
    }
}
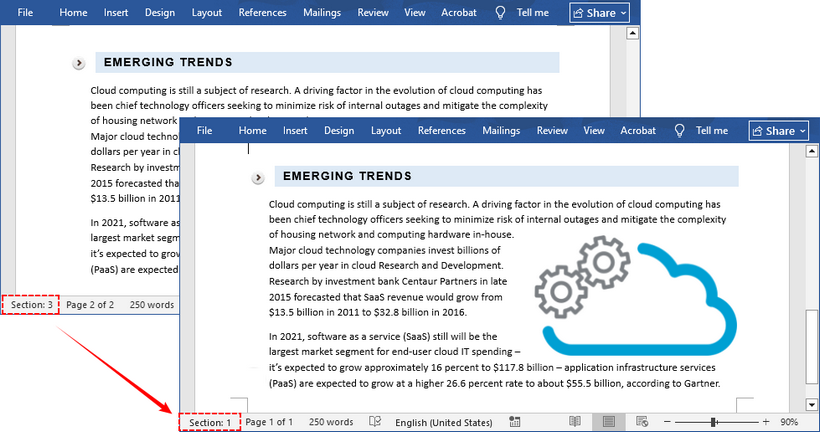
This example loads a Word document, copies content from all subsequent sections into the first section, and removes the empty sections—effectively eliminating every section break while preserving all text, images, and inline formatting.
Common Use Cases for This Method
- Pre-processing documents before converting them to PDFs to avoid pagination errors.
- Standardizing legacy documents that were built with inconsistent sectioning.
- Merging multiple documents into one continuous flow without inserting extra breaks.
If deleting section breaks merges sections, the opposite is splitting a document at every section break into separate files. Using Spire.Doc, you can clone each section and save it as an independent Word document.
Troubleshooting: Why Can't I Delete My Section Break?
If a section break seems impossible to remove, one of these common issues is usually the cause. Follow the corresponding fix to resolve it.
1. Track Changes is enabled
If Track Changes is turned on, Word may prevent you from fully deleting a section break, or it may reappear.
- Fix: Go to the Review tab, click Track Changes to turn it off, then accept all changes. Try deleting again.
2. You’re in an incompatible view mode
Section breaks are not visible in Read Mode or Web Layout.
- Fix: Switch to Print Layout view on the View tab, and make sure Show/Hide ¶ is active.
3. The document has editing restrictions
If the document is protected with editing restrictions, section breaks may be locked from deletion.
- Fix: Go to Review > Restrict Editing and click Stop Protection. You may need to enter the document password to unlock editing.
4. You’re not selecting the break marker correctly
It is easy to accidentally select adjacent text instead of the break itself.
- Fix: Click directly on the dotted section break line before pressing Delete. For extra precision, place your cursor at the very end of the text before the break, then press Delete (or Backspace, based on cursor position) repeatedly until the break is removed.
Final Thoughts
Deleting section breaks in Word is straightforward once you know how to locate and target them. For quick, targeted removals, the Show/Hide ¶ method is the most reliable choice. For bulk cleanup of large documents, the Find and Replace tool delivers fast results in one click. For edge cases and automated workflows, VBA macros and the Spire.Doc C# method turn a tedious task into a one-click operation.
The key rule to remember: the section break marker itself stores the formatting settings for the section that follows it. Always review your document layout after deletion to catch any unexpected changes to margins, headers, footers, or page orientation.
With a little practice, you will be able to manage section breaks confidently and take full control of your Word document layouts.
Frequently Asked Questions
What types of section breaks are there in Word?
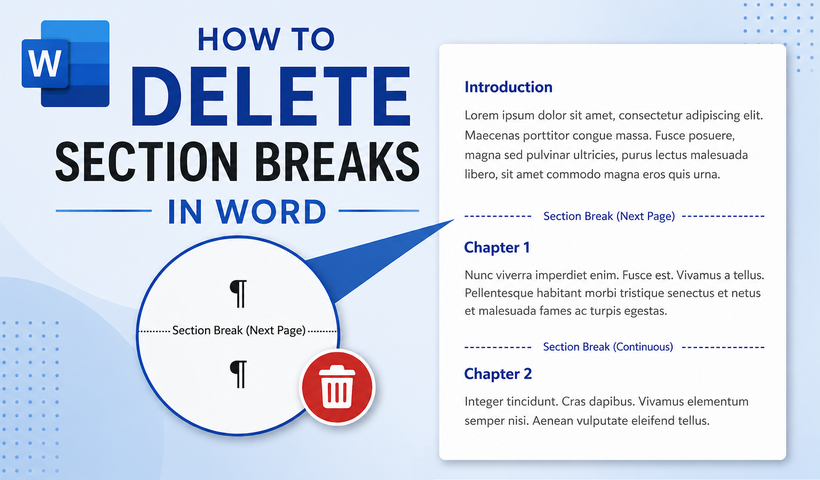
A: Word includes four main types of section breaks: Next Page, Continuous, Even Page, and Odd Page. Despite their different layout behaviors, all four are deleted using exactly the same methods covered in this guide. When revealed with Show/Hide, each type is labeled clearly on the dotted break line.
Q: Will deleting a section break delete my content?
A: No. Only the formatting marker is removed. All text, images, and other content remain fully intact — only the layout and formatting settings for the merged section may change.
Q: Can I delete section breaks in Word for Mac?
A: Yes. The Show/Hide button is located on the Home tab, and the Find and Replace method works identically.
Q: How do I fix formatting after removing a section break?
A: If headers, margins, or orientation change unexpectedly after deletion, go to the Layout tab to adjust page settings, or double-click the header/footer area to reapply your preferred formatting to the merged section.