Images make PowerPoint presentations more engaging, professional, and easier to understand. Screenshots, photos, and graphics help convey complex ideas visually, whether for business reports, classroom lectures, or project documentation. However, despite the benefits, images also increase the file size and cause issues when sharing via email.
Many users search for ways to compress images in PowerPoint. Follow this guide to learn three proven methods to reduce PPT file size efficiently while keeping quality.
- Why Compressing Images in PowerPoint Helps
- How to Compress Images in PowerPoint - 3 Effective Ways
- Extra Tips to Compress Images in PowerPoint
- Final Thoughts: Choose the Best Way for PowerPoint Image Compression
- FAQs
Why Compressing Images in PowerPoint Helps?
Large presentations are a common challenge in education, business, and software development. For example:
- Teachers and students sending lecture slides may encounter email attachment limits.
- Office workers sharing project presentations may experience slow uploads or download times.
- Developers or IT administrators managing multiple presentations may face storage or system performance issues.
In all these cases, compressing images in PowerPoint is an effective approach to make files smaller and easier to handle while maintaining visual quality.
How to Compress Images in PowerPoint?
In the following section, we'll share three basic to advanced techniques to compress images in PowerPoint. These methods help you reduce PPT file size, improve performance, and make your PPT easier to share via email or cloud platforms.
Below are the best possible ways to compress images in PowerPoint:
- Use PowerPoint's Built-in Compress Pictures Feature - Best for everyday users.
- Use an Online PowerPoint Compressor - Quick and requires no installation.
- Use C# Batch Compression for Multiple Files - Ideal for developers and enterprises.
Now, let's walk through each method one by one.
Compress Images in PowerPoint Using the Built-in Tool
To compress images in PowerPoint, you can use the built-in Compress Pictures tool. This method is available in the desktop version of PowerPoint and is particularly useful for users who are already working with PowerPoint and want to quickly optimize the file size of a single PowerPoint presentation.
Steps to Compress Images in PowerPoint:
-
Open your PowerPoint presentation in Microsoft PowerPoint.
-
Select any picture on a slide to enable the Picture Format tab.
-
Click Compress Pictures under the Adjust group.

-
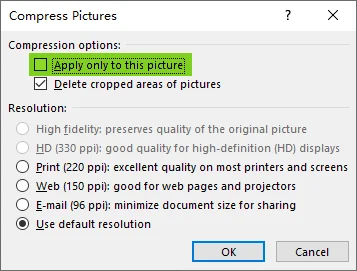
Uncheck Apply only to this picture to compress all images in the presentation.
-
Choose a resolution under Compression options:
- 220 ppi - Excellent quality for most prints and screens. Keeps images sharp with minimal quality loss.
- 150 ppi - Good for web pages and projectors. Balances image quality and file size.
- 96 ppi - Minimizes document size for sharing via email or online. Ideal for quick distribution.
-
Click OK and save the presentation.
Note:
- The Compress Pictures tool is only available in the desktop version of PowerPoint, not in the web version.
- You can delete image editing data to further shrink the PPT file, refer to the official Microsoft guide.
Pros of Built-in PowerPoint Image Compression:
- The official way to compress single or all images in PowerPoint
- Only PowerPoint, no extra software needed
- Useful for professional and casual users
Cons:
- It can be time-consuming when processing multiple presentations
You may also like: How to Convert Images to PPT - 3 Easy Methods
Compress Images in PowerPoint Using an Online Compressor
If you don't have access to the desktop PowerPoint application or prefer a cross-platform solution, you can compress images in PowerPoint online using a free web-based tool like Choladeck. This method is ideal for beginners or occasional users who simply want to shrink PPT file size without installing or configuring any software.
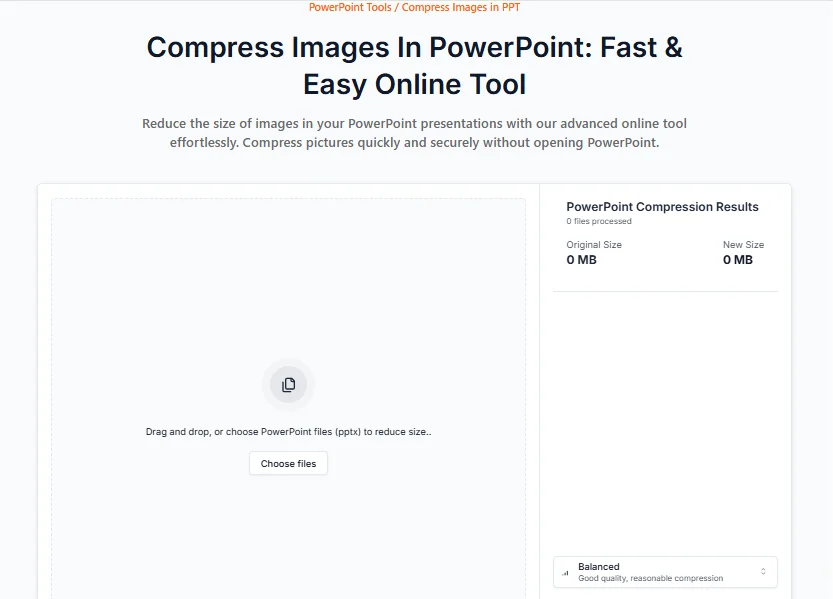
Steps to Compress Images in PowerPoint Online:
- Open the Choladeck online PowerPoint compressor in your browser.
- Select the desired compression level (Small Size, Balanced, or High Quality) for the images.
- Upload your PowerPoint file using drag-and-drop.
- Once the process is complete, download the optimized presentation with compressed images.
Pros of Online PowerPoint Image Compression:
- Completely free and very easy to use
- Simply use your browser-no installation needed
- Works on Windows, Mac, or mobile devices
Cons:
- Must be connected to the internet to use the service
- Potential privacy risks when uploading confidential files to online platforms
- Not ideal for batch compression of multiple presentations
Batch Compress PowerPoint Images Using C# Automation
If you're an enterprise, developer, or anyone who needs to process large volumes of PowerPoint presentations, batch compressing images with C# automation is the ideal solution. This method allows you to efficiently compress images across many presentations in just a few simple steps, saving time and effort compared to manual methods.
The stepwise guide below shows you how to automate the PowerPoint Image compression process using C# and Spire.Presentation - a .NET PowerPoint library for creating, updating, and converting PowerPoint presentations.
Steps to Batch Compress PowerPoint Images Using C#:
-
Install Spire.Presentation for .NET from NuGet:
-
Open your NuGet Package Manager Console.
-
Run the following command to install the Spire.Presentation library.
Install-Package Spire.Presentation
-
-
Write C# Code:
-
Create a new C# Console Application project.
-
Add the following code to perform batch compression of PowerPoint images.
using Spire.Presentation;
using System;
using System.IO;

namespace CompressImages
{
    internal class Program
    {
        static void Main(string[] args)
        {
            string inputDirectory = @"C:\path\to\input\folder";  // Specify your input directory
            string outputDirectory = @"C:\path\to\output\folder"; // Specify your output directory

            // Get all .pptx files in the input directory
            string[] files = Directory.GetFiles(inputDirectory, "*.pptx");

            foreach (string inputFile in files)
            {
                // Create output file path
                string outputFile = Path.Combine(outputDirectory, Path.GetFileName(inputFile));

                // Load presentation from file
                Presentation presentation = new Presentation();
                presentation.LoadFromFile(inputFile);

                // Iterate over all slides in the presentation
                foreach (ISlide slide in presentation.Slides)
                {
                    // Iterate over all shapes in each slide
                    foreach (IShape shape in slide.Shapes)
                    {
                        // Check if the shape is an image
                        if (shape is SlidePicture)
                        {
                            SlidePicture ps = shape as SlidePicture;
                            // Compress the image: remove cropped areas (true) and set target resolution to 150 DPI
                            ps.PictureFill.CompressImage(true, 150f);
                        }
                    }
                }

                // Save the compressed presentation to the output file
                presentation.SaveToFile(outputFile, FileFormat.Pptx2013);
                Console.WriteLine($"Compressed: {inputFile} -> {outputFile}");
            }

            Console.WriteLine("Batch compression completed.");
        }
    }
}
-
-
Press F5 to run the Code. You will find the optimized presentations with compressed images under the specified output directory.
Notes:
- You need to modify the inputDirectory and outputDirectory variables in this example to point to the appropriate folders on your system.
- This example assumes .pptx files. If you also have .ppt files, you can adjust the file filter in Directory.GetFiles() to include them as well.
- The target resolution in this case is set to 150 DPI (suitable for web display). You can change this to any desired value.
Pros of Batch Compression Using C#:
- Ideal for developers, IT administrators, or enterprises
- Allows handling of large numbers of presentations at once
- Customizable options for image resolution and compression settings
Cons:
- Requires programming knowledge and setup
- Setup is more complex than manual methods
Reference: Spire.Presentation Official Guide
Extra Tips to Compress Images in PowerPoint
- Delete Unused Images: Remove any images that aren't essential to reduce overall file size.
- Use Vector Graphics: Whenever possible, opt for vector-based graphics (like SVGs), which tend to have smaller file sizes than raster images.
- Resize Before Inserting: Resize images in a photo editing tool before inserting them into PowerPoint to avoid large, unneeded files.
- Embed Fonts Wisely: If you use custom fonts, make sure you embed them only when necessary to avoid bloating your file size.
Final Thoughts: Choose the Best Way for PowerPoint Image Compression
Compressing images in PowerPoint doesn't have to be complicated. The right method mainly depends on how many files you have and how often you need to reduce PPT file size.
Here's a quick way to decide:
- Working on one presentation only?
Use PowerPoint's built-in Compress Pictures tool. It's fast, reliable, and requires no extra tools. - Need a quick fix without installing software? Try an online PowerPoint image compressor. It's convenient for occasional use or when you're on a different device.
- Managing dozens or hundreds of PPT files?
Use C# Automation for batch compression. This approach saves significant time and is ideal for developers, IT teams, and enterprise workflows.
By choosing the right method, you can easily compress images in PowerPoint, shrink PPT file size, speed up sharing, and keep presentations professional without noticeable quality loss.
Looking for more high-quality PowerPoint tutorials? Check out our free PPT resources.
FAQs
Q1: What is the easiest way to compress images in PowerPoint and reduce file size?
A1: The easiest way is to use PowerPoint's Compress Pictures tool. Select any image → Picture Format → Compress Pictures → Uncheck Apply only to this picture → Choose Resolution → Click OK → Save. This can instantly optimize your PPT file size.
Q2: Does compressing images in PowerPoint reduce quality?
A2: Only slightly if you choose the right resolution. For most presentations, 150 ppi keeps images clear while significantly reducing file size. Viewers usually won't notice any difference on screens or projectors.
Q3: Can I compress images in PowerPoint online without installing software?
A3: Yes. You can use an online PowerPoint compressor to upload and optimize your PPT or PPTX file directly in your browser. This method is great for quick tasks but may not be suitable for confidential or sensitive files.
Q4: What is the best way to batch compress images in multiple PowerPoint presentations?
A4: For multiple files, C# automation is the most efficient solution. They allow you to compress images across dozens or hundreds of presentations automatically, saving hours of manual work.
Q5: Why is my PowerPoint file still large after compressing images?
Images aren't the only factor affecting size. Your PPT may still be large due to:
- Embedded fonts
- Videos or audio files
- Cropped image data not deleted
- Unused slides or media
Try deleting unused assets and enabling Delete cropped areas of pictures during compression for better results.