
Blank rows are more than a minor annoyance in Excel; they disrupt data analysis, break PivotTables, and create unprofessional, hard-to-navigate spreadsheets. Whether you’re cleaning imported data, organizing reports, or preparing spreadsheets for collaboration, removing blank lines in Excel is an essential skill.
This guide provides five reliable methods to delete blank rows in Excel, suitable for all skill levels and scenarios, from quick manual fixes to fully automated solutions.
- Method 1: Using Filter & Delete (Most User-Friendly)
- Method 2: Using "Go To Special" (Fastest for Large Datasets)
- Method 3: Using Power Query (Non-Destructive & Reusable)
- Method 4: Using VBA Macro (Automated for Advanced Users)
- Method 5: Using Python Automation (For Developers & Batch Processing)
Why You Should Eliminate Empty Rows in Excel
Deleting empty lines in Excel is crucial for:
- Accurate Data Analysis: Functions like SUM, AVERAGE, and VLOOKUP can deliver incorrect results if they include blank cells in their range.
- Functional PivotTables: PivotTables will often count blank rows as data items, cluttering your reports and skewing your insights.
- Clean Data Visualization: Charts and graphs will include empty spaces where blank rows exist, making them difficult to read and interpret.
- Professionalism & Readability: A tight, contiguous dataset is easier to navigate and work with.
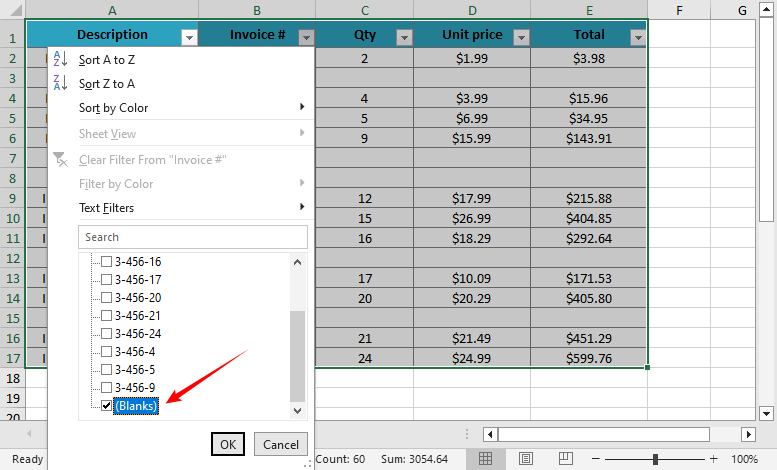
Method 1: Using Filter & Delete (Most User-Friendly)
The Filter method works for all Excel versions and is ideal for datasets with mixed blank/non-blank rows:
- Select your data range (include headers if applicable).
- Go to the Data tab → Click the Filter button (funnel icon).
- Click the dropdown arrow on any column header → Uncheck "Select All" → Check Blanks.
- Excel will hide non-blank rows, and then select all visible blank rows.
- Right-click → Delete Row → Confirm.
- Click the Filter button again to restore visibility.
- ✔ Pros: Simple and safe; works for most datasets.
- ✘ Cons: Manual; doesn't handle rows with partial data.
Best For: Quick, one-time cleanup of full empty rows.
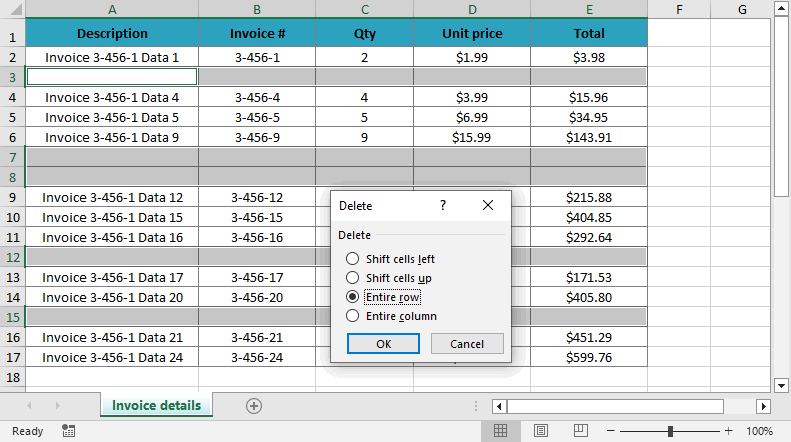
Method 2: Using "Go To Special" (Fastest for Large Datasets)
This keyboard shortcut method is a power user favorite. It skips manual selection and targets blank rows in seconds:
- Select your data range (or press Ctrl+A/⌘+A to select the entire sheet).
- Press Ctrl+G (Windows) or ⌘+G (Mac) to open the Go To dialog.
- Click Special → Select Blanks → Click OK.
- All blank cells in your range will be selected.
- Right-click any selected cell → Delete → Choose Entire Row → Click OK.

- ✔ Pros: 10x faster than filtering; works for 1000+ rows.
- ✘ Cons: Risky; can delete rows with partial data.
Best For: Quickly cleaning large datasets where you are sure the blank cells indicate entirely useless rows.
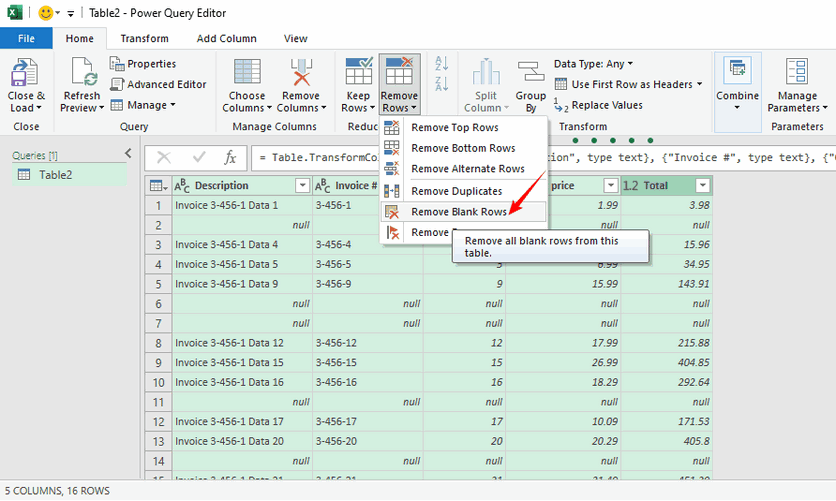
Method 3: Using Power Query (Non-Destructive & Reusable)
Power Query (Get & Transform Data) is the best choice for repeated data cleaning tasks. It preserves your original data and automates updates.
- Select your data range → Go to the Data tab → Click From Table/Range.
- Excel will convert your data to a table (confirm with "My table has headers" if applicable).
- In the Power Query Editor: Select all columns (hold Ctrl/⌘ and click column headers).
- Go to the Home tab → Click Remove Rows → Select Remove Blank Rows.
- Click Close & Load (top-left) to export the cleaned data to a new worksheet.

- ✔ Pros: Non-destructive; reusable (refresh with new data); handles large datasets efficiently.
- ✘ Cons: Not available in Excel 2013 or earlier.
Best For: Recurring data cleaning tasks, large datasets, and creating a repeatable process.
You may also like: How to Remove Duplicate Rows from Excel - 6 Easy Ways
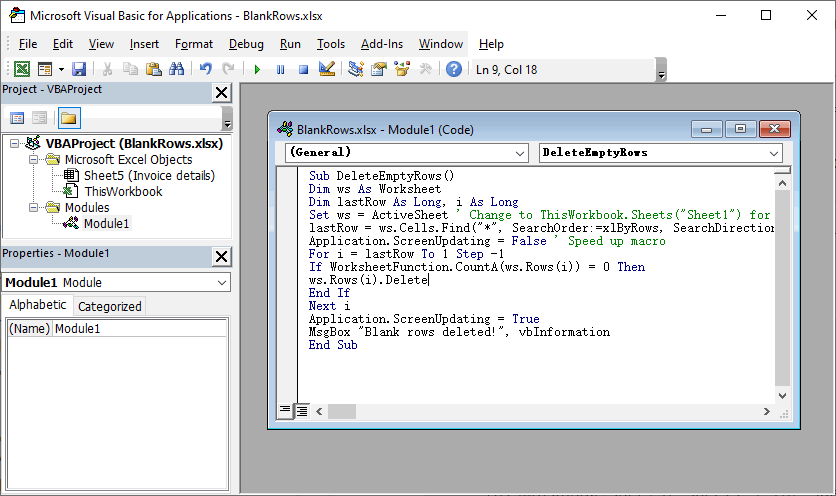
Method 4: Using VBA Macro (Automated for Advanced Users)
For ultimate automation within Excel, a VBA macro can delete blank rows with a single click.
- Press Alt+F11 (Windows) or ⌘+F11 (Mac) to open the VBA Editor.
- Right-click your workbook → Insert → Module.
- Copy and paste the following code into the module:
- Press F5 to run the macro. Always save a backup of your workbook before running macros, as the action cannot be undone.
Sub DeleteFullyBlankRows()
Dim ws As Worksheet
Dim lastRow As Long, i As Long
Set ws = ActiveSheet ' Change to ThisWorkbook.Sheets("Sheet1") for specific sheet
lastRow = ws.Cells.Find("*", SearchOrder:=xlByRows, SearchDirection:=xlPrevious).Row
Application.ScreenUpdating = False ' Speed up macro
For i = lastRow To 1 Step -1
If WorksheetFunction.CountA(ws.Rows(i)) = 0 Then
ws.Rows(i).Delete
End If
Next i
Application.ScreenUpdating = True
MsgBox "Blank rows deleted!", vbInformation
End Sub
This code checks every cell in a row to ensure it’s blank (avoids deleting rows with partial data)
- ✔ Pros: Automated; handles complex scenarios; customizable.
- ✘ Cons: Requires basic VBA knowledge; no undo (backup first).
Best For: Advanced users who need to automate the process for regular use.
Method 5: Using Python Automation (For Developers & Batch Processing)
For developers, data engineers, or anyone who needs to integrate Excel cleaning into an automated script or application, using Python is a powerful option. The Spire.XLS for Python library provides a robust API to process Excel files, including removing blank rows, copying rows/columns, applying conditional formatting, and adding pivot tables etc.
- First, install the library via pip:
- Write the Python code to delete blank rows in Excel:
pip install Spire.XLS
from spire.xls import *
from spire.xls.common import *

# Create a Workbook object
workbook = Workbook()
# Load an Excel file
workbook.LoadFromFile("Input1.xlsx")

# Get the first worksheet
sheet = workbook.Worksheets[0]

# Find and delete blank rows from the worksheet
for i in range(sheet.Rows.Length - 1, -1, -1):
    if sheet.Rows[i].IsBlank:
        sheet.DeleteRow(i + 1)

# Save the result file
workbook.SaveToFile("DeleteBlankRows.xlsx", ExcelVersion.Version2016)
workbook.Dispose()
This script loads an Excel file, detects empty rows via the IsBlank property, and then deletes them with the DeleteRows() method.
(Optional) If you need to delete blank columns as well, refer to:
# Delete blank columns from the worksheet
for j in range(sheet.Columns.Length - 1, -1, -1):
    if sheet.Columns[j].IsBlank:
        sheet.DeleteColumn(j + 1)
- ✔ Pros: Automates batch processing; integrates with Python workflows; highly scalable.
- ✘ Cons: Requires basic Python knowledge.
Best For: Automating the cleaning of multiple Excel files, integrating into a data processing pipeline, or server-side applications where Microsoft Excel is not installed.
Final Thoughts
Removing blank rows in Excel is a foundational skill for clean data management. From the straightforward Filter method to the powerful automation of Python, there is a solution for every user and scenario. Always remember to back up your data before trying a new method, especially those involving VBA or Go To Special. For recurring tasks, investing time in learning Power Query or writing a script will save you countless hours in the long run.
For more Excel tips, check out our guides on drop-down lists and conditional formatting.
FAQs about Deleting Excel Blank Rows
Q1: What's the difference between "truly blank" and "almost blank" rows?
- Truly blank rows: Contain no data, formulas, or hidden characters in any cell.
- Almost blank rows: Contain spaces, non-breaking spaces (ASCII 160), or formulas returning empty strings
Methods like Power Query and VBA (with specific logic) are better at identifying and handling these "almost blank" rows.
Q2: How to delete blank rows in Google Sheets?
The process is similar:
- Select your data range.
- Click Data > Create a filter.
- Click the filter icon in a column, and uncheck "Select all," then check "Blanks."
- Select the visible blank rows, right-click, and choose Delete rows.
- Turn off the filter.
Q3: How do I automatically delete blank rows when new data is added?
For recurring tasks (e.g., daily data imports), use:
- Power Query: Set up a query to "Remove Blank Rows" (Method 3) → Click Refresh All whenever new data is added to update the cleaned sheet.
- VBA Macro: Assign the DeleteFullyBlankRows macro (Method 4) to a button in your sheet—click it to run the deletion automatically.
Q4: When should I use Python over VBA?
Choose Python when:
- You are processing files on a computer without Excel installed (e.g., a server).
- You need to batch process hundreds of Excel files automatically.
Choose VBA when:
- The entire workflow happens within Excel.
- You need a simple, one-click solution inside the Excel application.