
Java (485)
HTML (Hypertext Markup Language) has become one of the most commonly used text markup languages on the Internet, and nearly all web pages are created using HTML. While HTML contains numerous tags and formatting information, the most valuable content is typically the visible text. It is important to know how to extract the text content from an HTML file when users intend to utilize it for tasks such as editing, AI training, or storing in databases. This article will demonstrate how to extract text from HTML using Spire.Doc for Java within Java programs.
Install Spire.Doc for Java
First of all, you're required to add the Spire.Doc.jar file as a dependency in your Java program. The JAR file can be downloaded from this link. If you use Maven, you can easily import the JAR file in your application by adding the following code to your project's pom.xml file.
<repositories>
    <repository>
        <id>com.e-iceblue</id>
        <name>e-iceblue</name>
        <url>https://repo.e-iceblue.com/nexus/content/groups/public/</url>
    </repository>
</repositories>
<dependencies>
    <dependency>
        <groupId>e-iceblue</groupId>
        <artifactId>spire.doc</artifactId>
        <version>14.7.0</version>
    </dependency>
</dependencies>
Extract Text from HTML File
Spire.Doc for Java supports loading HTML files using the Document.loadFromFile(fileName, FileFormat.Html) method. Then, users can use Document.getText() method to get the text that is visible in browsers and write it to a TXT file. The detailed steps are as follows:
- Create an object of Document class.
- Load an HTML file using Document.loadFromFile(fileName, FileFormat.Html) method.
- Get the text of the HTML file using Document.getText() method.
- Write the text to a TXT file.
- Java
import com.spire.doc.Document;
import com.spire.doc.FileFormat;

import java.io.FileWriter;
import java.io.IOException;

public class ExtractTextFromHTML {
    public static void main(String[] args) throws IOException {

        //Create an object of Document class
        Document doc = new Document();

        //Load an HTML file
        doc.loadFromFile("Sample.html", FileFormat.Html);

        //Get text from the HTML file
        String text = doc.getText();

        //Write the text to a TXT file
        FileWriter fileWriter = new FileWriter("HTMLText.txt");
        fileWriter.write(text);
        fileWriter.close();
    }
}
HTML Web Page:
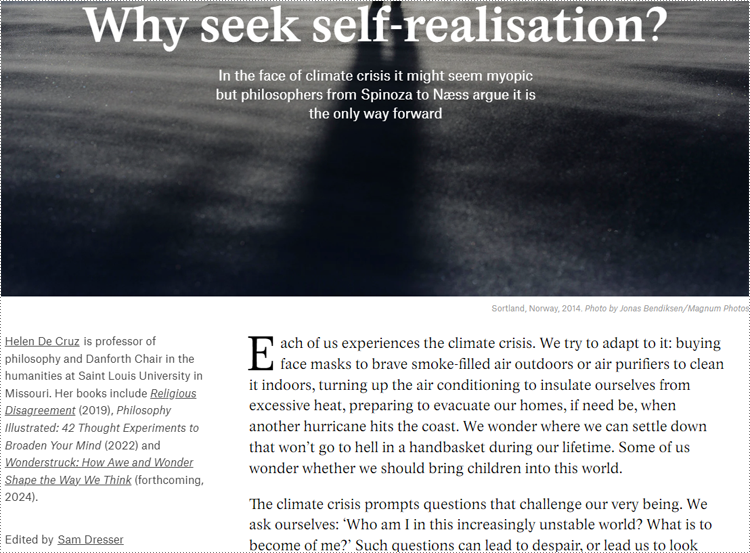
Extracted Text:
Extract Text from URL
To extract text from a URL, users need to create a custom method to retrieve the HTML file from the URL and then extract the text from it. The detailed steps are as follows:
- Create an object of Document class.
- Use the custom method readHTML() to get the HTML file from a URL and return the file path.
- Load the HTML file using Document.loadFromFile(filename, FileFormat.Html) method.
- Get the text from the HTML file using Document.getText() method.
- Write the text to a TXT file.
- Java
import com.spire.doc.Document;
import com.spire.doc.FileFormat;

import java.io.*;
import java.net.URL;
import java.net.URLConnection;

public class ExtractTextFromURL {
    public static void main(String[] args) throws IOException {
        //Create an object of Document
        Document doc = new Document();

        //Call the custom method to load the HTML file from a URL
        doc.loadFromFile(readHTML("https://aeon.co/essays/how-to-face-the-climate-crisis-with-spinoza-and-self-knowledge", "output.html"), FileFormat.Html);

        //Get the text from the HTML file
        String urlText = doc.getText();

        //Write the text to a TXT file
        FileWriter fileWriter = new FileWriter("URLText.txt");
        fileWriter.write(urlText);
    }

    public static String readHTML(String urlString, String saveHtmlFilePath) throws IOException {

        //Create an object of URL class
        URL url = new URL(urlString);

        //Open the URL
        URLConnection connection = url.openConnection();

        //Save the url as an HTML file
        BufferedReader reader = new BufferedReader(new InputStreamReader(connection.getInputStream(), "UTF-8"));
        BufferedWriter writer = new BufferedWriter(new OutputStreamWriter(new FileOutputStream(saveHtmlFilePath), "UTF-8"));
        String line;
        while ((line = reader.readLine()) != null) {
            writer.write(line);
            writer.newLine();
        }

        reader.close();
        writer.close();

        //Return the file path of the saved HTML file
        return saveHtmlFilePath;
    }
}
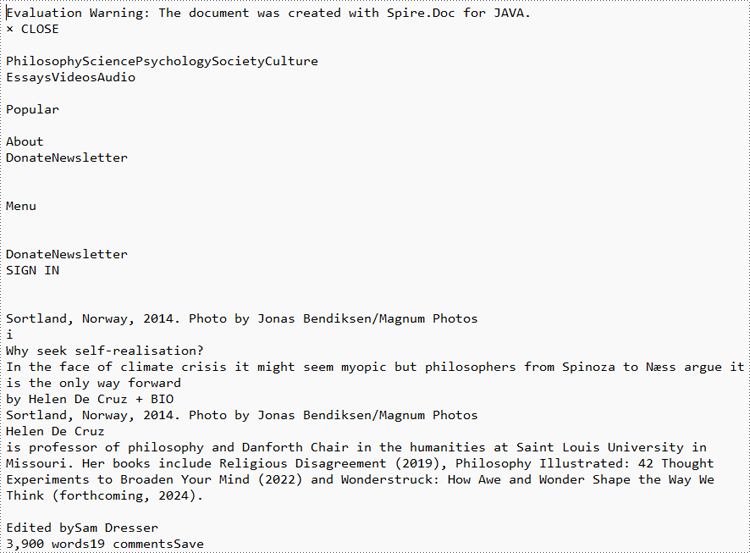
URL Web Page:

Extracted Text:
Apply for a Temporary License
If you'd like to remove the evaluation message from the generated documents, or to get rid of the function limitations, please request a 30-day trial license for yourself.
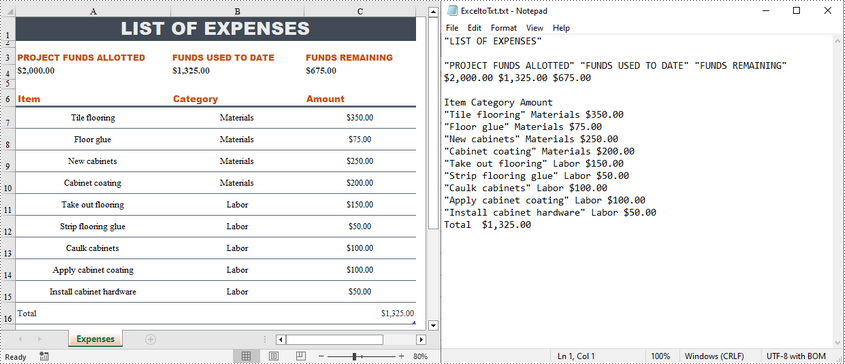
Converting Excel files to text files has several benefits. For example, it reduces file size, making data easier to store and share. In addition, text files are usually simple in structure, and converting Excel to text can make the document more straightforward for certain tasks. This article will demonstrate how to programmatically convert Excel to TXT format using Spire.XLS for Java.
Install Spire.XLS for Java
First of all, you're required to add the Spire.Xls.jar file as a dependency in your Java program. The JAR file can be downloaded from this link. If you use Maven, you can easily import the JAR file in your application by adding the following code to your project's pom.xml file.
<repositories>
    <repository>
        <id>com.e-iceblue</id>
        <name>e-iceblue</name>
        <url>https://repo.e-iceblue.com/nexus/content/groups/public/</url>
    </repository>
</repositories>
<dependencies>
    <dependency>
        <groupId>e-iceblue</groupId>
        <artifactId>spire.xls</artifactId>
        <version>16.6.5</version>
    </dependency>
</dependencies>
Create Excel to TXT in Java
Spire.XLS for Java offers the Worksheet.saveToFile(String fileName, String separator, java.nio.charset.Charset encoding) method to convert a specified worksheet to a txt file. The following are the detailed steps.
- Create a Workbook instance.
- Load a sample Excel file using Workbook.loadFromFile() method.
- Get a specified worksheet by its index using Workbook.getWorksheets().get() method.
- Convert the Excel worksheet to a TXT file using Worksheet.saveToFile() method.
- Java
import com.spire.xls.*;

import java.nio.charset.Charset;

public class toText {
    public static void main(String[] args) {
        //Create a Workbook object
        Workbook workbook = new Workbook();

        //Load a sample Excel file
        workbook.loadFromFile("sample.xlsx");

        //Get the first worksheet
        Worksheet worksheet = workbook.getWorksheets().get(0);

        //Save the worksheet as a txt file
        Charset charset = Charset.forName("utf8");
        worksheet.saveToFile("ExceltoTxt.txt", " ", charset);

    }
}
Apply for a Temporary License
If you'd like to remove the evaluation message from the generated documents, or to get rid of the function limitations, please request a 30-day trial license for yourself.
The background of a PowerPoint presentation sets the tone and mood of the presentation and can greatly enhance the aesthetic and impact of the slides. There are five types of backgrounds available in PowerPoint presentations, solid color backgrounds, gradient backgrounds, picture backgrounds, texture backgrounds, and patterned backgrounds. They each apply to different usage scenarios. For example, a professional business presentation may benefit from a clean and simple solid color background, while a creative presentation may use inspiring and interesting picture backgrounds to capture the audience's attention. This article is going to show how to set backgrounds for PowerPoint presentations through Java programs using Spire.Presentation for Java.
- Set a Solid Color Background for a PowerPoint Presentation
- Set a Gradient Background for a PowerPoint Presentation
- Set a Picture Background for a PowerPoint Presentation
- Set a Texture Background for a PowerPoint Presentation
- Set a Pattern Background for a PowerPoint Presentation
Install Spire.Presentation for Java
First of all, you're required to add the Spire.Presentation.jar file as a dependency in your Java program. The JAR file can be downloaded from this link. If you use Maven, you can easily import the JAR file in your application by adding the following code to your project's pom.xml file.
<repositories>
    <repository>
        <id>com.e-iceblue</id>
        <name>e-iceblue</name>
        <url>https://repo.e-iceblue.com/nexus/content/groups/public/</url>
    </repository>
</repositories>
<dependencies>
    <dependency>
        <groupId>e-iceblue</groupId>
        <artifactId>spire.presentation</artifactId>
        <version>11.5.1</version>
    </dependency>
</dependencies>
Set a Solid Color Background for a PowerPoint Presentation
Before customizing the background, it is necessary to use the SlideBackground.setType(BackgroundType.CUSTOM) method to allow the customization of the background. Then, the background type can be set to solid color background using the SlideBackground.getFill().setFillType(FillFormatType.SOLID) method, and the color can be set using the FillFormat.getSolidColor().setColor() method.
The detailed steps are as follows:
- Create an object of Presentation class.
- Load a PowerPoint presentation using Presentation.loadFromFile() method.
- Get the first slide using Presentation.getSlides().get() method.
- Get the background of the slide using ISlide.getSlideBackground() method.
- Set the background type to custom background to enable the customization of the background using SlideBackground.setType(BackgroundType.CUSTOM) method.
- Set the fill type of the background to solid color using SlideBackground.getFill().setFillType(FillFormatType.SOLID) method.
- Customize the background color using FillFormat.getSolidColor().setColor() method.
- Save the presentation using Presentation.saveToFile() method.
- Java
import com.spire.presentation.FileFormat;
import com.spire.presentation.ISlide;
import com.spire.presentation.Presentation;
import com.spire.presentation.SlideBackground;
import com.spire.presentation.drawing.BackgroundType;
import com.spire.presentation.drawing.FillFormat;
import com.spire.presentation.drawing.FillFormatType;
import org.w3c.dom.css.RGBColor;

import java.awt.*;

public class SolidColor {
    public static void main(String[] args) throws Exception {
        //Create an object of Presentation class
        Presentation ppt = new Presentation();

        //Load a PowerPoint presentation
        ppt.loadFromFile("Sample.pptx");

        //Get the first slide
        ISlide slide = ppt.getSlides().get(0);

        //Get the background
        SlideBackground background = slide.getSlideBackground();

        //Set the background type to custom
        background.setType(BackgroundType.CUSTOM);

        //Set the background fill type to solid color
        background.getFill().setFillType(FillFormatType.SOLID);

        //Set the background color
        FillFormat fillFormat = background.getFill();
        fillFormat.getSolidColor().setColor(new Color(199, 213, 237));

        //Save the presentation
        ppt.saveToFile("SolidColorBackground.pptx", FileFormat.AUTO);
    }
}

Set a Gradient Background for a PowerPoint Presentation
Gradient background can be set by setting the background type to Gradient Background and then setting the gradient type, color, and angle. The detailed steps are as follows:
- Create an object of Presentation class.
- Load a PowerPoint presentation using Presentation.loadFromFile() method.
- Get the first slide using Presentation.getSlides().get() method.
- Get the background of the slide using ISlide.getSlideBackground() method.
- Set the background type to custom background to enable the customization of the background using SlideBackground.setType(BackgroundType.CUSTOM) method.
- Set the fill type of the background to gradient using SlideBackground.getFill().setFillType(FillFormatType.GRADIENT) method.
- Set the gradient type to linear gradient using GradientFillFormat.setGradientShape(GradientShapeType.LINEAR) method.
- Add the gradient stops and set the gradient colors using GradientFillFormat.getGradientStops().append() method.
- Set the angle of the linear gradient using GradientFillFormat.getLinearGradientFill().setAngle() method.
- Save the presentation using Presentation.saveToFile() method.
- Java
import com.spire.presentation.FileFormat;
import com.spire.presentation.ISlide;
import com.spire.presentation.Presentation;
import com.spire.presentation.SlideBackground;
import com.spire.presentation.drawing.*;

import java.awt.*;

public class Gradient {
    public static void main(String[] args) throws Exception {
        //Create an object of Presentation class
        Presentation ppt = new Presentation();

        //Load a PowerPoint presentation
        ppt.loadFromFile("Sample.pptx");

        //Get the first slide
        ISlide slide = ppt.getSlides().get(0);

        //Get the background
        SlideBackground background = slide.getSlideBackground();

        //Set the background type to custom
        background.setType(BackgroundType.CUSTOM);

        //Set the background fill type to gradient color
        background.getFill().setFillType(FillFormatType.GRADIENT);

        //Set the gradient type to linear
        GradientFillFormat gradient = background.getFill().getGradient();
        gradient.setGradientShape(GradientShapeType.LINEAR);

        //Add gradient stops and set the colors
        gradient.getGradientStops().append(0f, new Color(230, 255, 255));
        gradient.getGradientStops().append(0.5f, new Color(255, 255, 255));
        gradient.getGradientStops().append(1f, new Color(199, 213, 237));

        //Set the angle of the linear gradient
        gradient.getLinearGradientFill().setAngle(90);

        //Save the presentation
        ppt.saveToFile("GradientBackground.pptx", FileFormat.AUTO);
    }
}

Set a Picture Background for a PowerPoint Presentation
To set the picture background, set the background type to picture, set the picture fill type to stretch fill, and then set the background image. The detailed steps are as follows:
- Create an object of Presentation class.
- Load a PowerPoint presentation using Presentation.loadFromFile() method.
- Load a picture using Presentation.getImages().append() method.
- Get the first slide using Presentation.getSlides().get() method.
- Get the background of the slide using ISlide.getSlideBackground() method.
- Set the background type to custom background to enable the customization of the background using SlideBackground.setType(BackgroundType.CUSTOM) method.
- Set the fill type of the background to picture using SlideBackground.getFill().setFillType(FillFormatType.PICTURE) method.
- Set the picture fill type to stretch fill using PictureFillFormat.setFillType(PictureFillType.STRETCH) method.
- Set the transparency of the background using PictureFillFormat.getPicture().setTransparency() method.
- Set the background image using PictureFillFormat.getPicture().setEmbedImage() method.
- Save the presentation using Presentation.saveToFile() method.
- Java
import com.spire.presentation.FileFormat;
import com.spire.presentation.ISlide;
import com.spire.presentation.Presentation;
import com.spire.presentation.SlideBackground;
import com.spire.presentation.drawing.*;

import javax.imageio.ImageIO;
import java.awt.*;
import java.io.File;

public class Picture {
    public static void main(String[] args) throws Exception {
        //Create an object of Presentation class
        Presentation ppt = new Presentation();

        //Load a PowerPoint presentation
        ppt.loadFromFile("Sample.pptx");

        //Load a picture
        IImageData image = ppt.getImages().append(ImageIO.read(new File("background.jpg")));

        //Get the first slide
        ISlide slide = ppt.getSlides().get(0);

        //Get the background
        SlideBackground background = slide.getSlideBackground();

        //Set the background type to custom
        background.setType(BackgroundType.CUSTOM);

        //Set the background fill type to picture
        background.getFill().setFillType(FillFormatType.PICTURE);

        //Set the picture fill type to stretch
        PictureFillFormat pictureFillFormat = background.getFill().getPictureFill();
        pictureFillFormat.setFillType(PictureFillType.STRETCH);

        //Set the transparency of the background
        pictureFillFormat.getPicture().setTransparency(50);

        //Set the background picture
        pictureFillFormat.getPicture().setEmbedImage(image);

        //Save the presentation
        ppt.saveToFile("PictureBackground.pptx", FileFormat.AUTO);
    }
}

Set a Texture Background for a PowerPoint Presentation
Setting a texture background is similar to setting a picture background. The difference is that the image fill type needs to be changed to a tiled fill and the texture alignment needs to be set. The detailed steps are as follows:
- Create an object of Presentation class.
- Load a PowerPoint presentation using Presentation.loadFromFile() method.
- Load the texture using Presentation.getImages().append() method.
- Get the first slide using Presentation.getSlides().get() method.
- Get the background of the slide using ISlide.getSlideBackground() method.
- Set the background type to custom background to enable the customization of the background using SlideBackground.setType(BackgroundType.CUSTOM) method.
- Set the fill type of the background to picture using SlideBackground.getFill().setFillType(FillFormatType.PICTURE) method.
- Set the picture fill type to tile fill using PictureFillFormat.setFillType(PictureFillType.TILE) method.
- Set the transparency of the background using PictureFillFormat.getPicture().setTransparency() method.
- Set the background texture using PictureFillFormat.getPicture().setEmbedImage() method.
- Save the presentation using Presentation.saveToFile() method.
- Java
import com.spire.presentation.*;
import com.spire.presentation.drawing.*;

import javax.imageio.ImageIO;
import java.io.File;

public class Texture {
    public static void main(String[] args) throws Exception {
        //Create an object of Presentation class
        Presentation ppt = new Presentation();

        //Load a PowerPoint presentation
        ppt.loadFromFile("Sample.pptx");

        //Load the texture
        IImageData image = ppt.getImages().append(ImageIO.read(new File("texture.png")));

        //Get the first slide
        ISlide slide = ppt.getSlides().get(0);

        //Get the background
        SlideBackground background = slide.getSlideBackground();

        //Set the background type to custom
        background.setType(BackgroundType.CUSTOM);

        //Set the background fill type to picture
        background.getFill().setFillType(FillFormatType.PICTURE);

        //Set the picture fill type to tile
        PictureFillFormat pictureFillFormat = background.getFill().getPictureFill();
        pictureFillFormat.setFillType(PictureFillType.TILE);

        //Set the texture alignment
        pictureFillFormat.setAlignment(RectangleAlignment.TOP_LEFT);

        //Set the transparency of the background
        pictureFillFormat.getPicture().setTransparency(50);

        //Set the background texture
        pictureFillFormat.getPicture().setEmbedImage(image);

        //Save the presentation
        ppt.saveToFile("TextureBackground.pptx", FileFormat.AUTO);
    }
}

Set a Pattern Background for a PowerPoint Presentation
In adding a pattern background, it is necessary to set the type of pattern as well as the foreground and background colors of the pattern. The detailed steps are as follows:
- Create an object of Presentation class.
- Load a PowerPoint presentation using Presentation.loadFromFile() method.
- Get the first slide using Presentation.getSlides().get() method.
- Get the background of the slide using ISlide.getSlideBackground() method.
- Set the background type to custom background to enable the customization of the background using SlideBackground.setType(BackgroundType.CUSTOM) method.
- Set the fill type of the background to pattern using SlideBackground.getFill().setFillType(FillFormatType.PATTERN) method.
- Set the pattern type using PatternFillFormat.setPatternType() method.
- Set the foreground color of the pattern using PatternFillFormat.getForegroundColor().setColor() method.
- Set the background color of the pattern using PatternFillFormat.getBackgroundColor().setColor() method.
- Save the presentation using Presentation.saveToFile() method.
- Java
import com.spire.presentation.*;
import com.spire.presentation.drawing.*;

import javax.imageio.ImageIO;
import java.awt.*;
import java.io.File;

public class Pattern {
    public static void main(String[] args) throws Exception {
        //Create an object of Presentation class
        Presentation ppt = new Presentation();

        //Load a PowerPoint presentation
        ppt.loadFromFile("Sample.pptx");

        //Get the first slide
        ISlide slide = ppt.getSlides().get(0);

        //Get the background
        SlideBackground background = slide.getSlideBackground();

        //Set the background type to custom
        background.setType(BackgroundType.CUSTOM);

        //Set the background fill type to pattern
        background.getFill().setFillType(FillFormatType.PATTERN);

        //Set the pattern type
        PatternFillFormat patternFillFormat = background.getFill().getPattern();
        patternFillFormat.setPatternType(PatternFillType.DOTTED_GRID);

        //Set the foreground color of the pattern
        patternFillFormat.getForegroundColor().setColor(new Color(230, 255, 255));

        //Set the background color of the pattern
        patternFillFormat.getBackgroundColor().setColor(new Color(199, 213, 237));

        //Save the presentation
        ppt.saveToFile("PatternBackground.pptx", FileFormat.AUTO);
    }
}

Apply for a Temporary License
If you'd like to remove the evaluation message from the generated documents, or to get rid of the function limitations, please request a 30-day trial license for yourself.
