When an order detail sheet or a statement is exported for printing, the page setup decides whether the printed copy is actually readable: whether the table comes out with gridlines and row and column headings, how fine the output is, and whether comments travel with it. These switches are scattered across several tabs of the Excel Page Setup dialog, which makes them tedious to tick one by one.Spire.XLS for JavaScript handles the page setup in the browser through WebAssembly, using a virtual file system (VFS) for the input and the output, with no backend service involved.
This article takes an 18-column by 60-row order detail sheet and covers three feature points:
- Set the print quality and draft quality
- Print gridlines and row and column headings
- Set black and white printing, comments and error values
For installation and project configuration, see Integrating Spire.XLS for JavaScript in a React Project. The examples below assume Spire.XLS is installed and the WebAssembly module has finished initializing.
Set the print quality and draft quality
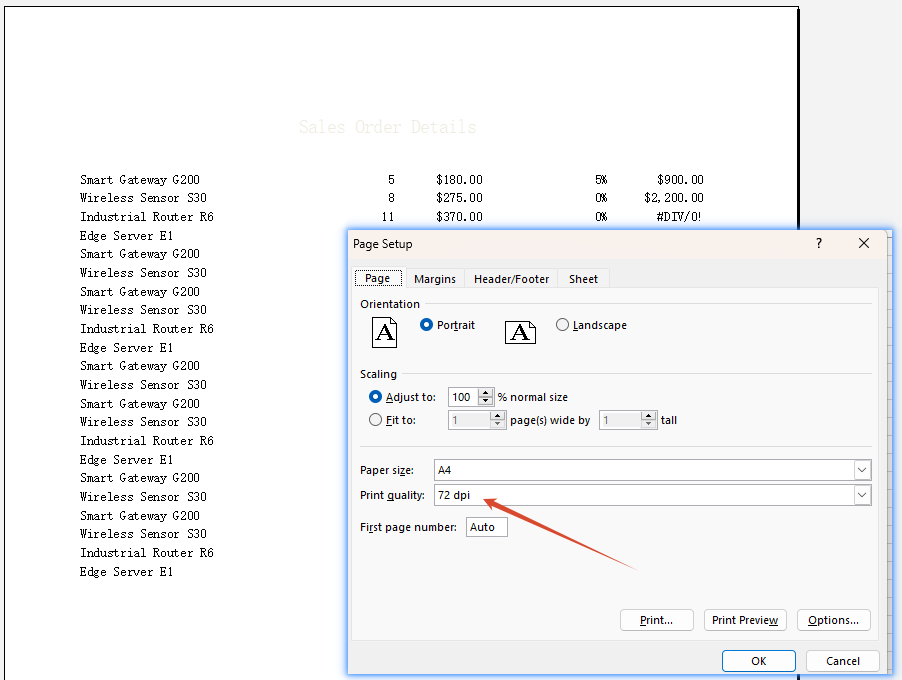
Print quality sets the number of ink dots per inch in the printed output and takes a plain integer in dpi; draft quality lets the printer run faster with less toner, which suits a proof that only circulates internally. Spire.XLS for JavaScript exposes both through the PrintQuality and Draft members of PageSetup:
PrintQuality = 72prints at 72 dpi, a low setting that lets the page come out faster with less consumableDraft = trueturns on draft quality, trading fine detail for speed
The complete example code is as follows:
function App() {
  const setPrintQuality = async () => {
    // Get the Spire.XLS WASM module
    const xlsModule = window.wasmModule?.spirexls;

    // Make sure the module is ready
    if (!xlsModule) {
      alert('Spire.Xls is not ready yet');
      return;
    }

    // Load the font and the input file into the VFS
    await window.spire.FetchFileToVFS('ARIAL.TTF', '/Library/Fonts/', `${process.env.PUBLIC_URL}/font/`);
    const inputFileName = 'OrderDetails.xlsx';
    await window.spire.FetchFileToVFS(inputFileName, '', `${process.env.PUBLIC_URL}data/`);

    // Load the workbook and take its first worksheet
    const workbook = new xlsModule.Workbook();
    workbook.LoadFromFile({ fileName: inputFileName });
    const sheet = workbook.Worksheets.get(0);

    // Get the page setup of the worksheet
    const pageSetup = sheet.PageSetup;

    // Set the print quality to 72 dpi
    pageSetup.PrintQuality = 72;

    // Turn on draft quality: speed matters more than fine detail
    pageSetup.Draft = true;

    // Save the workbook
    const outputFileName = 'SetPrintQuality.xlsx';
    workbook.SaveToFile({ fileName: outputFileName, version: xlsModule.ExcelVersion.Version2010 });

    // Release the workbook to free its resources
    workbook.Dispose();

    // Read the result file back from the VFS to trigger the download
    const fileArray = window.dotnetRuntime.Module.FS.readFile(outputFileName);
    const blob = new Blob([fileArray], { type: 'application/vnd.openxmlformats-officedocument.spreadsheetml.sheet' });
    const url = URL.createObjectURL(blob);
    const a = document.createElement('a');
    a.href = url;
    a.download = outputFileName;
    a.click();
    URL.revokeObjectURL(url);
  };

  return (
    <div style={{ textAlign: 'center', height: '300px' }}>
      <h1>Set print quality and draft quality</h1>
      <button onClick={setPrintQuality}>Set print quality and draft quality</button>
    </div>
  );
}

export default App;
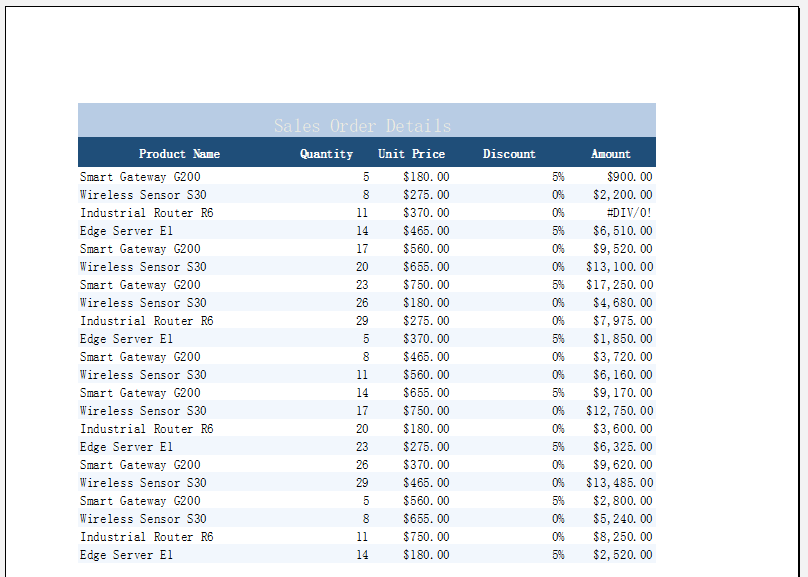
The original file as printed:
The effect of the print quality and draft quality settings:
Print gridlines and row and column headings
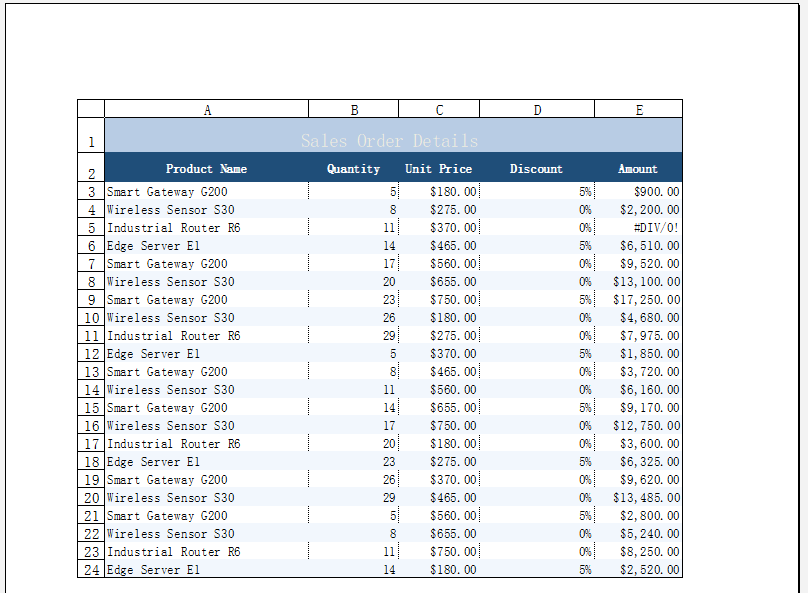
The gridlines on screen do not travel with the data when the sheet is printed, so a sheet without borders of its own reaches paper as a field of floating values that is hard to check cell by cell. Row and column headings have the same problem: printing them is what lets a printed copy be discussed in the same C5, D7 terms used in Excel. The two boolean members IsPrintGridlines and IsPrintHeadings control them. The complete example code is as follows:
function App() {
  const setGridlinesAndHeadings = async () => {
    // Get the Spire.XLS WASM module
    const xlsModule = window.wasmModule?.spirexls;

    // Make sure the module is ready
    if (!xlsModule) {
      alert('Spire.Xls is not ready yet');
      return;
    }

    // Load the font and the input file into the VFS
    await window.spire.FetchFileToVFS('ARIAL.TTF', '/Library/Fonts/', `${process.env.PUBLIC_URL}/font/`);
    const inputFileName = 'OrderDetails.xlsx';
    await window.spire.FetchFileToVFS(inputFileName, '', `${process.env.PUBLIC_URL}data/`);

    // Load the workbook and take its first worksheet
    const workbook = new xlsModule.Workbook();
    workbook.LoadFromFile({ fileName: inputFileName });
    const sheet = workbook.Worksheets.get(0);

    // Get the page setup of the worksheet
    const pageSetup = sheet.PageSetup;

    // Print the gridlines along with the data
    pageSetup.IsPrintGridlines = true;

    // Print the row and column headings along with the data
    pageSetup.IsPrintHeadings = true;

    // Save the workbook
    const outputFileName = 'SetGridlinesAndHeadings.xlsx';
    workbook.SaveToFile({ fileName: outputFileName, version: xlsModule.ExcelVersion.Version2010 });

    // Release the workbook to free its resources
    workbook.Dispose();

    // Read the result file back from the VFS to trigger the download
    const fileArray = window.dotnetRuntime.Module.FS.readFile(outputFileName);
    const blob = new Blob([fileArray], { type: 'application/vnd.openxmlformats-officedocument.spreadsheetml.sheet' });
    const url = URL.createObjectURL(blob);
    const a = document.createElement('a');
    a.href = url;
    a.download = outputFileName;
    a.click();
    URL.revokeObjectURL(url);
  };

  return (
    <div style={{ textAlign: 'center', height: '300px' }}>
      <h1>Print gridlines and headings</h1>
      <button onClick={setGridlinesAndHeadings}>Print gridlines and headings</button>
    </div>
  );
}

export default App;
The effect of printing the gridlines and the row and column headings:
Set black and white printing, comments and error values
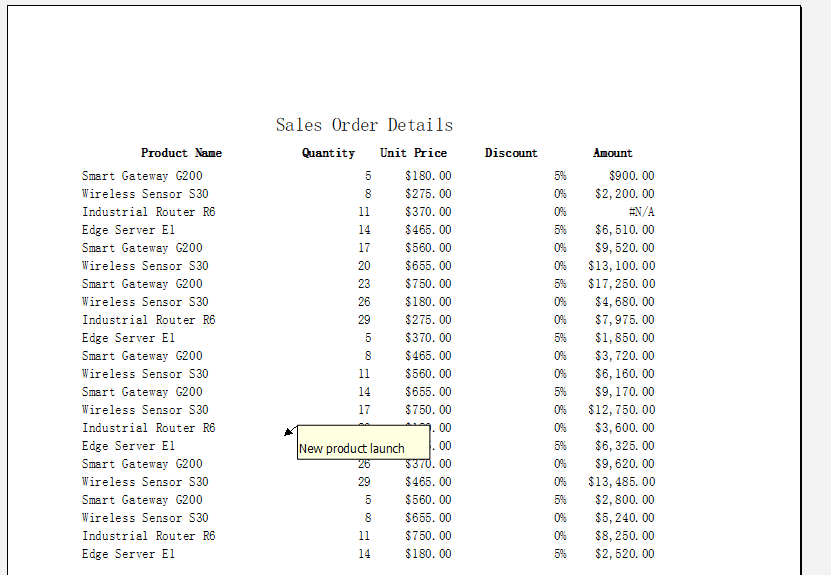
The remaining three output switches also live on PageSetup, and they decide what colour the printed copy comes out in, whether comments travel with the sheet, and how errors are shown. The three members and their values:
BlackAndWhiteset totrueprints in black and white, turning colour content into greyscale, which is especially useful with a mono laser printerPrintCommentsset toInPlaceprints each comment box where it sits on the sheet; the comment has to be shown first — one that is not displayed is not printedPrintErrorsset toNAshows every error value such as#DIV/0!as#N/Aon paper, keeping internal formula errors out of sight
The complete example code is as follows:
function App() {
  const setOtherPrintOptions = async () => {
    // Get the Spire.XLS WASM module
    const xlsModule = window.wasmModule?.spirexls;

    // Make sure the module is ready
    if (!xlsModule) {
      alert('Spire.Xls is not ready yet');
      return;
    }

    // Load the font and the input file into the VFS
    await window.spire.FetchFileToVFS('ARIAL.TTF', '/Library/Fonts/', `${process.env.PUBLIC_URL}/font/`);
    const inputFileName = 'OrderDetails.xlsx';
    await window.spire.FetchFileToVFS(inputFileName, '', `${process.env.PUBLIC_URL}data/`);

    // Load the workbook and take its first worksheet
    const workbook = new xlsModule.Workbook();
    workbook.LoadFromFile({ fileName: inputFileName });
    const sheet = workbook.Worksheets.get(0);

    // Get the page setup of the worksheet
    const pageSetup = sheet.PageSetup;

    // The sample carries one comment, on cell A18
    // Show it first: a comment that is not displayed is not printed
    sheet.Range.get('A18').Comment.Visible = true;

    // Print the worksheet in black and white
    pageSetup.BlackAndWhite = true;

    // Print comments where they appear on the worksheet
    pageSetup.PrintComments = xlsModule.PrintCommentType.InPlace;

    // Print every cell error as #N/A
    pageSetup.PrintErrors = xlsModule.PrintErrorsType.NA;

    // Save the workbook
    const outputFileName = 'SetOtherPrintOptions.xlsx';
    workbook.SaveToFile({ fileName: outputFileName, version: xlsModule.ExcelVersion.Version2010 });

    // Release the workbook to free its resources
    workbook.Dispose();

    // Read the result file back from the VFS to trigger the download
    const fileArray = window.dotnetRuntime.Module.FS.readFile(outputFileName);
    const blob = new Blob([fileArray], { type: 'application/vnd.openxmlformats-officedocument.spreadsheetml.sheet' });
    const url = URL.createObjectURL(blob);
    const a = document.createElement('a');
    a.href = url;
    a.download = outputFileName;
    a.click();
    URL.revokeObjectURL(url);
  };

  return (
    <div style={{ textAlign: 'center', height: '300px' }}>
      <h1>Set black and white, comments and errors</h1>
      <button onClick={setOtherPrintOptions}>Set black and white, comments and errors</button>
    </div>
  );
}

export default App;
The effect of the black and white, comment and error value settings:
FAQ
The sheet still runs to several pages, and lowering the print quality did not help
Cause: print quality and draft quality only decide how fine the output is and how much ink it uses; they do not change the layout of the content, so no setting of theirs moves a page break. Fitting a whole sheet onto one page is a matter of page scaling, which has nothing to do with print quality. Setting both at once is not a conflict — each one simply does its own job.
Solution: use FitToPagesWide and FitToPagesTall to squeeze the worksheet into a given number of pages, where 1 means one page wide and one page tall:
// Scale the worksheet onto one page wide and one page tall
pageSetup.FitToPagesWide = 1;
pageSetup.FitToPagesTall = 1;
Set together with the print quality, both survive:
<pageSetup fitToHeight="1" fitToWidth="1" horizontalDpi="72" verticalDpi="72" orientation="portrait" paperSize="9" />
The worksheet looks exactly the same after setting PrintQuality and Draft
Cause: both act on the printer output only and leave the worksheet's own content and display untouched, so the document looks no different once they are set. That is expected, and does not mean the setting failed to apply.
Solution: the print quality and the draft quality are written into the result file. To confirm they took effect, unzip the result file and look at xl/worksheets/sheet1.xml: the print quality lands on the horizontalDpi and verticalDpi of <pageSetup>, and the draft quality shows up as draft="1" on the same element. This example sets both, giving:
<pageSetup draft="1" horizontalDpi="72" verticalDpi="72" orientation="portrait" paperSize="9" />
Note that what Draft actually does depends on the printer driver — some drivers ignore the switch, and the attribute is written into the file either way.
Get a Free License
Spire.XLS for JavaScript offers a 30-day full-featured free trial license with no functional limitations. Apply here to evaluate before purchasing.
