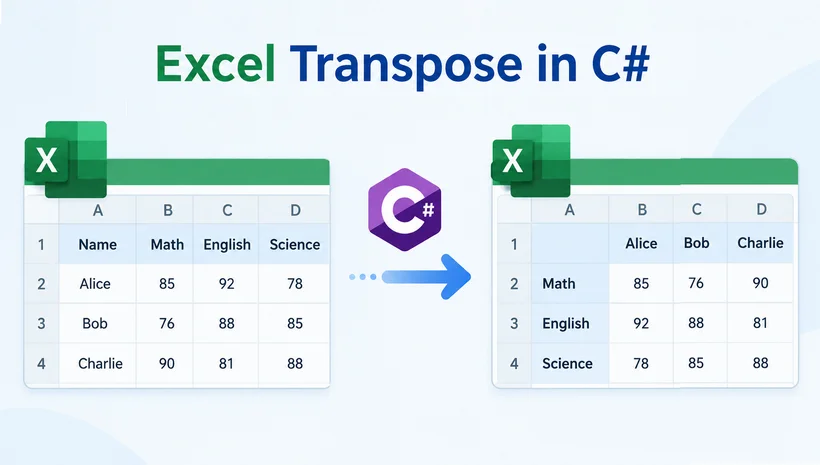
Transposing data in Excel (i.e., swapping rows and columns) is a common requirement in data processing, reporting, and ETL workflows. Within desktop Microsoft Excel, you can copy a range and use the Transpose paste option. For .NET‑based applications, you may need to perform this transpose task programmatically without opening Microsoft Excel.
This tutorial walks you through two practical ways to transpose rows and columns in C# using Spire.XLS for .NET , from the built-in copy with transpose option to the native TRANSPOSE array formula.
- Method 1: Transpose Data via Static Copy
- Method 2: Transpose via the Dynamic TRANSPOSE Array Formula
- Excel Transpose Data Method Comparison
- Conclusion: Choosing the Right Method
- Frequently Asked Questions
Prerequisites
- A .NET project (.NET Framework / .NET Core / .NET 5+)
- Install Spire.XLS for .NET via NuGet Package Manager
Install-Package Spire.XLS
Note: Spire.XLS works on Windows, macOS, and Linux environments for cross-platform Excel processing.
Method 1: Transpose Data via Static Copy
Starting with Spire.XLS 16.1.4, the library introduced native support for transposing rows and columns when copying a cell range. It creates a disconnected snapshot of transposed data, preserving cell formatting.
using Spire.Xls;
class Program
{
    static void Main()
    {
        // 1. Create a new workbook
        Workbook workbook = new Workbook();

        // 2. Load an existing Excel file
        workbook.LoadFromFile(@"F:\SalesData.xlsx");

        // 3. Get the first worksheet
        Worksheet sheet = workbook.Worksheets[0];

        // 4. Define the source range (e.g., A1:D5)
        CellRange sourceRange = sheet.Range["A1:D5"];

        // 5. Define the destination cell (top-left corner)
        CellRange destCell = sheet.Range["F7"];

        // 6. Set transposition options
        CopyRangeOptions options = CopyRangeOptions.Transpose | CopyRangeOptions.All;

        // 7. Copy the range with transposition
        sourceRange.Copy(destCell, options);

        // 8. Save the result
        workbook.SaveToFile(@"Transposed.xlsx", ExcelVersion.Version2016);
        workbook.Dispose();
    }
}
How It Works
CopyRangeOptions.Transpose: Inverts rows and columns for the copied cell range.CopyRangeOptions.All: Copies cell values, formulas, fill styles, borders and font settings. You can combine multiple flags with the bitwise OR (|) operator.- You only specify the top‑left destination cell, and Spire.XLS will automatically calculate the full output range dimensions.
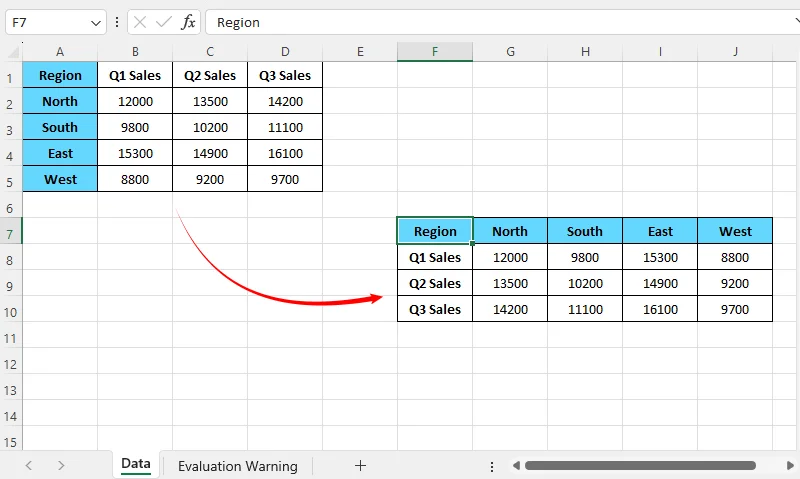
Result Preview:
The source range A1:D5 is transposed to F7:J10. The original rows become columns and the original columns become rows.
Copying Without Styles
If you only need the raw data and want to avoid copying cell formatting, omit CopyRangeOptions.All:
CopyRangeOptions options = CopyRangeOptions.Transpose;
Copying to a Different Worksheet
You can also transpose data into another worksheet:
Worksheet sourceSheet = workbook.Worksheets[0];
Worksheet destSheet = workbook.Worksheets.Add("TransposedData");

CellRange sourceRange = sourceSheet.Range["A1:D5"];
CellRange destCell = destSheet.Range["A1"];

CopyRangeOptions options = CopyRangeOptions.Transpose | CopyRangeOptions.All;
sourceRange.Copy(destCell, options);
Method 2: Transpose via the Dynamic TRANSPOSE Array Formula
Spire.XLS 16.9.2 added support for the Excel TRANSPOSE function. This method is useful when you want the transposed output to remain dynamically linked to the source range—if the source data changes, the transposed data updates automatically (depending on Excel's calculation settings).
using Spire.Xls;
class Program
{
    static void Main()
    {
        // Load an existing Excel file
        Workbook workbook = new Workbook();
        workbook.LoadFromFile(@"F:\SalesData.xlsx");

        // Get the first worksheet
        Worksheet sheet = workbook.Worksheets[0];

        // Source range: A1:D5 (5 rows × 4 columns)
        // Transposed output: F7:J10 (4 rows × 5 columns)
        sheet.Range["F7:J10"].FormulaArray = "=TRANSPOSE(A1:D5)";

        // Save the result
        workbook.SaveToFile("TransposedFormula.xlsx", ExcelVersion.Version2016);
        workbook.Dispose();
    }
}
Important Notes
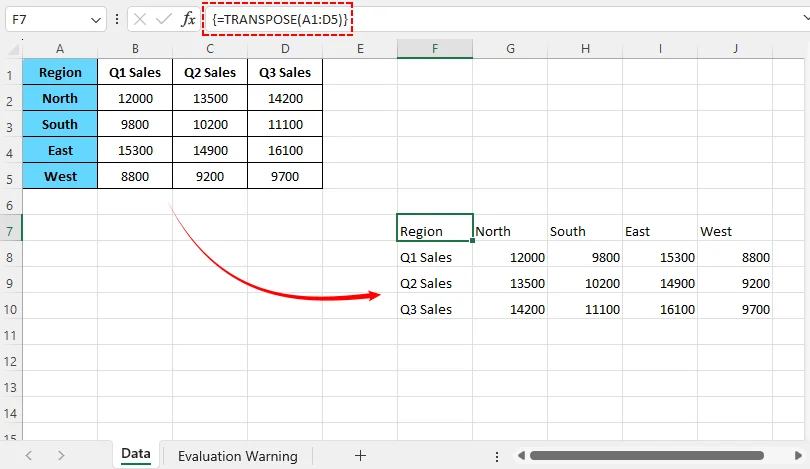
- The output range must be sized correctly: if the source is m rows × n columns, the destination must be n rows × m columns. In the example above,
A1:D5is 5×4, soF7:J10is 4×5. - The formula is entered as an array formula using FormulaArray, not the regular Formula property.
- This approach preserves the dynamic link only if the recipient opens the file in Excel with automatic calculation enabled.
- Source‑sheet cell formatting is not copied to formula‑driven output cells.
Result Preview:
Excel Transpose Data Method Comparison
| Feature | Method 1: Static Copy with Transpose | Method 2: TRANSPOSE Array Formula |
|---|---|---|
| Data type | Static copy (values, formats) | Dynamic array formula |
| Auto-update | No | Yes (when source changes) |
| Preserves formatting | Yes | Formula only |
| Output cells | Plain cell values | Embedded formula |
| Best for | One-time transposition, formatting preservation | Editable templates, dynamic dashboards |
Conclusion: Choosing the Right Method
Converting rows to columns or columns to rows in C# is a common requirement that Spire.XLS for .NET handles elegantly. The best method depends on whether you need a static snapshot or a dynamic, formula-driven result.
Pick Method 1 if:
- You need a snapshot of transposed data
- You want to retain cell styles, borders, fills, and formatting
- End users only view the result and won’t edit the source
- You don’t want formulas in the final Excel file
Pick Method 2 if:
- You’re building editable Excel templates for users
- The transposed block needs to refresh when source data changes
- You prefer minimal code and don’t need to copy formatting
Always validate exported Excel outputs against real‑world test data before production deployment. These reusable patterns help streamline row‑and‑column transformation within your .NET applications.
Frequently Asked Questions
Q: Can I transpose a single row or column?
A: Yes. Set the source range to a single row, such as A1:J1, or a single column, such as A1:A10. The output becomes a column or row, respectively.
Q: Does CopyRangeOptions.Transpose work with merged cells?
A: Merged cells can behave unpredictably when transposed. The CopyRangeOptions.Transpose method may preserve them in some cases, but it is safer to unmerge cells before transposing or test the result.
Q: After static transpose, can I still modify the transposed cells independently?
A: Yes. The static transpose output creates independent cell copies. These cells hold plain values and formatting and have no link to the original source cells. Any edits to the transposed region will not affect the source data, and vice versa.
Q: Can I transpose multiple ranges at once?
A: Not in a single built-in call. You can transpose each range separately and place the outputs in different destination areas, or combine the data into one range before transposing.
