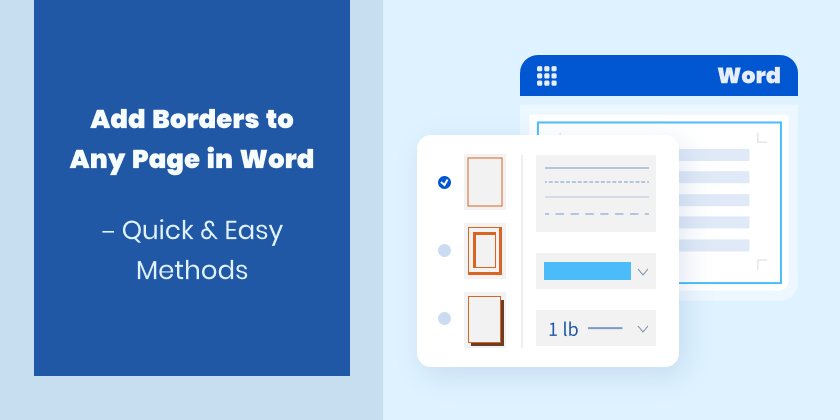
Add Page Borders in Word (Any Page): 4 Simple Ways
Adding page borders in Microsoft Word is a simple way to enhance document appearance, whether you're creating reports, certificates, or styled documents. However, Word’s built-in border options are mainly designed for entire documents or sections, which can limit flexibility in certain layout scenarios.
In this guide, you’ll learn 4 simple and practical methods to add page borders in Word—covering the entire document, specific sections, and even any single page using reliable workarounds.
Quick Navigation:
- Method 1: Using Page Borders Feature in Word
- Method 2: Using a Shape as a Border
- Method 3: Using a Text Box as a Border
- Method 4: Using Python Add Borders Automatically
Method 1: Using Page Borders Feature in Word
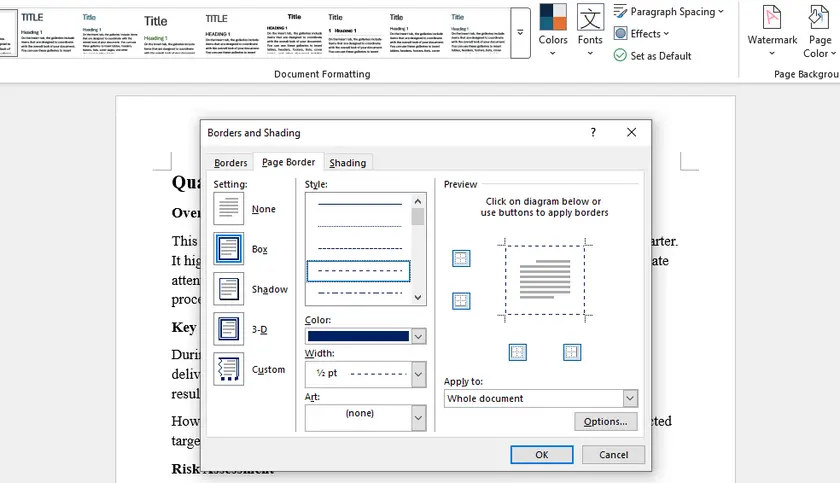
The built-in Page Borders feature is the most straightforward way to add borders in Word. It works best when you want to apply borders to the entire document or a section. However, it comes with limitations when targeting a specific page.
How to Add Borders to the Whole Document or a Section
- Open your Word document.
- Go to Design → Page Borders .
- In the Borders and Shading dialog:
- Choose a border style (Box, Shadow, 3-D, Custom).
- Set color and width.
- Under Apply to , select:
- Whole document, or
- This section
- Click OK .
Understanding the Limitation
Word’s Page Borders feature only provides these options:
- Whole document
- This section
- This section – First page only
- This section – All except first page
There is no direct “This page only” option.
Workaround: Apply Border to a Specific Page
To add a border to a single page using this method:
- Place your cursor at the start of the target page.
- Go to Layout → Breaks → Next Page (insert a section break).
- Place the cursor at the end of that page and insert another Next Page section break.
- Now go to Design → Page Borders .
- Select Apply to: This section – First page only .
- Click OK .
This works because the page becomes the first page of a new section.
Method 2: Using a Shape as a Border
If you need to add a border to any specific page without dealing with sections, using a shape is one of the easiest and most flexible methods. It allows full control over appearance and works independently of Word’s border limitations.
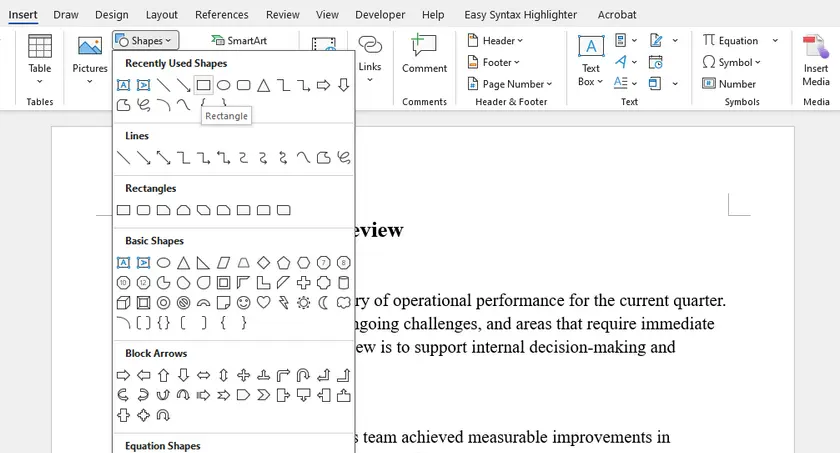
Steps
- Go to Insert → Shapes → Rectangle .
- Draw the rectangle to fit within the page margins.
- Right-click the shape → Format Shape :
- Set Fill → No Fill
- Customize Line (color, width, style)
- Set the shape layout to Behind Text .
Why Use This Method?
- Works on any page
- No need for section breaks
- Highly customizable
Method 3: Using a Text Box as a Border
If you want to add a border to any specific page with extra flexibility—such as including decorative text or designs—a Text Box is a great choice. It works independently of Word’s border limitations and does not require creating sections.
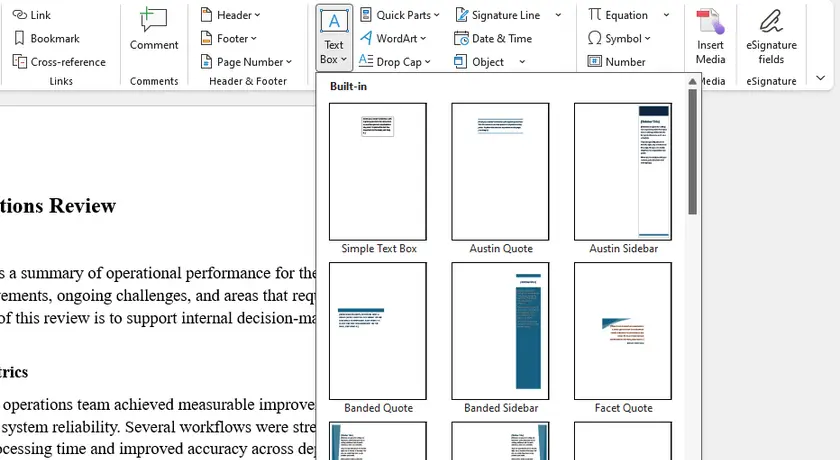
Steps
- Go to Insert → Text Box → Draw Text Box .
- Set the Text Box Layout to Behind Text to prevent moving existing content.
- Delete the placeholder text inside the Text Box.
- Adjust the Text Box position and size so it covers the page edges as desired.
- Right-click → Format Shape :
- Set Fill to No Fill
- Customize Line (color, width, style)
Why Use This Method?
- Works on any page, no section breaks needed
- Does not disturb existing content when layout is set first
- Can include decorative text or designs inside the border
- Stable and flexible for single-page borders
Tip: If you only need a simple border without text, a Shape works just as well and is slightly lighter.
Method 4: Using Python to Add Borders Automatically
If you need to apply page borders to multiple Word documents or automate the process, using Python is the most efficient solution. Libraries like Spire.Doc for Python allow you to programmatically add and customize page borders with precision.
Install Required Library
pip install spire.doc
Code Example: Add Borders to Word in Python
from spire.doc import *
from spire.doc.common import *

# Load document
doc = Document()
doc.LoadFromFile(r"C:\Users\Administrator\Desktop\Input-en.docx")

# Apply borders to all sections
for i in range(len(doc.Sections)):
    section = doc.Sections[i]
    setup = section.PageSetup
    borders = setup.Borders

    setup.PageBordersApplyType = PageBordersApplyType.AllPages
    borders.BorderType(BorderStyle.DotDotDash)
    borders.LineWidth(1)
    borders.Color(Color.get_Blue())

    # Set spacing for all sides
    for side in [borders.Top, borders.Bottom, borders.Left, borders.Right]:
        side.Space = 20.0

# Save result
doc.SaveToFile("AddWordPageBorders.docx", FileFormat.Docx)
doc.Dispose()
Output:
Why Use This Method?
- Ideal for batch processing
- Ensures consistent formatting
- Perfect for automation workflows
This approach is especially useful for generating documents like reports, invoices, or certificates at scale.
In addition to adding borders, you can also use Spire.Doc to adjust page margins for precise layout control; you can apply background colors or watermarks to Word pages, enhancing the visual design of your documents.
Quick Comparison Table
| Method | Best For | Can Target Any Page | Difficulty |
|---|---|---|---|
| Page Borders | Whole document / sections | ✗ (needs workaround) | Easy |
| Section Break + Page Borders | Specific page | √ | Medium |
| Shape | Single page or multiple pages | √ | Easy |
| Text Box | Single page with optional text/decor | √ | Easy |
| Python (Spire.Doc) | Automation / batch processing | √ | Advanced |
Conclusion
Adding page borders in Word depends on your specific needs and the level of control you want over your document:
- Page Borders are ideal for adding borders to the entire document or specific sections quickly and consistently.
- Section breaks are useful if you want to leverage Word’s built-in border feature for a single page while maintaining proper layout.
- Shapes or Text Boxes provide a fast, flexible way to add borders on any page without affecting existing content; Text Boxes are especially handy if you want to include decorative text or designs.
- Python automation is perfect for batch processing multiple documents, ensuring consistent borders across all files.
By choosing the right method, you can overcome Word’s limitations, save time, and create professional-looking documents that match your design vision.
FAQs
Why can’t I add a border to just one page in Word?
Because Word’s border feature is section-based, not page-based. There’s no built-in “this page only” option.
What’s the easiest way to add a border to a single page?
Using a shape (rectangle) is the quickest and simplest method.
Which method is best for professional documents?
For consistency, use Page Borders with sections or Python automation.
Do text boxes affect document layout?
Text Box will not disturb existing content if its layout is set to Behind Text.
See Also
Convert XPS to PDF: Built-in, Online & Scripted Methods
Table of Contents
Need to convert an XPS file to PDF? You’re not alone. From businesses archiving documents to individuals sharing reports, converting XPS to PDF ensures your files are accessible, compatible, and professional-looking.
In this article, we’ll walk you through four reliable ways to convert XPS to PDF, including built-in tools, online converters, command-line options, and Python-based batch processing, so you can pick the method that best fits your needs.
Quick Navigation:
- Method 1 - Using XPS Viewer + Microsoft Print to PDF
- Method 2 - Using Online Converters
- Method 3 - Using Command-Line Tools
- Method 4 - Using Python Libraries (Batch Processing)
XPS vs PDF: What’s the Difference?
PDF is Adobe’s long-standing, cross-platform standard. It’s feature-rich—supporting forms, annotations, encryption, digital signatures, and advanced print and archival profiles—and is backed by a vast ecosystem of viewers, editors, and professional tools. PDF ensures reliable rendering, accessibility, and robust security across devices and industries.
XPS is Microsoft’s XML-based, ZIP-packaged fixed-layout format, mainly used in certain Windows printing workflows. Its feature set and third-party support are limited compared with PDF, resulting in weaker interoperability and fewer tools. Because PDF offers superior compatibility, features, and industry adoption, converting XPS to PDF is often necessary.
Method 1 - Using XPS Viewer + Microsoft Print to PDF
For Windows users, the simplest way to convert an XPS file is through the built-in XPS Viewer and Microsoft Print to PDF. This method requires no extra software and is ideal for one-off conversions or occasional use. By leveraging the system’s print-to-PDF functionality, you can quickly generate a PDF without compromising basic layout.
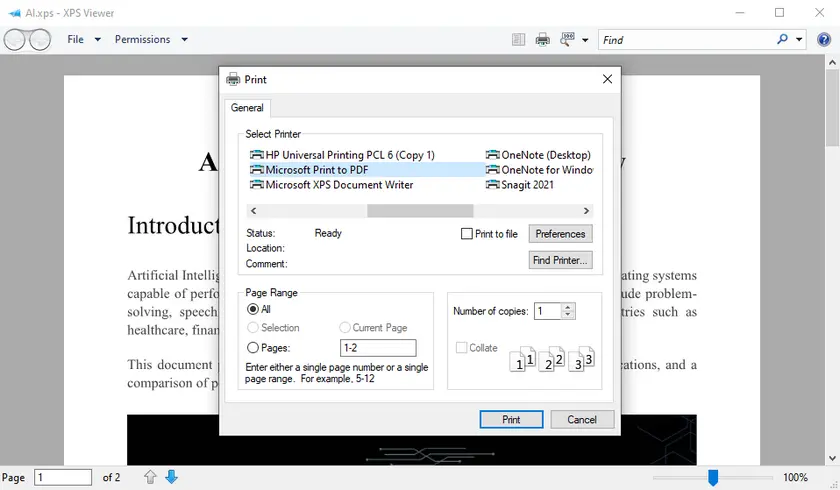
Steps:
- Open your XPS file using XPS Viewer.
- Click Print in the toolbar.
- Select Microsoft Print to PDF as the printer.
- Choose the output location and save your PDF.
Pros:
- Free and requires no installation.
- Simple interface for casual users.
Cons:
- Cannot process multiple files at once.
- Complex formatting may shift slightly.
Method 2 - Using Online Converters
Online converters offer a convenient way to convert XPS to PDF without installing software. They are particularly useful if you need a quick conversion or are using a non-Windows platform. Most online tools are as simple as uploading your file, selecting PDF as the output format, and downloading the result.
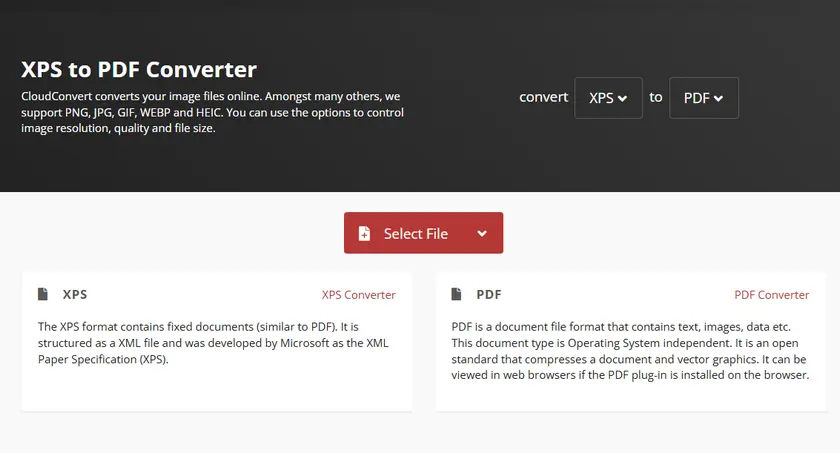
Steps:
- Visit a reputable online converter, such as CloudConvert.
- Upload your XPS file.
- Choose PDF as the target format.
- Click Convert and download the resulting PDF.
Pros:
- Works on any platform (Windows, Mac, mobile).
- No software installation needed.
- Quick drag-and-drop interface.
Cons:
- File size limits may apply.
- Internet connection required.
- Potential privacy concerns for sensitive files.
Method 3 - Using Command-Line Tools (MuPDF)
For advanced users or automation workflows, command-line tools offer flexible conversion options. MuPDF provides a lightweight command-line utility ( mutool ) that can convert XPS files to PDF, either individually or in batch scripts. This method is ideal for developers or IT administrators who need consistent results across multiple files.
Steps:
-
Download MuPDF.
- Go to the official MuPDF website: https://mupdf.com/downloads/
- Download the MuPDF tools package for your operating system (Windows, macOS, or Linux)
- Extract the package to a folder, e.g., C:\MuPDF
-
Open a Command Prompt / Terminal.
- Windows: Press Win + R, type cmd, press Enter
- macOS/Linux: Open Terminal
-
Navigate to your XPS file folder.
Use the cd command to change the directory to where your XPS file is located. Example:
cd C:\Users\Administrator\Desktop\XPSFiles -
Run the conversion command.
Use mutool convert with the -o option to specify the output PDF:
C:\MuPDF\mutool.exe convert -o output.pdf input.xpsExplanation:
- convert → tells MuPDF to convert file formats
- -o output.pdf → specifies the PDF output file name
- input.xps → your XPS file
On Linux/macOS, it might look like:
./mutool convert -o output.pdf input.xps -
Check the output PDF in your target folder.
Pros:
- Automatable and scriptable for bulk processing.
- Cross-platform (Windows, Mac, Linux).
Cons:
- Requires technical knowledge.
- Setup and syntax may be complex for beginners.
Method 4 - Using Python Libraries (Batch Processing with Spire.PDF)
For developers or businesses needing batch processing, Python libraries provide an efficient solution. Using Spire.PDF for Python , you can convert multiple XPS files into PDFs programmatically while preserving high-quality images and layout integrity. This approach is ideal for automating large workflows or integrating into backend systems.
Steps:
- Install the required library.
- Use the following script to convert a single XPS to a PDF file.
pip install spire.pdffrom spire.pdf.common import *
from spire.pdf import *
# Load an XPS file
doc = PdfDocument()
doc.LoadFromFile("Input.xps", FileFormat.XPS)
# Preserve images' quality
doc.ConvertOptions.SetXpsToPdfOptions(True)
# Save to PDF
doc.SaveToFile("XpsToPdf.pdf", FileFormat.PDF)
doc.Dispose()
Output:
Batch Processing Example:
import os
from spire.pdf.common import *
from spire.pdf import *

folder = r"C:\path\to\your\folder"

for name in os.listdir(folder):
    if not name.lower().endswith(".xps"):
        continue
    in_path = os.path.join(folder, name)
    out_path = os.path.join(folder, os.path.splitext(name)[0] + ".pdf")

    doc = PdfDocument()
    doc.LoadFromFile(in_path, FileFormat.XPS)
    doc.ConvertOptions.SetXpsToPdfOptions(True)
    doc.SaveToFile(out_path, FileFormat.PDF)
    doc.Dispose()
Pros:
- Full control over batch conversion.
- High fidelity preservation of layout and images.
- Easily integrates into automated workflows.
Cons:
- Requires coding knowledge.
- Library installation needed.
In addition to converting XPS to PDF, Spire.PDF for Python also lets you programmatically apply watermarks, add annotations, and encrypt PDF documents. You can explore these features to enhance or secure your PDF files directly from your code, making it a versatile solution for many PDF automation tasks.
Comparison – Which Method Should You Choose?
| Method | Ease of Use | Batch Support | Platform | Pros | Cons |
|---|---|---|---|---|---|
| XPS Viewer | ★★★★ | ✗ | Windows | Free, simple | Single file, formatting issues |
| Online Converters | ★★★★ | ✗ | Any | No installation, fast | Privacy, file size limits |
| MuPDF | ★★ | ✓ | Windows / Mac / Linux | Automatable | Technical setup required |
| Python / Spire.PDF | ★★ | ✓ | Cross-platform | Batch processing, high fidelity | Requires coding knowledge |
Conclusion
Choosing the right method depends on your needs: casual users may prefer XPS Viewer or online converters, while developers and businesses handling multiple files will benefit from MuPDF or Python/Spire.PDF for batch processing. For high-quality, automated, and scalable conversion, Spire.PDF is a robust solution that ensures your PDF output maintains the integrity of the original XPS files.
FAQs
Q1: Can I convert multiple XPS files at once?
Yes, batch conversion is possible using command-line tools like MuPDF or Python libraries such as Spire.PDF.
Q2: Are online converters safe for confidential documents?
It depends on the platform. For sensitive files, it’s recommended to use offline tools like XPS Viewer or Spire.PDF.
Q3: Can Python convert XPS to PDF on Mac/Linux?
Yes, Spire.PDF for Python supports cross-platform conversion, and the command-line tool provided by MuPDF is also compatible with Mac and Linux.
Q4: Will the PDF retain the original layout and images?
Most methods preserve the layout, but batch and programmatic solutions like Spire.PDF provide the highest fidelity, especially for complex XPS files.
See Also
Convert Word to XPS: 4 Easy Methods (Free & Automated)
Table of Contents
Converting Word documents to XPS format is a useful way to preserve layout, ensure consistent viewing, and prepare files for sharing or printing. Whether you're working with reports, contracts, or technical documents, XPS provides a fixed-layout format similar to PDF but natively supported in Windows environments.
In this guide, you’ll learn four easy methods to convert Word to XPS, including manual approaches, online tools, and automated solutions for batch processing.
Quick Navigation:
- Method 1 - Using Microsoft Word
- Method 2 - Using Windows Print to XPS
- Method 3 - Using Online Converters
- Method 4 - Using Python (Batch Processing)
Why Convert Word to XPS?
XPS (XML Paper Specification) is designed to maintain document fidelity across different systems and devices. It locks in formatting, fonts, and layout, making it ideal for final versions of documents that should not be edited.
Additionally, XPS files integrate well with Windows systems and can be viewed without needing third-party software. For developers and businesses, XPS is also useful in workflows that require consistent document rendering.
Method 1 – Using Microsoft Word
Microsoft Word includes a built-in feature that allows you to save documents directly as XPS files. Since the conversion is handled internally by Word, this method offers both simplicity and high fidelity.
Best for: Quick, one-off conversions where accuracy is important.
Steps to Convert Word to XPS Using MS Word
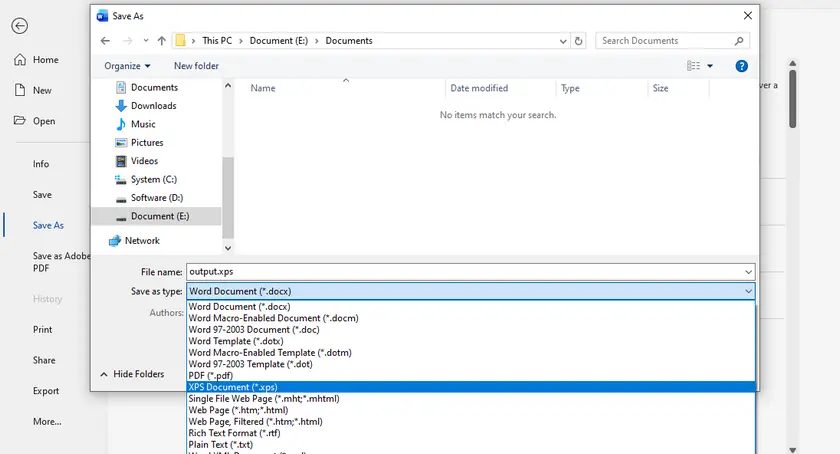
- Open your Word document in Microsoft Word.
- Click File → Save As .
- Choose the location where you want to save the file.
- Select XPS Document (*.xps) from the file type dropdown.
- Click Save .
Pros
- High-quality output with accurate formatting.
- Simple and beginner-friendly.
Cons
- Requires Microsoft Word installation.
- No support for batch processing.
Method 2 – Using Windows Print to XPS
Windows includes a virtual printer called Microsoft XPS Document Writer that allows you to convert any printable document to XPS format. This method works with virtually any application that supports printing—not just Word.
Best for: When you prefer not to rely on application-specific export features.
Steps to Convert Word to XPS Using XPS Document Writer
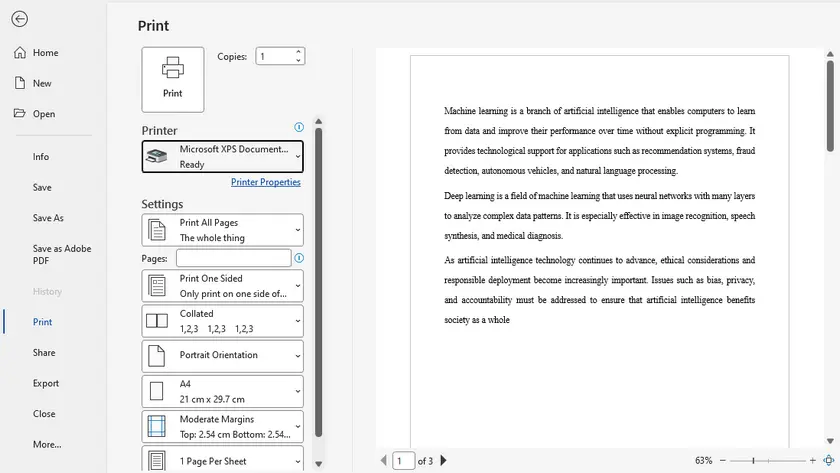
- Open the Word document.
- Go to File → Print .
- Select Microsoft XPS Document Writer as the printer.
- Click Print .
- Choose a file name and save location.
Pros
- Built into Windows (no installation needed).
- Works with multiple applications.
- Reliable for preserving layout.
Cons
- Manual process, not suitable for bulk conversion.
- Slightly slower than direct export.
Method 3 – Using Online Converters
Online converters offer a convenient way to convert Word files to XPS without installing any software. These tools typically support drag-and-drop uploads and quick downloads, making them accessible on any device.
Best for: Occasional use or when working on systems where you cannot install software.
Steps to Convert Word to XPS Online
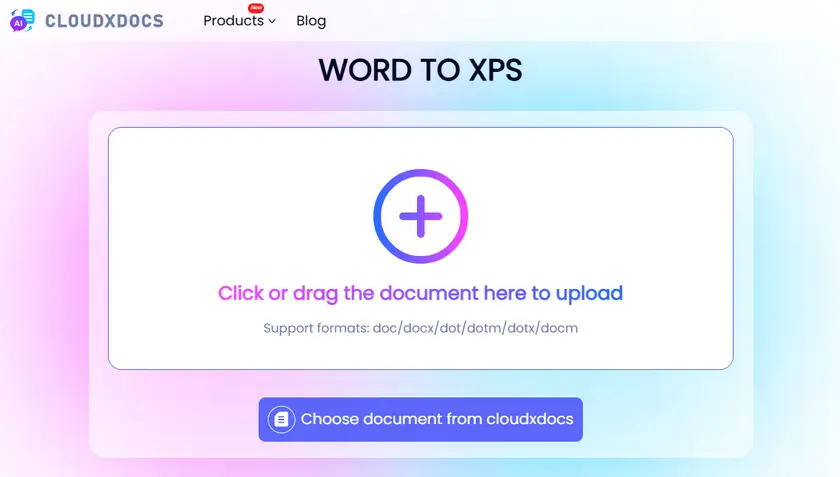
- Open an online converter website (e.g., cloudxdocs).
- Upload your Word document.
- The conversion automatically starts as soon as uploading is finished.
- Download the converted file.
Pros
- No installation required.
- Accessible from any device.
- Quick and easy for occasional use.
Cons
- File size limits on free plans.
- Potential privacy/security concerns.
- Requires internet connection.
Method 4 – Using Python (Batch Processing)
For developers or users handling multiple files, automation is the most efficient solution. Using libraries like Spire.Doc for Python, you can programmatically convert Word documents to XPS in bulk with minimal effort.
This approach is ideal for backend systems, document workflows, or large-scale processing tasks where manual conversion would be too time-consuming.
Steps to Batch Convert Word to XPS in Python
- Create a Python program.
- Install the Spire.Doc library for Python.
- Run the following script to perform the conversion.
import os
from spire.doc import *
from spire.doc.common import *

# Input and output folders
input_folder = "input_docs"
output_folder = "output_xps"

# Create output folder if it doesn't exist
if not os.path.exists(output_folder):
    os.makedirs(output_folder)

# Loop through all files in the input folder
for file_name in os.listdir(input_folder):
    if file_name.endswith((".doc", ".docx")):
        input_path = os.path.join(input_folder, file_name)
        output_name = os.path.splitext(file_name)[0] + ".xps"
        output_path = os.path.join(output_folder, output_name)

        # Create a Document object
        doc = Document()

        # Load the Word document
        doc.LoadFromFile(input_path)

        # Save as XPS
        doc.SaveToFile(output_path, FileFormat.XPS)

        # Dispose the document
        doc.Dispose()

        print(f"Converted: {file_name} → {output_name}")

print("Batch conversion completed.")
Pros
- Supports batch conversion (high efficiency).
- Fully automated workflow.
- Easy to integrate into systems or pipelines.
Cons
- Requires programming knowledge.
- Needs environment setup and dependencies.
- Initial setup takes more time than manual methods.
In addition to XPS conversion, Spire.Doc allows you to convert Word to PDF, or export Word as images, giving you full control over how your documents are shared and displayed.
Comparison Table – Which Method Should You Choose?
| Method | Best For | Ease of Use | Batch Support | Requires Installation | Cost |
|---|---|---|---|---|---|
| Microsoft Word | Quick, high-quality conversion | ★★★★★ | x | √ | Paid (Office license) |
| Print to XPS | Flexible, works with any app | ★★★★★ | x | x (built-in) | Free |
| Online Tools | Convenience, no setup | ★★★★★ | x | x | Free (limited) / Paid |
| Python (Spire.Doc) | Automation, bulk processing | ★★★☆☆ | √ | √ | Free (limited) / Paid |
Best Practices for High-Quality XPS Output
Before converting, make sure your Word document is finalized, including fonts, images, and layout. Since XPS preserves formatting exactly, any issues in the original file will carry over to the output.
It’s also a good idea to embed fonts and avoid unsupported elements to ensure compatibility across different systems. For batch processing, test a few files first to confirm consistent results.
Conclusion
Converting Word to XPS can be done using a variety of methods depending on your needs. For quick and reliable results, built-in options like Microsoft Word or Windows Print to XPS work well. If you need flexibility or portability, online tools are a solid choice.
For advanced users and developers, Python automation with libraries like Spire.Doc provides a powerful way to handle large volumes of documents efficiently.
FAQs
Q1: Is XPS better than PDF?
XPS and PDF are similar in that both preserve document layout. PDF is more widely supported, while XPS is more tightly integrated with Windows systems.
Q2: Can I convert XPS back to Word?
Yes, but it usually requires third-party tools or intermediate conversion (e.g., XPS → PDF → Word), and formatting may not be perfectly preserved.
Q3: Does converting to XPS reduce file quality?
No, XPS maintains the original layout and quality. However, compression settings and embedded resources can affect file size.
Q4: Which method is best for bulk conversion?
The Python method using Spire.Doc is the best choice for batch processing and automation.
Q5: How to open an XPS file?
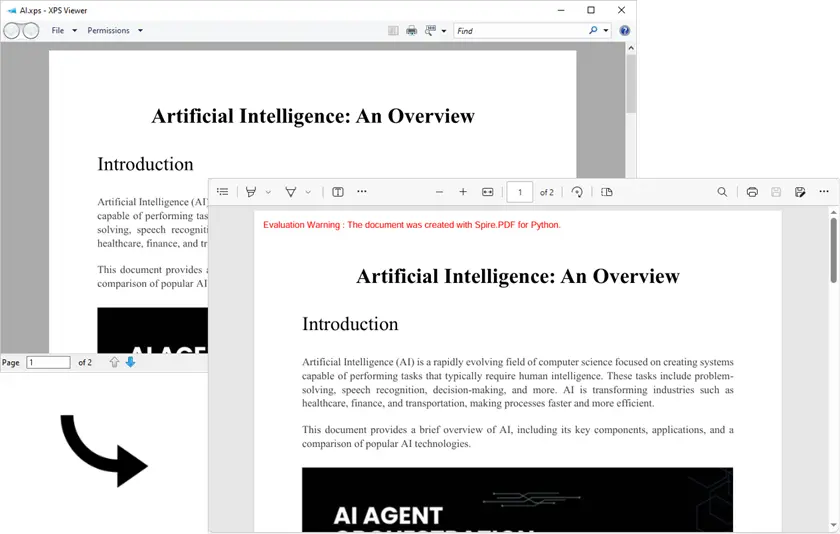
You can open an XPS file using the built-in XPS Viewer on Windows. Simply double-click the file, or right-click and choose Open with → XPS Viewer .
See Also
Convert PDF to TIFF at 300 DPI (Including Multi-Page Output)
Table of Contents
- Why 300 DPI and Multi-Page TIFF Matter
- Method 1 — Convert PDF to TIFF with Adobe Acrobat Pro
- Method 2 — Convert PDF to TIFF Online with CloudConvert
- Method 3 — Convert PDF to Multi-Page TIFF with Preview (Mac)
- Method 4 — Convert PDF to Multi-Page TIFF with Python (Spire.PDF)
- PDF to TIFF Conversion Methods Comparison
- Conclusion
- FAQs
Converting PDFs to TIFF images is a common requirement for printing, archival, and OCR workflows. While many tools can export TIFFs from PDFs, getting a multi-page TIFF at 300 DPI—the standard for print and high-quality scans—is not always straightforward.
In this guide, we’ll walk you through four practical methods, ranging from no-code solutions to an automated Python workflow. Each method is designed to address different needs, helping you choose the most efficient approach based on your workflow and technical level.
Overview of methods covered:
- Method 1 — Convert PDF to TIFF with Adobe Acrobat Pro
- Method 2 — Convert PDF to TIFF Online with CloudConvert
- Method 3 — Convert PDF to Multi-Page TIFF with Preview (Mac)
- Method 4 — Convert PDF to Multi-Page TIFF with Python (Spire.PDF)
Why 300 DPI and Multi-Page TIFF Matter
300 DPI ensures your images are sharp enough for:
- Printing at high quality
- OCR (Optical Character Recognition) accuracy
- Archival or legal documentation
Multi-page TIFF files are convenient for:
- Storing multi-page documents in a single file
- Compatibility with scanners, fax systems, and medical or legal imaging software
- Choosing the right method depends on whether you prioritize ease of use, image quality, or automation.
Method 1 — Convert PDF to TIFF with Adobe Acrobat Pro
Adobe Acrobat Pro is a widely used commercial tool that can export PDF pages as TIFF images quickly. You can set the resolution to 300 DPI, ensuring high-quality output suitable for print or OCR tasks.
However, Acrobat exports each page as a separate TIFF file, so multi-page TIFFs are not supported directly. This method is ideal if you already have Acrobat and want a fast, high-quality export, but you may need an additional step to merge the pages.
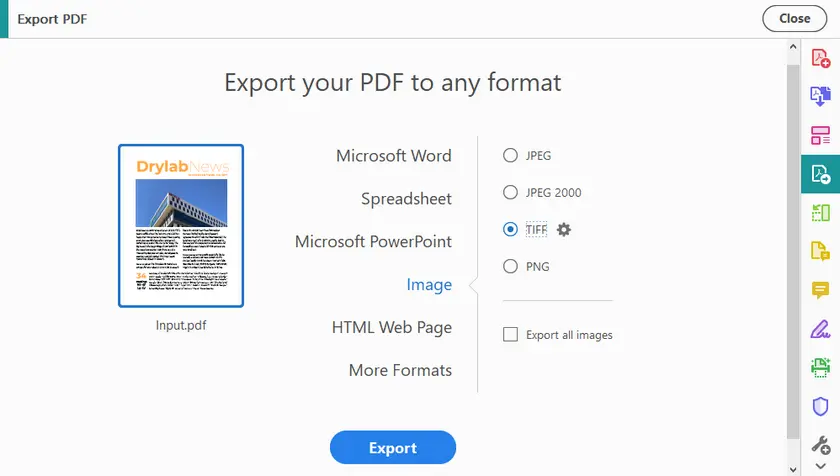
Steps to Export PDF to TIFF Using Adobe
- Launch Adobe Acrobat Pro and open your PDF file.
- Go to Tools and select Export PDF.
- Choose Image and then select TIFF as the output file format.
- Click the Gear icon next to TIFF, and set the Resolution to 300 pixels/inch.
- Click Export, choose the file location, and save your TIFF images.
Note:
- Acrobat exports one TIFF per page.
- If you need a multi-page TIFF, you’ll have to merge the individual TIFF files afterward (see solution in Method 2).
Method 2 — Convert PDF to TIFF Online with CloudConvert
CloudConvert is a versatile online converter that allows you to set the DPI to 300 for high-quality output. It is accessible from any browser, requires no installation, and works on all major platforms.
The tool exports each page as a separate TIFF image, so if you need a single multi-page TIFF, you will need to merge the files afterward. Despite this, CloudConvert is an excellent solution for users who want easy, high-resolution conversion without touching code.
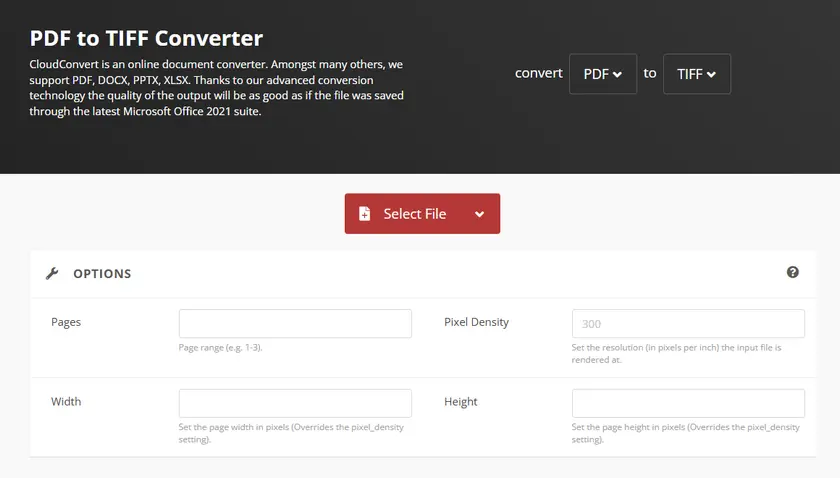
Steps to Convert PDF to TIFF Online
- Go to the CloudConvert PDF to TIFF converter in your web browser.
- Click Select File to upload your PDF from your device.
- Set Pixels Density to 300 in the Options section.
- Click the Convert button, then download your TIFF file once the conversion is complete.
Note:
- Each page is exported as a separate TIFF image.
Combine into Multi-Page TIFF (Optional)
If you want a single multi-page TIFF:
- Windows: Use IrfanView
- Open IrfanView, then choose File → Thumbnails.
- In the Thumbnails window, navigate to the folder with your TIFF images.
- Select the images you want to merge (Shift/Ctrl + click).
- Right-click any selected image → choose "Start Multipage-TIF dialog with selected files".
- In the dialog, set output folder and filename → click Create TIF Image.
- Online: Use any free online TIFF merger to combine pages
This step ensures you get both 300 DPI quality and multi-page TIFF without coding.
Method 3 — Convert PDF to Multi-Page TIFF with Preview (Mac)
Mac users can take advantage of the built-in Preview app, which supports exporting PDFs to multi-page TIFF directly. You can set the resolution to 300 pixels/inch to ensure print-quality output.
This method is simple, reliable, and requires no additional tools or installations. Preview is especially convenient for users who want a one-step solution for both DPI and multi-page output.
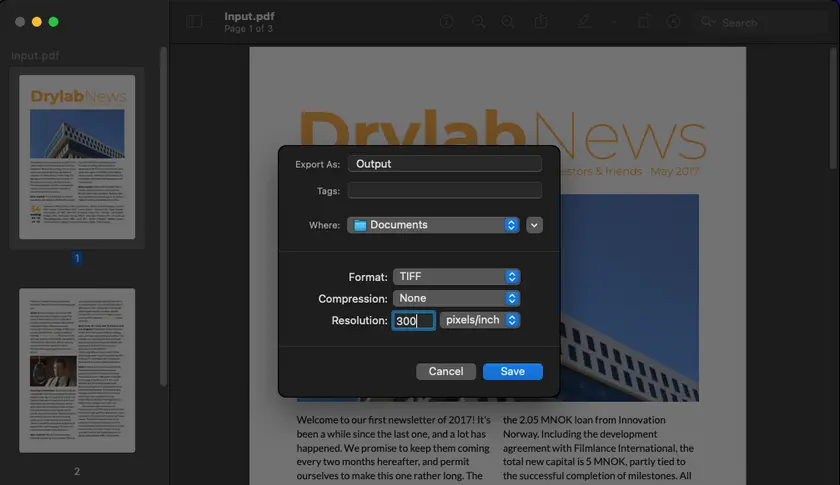
Steps to Convert PDF to TIFF Using Preview
- Open your PDF file with Preview.
- Click File in the top menu and select Export.
- Choose TIFF from the Format dropdown menu.
- Specify the output file name and select your desired file location.
- Set the Resolution to 300 pixels/inch.
- Click Save to finish the process.
This is a one-step solution for Mac users, combining ease-of-use with full control over DPI and multi-page output.
Method 4 — Convert PDF to Multi-Page TIFF with Python (Spire.PDF)
Python with Spire.PDF provides an automated way to convert PDFs to multi-page TIFFs at any DPI, making it ideal for batch processing or repetitive tasks. The workflow uses PIL (Python Imaging Library) to generate a single multi-page TIFF from all PDF pages in one go.
This method gives full control over resolution, output format, and automation, which is perfect for developers or users working with large volumes of files. Below is a ready-to-use code snippet demonstrating the process:
Install Required Libraries
Before running the code, install the necessary Python packages:
pip install spire.pdf pillow
- Spire.PDF for Python: Handles loading, reading, and converting PDF files. It provides methods to render each page as an image at the specified DPI.
- Pillow (PIL): A Python imaging library used to process and save images, including combining multiple pages into a single multi-page TIFF.
Python Code to Convert PDF to TIFF
from spire.pdf.common import *
from spire.pdf import *

from PIL import Image
from io import BytesIO

# Create a PdfDocument object
doc = PdfDocument()

# Load a PDF document
doc.LoadFromFile("Input.pdf")

# Create an empty list to store PIL Images
images = []

# Iterate through all pages in the document
for i in range(doc.Pages.Count):

    # Convert a specific page to an image stream
    with doc.SaveAsImage(i, 300, 300) as imageData:

        # Open the image stream as a PIL image
        img = Image.open(BytesIO(imageData.ToArray()))

        # Append the PIL image to list
        images.append(img)

# Save the PIL Images as a multi-page TIFF file
images[0].save("Output/ToTIFF.tiff", save_all=True, append_images=images[1:])

# Dispose resources
doc.Dispose()
How it works:
- Load the PDF into a PdfDocument object using Spire.PDF.
- Iterate through each page in the PDF and convert it into an image stream at 300 DPI.
- Open the image stream with PIL, creating a PIL Image object for each page.
- Store all images in a list and use PIL to save them as a single multi-page TIFF.
This approach gives you full control over DPI, produces a multi-page TIFF directly, and is ideal for automation and batch workflows.
Output:
You May Also Like: Convert PDF to TIFF and TIFF to PDF Using Python
PDF to TIFF Conversion Methods Comparison
| Method | Platform | Multi-Page TIFF | 300 DPI | Ease of Use | Automation / Batch Support | Cost | Ease of Merging |
|---|---|---|---|---|---|---|---|
| Adobe Acrobat Pro | Windows / Mac | ✘ (one per page) | ✔ | ★★★★☆ | ✘ | Paid | Medium (requires extra step) |
| CloudConvert | Web / Any | ✘ (one per page) | ✔ | ★★★★★ | ✘ | Free / Paid plan | Easy (via IrfanView or online tool) |
| Preview (Mac) | Mac | ✔ | ✔ | ★★★★★ | ✘ | Free (built-in) | Built-in (one-step) |
| Python + Spire.PDF | Windows / Mac / Linux | ✔ | ✔ | ★★★☆☆ | ✔ | Paid (Spire.PDF library) | Built-in (one-step) |
Conclusion
Converting PDFs to multi-page TIFFs at 300 DPI can be straightforward when you pick the right method for your workflow. Preview on Mac provides a simple, one-step solution, while Adobe Acrobat Pro and online converters such as CloudConvert offer high-quality, 300 DPI exports but produce one file per page, requiring an additional merging step.
For users needing automation or batch processing, Python with Spire.PDF offers full control over resolution and multi-page output, making it ideal for larger workflows. By understanding the strengths and limitations of each method, you can reliably produce high-quality TIFFs that meet both professional and archival standards.
FAQs
Q1: How can I merge single-page TIFFs into one multi-page TIFF?
Use IrfanView (Windows) or any online TIFF merger tool.
Q2: Is 300 pixels/inch the same as 300 DPI?
Yes. In PDF-to-image conversion, 300 PPI effectively equals 300 DPI, ensuring high-quality output for printing and OCR.
Q3: Can Python generate multi-page TIFFs directly?
Yes. Using Spire.PDF with Python, you can generate multi-page TIFFs at 300 DPI in a single step, perfect for batch processing.
Q4. Why are my converted TIFF files too large?
TIFF files at 300 DPI are large because they store high-resolution image data with minimal compression. To reduce file size, you can use compression options like LZW or ZIP (if supported), or lower the DPI if high resolution is not required.
See Also
Change PDF Background Color: White to Custom or Dark
Table of Contents
- Why Change PDF Background Color?
- Method 1 — Using Acrobat Pro (Professional Editing)
- Method 2 — Using Online Tool (Quick & Free)
- Method 3 — Using Python with Spire.PDF (Batch Processing)
- Best Practices for Maintaining Readability
- Bonus — Dark Mode Viewing in Adobe Acrobat (Viewer-Level)
- Conclusion
- FAQs
White backgrounds in PDFs are not always ideal. They can cause eye strain during long reading sessions, look unappealing in branded documents, or highlight imperfections in scanned files.
In this guide, you’ll learn three practical ways to change PDF background color, including permanent changes using Adobe Acrobat Pro, quick online edits, and Python automation for batch processing. A bonus section also shows how to enable dark mode viewing in Adobe Acrobat without modifying the file.
On this page:
- Why Change PDF Background Color?
- Method 1 — Using Acrobat Pro (Professional Editing)
- Method 2 — Using Online Tool (Quick & Free)
- Method 3 — Using Python with Spire.PDF (Batch Processing)
- Best Practices for Maintaining Readability
- Bonus — Dark Mode Viewing in Adobe Acrobat (Viewer-Level)
- Conclusion
- FAQs
Why Change PDF Background Color?
Changing the background color of a PDF can:
- Improve readability with softer or darker backgrounds.
- Enhance visual appeal for presentations or corporate branding.
- Correct scanned PDFs that have yellow or gray backgrounds.
- Reduce eye strain for on-screen reading.
However, simply changing the background isn’t always enough — text contrast must be preserved for readability.
Method 1 — Using Acrobat Pro (Professional Editing)
Adobe Acrobat Pro allows you to permanently modify the PDF background color, creating a true file-level change that applies for all readers. This method is ideal for changing white backgrounds to light gray, soft beige, or other colors while keeping black or dark text fully readable.

Steps to Change PDF Background Color Using Adobe
- Launch Adobe Acrobat Pro on your computer.
- Click Tools in the top menu and select Edit PDF .
- In the secondary toolbar, click More → Background → Add/Update .
- Click Color , then choose your desired background color (e.g., light gray).
- Apply the changes to all pages or select specific pages.
- Click OK , then save the document to preserve the new background.
Pros
- Intuitive, user-friendly interface.
- Maintains text readability.
- Precise color selection per page.
Cons
- Paid software required.
- Not suitable for batch processing.
Method 2 — Using Online Tool (Quick & Free)
Online PDF tools offer a fast and convenient way to change backgrounds without installing software. They’re ideal for simple edits like presentations or branding updates, though most do not adjust text color automatically.
Steps to Change PDF Background Color Online
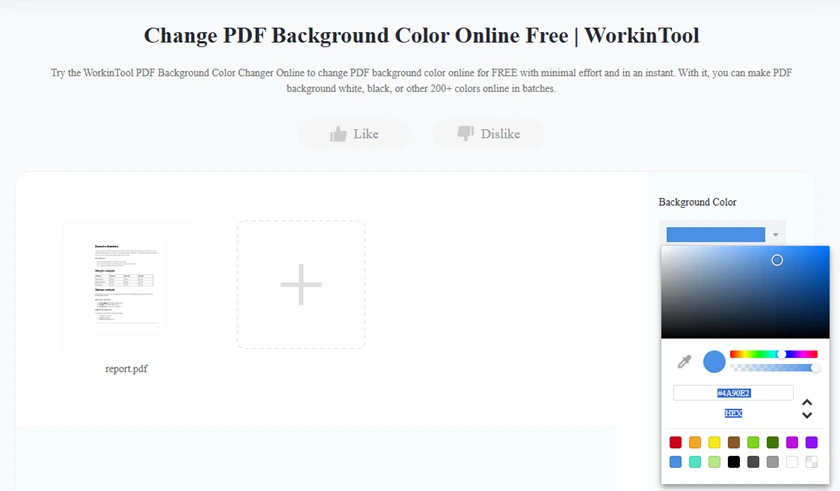
- Open a trusted online PDF tool such as WorkinTool.
- Click Upload PDF and select the file from your device.
- Locate the Background Color tool in the interface.
- Select a new background color from the palette or enter a custom hex code.
- Apply the color change to all pages.
- Download the updated PDF and review the result to ensure readability.
Pros
- No installation required.
- Quick for small edits.
- Works on any device.
Cons
- Often has file size limitation.
- May not be suitable for confidential documents.
Method 3 — Using Python with Spire.PDF (Batch Processing)
For developers and businesses managing multiple documents, Spire.PDF offers an efficient, scalable Python solution for programmatic PDF editing. This library supports background changes and batch processing without the need for Adobe Acrobat.
This method allows you to apply a consistent background color across hundreds of documents, saving time and ensuring uniformity.
Steps
- Install Spire.PDF for Python in your environment (pip install spire.pdf).
- Prepare the PDF files you want to process and place them in a folder.
- Open your Python editor and create a script to loop through each PDF file.
- For each page, set the background color to your desired shade.
- Save the modified PDF to a new folder to preserve the originals.
Example Python Code (Batch Processing)
from spire.pdf.common import *
from spire.pdf import *
import os

# Input and output folders
input_folder = "C:\\Users\\Administrator\\Desktop\\PDFs"
output_folder = "C:\\Users\\Administrator\\Desktop\\Output"

# Loop through all PDF files in the input folder
for filename in os.listdir(input_folder):
    if filename.endswith(".pdf"):
        file_path = os.path.join(input_folder, filename)

        # Load the PDF
        doc = PdfDocument()
        doc.LoadFromFile(file_path)

        # Change background color for all pages
        for i in range(doc.Pages.Count):
            page = doc.Pages.get_Item(i)
            page.BackgroundColor = Color.get_LightYellow()

        # Save updated PDF to output folder
        output_path = os.path.join(output_folder, filename)
        doc.SaveToFile(output_path)
Pros
- Automates bulk processing.
- Consistent results across multiple PDFs.
- Ideal for branding or workflow automation.
Cons
- Cannot automatically recolor existing text.
- Requires basic Python knowledge.
Tip: Use this method for batch updates, but for true dark mode readability, text color adjustments are needed.
Read Further : Set a Background Color or Image for PDF Using Python
Best Practices for Maintaining Readability
When changing PDF backgrounds, follow these guidelines:
- Use high-contrast combinations: dark text on light backgrounds or light text on dark backgrounds.
- Avoid pure black (#000000) for the background to reduce eye strain.
- Keep text colors readable after background changes.
- Test documents on different devices or PDF readers to ensure consistency.
- For scanned PDFs, consider noise reduction and contrast enhancement before applying background color.
Tip: Subtle shades like light gray (#f2f2f2) work well in professional contexts without overwhelming the reader or making text difficult to scan.
Bonus — Dark Mode Viewing in Adobe Acrobat (Viewer-Level)
If your goal is comfortable on-screen reading, Adobe Acrobat offers a viewer-level dark mode. This method does not modify the PDF file, but simulates dark mode by changing background and text colors in the reader.
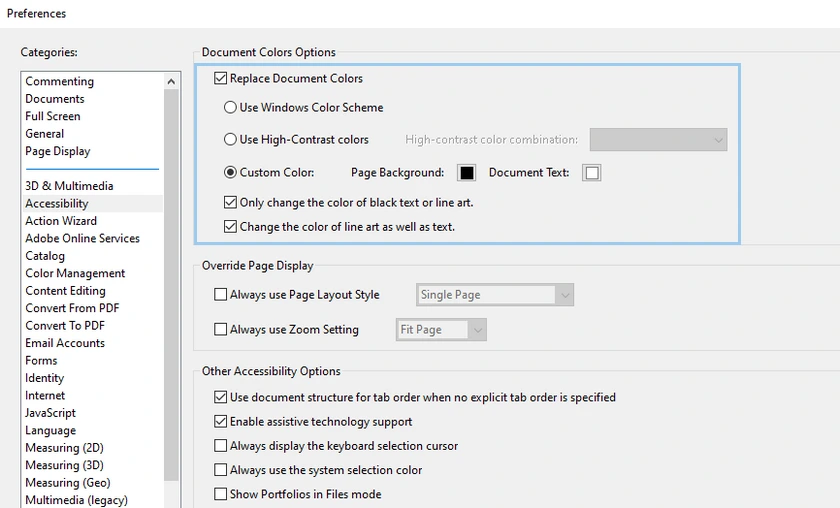
Steps
- Launch Adobe Acrobat on your computer.
- Go to Edit → Preferences → Accessibility .
- Enable Replace Document Colors .
- Select Custom Color , then set:
- Page Background → dark gray
- Document Text → light gray or white
- Click OK and view your PDF in dark mode.
Note: Changes apply only in your Acrobat Reader. The original PDF file remains unchanged.
Conclusion
Changing the background color of PDFs enhances both readability and aesthetics. Selecting the right method depends on your goals:
- Adobe Acrobat Pro: Best for users who want an easy-to-use, professional interface to edit backgrounds with precise control.
- Online Tools: Quick and convenient for one-off edits or presentation files.
- Python (Spire.PDF): Ideal for batch processing, automation, and ensuring consistent styling across multiple documents.
- Bonus Viewer-Level Dark Mode: Useful for personal comfort reading without altering the PDF file.
For scanned PDFs, adjusting the background color alone may not be sufficient — consider combining background changes with contrast enhancement or noise removal for optimal results. By choosing the appropriate method and applying best practices, you can create PDFs that are both visually appealing and easy to read across devices and environments.
FAQs
Q1. Can I change PDF background color for free?
Yes, online tools can do this for free, but they often have limitations in quality and features.
Q2. How do I make a PDF dark mode permanently?
Most tools don’t support true permanent dark mode. You would need to modify both background and text colors, which is not easily achievable with standard tools.
Q3. Why does my text become hard to read after changing background?
Because the text color remains unchanged. Black text on a dark background reduces contrast.
Q4. Can I batch change PDF background color?
Yes, using Python libraries like Spire.PDF is the most efficient way to process multiple files.
See Also
Convert JSON to Excel: 5 Methods for Different Workflows
Table of Contents
- Prepare Your JSON Structure
- Method 1 — Excel Power Query (No Code)
- Method 2 — Online JSON Converter (Quick One-Off)
- Method 3 — Python with pandas (Automation Friendly)
- Method 4 — Python with Spire.XLS (Formatted Excel Reports)
- Method 5 — Node.js with SheetJS (JavaScript Workflow)
- Quick Comparison of the 5 Methods
- Best Practices for Converting JSON to Excel
- Conclusion
- FAQs

JSON is one of the most widely used formats for storing and exchanging structured data. APIs, configuration files, and many modern applications use JSON to represent datasets.
However, JSON is not always convenient for analysis, reporting, or sharing with non-technical users. In many cases, converting JSON data into an Excel spreadsheet makes it easier to view, filter, sort, and present the information.
This guide shows five practical methods to convert JSON to Excel, ranging from no-code solutions to programmatic approaches.
Overview of methods covered:
- Method 1 — Excel Power Query (No Code)
- Method 2 — Online JSON Converter (Quick One-Off)
- Method 3 — Python with pandas (Automation Friendly)
- Method 4 — Python with Spire.XLS (Formatted Excel Reports)
- Method 5 — Node.js with SheetJS (JavaScript Workflow)
Prepare Your JSON Structure
Before converting JSON to Excel, it’s important to understand how the structure of your JSON data affects the conversion process. Many conversion tools assume a specific format, and mismatched structures can cause unexpected results or errors.
Root Array vs. Root Object
Many JSON-to-Excel tools expect the data to be a root array of objects, like this:
[
  {"id":1,"name":"Alice"},
  {"id":2,"name":"Bob"}
]
This structure maps naturally to an Excel table:
| id | name |
|---|---|
| 1 | Alice |
| 2 | Bob |
Each object becomes a row, and the keys become column headers.
However, many real-world APIs and datasets wrap the array inside a root object:
{
  "employees":[
    {"id":1,"name":"Alice"},
    {"id":2,"name":"Bob"}
  ]
}
In this case, the actual tabular dataset is stored inside the "employees" property.
Why Some Tools Fail on Root Objects
Some converters cannot automatically determine which property contains the tabular dataset. They expect the JSON file to start directly with an array.
When the data is wrapped inside a root object, these tools may fail to parse the file correctly or produce empty results.
Therefore, you may need to extract the relevant array manually before performing the conversion. For example, you might restructure the JSON so the array becomes the root element for an online converter, or access it directly in code.
Accessing the Array in Python
For example, if the dataset is stored under "employees", you can load and extract it like this:
data = json.load(f)["employees"]
After this step, data becomes a list of objects, which can be easily written to Excel as rows and columns.
Method 1 — Excel Power Query (No Code)
If you already have Microsoft Excel installed, you can import JSON data directly without writing any code. Excel’s Power Query feature allows users to load JSON files and automatically convert them into a tabular format. This approach is ideal for analysts or business users who want to quickly view JSON data inside a spreadsheet environment.
Steps
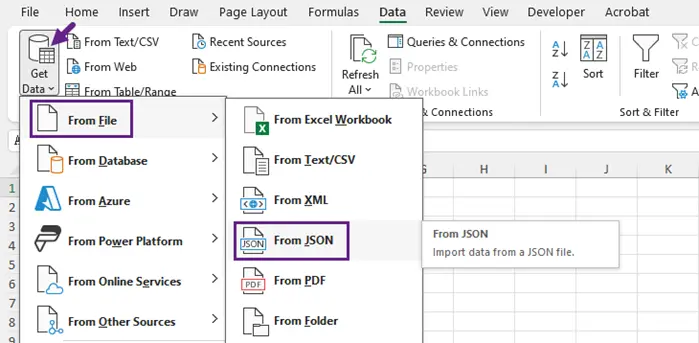
- Launch Microsoft Excel on your computer.
- Click on the Data tab located in the top menu of Excel.
- In the Data tab, navigate to Get Data, then select From File, and choose From JSON from the dropdown menu.
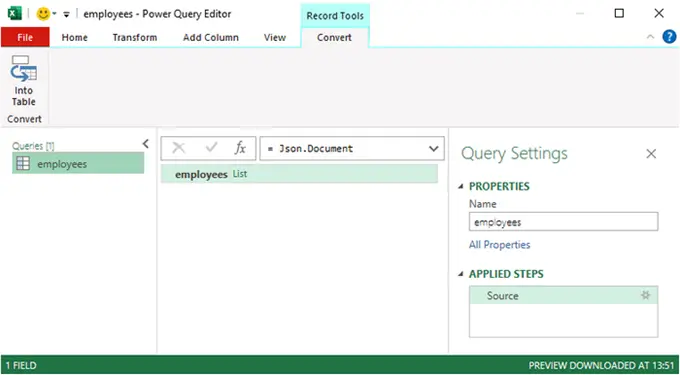
- When prompted, locate and select your JSON file, then click Import.
- The Power Query Editor will launch.
-
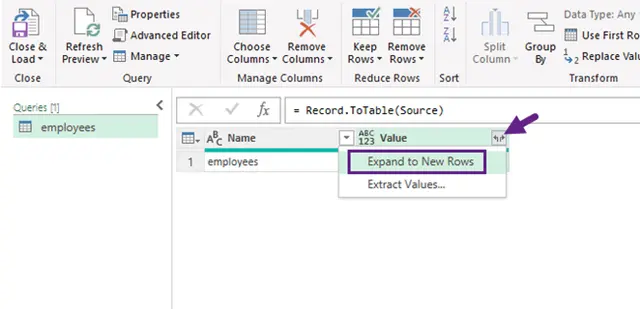
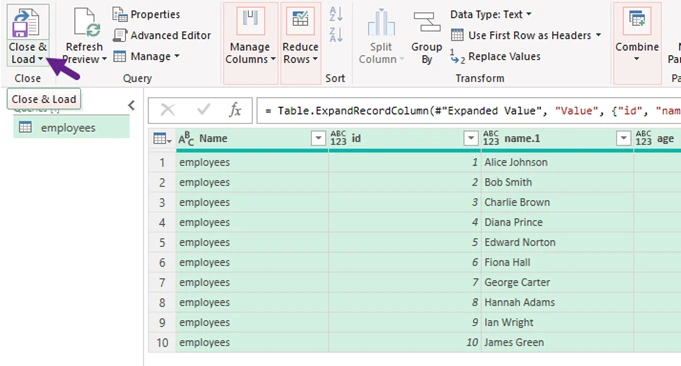
If the file opens as a list of records:
- Click To Table to convert the list into a table format.
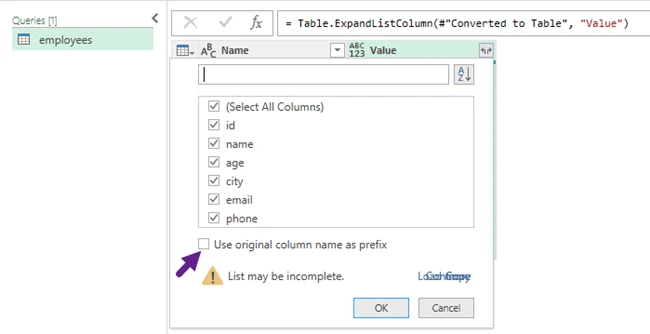
- Then, click the Expand (⇄) icon in the column header to reveal column names. If columns still show "List" or "Record," click the expand icon again to flatten further.
- A dialog box will appear, allowing you to select which fields you want to include in the table. Choose the necessary fields, uncheck "Use original column name as prefix" for cleaner headers, and then click OK.
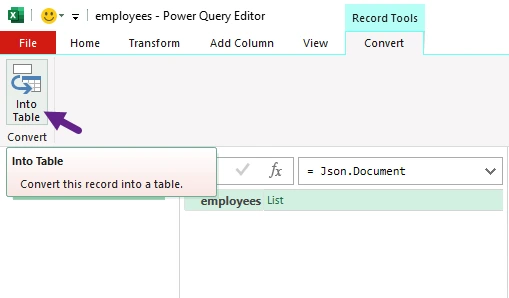
- Click Close & Load to import the structured data into your Excel worksheet.
- Save your Excel file in .xlsx format, ensuring your data is preserved for future use.
When to use this method
Best for small datasets and users who prefer a visual interface rather than programming.
Method 2 — Online JSON Converter (Quick One-Off)
Online JSON converters provide one of the fastest ways to turn JSON files into Excel spreadsheets. These tools typically require only a file upload and automatically generate a downloadable Excel file. Platforms like those offered by jsontoexcel.net can complete the conversion in seconds without installing any software.
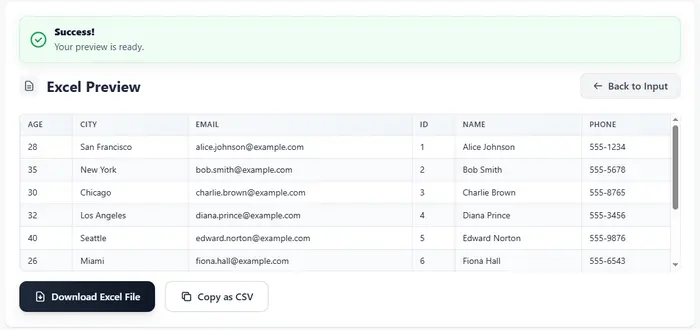
Steps
- Open a JSON-to-Excel converter website.
- Copy and paste your JSON data directly into the text editor, or upload a file from your computer.
- Click Convert to Excel button to initiate the conversion process.
- Download the generated Excel file.

Important Note
Most online converters expect a root array of objects; otherwise, they may fail silently or produce unexpected results. This format converts most reliably to Excel.
When to use this method
Best for quick, one-time conversions or testing sample datasets.
Method 3 — Python with pandas (Automation Friendly)
For developers and data engineers, Python provides a powerful way to automate JSON-to-Excel conversions. The popular data analysis library pandas can easily load JSON files, transform them into a structured DataFrame, and export the results to Excel. This method is particularly useful when the conversion needs to be integrated into scripts, ETL workflows, or automated reporting pipelines.
Install Dependencies
pip install pandas openpyxl
Convert JSON to Excel
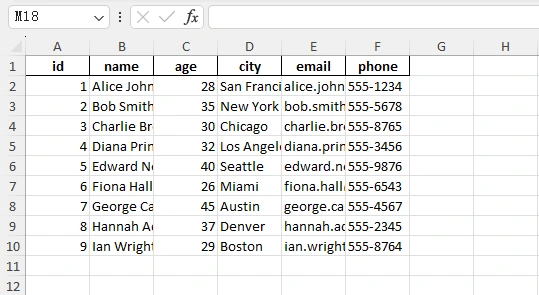
import pandas as pd
import json

with open("employees.json") as f:
    data = json.load(f)["employees"]

df = pd.json_normalize(data)
df.to_excel("output.xlsx", index=False)
Output:
When to use this method
Ideal for automated data processing, analytics workflows, and large datasets.
Method 4 — Python with Spire.XLS (Formatted Excel Reports)
If your goal is to generate well-formatted Excel reports, Python can work with Spire.XLS to create spreadsheets programmatically. Unlike simple data export libraries, Spire.XLS provides extensive control over Excel formatting, including fonts, colors, alignment, and column sizing. This makes it suitable for producing professional spreadsheets that are ready to share with stakeholders.
Install the Library
pip install spire.xls
Example Code
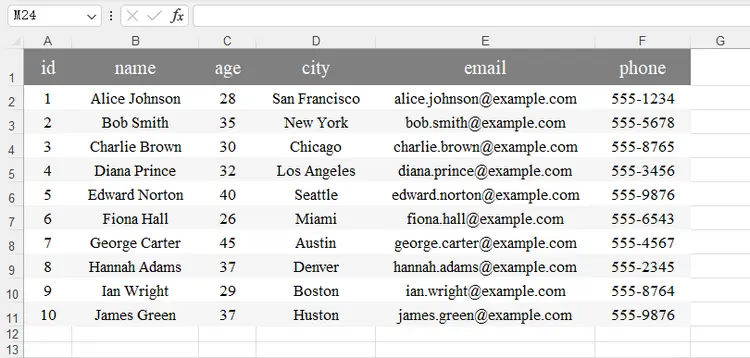
The following script reads JSON employee data, dynamically generates column headers, writes rows into Excel, and applies formatting such as header styling, alternating row colors, and auto-fitted columns.
import json
from spire.xls import *

# Load JSON data
with open('C:/Users/Administrator/Desktop/employees.json') as f:
    data = json.load(f)["employees"]

if not data:
    raise ValueError("JSON data is empty!")

# Create workbook and worksheet
workbook = Workbook()
sheet = workbook.Worksheets[0]

# Extract headers dynamically
headers = list(data[0].keys())
num_cols = len(headers)

# Write headers
for col, header in enumerate(headers, start=1):
    sheet.Range[1, col].Value = header

# Write rows
for row_index, item in enumerate(data, start=2):
    for col_index, key in enumerate(headers, start=1):
        value = item.get(key, "")
        sheet.Range[row_index, col_index].Value = str(value) if value is not None else ""

# Header formatting
header_row = sheet.Range[1, 1, 1, num_cols]
header_row.RowHeight = 30
header_style = header_row.Style
header_style.Font.FontName = "Times New Roman"
header_style.Font.Size = 16
header_style.Font.Color = Color.get_White()
header_style.Color = Color.FromArgb(255, 128, 128, 128)
header_style.HorizontalAlignment = HorizontalAlignType.Center
header_style.VerticalAlignment = VerticalAlignType.Center

# Data formatting
locatedRange = sheet.AllocatedRange
for rowNum in range(2, locatedRange.RowCount + 1):
    data_row = sheet.Range[rowNum, 1, rowNum, num_cols]
    data_row.RowHeight = 20
    row_style = data_row.Style
    row_style.Font.FontName = "Times New Roman"
    row_style.Font.Size = 13
    row_style.HorizontalAlignment = HorizontalAlignType.Center
    row_style.VerticalAlignment = VerticalAlignType.Center
    row_style.Color = Color.get_White() if rowNum % 2 == 0 else Color.FromArgb(255, 245, 245, 245)

# Auto-fit columns
extra_width = 3
for col in range(1, num_cols + 1):
    sheet.AutoFitColumn(col)
    current_width = sheet.Columns[col - 1].ColumnWidth
    sheet.Columns[col - 1].ColumnWidth = current_width + extra_width

workbook.SaveToFile("JsonToExcel.xlsx", ExcelVersion.Version2016)
workbook.Dispose()
Output:
When to use this method
Best for automated report generation, applications that require precise Excel formatting, and workflows where Excel files are the final deliverable.
You May Also Like: Convert JSON to/from Excel in Python – Full Guide with Examples
Method 5 — Node.js with SheetJS (JavaScript Workflow)
JavaScript developers can convert JSON to Excel using libraries such as SheetJS. This library provides utilities for transforming JSON objects into spreadsheet worksheets and writing them to .xlsx files. Because it works well in Node.js environments, it is commonly used in backend services and data-processing scripts.
Install
npm install xlsx
Example
const XLSX = require("xlsx");
const fs = require("fs");

const data = JSON.parse(fs.readFileSync("employees.json")).employees;

const worksheet = XLSX.utils.json_to_sheet(data);
const workbook = XLSX.utils.book_new();

XLSX.utils.book_append_sheet(workbook, worksheet, "Employees");
XLSX.writeFile(workbook, "output.xlsx");
Output:

When to use this method
Best for web applications, Node.js backends, and JavaScript-based automation workflows.
Quick Comparison of the 5 Methods
Each method for converting JSON to Excel serves a different type of user and workflow. Some approaches focus on simplicity and speed, while others provide automation and formatting control for more advanced scenarios. The table below summarizes the key differences to help you choose the most suitable option.
| Method | Skill Level | Automation | Best For | Limitations |
|---|---|---|---|---|
| Excel (Power Query) | Beginner | No | Quick manual conversion and data exploration | Requires manual steps; limited for repeated workflows |
| Online Converter | Beginner | No | One-time conversions and quick testing | File size limits; potential privacy concerns |
| Python with pandas | Intermediate | Yes | Data pipelines, analytics, and large datasets | Limited control over advanced Excel formatting |
| Python with Spire.XLS | Intermediate | Yes | Generating professional Excel reports | Requires additional library setup |
| Node.js with SheetJS | Intermediate | Yes | JavaScript applications and backend automation | Requires Node.js environment |
Best Practices for Converting JSON to Excel
Converting JSON to Excel may seem straightforward, but real-world datasets often contain nested structures, inconsistent keys, or large volumes of data. Following a few best practices can help ensure reliable and readable results.
- Flatten Nested JSON Structures
- Consider File Size and Performance
Large JSON datasets can contain thousands or millions of records, which may cause performance issues when converting directly to Excel. A few tips:
- Use programmatic solutions (Python or Node.js) for large files.
- Process the data in batches if necessary.
- Avoid loading extremely large datasets directly into Excel.
Excel itself has limits (for example, around 1,048,576 rows per sheet), so very large datasets may need to be split across multiple worksheets.
- Use Multiple Sheets for Complex Data
- Apply Formatting for Better Readability
If the Excel file will be shared with colleagues or stakeholders, formatting can significantly improve readability.
Useful formatting practices include:
- Bold header rows
- Adjusted column widths
- Alternating row colors
- Consistent fonts and alignment
Libraries like Spire.XLS allow programmatic control over these elements, making it possible to generate presentation-ready reports automatically.
Many JSON files contain nested objects or arrays. While JSON supports hierarchical data, Excel works best with flat, tabular structures.
For example, JSON like this:
{
  "id": 1,
  "name": "Alice",
  "address": {
    "city": "San Francisco",
    "zip": "94105"
  }
}
may need to be flattened into:
| id | name | address.city | address.zip |
|---|---|---|---|
| 1 | Alice | San Francisco | 94105 |
Libraries such as pandas provide tools like json_normalize() to flatten nested data automatically. When working with more complex JSON, preprocessing the structure before exporting to Excel often produces cleaner results.
Some APIs return JSON with multiple related arrays, such as:
{
  "customers": [...],
  "orders": [...],
  "products": [...]
}
Instead of forcing everything into one worksheet, consider exporting each dataset into separate Excel sheets. This preserves the logical structure of the original data and makes analysis easier.
Conclusion
JSON is widely used for storing and exchanging structured data, but it is not always ideal for analysis or sharing with non-technical users. Converting JSON to Excel makes the data easier to read, filter, and organize in a familiar spreadsheet format.
For simple, one-time conversions, tools like Excel or online converters are often sufficient. However, developers working with data pipelines or automated reports will benefit from programmatic solutions such as pandas, Spire.XLS, or SheetJS, which offer greater flexibility and control over the output.
FAQs
Q1. Why do some online converters reject valid JSON?
Many online converters expect a root array of objects as the dataset. If the JSON file starts with a root object containing nested arrays, the tool may not know which property represents the table. Extracting the relevant array before uploading the file usually resolves this issue.
Q2. What is the difference between a JSON array and a JSON object?
A JSON array is an ordered list of values enclosed in square brackets [], while a JSON object is a collection of key-value pairs enclosed in curly braces {}.
Q3. How can I convert nested JSON to Excel?
Nested JSON often requires flattening before exporting to Excel. Tools like pandas provide functions such as json_normalize() that automatically expand nested fields into columns. Alternatively, you can manually extract nested objects or arrays before writing the data.
Q4. Can Excel open JSON files directly?
Yes. Excel includes a feature called Power Query , which can import JSON files and convert them into tables. However, the process may require expanding nested structures manually to obtain a clean tabular dataset.
Also Read
Convert PHP to PDF: Creating High-Quality Code PDFs
Table of Contents
- Why Convert PHP Code to PDF?
- Method 1 — Print PHP Code to PDF in a Browser (No Syntax Highlighting)
- Method 2 — Export PHP Code to PDF with VS Code (High Visual Quality)
- Method 3 — Convert PHP to PDF Using Online Tools (No Installation)
- Method 4 — Convert PHP to PDF with Python (Full Control & Automation)
- Compare the Methods — Choosing the Right Way
- Final Thoughts
- PHP to PDF FAQs
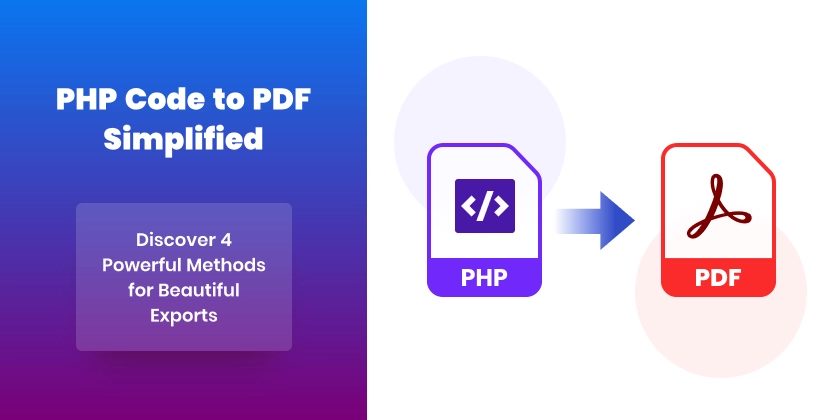
Exporting PHP source code to PDF is useful for documentation, code reviews, compliance archives, tutorials, and client delivery. A well-formatted PDF makes code easier to read, share, and print — especially when syntax highlighting and line numbers are preserved.
This guide walks you through four practical methods, from the quickest manual option to a fully automated developer pipeline.
Quick Navigation
- Method 1 — Print PHP Code to PDF in a Browser
- Method 2 — Export PHP Code to PDF with VS Code
- Method 3 — Convert PHP to PDF Using Online Tools
- Method 4 — Convert PHP to PDF with Python
Why Convert PHP Code to PDF?
Developers and teams convert PHP code to PDF for several common reasons:
- Documentation — Include readable code in technical manuals
- Code Reviews — Share snapshots without exposing repositories
- Client Delivery — Provide non-editable reference materials
- Training & Tutorials — Print-friendly learning resources
- Archival & Compliance — Long-term, tamper-resistant storage
If visual clarity matters, syntax highlighting and clean layout are essential.
Method 1 — Print PHP Code to PDF Using a Browser (No Syntax Highlighting)
This is the quickest way to turn PHP code into a PDF using tools you already have. It works by printing the file directly from your browser, making it ideal for simple sharing and temporary documentation. However, since browsers treat the file as plain text, visual formatting is very limited.
Best for: Fastest possible export
Skill level: Beginner
Syntax highlighting: No

Steps
- Open your .php file in a web browser (e.g. Google Chrome).
- Press Ctrl + P (Print).
- Choose Save as PDF as the printer.
- Click Save.
Pros
- No installation required.
- Works on any operating system.
- Fastest workflow.
Cons
- No syntax highlighting.
- Plain formatting.
- Harder to read for large files.
This is a quick “good enough” option when formatting does not matter.
Method 2 — Export PHP Code to PDF with VS Code (High Visual Quality)
If presentation quality matters, exporting from a modern code editor is a great choice. VS Code can generate polished PDFs that closely match what you see in the editor, including themes, fonts, and spacing. This makes it especially suitable for tutorials, documentation, and code samples.
Best for: Clean, beautiful code PDFs
Skill level: Beginner → Intermediate
Syntax highlighting: Yes
Using VS Code with the PrintCode extension produces professional, IDE style PDFs with excellent readability.
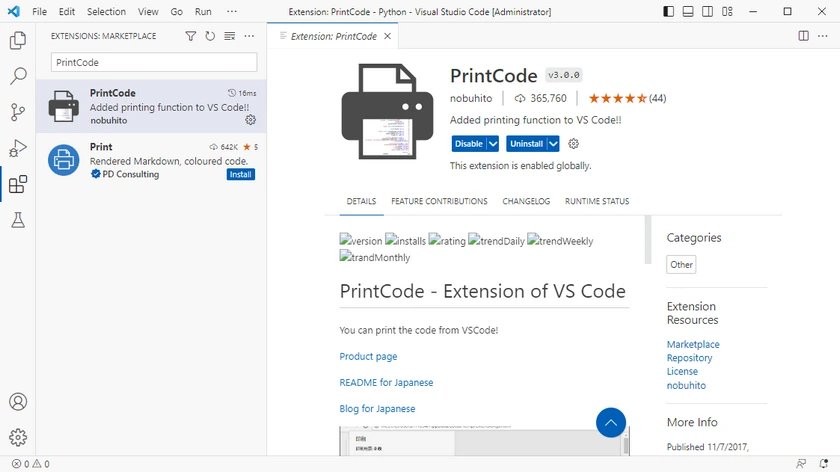
Step 1 — Install PrintCode
- Open VS Code.
- Go to Extensions (Ctrl + Shift + X).
- Search for PrintCode.
- Click Install.
Step 2 — Open Your PHP File
Open the PHP file you want to export.
Step 3 — Open Print Preview
- Press F1 to open the Command Palette.
- Type PrintCode.
- Click the PrintCode command.
- The print preview window will appear.
Step 4 — Save as PDF
In the preview window:
- Choose Save as PDF as the default printer.
- Adjust page margins (optional).
- Include headers and footers (optional).
- Click Save.
Pros
- Excellent syntax highlighting.
- WYSIWYG layout.
- Very readable output.
- No coding required.
Cons
- Manual workflow.
- Not suitable for batch conversion.
Ideal for documentation, tutorials, and sharing polished code samples.
Method 3 — Convert PHP to PDF Using Online Tools (No Installation)
Online converters let you generate PDFs without installing any software locally. You simply upload your PHP file, configure formatting options, and download the result. This convenience makes them ideal for quick, occasional tasks and users on restricted devices.
Best for: One-time conversions on any device
Skill level: Beginner
Syntax highlighting: Usually supported
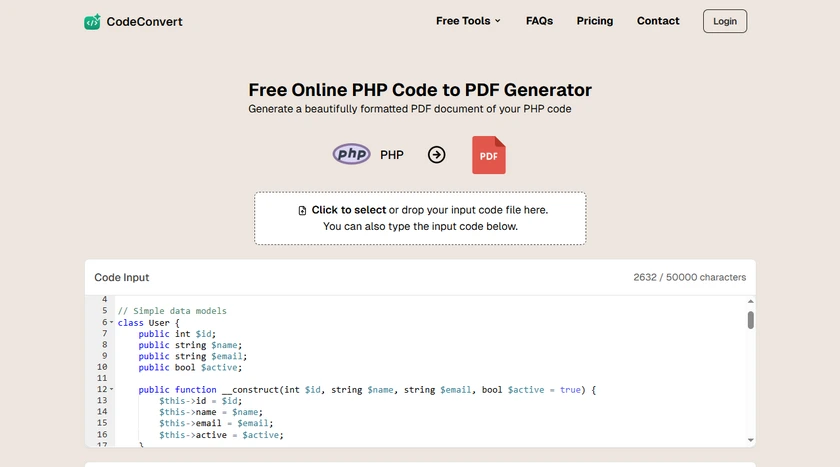
Steps
- Open an online code-to-PDF converter.
- Upload your PHP file.
- Adjust formatting options under PDF Options, including font, line numbers, and theme.
- Download the generated PDF.
Pros
- No software installation.
- Works on mobile devices.
- Very fast for small files.
Cons
- Privacy concerns (code uploaded to third party).
- File size limits.
- Limited customization.
- Not ideal for sensitive projects.
Best for quick, non-confidential tasks.
Method 4 — Convert PHP to PDF with Python (Full Control & Automation)
For developers who need automation and precise formatting control, a programmatic solution is the most powerful option. This method converts source code through a customizable pipeline, making it perfect for batch processing, report generation, and engineering workflows. It requires some setup but delivers the most flexibility and scalability.
Best for: Automation, batch processing, custom styling
Skill level: Intermediate → Advanced
Syntax highlighting: Yes (professional quality)
This method gives you full control over formatting and is ideal for developer workflows and report systems.
What This Pipeline Does
PHP source code → Syntax highlighting → Structured document → PDF
Step 1 — Install Required Libraries
pip install pygments spire.doc
- Pygments: A powerful syntax highlighter for over 300 programming languages that enhances code readability by applying color-coding to snippets.
- Spire.Doc for Python: A comprehensive library for creating and manipulating Word documents, allowing seamless export to PDF with precise formatting for professional-quality results.
Step 2 — Convert PHP Code to PDF
The script below:
- Preserves original line breaks.
- Adds line numbers.
- Applies syntax highlighting.
- Produces a clean two-column layout.
- Uses a customizable monospaced developer font with adjustable size.
- Supports configurable page size (e.g., A4, Letter) and adjustable margins.
- Exports directly to PDF.
from pathlib import Path
from pygments import highlight
from pygments.lexers import PhpLexer
from pygments.formatters import RtfFormatter
from spire.doc import *

# ==============================
# Read PHP file
# ==============================
code = Path(r"C:\Users\Administrator\Desktop\Demo.php").read_text(encoding="utf-8-sig")
lines = code.split("\n")  # preserve real lines

# ==============================
# Create Word document
# ==============================
doc = Document()
section = doc.AddSection()
section.PageSetup.PageSize = PageSize.A4()
section.PageSetup.Margins.All = 40

# ==============================
# Create table
# ==============================
table = section.AddTable(True)
table.ResetCells(len(lines), 2)

table.PreferredWidth = PreferredWidth(WidthType.Percentage, 100)

for i in range(table.Rows.Count):
    row = table.Rows[i]
    row.Cells[0].SetCellWidth(8, CellWidthType.Percentage)
    row.Cells[1].SetCellWidth(92, CellWidthType.Percentage)

# ==============================
# Syntax highlighter
# ==============================
formatter = RtfFormatter(fontface="Consolas")
lexer = PhpLexer(startinline=True)

# ==============================
# Fill table
# ==============================
line_no_width = len(str(len(lines)))

for i, line in enumerate(lines):
    # Line number
    num_para = table.Rows[i].Cells[0].AddParagraph()
    num_para.AppendText(str(i + 1).rjust(line_no_width))

    # Highlight PHP
    rtf = highlight(line if line.strip() else " ", lexer, formatter).rstrip()
    rtf = rtf.replace(r"\f0", r"\f0\fs26") # font size

    code_para = table.Rows[i].Cells[1].AddParagraph()
    code_para.AppendRTF(rtf)

# ==============================
# Border styling
# ==============================
table.TableFormat.Borders.Horizontal.BorderType = BorderStyle.none

# ==============================
# Save
# ==============================
doc.SaveToFile("PHP_Code.pdf", FileFormat.PDF)
doc.Dispose()

Pros
- Fully automated workflow.
- Batch-convert entire projects.
- Professional developer layout.
- Precise formatting control.
- Easy to integrate into pipelines.
Cons
- Requires environment setup.
- More technical than other methods.
Perfect for engineering teams and documentation systems.
You May Also Like: Convert Python Code to Word (Plain or Syntax-Highlighted)
Compare the Methods — Choosing the Right Way
| Feature | Browser Print | VS Code + PrintCode | Online Converters | Python Pipeline |
|---|---|---|---|---|
| Ease of use | ★★★★★ | ★★★★☆ | ★★★★★ | ★★★☆☆ |
| Setup required | None | Install extension | None | Install libraries |
| Syntax highlighting | No | Yes | Yes (varies by tool) | Yes (full control) |
| Visual quality | Basic | High | High | Excellent (customizable) |
| Line numbers | No | Yes | Yes | Yes |
| Batch conversion | No | No | No | Yes |
| Automation friendly | No | No | No | Yes |
| Custom styling | No | No | Limited | Full control |
| Privacy / security | High (local) | High (local) | Low–Medium (upload required) | High (local) |
| Best for | Quick exports | Polished documentation | One-off quick tasks | Dev workflows & reports |
Final Thoughts
There’s no single “best” way to convert PHP to PDF — the right method depends on your workflow and goals. For quick, occasional exports, the browser method is sufficient. If presentation quality and readability are important, VS Code with PrintCode offers a polished solution. Online converters provide convenience for users on restricted devices or when no software installation is possible. For teams, automation, or large projects, Python pipelines give full control and flexibility.
By understanding your needs — speed, visual quality, automation, and security — you can select the method that best fits your workflow and ensures your code is presented clearly and professionally.
PHP to PDF FAQs
Q1. Does converting PHP to PDF preserve syntax highlighting?
Only tools that support code rendering (editors, converters, or libraries) preserve syntax highlighting. Browser printing does not.
Q2. Can I batch convert multiple PHP files to PDF?
Yes. Programmatic solutions like Python pipelines can process entire folders automatically.
Q3. Is it safe to use online converters?
They are convenient but not recommended for confidential or proprietary code.
Q4. What’s the best method for documentation?
VS Code exports are ideal for small sets of files. Automated pipelines are better for large documentation projects.
Q5. Can I add line numbers to code PDFs?
Yes. Many tools and libraries support line numbering, especially editor extensions and programmatic solutions.
See Also
Copy Text from a Secured PDF: 5 Free & Easy Ways
Table of Contents
- Why Can't You Copy Text from Some PDFs?
- Method 1 — Copy Text from a Secured PDF Using Google Docs
- Method 2 — Convert a Restricted PDF to TXT Online
- Method 3 — Screenshot + OCR to Extract Text
- Method 4 — Print a Copy-Protected PDF to a New PDF
- Method 5 — Extract Text from a Secured PDF Using Python
- Comparison Table: Which Method Should You Choose?
- Conclusion
- FAQs (Frequently Asked Questions)
PDF files are widely used for sharing documents because they preserve layout and formatting across devices. However, some PDFs include security permissions that prevent users from copying text. When you try to select or copy content from these files, you may see that copying is disabled.
This type of file is often called a secured, protected, or restricted PDF. Unlike password-protected PDFs that block opening the file, these documents can still be viewed normally—but certain actions such as copying text are restricted.
Fortunately, there are several free and practical workarounds that allow you to extract or copy text from protected PDFs. In this guide, we’ll explore five easy methods, including online tools, built-in system features, and a Python automation approach.
Quick Navigation
- Method 1 — Copy Text from a Secured PDF Using Google Docs
- Method 2 — Convert a Restricted PDF to TXT Online
- Method 3 — Screenshot + OCR to Extract Text
- Method 4 — Print a Copy-Protected PDF to a New PDF
- Method 5 — Extract Text from a Secured PDF Using Python
Why Can't You Copy Text from Some PDFs?
Many PDF creators apply permission restrictions to control how the document can be used. These permissions are set in the PDF’s security settings and may disable actions such as:
- Copying text
- Editing the document
- Printing the file
- Adding annotations
This is often referred to as copy protection or content restriction. While the document remains readable, the PDF viewer prevents text selection or copying.
These restrictions are typically used to protect intellectual property or prevent unauthorized reuse of content. However, when you legitimately need to reuse text—for example, for research, documentation, or accessibility purposes—you may need alternative ways to extract the content.
Below are five methods that can help.
Method 1 — Copy Text from a Secured PDF Using Google Docs
One of the simplest ways to copy text from a protected PDF is to open it with Google Docs. When a PDF is uploaded to Google Drive and opened in Google Docs, the service automatically converts the file into an editable document.
During this conversion process, the content of the PDF is reinterpreted as text and paragraphs, which often bypasses basic copy restrictions. After the conversion is complete, you can easily select and copy the text just like in a normal document.
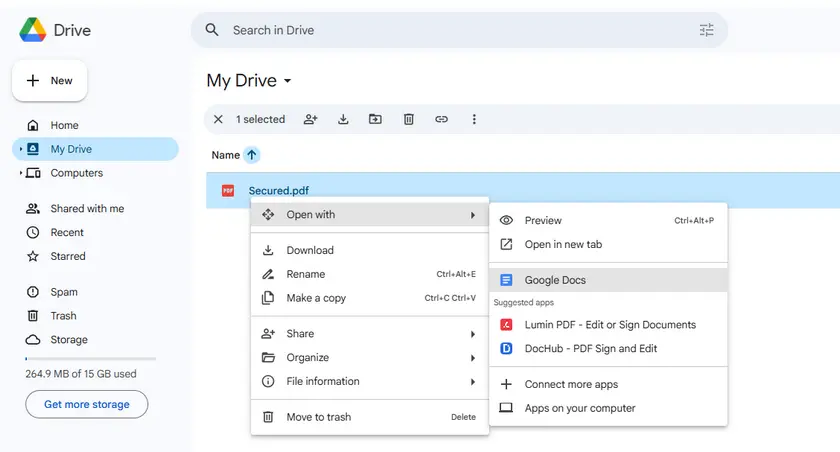
Steps
- Open Google Drive.
- Upload the protected PDF.
- Right-click the file and select Open with → Google Docs.
- Google Docs will convert the PDF into an editable document.
- Copy the extracted text from the document.
Pros
- Free and easy to use.
- No software installation required.
- Works well with text-based documents.
Limitations
- Scanned/image-based PDFs won’t convert to text (no OCR).
- Formatting can get messy with complex layouts.
- Requires a Google account and internet connection.
Method 2 — Convert a Restricted PDF to TXT Online
Another quick solution is to convert the restricted PDF into a plain text file using an online converter. Once the document is converted to TXT format, the text becomes fully editable and can be copied without restrictions.
A convenient free tool for this purpose is PDF24 Tools, which provides a browser-based PDF to TXT converter. This method works well when you need to extract text quickly without installing additional software.
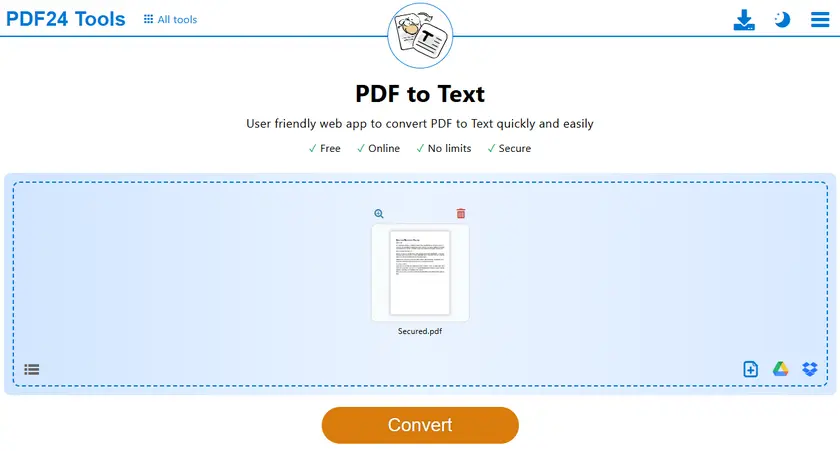
Steps
- Open the PDF-to-TXT tool.
- Upload your protected PDF file.
- Start the conversion process.
- Download the generated TXT file.
- Open the TXT file and copy the text freely.
Pros
- Quick and simple workflow.
- No installation required.
Limitations
- Privacy risk — sensitive documents are uploaded to third-party servers.
- Often limited to a few free conversions per day.
- No OCR support in most free tools (image-based PDFs won’t work).
Method 3 — Screenshot + OCR to Extract Text
If the PDF has strong copy restrictions or contains scanned pages, OCR (Optical Character Recognition) can still retrieve the visible text. OCR technology analyzes the image of the document and converts detected characters into editable text.
Windows 11 includes a built-in OCR feature in Snipping Tool, allowing you to capture part of the screen and instantly extract the text from the image.
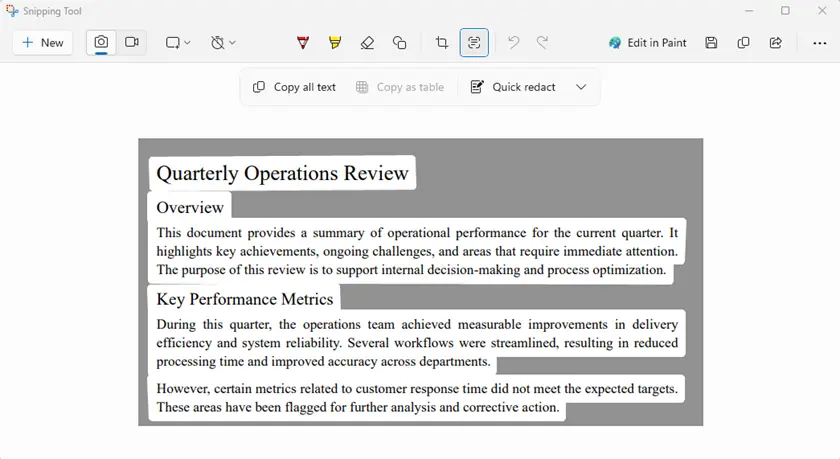
Steps
- Open the protected PDF on your screen.
- Launch Snipping Tool.
- Capture the area containing the text.
- Use Text Actions → Copy all text.
- Paste the extracted text into a document.
Pros
- Bypasses almost all copy protection since it captures the screen.
- Works with scanned/image-based PDFs.
Limitations
- Time-consuming if there are many pages.
- OCR errors — accuracy depends on image quality and font.
- Manual process unless automated with scripts.
Method 4 — Print a Copy-Protected PDF to a New PDF
Some protected PDFs block copying but still allow printing. In such cases, you can print the document to a new PDF file, which may remove the copy restriction.
This can be done easily using the built-in print feature in Google Chrome. After saving the printed version of the file, the new PDF may allow normal text selection and copying.
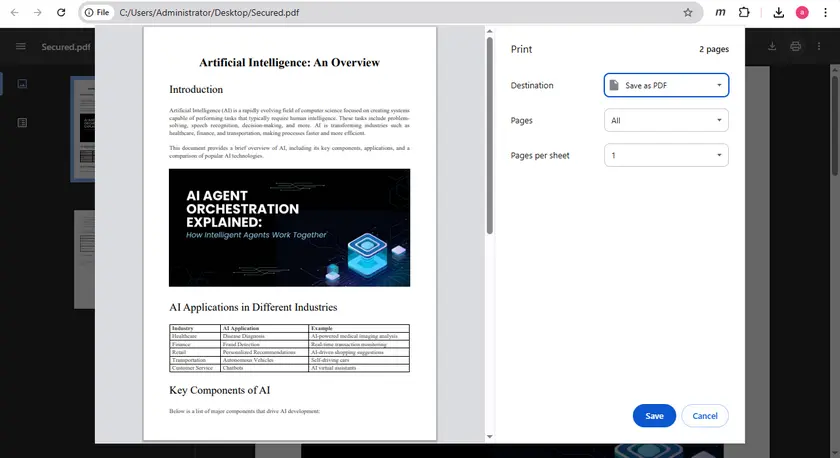
Steps
- Open the PDF in Google Chrome.
- Press Ctrl + P to open the print dialog.
- Set the destination to Save as PDF.
- Save the newly generated PDF.
- Open the new file and try copying the text.
Pros
- Simple workaround.
- No additional tools required.
Limitations
- If printing is disabled in the PDF permissions, this won’t work.
- Some formatting differences may appear.
Method 5 — Extract Text from a Secured PDF Using Python
For developers or users who need to process multiple documents, extracting text programmatically can be the most efficient solution. Instead of manually copying content, a script can automatically read the PDF structure and retrieve text from each page.
Using Free Spire.PDF for Python, you can easily extract text from PDF documents with just a few lines of code. This approach is particularly useful for automation, batch processing, or building document processing workflows.
If you are working with small documents (within 10 pages per document) or testing extraction workflows, the free version works well. For larger files, you can either split the document first or use the full version.
Install the library
pip install spire.pdf.free
Example: Extract Text from Each Page
from spire.pdf import *

# Create a PdfDocument object
doc = PdfDocument()

# Load a PDF document
doc.LoadFromFile("Secured.pdf")

# Iterate through the pages in the document
for i in range(doc.Pages.Count):

    # Get a specific page
    page = doc.Pages[i]

    # Create a PdfTextExtractor object
    textExtractor = PdfTextExtractor(page)

    # Create a PdfTextExtractOptions object
    extractOptions = PdfTextExtractOptions()

    # Set IsExtractAllText to True
    extractOptions.IsExtractAllText = True

    # Extract text from the page keeping white spaces
    text = textExtractor.ExtractText(extractOptions)

    # Write text to a txt file
    with open('output/TextOfPage-{}.txt'.format(i + 1), 'w', encoding='utf-8') as file:
        lines = text.split("\n")
        for line in lines:
            if line != '':
                file.write(line)
doc.Close()
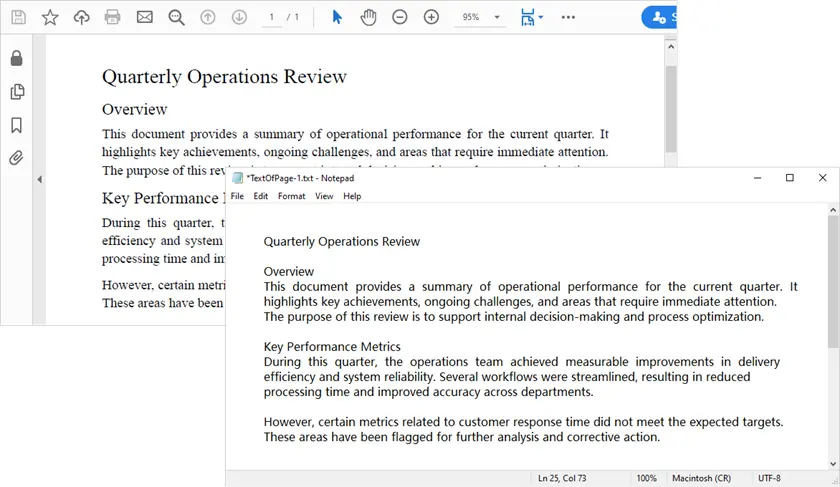
What This Script Does
- Loads the PDF document.
- Iterates through each page.
- Extracts text while preserving whitespace.
- Saves the extracted text to TXT files.
Pros
- Full control over the extraction process.
- Can be automated for batch processing.
- Works well with text-based PDFs.
Limitations
- Requires programming knowledge.
- Cannot handle image-based PDFs unless an additional OCR library is used.
You May Also Like: Perform PDF OCR with Python (Extract Text from Scanned PDF)
Comparison Table: Which Method Should You Choose?
| Method | Skill Level | Ease of Use | Best For | Works with Scanned PDFs | Works Under Strong Restrictions | Batch Processing |
|---|---|---|---|---|---|---|
| Google Docs | Beginner | Very Easy | Quick extraction in browser | No | Yes | No |
| Online Converter | Beginner | Very Easy | Fast TXT conversion | No | Yes | No |
| Screenshot + OCR | Beginner | Easy | Scanned or image-based PDFs | Yes | Yes | No |
| Print to PDF | Beginner | Easy | Removing simple restrictions | No | Conditional (Printing must be allowed) | No |
| Python (Spire.PDF) | Developer | Moderate | Automation & batch workflows | Relies on extra OCR libraries | Yes | Yes |
Conclusion
Copy restrictions in PDFs can be frustrating, especially when you only need to reuse a portion of text. Fortunately, several free methods can help extract content from protected PDFs.
For quick tasks, tools like Google Docs or online converters may be the easiest solution. If the document contains scanned content or strict restrictions, OCR-based methods can still recover the text. For large-scale workflows or automation scenarios, using Python libraries such as Free Spire.PDF for Python provides a powerful and flexible approach.
By choosing the method that best fits your needs, you can efficiently retrieve text from restricted PDFs while maintaining an efficient workflow.
FAQs (Frequently Asked Questions)
Q1: What is a secured or restricted PDF?
A protected or restricted PDF is a document that can be opened and viewed normally but has security settings that prevent copying, printing, or editing its content. These permissions are set by the document owner.
Q2: Can I copy text from all secured PDFs?
Not always. Some PDFs have strong encryption or DRM that prevents copying entirely. In such cases, OCR tools or professional libraries may be required.
Q3: Which method is best for scanned PDFs?
For scanned PDFs, screenshot + OCR extraction or Python automation with OCR libraries is usually the most reliable way to retrieve text.
Q4: Can I automate text extraction for multiple PDFs?
Yes. Using Python libraries like Spire.PDF, you can extract text from multiple PDF files automatically, making it ideal for batch processing or workflow automation.
Q5: Do I need to pay for any of these methods?
All methods listed in the article are free to use. However, some tools (like Spire.PDF) have free versions with limitations, such as a page count restriction. For larger files, you may need the full version.
Also Read
JSON to PDF in Python: Flatten & Export as Tables
Table of Contents
- Why Converting JSON to PDF Is Not Always Simple
- Step 1 — Load JSON Data
- Step 2 — Automatically Detect the Dataset to Export
- Step 3 — Flatten and Normalize JSON
- Step 4 — Export to PDF via Excel
- Step 5 — Example: Export Products from Complex JSON File
- Complete Python Example: JSON to PDF
- Conclusion
- FAQs

In modern applications, JSON is one of the most common data formats for APIs, configuration files, and data exchange. However, while JSON is ideal for machines, it’s not always human-readable. Exporting JSON into a PDF table can help present structured information clearly in reports, dashboards, or internal documentation.
In this tutorial, you will learn how to convert JSON to a well-formatted PDF table using Python and Spire.XLS, including:
- Automatically detecting datasets for table export
- Flattening nested JSON fields
- Generating professional-looking PDFs
We’ll also cover manual dataset extraction for deeply nested structures, giving you full control over complex JSON files.
Why Converting JSON to PDF Is Not Always Simple
JSON comes in all shapes and sizes:
- Flat arrays: easy to convert directly to rows
- Nested objects: e.g., a specs dictionary inside each product
- Arrays within arrays: e.g., a list of products inside a department
- Inconsistent keys: some objects have additional or missing fields
For example, consider this structure for a store’s inventory:
{
  "store": {
    "departments": [
      {
        "name": "Computers",
        "products": [{"id": 1, "name": "Laptop", "specs": {"CPU": "i7"}}]
      },
      {
        "name": "Accessories",
        "products": [{"id": 101, "name": "Mouse", "colors": ["Black", "White"]}]
      }
    ]
  }
}
Flattening this into a table is not trivial, because nested fields need to be converted into columns, and arrays may need to be expanded or joined into strings. Our solution provides robust handling for most JSON structures while offering an option for manual extraction for unusually complex cases.
For a quick refresher on JSON syntax and structure, see: Introduction to JSON
Step 1 — Load JSON Data
Before processing, load your JSON file into Python. Using the built-in json module ensures the content is parsed into native Python dictionaries and lists:
import json

file_path = r"C:\Users\Administrator\Desktop\Products.json"

with open(file_path, "r", encoding="utf-8") as f:
    data = json.load(f)
What this step does:
- Reads a JSON file from disk
- Converts it into Python objects (dict and list) for further processing
Tip: Always specify encoding="utf-8" to avoid issues with non-ASCII characters.
Step 2 — Automatically Detect the Dataset to Export
Many JSON files contain multiple nested lists. Often, we need the list of objects that represents the “main table” — usually the largest list of dictionaries. The following function searches for the most table-like dataset automatically:
def find_dataset(obj):
    """Recursively search JSON and return the most table-like dataset."""
    candidates = []

    def search(node):
        if isinstance(node, list):
            if node and all(isinstance(i, dict) for i in node):
                keys = set()
                for item in node:
                    keys.update(item.keys())
                score = len(keys) * len(node)
                candidates.append((score, node))
            for item in node:
                search(item)
        elif isinstance(node, dict):
            for value in node.values():
                search(value)

    search(obj)
    if not candidates:
        raise ValueError("No suitable dataset found.")
    candidates.sort(key=lambda x: x[0], reverse=True)
    return candidates[0][1]

# Usage
dataset = find_dataset(data)
How it works:
- Recursively traverses the JSON structure
- Scores candidate lists based on number of keys × number of items
- Picks the richest dataset as the main table
Limitations:
- Will not automatically merge deeply nested lists (e.g., multiple departments’ products)
- Some fields may require manual extraction for full visibility
Optional — Manual Dataset Extraction
For deeply nested or customized datasets, manually extract the data:
dataset = []
for dept in data["store"]["departments"]:
    for prod in dept["products"]:
        prod["department"] = dept["name"]
        dataset.append(prod)
This approach guarantees you capture the exact fields you need, including adding context such as department for each product.
Step 3 — Flatten and Normalize JSON
To convert JSON to a table, nested structures must be flattened:
def flatten_json(obj, parent_key="", sep="_"):
    items = {}
    if isinstance(obj, dict):
        for key, value in obj.items():
            new_key = f"{parent_key}{sep}{key}" if parent_key else key
            if isinstance(value, dict):
                items.update(flatten_json(value, new_key, sep))
            elif isinstance(value, list):
                if not value:
                    items[new_key] = ""
                elif all(not isinstance(i, (dict, list)) for i in value):
                    items[new_key] = ", ".join(map(str, value))
                else:
                    for index, item in enumerate(value):
                        indexed_key = f"{new_key}{sep}{index}"
                        items.update(flatten_json(item, indexed_key, sep))
            else:
                items[new_key] = value
    elif isinstance(obj, list):
        for index, item in enumerate(obj):
            indexed_key = f"{parent_key}{sep}{index}" if parent_key else str(index)
            items.update(flatten_json(item, indexed_key, sep))
    else:
        items[parent_key] = obj
    return items

def normalize_json(data):
    flattened_rows = [flatten_json(item) for item in data]
    all_keys_ordered, seen_keys = [], set()
    for row in flattened_rows:
        for key in row.keys():
            if key not in seen_keys:
                seen_keys.add(key)
                all_keys_ordered.append(key)
    aligned_rows = [{key: str(row.get(key, "")) for key in all_keys_ordered} for row in flattened_rows]
    return aligned_rows, all_keys_ordered

rows, headers = normalize_json(dataset)
What this step does:
- Converts nested dictionaries into column names like specs_CPU, specs_RAM
- Converts lists of primitives to comma-separated strings
- Preserves first-seen key as the first column
Step 4 — Export to PDF via Excel
Once the data is flattened, export it as a PDF using Spire.XLS for Python. Rather than rendering PDF directly, we use Excel as an intermediate layout layer. This approach provides full control over table structure, formatting, margins, and scaling before exporting to PDF.
Install dependency:
pip install spire.xls
Export JSON to PDF using Spire.XLS:
from spire.xls import Workbook
import os

def export_to_pdf(data_rows, headers, output_path):
    workbook = Workbook()
    sheet = workbook.Worksheets[0]

    # Write headers
    for col, header in enumerate(headers):
        sheet.Range[1, col + 1].Text = header

    # Write data rows
    for row_idx, row in enumerate(data_rows, start=2):
        for col_idx, header in enumerate(headers):
            sheet.Range[row_idx, col_idx + 1].Text = row[header]

    # Formatting
    workbook.ConverterSetting.SheetFitToPageRetainPaperSize = True
    workbook.ConverterSetting.SheetFitToWidth = True
    for i in range(1, sheet.Range.ColumnCount + 1):
        sheet.AutoFitColumn(i)
    sheet.PageSetup.LeftMargin = 0.3
    sheet.PageSetup.RightMargin = 0.3
    sheet.PageSetup.TopMargin = 0.5
    sheet.PageSetup.BottomMargin = 0.5
    sheet.PageSetup.IsPrintGridlines = True
    sheet.DefaultRowHeight = 18

    os.makedirs(os.path.dirname(output_path), exist_ok=True)
    sheet.SaveToPdf(output_path)
    workbook.Dispose()
    print(f"PDF saved: {output_path}")
Tips for PDF formatting:
- Auto-fit columns to content
- Set margins for readability
- Enable gridlines for better table visualization
You May Also Like: Convert Excel to PDF in Python
Step 5 — Example: Export Products from Complex JSON File
Combine the previous steps:
file_path = r"C:\Users\Administrator\Desktop\Products.json"
with open(file_path, "r", encoding="utf-8") as f:
    data = json.load(f)

# Option 1: Automatic detection
dataset = find_dataset(data)
rows, headers = normalize_json(dataset)

# Option 2: Manual extraction for nested structure
# dataset = []
# for dept in data["store"]["departments"]:
#     for prod in dept["products"]:
#         prod["department"] = dept["name"]
#         dataset.append(prod)
# rows, headers = normalize_json(dataset)

export_to_pdf(rows, headers, "output/Products.pdf")
Key points:
- Automatic detection works for most JSON arrays
- Manual extraction ensures control over nested and hierarchical datasets
Output:
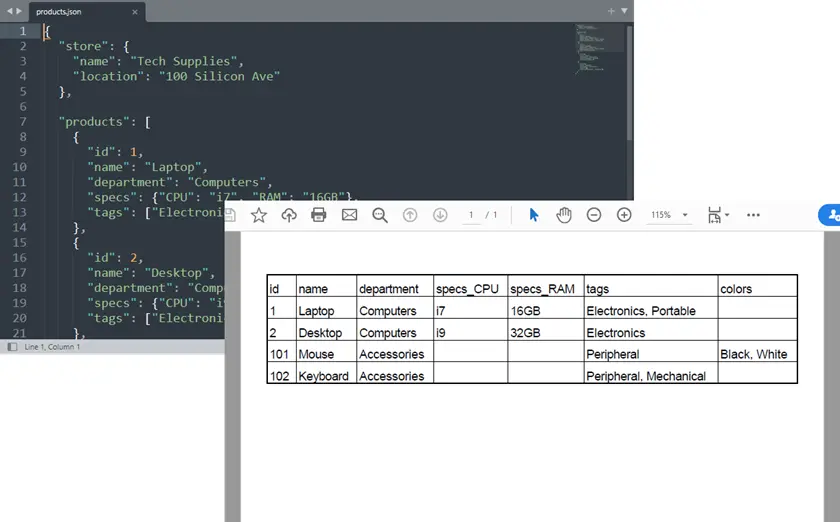
Complete Python Example: JSON to PDF
from spire.xls import Workbook
import json
import os

# ---------------------------
# Atoumatically Detect dataset
# ---------------------------
def find_dataset(obj):
    """
    Recursively search JSON and return the most table-like dataset.

    Strategy:
    - Find lists containing dictionaries
    - Score datasets based on number of fields
    - Choose the dataset with the richest structure
    """

    candidates = []

    def search(node):
        if isinstance(node, list):

            if node and all(isinstance(i, dict) for i in node):

                # Count unique keys across objects
                keys = set()
                for item in node:
                    keys.update(item.keys())

                score = len(keys) * len(node)
                candidates.append((score, node))

            for item in node:
                search(item)

        elif isinstance(node, dict):
            for value in node.values():
                search(value)

    search(obj)

    if not candidates:
        raise ValueError("No suitable dataset found.")

    # choose best scored dataset
    candidates.sort(key=lambda x: x[0], reverse=True)

    return candidates[0][1]

# ---------------------------
# Robust Recursive JSON Flattener
# ---------------------------
def flatten_json(obj, parent_key="", sep="_"):
    """
    Recursively flattens nested dictionaries and lists.

    Rules:
    - Nested dict → key_subkey
    - List of primitives → comma-separated string
    - List of dicts → indexed columns (key_0_name, key_1_name)
    - Mixed lists / arrays-of-arrays → recursively indexed (key_0_0, key_0_1)
    """
    items = {}

    if isinstance(obj, dict):
        for key, value in obj.items():
            new_key = f"{parent_key}{sep}{key}" if parent_key else key

            if isinstance(value, dict):
                items.update(flatten_json(value, new_key, sep))

            elif isinstance(value, list):
                # Empty list
                if not value:
                    items[new_key] = ""

                # List of primitives
                elif all(not isinstance(i, (dict, list)) for i in value):
                    items[new_key] = ", ".join(map(str, value))

                # Mixed or nested lists
                else:
                    for index, item in enumerate(value):
                        indexed_key = f"{new_key}{sep}{index}"
                        items.update(flatten_json(item, indexed_key, sep))

            else:
                items[new_key] = value

    # Top-level lists
    elif isinstance(obj, list):
        for index, item in enumerate(obj):
            indexed_key = f"{parent_key}{sep}{index}" if parent_key else str(index)
            items.update(flatten_json(item, indexed_key, sep))

    else:
        items[parent_key] = obj

    return items

# ---------------------------
# Normalize JSON Data (First-Seen Column Order)
# ---------------------------
def normalize_json(data):
    """
    Flatten JSON objects and align headers, preserving the first-seen order.
    The first key in the first JSON object will be the first column.
    """
    if not isinstance(data, list):
        raise ValueError("Data must be a list of objects.")

    flattened_rows = [flatten_json(item) for item in data]

    # Track headers in first-seen order
    all_keys_ordered = []
    seen_keys = set()
    for row in flattened_rows:
        for key in row.keys():
            if key not in seen_keys:
                seen_keys.add(key)
                all_keys_ordered.append(key)

    # Align all rows to include all keys
    aligned_rows = [{key: str(row.get(key, "")) for key in all_keys_ordered} for row in flattened_rows]

    return aligned_rows, all_keys_ordered

# ---------------------------
# Export to PDF via Excel
# ---------------------------
def export_to_pdf(data_rows, headers, output_path):
    workbook = Workbook()
    sheet = workbook.Worksheets[0]

    # Write header
    for col, header in enumerate(headers):
        sheet.Range[1, col + 1].Text = header

    # Write data rows
    for row_idx, row in enumerate(data_rows, start=2):
        for col_idx, header in enumerate(headers):
            sheet.Range[row_idx, col_idx + 1].Text = row[header]

    # Formatting
    workbook.ConverterSetting.SheetFitToPageRetainPaperSize = True
    workbook.ConverterSetting.SheetFitToWidth = True
    for i in range(1, sheet.Range.ColumnCount + 1):
        sheet.AutoFitColumn(i)
    sheet.PageSetup.LeftMargin = 0.3
    sheet.PageSetup.RightMargin = 0.3
    sheet.PageSetup.TopMargin = 0.5
    sheet.PageSetup.BottomMargin = 0.5
    sheet.PageSetup.IsPrintGridlines = True
    sheet.DefaultRowHeight = 18

    os.makedirs(os.path.dirname(output_path), exist_ok=True)
    sheet.SaveToPdf(output_path)
    workbook.Dispose()
    print(f"PDF saved: {output_path}")

# ===========================
# Example: Complex JSON Dataset
# ===========================

# Load JSON from file
with open(r"C:\Users\Administrator\Desktop\Products.json", "r", encoding="utf-8") as f:
    data = json.load(f)

# Option 1. Automatically detect dataset (work for most cases)
dataset = find_dataset(data)

'''
# Option 2. Manually extract dataset (work for complex unusual structures)
dataset = []
for dept in data["store"]["departments"]:
    for prod in dept["products"]:
        prod["department"] = dept["name"]
        dataset.append(prod)
'''

# Normalize (first-seen key becomes first column)
rows, headers = normalize_json(dataset)

# Export to PDF
export_to_pdf(rows, headers, "output/Products.pdf")
Conclusion
Converting JSON to a PDF table can be tricky, especially with nested structures or inconsistent keys. Using Python and Spire.XLS, you can automatically flatten JSON and preserve a logical column order, turning complex datasets into clean, readable tables suitable for reports or documentation.
Automatic dataset detection handles most JSON files, while manual extraction allows capturing specific nested data when needed. This approach offers a flexible and reliable way to convert JSON into professional PDF tables without losing structure or context.
FAQs
Can this handle any JSON file?
Automatic detection works for most, but manual extraction may be needed for deeply nested data.
How is column order determined?
Columns appear in the order of first appearance in the JSON objects.
Can multiple datasets be merged?
Yes, you can concatenate datasets before flattening.
How to handle missing fields?
Missing values are automatically represented as empty cells.
Can I customize PDF layout?
Yes, margins, gridlines, and auto-fit options are fully configurable via Spire.XLS.
See Also
How to Create a PDF Portfolio With or Without Adobe
Table of Contents
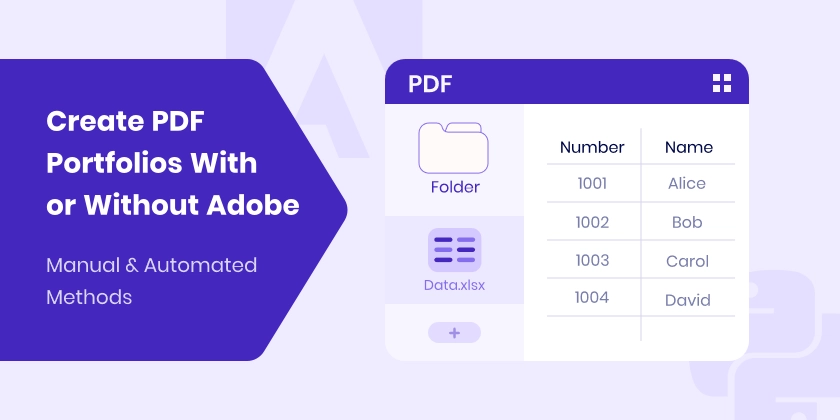
The PDF Portfolio was introduced by Adobe to solve a common challenge: how to package multiple files into a single document without losing their original formats or structure. Unlike traditional merged PDFs, a PDF Portfolio keeps each file independent while organizing them within a structured container.
This makes it ideal for complex document packages such as legal submissions, project deliverables, or engineering documentation.
In this article, you’ll learn how to create a PDF Portfolio, understand its hierarchical folder structure, and explore two practical methods: using Adobe Acrobat or generating one programmatically with Spire.PDF for Python.
What Is a PDF Portfolio?
A PDF Portfolio is a standards-based PDF container defined in the PDF specification. Rather than combining content into a single stream of pages, it embeds multiple independent files within one PDF wrapper. When opened in Adobe Acrobat Pro DC or Adobe Reader, the portfolio functions similarly to a lightweight file explorer, allowing users to browse folders and open embedded files individually.
A PDF Portfolio can include:
- PDF documents
- Word and Excel files
- Images and multimedia
- Other common file formats
One of its defining characteristics is support for hierarchical folder structures, enabling logical organization of documents within the portfolio.
PDF Portfolio vs ZIP vs Attachments vs Merge
These formats are frequently confused because they all allow multiple files to be grouped together in some way. However, their structure, behavior, and use cases differ significantly.
| Aspect | PDF Portfolio | ZIP Archive | PDF with Attachments | Merged PDF |
|---|---|---|---|---|
| Primary purpose | Structured file container | File compression & transfer | Main document with extra files | Combine documents into one |
| Files remain independent | Yes | Yes | Yes | No |
| Supports folder hierarchy | Yes | Yes | No | No |
| Requires extraction before access | No | Yes | No | No |
| Best for | Organized document packages | Sending multiple files | Supplementary materials | Simple consolidation |
Key Takeaway
- Use Merged PDF when you only need one continuous document.
- Use PDF with Attachments when one file is primary and others are supporting.
- Use ZIP when compression and transfer are the priority.
- Use a PDF Portfolio when multiple files must remain independent and clearly organized within a single, structured PDF.
Understanding Portfolio Structure
A PDF Portfolio utilizes a hierarchical folder organization, akin to a traditional file system. This structure allows for efficient sorting and easy navigation, making it ideal for managing complex document sets.
Example structure:
PDF Portfolio
│
├── root_file.xlsx
│
└── Folder_A
      ├── file_in_A.docx
      │
      └── Folder_A_1
            └── file_in_A1.xml
This demonstrates:
- Files at the root level
- First-level folders
- Nested subfolders
- Independent files at each level
There is no strict limitation on nesting depth—you can build multi-level structures to suit enterprise document packaging needs.
Method 1: Create a PDF Portfolio Using Adobe
Adobe Acrobat Pro DC is recognized as the leading tool for creating PDF Portfolios, providing a user-friendly interface that simplifies the process. This method is particularly beneficial for individuals or teams looking to present diverse documentation in an organized manner.
Steps to Create a PDF Portfolio Using Adobe
-
Open Adobe Acrobat Pro.
-
Navigate to File → Create → PDF Portfolio to start the process.
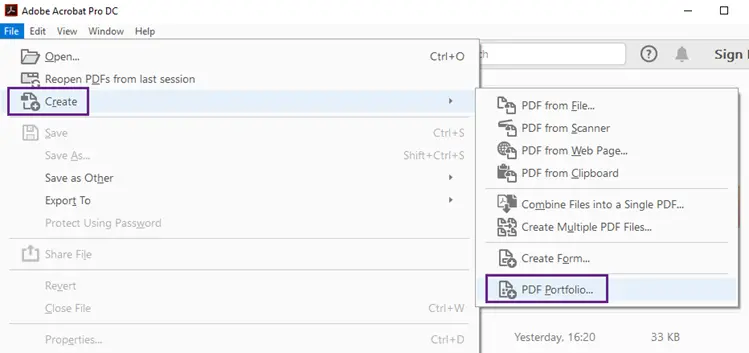
-
Click Add Files to import your documents.
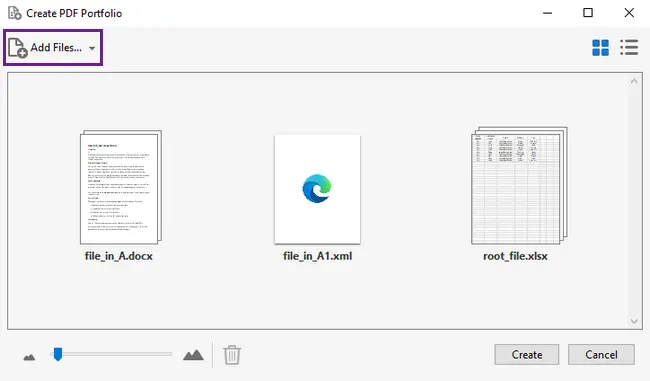
-
Create folders by right-clicking on the panel and selecting Create Folder.
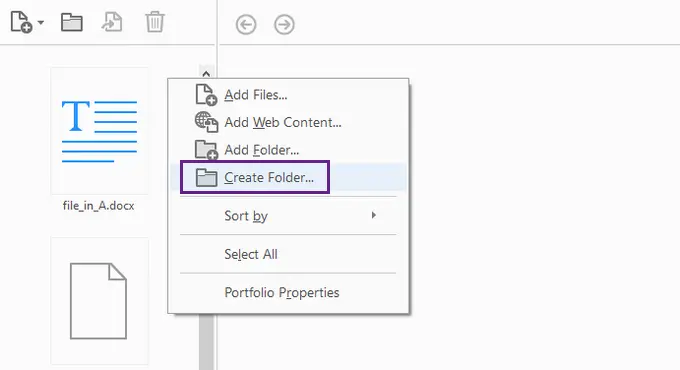
-
Drag and drop your files into these folders.
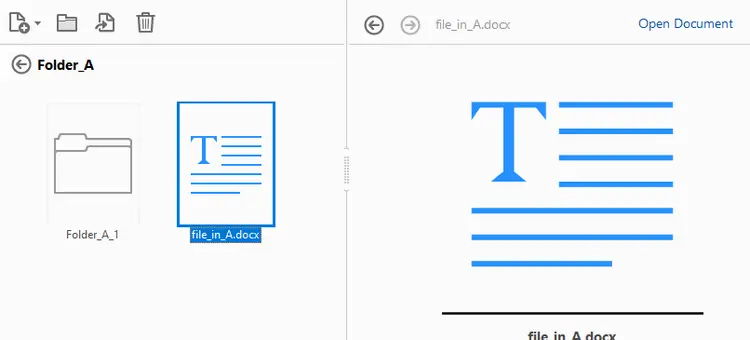
-
Click Save to finalize your PDF Portfolio.
When to Use the Adobe Method
This approach excels in various scenarios, including:
- Occasional portfolio creation, making it straightforward for one-time projects.
- Situations where visual control over document layout is essential, allowing for immediate feedback on how the portfolio appears.
- Environments that do not require automated processes, as it supports streamlined manual workflows.
While this method is ideal for small-scale projects and individual users, it may not be suitable for large batch generation or integration into backend systems where automation is necessary.
Read Further: Create and customize PDF Portfolios
Method 2: Create a PDF Portfolio Without Adobe (Using Python)
For scenarios that require automation, server-side generation, or large-scale enterprise workflows, programmatic creation of PDF Portfolios is often more efficient. Using Spire.PDF for Python, you can effortlessly generate a standards-compliant PDF Portfolio that is fully recognized by Adobe Acrobat, ensuring compatibility and ease of use in various environments.
Install Spire.PDF for Python
Before generating a PDF Portfolio programmatically, you need to install Spire.PDF for Python.
You can install it via pip:
pip install spire.pdf
Example: Create a Nested Portfolio Structure
Here’s a practical example demonstrating how to construct a nested PDF Portfolio with Spire.PDF for Python.
from spire.pdf import PdfDocument

# ----------- Input Files -----------
root_file = "Files/root_file.xlsx"
file_in_folder_a = "Files/file_in_A.docx"
file_in_subfolder_a1 = "Files/file_in_A1.xml"

# ----------- Create PDF Portfolio -----------
document = PdfDocument()

# 1. Add one file to root
document.Collection.AddFile(root_file)

# 2. Create first-level folder
folder_a = document.Collection.Folders.CreateSubfolder("Folder_A")

# Add a file directly inside Folder_A
folder_a.AddFile(file_in_folder_a)

# 3. Create second-level subfolder inside Folder_A
subfolder_a1 = folder_a.CreateSubfolder("Folder_A_1")

# Add file inside subfolder
subfolder_a1.AddFile(file_in_subfolder_a1)

# ----------- Save -----------
document.SaveToFile("CreatePDFPortfolio_WithNestedStructure.pdf")
document.Close()

print("PDF Portfolio created successfully.")
This code illustrates:
- Root-Level File Insertion: The primary document is added to the root of the PDF Portfolio, establishing a foundation.
- Folder Creation: The first-level folder is created for organizational purposes, allowing for better content management.
- Nested Subfolder Creation: A second-level subfolder is added, demonstrating the hierarchical structure that PDF Portfolios support.
- Structured File Placement: Files are appropriately organized, making navigation intuitive for end-users.
The resulting PDF Portfolio opens seamlessly in Adobe Acrobat, preserving the full folder hierarchy and ensuring that all files remain independent and easily accessible.
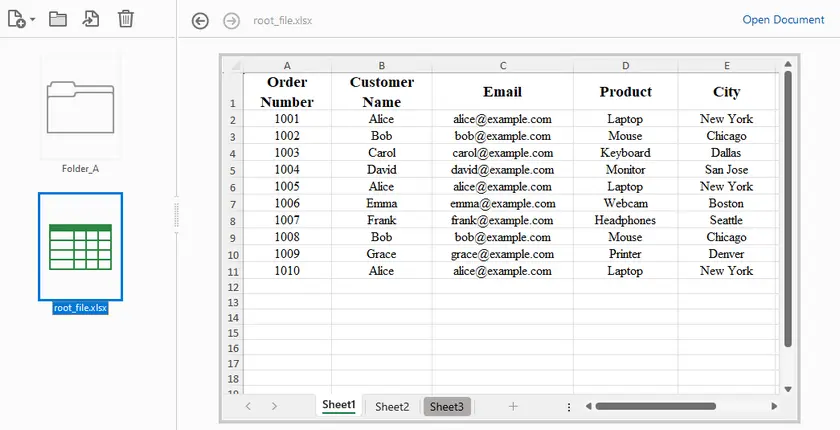
This programmatic approach is particularly advantageous for organizations needing to automate document packaging, enabling batch processing and integration into existing systems without manual intervention.
In addition to creating PDF Portfolios, Spire.PDF also supports combining multiple PDF files into a single document and attaching files as attachments to a PDF. This versatility makes it a comprehensive solution for managing diverse document needs.
Adobe vs Python: Choosing the Right Approach
| Criteria | Adobe Acrobat | Spire.PDF for Python |
|---|---|---|
| Ease of use | Very easy | Developer-oriented |
| Automation | No | Yes |
| Batch generation | No | Yes |
| Folder hierarchy | Yes | Yes |
| Suitable for enterprise systems | No | Yes |
| Requires GUI | Yes | No |
Final Thoughts
A PDF Portfolio is more than just a merged PDF or a compressed archive; it serves as a structured, standards-compliant container that maintains folder hierarchy and keeps embedded files independent.
If you need manual creation with visual customization, Adobe Acrobat or similar editors are suitable. If you require automation, scalability, and backend integration, Spire.PDF for Python provides a reliable programmatic solution to generate structured, Adobe-recognized PDF Portfolios—complete with nested folders.
For organizations managing complex document packages, the automated approach often delivers greater efficiency and flexibility.
FAQs
What is the difference between a PDF Portfolio and a merged PDF?
A merged PDF combines multiple documents into one continuous file. A PDF Portfolio keeps each file independent inside a structured container, allowing them to be opened separately.
How is a PDF Portfolio different from a ZIP file?
A ZIP file requires extraction before use. A PDF Portfolio opens directly in viewers like Adobe Acrobat Pro DC and maintains PDF compatibility while supporting folder hierarchy.
Can I create folders and subfolders inside a PDF Portfolio?
Yes. A PDF Portfolio supports hierarchical folder structures, including nested subfolders. This can be done manually in Adobe or programmatically using Spire.PDF for Python.
Can I automate PDF Portfolio creation?
Yes. Manual tools require GUI interaction. For automation, batch processing, or backend systems, developer SDKs like Spire.PDF for Python allow programmatic generation.
Can a PDF Portfolio contain non-PDF files?
Yes. It can embed Word documents, Excel files, images, and other formats while preserving their original file types inside the portfolio.