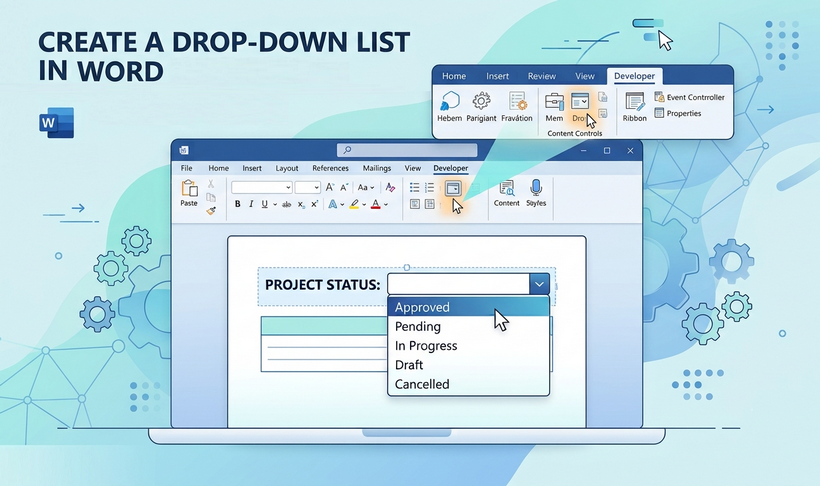
Drop-down lists are one of the most useful features in Microsoft Word. They constrain user input to a specific set of predefined choices, which improves data accuracy, streamlines responses, and delivers a cleaner user experience. Whether you're building a professional form or questionnaire, knowing how to create a drop-down list in Word is an essential skill for modern document engineering.
Unlike drop-down lists in Excel, which are more commonly used, Word's implementation is purpose-built for form creation and interactive document design. In this step-by-step guide, we break down every reliable method to create a drop-down list in Word.
- What Is a Drop-Down List in Word?
- Method 1: Create a Drop-Down List Using Content Controls
- Method 2: Use Legacy Form Fields for Compatibility
- Method 3: Create a Drop-Down List Programmatically in C#
- Frequently Asked Questions (FAQs)
What Is a Drop-Down List in Word?
A drop-down list is a user interface element that displays a list of choices in a menu format. When a user clicks on the control, a list of predefined options appears, and they can select one to populate the field.
This control is particularly useful in scenarios where you want to:
- Standardize responses in forms and surveys
- Prevent data entry errors by limiting choices
- Speed up form completion by eliminating typing
- Collect clean, consistent data for analysis
Method 1: Create a Drop-Down List Using Content Controls
Available in Word 2007 through the latest Microsoft 365, this is the modern, officially supported approach for adding interactive fields. Content controls in Word are flexible, customizable, and work without locking the entire document.
Step 1: Enable the Developer Tab
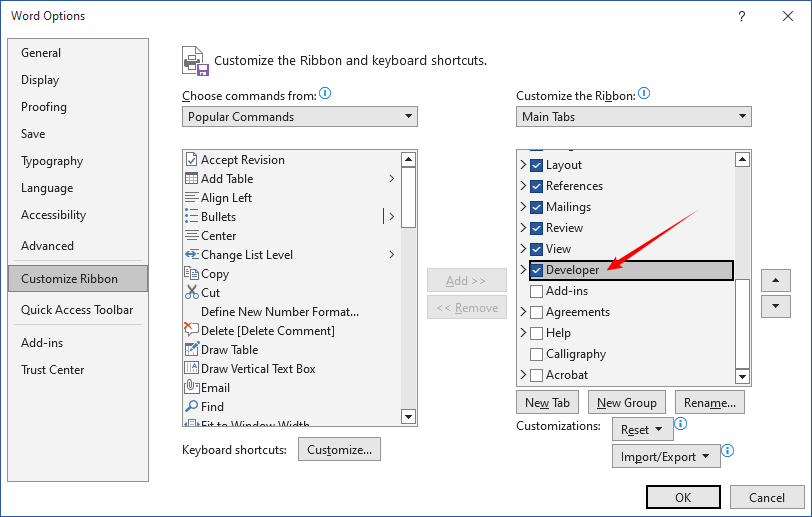
The drop down box in Word lives on the “Developer” tab, which is hidden by default to simplify the standard user interface.
- Click “File > Options” (or “Word > Preferences” on Mac).
- In the “Word Options” window, choose “Customize Ribbon”.
- On the right side, check the box next to “Developer” option.
- Click “OK”. The Developer tab now appears in the top ribbon.
Step 2: Insert the Drop-Down Content Control
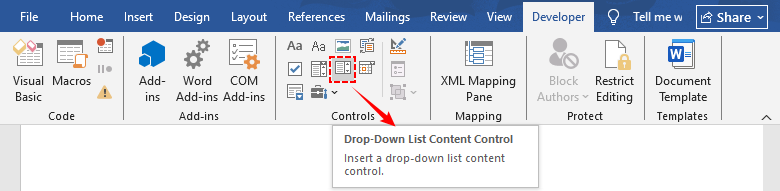
- Place your cursor where you want the drop-down list to appear.
- Navigate to the “Developer” tab and locate the “Controls” group.
- Click the “Drop-Down List Content Control” icon (it looks like a list with a small arrow).
- A default drop-down box will appear at your cursor position.
Step 3: Add and Customize List Items
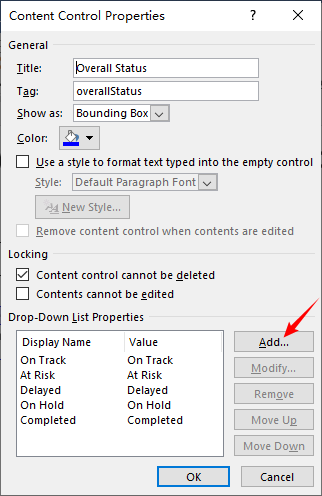
- Select the newly created control and click “Properties” in the ribbon.
- In the “Content Control Properties” dialog box, configure the general settings:
- Enter a “Title” for your list (appears as a label above the control)
- Enter a “Tag” (an internal identifier for document automation)
- Choose a “Color” scheme for the control
- Check "Content control cannot be deleted" to prevent accidental removal
- Under the “Drop-Down List Properties” section, click the “Add” button.
- In the “Add Choice” window, enter your option in the “Display Name” field (this is what users will see in the list).
- The “Value” field will auto-populate with the same text. You can modify it if needed.
- Repeat this process for each option you want to include in your drop-down list.
- Use the “Modify”, “Remove”, “Move Up”, and “Move Down” buttons to refine your list.
- Click “OK” to save your settings.
Step 4: Test the Drop-Down Menu in Word
Click the small arrow on the right side of the control to expand the list and select an item. The default placeholder text ("Choose an item.") will be replaced with your selection.
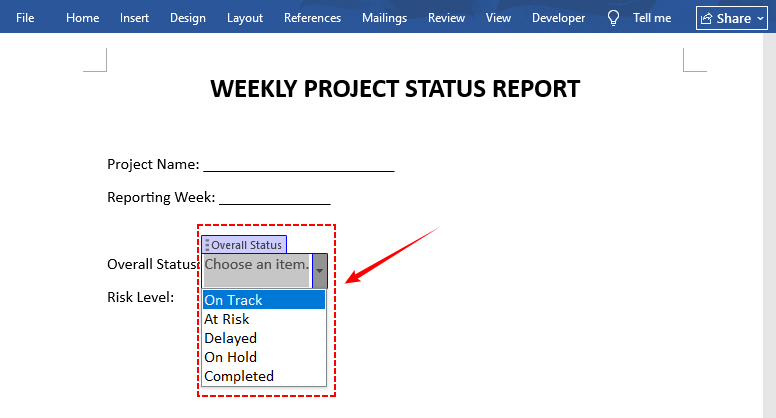
Pro Tip: Native Microsoft Word drop down list only supports single selection. For multi-select, you can use checkbox content controls in Word.
Method 2: Use Legacy Form Fields for Compatibility
If your document needs to work with Word 2003 and earlier, or be saved in the older .doc format, use legacy drop-down form fields. This approach requires document protection to function, and supports form-specific features like exit macros and field calculations.
Step 1: Insert the Legacy Drop-Down
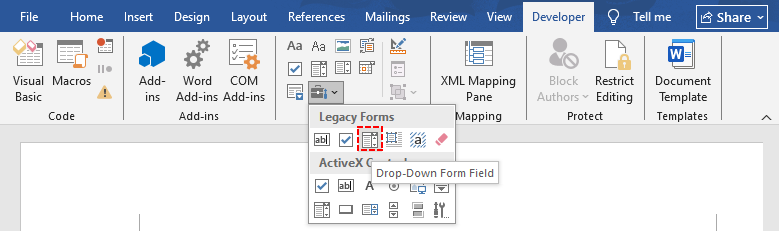
- From the “Developer” tab, click the “Legacy Tools” button (looks like a toolbox).
- Under “Legacy Forms”, click the “Drop-Down Form Field” icon.
- A gray form field box appears at your cursor position.
Step 2: Configure the Drop-Down Options
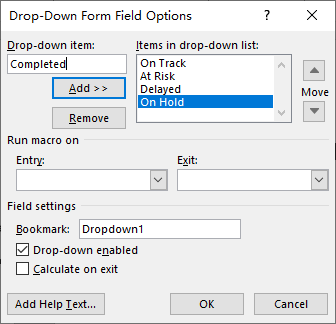
- Double-click the gray form field to open the “Drop-Down Form Field Options” dialog
- In the “Drop-down item” field, type your first option.
- Click “Add >>” to move it to the “Items in drop-down list” box.
- Repeat for all remaining options.
- Use the arrow buttons to reorder items, or click “Remove” to delete an option.
- Optional: Configure bookmark names, exit macros, or help text for accessibility.
- Click “OK” to save.
Step 3: Protect the Document (Crucial)
Unlike modern content controls, legacy form fields will not work unless the document is protected for form filling.
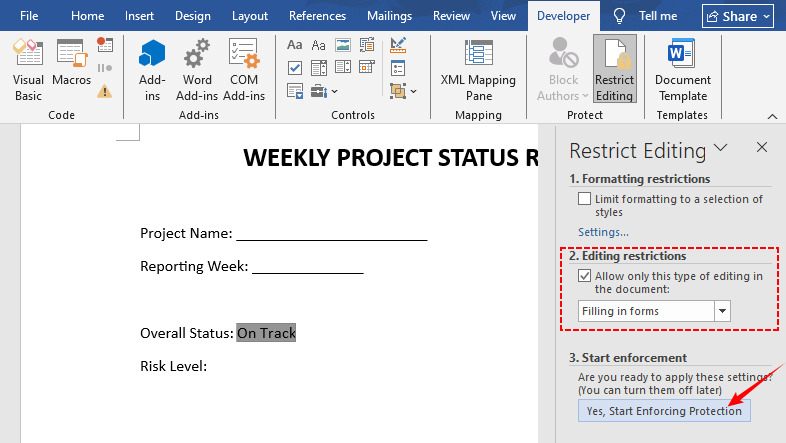
- Click “Restrict Editing” on the “Developer” tab.
- In the “Restrict Editing” pane on the right:
- Check “Allow only this type of editing in the document”
- Select “Filling in forms” from the dropdown
- Click “Yes, Start Enforcing Protection”.
- Enter a password (optional) and click “OK”.
- Users can now select from drop-downs but cannot edit the rest of the document.
Method 3: Create a Drop-Down List Programmatically in C#
For developers who need to generate or batch-modify Word documents at scale, Free Spire.Doc for .NET provides a programmatic way to insert drop down menu in Word without requiring Microsoft Office to be installed on the machine.
Step 1: Install Free Spire.Doc
You can add the library to your .NET project via NuGet:
- NuGet GUI: Search for “FreeSpire.Doc” and install.
- Package Manager Console: Run PM> Install-Package FreeSpire.Doc.
Alternatively, download the DLL manually from the Free Spire.Doc for .NET website and add it as a reference.
Step 2: Write the C# Code to Create Dropdown in Word
The following code creates a new Word document, adds a labeled drop-down list content control with custom display names and underlying values, and saves the output file:
using Spire.Doc;
using Spire.Doc.Fields;
using Spire.Doc.Documents;

namespace CreateDropDownList
{
    class Program
    {
        static void Main(string[] args)
        {
            // Create a new Word document
            Document document = new Document();
            Section section = document.AddSection();
            Paragraph paragraph = section.AddParagraph();

            // Add a label text before the drop-down
            TextRange label = paragraph.AppendText("Department: ");
            label.CharacterFormat.Bold = true;

            // Create an inline structured document tag (drop-down content control)
            StructureDocumentTagInline sdt = new StructureDocumentTagInline(document);
            sdt.SDTProperties.SDTType = SdtType.DropDownList;
            sdt.SDTProperties.Alias = "Department";
            sdt.SDTProperties.Tag = "dept_selection";
            paragraph.ChildObjects.Add(sdt);

            // Define drop-down list items
            SdtDropDownList dropDownList = new SdtDropDownList();
            dropDownList.ListItems.Add(new SdtListItem("Marketing", "MKT"));
            dropDownList.ListItems.Add(new SdtListItem("Sales", "SLS"));
            dropDownList.ListItems.Add(new SdtListItem("Human Resources", "HR"));
            dropDownList.ListItems.Add(new SdtListItem("Engineering", "ENG"));
            dropDownList.ListItems.Add(new SdtListItem("Finance", "FIN"));

            // Assign items to the content control
            sdt.SDTProperties.ControlProperties = dropDownList;

            // Set default displayed text (first item)
            TextRange defaultText = new TextRange(document);
            defaultText.Text = dropDownList.ListItems[0].DisplayText;
            sdt.SDTContent.ChildObjects.Add(defaultText);

            // Save the document
            document.SaveToFile("DropDownList.docx", FileFormat.Docx2016);
            document.Close();
        }
    }
}
Key Component Reference
| Component | Purpose |
|---|---|
| StructureDocumentTagInline | Creates a content control (SDT) inside the paragraph. |
| SdtType.DropDownList | Specifies the control type as a drop-down list. |
| SdtDropDownList | Stores the full collection of drop-down list items. |
| SdtListItem | Represents a single option in the list (Display Text + Value). |
| SDTContent.ChildObjects.Add() | Sets the default value displayed when the document opens. |
Output:
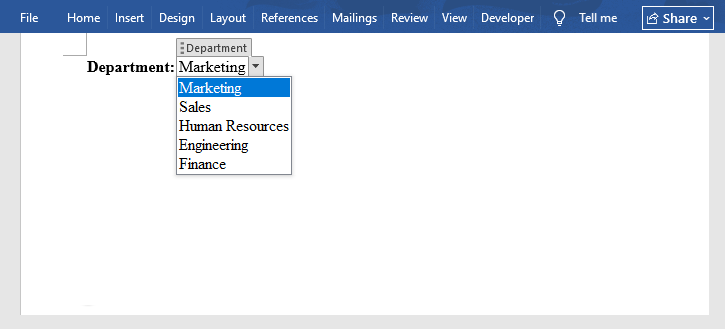
The SdtType enumeration supports a full range of controls. Beyond drop-downs, you can also insert combo boxes, check boxes, and date pickers in Word.
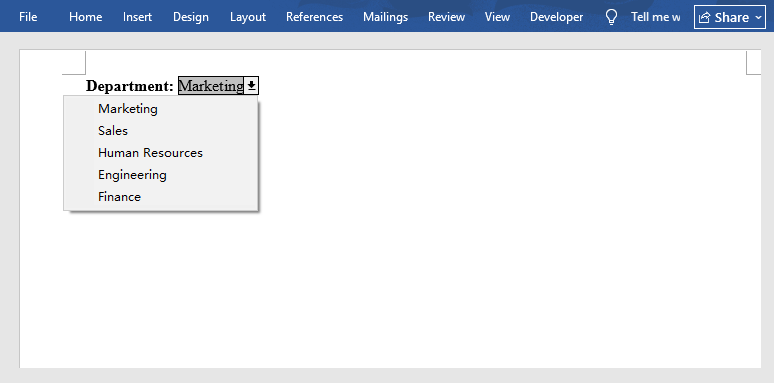
Alternative: Create Legacy Drop-Down Form Field in C#
If you need compatibility with older Word formats, you can also create a legacy drop-down form field:
DropDownFormField legacyDropDown = paragraph.AppendField("StatusField", FieldType.FieldFormDropDown) as DropDownFormField;
legacyDropDown.DropDownItems.Add("Marketing");
legacyDropDown.DropDownItems.Add("Sales");
legacyDropDown.DropDownItems.Add("Human Resources");
legacyDropDown.DropDownItems.Add("Engineering");
legacyDropDown.DropDownItems.Add("Finance");

// Enable form protection (required for legacy fields to work)
document.Protect(ProtectionType.AllowOnlyFormFields, "");
Note that legacy form fields require document protection to function, just like the manual legacy method covered earlier.
Frequently Asked Questions (FAQs)
Q: How do I remove a drop-down list?
Select the control and press the “Delete” key. If it's locked, open “Properties” and uncheck "Content control cannot be deleted" first.
Q: Why is my drop-down list not working?
- For legacy form fields: The document is not protected for form filling. Go to “Developer” > “Restrict Editing” and enable form filling protection.
- For content controls: The control may be locked for editing, or the document is in a compatibility mode that disables modern controls.
- If the selection arrow does not appear: Ensure you are not in Design Mode.
Q: What's the difference between a drop-down list and a combo box?
A drop-down list restricts users to your predefined options only. A combo box allows both selection from the list and free text entry.
Q: Is there a maximum number of items I can add to a drop-down list?
Word does not enforce a strict hard limit, but for usability it is recommended to keep lists under 20–30 items. Very long lists become difficult for users to navigate. If you need dozens of options, consider using a combo box (which supports type-to-search) or splitting the choices across multiple fields.
Final Thoughts
Mastering how to make a drop down list in Word transforms static documents into dynamic, user-friendly forms that improve data quality and reduce administrative work. For most everyday use cases, modern content controls offer the best balance of flexibility, appearance, and ease of use. When backward compatibility is critical, legacy form fields remain a reliable option. For high-volume or automated document workflows, programmatic generation with a .NET library provides a scalable, server-side solution.
Whichever method you choose, following the steps above will help you build polished, functional drop-down lists that work reliably across your organization.