When writing or editing a Word document, we often find ourselves needing to start a fresh page—whether it is right between two existing paragraphs or at the very end of a section. But repeatedly pressing the Enter key is only a temporary workaround; once you edit the content above, the layout can easily shift.
To prevent this layout disorder, you need to know how to insert a page in Word the right way. In this guide, we will walk you through every professional method to seamlessly add a page to your document, including quick shortcuts, automated layout rules, and developers' coding tricks, ensuring your pages split exactly where you intend without unexpected formatting changes.
- Insert a Blank Page in Word Using Toolbar
- Insert a Page in Word Instantly Using Page Break
- Insert a Cover Page in Word Documents
- Automated Page Insertion Using Page Break Before
- Insert a Page in Word Programmatically via Free Spire.Doc
- FAQs
How to Insert a Blank Page in Word Using the Toolbar
If you prefer editing documents using the main menu, the Ribbon is the best method to add a page to a Word file. This approach allows you to split your text exactly where you want, ensuring a smooth and seamless transition to the next page.
Use this option when you want to insert a blank page in Word documents right in the middle of existing content, like creating a fresh, empty canvas for a new section or an upcoming gallery.
- Step 1. Place your cursor exactly where you want the new, empty space to appear.
- Step 2. Go to the Insert tab on the top Ribbon.
- Step 3. Click the Blank Page button in the Pages group.
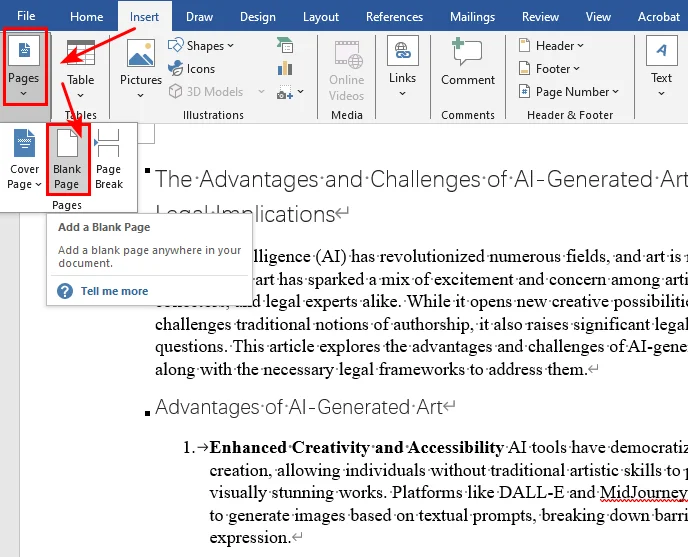
Microsoft Word will instantly insert a clean and empty page into your document at that exact spot, pushing existing text down to the following page.
How to Insert a Page in Word Instantly Using Page Break
Generally speaking, a single page break is used to split your content and push a specific heading or paragraph to the top of the next page. Two consecutive page breaks typically create an empty page between content sections. Whether you prefer using the toolbar or keyboard shortcuts, mastering this method helps you quickly generate blank pages in Word.
Method 1: Shortcut to Insert Page Break
When you are on a tight deadline, using a keyboard shortcut is the fastest way to add a page break to a Word document.
- Step 1. Click to place your cursor right before the text you want to push down.
- Step 2. Press Ctrl + Enter (Windows) or Cmd + Return (Mac) once to push text down, or press it twice if you want to insert a blank page right there.
Method 2: Inserting a Page Break via the Ribbon
If you prefer visual menus, you can achieve the exact same result using Microsoft Word's main navigation bar to add page breaks in Word documents:
- Step 1. Place your cursor right before the text or heading that needs to move.
- Step 2. Navigate to the Insert tab on the Ribbon.
- Step 3. Click Page Break in the Pages group (click it twice if you want to create a full blank page).

You may like: How to Remove Page Breaks in Word (4 Easy Methods)
How to Insert a Cover Page in Word Documents
Every professional report, business proposal, or academic essay needs a strong front page. Instead of manual formatting, you should let Word handle the design and structural heavy lifting.
If you are looking for how to insert a cover page in Word, the software provides a built-in feature that sets up an introductory layout for you.
- Step 1. Click anywhere inside your document.
- Step 2. Go to the Insert tab on the Ribbon.
- Step 3. Click Cover Page and select your favorite layout from the built-in gallery.
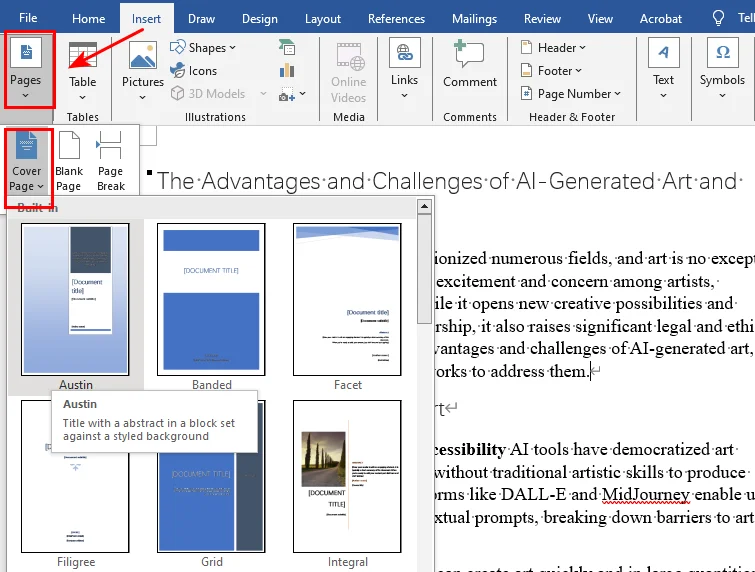
Word handles cover pages differently from regular document content. When you insert a built-in cover page, Word automatically places it at the beginning of the document and can keep page numbering from appearing on the title page.
Automated Page Insertion Using Page Break Before
This feature is especially useful in long reports, manuals, and books where each chapter should start on a new page. Instead of inserting page breaks manually, you can use Word's Page Break Before setting to ensure specific headings always begin on a new page.
- Step 1. Right-click on the specific heading or the Heading 1 style in your Home tab, then select Paragraph.
- Step 2. Go to the Line and Page Breaks tab in the dialogue window.
- Step 3. Check the box next to Page break before, then click OK.
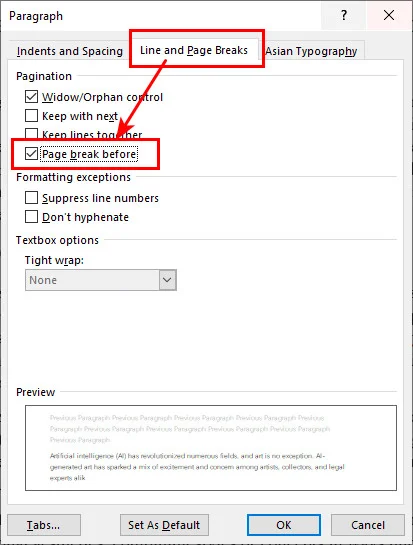
Now, every time you apply that heading style, Word will automatically create a new page for it. Even if you delete paragraphs in earlier sections, your chapters will never crowd together or misalign.
How to Insert a Page in Word Programmatically via Free Spire.Doc
When generating invoices, bundling monthly client statements, or assembling dynamic contracts, it is highly recommended to automate inserting pages in Word documents to save time and effort. Using Free Spire.Doc for Python makes it easy to streamline this entire process. Mirroring the double-break technique we learned in the previous section, this library allows you to add page breaks using the AppendBreak method. By injecting two back-to-back page break objects right into a paragraph or text range, you can effortlessly add an empty page in your output file without opening Microsoft Word.
Here's the code example showing how to insert a new page after the first paragraph:
from spire.doc import *
from spire.doc.common import *

# Create an object of Document class
document = Document()

# Load a sample file from disk
document.LoadFromFile("/input/sample.docx")

# Get the first section of the document
section = document.Sections[0]

# Get the first paragraph
paragraph = section.Paragraphs[0]

# Append the first page break to end the current page
paragraph.AppendBreak(BreakType.PageBreak)

# Append the second page break to create an empty page
paragraph.AppendBreak(BreakType.PageBreak)

# Save the result file
document.SaveToFile("/output/InsertBlankPage.docx", FileFormat.Docx2013)
document.Close()
Below is a preview of the result document, you can see that there's a new page after the first paragraph: 
Conclusion
This guide covers five efficient ways to insert a page in Word documents, ranging from quick manual fixes in Microsoft Word to programmatic automation using Free Spire.Doc for Python. Each method shines in different scenarios: manual options like blank pages or page breaks are perfect for one-off edits, while the Free Spire.Doc is the ideal choice for integrating workflows and high-volume file processing. By choosing the appropriate method for your scenario, you can insert pages efficiently while maintaining a consistent document layout.
FAQs about Inserting Pages in Word
Q1: How do I insert a landscape page in Word?
To insert a landscape page in Word, you simply need to isolate that specific section using a section break and change its orientation.
First, place your cursor right before the content you want to flip, go to Layout > Breaks > Next Page, and then navigate to Layout > Orientation > Landscape. This allows you to directly rotate a page in Word from portrait to landscape without changing the formatting of the rest of your document.
Q2: What is the difference between inserting a blank page and a page break?
A blank page drops an untouched empty page between sections. A page break does not create empty space; it is simply an invisible formatting boundary that cuts the current line short and pushes any following text directly to the top of the next page, but inserting two page breaks can also insert a blank page in Word.
Q3: Why does my page numbering mess up after I insert a cover page?
Word's built-in layouts are programmed to hide numbering on title pages, but if numbers still show up on your cover, double-click the header or footer area to reveal the layout options. In the Header & Footer tab on the Ribbon, check the box for Different First Page to start your visible numbering cleanly from page two.