Excel spreadsheets often look perfect on screen but become difficult to print properly. Large tables may spill across multiple pages, columns get cut off, or the printed result becomes messy and hard to read.
Fortunately, Excel provides several built-in tools to help fit worksheets onto a single page when printing. Whether you're printing invoices, reports, schedules, dashboards, or financial statements, these methods can help create cleaner and more professional printouts.
In this guide, you'll learn 7 effective ways to print an Excel sheet on one page, ranging from beginner-friendly Excel settings to advanced C# automation using Spire.XLS.
Quick Navigation:
- Method 1: Use “Fit Sheet on One Page” Option
- Method 2: Adjust Page Scaling Manually
- Method 3: Change Page Orientation
- Method 4: Reduce Margins and Remove Extra Columns
- Method 5: Set a Custom Print Area
- Method 6: Change Paper Size
- Method 7: Print Excel Sheet on One Page Using C#
Why Excel Sheets Don’t Fit on One Page
Excel automatically separates worksheets into multiple printed pages based on page size, margins, scaling, and content dimensions. If a worksheet contains too many columns or rows, Excel may split the content into several pages during printing.
Common reasons include:
- Wide tables with many columns
- Large font sizes
- Excessive blank spaces
- Wide page margins
- Incorrect page orientation
- Unused cells extending the print range
As a result, reports can become difficult to read and waste paper unnecessarily. The following methods will help you optimize your worksheet layout and fit the content onto a single printed page.
Method 1: Use “Fit Sheet on One Page” Option
This is the easiest and most commonly used method. Excel includes a built-in scaling feature that automatically shrinks worksheet content to fit onto one printed page.
It works particularly well for invoices, schedules, reports, and medium-sized tables.
Steps
- Open your Excel worksheet.
- Click File > Print.
- Under Settings, click No Scaling.
- Select Fit Sheet on One Page.
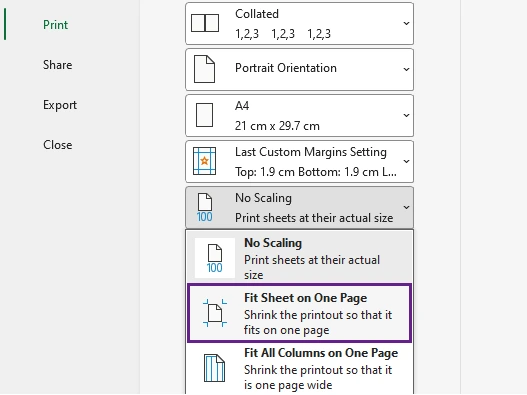
- Preview the result in the Print Preview pane.
- Click Print to print the worksheet.
What Happens
Excel automatically scales the worksheet so all rows and columns fit within a single page during printing.
Pros
- Extremely easy to use
- No manual resizing required
- Built directly into Excel
Cons
- Text may become too small for very large worksheets
Method 2: Adjust Page Scaling Manually
Instead of forcing everything onto one page automatically, you can manually reduce the scaling percentage. This provides more control over readability and print appearance.
For example, reducing scaling to 85% or 90% may fit the content nicely while keeping text readable.
Steps
- Open your Excel worksheet and click File > Print.
- Under Settings, click No Scaling.
- Select Custom Scaling Options.
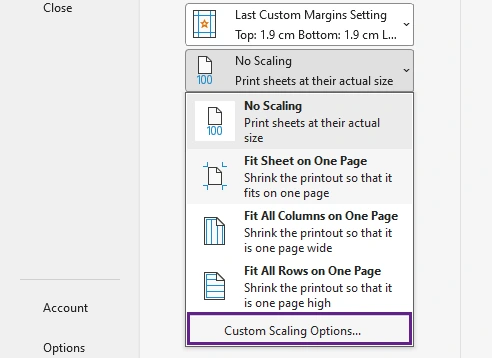
- In the scaling settings, reduce the scaling percentage until the worksheet fits better on the page.
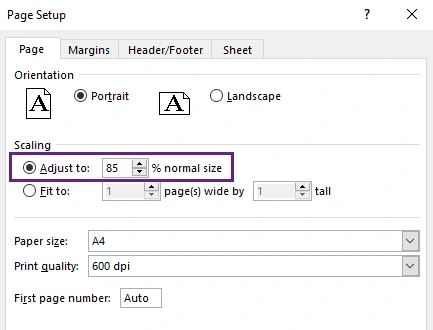
- Check the layout in the Print Preview pane and continue adjusting if needed.
- Once the worksheet fits properly on one page, click Print.
Best For
- Financial reports
- Tables with slightly oversized columns
- Worksheets where readability matters
Tip: Avoid reducing scaling too aggressively. Tiny text can make printed documents difficult to read.
Method 3: Change Page Orientation
Many Excel worksheets are wider than they are tall. Switching from Portrait orientation to Landscape orientation provides more horizontal space and can instantly reduce page breaks.
This simple adjustment is especially effective for spreadsheets with many columns.
Steps
- Open your Excel worksheet and click File > Print.
- In the print settings window, click Page Setup.
- Under the Page tab, select Landscape orientation.
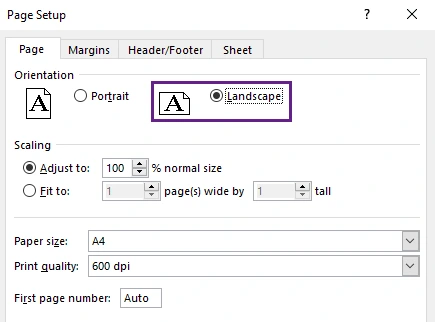
- Click OK to apply the setting.
- Review the layout in the Print Preview pane.
- If the worksheet fits properly on one page, click Print.
Why It Helps
Landscape mode increases printable width, allowing more columns to fit onto a single page.
Best For
- Wide data tables
- Dashboards
- Reports with many columns
Method 4: Reduce Margins and Remove Extra Columns
Large page margins and unused worksheet areas consume valuable printing space. Reducing margins and removing unnecessary content can significantly improve page fitting.
This method is often combined with scaling for better results.
Steps
- Open your Excel worksheet and remove unnecessary content, such as blank rows, empty columns, oversized fonts, excessive spacing, or data that does not need to be printed.
- Click File > Print.
- Under Settings, click Normal Margins.
- Select Narrow to reduce the page margins and create more printable space.
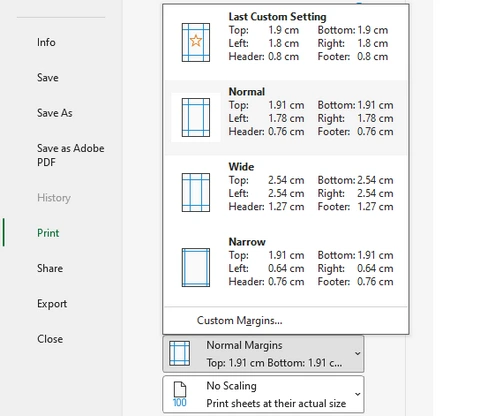
- If you need additional space, select Custom Margins and manually reduce the top, bottom, left, and right margins further.
- Review the result in the Print Preview pane.
- Once the worksheet fits properly on one page, click Print.
Why It Works
Smaller margins provide more printable area, while cleaning unused content prevents Excel from printing unnecessary pages.
Tip: Press Ctrl + End to see Excel’s last used cell. Sometimes hidden formatting extends far beyond your actual data.
Method 5: Set a Custom Print Area
Sometimes only part of the worksheet needs to be printed. By defining a custom print area, Excel ignores unnecessary cells and focuses only on the selected content.
This is one of the most effective ways to prevent blank pages and oversized print ranges.
Steps
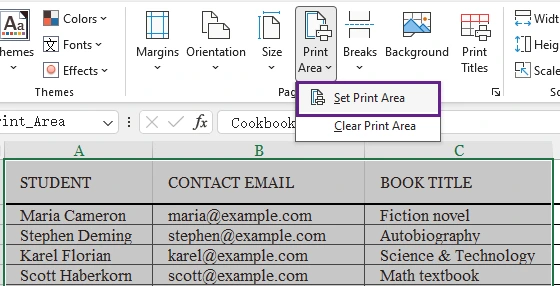
- Select the cells or range you want to print.
- Go to the Page Layout tab.
- Click Print Area in the Page Setup group.
- Select Set Print Area.
- Click File > Print to open the printing settings.
- Review the selected content in the Print Preview pane.
- If the layout looks correct, click Print.
Best For
- Reports
- Dashboards
- Summaries
- Invoice sections
Pros
- Prevents extra blank pages
- Faster printing
- Cleaner output
Method 6: Change Paper Size
Using a larger paper size provides additional printable space and reduces the need for excessive scaling. This method is commonly used in offices for large spreadsheets and detailed reports.
For example, switching from Letter to Legal paper can dramatically improve print layout.
Steps
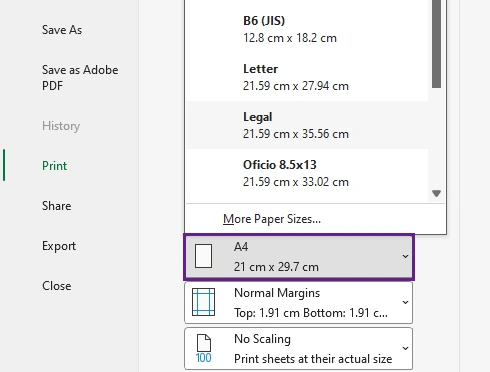
- Open your Excel worksheet and click File > Print.
- Under Settings, click the current paper size (such as A4).
- Select a larger paper size, such as Legal , A3, or Tabloid.
- Review the layout in the Print Preview pane.
- If the worksheet fits properly on the page, click Print .
Best For
- Large reports
- Financial spreadsheets
- Wide tables
Important Note
Make sure your printer supports the selected paper size.
Method 7: Print Excel Sheet on One Page Using C#
If you need to print Excel worksheets programmatically, C# automation provides a much more efficient solution than manual printing. This approach is ideal for enterprise systems, reporting platforms, scheduled tasks, and batch document processing.
Using Spire.XLS for .NET, you can automatically configure page settings and fit worksheets onto a single printed page.
The key setting is:
pageSetup.IsFitToPage = true;
This property automatically scales worksheet content to fit within one page during printing.
Install Spire.XLS
You can install Spire.XLS via NuGet:
Install-Package Spire.XLS
C# Example: Print Excel Sheet on One Page
using Spire.Xls;
using System.Drawing.Printing;

namespace PrintExcel
{
    class Program
    {
        static void Main(string[] args)
        {
            // Load an Excel document
            Workbook workbook = new Workbook();
            workbook.LoadFromFile("Sample.xlsx");

            // Loop through the worksheets
            for (int i = 0; i < workbook.Worksheets.Count; i++)
            {
                // Get a specific worksheet
                Worksheet worksheet = workbook.Worksheets[i];

                // Get the PageSetup object
                PageSetup pageSetup = worksheet.PageSetup;

                // Set page margins
                pageSetup.TopMargin = 0.3;
                pageSetup.BottomMargin = 0.3;
                pageSetup.LeftMargin = 0.3;
                pageSetup.RightMargin = 0.3;

                // Allow to print with gridlines
                pageSetup.IsPrintGridlines = true;

                // Fit worksheet on one page
                pageSetup.IsFitToPage = true;
            }

            // Get PrinterSettings
            PrinterSettings settings = workbook.PrintDocument.PrinterSettings;

            // Specify printer name
            settings.PrinterName = "Your Printer Name";

            // Specify page range to print
            settings.FromPage = 1;
            settings.ToPage = 3;

            // Execute printing
            workbook.PrintDocument.Print();
        }
    }
}
Advantages of This Method
- Fully automated Excel printing
- Supports batch processing
- Suitable for enterprise applications
- Eliminates manual Excel operations
- Easy to integrate into reporting systems
As a comprehensive Excel API for .NET, Spire.XLS for .NET allows developers to control worksheet printing entirely through code, including scaling, print areas, margins, orientation, headers, footers, and page breaks.
Beyond printing, it also supports Excel creation, editing, data import/export, formula calculation, chart processing, and conversion between Excel, PDF, CSV, HTML, and image formats. It is widely used for report generation, business automation, financial systems, and large-scale spreadsheet processing applications.
Quick Comparison Table
| Method | Difficulty | Best For | Automation |
|---|---|---|---|
| Fit Sheet on One Page | Easy | Quick printing | No |
| Manual Scaling | Easy | Better readability | No |
| Landscape Orientation | Easy | Wide worksheets | No |
| Reduce Margins | Easy | Minor layout fixes | No |
| Set Print Area | Easy | Partial worksheet printing | No |
| Change Paper Size | Easy | Large reports | No |
| C# with Spire.XLS | Advanced | Batch/automatic printing | Yes |
Conclusion
Printing Excel worksheets on a single page can greatly improve document readability and presentation quality. Excel offers several built-in features—including scaling, landscape orientation, print area configuration, and margin adjustment—to help optimize print layouts quickly.
For developers and enterprise users, programmatic printing with Spire.XLS provides a powerful automation solution. By enabling the IsFitToPage property, Excel worksheets can automatically fit onto one printed page, making batch printing and report generation much more efficient.
FAQs
Q1. Why is my Excel sheet still printing on multiple pages?
Your worksheet may contain hidden data, unused formatted cells, large margins, or too many columns. Check the print area and scaling settings.
Q2. Does fitting a sheet onto one page reduce print quality?
No. Excel only scales the content size. However, excessive shrinking may make text difficult to read.
Q3. Can I fit only columns onto one page?
Yes. Under Settings , click No Scaling , and choose Fit All Columns on One Page. This keeps rows flowing naturally while fitting all columns onto one page.
Q4. Is Landscape mode better for printing Excel sheets?
For wide spreadsheets, yes. Landscape orientation provides more horizontal printing space.
Q5. Can I automate Excel printing in backend applications?
Yes. Libraries such as Spire.XLS allow developers to print Excel files programmatically using C# without manually opening Excel.