
.NET (1327)
Children categories
In the previous article, we have introduced how to read a PST file and get the folder information from it. This article will show you how we can add existing mail message files into PSF file for archiving.
Step 1: Load a PST file from disk into an instance of OutlookFile class.
OutlookFile outlookFile = new OutlookFile(@"C:\Users\Administrator\Documents\Outlook Files\Sample.pst");
Step 2: Load a MSG file into an instance of OutlookItme class.
OutlookItem item = new OutlookItem();
item.LoadFromFile(@"C:\Users\Administrator\Documents\Outlook Files\Sample.msg");
Step 3: Get inbox folder from PST file.
OutlookFolder inboxFolder = outlookFile.RootOutlookFolder.GetSubFolder("Inbox");
Step 4: Add the MSG file to inbox folder.
inboxFolder.AddItem(item);
Full Code:
using Spire.Email;
using Spire.Email.Outlook;
using System;

namespace AddMessageToPSTFile
{
    class Program
    {
        static void Main(string[] args)
        {
            OutlookFile outlookFile = new OutlookFile(@"C:\Users\Administrator\Documents\Outlook Files\Sample.pst");
            OutlookItem item = new OutlookItem();
            item.LoadFromFile(@"C:\Users\Administrator\Documents\Outlook Files\Sample.msg");
            OutlookFolder inboxFolder = outlookFile.RootOutlookFolder.GetSubFolder("Inbox");
            inboxFolder.AddItem(item);
            Console.WriteLine("Completed");
        }
    }
}
Imports Spire.Email
Imports Spire.Email.Outlook

Namespace AddMessageToPSTFile
	Class Program
		Private Shared Sub Main(args As String())
			Dim outlookFile As New OutlookFile("C:\Users\Administrator\Documents\Outlook Files\Sample.pst")
			Dim item As New OutlookItem()
			item.LoadFromFile("C:\Users\Administrator\Documents\Outlook Files\Sample.msg")
			Dim inboxFolder As OutlookFolder = outlookFile.RootOutlookFolder.GetSubFolder("Inbox")
			inboxFolder.AddItem(item)
			Console.WriteLine("Completed")
		End Sub
	End Class
End Namespace
We often come across a scenario where we need to merge data to the merge fields which are created by some others, and we are not sure about the merge fields’ names. So in order to accomplish the mail merge purpose, first we need to read the names of all the merge fields.
The MailMerge class in Spire.Doc.Reporting namespace exposes the following methods which return a collection of merge field names or group (region) names in a word document.
- public string[] GetMergeFieldNames(): return a collection of all the merge field names.
- public string[] GetMergeFieldNames(string groupName): return a collection of merge field names within a specific group.
- public string[] GetMergeGroupNames(): return a collection of group names.
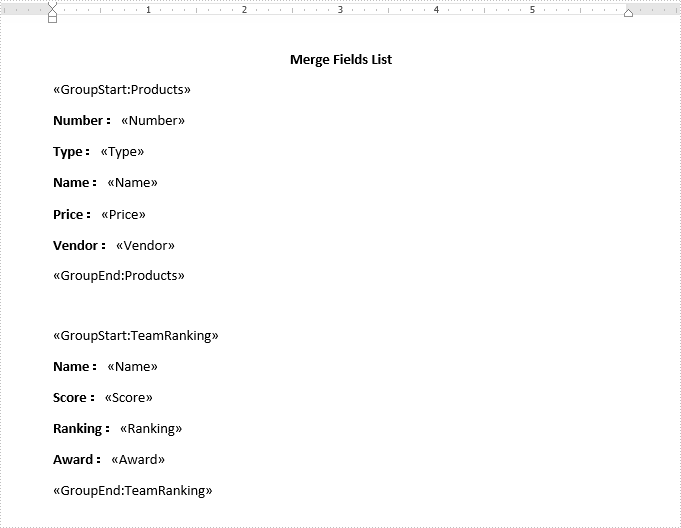
For better demonstration, we use the following sample document:
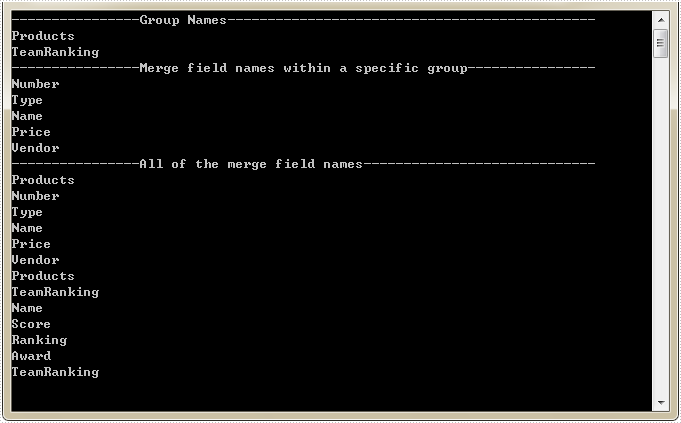
The following example elaborates how to read the names of groups and merge fields in above word document.
using Spire.Doc;
using System;
namespace MailMerge
{
    class Program
    {
        static void Main(string[] args)
        {

            //Creates Document instance
            Document document = new Document();

            //Loads the word document
            document.LoadFromFile("MergeFields.docx");

            //Gets the collection of group names
            string[] GroupNames = document.MailMerge.GetMergeGroupNames();

            //Gets the collection of merge field names in a specific group
            string[] MergeFieldNamesWithinRegion = document.MailMerge.GetMergeFieldNames("Products");

            // Gets the collection of all the merge field names
            string[] MergeFieldNames = document.MailMerge.GetMergeFieldNames();

            Console.WriteLine("----------------Group Names-----------------------------------------");
            for (int i = 0; i < GroupNames.Length; i++)
            {
                Console.WriteLine(GroupNames[i]);
            }

            Console.WriteLine("----------------Merge field names within a specific group-----------");
            for (int j = 0; j < MergeFieldNamesWithinRegion.Length; j++)
            {
                Console.WriteLine(MergeFieldNamesWithinRegion[j]);
            }

            Console.WriteLine("----------------All of the merge field names------------------------");
            for (int k = 0; k < MergeFieldNames.Length; k++)
            {
                Console.WriteLine(MergeFieldNames[k]);
            }

        }

    }
}
Screenshot:
With Spire.PDF for .NET, we can easily set the password to encrypt the PDF document by password. We can also use Spire.PDF to remove the password from the encrypted PDF document in C# and VB.NET. We need to load the encrypted PDF file with password by calling the method PdfDocument.LoadFromFile (string filename, string password) and then set the password as empty to remove the password.
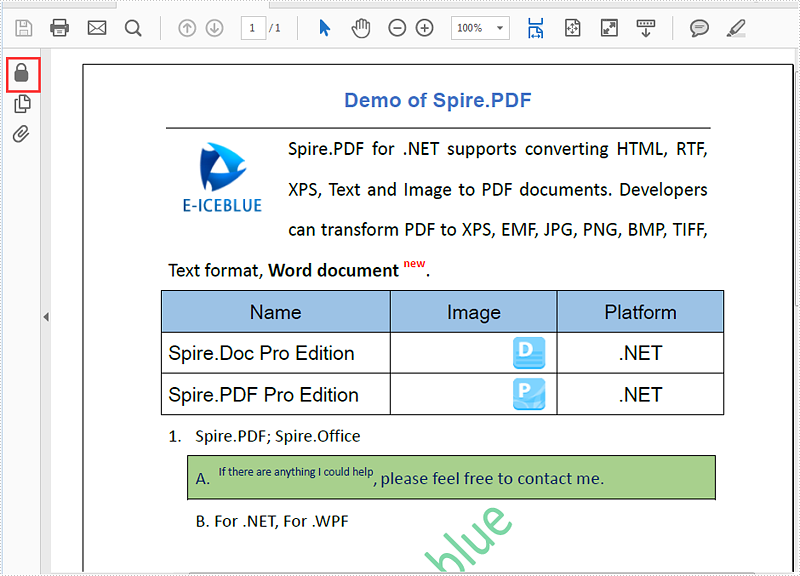
Firstly, view the PDF with user password:
Step 1: Load the password protected PDF document.
PdfDocument pdf = new PdfDocument();
pdf.LoadFromFile("Sample.pdf", "e-iceblue");
Step 2: Set the password as empty to remove the user password.
string UserPassword = string.Empty;
string OwnerPassword = string.Empty;
PdfSecurityPolicy securityPolicy = new PdfPasswordSecurityPolicy(UserPassword, OwnerPassword);
pdf.Encrypt(securityPolicy);
Step 3: Save the document to file.
pdf.SaveToFile("Decrypted.pdf");
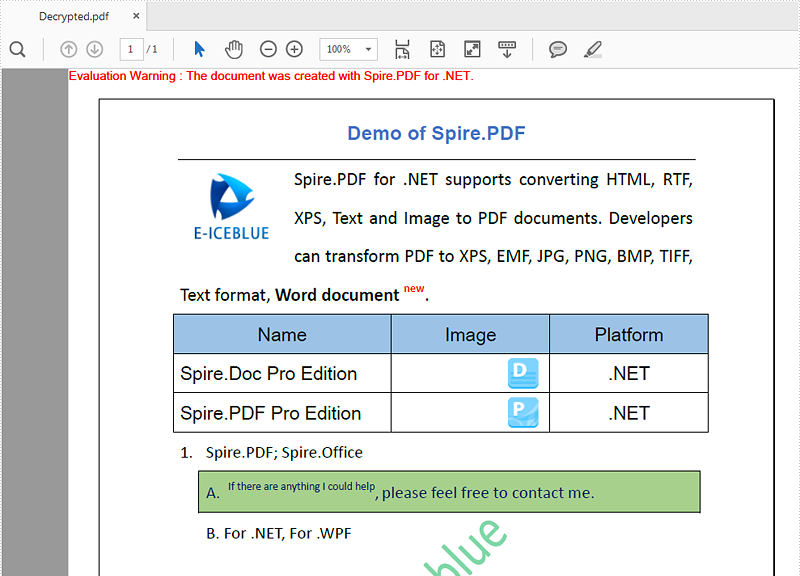
Effective screenshot after removing the password from the PDF document:
Full codes:
using Spire.Pdf;

namespace RemovePassword
{
    class Program
    {
        static void Main(string[] args)
        {
            PdfDocument pdf = new PdfDocument();
            pdf.LoadFromFile("Sample.pdf", "e-iceblue");

            string UserPassword = string.Empty;
            string OwnerPassword = string.Empty;
            PdfSecurityPolicy securityPolicy = new PdfPasswordSecurityPolicy(UserPassword, OwnerPassword);
            pdf.Encrypt(securityPolicy);
            pdf.Encrypt(securityPolicy);

            pdf.SaveToFile("Decrypted.pdf");
        }
    }
}
Imports Spire.Pdf

Namespace RemovePassword
	Class Program
		Private Shared Sub Main(args As String())
			Dim pdf As New PdfDocument()
			pdf.LoadFromFile("Sample.pdf", "e-iceblue")
			Dim UserPassword As String = String.Empty
			Dim OwnerPassword As String = String.Empty
			Dim securityPolicy As PdfSecurityPolicy = New PdfPasswordSecurityPolicy(UserPassword, OwnerPassword)
			pdf.Encrypt(securityPolicy)
			pdf.SaveToFile("Decrypted.pdf")
		End Sub
	End Class
End Namespace
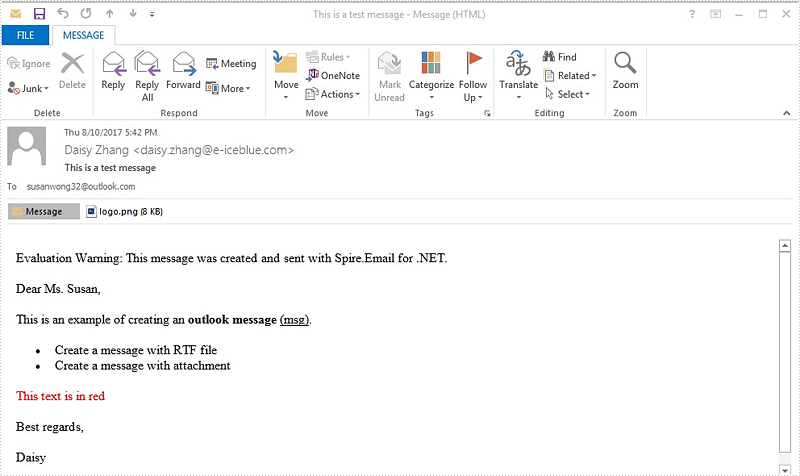
Spire.Email supports to create Outlook message (MSG) files with rich text bodies and attachments in C# and VB.NET. The RTF body supports to set the formatting for the font, such as in bold, underline and set the color and add lists to the message body. It makes the outlook message vivid and clear to view. Here comes to the steps of how to use Spire.Email to create and save the Outlook message with RTF body and attachment in C#.
Step 1: Create an instance of MailMessage class and specify sender and recipient address.
MailAddress addressFrom = new MailAddress("daisy.zhang@e-iceblue.com", "Daisy Zhang");
MailAddress addressTo = new MailAddress("susanwong32@outlook.com");
MailMessage mail = new MailMessage(addressFrom, addressTo);
Step 2: Add the subject, message body and attachment of the message.
mail.Subject = "This is a test message";

string htmlString = @"
   <p>Dear Ms. Susan,</p>
   <p>This is an example of creating an <b>outlook message</b> <u>(msg)</u>.</p>
   <ul>
   <li> Create a message with RTF file </li>
   <li> Create a message with attachment</li>
   </ul>
   <p style='color:red'>This text is in red </p>

   <p>Best regards, </p>
   <p>Daisy </p>";
 mail.BodyHtml = htmlString;

 mail.Attachments.Add(new Attachment("logo.png"));
Step 3: Save the message as MSG format.
mail.Save("Sample.msg", MailMessageFormat.Msg);
Effective screenshot:
Full codes:
using Spire.Email;

namespace CreatingMSGFiles
{
    class Program
    {
        static void Main(string[] args)
        {
            MailAddress addressFrom = new MailAddress("daisy.zhang@e-iceblue.com", "Daisy Zhang");
            MailAddress addressTo = new MailAddress("susanwong32@outlook.com");

            MailMessage mail = new MailMessage(addressFrom, addressTo);

            mail.Subject = "This is a test message";
            string htmlString = @"
           <p>Dear Ms. Susan,</p>
           <p>This is an example of creating an <b>outlook message</b> <u>(msg)</u>.</p>
           <ul>
           <li> Create a message with RTF file </li>
           <li> Create a message with attachment</li>
           </ul>
           <p style='color:red'>This text is in red </p>
           <p>Best regards, </p>
           <p>Daisy </p>";

            mail.BodyHtml = htmlString;

            mail.Attachments.Add(new Attachment("logo.png"));

            mail.Save("Sample.msg", MailMessageFormat.Msg);
        }
    }
}
The PST files are used to store information that pertains to the e-mail folders, addresses, contact information, email messages and other data that is saved within Outlook and Exchange programs. Spire.Email supports to read PST files and get the folder information such as folder name, message count and unread message count.
Step 1: Load a PST file from disk into an instance of OutlookFile class.
OutlookFile olf = new OutlookFile(@"C:\Users\jack\Documents\Outlook Files\Sample.pst");
Step 2: Get the folders collection.
OutlookFolderCollection folderCollection = olf.RootOutlookFolder.GetSubFolders();
Step 3: Traverse the collection and get the folder information of each element in the collection.
foreach (OutlookFolder folder in folderCollection)
{
    Console.WriteLine("Folder: " + folder.Name);
    Console.WriteLine("Total items: " + folder.ItemCount);
    Console.WriteLine("Total unread items: " + folder.UnreadItemCount);
    Console.WriteLine("Whether this folder has subfolders: {0}", (folder.HasSubFolders)?"Yes":"No");
    Console.WriteLine("------------------Next Folder--------------------");
}
Output:

Full Code:
using Spire.Email;
using Spire.Email.Outlook;
using System;

namespace GetFolderInformation
{
    class Program
    {
        static void Main(string[] args)
        {
            OutlookFile olf = new OutlookFile(@"C:\Users\jack\Documents\Outlook Files\Sample.pst");
            OutlookFolderCollection folderCollection = olf.RootOutlookFolder.GetSubFolders();

            foreach (OutlookFolder folder in folderCollection)
            {
                Console.WriteLine("Folder: " + folder.Name);
                Console.WriteLine("Total items: " + folder.ItemCount);
                Console.WriteLine("Total unread items: " + folder.UnreadItemCount);
                Console.WriteLine("Whether this folder has subfolders: {0}", (folder.HasSubFolders) ? "Yes" : "No");
                Console.WriteLine("------------------Next Folder--------------------");
            }
            Console.WriteLine("Completed");
        }
    }
}
Imports Spire.Email
Imports Spire.Email.Outlook

Namespace GetFolderInformation
	Class Program
		Private Shared Sub Main(args As String())
			Dim olf As New OutlookFile("C:\Users\jack\Documents\Outlook Files\Sample.pst")
			Dim folderCollection As OutlookFolderCollection = olf.RootOutlookFolder.GetSubFolders()

			For Each folder As OutlookFolder In folderCollection
				Console.WriteLine("Folder: " + folder.Name)
				Console.WriteLine("Total items: " + folder.ItemCount)
				Console.WriteLine("Total unread items: " + folder.UnreadItemCount)
				Console.WriteLine("Whether this folder has subfolders: {0}", If((folder.HasSubFolders), "Yes", "No"))
				Console.WriteLine("------------------Next Folder--------------------")
			Next
			Console.WriteLine("Completed")
		End Sub
	End Class
End Namespace
This article demonstrates how to set the row height and column width of an existing table in PowerPoint document using Spire.Presentation in C# and VB.NET.
The following screenshot shows the table before setting row height and column width.
Detail steps:
Step 1: Instantiate a Presentation object and load the PowerPoint document.
Presentation ppt = new Presentation();
ppt.LoadFromFile("Input.pptx");
Step 2: Get the first slide.
ISlide slide = ppt.Slides[0];
Step 3: Get the first table on the slide.
ITable table = ppt.Slides[0].Shapes[0] as ITable;
Step 4: Set table row height and column width.
table.TableRows[1].Height = 50;
table.ColumnsList[1].Width = 100;
Step 5: Save the document.
ppt.SaveToFile("Output.pptx", FileFormat.Pptx2013);
Screenshot:
Full code:
using Spire.Presentation;

namespace Set_table_column_width_and_row_height
{
    class Program
    {
        static void Main(string[] args)
        {
            Presentation ppt = new Presentation();
            ppt.LoadFromFile("Input.pptx");

            ISlide slide = ppt.Slides[0];

            ITable table = ppt.Slides[0].Shapes[0] as ITable;

            table.TableRows[1].Height = 50;
            table.ColumnsList[1].Width = 100;

            ppt.SaveToFile("Output.pptx", FileFormat.Pptx2013);
        }
    }
}
Imports Spire.Presentation

Namespace Set_table_column_width_and_row_height
	Class Program
		Private Shared Sub Main(args As String())
			Dim ppt As New Presentation()
			ppt.LoadFromFile("Input.pptx")

			Dim slide As ISlide = ppt.Slides(0)

			Dim table As ITable = TryCast(ppt.Slides(0).Shapes(0), ITable)

			table.TableRows(1).Height = 50
			table.ColumnsList(1).Width = 100

			ppt.SaveToFile("Output.pptx", FileFormat.Pptx2013)
		End Sub
	End Class
End Namespace
A file with the EMLX or EML file extension is a Mail Message file used to store an email message. EML/EMLX file can converted to MHTML or MSG file format with few lines of core code by using Spire.Email.
Convert EML/EMLX to MHTML
using Spire.Email;
using System;

namespace ConvertEMLandEMLXtoMHTML
{
    class Program
    {
        static void Main(string[] args)
        {
            MailMessage message = MailMessage.Load("example.eml");
            message.Save("ToMhtml.mhtml", MailMessageFormat.Mhtml);
            Console.WriteLine("Done");
        }
    }
}
Imports Spire.Email

Namespace ConvertEMLandEMLXtoMHTML
	Class Program
		Private Shared Sub Main(args As String())
			Dim message As MailMessage = MailMessage.Load("example.eml")
			message.Save("ToMhtml.mhtml", MailMessageFormat.Mhtml)
			Console.WriteLine("Done")
		End Sub
	End Class
End Namespace
Convert EML/EMLX to MSG
using Spire.Email;
using System;

namespace ConvertEMLandEMLXtoMSG
{
    class Program
    {
        static void Main(string[] args)
        {
            MailMessage message = MailMessage.Load("example.eml");
            message.Save("ToMsg.msg", MailMessageFormat.Msg);
            Console.WriteLine("Done");
        }
    }
}
Imports Spire.Email

Namespace ConvertEMLandEMLXtoMSG
	Class Program
		Private Shared Sub Main(args As String())
			Dim message As MailMessage = MailMessage.Load("example.eml")
			message.Save("ToMsg.msg", MailMessageFormat.Msg)
			Console.WriteLine("Done")
		End Sub
	End Class
End Namespace
We have already demonstrated how to use Spire.Doc to add shapes to word document from code. Spire.Doc also supports to remove a single shape by index or clear all the shapes from the word document. This article will illustrates how to remove the shape from word document in C# and VB.NET.
Sample word document with shapes:
Step 1: Initialize a new instance of Document class and load the document from file.
Document doc = new Document();
doc.LoadFromFile("Shapes.docx",FileFormat.Docx2010);
Step 2: Get the first section from the document and the first paragraph from the section.
Section section = doc.Sections[0];
Paragraph para = section.Paragraphs[0];
Step 3: Get shapes from the first paragraph.
ShapeObject shape = para.ChildObjects[0] as ShapeObject;
Step 4: Remove the shape or all the shapes.
//remove the third shape.
para.ChildObjects.RemoveAt(2);

////clear all the shapes.
//para.ChildObjects.Clear();
Step 5: Save the document to file.
doc.SaveToFile("Removeshape.docx",FileFormat.Docx2010);
Effective screenshot after removing one shape from the word document:

Full codes:
using Spire.Doc;
using Spire.Doc.Documents;
using Spire.Doc.Fields;
namespace RemoveShape
{
    class Program
    {
        static void Main(string[] args)
        {
            Document doc = new Document();
            doc.LoadFromFile("Shapes.docx", FileFormat.Docx2010);

            Section section = doc.Sections[0];

            Paragraph para = section.Paragraphs[0];
            ShapeObject shape = para.ChildObjects[0] as ShapeObject;

            //remove the third shape.
            para.ChildObjects.RemoveAt(2);

            ////clear all the shapes.
            //para.ChildObjects.Clear();

            doc.SaveToFile("Removeshape.docx", FileFormat.Docx2010);
        }
    }
}
Imports Spire.Doc
Imports Spire.Doc.Documents
Imports Spire.Doc.Fields
Namespace RemoveShape
	Class Program
		Private Shared Sub Main(args As String())
			Dim doc As New Document()
			doc.LoadFromFile("Shapes.docx", FileFormat.Docx2010)

			Dim section As Section = doc.Sections(0)

			Dim para As Paragraph = section.Paragraphs(0)
			Dim shape As ShapeObject = TryCast(para.ChildObjects(0), ShapeObject)

			'remove the third shape.
			para.ChildObjects.RemoveAt(2)

			'''/clear all the shapes.
			'para.ChildObjects.Clear();

			doc.SaveToFile("Removeshape.docx", FileFormat.Docx2010)
		End Sub
	End Class
End Namespace
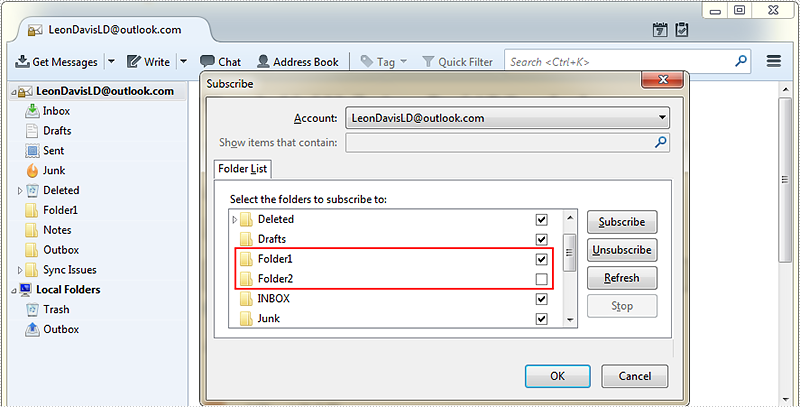
Spire.Email supports to manage folder subscriptions by using ImapClient.Subscribe and ImapClient.Unsubscribe method.
The following example shows how to subscribe to a folder and unsubscribe from a folder using Spire.Email component.
Detail steps:
Step 1: Create an ImapClient instance.
ImapClient imap = new ImapClient();
Step 2: Set host, port, authentication and connection protocol.
imap.Host = "outlook.office365.com";
imap.Port = 143;
imap.Username = "LeonDavisLD@outlook.com";
imap.Password = "password";
imap.ConnectionProtocols = ConnectionProtocols.Ssl;
Step 3: Connect the imap server.
imap.Connect();
Step 4: Subscribe folder using its name.
imap.Subscribe("Folder1");
Step 5: Unsubscribe folder.
imap.Unsubscribe("Folder2");
Screenshot:
Full code:
using Spire.Email;
using Spire.Email.IMap;

namespace SubscribAndUnsubscribeFolders
{
    class Program
    {
        static void Main(string[] args)
        {
            //Create an ImapClient instance
            ImapClient imap = new ImapClient();

            //Set host, port, authentication and connection protocol
            imap.Host = "outlook.office365.com";
            imap.Port = 143;
            imap.Username = "LeonDavisLD@outlook.com";
            imap.Password = "password";
            imap.ConnectionProtocols = ConnectionProtocols.Ssl;

            //Connect the imap server
            imap.Connect();

            //subscribe folder using its name
            imap.Subscribe("Folder1");

            //Unsubscribe folder
            imap.Unsubscribe("Folder2");
        }
    }
}
Imports Spire.Email
Imports Spire.Email.IMap

Namespace SubscribAndUnsubscribeFolders
	Class Program
		Private Shared Sub Main(args As String())
			'Create an ImapClient instance
			Dim imap As New ImapClient()

			'Set host, port, authentication and connection protocol
			imap.Host = "outlook.office365.com"
			imap.Port = 143
			imap.Username = "LeonDavisLD@outlook.com"
			imap.Password = "password"
			imap.ConnectionProtocols = ConnectionProtocols.Ssl

			'Connect the imap server
			imap.Connect()

			'subscribe folder using its name
			imap.Subscribe("Folder1")

			'Unsubscribe folder
			imap.Unsubscribe("Folder2")
		End Sub
	End Class
End Namespace
Spire.Presentation supports to insert HTML formatted text to PowerPoint slide. The following code snippets demonstrate how to.
Step 1: Create an instance of Presentation class.
Presentation ppt = new Presentation();
Step 2: Insert an autoshape (rectangle) in slide.
IAutoShape shape = ppt.Slides[0].Shapes.AppendShape(ShapeType.Rectangle, new RectangleF(50, 50, 400, 100));
Step 3: Clear default paragraphs in the shape.
shape.TextFrame.Paragraphs.Clear();
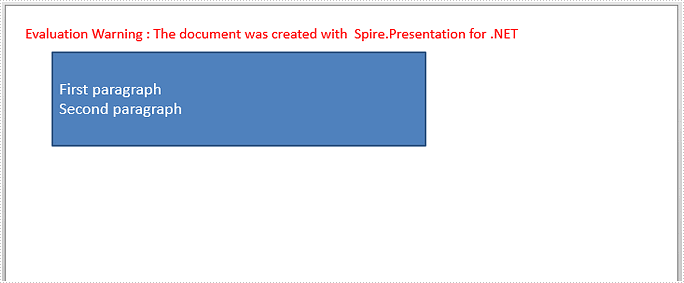
Step 4: Add paragraphs to shape from HTML code. Make sure your HTML segments are written between <html><body> and </body></html> tags, otherwise, AddFromHtml method will fail to work.
string htmlText= "<html><body><p>First paragraph</p><p>Second paragraph</p></body></html>";
shape.TextFrame.Paragraphs.AddFromHtml(htmlText);
Step 5: Save to file.
ppt.SaveToFile("output.pptx", FileFormat.Pptx2013);
Output:
Full Code:
using Spire.Presentation;
using System.Drawing;
namespace AppendHTMLString
{
class Program
{
static void Main(string[] args)
{
Presentation ppt = new Presentation();
IAutoShape shape = ppt.Slides[0].Shapes.AppendShape(ShapeType.Rectangle, new RectangleF(50, 50, 400, 100));
shape.TextFrame.Paragraphs.Clear();
string htmlText = "First paragraph
Second paragraph
";
shape.TextFrame.Paragraphs.AddFromHtml(htmlText);
ppt.SaveToFile("output.pptx", FileFormat.Pptx2013);
}
}
}
Imports Spire.Presentation Imports System.Drawing Namespace AppendHTMLString Class Program Private Shared Sub Main(args As String()) Dim ppt As New Presentation() Dim shape As IAutoShape = ppt.Slides(0).Shapes.AppendShape(ShapeType.Rectangle, New RectangleF(50, 50, 400, 100)) shape.TextFrame.Paragraphs.Clear() Dim htmlText As String = "First paragraph
Second paragraph
" shape.TextFrame.Paragraphs.AddFromHtml(htmlText) ppt.SaveToFile("output.pptx", FileFormat.Pptx2013) End Sub End Class End Namespace
