.NET (1327)
Children categories
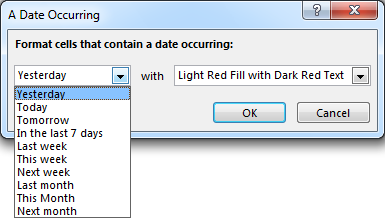
Microsoft Excel provides 10 date options, ranging from yesterday to next month (see below image) to format selected cells based on the current date. Spire.XLS supports all of these options, in this article, we’re going to show you how to conditionally format dates in Excel using Spire.XLS. If you want to highlight cells based on a date in another cell, or create rules for other dates (i.e., more than a month from the current date), you will have to create your own conditional formatting rule based on a formula.
Detail steps:
Step 1: Initialize an object of Workbook class and load the Excel file.
Workbook workbook = new Workbook();
workbook.LoadFromFile("Input.xlsx");
Step 2: Get the first worksheet.
Worksheet sheet = workbook.Worksheets[0];
Step 3: Add a condition to the used range in the worksheet.
XlsConditionalFormats xcfs1 = sheet.ConditionalFormats.Add();
xcfs1.AddRange(sheet.AllocatedRange);
Step 4: Specify the format type of the condition as time period and set the time period as last 7 days.
IConditionalFormat format1 = xcfs1.AddTimePeriodCondition(TimePeriodType.Last7Days);
Step 5:Set the highlight color.
conditionalFormat.BackColor = Color.Orange;
Step 6:Save the file.
workbook.SaveToFile("ConditionallyFormatDates.xlsx", ExcelVersion.Version2013);
Screenshot::

Full Code:
using Spire.Xls;
using Spire.Xls.Core;
using Spire.Xls.Core.Spreadsheet.Collections;
using Spire.Xls.Core.Spreadsheet.ConditionalFormatting;
using System.Drawing;

namespace ConditionallyFormatDates
{
    class Program
    {
        static void Main(string[] args)
        {
            //Initialize an object of Workbook class
            Workbook workbook = new Workbook();

            //Load the Excel file
            workbook.LoadFromFile("Input.xlsx");

            //Get the first worksheet
            Worksheet sheet = workbook.Worksheets[0];

            //Highlight cells that contain a date occurring in the last 7 days
            XlsConditionalFormats xcfs1 = sheet.ConditionalFormats.Add();
            xcfs1.AddRange(sheet.AllocatedRange);

            IConditionalFormat conditionalFormat = xcfs1.AddTimePeriodCondition(TimePeriodType.Last7Days);
            conditionalFormat.BackColor = Color.Orange;

            //Save the file
            workbook.SaveToFile("ConditionallyFormatDates.xlsx", ExcelVersion.Version2013);
        }
    }
}
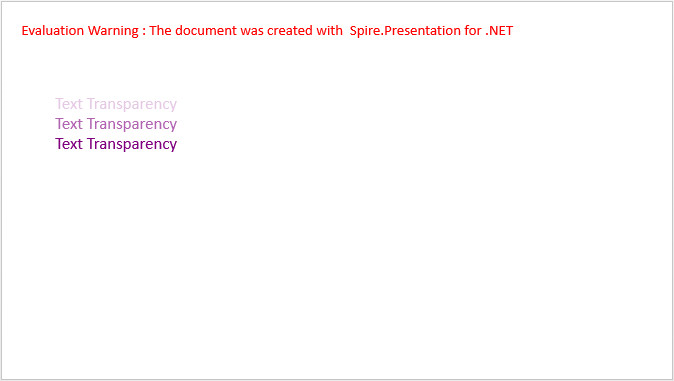
It is possible to add text transparency to any text shape in PowerPoint. In order to make the text transparent, we’d need to apply the transparency level to the text shape. This article will show you how to set the transparency level of text using Spire.Presentation.
Step 1: Create a Presentation instance.
Presentation ppt = new Presentation();
Step 2: Add a shape to the first slide.
IAutoShape textboxShape = ppt.Slides[0].Shapes.AppendShape(ShapeType.Rectangle, new RectangleF(50, 70,300, 120));
textboxShape.ShapeStyle.LineColor.Color = Color.Transparent;
textboxShape.Fill.FillType = FillFormatType.None;
Step 3: Add text to shape.
textboxShape.TextFrame.Text = "Text Transparency";
Step 4: Set the fill type of TextRange to solid, and fill the TextRange using the color created with specified alpha value.
textboxShape.TextFrame.TextRange.Fill.FillType = FillFormatType.Solid;
int alpha = 55;
textboxShape.TextFrame.TextRange.Fill.SolidColor.Color = Color.FromArgb(alpha, Color.Purple);
Step 5:Save the file.
ppt.SaveToFile("result.pptx", FileFormat.Pptx2013);
Output:
Full Code:
using Spire.Presentation;
using Spire.Presentation.Drawing;
using System.Drawing;
namespace ApplyTransparency
{
    class Program
    {
        static void Main(string[] args)
        {

            //create a PowerPoint document
            Presentation ppt = new Presentation();
            ppt.SlideSize.Type = SlideSizeType.Screen16x9;

            //add a shape
            IAutoShape textboxShape = ppt.Slides[0].Shapes.AppendShape(ShapeType.Rectangle, new RectangleF(50, 70, 300, 120));
            textboxShape.ShapeStyle.LineColor.Color = Color.Transparent;
            textboxShape.Fill.FillType = FillFormatType.None;

            //remove default blank paragraphs
            textboxShape.TextFrame.Paragraphs.Clear();

            //add three paragraphs, apply color with different alpha values to text
            int alpha = 55;
            for (int i = 0; i < 3; i++)
            {
                textboxShape.TextFrame.Paragraphs.Append(new TextParagraph());
                textboxShape.TextFrame.Paragraphs[i].TextRanges.Append(new TextRange("Text Transparency"));
                textboxShape.TextFrame.Paragraphs[i].TextRanges[0].Fill.FillType = FillFormatType.Solid;
                textboxShape.TextFrame.Paragraphs[i].TextRanges[0].Fill.SolidColor.Color = Color.FromArgb(alpha, Color.Purple);
                alpha += 100;
            }

            //save to file
            ppt.SaveToFile("result.pptx", FileFormat.Pptx2013);

        }
    }
}
Imports Spire.Presentation
Imports Spire.Presentation.Drawing
Imports System.Drawing
Namespace ApplyTransparency
	Class Program
		Private Shared Sub Main(args As String())

			'create a PowerPoint document
			Dim ppt As New Presentation()
			ppt.SlideSize.Type = SlideSizeType.Screen16x9

			'add a shape
			Dim textboxShape As IAutoShape = ppt.Slides(0).Shapes.AppendShape(ShapeType.Rectangle, New RectangleF(50, 70, 300, 120))
			textboxShape.ShapeStyle.LineColor.Color = Color.Transparent
			textboxShape.Fill.FillType = FillFormatType.None

			'remove default blank paragraphs
			textboxShape.TextFrame.Paragraphs.Clear()

			'add three paragraphs, apply color with different alpha values to text
			Dim alpha As Integer = 55
			For i As Integer = 0 To 2
				textboxShape.TextFrame.Paragraphs.Append(New TextParagraph())
				textboxShape.TextFrame.Paragraphs(i).TextRanges.Append(New TextRange("Text Transparency"))
				textboxShape.TextFrame.Paragraphs(i).TextRanges(0).Fill.FillType = FillFormatType.Solid
				textboxShape.TextFrame.Paragraphs(i).TextRanges(0).Fill.SolidColor.Color = Color.FromArgb(alpha, Color.Purple)
				alpha += 100
			Next

			'save to file
			ppt.SaveToFile("result.pptx", FileFormat.Pptx2013)

		End Sub
	End Class
End Namespace
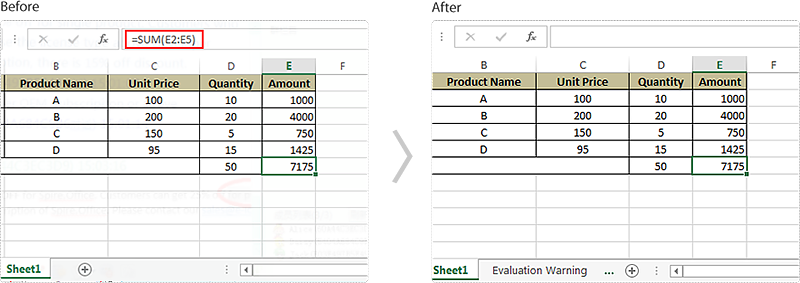
If your worksheet has some important formulas that you don’t want others to view, you may want to hide these formulas. This article demonstrates how to hide formulas when protecting a worksheet using Spire.XLS and C#.
The XlsRange.IsFormulaHidden property is used to determine if the formula will be hidden when the worksheet is protected. You can hide the formulas in a specific cell range by setting the XlsRange.IsFormulaHidden property to true, but note that the formulas can be hidden only if the worksheet is protected, they won’t be hidden if the workbook is protected while the worksheet is not.
using Spire.Xls;
namespace HideFormulas
{
    class Program
    {

        static void Main(string[] args)
        {
            //Initialize an object of Workbook class
            Workbook workbook = new Workbook();
            //Load the Excel file
            workbook.LoadFromFile("Input.xlsx");

            //Get the first worksheet
            Worksheet sheet = workbook.Worksheets[0];

            //Hide the formulas in the used range
            sheet.AllocatedRange.IsFormulaHidden = true;

            //Protect the worksheet with password
            sheet.Protect("123");

            //Save the file
            workbook.SaveToFile("HideFormulas.xlsx", ExcelVersion.Version2013);


        }
    }
}
Screenshot:
Before diving into the full tutorial, watch this short demonstration video to learn how PDF encryption and decryption works in C#:
In today's digital landscape, PDFs carry sensitive contracts, financial reports, and personal data. A single breach can lead to compliance violations or intellectual property theft. To protect your PDFs from unauthorized access, it’s necessary to encrypt them.
Spire.PDF for .NET provides enterprise-grade PDF security solution, enabling developers to easily implement PDF encryption/decryption workflows in .NET applications. This article will provide practical examples to show you how to use C# to encrypt PDF or decrypt PDF.
- .NET Library for PDF Security
- What is Involved in PDF Encryption?
- How to Encrypt a PDF in C# (Code Example)
- How to Decrypt a PDF in C# (Steps & Code)
- FAQs
.NET Library for PDF Security
Why Use Spire.PDF?
Spire.PDF is a robust, standalone .NET library designed to create, edit, convert and secure PDF documents without Adobe Acrobat. Speaking of its security features, it enables developers to:
- Apply AES/RC4 encryption with password protection
- Restrict printing/copying/editing permissions
- Support .NET Framework, ASP.NET Core, and .NET 5+
Installation Guide
Method 1: NuGet Package Manager (Recommended)
- Open your project in Visual Studio
- Go to “Tools -> NuGet Package Manager -> Package Manager Console”
- Run the following:
PM> Install-Package Spire.PDF
Method 2: Manual Installation
- Download DLL from Spire.PDF Official Site
- Right-click your project in Solution Explorer
- Go to “Add-> Reference -> Browse -> Select Spire.PDF.dll”.
What is Involved in PDF Encryption?
Spire.PDF allows developers to encrypt PDF with passwords, set encryption algorithm, and set permissions. Below is a comprehensive technical breakdown:
User & Owner Passwords
- User Password (Open Password): Required to open and view the PDF.
- Owner Password (Permissions Password): Controls security permissions (printing, copying, editing)
Critical Security Rule: The owner password overrides user password restrictions. If a PDF file is encrypted with both passwords, it can be opened with either one. 
Example code:
PdfSecurityPolicy securityPolicy = new PdfPasswordSecurityPolicy(
"user123",   // Open password
"e-iceblue"   // Permission password
);
Encryption Algorithms (RC4 and AES Encrypt)
Spire.PDF supports industry-standard encryption methods with varying key strengths:
| Algorithm | Key Length | Security Level | Use Case |
|---|---|---|---|
| AES | 128/256-bit | Military-grade | Sensitive documents (Default) |
| RC4 | 40/128-bit | Legacy | Backward compatibility |
Example code:
securityPolicy.EncryptionAlgorithm = PdfEncryptionAlgorithm.AES_256;
Permission Flags
Permission flags control user actions on encrypted PDF documents after opening. These flags are controlled via the properties of the PdfDocumentPrivilege class. Here are some common permission flags.
| Properties | Description |
|---|---|
| AllowContentCopying | Gets or sets the permission which allow copy contents or not. |
| AllowPrint | Gets or sets the permission which allow print or not. |
| AllowModifyContents | Gets or sets the permission which allow modify contents or not. |
| AllowFillFormFields | Gets or sets the permission which allow fill in form fields or not. |
| AllowAll | All allowed. |
| ForbidAll | All forbidden. |
Example code:
securityPolicy.DocumentPrivilege.AllowPrint = false;  // Disable printing
securityPolicy.DocumentPrivilege.AllowContentCopying = false;  // Disable copying
How to Encrypt a PDF in C# (Code Example)
The following C# code password protects a PDF file with AES-256 encryption and restrict permissions.
using Spire.Pdf;

namespace EncryptPDF
{
    class Program
    {
        static void Main(string[] args)
        {
            // Create a PdfDocument object
            PdfDocument pdf = new PdfDocument();

            // Load a sample PDF file
            pdf.LoadFromFile("sample.pdf");

            // Specify the user and owner passwords
            string userPassword = "user123";
            string ownerPassword = "e-iceblue";

            // Create a PdfSecurityPolicy object with the two passwords
            PdfSecurityPolicy securityPolicy = new PdfPasswordSecurityPolicy(userPassword, ownerPassword);

            // Set encryption algorithm
            securityPolicy.EncryptionAlgorithm = PdfEncryptionAlgorithm.AES_256;

            // Set document permissions (If you do not set, the default is ForbidAll)
            securityPolicy.DocumentPrivilege = PdfDocumentPrivilege.AllowAll;

            // Restrict printing and content copying
            securityPolicy.DocumentPrivilege.AllowPrint = false;
            securityPolicy.DocumentPrivilege.AllowContentCopying = false;

            // Encrypt the PDF file
            pdf.Encrypt(securityPolicy);

            // Save the result file
            pdf.SaveToFile("EncryptPDF.pdf", FileFormat.PDF);
        }
    }
}
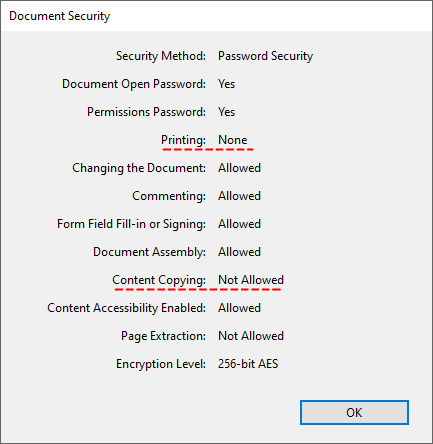
The encrypted PDF will:
- Require a password to open.

- Block printing and copying content. Retain all other permissions (editing, form filling, etc.).
How to Decrypt a PDF in C# (Steps & Code)
Decrypt PDF removes passwords and restrictions, allowing full access to the document. With Spire.PDF, you can decrypt a password-protected PDF file in C# with <5 lines of code.
Main Steps:
- Open Encrypted PDF: Load your encrypted PDF file with the owner password.
- Remove Encryption: Invoke the Decrypt() method to remove all security restrictions.
- Save Decrypted PDF: Call the SaveToFile() method to save the decrypted PDF to the specified file path.
Code Example:
The following C# code removes the PDF passwords and restores access.
using Spire.Pdf;

namespace DecryptPDF
{
    class Program
    {
        static void Main(string[] args)
        {
            // Create a PdfDocument object
            PdfDocument pdf = new PdfDocument();

            // Load a sample PDF file with owner password
            pdf.LoadFromFile("EncryptPDF.pdf", "e-iceblue");

            // Decrypt the PDF file
            pdf.Decrypt();

            // Save the Decrypted PDF
            pdf.SaveToFile("DecryptPDF.pdf");
        }
    }
}
Open the decrypted PDF:

Conclusion
Securing PDFs with encryption is essential for protecting sensitive data. With Spire.PDF for .NET, developers can effortlessly encrypt, decrypt, and manage permissions in PDF files using C#. The .NET PDF library’s comprehensive features and straightforward implementation make it an ideal choice for enhancing document security in enterprise applications.
Next Steps:
- Getting started with Spire.PDF and request a free 30-day trial license to fully evaluate it.
- Explore the Online Documentation for more PDF protection features such as adding digital signatures, adding watermarks, and more.
FAQs
Q1: Can I encrypt a PDF without a user password?
A: Yes. Set the user password to an empty string and use the owner password to control permissions.
Q2: What encryption standards are supported?
A: Spire.PDF supports:
- 40-bit RC4 (legacy)
- 128-bit RC4/AES (standard)
- 256-bit AES (highest security)
Recommend 256-bit AES for sensitive data compliance (e.g., HIPAA, GDPR).
Q3: How to handle incorrect passwords when decrypting?
A: Use try-catch blocks to handle exceptions:
try
{
    pdf.LoadFromFile("EncryptPDF.pdf", " wrongPassword");

}
catch (Exception ex)
{
    Console.WriteLine($"Error: {ex.Message}");
}
Q4. How to check if a PDF is encrypted?
A: Use the PdfDocument.IsPasswordProtected(string fileName) method. A comprehensive guide can be found at: Check Whether a PDF is Password Protected in C#
EAN-13, based upon the UPC-A standard, is used world-wide for marking retail goods. The 13-digit EAN-13 number consists of four components:
- Country code - 2 or 3 digits
- Manufacturer Code - 5 to 7 digits
- Product Code - 3 to 5 digits
- Check digit - last digit
The following code snippets demonstrate how to create EAN-13 barcode image using Spire.Barcode in C#.
Step 1: Create a BarcodeSettings instance.
BarcodeSettings settings = new BarcodeSettings();
Step 2: Set the barcode type as EAN13.
settings.Type = BarCodeType.EAN13;
Step 3: Set the data to encode.
settings.Data = "123456789012";
Step 4: Calculate checksum and add the check digit to barcode.
settings.UseChecksum = CheckSumMode.ForceEnable;
Step 5: Display barcode's text on bottom and centrally align the text.
settings.ShowTextOnBottom = true;
settings.TextAlignment = StringAlignment.Center;
Step 6: Generate barcode image based on the settings and save it in .png format.
BarCodeGenerator generator = new BarCodeGenerator(settings);
Image image = generator.GenerateImage();
image.Save("EAN-13.png", System.Drawing.Imaging.ImageFormat.Png);
Output:
Full Code:
using Spire.Barcode;
using System.Drawing;

namespace EAN-13
{
    class Program
    {
        static void Main(string[] args)
        {
            BarcodeSettings settings = new BarcodeSettings();
            settings.Type = BarCodeType.EAN13;
            settings.Data = "123456789012";
            settings.UseChecksum = CheckSumMode.ForceEnable;
            settings.ShowTextOnBottom = true;
            settings.TextAlignment = StringAlignment.Center;
            BarCodeGenerator generator = new BarCodeGenerator(settings);
            Image image = generator.GenerateImage();
            image.Save("EAN-13.png", System.Drawing.Imaging.ImageFormat.Png);
        }
    }
}
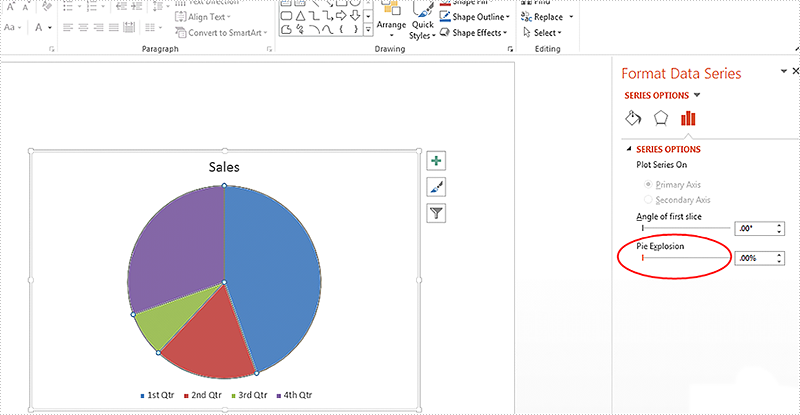
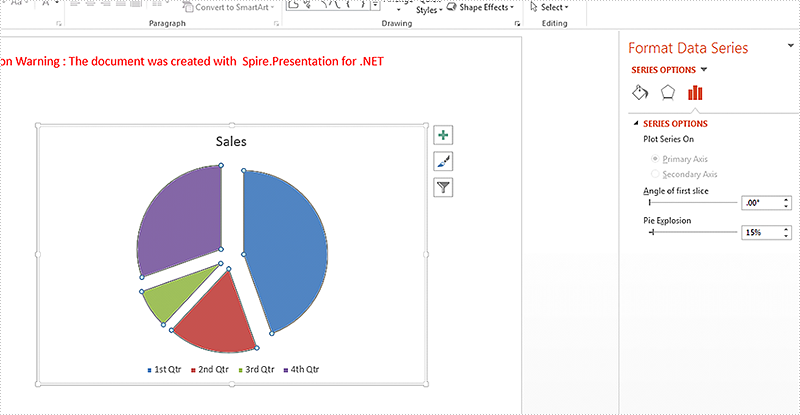
When we work with the pie chart on the presentation slide, we may need to separate each part of pie chart to make them stand out. This article is going to introduce the method of how to set the pie explosion for the pie chart on the presentation slides in C# by using Spire.Presentation.
Spire.Presentation offers a property of chart.Series[].Distance to enable developers to pull the whole pie apart by exploding the pie chart.
On Microsoft PowerPoint, We can adjust the percentage of "Pie Explosion" on the Series Options at the "Format Data Series" area to control the distance between each section in the chart.
Step 1: Create a presentation document and load the file from disk.
Presentation ppt = new Presentation();
ppt.LoadFromFile("Sample.pptx");
Step 2: Get the chart that needs to set the point explosion.
IChart chart = ppt.Slides[0].Shapes[0] as IChart;
Step 3: Explode the pie chart.
chart.Series[0].Distance = 15;
Step 4: Save the document to file.
ppt.SaveToFile("Result.pptx", FileFormat.Pptx2010);
Effective screenshots after exploding the pie chart on presentation slide:
Full codes:
using Spire.Presentation;
using Spire.Presentation.Charts;

namespace ExplodePie
{
    class Program
    {
        static void Main(string[] args)
        {
            Presentation ppt = new Presentation();
            ppt.LoadFromFile("Sample.pptx");

            IChart chart = ppt.Slides[0].Shapes[0] as IChart;

            chart.Series[0].Distance = 15;

            ppt.SaveToFile("Result.pptx", FileFormat.Pptx2010);
        }
    }
}
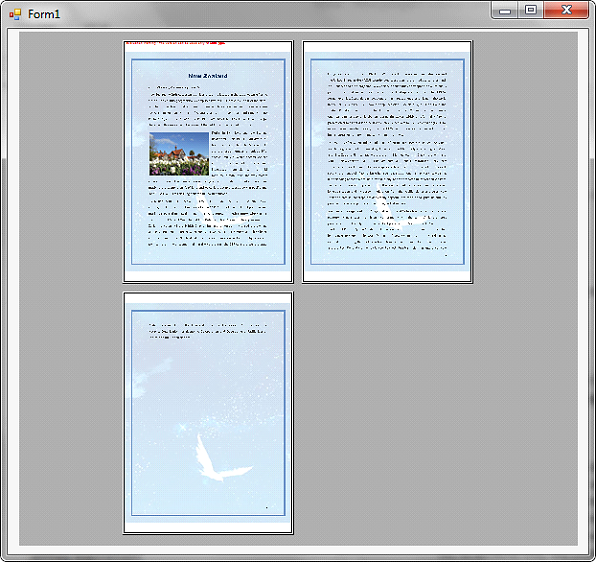
At some point, we may want to display a PDF file as it will appear when printed. This article demonstrates how to show print preview of a PDF file in Windows Forms application using Spire.PDF and c#.
Before using the following code, we need to create a windows forms application, add a PrintPreviewControl control to the form and reference Spire.Pdf.dll into the application.
using System;
using System.Windows.Forms;
using Spire.Pdf;

namespace PreviewPDF
{
    public partial class Form1 : Form
    {
        public Form1()
        {
            InitializeComponent();
        }

        private void printPreviewControl1_Click(object sender, EventArgs e)
        {
            //Load PDF file
            PdfDocument pdf = new PdfDocument();
            pdf.LoadFromFile("New Zealand.pdf");

            //Set the PrintPreviewControl.Rows and PrintPreviewControl.Columns properties to show multiple pages
            this.printPreviewControl1.Rows = 2;
            this.printPreviewControl1.Columns = 2;

            //Preview the pdf file
            pdf.Preview(this.printPreviewControl1);
        }
    }
}
Screenshot:
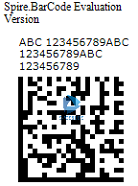
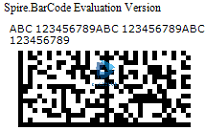
A DataMatrix code is a two-dimensional barcode consisting of black and white "cells" or modules arranged in either a square or rectangular pattern. The information to be encoded can be text or numeric data.
Following code snippets show how to create a DataMatrix barcode image using Spire.Barcode.
Step 1: Create a BarcodeSettings instance.
BarcodeSettings settings = new BarcodeSettings();
Step 2: Set the width of barcode module
settings.X = 2;
Step 3: Set the barcode type as DataMatrix.
settings.Type = BarCodeType.DataMatrix;
Step 4: Set the data and display text
settings.Data = "ABC 123456789ABC 123456789ABC 123456789";
settings.Data2D = "ABC 123456789ABC 123456789ABC 123456789";
Step 5: Set the DataMatrix symbol shape to square.
settings.DataMatrixSymbolShape = DataMatrixSymbolShape.Square;
Step 6: Generate barcode image based on the settings and save it in .png format.
BarCodeGenerator generator = new BarCodeGenerator(settings);
Image image = generator.GenerateImage();
image.Save("DataMatrix.png", System.Drawing.Imaging.ImageFormat.Png);
To create a rectangular DataMatrix barcode, set the DataMatrixSymbolShape property to Rectangle.
settings.DataMatrixSymbolShape = DataMatrixSymbolShape.Rectangle;
Full Code:
using Spire.Barcode;
using System.Drawing;

namespace DataMatrix
{
    class Program
    {
        static void Main(string[] args)
        {
            BarcodeSettings settings = new BarcodeSettings();
            settings.Type = BarCodeType.DataMatrix;
            settings.X = 1.5f;
            settings.DataMatrixSymbolShape = DataMatrixSymbolShape.Square;
            //rectangular DataMatrix barcode
            //settings.DataMatrixSymbolShape = DataMatrixSymbolShape.Rectangle;
            settings.Data = "ABC 123456789ABC 123456789ABC 123456789";
            settings.Data2D = "ABC 123456789ABC 123456789ABC 123456789";
            BarCodeGenerator generator = new BarCodeGenerator(settings);
            Image image = generator.GenerateImage();
            image.Save("DataMatrix.png", System.Drawing.Imaging.ImageFormat.Png);
        }
    }
}
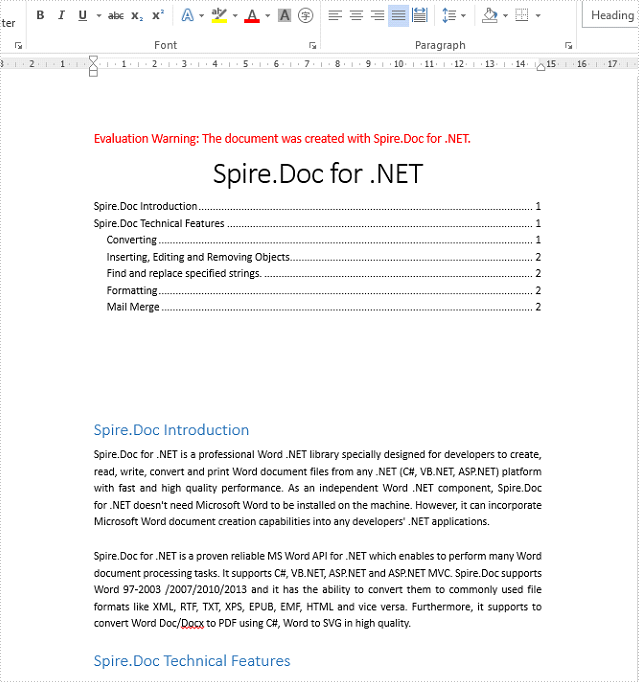
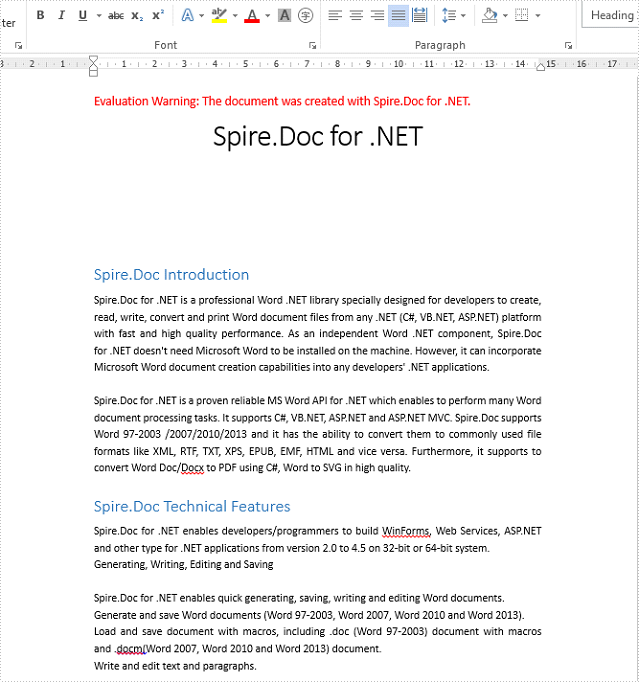
We have already demonstrated how to add a brand new TOC when we create the word documents. This article will show you how to insert a TOC to the existing word documents with styles and remove the TOC from the word document.
Firstly, view the sample document with Title, Heading1 and Heading 2 styles:
The below code snippet shows how to insert a Table of contents (TOC) into a document.
using Spire.Doc;
using Spire.Doc.Documents;
using Spire.Doc.Fields;
using System.Text.RegularExpressions;
namespace InsertTOC
{
    class Program
    {
        static void Main(string[] args)
        {
            //Create a new instance of Document and load the document from file.
            Document doc = new Document();
            doc.LoadFromFile("Sample.docx", FileFormat.Docx2010);

            //Add the TOC to the document
            TableOfContent toc = new TableOfContent(doc, "{\\o \"1-3\" \\h \\z \\u}");
            Paragraph p = doc.LastSection.Paragraphs[0];
            p.Items.Add(toc);
            p.AppendFieldMark(FieldMarkType.FieldSeparator);
            p.AppendText("TOC");
            p.AppendFieldMark(FieldMarkType.FieldEnd);
            doc.TOC = toc;

            //Update the table of contents
            doc.UpdateTableOfContents();

            //Save the document to file
            doc.SaveToFile("Result.docx", FileFormat.Docx);

        }
    }
}
Removing a Table of Contents from the Document
using Spire.Doc;
using System.Text.RegularExpressions;
namespace RemoveTOC
{
    class Program
    {
        static void Main(string[] args)
        {
            //load the document from file with TOC
            Document doc = new Document();
            doc.LoadFromFile("Result.docx", FileFormat.Docx2010);

            //get the first body from the first section
            Body body = doc.Sections[0].Body;

            //remove TOC from first body
            Regex regex = new Regex("TOC\\w+");
            for (int i = 0; i < body.Paragraphs.Count; i++)
            {
                if (regex.IsMatch(body.Paragraphs[i].StyleName))
                {
                    body.Paragraphs.RemoveAt(i);
                    i--;
                }
            }
            //save the document to file
            doc.SaveToFile("RemoveTOC.docx", FileFormat.Docx2010);

        }
    }
}
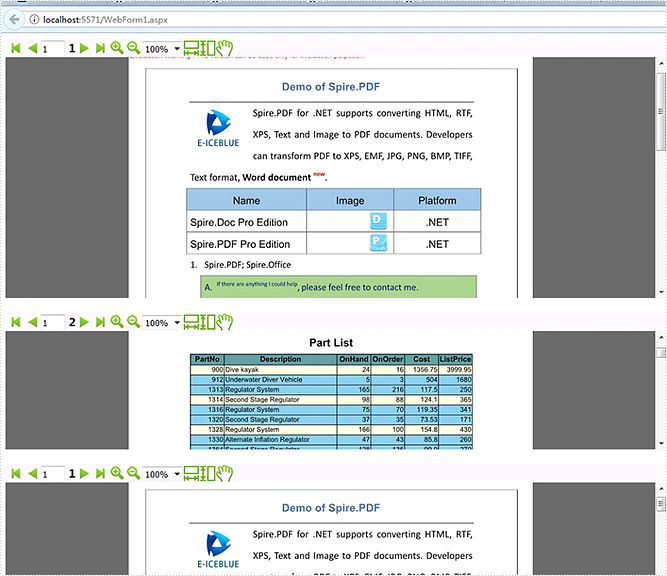
We have already demonstrated how to view the PDF file on the web with the help of Spire.PDFViewer for ASP.NET. This article we will demonstrate how to use three PDFViewer Control to view multiple PDF files on One Web Form in C#.
Before started, we need to create a new ASP.NET Empty Web Application in Visual Studio and add the Spire.PDFViewer.Asp dll file as the references. Then add the PDFViewer control and the PDFDocumentViewer control into toolbox.
Usually, we can Right-click Default.aspx, select view designer, and then drag the PDFViewer control from toolbox into Deafault.aspx to view one PDF file from web. This article we will use the code to add the PDFViewer control to one Web Form.
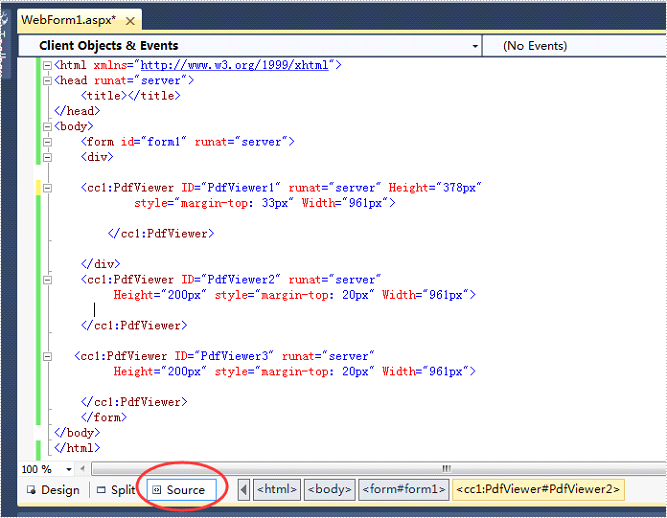
Step 1: Right-click Default.aspx, click the “Source” and use the following code to add three PDFViewer control from toolbox into Deafault.aspx. We can set the size for each PDFViewer control.
<div>

<cc1:PdfViewer ID="PdfViewer1" runat="server" Height="378px"
        style="margin-top: 33px" Width="961px">

</cc1:PdfViewer>

</div>

<cc1:PdfViewer ID="PdfViewer2" runat="server"
     Height="200px" style="margin-top: 20px" Width="961px">

</cc1:PdfViewer>

<cc1:PdfViewer ID="PdfViewer3" runat="server"
     Height="200px" style="margin-top: 20px" Width="961px">

</cc1:PdfViewer>
Step 2: Add a new folder under the projects and add the sample PDF files need to view on the web.
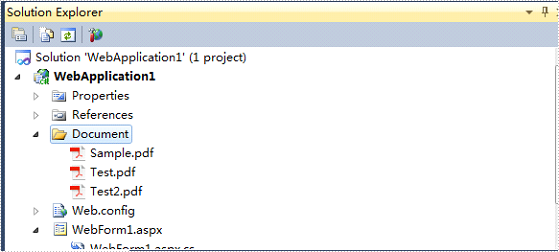
Step 3: Double-click Default.aspx.cs, add the code below to load a PDF file.
this.PdfViewer1.LoadFromFile("Document/Test.pdf");
this.PdfViewer2.LoadFromFile("Document/Sample.pdf");
this.PdfViewer3.LoadFromFile("Document/Test2.pdf");
After clicking the debug button, we will view the three PDF files on web.