
.NET (1327)
Children categories
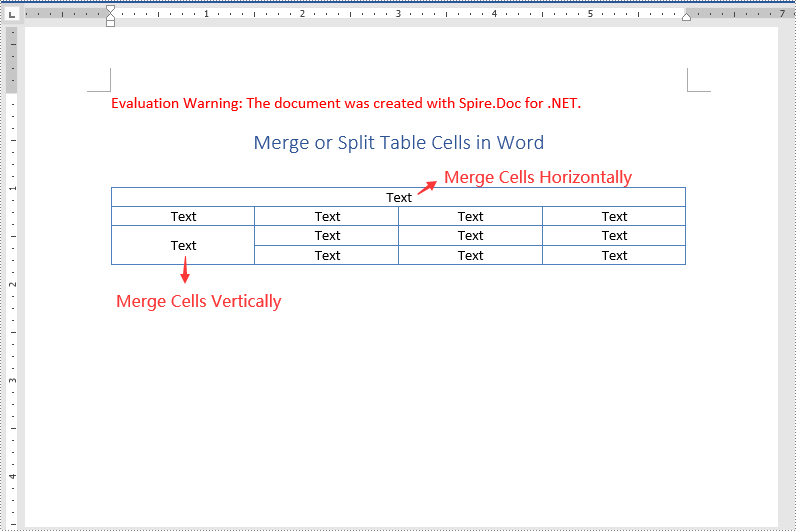
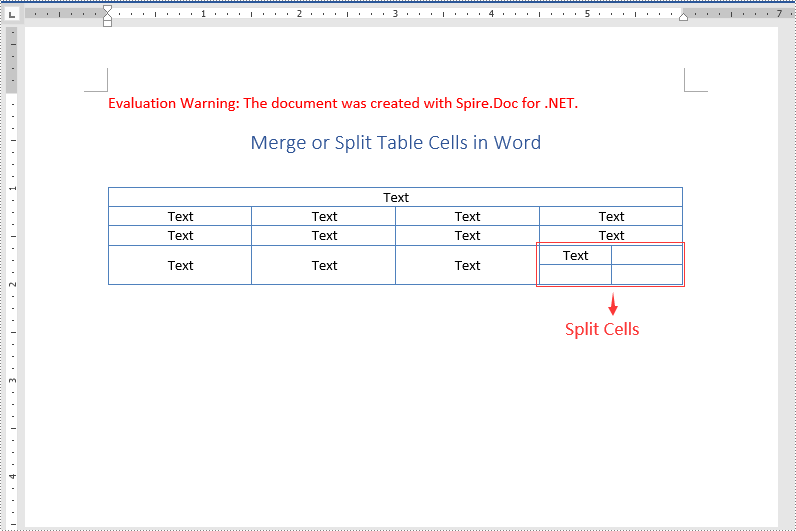
Merging cells means combining two or more cells into one larger cell, while splitting cells means dividing one cell into two or more smaller cells. When creating or editing tables in Microsoft Word, you may often need to merge or split table cells in order to better present your data. In this article, you will learn how to merge or split table cells in a Word document in C# and VB.NET using Spire.Doc for .NET.
Install Spire.Doc for .NET
To begin with, you need to add the DLL files included in the Spire.Doc for.NET package as references in your .NET project. The DLL files can be either downloaded from this link or installed via NuGet.
PM> Install-Package Spire.Doc
Merge Table Cells in Word Using C# and VB.NET
In Microsoft Word, you can merge two or more adjacent cells horizontally or vertically into a larger cell. In Spire.Doc, you can achieve the same using the Table.ApplyHorizontalMerge() or Table.ApplyVerticalMerge() method. The following are the detailed steps:
- Initialize an instance of the Document class.
- Load a Word document using Document.LoadFromFile() method.
- Get a specific section in the document by its index through Document.Sections[int] property.
- Add a table to the section using Section.AddTable() method.
- Specify the number of rows and columns of the table using Table.ResetCells() method.
- Horizontally merge specific cells in the table using Table.ApplyHorizontalMerge() method.
- Vertically merge specific cells in the table using Table.ApplyVerticalMerge() method.
- Add some data to the table.
- Apply a style to the table.
- Save the result document using Document.SaveToFile() method.
- C#
- VB.NET
using Spire.Doc;
using Spire.Doc.Documents;

namespace MergeTableCells
{
    class Program
    {
        static void Main(string[] args)
        {
            //Create a Document instance
            Document document = new Document();
            //Load a Word document
            document.LoadFromFile("Input.docx");

            //Get the first section
            Section section = document.Sections[0];

            //Add a 4 x 4 table to the section
            Table table = section.AddTable();
            table.ResetCells(4, 4);

            //Horizontally merge cells 1, 2, 3, and 4 in the first row
            table.ApplyHorizontalMerge(0, 0, 3);
            //Vertically merge cells 3 and 4 in the first column
            table.ApplyVerticalMerge(0, 2, 3);

            //Add some data to the table
            for (int row = 0; row < table.Rows.Count; row++)
            {
                for (int col = 0; col < table.Rows[row].Cells.Count; col++)
                {
                    TableCell cell = table[row, col];
                    cell.CellFormat.VerticalAlignment = VerticalAlignment.Middle;
                    Paragraph paragraph = cell.AddParagraph();
                    paragraph.Format.HorizontalAlignment = HorizontalAlignment.Center;
                    paragraph.Text = "Text";
                }
            }

            //Apply a style to the table
            table.ApplyStyle(DefaultTableStyle.LightGridAccent1);

            //Save the result document
            document.SaveToFile("MergeCells.docx", FileFormat.Docx2013);
        }
    }
}
Split Table Cells in Word Using C# and VB.NET
Spire.Doc for .NET offers the TableCell.SplitCell() method that enables you to split a cell in a Word table into two or more cells. The following are the detailed steps:
- Initialize an instance of the Document class.
- Load a Word document using Document.LoadFromFile() method.
- Get a specific section in the document by its index through Document.Sections[int] property.
- Get a specific table in the section by its index through Section.Tables[int] property.
- Get the table cell that you want to split through Table.Rows[int].Cells[int] property.
- Split the cell into specific number of columns and rows using TableCell.SplitCell() method.
- Save the result document using Document.SaveToFile() method.
- C#
- VB.NET
using Spire.Doc;

namespace SplitTableCells
{
    class Program
    {
        static void Main(string[] args)
        {
            //Create a Document instance
            Document document = new Document();
            //Load a Word Document
            document.LoadFromFile("MergeCells.docx");

            //Get the first section
            Section section = document.Sections[0];

            //Get the first table in the section
            Table table = section.Tables[0] as Table;

            //Get the 4th cell in the 4th row
            TableCell cell1 = table.Rows[3].Cells[3];
            //Split the cell into 2 columns and 2 rows
            cell1.SplitCell(2, 2);

            //save the result document
            document.SaveToFile("SplitCells.docx", FileFormat.Docx2013);
        }
    }
}
Apply for a Temporary License
If you'd like to remove the evaluation message from the generated documents, or to get rid of the function limitations, please request a 30-day trial license for yourself.
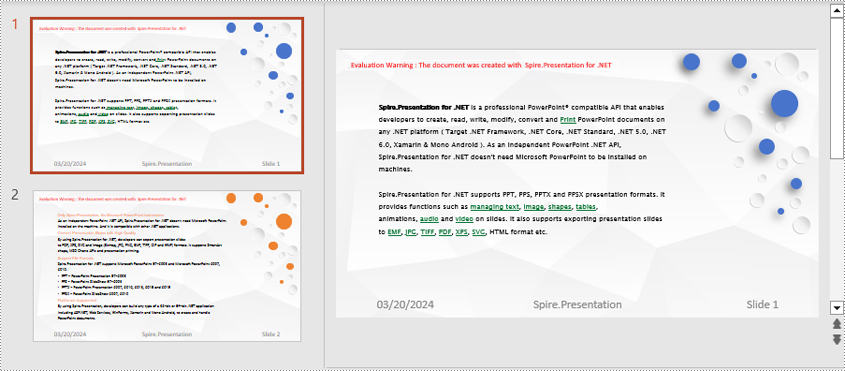
Adding, modifying, and removing footers in a PowerPoint document is crucial for enhancing the professionalism and readability of a presentation. By adding footers, you can include key information such as presentation titles, authors, dates, or page numbers, which helps the audience better understand the content. Modifying footers allows you to update information, making it more attractive and practical. Additionally, removing footers is also necessary, especially in certain situations such as when specific information is not required to be displayed at the bottom of each page for a particular occasion. In this article, you will learn how to add, modify, or remove footers in PowerPoint documents in C# using Spire.Presentation for .NET.
- C# Add Footers in PowerPoint Documents
- C# Modify Footers in PowerPoint Documents
- C# Remove Footers in PowerPoint Documents
Install Spire.Presentation for .NET
To begin with, you need to add the DLL files included in the Spire.Presentation for.NET package as references in your .NET project. The DLL files can be either downloaded from this link or installed via NuGet.
PM> Install-Package Spire.Presentation
C# Add Footers in PowerPoint Documents
Spire.Presentation enables the addition of footer, slide number, and date placeholders at the bottom of PowerPoint document pages to uniformly add the same footer content across all pages. Here are the detailed steps:
- Create a Presentation object.
- Load a PowerPoint document using the lisentation.LoadFromFile() method.
- Set Presentation.FooterVisible = true to make the footer visible and set the footer text.
- Set Presentation.SlideNumberVisible = true to make slide numbers visible, then iterate through each slide, check for the existence of a slide number placeholder, and modify the text to "Slide X" format if found.
- Set Presentation.DateTimeVisible = true to make date and time visible.
- Use the Presentation.SetDateTime() method to set the date format.
- Save the document using the Presentation.SaveToFile() method.
- C#
using Spire.Presentation;

namespace SpirePresentationDemo
{
    internal class Program
    {
        static void Main(string[] args)
        {
            // Create a Presentation object
            Presentation presentation = new Presentation();

            // Load the presentation from a file
            presentation.LoadFromFile("Sample1.pptx");

            // Set the footer visible
            presentation.FooterVisible = true;

            // Set the footer text to "Spire.Presentation"
            presentation.SetFooterText("Spire.Presentation");

            // Set slide number visible
            presentation.SlideNumberVisible = true;

            // Iterate through each slide in the presentation
            foreach (ISlide slide in presentation.Slides)
            {
                foreach (IShape shape in slide.Shapes)
                {
                    if (shape.Placeholder != null)
                    {
                        // If it is a slide number placeholder
                        if (shape.Placeholder.Type.Equals(PlaceholderType.SlideNumber))
                        {
                            TextParagraph textParagraph = (shape as IAutoShape).TextFrame.TextRange.Paragraph;
                            String text = textParagraph.Text;

                            // Modify the slide number text to "Slide X"
                            textParagraph.Text = "Slide " + text;
                        }
                    }
                }
            }

            // Set date time visible
            presentation.DateTimeVisible = true;

            // Set date time format
            presentation.SetDateTime(DateTime.Now, "MM/dd/yyyy");

            // Save the modified presentation to a file
            presentation.SaveToFile("AddFooter.pptx", FileFormat.Pptx2016);

            // Dispose of the Presentation object resources
            presentation.Dispose();
        }
    }
}
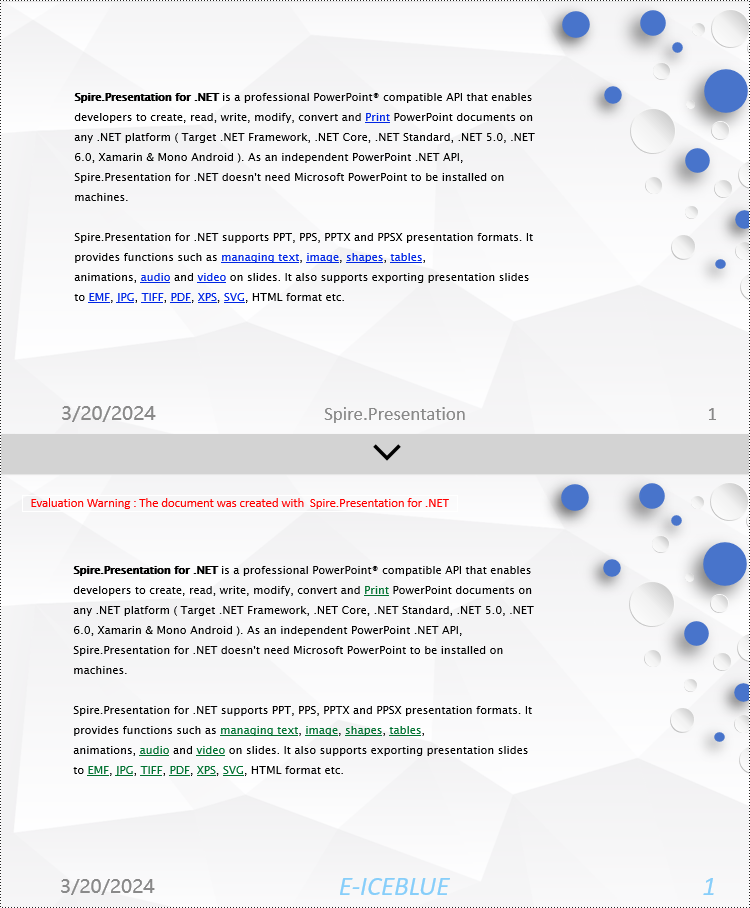
C# Modify Footers in PowerPoint Documents
To modify footers in a PowerPoint document, you first need to individually inspect the shapes on each slide, identify footer placeholders, page number placeholders, etc., and then set specific content and formats for each type of placeholder. Here are the detailed steps:
- Create a Presentation object.
- Load a PowerPoint document using the Presentation.LoadFromFile() method.
- Use the Presentation.Slides[index] property to retrieve a slide.
- Use a for loop to iterate through the shapes on the slide, individually checking each shape to determine if it is a placeholder for a footer, page number, etc., and then modify its content or format accordingly.
- Save the document using the Presentation.SaveToFile() method.
- C#
using Spire.Presentation;

namespace SpirePresentationDemo
{
    internal class Program
    {
        static void Main(string[] args)
        {
            // Create a Presentation object
            Presentation presentation = new Presentation();

            // Load the presentation from a file
            presentation.LoadFromFile("Sample2.pptx");

            // Get the first slide
            ISlide slide = presentation.Slides[0];

            // Iterate through shapes in the slide
            for (int i = 0; i < slide.Shapes.Count; i++)
            {
                // Check if the shape is a placeholder
                if (slide.Shapes[i].Placeholder != null)
                {
                    // Get the placeholder type
                    PlaceholderType type = slide.Shapes[i].Placeholder.Type;

                    // If it is a footer placeholder
                    if (type == PlaceholderType.Footer)
                    {
                        // Convert the shape to IAutoShape type
                        IAutoShape autoShape = (IAutoShape)slide.Shapes[i];

                        // Set the text content to "E-ICEBLUE"
                        autoShape.TextFrame.Text = "E-ICEBLUE";

                        // Modify the text font
                        ChangeFont1(autoShape.TextFrame.Paragraphs[0]);
                    }
                    // If it is a slide number placeholder
                    if (type == PlaceholderType.SlideNumber)
                    {
                        // Convert the shape to IAutoShape type
                        IAutoShape autoShape = (IAutoShape)slide.Shapes[i];

                        // Modify the text font
                        ChangeFont1(autoShape.TextFrame.Paragraphs[0]);
                    }
                }
            }

            // Save the modified presentation to a file
            presentation.SaveToFile("ModifyFooter.pptx", FileFormat.Pptx2016);

            // Dispose of the Presentation object resources
            presentation.Dispose();
        }
       static void ChangeFont1(TextParagraph paragraph)
        {
            // Iterate through each text range in the paragraph
            foreach (TextRange textRange in paragraph.TextRanges)
            {
                // Set the text style to italic
                textRange.IsItalic = TriState.True;

                // Set the text font
                textRange.EastAsianFont = new TextFont("Times New Roman");

                // Set the text font size to 34
                textRange.FontHeight = 34;

                // Set the text color
                textRange.Fill.FillType = Spire.Presentation.Drawing.FillFormatType.Solid;
                textRange.Fill.SolidColor.Color = System.Drawing.Color.LightSkyBlue;
            }
        }
   }
}
C# Remove Footers in PowerPoint Documents
To remove footers from a PowerPoint document, you first need to locate footer placeholders, page number placeholders, date placeholders, etc., within the slides, and then remove them from the collection of shapes on the slide. Here are the detailed steps:
- Create a Presentation object.
- Load a PowerPoint document using the Presentation.LoadFromFile() method.
- Use the Presentation.Slides[index] property to retrieve a slide.
- Use a for loop to iterate through the shapes on the slide, check if it is a placeholder, and if it is a footer placeholder, page number placeholder, date placeholder, remove it from the slide.
- Save the document using the Presentation.SaveToFile() method.
- C#
using Spire.Presentation;

namespace SpirePresentationDemo
{
    internal class Program
    {
        static void Main(string[] args)
        {
            // Create a Presentation object
            Presentation presentation = new Presentation();

            // Load the presentation from a file
            presentation.LoadFromFile("Sample2.pptx");

            // Get the first slide
            ISlide slide = presentation.Slides[0];

            // Iterate through shapes in the slide in reverse order
            for (int i = slide.Shapes.Count - 1; i >= 0; i--)
            {
                // Check if the shape is a placeholder
                if (slide.Shapes[i].Placeholder != null)
                {
                    // Get the placeholder type
                    PlaceholderType type = slide.Shapes[i].Placeholder.Type;

                    // If it is a footer placeholder, slide number placeholder, or date placeholder
                    if (type == PlaceholderType.Footer || type == PlaceholderType.SlideNumber || type == PlaceholderType.DateAndTime)
                    {
                        // Remove it from the slide
                        slide.Shapes.RemoveAt(i);
                    }
                }
            }

            // Save the modified presentation to a file
            presentation.SaveToFile("RemoveFooter.pptx", FileFormat.Pptx2016);

            // Dispose of the Presentation object resources
            presentation.Dispose();
        }
    }
}
Apply for a Temporary License
If you'd like to remove the evaluation message from the generated documents, or to get rid of the function limitations, please request a 30-day trial license for yourself.
PPT file format is a vivid and explicit way to present your stuff. PPT file can be very beautiful and powerful. And text is a basic element that PPT supports. Spire.Presentation is a powerful .NET component specially designed for developers. It enables developers to manipulate PPT files easily and flexibly. In this document, I will introduce you how to add a paragraph to PPT file using Spire.Presentation.
Step 1. Create a PPT document.
Presentation presentation = new Presentation();
Step 2. Add a new shape to the document.
IAutoShape shape = presentation.Slides[0].Shapes.AppendShape(ShapeType.Rectangle, new RectangleF(50, 70, 450, 150));
shape.Fill.FillType = FillFormatType.None;
shape.ShapeStyle.LineColor.Color = Color.White;
Shape represents a TextBox in PPT document.
Step 3. Add some text to the shape.
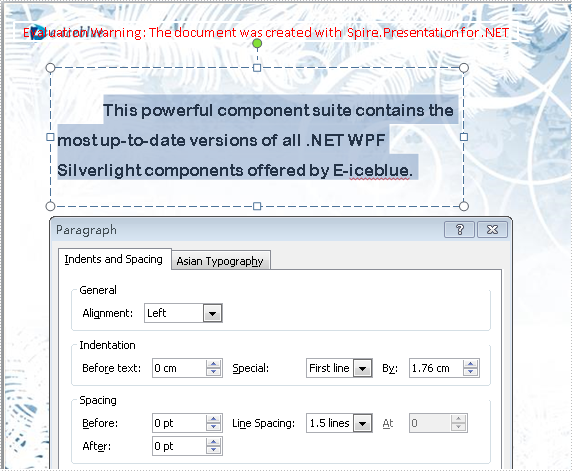
shape.TextFrame.Text = "This powerful component suite contains the most up-to-date versions of all .NET WPF Silverlight components offered by E-iceblue.";
These will form a new paragraph.
Step 4. Set the alignment of the paragraph.
shape.TextFrame.Paragraphs[0].Alignment = TextAlignmentType.Left;
Step 5. Set the indent of the paragraph.
shape.TextFrame.Paragraphs[0].Indent = 25*2;
Step 6. Set the line spacing of the paragraph.
shape.TextFrame.Paragraphs[0].LineSpacing = 250;
Step 7. Save the document.
presentation.SaveToFile("para.pptx", FileFormat.Pptx2010);
Full code:
using Spire.Presentation;
using Spire.Presentation.Drawing;
using System.Drawing;
namespace AddParagh
{
    class Program
    {
        static void Main(string[] args)
        {
            //create PPT document
            Presentation presentation = new Presentation();

            //set background Image
            string ImageFile = "bg.png";
            RectangleF rect = new RectangleF(0, 0, presentation.SlideSize.Size.Width, presentation.SlideSize.Size.Height);
            presentation.Slides[0].Shapes.AppendEmbedImage(ShapeType.Rectangle, ImageFile, rect);
            presentation.Slides[0].Shapes[0].Line.FillFormat.SolidFillColor.Color = Color.FloralWhite;

            //append new shape
            IAutoShape shape = presentation.Slides[0].Shapes.AppendShape(ShapeType.Rectangle, new RectangleF(50, 70, 450, 150));
            shape.Fill.FillType = FillFormatType.None;
            shape.ShapeStyle.LineColor.Color = Color.White;

            //set the alignment
            shape.TextFrame.Paragraphs[0].Alignment = TextAlignmentType.Left;
            //set the indent
            shape.TextFrame.Paragraphs[0].Indent = 50;
            //set the linespacing
            shape.TextFrame.Paragraphs[0].LineSpacing = 150;
            shape.TextFrame.Text = "This powerful component suite contains the most up-to-date versions of all .NET WPF Silverlight components offered by E-iceblue.";

            //set the Font
            shape.TextFrame.Paragraphs[0].TextRanges[0].LatinFont = new TextFont("Arial Rounded MT Bold");
            shape.TextFrame.Paragraphs[0].TextRanges[0].Fill.FillType = FillFormatType.Solid;
            shape.TextFrame.Paragraphs[0].TextRanges[0].Fill.SolidColor.Color = Color.Black;

            //save the document
            presentation.SaveToFile("para.pptx", FileFormat.Pptx2010);
            System.Diagnostics.Process.Start("para.pptx");
        }
    }
}
'create PPT document
Dim presentation As New Presentation()

'set background Image
Dim ImageFile As String = "bg.png"
Dim rect As New RectangleF(0, 0, presentation.SlideSize.Size.Width, presentation.SlideSize.Size.Height)
presentation.Slides(0).Shapes.AppendEmbedImage(ShapeType.Rectangle, ImageFile, rect)
presentation.Slides(0).Shapes(0).Line.FillFormat.SolidFillColor.Color = Color.FloralWhite

'append new shape
Dim shape As IAutoShape = presentation.Slides(0).Shapes.AppendShape(ShapeType.Rectangle, New RectangleF(50, 70, 450, 150))
shape.Fill.FillType = FillFormatType.None
shape.ShapeStyle.LineColor.Color = Color.White

'set the alignment
shape.TextFrame.Paragraphs(0).Alignment = TextAlignmentType.Left
'set the indent
shape.TextFrame.Paragraphs(0).Indent = 50
'set the linespacing
shape.TextFrame.Paragraphs(0).LineSpacing = 150
shape.TextFrame.Text = "This powerful component suite contains the most up-to-date versions of all .NET WPF Silverlight components offered by E-iceblue."

'set the Font
shape.TextFrame.Paragraphs(0).TextRanges(0).LatinFont = New TextFont("Arial Rounded MT Bold")
shape.TextFrame.Paragraphs(0).TextRanges(0).Fill.FillType = FillFormatType.Solid
shape.TextFrame.Paragraphs(0).TextRanges(0).Fill.SolidColor.Color = Color.Black

'save the document
presentation.SaveToFile("para.pptx", FileFormat.Pptx2010)
System.Diagnostics.Process.Start("para.pptx")
Screenshot:
A hyperlink is a clickable element, typically embedded within text or images, which allows users to navigate and access different webpages, documents, or resources. By adding hyperlinks in a PowerPoint presentation, users are able to easily visit related content while viewing or showing the slides, enhancing convenience during the presentation. In this article, we will show you how to add hyperlink to PowerPoint Presentation programmatically by using Spire.Presentation for .NET.
Install Spire.Presentation for .NET
To begin with, you need to add the DLL files included in the Spire.Presentation for.NET package as references in your .NET project. The DLLs files can be either downloaded from this link or installed via NuGet.
PM> Install-Package Spire.Presentation
Add Hyperlink to Text on Slide
Spire.Presentation for .NET allows users to insert hyperlink to text on slides easily by using TextRange.ClickAction.Address property. The following are detailed steps.
- Create a new PowerPoint presentation.
- Load a PowerPoint file using Presentation.LoadFromFile() method.
- Get the first slide using Presentation.Slides[] property.
- Add a rectangle shape to the slide by using ISlide.Shapes.AppendShape() method.
- Remove the default paragraphs in the shape.
- Create a TextParagraph instance to represent a text paragraph.
- Create a TextRange instance to represent a text range and set link address for it by TextRange.ClickAction.Address property.
- Create an another TextRange instance to represent the rest of the text.
- Append text ranges to paragraph using TextParagraph.TextRanges.Append() method.
- Append the paragraph to the shape using IAutoShape.TextFrame.Paragraphs.Append() method.
- Loop through all text ranges in each paragraph and set font for them.
- Save the result file using Presentation.SaveToFile() method.
- C#
- VB.NET
using Spire.Presentation;
using Spire.Presentation.Drawing;
using System.Drawing;
namespace Hyperlink
{
internal class Program
{
static void Main(string[] args)
{
//Create a Presentation instance
Presentation presentation = new Presentation();
//Load the PowerPoint file
presentation.LoadFromFile("sample.pptx", FileFormat.Pptx2010);
//Get the first slide of the presentation
ISlide slide = presentation.Slides[0];
//Add a shape to the slide
RectangleF rec = new RectangleF(presentation.SlideSize.Size.Width / 2 - 120, 200, 500, 150);
IAutoShape shape = slide.Shapes.AppendShape(ShapeType.Rectangle, rec);
shape.Fill.FillType = FillFormatType.None;
shape.ShapeStyle.LineColor.Color = Color.White;
//Remove the default paragraphs in the shape
shape.TextFrame.Paragraphs.Clear();
//Create a TextParagraph instance
TextParagraph para = new TextParagraph();
//Create a TextRange instance
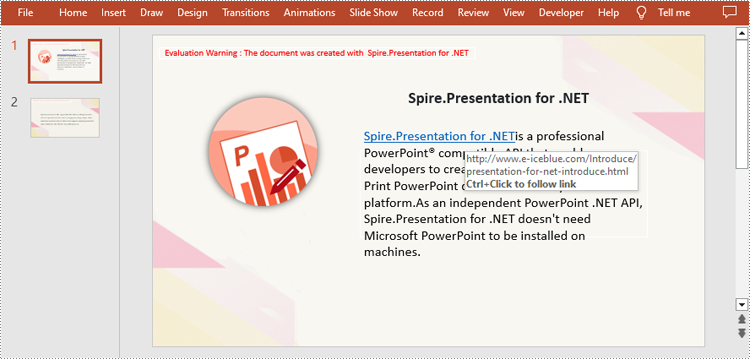
TextRange tr = new TextRange("Spire.Presentation for .NET");
//Set a hyperlink address for the text range
tr.ClickAction.Address = "http://www.e-iceblue.com/Introduce/presentation-for-net-introduce.html";
//Append the text range to the paragraph
para.TextRanges.Append(tr);
//Create a TextRange instance
tr = new TextRange("is a professional PowerPoint® compatible API that enables developers to create, read, modify, convert and Print PowerPoint documents on any .NET platform."
+"As an independent PowerPoint .NET API, Spire.Presentation for .NET doesn't need Microsoft PowerPoint to be installed on machines.");
//Append the text range to the paragraph
para.TextRanges.Append(tr);
//Append the paragraph to the shape
shape.TextFrame.Paragraphs.Append(para);
//Loop through the paragraphs in the shape
foreach (TextParagraph textPara in shape.TextFrame.Paragraphs)
{
if (!string.IsNullOrEmpty(textPara.Text))
{
//Loop through the text ranges in each paragraph
foreach (TextRange textRange in textPara.TextRanges)
{
//Set font
textRange.LatinFont = new TextFont("Calibri");
textRange.FontHeight = 24;
textRange.Fill.FillType = FillFormatType.Solid;
textRange.Fill.SolidColor.Color = Color.Black;
}
}
}
//Save the presentation
presentation.SaveToFile("TextHyperlink.pptx", FileFormat.Pptx2013);
presentation.Dispose();
}
}
}
Add Hyperlink to Image on Slide
Spire.Presentation for .NET also supports adding a hyperlink to an image. You can create a hyperlink by using ClickHyperlink class and then add the hyperlink to the image using the IEmbedImage.Click property. The related steps are as follows.
- Create a new PowerPoint presentation.
- Load a PowerPoint file using Presentation.LoadFromFile() method.
- Get the second slide by using Presentation.Slides[] property.
- Add a image to the slide using ISlide.Shapes.AppendEmbedImage() method.
- Create a ClickHyperlink object and append the hyperlink to added image using IEmbedImage.Click property.
- Save the result file using Presentation.SaveToFile() method.
- C#
- VB.NET
using Spire.Presentation;
using System.Drawing;
namespace ImageHyperlink
{
    class Program
    {
        static void Main(string[] args)
        {
            //Initialize an object of Presentation class
            Presentation presentation = new Presentation();

            //Load the PowerPoint file
            presentation.LoadFromFile("TextHyperlink.pptx", FileFormat.Pptx2010);

            //Get the second slide of the presentation
            ISlide slide = presentation.Slides[1];

            //Add a image to slide
            RectangleF rect = new RectangleF(100, 50, 150, 150);
            IEmbedImage image = slide.Shapes.AppendEmbedImage(ShapeType.Rectangle, @"logo.png", rect);

            //Add hyperlink to image
            ClickHyperlink hyperlink = new ClickHyperlink("http://www.e-iceblue.com/Introduce/presentation-for-net-introduce.html");
            image.Click = hyperlink;

            //Save the result file
            presentation.SaveToFile("ImageHyperlink.pptx", FileFormat.Pptx2010);
            presentation.Dispose();
        }
    }
}
Apply for a Temporary License
If you'd like to remove the evaluation message from the generated documents, or to get rid of the function limitations, please request a 30-day trial license for yourself.
PPT is the file format used by Microsoft PowerPoint Presentation 97 - 2003, while PPTX is created by PowerPoint Presentation 2007, 2010. PPTX file format enjoys the advantages of smaller size, higher security, and higher integration with other file formats. But the Microsoft Office version under 2007 cannot open PPTX PowerPoint presentation directly. This article will show you how to convert PPT file format to PPTX in C# with only three lines of code.
Make sure Spire.Presentation for .NET has been installed correctly and then add Spire.Presentation.dll as reference in the downloaded Bin folder though the below path: "..\Spire.Presentation\Bin\NET4.0\ Spire. Presentation.dll". Here comes to the details of how to output PPT to PPTX:
Step 1: Create a presentation document.
Presentation presentation = new Presentation();
Step 2: Load the PPT file from disk.
presentation.LoadFromFile(@"..\..\..\..\..\..\Data\sample4.ppt");
Step 3: Save the PPT document to PPTX file format.
presentation.SaveToFile("ToPPTX.pptx", FileFormat.Pptx2010);
Step4: Launch and view the resulted PPTX file.
System.Diagnostics.Process.Start("ToPPTX.pptx");
Full codes:
namespace Spire.Presentation.Demo
{
    public partial class Form1 : Form
    {
        public Form1()
        {
            InitializeComponent();
        }

        private void btnRun_Click(object sender, EventArgs e)
        {
            //create PPT document
            Presentation presentation = new Presentation();

            //load the PPT file from disk
            presentation.LoadFromFile(@"..\..\..\..\..\..\Data\sample4.ppt");

            //save the PPT document to PPTX file format
            presentation.SaveToFile("ToPPTX.pptx", FileFormat.Pptx2010);
            System.Diagnostics.Process.Start("ToPPTX.pptx");
        }
    }
}
Target screenshot:
Lists are a powerful tool in PowerPoint presentations that enable you to organize and present information in a clear and concise manner. Whether you're showcasing key points, summarizing ideas, or highlighting important details, utilizing lists can enhance the visual appeal, readability and professionalism of your slides. In this article, we will explore how to create numbered lists and bulleted lists in PowerPoint presentations in C# and VB.NET using Spire.Presentation for .NET.
- Create a Numbered List in PowerPoint
- Create a Symbol Bulleted List in PowerPoint
- Create an Image Bulleted List in PowerPoint
Install Spire.Presentation for .NET
To begin with, you need to add the DLL files included in the Spire.Presentation for.NET package as references in your .NET project. The DLL files can be either downloaded from this link or installed via NuGet.
PM> Install-Package Spire.Presentation
Create a Numbered List in PowerPoint in C# and VB.NET
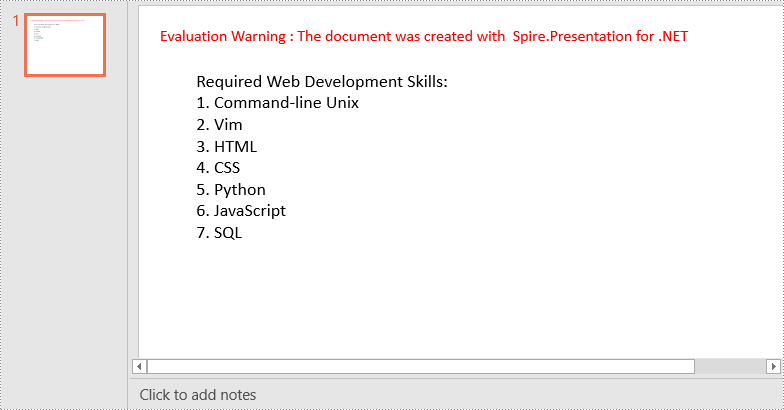
A numbered list in PowerPoint is a list of items where each item is preceded by a number or a sequence of numbers. It follows a sequential order, typically starting from 1 and progressing incrementally. Numbered lists are commonly used to present steps, instructions, rankings, or any information that requires a specific order.
To create a numbered list in a PowerPoint presentation using Spire.Presentation for .NET, you can follow these steps:
- Create a Presentation object.
- Get the first slide using Presentation.Slides[0] property.
- Append a shape to the slide using ISlide.Shapes.AppendShape() method and set the shape style.
- Specify the items of the list inside a String array.
- Create paragraphs based on the list items, and set the bullet type of these paragraphs to Numbered using ParagraphProperties.BulletType property.
- Set the numbered bullet style of these paragraphs using ParagraphProperties.BulletStyle property.
- Add these paragraphs to the shape using IAutoShape.TextFrame.Paragraphs.Append() method.
- Save the document to a PowerPoint file using Presentation.SaveToFile() method.
- C#
- VB.NET
using Spire.Presentation;
using Spire.Presentation.Drawing;
using System.Drawing;

namespace CreateNumberedList
{
    internal class Program
    {
        static void Main(string[] args)
        {
            //Create a Presentation object
            Presentation presentation = new Presentation();
            //Get the first slide
            ISlide slide = presentation.Slides[0];

            //Add a shape to the slide and set the shape style
            IAutoShape shape = slide.Shapes.AppendShape(ShapeType.Rectangle, new RectangleF(50, 50, 300, 200));
            shape.Fill.FillType = FillFormatType.None;
            shape.Line.FillType= FillFormatType.None;

            //Add text to the default paragraph
            TextParagraph paragraph = shape.TextFrame.Paragraphs[0];
            paragraph.Text = "Required Web Development Skills:";
            paragraph.Alignment = TextAlignmentType.Left;
            paragraph.TextRanges[0].Fill.FillType = FillFormatType.Solid;
            paragraph.TextRanges[0].Fill.SolidColor.Color = Color.Black;

            //Specify the list items
            string[] listItems = new string[] {
                " Command-line Unix",
                " Vim",
                " HTML",
                " CSS",
                " Python",
                " JavaScript",
                " SQL"
            };

            //Create a numbered list
            foreach (string item in listItems)
            {
                TextParagraph textParagraph = new TextParagraph();
                textParagraph.Text = item;
                textParagraph.Alignment = TextAlignmentType.Left;
                textParagraph.TextRanges[0].Fill.FillType = FillFormatType.Solid;
                textParagraph.TextRanges[0].Fill.SolidColor.Color = Color.Black;

                textParagraph.BulletType = TextBulletType.Numbered;
                textParagraph.BulletStyle = NumberedBulletStyle.BulletArabicPeriod;
                shape.TextFrame.Paragraphs.Append(textParagraph);
            }

            //Save the result document
            presentation.SaveToFile("NumberedList.pptx", FileFormat.Pptx2013);
        }
    }
}
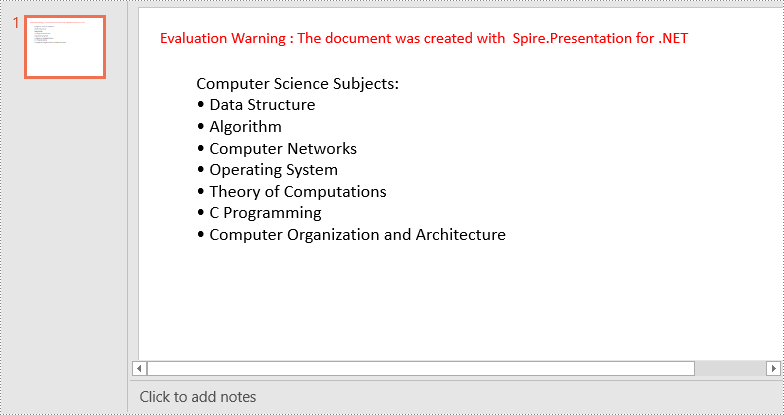
Create a Symbol Bulleted List in PowerPoint in C# and VB.NET
A symbol bulleted list in PowerPoint uses symbols instead of numbers to visually represent each item. Symbol bulleted lists are useful for presenting non-sequential information or a collection of points without a specific order.
To create a symbol bulleted list in a PowerPoint presentation using Spire.Presentation for .NET, you can follow these steps:
- Create a Presentation object.
- Get the first slide using Presentation.Slides[0] property.
- Append a shape to the slide using ISlide.Shapes.AppendShape() method and set the shape style.
- Specify the items of the list inside a String array.
- Create paragraphs based on the list items, and set the bullet type of these paragraphs to Symbol using ParagraphProperties.BulletType property.
- Add these paragraphs to the shape using IAutoShape.TextFrame.Paragraphs.Append() method.
- Save the document to a PowerPoint file using Presentation.SaveToFile() method.
- C#
- VB.NET
using Spire.Presentation;
using Spire.Presentation.Drawing;
using System.Drawing;

namespace CreateSymbolBulletedList
{
    internal class Program
    {
        static void Main(string[] args)
        {
            //Create a Presentation object
            Presentation presentation = new Presentation();
            //Get the first slide
            ISlide slide = presentation.Slides[0];

            //Add a shape to the slide and set the shape style
            IAutoShape shape = slide.Shapes.AppendShape(ShapeType.Rectangle, new RectangleF(50, 50, 350, 200));
            shape.Fill.FillType = FillFormatType.None;
            shape.Line.FillType = FillFormatType.None;

            //Add text to the default paragraph
            TextParagraph paragraph = shape.TextFrame.Paragraphs[0];
            paragraph.Text = "Computer Science Subjects:";
            paragraph.Alignment = TextAlignmentType.Left;
            paragraph.TextRanges[0].Fill.FillType = FillFormatType.Solid;
            paragraph.TextRanges[0].Fill.SolidColor.Color = Color.Black;

            //Specify the list items
            string[] listItems = new string[] {
                " Data Structure",
                " Algorithm",
                " Computer Networks",
                " Operating System",
                " Theory of Computations",
                " C Programming",
                " Computer Organization and Architecture"
            };

            //Create a symbol bulleted list
            foreach (string item in listItems)
            {
                TextParagraph textParagraph = new TextParagraph();
                textParagraph.Text = item;
                textParagraph.Alignment = TextAlignmentType.Left;
                textParagraph.TextRanges[0].Fill.FillType = FillFormatType.Solid;
                textParagraph.TextRanges[0].Fill.SolidColor.Color = Color.Black;
                textParagraph.BulletType = TextBulletType.Symbol;
                shape.TextFrame.Paragraphs.Append(textParagraph);
            }

            //Save the result document
            presentation.SaveToFile("SymbolBulletedList.pptx", FileFormat.Pptx2013);
        }
    }
}
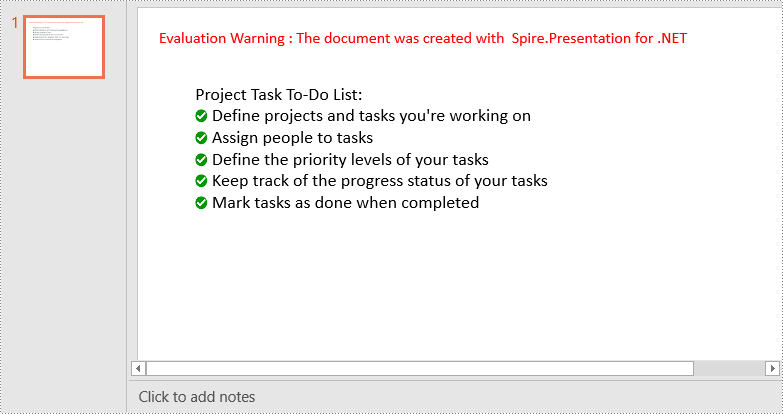
Create an Image Bulleted List in PowerPoint in C# and VB.NET
An image bulleted list in PowerPoint replaces the traditional bullet points with small images or icons. Instead of using numbers or symbols, each item is represented by an image that adds a visual element to the list. Image bulleted lists are commonly used when you want to incorporate visual cues or represent items with relevant icons or graphics.
To create an image bulleted list in a PowerPoint presentation using Spire.Presentation for .NET, you can follow these steps:
- Create a Presentation object.
- Get the first slide using Presentation.Slides[0] property.
- Append a shape to the slide using ISlide.Shapes.AppendShape() method and set the shape style.
- Specify the items of the list inside a String array.
- Create paragraphs based on the list items, and set the bullet type of these paragraphs to Picture using ParagraphProperties.BulletType property.
- Set the image that will be used as bullets using ParagraphProperties.BulletPicture.EmbedImage property.
- Add these paragraphs to the shape using IAutoShape.TextFrame.Paragraphs.Append() method.
- Save the document to a PowerPoint file using Presentation.SaveToFile() method.
- C#
- VB.NET
using Spire.Presentation;
using Spire.Presentation.Drawing;
using System.Drawing;

namespace CreateImageBulletedList
{
    internal class Program
    {
        static void Main(string[] args)
        {
            //Create a Presentation object
            Presentation presentation = new Presentation();
            //Get the first slide
            ISlide slide = presentation.Slides[0];

            //Add a shape to the slide and set the shape style
            IAutoShape shape = slide.Shapes.AppendShape(ShapeType.Rectangle, new RectangleF(50, 50, 400, 180));
            shape.Fill.FillType = FillFormatType.None;
            shape.Line.FillType = FillFormatType.None;

            //Add text to the default paragraph
            TextParagraph paragraph = shape.TextFrame.Paragraphs[0];
            paragraph.Text = "Project Task To-Do List:";
            paragraph.Alignment = TextAlignmentType.Left;
            paragraph.TextRanges[0].Fill.FillType = FillFormatType.Solid;
            paragraph.TextRanges[0].Fill.SolidColor.Color = Color.Black;

            //Specify the list items
            string[] listItems = new string[] {
                " Define projects and tasks you're working on",
                " Assign people to tasks",
                " Define the priority levels of your tasks",
                " Keep track of the progress status of your tasks",
                " Mark tasks as done when completed"
            };

            //Create an image bulleted list
            foreach (string item in listItems)
            {
                TextParagraph textParagraph = new TextParagraph();
                textParagraph.Text = item;
                textParagraph.Alignment = TextAlignmentType.Left;
                textParagraph.TextRanges[0].Fill.FillType = FillFormatType.Solid;
                textParagraph.TextRanges[0].Fill.SolidColor.Color = Color.Black;
                textParagraph.BulletType = TextBulletType.Picture;
                IImageData image = presentation.Images.Append(Image.FromFile("icon.png"));
                textParagraph.BulletPicture.EmbedImage = image;
                shape.TextFrame.Paragraphs.Append(textParagraph);
            }

            //Save the result document
            presentation.SaveToFile("ImageBulletedList.pptx", FileFormat.Pptx2013);
        }
    }
}
Apply for a Temporary License
If you'd like to remove the evaluation message from the generated documents, or to get rid of the function limitations, please request a 30-day trial license for yourself.
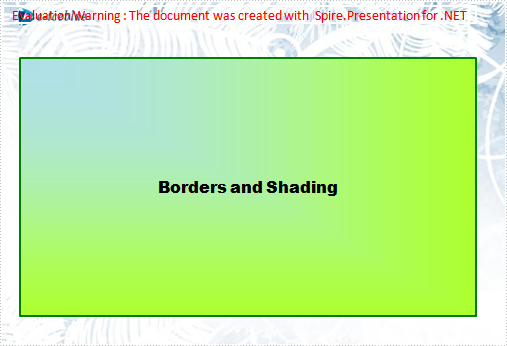
Set border and shading in PowerPoint document in C#, VB.NET
2014-04-23 03:39:09 Written by AdministratorSuppose you want your doc document more attract and prominent your content. You would use a kind of border and shading style to beatify your document and give prominence to the key points. AS well as doc document the PPT document also can set shape to as border and shading.
Spire.Presentation for .NET, a professional .NET PPT component to allow users to manipulate PPT documents without automation. It can set kinds of shape types which can help users to beatify their document as their expectation
Below demonstrate the effect by a screenshot which shows a shape type in PPT document with C#, VB.NET via Spire.Presentation for .NET.
There is a guide to introduce a method to set shape type to achieve above screenshot with C#, VB.NET via Spire.Presentation for .NET.
This method is:
First, new a PPT document and set its slide. Then, new a shape and set its line color and gradient color. Last set the font and fill style for the paragraph. Now Download and install Spire.Presentation for .NET and use below code to experience this method to set shape type in PPT document.
The full code:
using System;
using System.Drawing;
using Spire.Presentation;
using Spire.Presentation.Drawing;

namespace BorderAndShading
{
    class Program
    {
        static void Main(string[] args)
        {
            Presentation presentation = new Presentation();

            //set background Image
            string ImageFile = @" bg.png";
            RectangleF rect = new RectangleF(0, 0, presentation.SlideSize.Size.Width, presentation.SlideSize.Size.Height);
            presentation.Slides[0].Shapes.AppendEmbedImage(ShapeType.Rectangle, ImageFile, rect);
            presentation.Slides[0].Shapes[0].Line.FillFormat.SolidFillColor.Color = Color.FloralWhite;

            //append new shape
            IAutoShape shape = presentation.Slides[0].Shapes.AppendShape(ShapeType.Rectangle,
                new RectangleF(120, 70, 450, 300));

            //set the LineColor
            shape.ShapeStyle.LineColor.Color = Color.Green;

            //set the gradient color of shape
            shape.Fill.FillType = Spire.Presentation.Drawing.FillFormatType.Gradient;
            shape.Fill.Gradient.GradientShape = Spire.Presentation.Drawing.GradientShapeType.Rectangle;
            shape.Fill.Gradient.GradientStyle = Spire.Presentation.Drawing.GradientStyle.FromTopLeftCorner;
            shape.Fill.Gradient.GradientStops.Append(1f, KnownColors.GreenYellow);
            shape.Fill.Gradient.GradientStops.Append(0, KnownColors.PowderBlue);
            shape.AppendTextFrame("Borders and Shading");

            //set the Font
            shape.TextFrame.Paragraphs[0].TextRanges[0].LatinFont = new TextFont("Arial Black");
            shape.TextFrame.Paragraphs[0].TextRanges[0].Fill.FillType = FillFormatType.Solid;
            shape.TextFrame.Paragraphs[0].TextRanges[0].Fill.SolidColor.Color = Color.Black;

            //save the document
            presentation.SaveToFile("BordersAndShading.pptx", FileFormat.Pptx2007);
            System.Diagnostics.Process.Start("BordersAndShading.pptx");
        }
    }
}
Imports System.Text
Imports System.Drawing
Imports Spire.Presentation
Imports Spire.Presentation.Drawing

Module Module1

    Sub Main()
        'create PPT document
        Dim presentation As New Presentation()

        'set background Image
        Dim ImageFile As String = "bg.png"
        Dim rect As New RectangleF(0, 0, presentation.SlideSize.Size.Width, presentation.SlideSize.Size.Height)
        presentation.Slides(0).Shapes.AppendEmbedImage(ShapeType.Rectangle, ImageFile, rect)
        presentation.Slides(0).Shapes(0).Line.FillFormat.SolidFillColor.Color = Color.FloralWhite

        'append new shape
        Dim shape As IAutoShape = presentation.Slides(0).Shapes.AppendShape(ShapeType.Rectangle, New RectangleF(30, 70, 550, 300))

        'set the LineColor
        shape.ShapeStyle.LineColor.Color = Color.Green

        'set the gradient color of shape
        shape.Fill.FillType = Spire.Presentation.Drawing.FillFormatType.Gradient
        shape.Fill.Gradient.GradientShape = Spire.Presentation.Drawing.GradientShapeType.Rectangle
        shape.Fill.Gradient.GradientStyle = Spire.Presentation.Drawing.GradientStyle.FromTopLeftCorner
        shape.Fill.Gradient.GradientStops.Append(1.0F, KnownColors.GreenYellow)

        shape.Fill.Gradient.GradientStops.Append(0, KnownColors.PowderBlue)
        shape.AppendTextFrame("Borders and Shading")

        'set the Font
        shape.TextFrame.Paragraphs(0).TextRanges(0).LatinFont = New TextFont("Arial Black")
        shape.TextFrame.Paragraphs(0).TextRanges(0).Fill.FillType = FillFormatType.Solid
        shape.TextFrame.Paragraphs(0).TextRanges(0).Fill.SolidColor.Color = Color.Black

        'save the document
        presentation.SaveToFile("BordersAndShading.pptx", FileFormat.Pptx2007)
        System.Diagnostics.Process.Start("BordersAndShading.pptx")

    End Sub

End Module
Converting PowerPoint presentations to PDF offers portability, compatibility, and secure sharing capabilities. By transforming dynamic slides into a static, universally accessible format, users ensure seamless viewing across different devices and platforms.
This article explains how to convert PowerPoint presentations to PDFs using C# and Spire.Presentation for .NET. You'll learn to customize the conversion, including options like including hidden slides, securing PDFs with passwords, and enforcing compliance standards.
- Convert PowerPoint to PDF in C#
- Convert PowerPoint to PDF/A in C#
- Convert PowerPoint to Password-Protected PDF in C#
- Convert PowerPoint to PDF with Hidden Slides in C#
- Convert PowerPoint to PDF with Custom Slide Size in C#
- Convert a Specific Slide in PowerPoint to PDF in C#
Install Spire.Presentation for .NET
To begin with, you need to add the DLL files included in the Spire.Presentation for.NET package as references in your .NET project. The DLL files can be either downloaded from this link or installed via NuGet.
PM> Install-Package Spire.Presentation
Convert PowerPoint to PDF in C#
To convert a PowerPoint document to PDF without any customization, you can first load the document using the Presentation.LoadFromFile() method, and then save it as a PDF file using the Presentation.SaveToFile() method.
The steps to convert a PowerPoint document to PDF using C# are as follows:
- Create a Presentation object.
- Load a PowerPoint document using Presetation.LoadFromFile() method.
- Convert it to PDF using Presentation.SaveToFile() method.
- C#
using Spire.Presentation;

namespace ConvertPowerPointToPdf
{
    class Program
    {
        static void Main(string[] args)
        {
            // Create a Presentation object
            Presentation presentation = new Presentation();

            // Load a PowerPoint file
            presentation.LoadFromFile("C:\\Users\\Administrator\\Desktop\\Input.pptx");

            // Save it to PDF
            presentation.SaveToFile("ToPdf.pdf", FileFormat.PDF);

            // Dispose resources
            presentation.Dispose();
        }
    }
}
Convert PowerPoint to PDF/A in C#
Spire.Presentation provides the SaveToPdfOption class, which allows you to configure the options for PowerPoint-to-PDF conversion. For instance, you can set the conformance level of the generated PDF document to Pdf/A-1a.
The steps to convert a PowerPoint presentation to a PDF/A document using C# are as follows:
- Create a Presentation object.
- Load a PowerPoint document using Presetation.LoadFromFile() method.
- Get the SaveToPdfOption object using Presentation.SaveToPdfOption property.
- Set the conformance level to Pdf_A1A using SaveToPdfOption.PdfConformanceLevel property.
- Convert the presentation to PDF using Presentation.SaveToFile() method.
- C#
using Spire.Presentation;
using Spire.Presentation.External.Pdf;

namespace ConvertPowerPointToPdfa
{
    class Program
    {
        static void Main(string[] args)
        {
            // Create a Presentation object
            Presentation presentation = new Presentation();

            // Load a PowerPoint file
            presentation.LoadFromFile("C:\\Users\\Administrator\\Desktop\\Input.pptx");

            // Get the SaveToPdfOption object
            SaveToPdfOption options = presentation.SaveToPdfOption;

            // Set the pdf conformance level to pdf_a1a
            options.PdfConformanceLevel = PdfConformanceLevel.Pdf_A1A;

            // Save the presentation to PDF
            presentation.SaveToFile("ToPdfa.pdf",FileFormat.PDF);

            // Dispose resources
            presentation.Dispose();
        }
    }
}
Convert PowerPoint to Password-Protected PDF in C#
The SaveToPdfOption class offers the PdfSecurity.Encrypt() method, which enables you to protect the generated PDF document with a password and set document processing permissions, such as allowing printing and filling form fields.
The steps to convert a PowerPoint presentation to a password-protected PDF using C# are as follows.
- Create a Presentation object.
- Load a PowerPoint document using Presetation.LoadFromFile() method.
- Get the SaveToPdfOption object using Presentation.SaveToPdfOption property.
- Encrypt the generated PDF with a password using SaveToPdfOption.PdfSecurity.Encrypt() method.
- Convert the presentation to PDF using Presentation.SaveToFile() method.
- C#
using Spire.Presentation;
using Spire.Presentation.External.Pdf;

namespace ConvertPowerPointToPasswordProtectedPdf
{
    class Program
    {
        static void Main(string[] args)
        {
            // Create a Presentation object
            Presentation presentation = new Presentation();

            // Load a PowerPoint file
            presentation.LoadFromFile("C:\\Users\\Administrator\\Desktop\\Input.pptx");

            // Get the SaveToPdfOption object
            SaveToPdfOption option = presentation.SaveToPdfOption;

            // Encrypt the generated document with a password
            option.PdfSecurity.Encrypt("abc-123",PdfPermissionsFlags.Print | PdfPermissionsFlags.FillFields);

            // Save the presentation to PDF
            presentation.SaveToFile("ToEncryptedPdf.pdf", FileFormat.PDF);

            // Dispose resources
            presentation.Dispose();
        }
    }
}
Convert PowerPoint to PDF with Hidden Slides in C#
When converting a PowerPoint document to PDF, you can include any hidden slides by setting the SaveToPdfOption.ContainHiddenSlides property to true.
The following are the steps to convert PowerPoint to PDF with hidden slides using C#.
- Create a Presentation object.
- Load a PowerPoint document using Presetation.LoadFromFile() method.
- Get the SaveToPdfOption object using Presentation.SaveToPdfOption property.
- Set the SaveToPdfOption.ContainHiddenSlides property to true to include hidden when converting PowerPoint to PDF.
- Convert the presentation to PDF using Presentation.SaveToFile() method.
- C#
using Spire.Presentation;

namespace ConvertPowerPointToPdfWithHiddenSlides
{
    class Program
    {
        static void Main(string[] args)
        {
            // Create a Presentation object
            Presentation presentation = new Presentation();

            // Load a PowerPoint file
            presentation.LoadFromFile("C:\\Users\\Administrator\\Desktop\\Input.pptx");

            // Get the SaveToPdfOption object
            SaveToPdfOption option = presentation.SaveToPdfOption;

            // Enable ContainHiddenSlides option
            option.ContainHiddenSlides = true;

            // Save the presentation to PDF
            presentation.SaveToFile("ToPdfWithHiddenSlides.pdf", FileFormat.PDF);

            // Dispose resources
            presentation.Dispose();
        }
    }
}
Convert PowerPoint to PDF with Custom Slide Size in C#
Customizing the slide size allows you to optimize the PDF for printing on specific paper sizes, like A4, Letter, or even custom sizes. This can be achieved by adjusting the Presentation.SlideSize.Type and Presentation.SlideSize.Size properties.
The steps to convert PowerPoint to PDF with custom slide size are as follows.
- Create a Presentation object.
- Load a PowerPoint document using Presetation.LoadFromFile() method.
- Change the slide size using Presentation.SlideSize.Type and Presentation.SlideSize.Size properties.
- Auto fit content to the slide by setting Presentation.SlideSizeAutoFit to true.
- Convert the presentation to PDF using Presentation.SaveToFile() method.
- C#
using Spire.Presentation;
using System.Drawing;

namespace ConvertPowerPointToPdfWithCustomSlideSize
{
    class Program
    {
        static void Main(string[] args)
        {
            // Create a Presentation object
            Presentation presentation = new Presentation();

            // Load a PowerPoint file
            presentation.LoadFromFile("C:\\Users\\Administrator\\Desktop\\Input.pptx");

            // Set the slide size type as custom
            presentation.SlideSize.Type = SlideSizeType.Custom;

            // Set the custom slide size
            presentation.SlideSize.Size = new SizeF(750, 500);

            // Or, you can set the slide size to a standard slide size like A4
            // presentation.SlideSize.Type = SlideSizeType.A4;

            // Fit content to the new size of slide
            presentation.SlideSizeAutoFit = true;

            // Save the presentation to PDF
            presentation.SaveToFile("ToPdfWithCustomSlideSize.pdf", FileFormat.PDF);

            // Dispose resources
            presentation.Dispose();
        }
    }
}
Convert a Specific Slide in PowerPoint to PDF in C#
To convert a specific slide in a PowerPoint document into a PDF file, you can use the ISlide.SaveToFile() method. Here are the detailed steps.
- Create a Presentation object.
- Load a PowerPoint document using Presetation.LoadFromFile() method.
- Get a specific slide using Presentation.Slides[index] property.
- Convert it to PDF using ISlide.SaveToFile() method.
- C#
using Spire.Presentation;

namespace ConvertSpecificSlideToPdf
{
    class Program
    {
        static void Main(string[] args)
        {
            // Create a Presentation object
            Presentation presentation = new Presentation();

            // Load a PowerPoint file
            presentation.LoadFromFile("C:\\Users\\Administrator\\Desktop\\Input.pptx");

            // Get a specific slide
            ISlide slide = presentation.Slides[1];

            // Save it to PDF
            slide.SaveToFile("SlideToPdf.pdf", FileFormat.PDF);

            // Dispose resources
            presentation.Dispose();
        }
    }
}

Apply for a Temporary License
If you'd like to remove the evaluation message from the generated documents, or to get rid of the function limitations, please request a 30-day trial license for yourself.
Generally, we tend to insert graphics, animation effects, audio frames or video frames into our PPT slides to make it more vivid and persuasive. Adding high-quality audio, background music for example, to a slide presentation can greatly increase the impact that it has on your viewers.
Spire.Presentation for .NET is a comprehensive toolkit which allows developers to process PPT slides in massive ways, including multitude of graphics and multimedia features. In this topic, we will make a simple introduction of how to insert audio into PPT using C#.
Step 1: Create a new PPT document first
Presentation presentation = new Presentation()
Step 2: Basically, we need to set a background image before inserting Audio file
string ImageFile = "bg.png";

            RectangleF rect = new RectangleF(0, 0, presentation.SlideSize.Size.Width, presentation.SlideSize.Size.Height);
            presentation.Slides[0].Shapes.AppendEmbedImage(ShapeType.Rectangle, ImageFile, rect);
            presentation.Slides[0].Shapes[0].Line.FillFormat.SolidFillColor.Color = Color.FloralWhite;
Step 3: Load the Audio file from disk
presentation.Slides[0].Shapes.AppendAudioMedia(Path.GetFullPath("paipai_sound.wav"), new RectangleF(100, 100, 20, 20));
Step 4: Set properties of AutoShape
IAutoShape shape = presentation.Slides[0].Shapes.AppendShape(ShapeType.Rectangle, new RectangleF(50, 150, 600, 250));
            shape.ShapeStyle.LineColor.Color = Color.White;
            shape.Fill.FillType = Spire.Presentation.Drawing.FillFormatType.None;
Step 5: Save PPT file
presentation.SaveToFile("Audio.pptx", FileFormat.Pptx2010);
            System.Diagnostics.Process.Start("Audio.pptx");
Effect Screenshot:
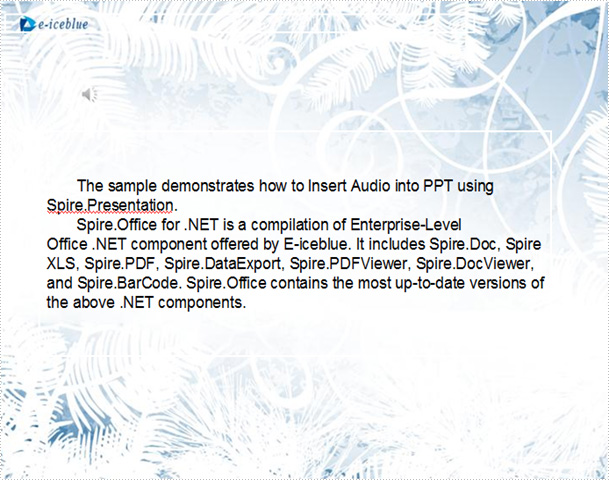
With Spire.Presentation, you can insert audio into your PowerPoint documents and do more same thing in your any .NET(C#, VB.NET, ASP.NET) applications without PowerPoint automation and any other third party add-ins.
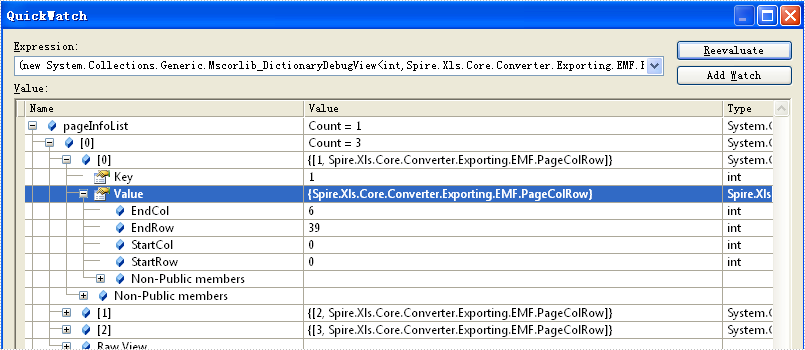
Different printer drivers print out the document with different numbers of rows and columns. When we need to print an excel file with header and footer, the information of how many pages in one excel file and where is the first line start becomes very important. This article will show you how to get the page count of excel file and the row and column number of page break in C# by using Spire.XLS for .NET.
Firstly, make sure that Spire.XLS for .NET (version7.3.12 or above) has been installed on your machine. And then, adds Spire.XLS.dll as reference in the downloaded Bin folder thought the below path: "..\Spire.XLS\Bin\NET4.0\ Spire.XLS.dll".
Now it comes to the details of how to get the page count of excel file in C#:
//Create a new excel document
Workbook wb = new Workbook();
//load from the file
wb.LoadFromFile(@"D:\test.xlsx");
//get the page info.
var pageInfoList = wb.GetSplitPageInfo();
//Get the sheet count
int sheetCount = pageInfoList.Count;
//The page count of the first sheet
int pageCount = pageInfoList[0].Count;
You could find a screenshot shows row number and column number of each Excel page.
Spire.XLS for .NET, as a professional Excel component, it enables you to generate, read, write and manipulate Excel files in C#, VB.NET in any .NET applications directly.
