
.NET (1327)
Children categories
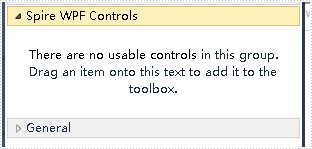
In this document, I will introduce you how to add Spire.PDFViewer controls to Toolbox for WPF application.
How To
Right-click on the blank part of the Toolbox - "Add Tab" - name the new Tab "Spire WPF Controls":
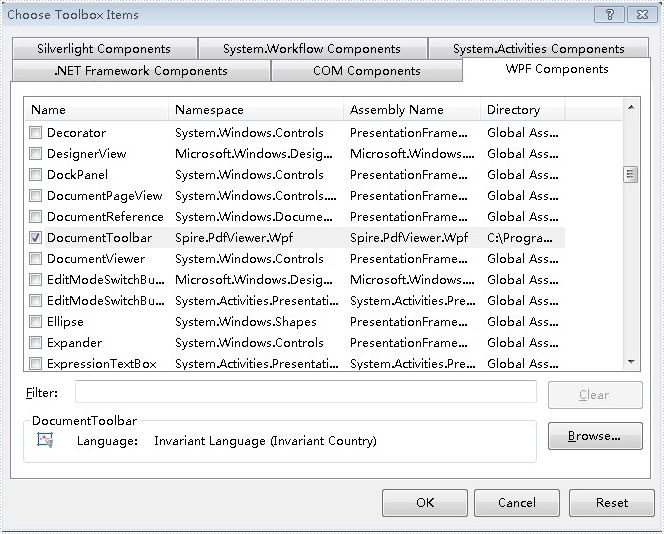
Right-click on the blank part below "Spire WPF Controls" - "Choose Items" - "WPF Components" - "Browse" to the "Bin" folder - find the file "Spire.PdfViewer.Wpf.dll" - "Open".
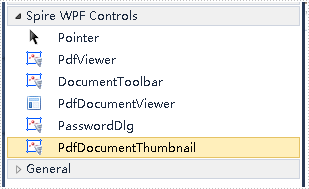
Click "OK". Then you have added controls to Toolbox successfully.
There are three ways to add Spire.PDFViewer controls to Toolbox for Windows Forms application.
In this document, these ways are introduced.
The First Solution
Set the CheckBox below to the CheckState "Checked" during installing Spire.PDFViewer.
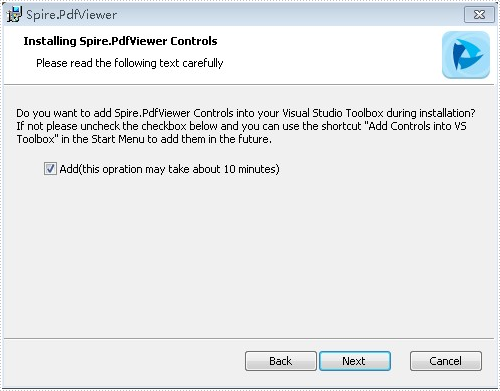
After installment is completed, controls will be added to the Toolbox.
The Second Solution
If you have already installed Spire.PDFViewer, you can also add controls this way:
"Start" -"Programs" -"e-iceblue" -"Spire.PDFViewer" : Click "Add Controls into VS Toolbox".
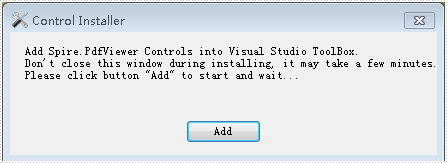
Click "Add" to add controls.

The Third Solution
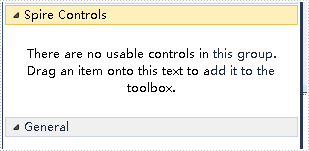
Right-click on the blank part of the Toolbox - "Add Tab" - name the new Tab "Spire Controls" :
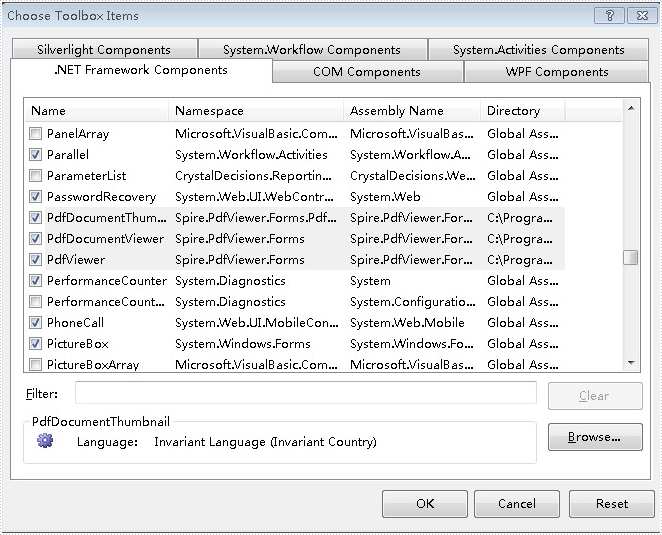
Right-click on the blank part below "Spire Controls" - "Choose Items" - ".NET Framework Components" - "Browse" to the "Bin" folder – find the file "Spire.PdfViewer.Forms.dll"- "Open".
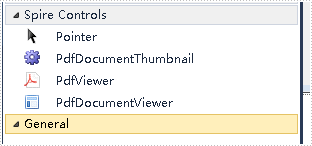
Click “OK”. Then you have added controls to Toolbox successfully.
In this document, I will introduce you how to add Spire.DataExport controls to Toolbox for Windows Forms application.
How To
If you have already installed Spire.DataExport, you can add controls this way:
"Start" - "Programs" - "e-iceblue" - "Spire.DataExport" : Click "Add Controls into VS Toolbox".
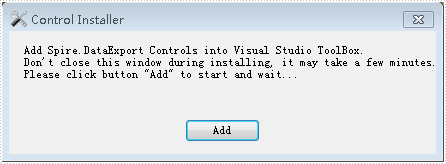
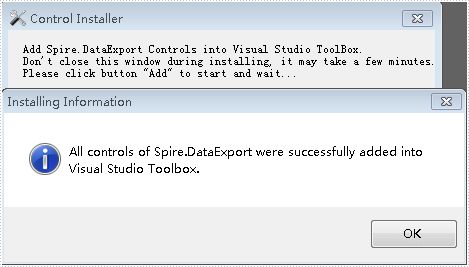
Click "Add" to add controls.
How To
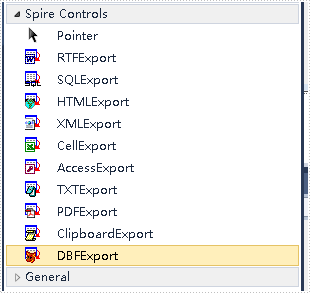
Right-click on the blank part of the Toolbo - "Add Tab" - name the new Tab "Spire Controls":

Right-click on the blank part below "Spire Controls"- "Choose Items" - ".NET Framework Components" - "Browse” to the "Bin" folde - find the file "Spire.DataExport.dll" -"Open".
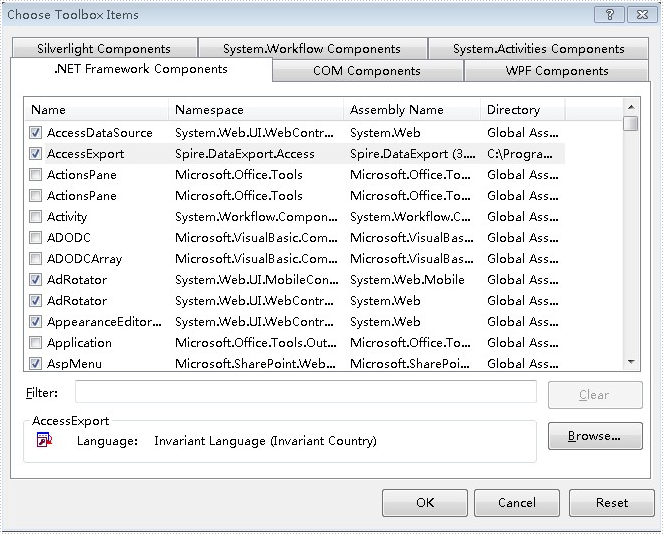
Click "OK". Then you have added controls to Toolbox successfully.
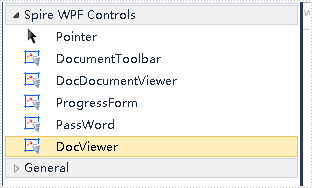
In this document, I will introduce you how to add Spire.DocViewer controls to Toolbox for WPF application.
How To
Right-click on the blank part of the Toolbox - "Add Tab" - name the new Tab "Spire WPF Controls":
Right-click on the blank part below "Spire WPF Controls" - "Choose Items" - "WPF Components" - "Browse" to the "Bin" folder - find the file "Spire.DocViewer.Wpf.dll" - "Open".

Click "OK". Then you have added controls to Toolbox successfully.
There are three ways to add Spire.DocViewer controls to Toolbox for Windows Forms application.
In this document, these ways are introduced. Hoping this document can be helpful to you.
The First Solution
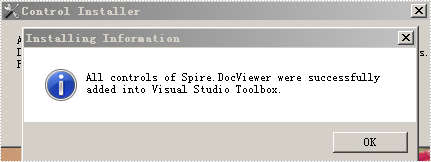
Set the CheckBox below to the CheckState "Checked" during installing Spire.DocViewer.
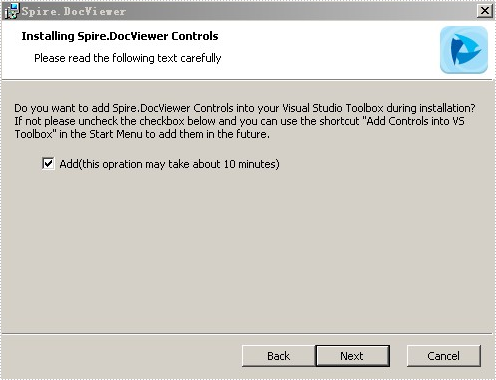
After installment is completed, controls will be added to the Toolbox.
The Second Solution
If you have already installed Spire.DocViewer, you can also add controls this way:
"Start" - "Programs" - "e-iceblue" - "Spire.DocViewer" : Click "Add Controls into VS Toolbox".
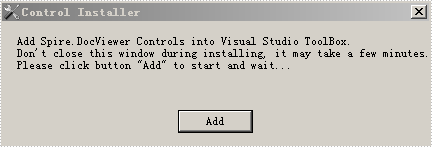
Click "Add" to add controls.
The Third Solution
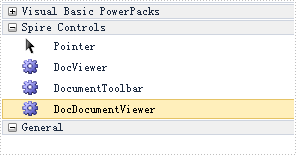
Right-click on the blank part of the Toolbox - "Add Tab" - name the new Tab "Spire Controls":
Right-click on the blank part below "Spire Controls" - "Choose Items" - ".NET Framework Components" - "Browse" to the "Bin" folder - find the file "Spire.DocViewer.Forms.dll" - "Open"
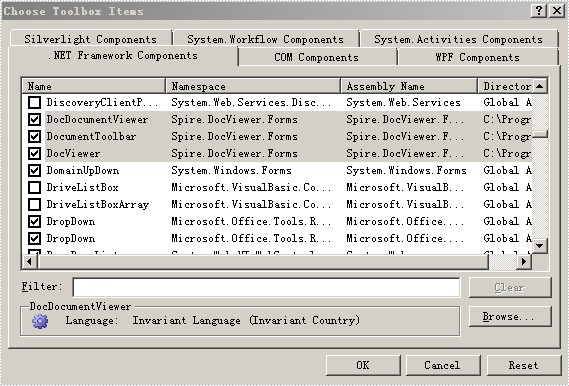
Click "OK". Then you have added controls to Toolbox successfully.
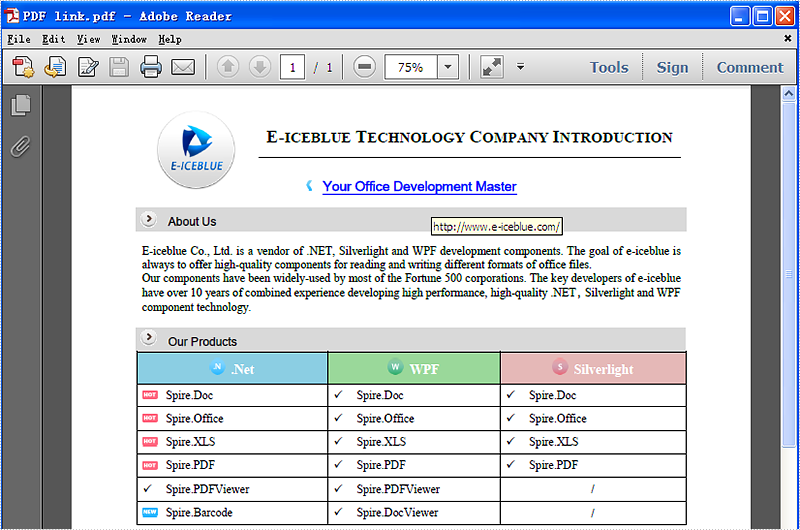
Spire.PDF for .NET is a PDF library which enables users to handle the whole PDF document with wide range of tasks in C#, VB.NET. Spire.PDF supports to create PDF links, extract PDF links, update PDF links and remove PDF links from a PDF file. This article mainly shows how to extract and update link from a PDF file in C#.
Before the steps and codes, please check the original PDF file at first:
Firstly we need to create a new Document object and load a PDF file which needs to extract and update the links. The links are represented as annotations in a PDF file. Before extract and update the link from a PDF file, we need to extract all the AnnotationsWidget objects.
The following code snippet shows you how to extract links from the PDF file.
//Load an existing PDF file
PdfDocument document = new PdfDocument();
document.LoadFromFile(@"..\..\output.pdf");

//Get the first page
PdfPageBase page = document.Pages[0];

//Get the annotation collection
PdfAnnotationCollection widgetCollection = page.Annotations;

//Verify whether widgetCollection is not null or not
if (widgetCollection.Count > 0)
            {
                foreach (var obj in widgetCollection)
                {

//Get the TextWebLink Annotation
if (obj is PdfTextWebLinkAnnotationWidget)
   {
     PdfTextWebLinkAnnotationWidget link = obj as PdfTextWebLinkAnnotationWidget;
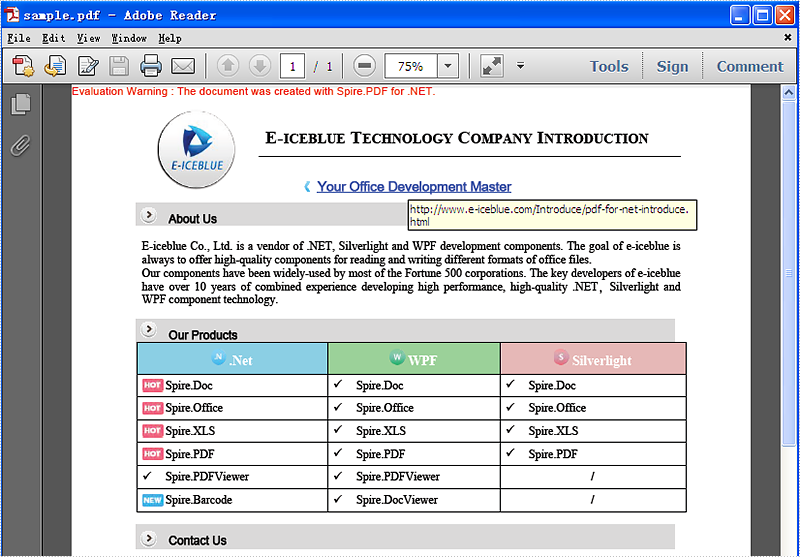
The following code snippet shows you how to update the link in PDF file
//Change the url of TextWebLink Annotation
link.Url = "http://www.e-iceblue.com/Introduce/pdf-for-net-introduce.html";

//Saves PDF document to file.
document.SaveToFile("sample.pdf");
This picture will show you the link has been updated in the PDF file.
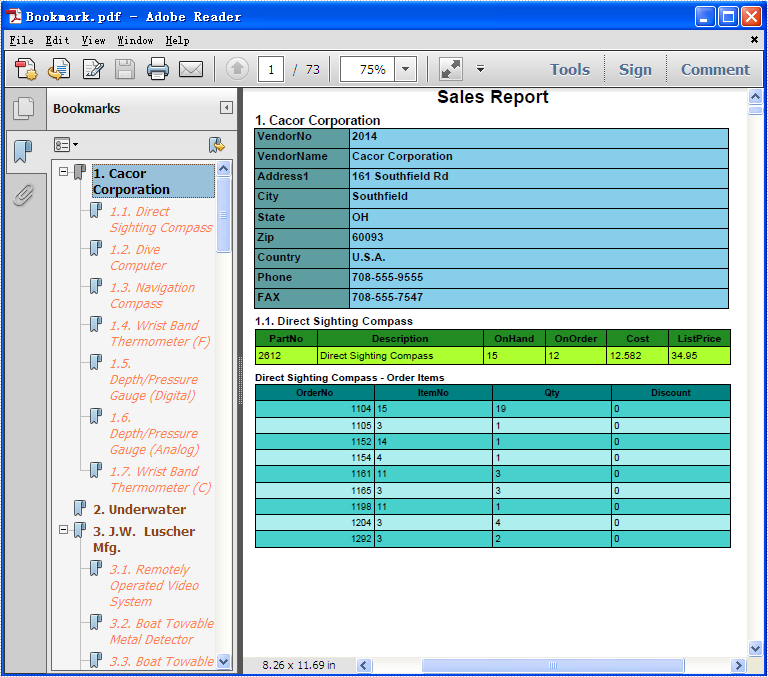
PDF Bookmarks is widely used to help us locate and link to points that we want to go. Spire.PDF for .NET, a powerful PDF component, not only enables developers to add bookmarks, get bookmark information, but also helps us to remove the bookmarks that we want. This article will show you how to delete bookmark from the PDF document in C# easily.
First, check the PDF document with bookmarks.
Here comes to the steps of how to remove the bookmarks in C#.
- Download Spire.PDF for .NET and install it correctly. The Spire.PDF installation is clean, professional and wrapped up in a MSI installer.
- Add Spire.Pdf.dll as reference in the downloaded Bin folder though the below path: "..\Spire.Pdf\Bin\NET4.0\ Spire.Pdf.dll".
- Check the code snippet of how to delete the bookmarks. With Spire.PDF.NET, we can remove both the particular bookmark and remove all the bookmarks at one time.
using Spire.Pdf;

namespace DeletePDFBookmark
{
    class Program
    {
        static void Main(string[] args)
        {
            //Create a new PDF document and load from the file.
            PdfDocument document = new PdfDocument();
            document.LoadFromFile(@"D:\Bookmark.pdf");

            //remove the first bookmark
            document.Bookmarks.RemoveAt(0);

            //remove all bookmarks
            document.Bookmarks.Clear();

            //save the document to file.
            document.SaveToFile("result.pdf");
        }
    }
}
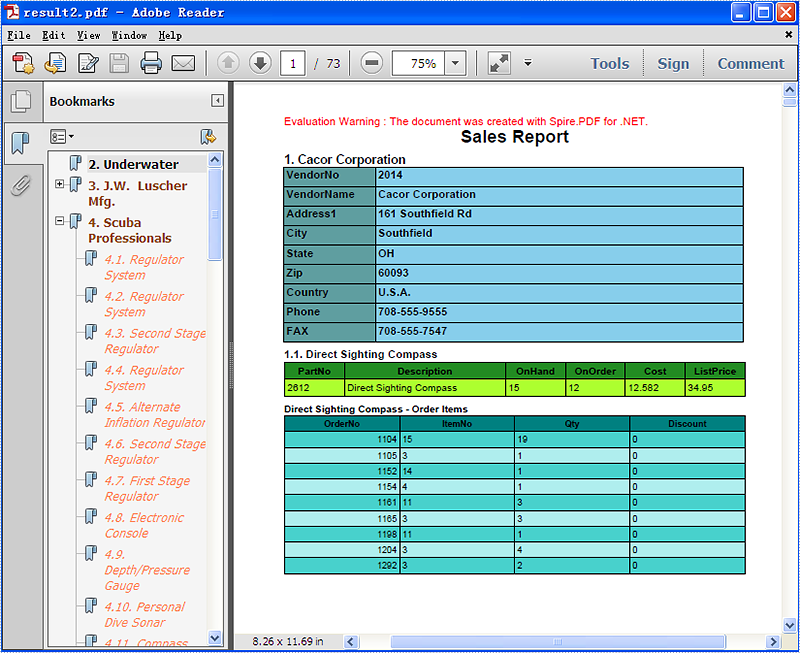
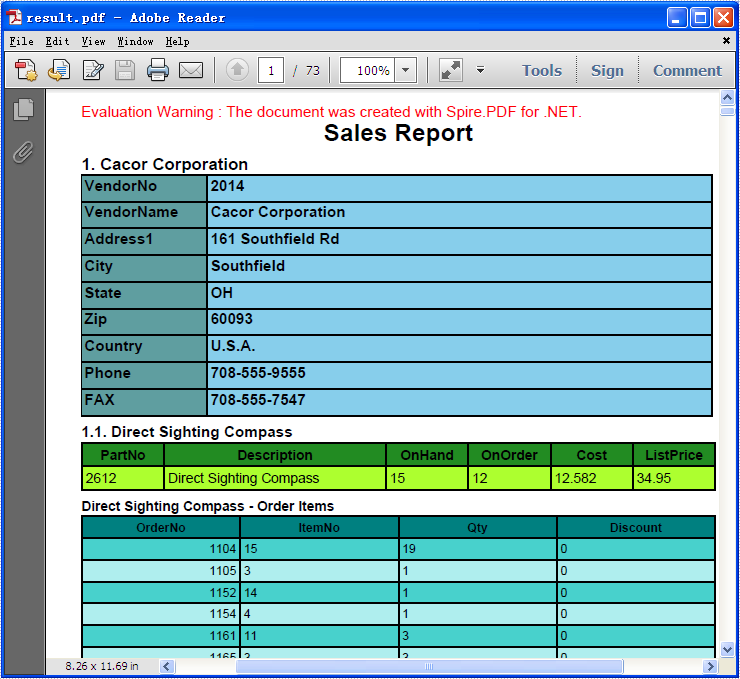
Please check the effective screenshots:
Section breaks allow you to divide a document into sections, each with its own formatting and layout settings, giving you greater control over the overall structure and appearance of your document. Whether you're compiling a complex report or a lengthy dissertation, mastering section breaks can greatly improve your document management skills. This article will demonstrate how to insert or remove section breaks in Word in C# using Spire.Doc for .NET.
Install Spire.Doc for .NET
To begin with, you need to add the DLL files included in the Spire.Doc for.NET package as references in your .NET project. The DLL files can be either downloaded from this link or installed via NuGet.
PM> Install-Package Spire.Doc
Insert Section Breaks in Word in C#
Spire.Doc for .NET provides the Paragraph.InsertSectionBreak(SectionBreakType breakType) method to insert a specified type of section break to a paragraph. The following table provides an overview of the supported section break types, along with their corresponding Enums and descriptions:
| Section Break | Enum | Description |
| New page | SectionBreakType.NewPage | Start the new section on a new page. |
| Continuous | SectionBreakType.NoBreak | Start the new section on the same page, allowing for continuous content flow. |
| Odd page | SectionBreakType.OddPage | Start the new section on the next odd-numbered page. |
| Even page | SectionBreakType.EvenPage | Start the new section on the next even-numbered page. |
| New column | SectionBreakType.NewColumn | Start the new section in the next column if columns are enabled. |
The following are the detailed steps to insert a continuous section break:
- Create a Document instance.
- Load a Word document using Document.LoadFromFile() method.
- Get a specified section using Document.Sections[] property.
- Get a specified paragraph of the section using Section.Paragraphs[] property.
- Add a section break to the end of the paragraph using Paragraph.InsertSectionBreak() method.
- Save the result document using Document.SaveToFile() method.
- C#
using Spire.Doc;
using Spire.Doc.Documents;

namespace InsertSectionBreak
{
    class Program
    {
        static void Main(string[] args)
        {
            //Create a Document instance
            Document doc = new Document();

            //Load a Word document
            doc.LoadFromFile("sample.docx");

            //Get the first section in the document
            Section sec = doc.Sections[0];

            //Get the second paragraph in the section
            Paragraph para = sec.Paragraphs[1];

            //Insert a continuous section break
            para.InsertSectionBreak(SectionBreakType.NoBreak);

            //Save the result document
            doc.SaveToFile("InsertSectionBreak.docx", FileFormat.Docx);
        }
    }
}

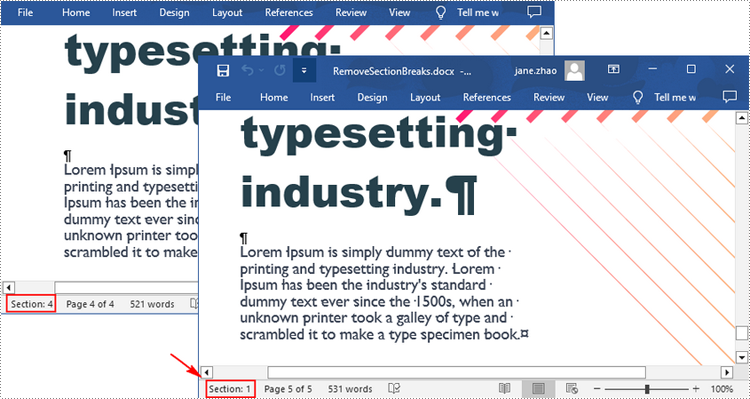
Remove Section Breaks in Word in C#
To delete all sections breaks in a Word document, we need to access the first section in the document, then copy the contents of the other sections to the first section and delete them. The following are the detailed steps:
- Create a Document instance.
- Load a Word document using Document.LoadFromFile() method.
- Get the first section using Document.Sections[] property.
- Iterate through other sections in the document.
- Get the second section, and then iterate through to get its child objects.
- Clone the child objects of the second section and add them to the first section using Section.Body.ChildObjects.Add() method.
- Delete the second section using Document.Sections.Remove() method.
- Repeat the process to copy and delete the remaining sections.
- Save the result document using Document.SaveToFile() method.
- C#
using Spire.Doc;

namespace DeleteSectionBreak
{
    class Program
    {
        static void Main(string[] args)
        {
            //Create a Document instance
            Document doc = new Document();

            //Load a Word document
            doc.LoadFromFile("Report.docx");

            //Get the first section in the document
            Section sec = doc.Sections[0];

            //Iterate through other sections in the document
            for (int i = 0; i < doc.Sections.Count - 1; i++)
            {
                //Get the second section in the document
                Section section = doc.Sections[1];

                //Iterate through all child objects of the second section
                for (int j = 0; j < section.Body.ChildObjects.Count; j++)
                {
                    //Get the child objects
                    DocumentObject obj = section.Body.ChildObjects[j];
                    //Clone the child objects to the first section
                    sec.Body.ChildObjects.Add(obj.Clone());
                }

                //Remove the second section
                doc.Sections.Remove(section);
            }

            //Save the result document
            doc.SaveToFile("RemoveSectionBreaks.docx", FileFormat.Docx);
        }
    }
}
Apply for a Temporary License
If you'd like to remove the evaluation message from the generated documents, or to get rid of the function limitations, please request a 30-day trial license for yourself.
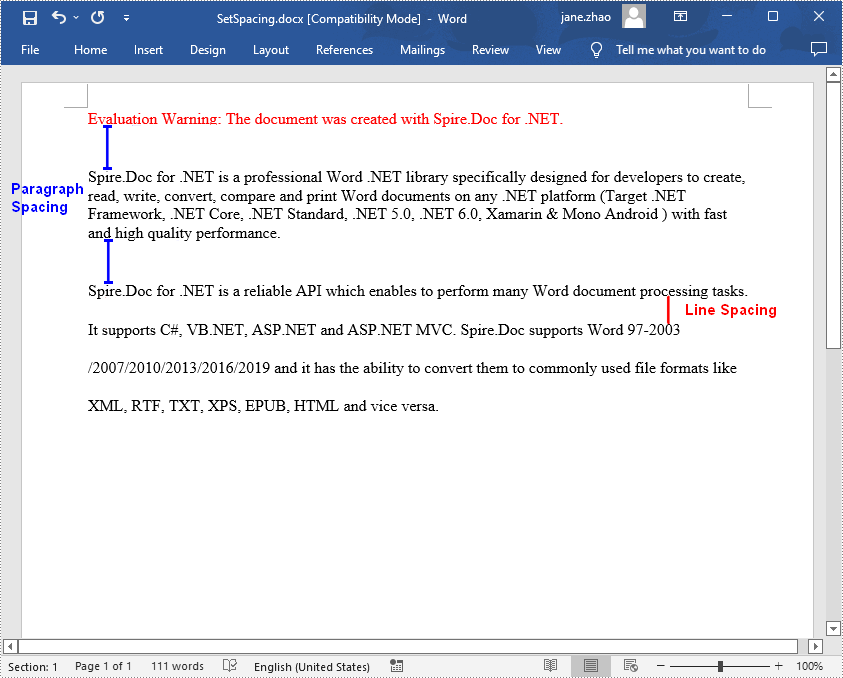
Line spacing is the amount of white space between each line in a paragraph, while paragraph spacing is the amount of white space before and after each paragraph in a document. In MS Word, you can adjust the spacing manually if the default spacing does not meet your needs. In this article, you will learn how to programmatically set line spacing and paragraph spacing in Word using Spire.Doc for .NET.
Install Spire.Doc for .NET
To begin with, you need to add the DLL files included in the Spire.Doc for.NET package as references in your .NET project. The DLL files can be either downloaded from this link or installed via NuGet.
PM> Install-Package Spire.Doc
Set Line Spacing and Paragraph Spacing in Word
Loose line or paragraph spacing can make text more readable, while tight line or paragraph spacing can fit more text in a document. Below are the steps to adjust the line spacing and paragraph spacing in a Word document.
- Create a Document instance.
- Add a section to the document using Document.AddSection() method, and then add a paragraph to the section.
- Set the before and after spacing for the paragraph using Paragraph.Format.BeforeSpacing and Paragraph.Format.AfterSpacing properties.
- Add another paragraph and set line spacing in the paragraph using Paragraph.Format.LineSpacing property.
- Save the result document using Document.SaveToFile() method.
- C#
- VB.NET
using Spire.Doc;
using Spire.Doc.Documents;

namespace SetSpacing
{
    class Program
    {
        static void Main(string[] args)
        {
            //Create a Document instance
            Document document = new Document();

            //Add a section
            Section section = document.AddSection();

            //Add a paragraph
            Paragraph paragraph = section.AddParagraph();
            paragraph.AppendText("Spire.Doc for .NET is a professional Word .NET library specifically designed for developers to " +
                "create, read, write, convert, compare and print Word documents on any .NET platform " +
                "(Target .NET Framework, .NET Core, .NET Standard, .NET 5.0, .NET 6.0, Xamarin & Mono Android ) with fast and high quality performance.");

            //Set spacing before the paragraph
            paragraph.Format.BeforeSpacing = 30;

            //Set spacing after the paragraph
            paragraph.Format.AfterSpacing = 30;

            //Add another paragraph
            Paragraph paragraph2 = section.AddParagraph();
            paragraph2.AppendText("Spire.Doc for .NET is a reliable API which enables to perform many Word document processing tasks. " +
                "It supports C#, VB.NET, ASP.NET and ASP.NET MVC. Spire.Doc supports Word 97-2003 /2007/2010/2013/2016/2019 " +
                "and it has the ability to convert them to commonly used file formats like XML, RTF, TXT, XPS, EPUB, HTML and vice versa. ");

            //Set line spacing in the paragraph
            paragraph2.Format.LineSpacing = 25;

            //Save the result document
            document.SaveToFile("SetSpacing.docx", FileFormat.Docx);
        }
    }
}
Apply for a Temporary License
If you'd like to remove the evaluation message from the generated documents, or to get rid of the function limitations, please request a 30-day trial license for yourself.
PDF/A is widely used for long term archiving for PDF format. By using Spire.PDF, you can create PDF/A file directly. This article mainly shows how to set up PDF/A file; it will also demonstrate how to add image and insert hyperlink to image in C#.
Make sure Spire.PDF for .NET (version 2.9.43 or above) has been installed correctly and then add Spire.Pdf.dll as reference in the downloaded Bin folder though the below path: "..\Spire.Pdf\Bin\NET4.0\ Spire.Pdf.dll".
Here comes to the steps:
Step 1: Create a PDF/A document.
// Create a PdfDocument instance
PdfDocument document = new PdfDocument();
PdfPageBase page = document.Pages.Add();
page.Canvas.DrawString("Hello World", new PdfFont(PdfFontFamily.Helvetica, 30f), new PdfSolidBrush(Color.Black), 10, 10);
Step 2: Load an image from file and insert to the PDF.
//insert an image
PdfImage image = PdfImage.FromFile(@"D:\PDF.png");
Step 3: Add a hyper link to the image.
//Add a link to image
PointF location = new PointF(100, 100);
RectangleF linkBounds = new RectangleF(location, new SizeF(image.Width, image.Height));
Spire.Pdf.Annotations.PdfUriAnnotation link = new Spire.Pdf.Annotations.PdfUriAnnotation(linkBounds, "http://www.e-iceblue.com/Introduce/pdf-for-net-introduce.html");
link.Border = new PdfAnnotationBorder(0);
page.Canvas.DrawImage(image, linkBounds);
page.Annotations.Add(link);
Step 4: Save the PDF document.
//Save the document to file in PDF format
String output1 = @"..\..\..\..\..\..\Data\ToPDF.pdf";
document.SaveToFile(output1);

// Create an instance of the PdfStandardsConverter class, passing the input PDF file path as a parameter.
PdfStandardsConverter converter = new PdfStandardsConverter(output1);

// Specify the desired file name for the resulting PDFA-1b compliant PDF.
String output2 = @"..\..\..\..\..\..\Data\ToPDFA.pdf";

// Convert the input PDF file to PDFA-1b format and save it using the specified output file name.
converter.ToPdfA1B(output2);
Effective screenshot:

