
.NET (1327)
Children categories
The purpose of creating dropdown lists in an Excel document is to provide a convenient way for data input, restricting users to select only from predefined options. This helps prevent input errors and ensures data accuracy. With dropdown lists, users can choose from a fixed list of options without the need to manually enter data, thereby reducing the possibility of input errors. This article will introduce how to use Spire.XLS for .NET to create dropdown lists in Excel documents within a C# project.
- Create Dropdown List using String Array in C#
- Create Dropdown List using Data from the Same Worksheet in C#
- Create Dropdown List using Data from Different Worksheets in C#
- Create Linked Dropdown Lists in the Same Worksheet in C#
- Create Linked Dropdown Lists across Different Worksheets in C#
Install Spire.XLS for .NET
To begin with, you need to add the DLL files included in the Spire.XLS for .NET package as references in your .NET project. The DLL files can be either downloaded from this link or installed via NuGet.
PM> Install-Package Spire.XLS
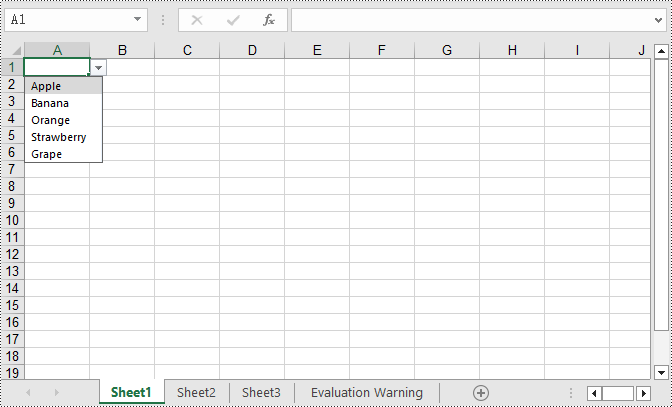
Create Dropdown List using String Array in C#
Using Spire.XLS, you can easily create dropdown lists in cells by assigning a string array to the CellRange.DataValidation.Values property. Here are the detailed steps:
- Create a Workbook object.
- Use Workbook.Worksheets[0] to get the first worksheet in the workbook.
- Create a string array and assign it to the CellRange.DataValidation.Values property.
- Save the document to a specified path using the Workbook.SaveToFile() method.
- C#
using Spire.Xls;

namespace SpireXlsDemo
{
    internal class Program
    {
        static void Main(string[] args)
        {
            // Create a Workbook object
            Workbook workbook = new Workbook();

            // Get the first Worksheet in the Workbook object
            Worksheet worksheet = workbook.Worksheets[0];

            // Create a string array
            string[] values = new string[] { "Apple", "Banana", "Orange", "Strawberry", "Grape" };

            // Set data validation in cell A1 of the worksheet, restricting selectable values to those in the values array
            worksheet.Range["A1"].DataValidation.Values = values;

            // Save the Workbook object as an Excel file
            workbook.SaveToFile("DropdownListCreatedFromArray.xlsx", ExcelVersion.Version2016);

            // Dispose of the resources occupied by the Workbook object
            workbook.Dispose();
        }
    }
}
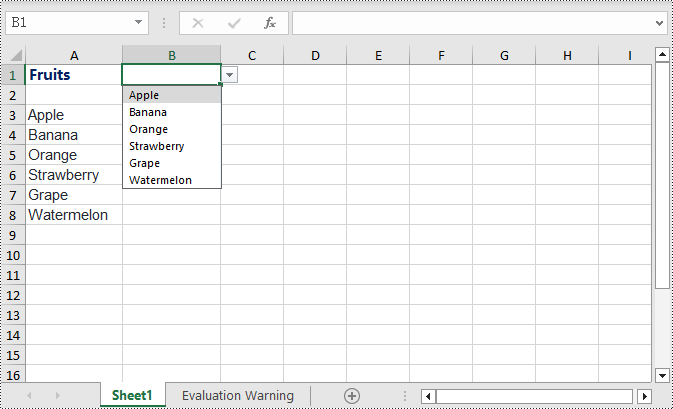
Create Dropdown List using Data from the Same Worksheet in C#
The following example demonstrates creating a dropdown list in the worksheet where the data is located by specifying the data range and applying it to the corresponding cell. Here are the detailed steps:
- Create a Workbook object.
- Load an Excel document using the Workbook.LoadFromFile() method.
- Access the first worksheet in the workbook using Workbook.Worksheets[0].
- Get the data range using Worksheet.Range[""].
- Specify cell B1 as a dropdown list and set the data range using Worksheet.Range["B1"].DataValidation.DataRange.
- Save the document to a specified path using the Workbook.SaveToFile() method.
- C#
using Spire.Xls;

namespace SpireXlsDemo
{
    internal class Program
    {
        static void Main(string[] args)
        {
            // Create a new workbook object
            Workbook workbook = new Workbook();

            // Load workbook data from a file
            workbook.LoadFromFile("Sample1.xlsx");

            // Get the first worksheet in the workbook
            Worksheet worksheet = workbook.Worksheets[0];

            // Get the cell range from A3 to A8 in the worksheet
            CellRange dataRange = worksheet.Range["A3:A8"];

            // Set cell B1 as a dropdown with data range obtained earlier
            worksheet.Range["B1"].DataValidation.DataRange = dataRange;

            // Save the workbook to a new file
            workbook.SaveToFile("CreateDropdownInSameWorksheet.xlsx", ExcelVersion.Version2016);

            // Dispose of the workbook resources
            workbook.Dispose();
        }
    }
}
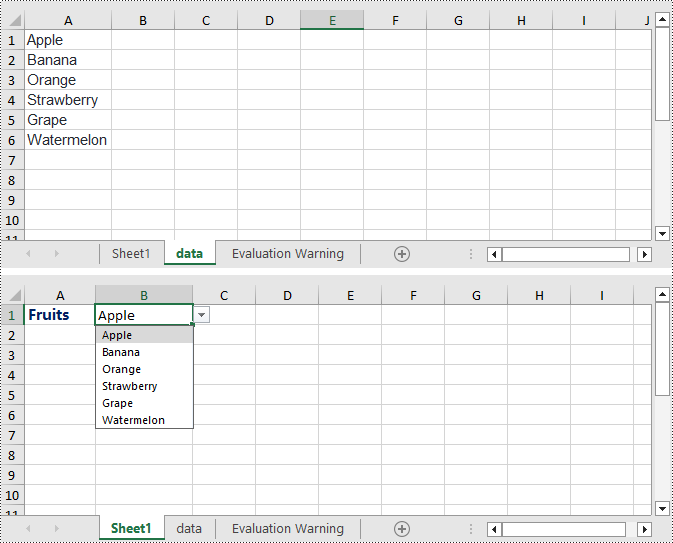
Create Dropdown List using Data from Different Worksheets in C#
This example demonstrates how to specify a data range in one worksheet and apply it to a specific cell in another worksheet. In this process, it is necessary to ensure that Worksheet.ParentWorkbook.Allow3DRangesInDataValidation = true is set to enable the functionality of creating dropdown lists across different worksheets. Here are the detailed steps:
- Create a Workbook object.
- Load an Excel document using the Workbook.LoadFromFile() method.
- Retrieve a specific worksheet from the workbook using Workbook.Worksheets[].
- Set Worksheet.ParentWorkbook.Allow3DRangesInDataValidation = true to enable the use of 3D ranges in data validation within the worksheet.
- Use CellRange.DataValidation.DataRange to specify a cell as a dropdown list and set the data range.
- Save the document to a specified path using the Workbook.SaveToFile() method.
- C#
using Spire.Xls;

namespace SpireXlsDemo
{
    internal class Program
    {
        static void Main(string[] args)
        {
            // Create a Workbook object
            Workbook workbook = new Workbook();

            // Load the workbook from a file
            workbook.LoadFromFile("Sample2.xlsx");

            // Get the first worksheet
            Worksheet worksheet1 = workbook.Worksheets[0];

            // Get the second worksheet
            Worksheet worksheet2 = workbook.Worksheets[1];

            // Allow the use of 3D ranges in data validation
            worksheet1.ParentWorkbook.Allow3DRangesInDataValidation = true;

            // Define the data range
            CellRange dataRange = worksheet2.Range["A1:A6"];

            // Apply the data range to cell B1 in worksheet 1 as data validation
            worksheet1.Range["B1"].DataValidation.DataRange = dataRange;

            // Save the workbook to a file
            workbook.SaveToFile("Create the Dropdowns Across Different Worksheets.xlsx", ExcelVersion.Version2016);

            // Release the resources of the workbook
            workbook.Dispose();
        }
    }
}
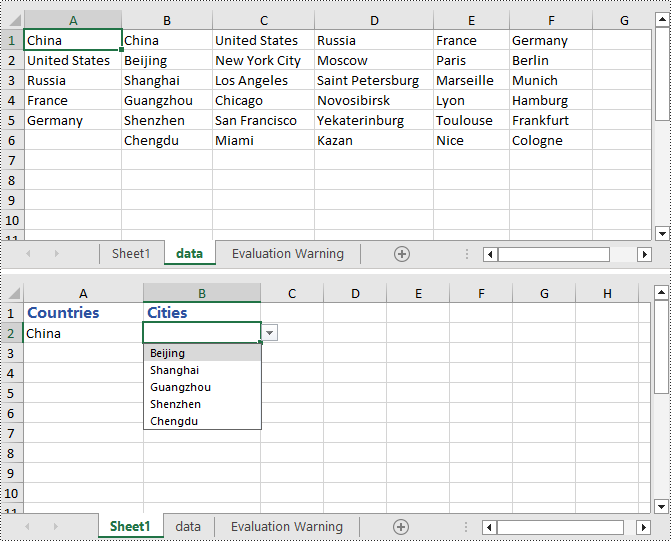
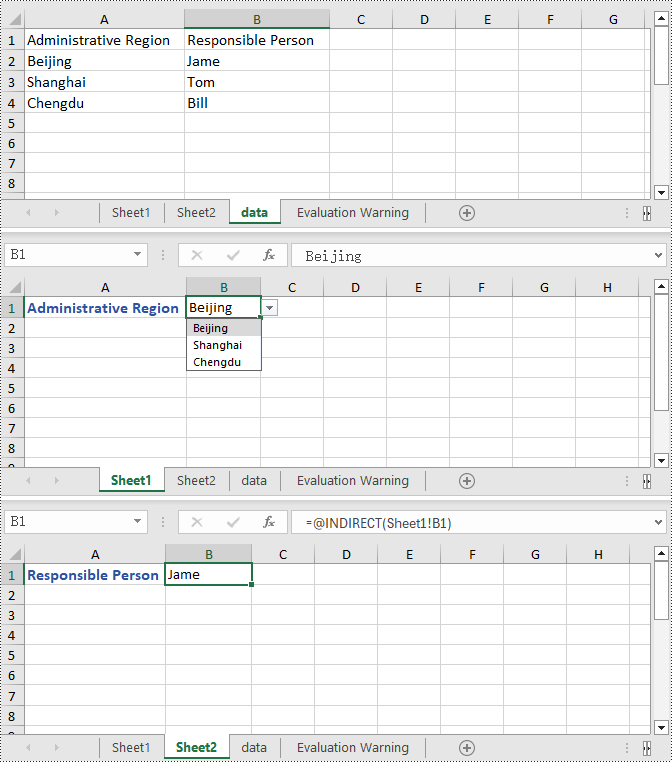
Create Linked Dropdown Lists in the Same Worksheet in C#
Linked dropdown menus refer to the automatic updating of options in one dropdown menu based on the selection made in another dropdown menu. This example demonstrates how to create linked dropdown lists (dropdown menus) functionality within the same worksheet. This is achieved by adding an INameRange object and setting the reference range, as well as setting the data range and formula for data validation to achieve the linked dropdown effect. Here are the detailed steps:
- Create a Workbook object.
- Load an Excel document using the Workbook.LoadFromFile() method.
- Retrieve a specific worksheet from the workbook using Workbook.Worksheets[].
- Add an INamedRange object and set the reference range.
- Set Worksheet.ParentWorkbook.Allow3DRangesInDataValidation = true to enable the use of 3D ranges in data validation within the worksheet.
- Use CellRange.DataValidation.DataRange to specify a cell as a dropdown box and set the data range.
- Set CellRange.DataValidation.AllowType = CellDataType.User to specify the data validation type for cells in the worksheet as user-defined.
- Set CellRange.DataValidation.Formula1 = "=INDIRECT(SUBSTITUTE(A2,\" \",\"_\"))", which means that the data validation for this cell will dynamically select the data range based on the value in the cell.
- Save the document to a specified path using the Workbook.SaveToFile() method.
- C#
using Spire.Xls;

namespace SpireXlsDemo
{
    internal class Program
    {
        static void Main(string[] args)
        {
            // Create a new workbook object
            Workbook workbook = new Workbook();

            // Load the workbook from a file
            workbook.LoadFromFile("Sample3.xlsx");

            // Get the first worksheet
            Worksheet worksheet1 = workbook.Worksheets[0];

            // Get the second worksheet
            Worksheet worksheet2 = workbook.Worksheets[1];

            // Add named range objects and set reference ranges
            Spire.Xls.Core.INamedRange namedRange = workbook.NameRanges.Add(worksheet2.Range["A1"].Text);
            namedRange.RefersToRange = worksheet2.Range["B2:B6"];
            namedRange = workbook.NameRanges.Add(worksheet2.Range["A2"].Text.Replace(" ", "_"));
            namedRange.RefersToRange = worksheet2.Range["C2:C6"];
            namedRange = workbook.NameRanges.Add(worksheet2.Range["A3"].Text);
            namedRange.RefersToRange = worksheet2.Range["D2:D6"];
            namedRange = workbook.NameRanges.Add(worksheet2.Range["A4"].Text);
            namedRange.RefersToRange = worksheet2.Range["E2:E6"];
            namedRange = workbook.NameRanges.Add(worksheet2.Range["A5"].Text);
            namedRange.RefersToRange = worksheet2.Range["F2:F6"];

            // Allow 3D ranges in data validation
            worksheet1.ParentWorkbook.Allow3DRangesInDataValidation = true;

            // Set the data range for data validation
            worksheet1.Range["A2"].DataValidation.DataRange = worksheet2.Range["A1:A5"];
            worksheet1.Range["B2"].DataValidation.AllowType = CellDataType.User;

            // Set the formula
            worksheet1.Range["B2"].DataValidation.Formula1 = "=INDIRECT(SUBSTITUTE(A2,\" \",\"_\"))";

            // Save the workbook to a file
            workbook.SaveToFile("Linked Dropdowns in the Same Worksheet.xlsx", ExcelVersion.Version2016);

            // Dispose of the workbook resources
            workbook.Dispose();
        }
    }
}
Create Linked Dropdown Lists across Different Worksheets in C#
This example demonstrates how to implement linked dropdown lists between different worksheets in an Excel document. By adding an INameRange object and setting the reference range, you can set the data validation range in the first worksheet and set the cell formula in the second worksheet to achieve the linked dropdown effect. Here are the detailed steps:
- Create a Workbook object.
- Load an Excel document using the Workbook.LoadFromFile() method.
- Retrieve a specific worksheet from the workbook using Workbook.Worksheets[].
- Add an INamedRange object and set the reference range.
- Set Worksheet.ParentWorkbook.Allow3DRangesInDataValidation = true to enable data validation using 3D ranges in the worksheet.
- Set the data validation range using CellRange.DataValidation.DataRange.
- Set the formula in a cell in the second worksheet using CellRange.Formula = "=INDIRECT(" + worksheet1.Name + "!B1)" to indirectly reference the value of a cell in the first worksheet.
- Save the document to a specified path using the Workbook.SaveToFile() method.
- C#
using Spire.Xls;

namespace SpireXlsDemo
{
	internal class Program
	{
		static void Main(string[] args)
		{
                                     // Create a Workbook object
                                     Workbook workbook = new Workbook();

                                     // Load the workbook from a file
                                     workbook.LoadFromFile("Sample4.xlsx");

                                     // Get the first worksheet
                                     Worksheet worksheet1 = workbook.Worksheets[0];

                                     // Get the second worksheet
                                     Worksheet worksheet2 = workbook.Worksheets[1];

                                     // Get the data worksheet
                                     Worksheet dataSheet = workbook.Worksheets[2];

                                     // Add a named range object and set the reference range
                                     Spire.Xls.Core.INamedRange namedRange = workbook.NameRanges.Add(dataSheet.Range["A2"].Text);
                                     namedRange.RefersToRange = dataSheet.Range["B2"];
                                     namedRange = workbook.NameRanges.Add(dataSheet.Range["A3"].Text);
                                     namedRange.RefersToRange = dataSheet.Range["B3"];
                                     namedRange = workbook.NameRanges.Add(dataSheet.Range["A4"].Text);
                                     namedRange.RefersToRange = dataSheet.Range["B4"];

                                     // Allow 3D ranges in data validation
                                     worksheet1.ParentWorkbook.Allow3DRangesInDataValidation = true;

                                     // Set the data range for data validation
                                     worksheet1.Range["B1"].DataValidation.DataRange = dataSheet.Range["A2:A4"];

                                     // Set the formula for cell B1 in the second worksheet
                                     worksheet2.Range["B1"].Formula = "=INDIRECT(" + worksheet1.Name + "!B1)";

                                     // Save the workbook to a file
                                     workbook.SaveToFile("Creating Linked Dropdowns Across Different Worksheets.xlsx", ExcelVersion.Version2016);

                                     // Release the resources of the workbook
                                     workbook.Dispose();
		}
	}
}
Apply for a Temporary License
If you'd like to remove the evaluation message from the generated documents, or to get rid of the function limitations, please request a 30-day trial license for yourself.
This section is designed to provide a solution for developers on how to delete PDF page for WPF via this PDF library Spire.PDF for WPF.
Spire.PDF for WPF enables users to delete any PDF page only by one line of code: RemoveAt(int index). As you see, there is only one parameter in this method. This parameter determines which page will be deleted in PDF file. Now let us see the whole task in detail.
Delete PDF Page for WPF
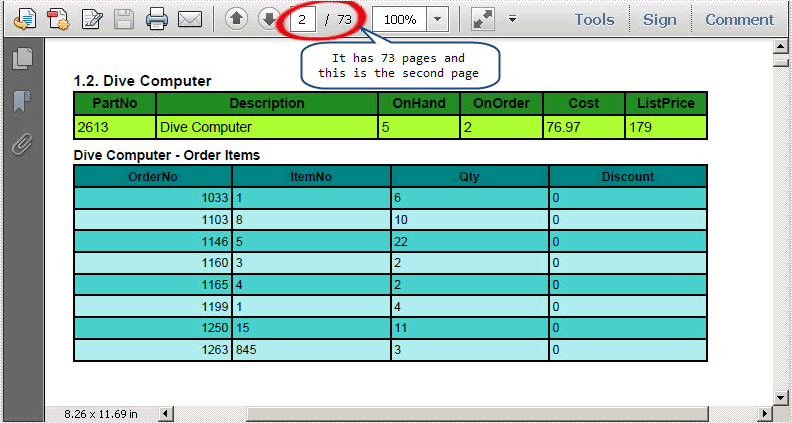
Step 1: Prepare a template PDF File
I pick a PDF file from my system and it has 73 pages, we can see it below:
Step 2: Download and Install Spire.PDF for WPF
Spire.PDF for WPF is a PDF component applied in WPF applications. It enables developers to create, read, edit and handle PDF files with fast speed. Here you can download Spire.PDF for WPF. After installing it on system, Spire.PDF for WPF will run in evaluation mode. This evaluation mode has no time limit and has no bad influence on performing the task.
Step 3: Start a new Project and Add References
Start your Visual Studio and create a new project in Visual C# WPF Application or VB。NET WPF Application. Here is an example of Visual C# in WPF Application. Please do not forget to add a button in the MainWindow.
We will use Spire.PDF for WPF, so we have to add Spire.Pdf for Wdf.dll and Spire.License.dll in our project in Bin folder. The detail Path is "..\Spire.Pdf\Bin\WPF4.0\ Spire.Pdf.Wpf.dll".
Step 4: Delete PDF Page
Below is the complete code in my project:
//Initialize a new instance of PdfDocument
PdfDocument document = new PdfDocument();
//Open a template PDF file
document.LoadFromFile(@"..\Report.pdf");
//Remove the second Page
document.Pages.RemoveAt(1);
//Save the PDF file to disk
document.SaveToFile("DeletePDFPage.pdf");
//Launch the PDF file
System.Diagnostics.Process.Start("DeletePDFPage.pdf ");
'Initialize a new instance of PdfDocument
Dim document As New PdfDocument()
'Open a template PDF file
document.LoadFromFile("..\Report.pdf")
'Remove the second Page
document.Pages.RemoveAt(1)
'Save the PDF file to disk
document.SaveToFile("DeletePDFPage.pdf")
'Launch the PDF file
System.Diagnostics.Process.Start("DeletePDFPage.pdf ")
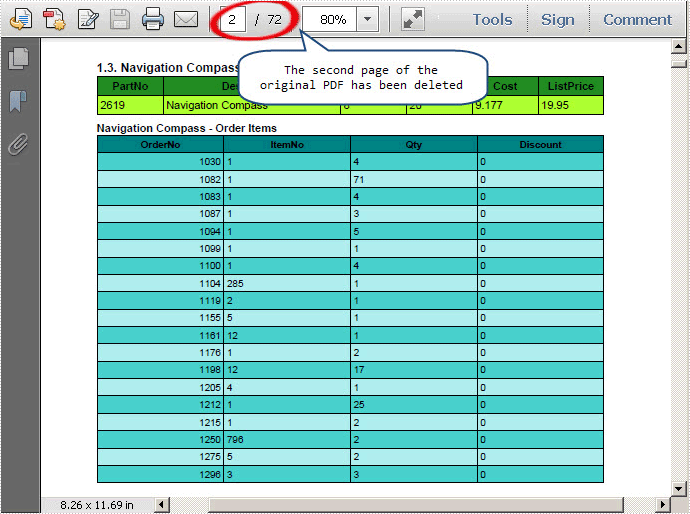
Output PDF File
After executing above code, the second page of the template PDF file has been deleted, and there are only 72 pages in the target PDF file, we can see here:
In this section, I have expounded the solution on how to delete PDF page in WPF application. I wish it can help you and give you some insight on your development.
Spire.PDF for WPF is a PDF component which is designed to meet customers’ requirements on programming with high efficiency and reliability.
We welcome any kind of queries, comments and advices at E-iceblue Forum. Our professionals will be there to give prompt reply.
Watch this quick demo video to see how multiple Word documents can be merged into one file using C# and VB.NET.
Long papers or research reports are often completed collaboratively by multiple people. To save time, each person can work on their assigned parts in separate documents and then merge these documents into one after finish editing. Apart from manually copying and pasting content from one Word document to another, this article will demonstrate the following two ways to merge Word documents programmatically using Spire.Doc for .NET .
Install Spire.Doc for .NET
To begin with, you need to add the DLL files included in the Spire.Doc for.NET package as references in your .NET project. The DLL files can be either downloaded from this link or installed via NuGet.
PM> Install-Package Spire.Doc
Merge Documents by Inserting the Entire File
The Document.InsertTextFromFile() method provided by Spire.Doc for .NET allows merging Word documents by inserting other documents entirely into a document. Using this method, the contents of the inserted document will start from a new page. The detailed steps are as follows:
- Create a Document instance.
- Load the original Word document using Document.LoadFromFile() method.
- Insert another Word document entirely to the original document using Document.InsertTextFromFile() method.
- Save the result document using Document.SaveToFile() method.
- C#
- VB.NET
using Spire.Doc;

namespace MergeWord
{
    class Program
    {
        static void Main(string[] args)
        {
            //Create a Document instance
            Document document = new Document();

            //Load the original Word document
            document.LoadFromFile("Doc1.docx", FileFormat.Docx);

            //Insert another Word document entirely to the original document
            document.InsertTextFromFile("Doc2.docx", FileFormat.Docx);

            //Save the result document
            document.SaveToFile("MergedWord.docx", FileFormat.Docx);
        }
    }
}
Merge Documents by Cloning Contents
If you want to merge documents without starting a new page, you can clone the contents of other documents to add to the end of the original document. The detailed steps are as follows:
- Load two Word documents.
- Loop through the second document to get all the sections using Document.Sections property, and then loop through all the sections to get their child objects using Section.Body.ChildObjects property.
- Get the last section of the first document using Document.LastSection property, and then add the child objects to the last section of the first document using LastSection.Body.ChildObjects.Add() method.
- Save the result document using Document.SaveToFile() method.
- C#
- VB.NET
using Spire.Doc;

namespace MergeWord
{
    class Program
    {
        static void Main(string[] args)
        {
            //Load two Word documents
            Document doc1 = new Document("Doc1.docx");
            Document doc2 = new Document("Doc2.docx");

            //Loop through the second document to get all the sections
            foreach (Section section in doc2.Sections)
            {

                //Loop through the sections of the second document to get their child objects
                foreach (DocumentObject obj in section.Body.ChildObjects)
                {

                    // Get the last section of the first document
                     Section lastSection = doc1.LastSection;

                    //Add all child objects to the last section of the first document
                    lastSection.Body.ChildObjects.Add(obj.Clone());
                }
            }

            // Save the result document
            doc1.SaveToFile("MergeDocuments.docx", FileFormat.Docx);
        }
    }
}
Apply for a Temporary License
If you'd like to remove the evaluation message from the generated documents, or to get rid of the function limitations, please request a 30-day trial license for yourself.
Extract Comments from Word Document and Save in TXT File in C#, VB.NET
2013-02-18 07:33:05 Written by KoohjiWord comments can be reviews or thoughts about part of contents or explanations or references of specified phrase, sentence or paragraph given by author. Also, the existing comments can be extracted from document and solution in this guide demonstrates how to extract Word comments and save to TXT file in C# and Visual Basic via Spire.Doc for .NET.
Spire.Doc for .NET, one easy-to-use .NET Word component to preform Word tasks, provides a Comment class to enable users to get comments in Word and paragraphs of comment body. The screenshot below shows the original documents with two comments.

Download and install Spire.Doc for .NET and follow the steps to extract Word comments. Firstly, initialize a StringBuilder instance to save extracted comments. Secondly, use a foreach statement to get all comments in Word and use another foreach statement to get each paragraph of body of each comment. Then, invoke StringBuilder.AppendLine method to append a copy of comment string followed by default line terminator to the end of the current StringBuilder object. The parameter passed to this method is string value which is comment paragraph text. Thirdly, invoke File.WrtieAllText method to create a new TXT file with comments text as contents. The parameters passed to this method are string path and string contents. Code as following:
using System.Text;
using System.IO;
using Spire.Doc;
using Spire.Doc.Documents;
using Spire.Doc.Fields;

namespace ExtractComments
{
    class Program
    {
        static void Main(string[] args)
        {
            //Load Document
            Document doc = new Document();
            doc.LoadFromFile(@"E:\Work\Document\A GOOD MAN IS HARD TO FIND.docx");

            //Extract Comment
            StringBuilder SB = new StringBuilder();

            foreach(Comment comment in doc.Comments)
            {
                foreach (Paragraph p in comment.Body.Paragraphs)
                {
                    SB.AppendLine(p.Text);
                }
            }

            //Save to TXT File
            File.WriteAllText("CommentExtraction.txt", SB.ToString());
            System.Diagnostics.Process.Start("CommentExtraction.txt");
        }
    }
}
Imports System.Text
Imports System.IO
Imports Spire.Doc
Imports Spire.Doc.Documents
Imports Spire.Doc.Fields

Namespace ExtractComments
    Friend Class Program
        Shared Sub Main(ByVal args() As String)
            'Load Document
            Dim doc As New Document()
            doc.LoadFromFile("E:\Work\Document\A GOOD MAN IS HARD TO FIND.docx")

            'Extract Comment
            Dim SB As New StringBuilder()

            For Each comment As Comment In doc.Comments
                For Each p As Paragraph In comment.Body.Paragraphs
                    SB.AppendLine(p.Text)
                Next p
            Next comment

            'Save to TXT File
            File.WriteAllText("CommentExtraction.txt", SB.ToString())
            System.Diagnostics.Process.Start("CommentExtraction.txt")
        End Sub
    End Class
End Namespace
After debugging, the following result will be presented:

Spire.Doc, a professional Word component, enables developers/programmers to operate Word document, for example, generating, opening, saving and modifying on .NET, WPF and Silverlight applications
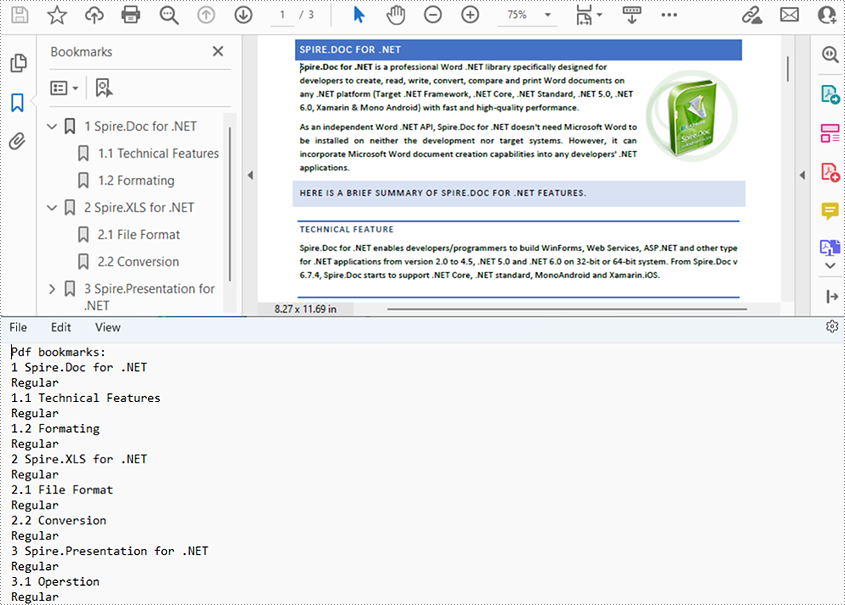
Bookmark is a helpful feature of PDF, especially for PDF documents with lots of pages. By clicking on a bookmark, the reader can jump to the corresponding location of the document quickly. A series of organized bookmarks can be used as contents as well. This article demonstrates how to get bookmarks from PDF documents using Spire.PDF for .NET.
Install Spire.PDF for .NET
To begin with, you need to add the DLL files included in the Spire.PDF for.NET package as references in your .NET project. The DLL files can be either downloaded from this link or installed via NuGet.
PM> Install-Package Spire.PDF
Get the Bookmarks of a PDF Document
The detailed steps are as follows:
- Create a PdfDocument instance.
- Load a PDF document from disk using PdfDocument.LoadFromFile() method.
- Get bookmarks collection in the PDF document using PdfDocument.Bookmarks property.
- Get the bookmarks’ content and save to a TXT file using custom method GetBookmarks().
- C#
- VB.NET
using System;
using System.IO;
using System.Text;
using Spire.Pdf;
using Spire.Pdf.Bookmarks;

namespace GetBookmark
{
    internal class Program
    {
        static void Main(string[] args)
        {
            //Create a PdfDocument instance
            PdfDocument pdf = new PdfDocument();

            //Load a PDF document from disk
            pdf.LoadFromFile(@"D:\testp\test.pdf");

            //Get bookmark collection of the Pdf document
            PdfBookmarkCollection bookmarks = pdf.Bookmarks;

            //Get the bookmarks and save them to a TXT file
            String result = "GetPdfBookmarks.txt";
            GetBookmarks(bookmarks, result);

        }

        public static void GetBookmarks(PdfBookmarkCollection bookmarks, string result)
        {
            //Create an object of StringBuilder
            StringBuilder content = new StringBuilder();

            //Get PDF bookmarks’ information
            if (bookmarks.Count > 0)
            {
                content.AppendLine("Pdf bookmarks:");
                foreach (PdfBookmark parentBookmark in bookmarks)
                {
                    //Get the title
                    content.AppendLine(parentBookmark.Title);

                    //Get the text style
                    string textStyle = parentBookmark.DisplayStyle.ToString();
                    content.AppendLine(textStyle);
                    GetChildBookmark(parentBookmark, content);
                }
            }

            //Save to a TXT file
            File.WriteAllText(result, content.ToString());
        }
        public static void GetChildBookmark(PdfBookmark parentBookmark, StringBuilder content)
        {
            if (parentBookmark.Count > 0)
            {
                foreach (PdfBookmark childBookmark in parentBookmark)
                {
                    //Get the title
                    content.AppendLine(childBookmark.Title);

                    //Get the text style
                    string textStyle = childBookmark.DisplayStyle.ToString();
                    content.AppendLine(textStyle);
                    GetChildBookmark(childBookmark, content);
                }
            }

        }
    }
}
Apply for a Temporary License
If you'd like to remove the evaluation message from the generated documents, or to get rid of the function limitations, please request a 30-day trial license for yourself.
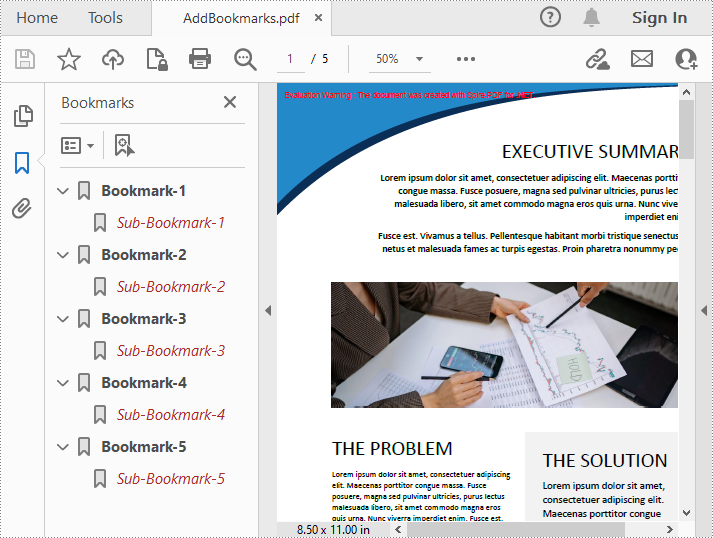
PDF bookmarks are navigational aids that allow users to quickly locate and jump to specific sections or pages in a PDF document. Through a simple click, users can arrive at the target location, which eliminates the need to manually scroll or search for specific content in a lengthy document. In this article, you will learn how to programmatically add, modify and remove bookmarks in PDF using Spire.PDF for .NET.
- Add Bookmarks to a PDF Document
- Edit Bookmarks in a PDF Document
- Delete Bookmarks from a PDF Document
Install Spire.PDF for .NET
To begin with, you need to add the DLL files included in the Spire.PDF for.NET package as references in your .NET project. The DLL files can be either downloaded from this link or installed via NuGet.
PM> Install-Package Spire.PDF
Add Bookmarks to a PDF Document in C# and VB.NET
Spire.PDF for .NET provides the PdfDocument.Bookmarks.Add() method to add bookmarks to a PDF document. After a bookmark is created, you can also use the PdfBookmark.Add() method to add sub-bookmarks for it. The following are the detailed steps.
- Create a PdfDocument object.
- Load a sample PDF file using PdfDocument.LoadFromFile() method.
- Loop through all pages in the PDF file to add bookmarks and set their styles.
- Add a parent bookmark to the document using PdfDocument.Bookmarks.Add() method.
- Create a PdfDestination object and set the destination of the parent bookmark using PdfBookmark.Action property.
- Set the text color and style of the parent bookmark.
- Add a sub-bookmark to the parent bookmark using PdfBookmark.Add() method.
- Set the destination, text color, and text style of the sub-bookmark.
- Save the result document using PdfDocument.SaveToFile() method.
- C#
- VB.NET
using System.Drawing;
using Spire.Pdf;
using Spire.Pdf.Graphics;
using Spire.Pdf.Actions;
using Spire.Pdf.Bookmarks;
using Spire.Pdf.General;

namespace AddBookmark
{
    class Program
    {
        static void Main(string[] args)
        {
            //Create a PdfDocument object
            PdfDocument pdf = new PdfDocument();

            //Load a sample PDF file
            pdf.LoadFromFile("template.pdf");

            //Loop through the pages in the PDF file
            for (int i = 0; i < pdf.Pages.Count; i++)
            {
                PdfPageBase page = pdf.Pages[i];

                //Add a bookmark
                PdfBookmark bookmark = pdf.Bookmarks.Add(string.Format("Bookmark-{0}", i + 1));

                //Set the destination page and location of the bookmark
                PdfDestination destination = new PdfDestination(page, new PointF(0, 0));
                bookmark.Action = new PdfGoToAction(destination);

                //Set the text color and style of the bookmark
                bookmark.Color = new PdfRGBColor(Color.Black);
                bookmark.DisplayStyle = PdfTextStyle.Bold;

                //Add a child bookmark
                PdfBookmark childBookmark = bookmark.Add(string.Format("Sub-Bookmark-{0}", i + 1));

                //Set the destination page and location of the child bookmark
                PdfDestination childDestination = new PdfDestination(page, new PointF(0, 100));
                childBookmark.Action = new PdfGoToAction(childDestination);

                //Set the text color and style of the child bookmark
                childBookmark.Color = new PdfRGBColor(Color.Brown);
                childBookmark.DisplayStyle = PdfTextStyle.Italic;
            }

            // Save the result file
            pdf.SaveToFile("AddBookmarks.pdf");
        }
    }
}
Edit Bookmarks in a PDF Document in C# and VB.NET
If you need to update the existing bookmarks, you can use the methods of PdfBookmark class to rename the bookmarks and change their text color, text style. The following are the detailed steps.
- Create a PdfDocument object.
- Load a sample PDF file using PdfDocument.LoadFromFile() method.
- Get a specified bookmark using PdfDocument.Bookmarks[] property.
- Change the title of the bookmark using PdfBookmark.Title property.
- Change the font color of the bookmark using PdfBookmark.Color property.
- Change the text style of the bookmark using PdfBookmark.DisplayStyle property.
- Change the text color and style of the sub-bookmark using the above methods.
- Save the result document using PdfDocument.SaveToFile() method.
- C#
- VB.NET
using Spire.Pdf;
using Spire.Pdf.Bookmarks;
using System.Drawing;


namespace ModifyBookmarks
{
    class Program
    {
        static void Main(string[] args)
        {
            //Create a PdfDocument object
            PdfDocument pdf = new PdfDocument();

            //Load a sample PDF file
            pdf.LoadFromFile("AddBookmarks.Pdf");

            //Get the first bookmark
            PdfBookmark bookmark = pdf.Bookmarks[0];

            //Change the title of the bookmark
            bookmark.Title = "Modified BookMark";

            //Change text color and style of the bookmark
            bookmark.Color = Color.Red;
            bookmark.DisplayStyle = PdfTextStyle.Italic;

            //Edit sub-bookmarks of the first bookmark
            foreach (PdfBookmark childBookmark in bookmark)
            {
                childBookmark.Color = Color.Blue;
                childBookmark.DisplayStyle = PdfTextStyle.Bold;
            }

            //Save the result file
            pdf.SaveToFile("EditBookmarks.Pdf");
        }
    }
}

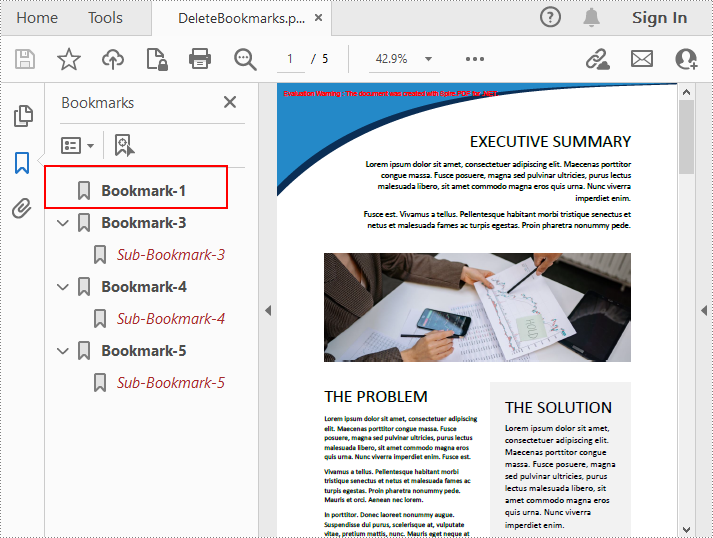
Delete Bookmarks from a PDF Document in C# and VB.NET
Spire.PDF for .NET allows to remove a specified bookmark as well as all bookmarks in a PDF file. Furthermore, removing only a specified sub-bookmark can also be achieved. The following are the detailed steps.
- Create a PdfDocument object.
- Load a sample PDF file using PdfDocument.LoadFromFile() method.
- Get the first bookmark using PdfDocument.Bookmarks[] property.
- Remove a specified sub-bookmark of the first bookmark using PdfBookmark.RemoveAt() method.
- Remove a specified bookmark including its sub-bookmarks using PdfDocument.Bookmarks.RemoveAt() method. Or you can remove all bookmarks in the PDF file using PdfDocument.Bookmarks.Clear() method.
- Save the document using PdfDocument.saveToFile() method.
- C#
- VB.NET
using Spire.Pdf;
using Spire.Pdf.Bookmarks;

namespace DeleteBookmarks
{
    class Program
    {
        static void Main(string[] args)
        {
            //Create a PdfDocument object
            PdfDocument pdf = new PdfDocument();

            //Load a sample PDF file
            pdf.LoadFromFile("AddBookmarks.Pdf");

            //Get the first bookmark
            PdfBookmark bookmark = pdf.Bookmarks[0];

            //Delete the first sub-bookmark of the first bookmark
            bookmark.RemoveAt(0);

            //Delete the second bookmark including its sub-bookmarks
            pdf.Bookmarks.RemoveAt(1);

            //Delete all bookmarks
            //pdf.Bookmarks.Clear();

            //Save the result file
            pdf.SaveToFile("DeleteBookmarks.pdf");
        }
    }
}
Apply for a Temporary License
If you'd like to remove the evaluation message from the generated documents, or to get rid of the function limitations, please request a 30-day trial license for yourself.
In this section, I will introduce a solution to export Excel to datatable through a datagridview via this WPF Excel component Spire.XLS for WPF. Using it, we can quickly export any Excel sheet to datatable. First let us see below picture:

When we export Excel to datatable, first we need to initialize a new instance of the class Spire.Xls.Workbook, here it is named “workbook”, then, after loading our Excel file from system by this method: Spire.Xls.Workbook.LoadFromFile(string fileName, ExcelVersion version); we need to decide which sheet will be exported to datatable. When using Spire.XLS for WPF, we do not need to install MS Excel, so suppose we do not know how many sheets in our Excel file, we can use this class System.Random provided by Microsoft to get the page count and export any sheet to datatable by calling the method: Spire.Xls.Worksheet.ExportDataTable(). After export data to datatable, with the help of the two properties of the class System.Data.Dataview:System.Data.Dataview.AutoGenerateColumns and System.Data.Dataview.ItemsSource. The datatable columns will be automatically created and all the data in datatable will be shown in datagrid.
Here we can download Spire.XLS for WPF and install it on system. After adding Spire.Xls dll on system, we can start our task of excel to datatable by below code:
using System.Data;
using Spire.Xls;

namespace wpfexceltodatatable
{
    public partial class MainWindow : Window
    {
        public MainWindow()
        {
            InitializeComponent();
        }
        private void button1_Click(object sender, RoutedEventArgs e)
        {
          //load an excel file
            Workbook workbook = new Workbook();
            workbook.LoadFromFile(@"..\excel.xls", ExcelVersion.Version97to2003);
            //get the count of excel worksheet
            int sheetCount = workbook.Worksheets.Count;
            Random r = new Random();
            int index = r.Next(0, sheetCount);
           //show datatable in datagrid
            Worksheet sheet = workbook.Worksheets[index];
            DataTable dataTable = sheet.ExportDataTable();
            DataView view = new DataView(dataTable);
            this.dataGrid1.ItemsSource = view;
            this.dataGrid1.AutoGenerateColumns = true;
        }
    }
}
Imports System.Data
Imports Spire.Xls

Namespace wpfexceltodatatable
	Public Partial Class MainWindow
		Inherits Window
		Public Sub New()
			InitializeComponent()
		End Sub
		Private Sub button1_Click(sender As Object, e As RoutedEventArgs)
			'load an excel file
			Dim workbook As New Workbook()
			workbook.LoadFromFile("..\excel.xls", ExcelVersion.Version97to2003)
			'get the count of excel worksheet
			Dim sheetCount As Integer = workbook.Worksheets.Count
			Dim r As New Random()
			Dim index As Integer = r.[Next](0, sheetCount)
			'show datatable in datagrid
			Dim sheet As Worksheet = workbook.Worksheets(index)
			Dim dataTable As DataTable = sheet.ExportDataTable()
			Dim view As New DataView(dataTable)
			Me.dataGrid1.ItemsSource = view
			Me.dataGrid1.AutoGenerateColumns = True
		End Sub
	End Class
End Namespace
A text box is a movable, resizable container for storing text or images. In Word documents, you can insert text boxes as sidebars or to bring focus to some important text, such as headings or quotes. Occasionally, you may also need to delete some mistakenly added text boxes. In this article, you will learn how to programmatically insert or remove a text box in a Word document using Spire.Doc for .NET.
Install Spire.Doc for .NET
To begin with, you need to add the DLL files included in the Spire.Doc for .NET package as references in your .NET project. The DLLs files can be either downloaded from this link or installed via NuGet.
PM> Install-Package Spire.Doc
Insert a Text Box in a Word Document
Spire.Doc for .NET provides the Paragraph.AppendTextBox(float width, float height) method to insert a text box in a specified paragraph. After the text box is inserted, Spire.Doc for .NET also provides the TextBox class for users to format the text box by setting its properties, such as Format, Body etc. The detailed steps are as follows.
- Create a Document instance, and then load a sample Word document using Document.LoadFromFile() method.
- Get the first section using Document.Sections[] property, and then add a paragraph to the section using Section.AddParagraph() method.
- Add a text box to the paragraph using Paragraph.AppendTextBox(float width, float height) method.
- Get the format of the text box using TextBox.Format property, and then set the text box's wrapping type, position, border color and fill color using the properties of TextBoxFormat Class.
- Add a paragraph to the text box using TextBox.Body.AddParagraph() method, and then set its alignment.
- Insert an image to the paragraph using Paragraph.AppendPicture() method, and then set the size of the inserted image.
- Insert text to the text box using Paragraph.AppendText() method, and then set the text font.
- Save the document to another file using Document.SaveToFile() method.
- C#
- VB.NET
using Spire.Doc;
using Spire.Doc.Documents;
using Spire.Doc.Fields;
using System.Drawing;
namespace InsertTextbox
{
class Program
{
static void Main(string[] args)
{
//Create a Document instance
Document document = new Document();
//Load a sample Word document
document.LoadFromFile("Ralph.docx");
//Insert a textbox and set its wrapping style
TextBox TB = document.Sections[0].AddParagraph().AppendTextBox(130, 320);
TB.Format.TextWrappingStyle = TextWrappingStyle.Square;
//Set the position of the textbox
TB.Format.HorizontalOrigin = HorizontalOrigin.RightMarginArea;
TB.Format.HorizontalPosition = -100;
TB.Format.VerticalOrigin = VerticalOrigin.Page;
TB.Format.VerticalPosition = 130f;
//Set the border style and fill color of the textbox
TB.Format.LineColor = Color.DarkBlue;
TB.Format.FillColor = Color.LightCyan;
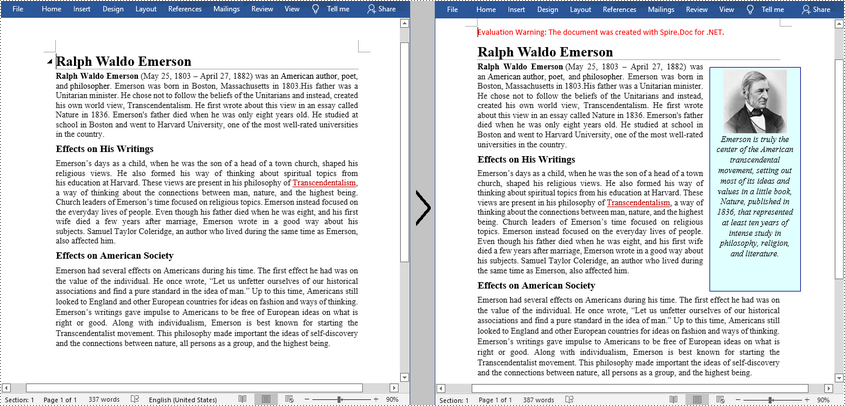
//Insert an image to textbox as a paragraph
Paragraph para = TB.Body.AddParagraph();
DocPicture picture = para.AppendPicture(@"C:\Users\Administrator\Desktop\Ralph.jpg");
//Set alignment for the paragraph
para.Format.HorizontalAlignment = HorizontalAlignment.Center;
//Set the size of the inserted image
picture.Height = 90;
picture.Width = 90;
//Insert text to textbox as the second paragraph
TextRange TR = para.AppendText("Emerson is truly the center of the American transcendental movement, "
+ "setting out most of its ideas and values in a little book, Nature, published in 1836, "
+ "that represented at least ten years of intense study in philosophy, religion, and literature.");
//Set alignment for the paragraph
para.Format.HorizontalAlignment = HorizontalAlignment.Center;
//Set the font of the text
TR.CharacterFormat.FontName = "Times New Roman";
TR.CharacterFormat.FontSize = 12;
TR.CharacterFormat.Italic = true;
//Save the result file
document.SaveToFile("AddTextBox.docx", FileFormat.Docx);
}
}
}
Remove a Text Box from a Word Document
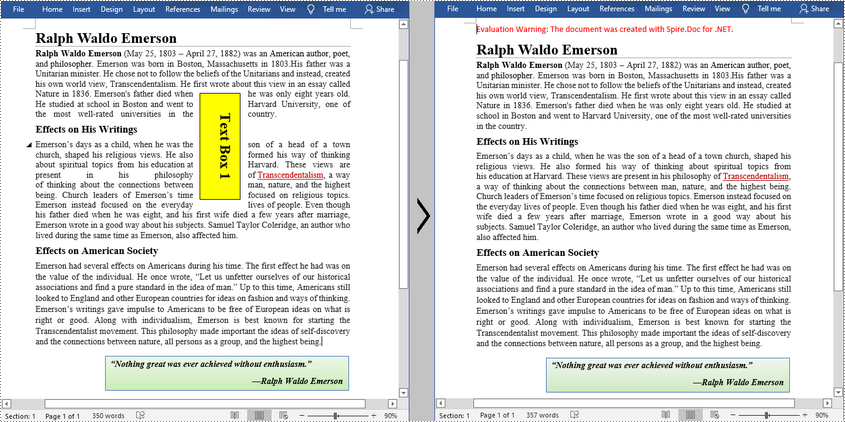
Spire.Doc for .NET provides the Document.TextBoxes.RemoveAt(int index) method to delete a specified text box. If you want to delete all text boxes from a Word document, you can use the Document.TextBoxes.Clear() method. The below example shows how to remove the first text box from a Word document.
- Create a Document instance.
- Load a sample Word document using Document.LoadFromFile() method.
- Remove the first text box using Document.TextBoxes.RemoveAt(int index) method.
- Save the document to another file using Document.SaveToFile() method.
- C#
- VB.NET
using Spire.Doc;

namespace Removetextbox
{
    class Program
    {
        static void Main(string[] args)
        {
            //Create a Document instance
            Document Doc = new Document();

            //Load a sample Word document
            Doc.LoadFromFile("TextBox.docx");

            //Remove the first text box
            Doc.TextBoxes.RemoveAt(0);

            //Remove all text boxes
            //Doc.TextBoxes.Clear();

            //Save the result document
            Doc.SaveToFile("RemoveTextbox.docx", FileFormat.Docx);
        }
    }
}
Apply for a Temporary License
If you'd like to remove the evaluation message from the generated documents, or to get rid of the function limitations, please request a 30-day trial license for yourself.
A PDF document can contain multiple pages with different text content, images, or other objects. Occasionally, users may need to delete certain pages with incorrectly drawn objects or pages that are irrelevant to the topic of the document. This article will demonstrate how to programmatically delete/remove pages from an existing PDF document using Spire.PDF for .NET.
Install Spire.PDF for .NET
To begin with, you need to add the DLL files included in the Spire.PDF for.NET package as references in your .NET project. The DLLs files can be either downloaded from this link or installed via NuGet.
PM> Install-Package Spire.PDF
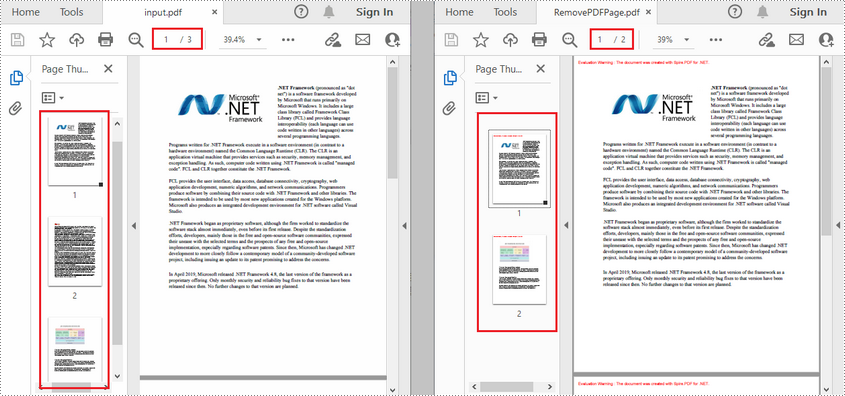
Delete/Remove Pages from PDF
- Create a PdfDocument object.
- Load a sample PDF document using PdfDocument.LoadFromFile() method.
- Get the pages in the PDF document using PdfDocument.Pages property.
- Delete a specified page by index using PdfPageCollection.RemoveAt(int index)method.
- Save the document to another file using PdfDocument.SaveToFile() method.
- C#
- VB.NET
using Spire.Pdf;

namespace RemovePage
{
    class Program
    {
        static void Main(string[] args)
        {
            //Create a PdfDocument object
            PdfDocument document = new PdfDocument();

            //Load a sample PDF document
            document.LoadFromFile(@"E:\Files\input.pdf");

            //Remove the second page
            document.Pages.RemoveAt(1);

            //Save the result document
            document.SaveToFile("RemovePDFPage.pdf");
        }
    }
}
Apply for a Temporary License
If you'd like to remove the evaluation message from the generated documents, or to get rid of the function limitations, please request a 30-day trial license for yourself.
PDF booklet is pretty helpful when people print a huge PDF document. It enjoys special popularity among book, newspaper and magazine editors. This section will introduce a very simple way to create PDF booklet via a .NET PDF component in C#, VB.NET.
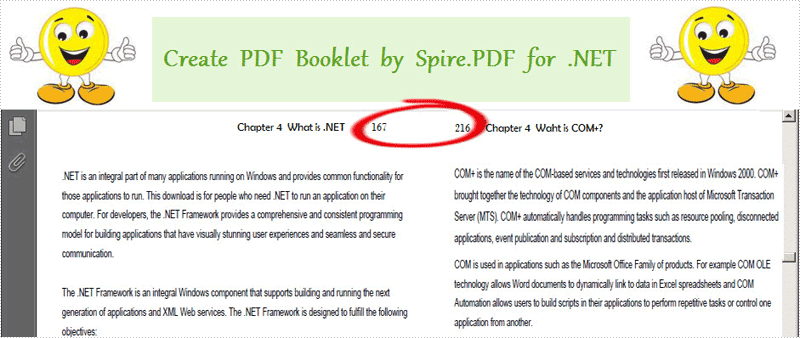
Spire.PDF for .NET is a .NET PDF library which can manipulate PDF documents without Adobe Acrobat or any third party library. Using this PDF component, you can quickly create PDF booklet in your .NET applications. After setting the PDF page width and height by a class Spire.Pdf.PdfPageSize, you can create your PDF booklet through implementing PdfDocument.CreateBooklet(string fileName, float width, float height, bool doubleSide) directly. Below picture shows the effect of this task:
Here you can quickly download Spire.PDF for .NET and install it on your system. After adding Spire.Pdf reference, please see the detail code of PDF booklet below.
Draw PDF Barcode in C#, VB.NET
using System.Drawing;
using Spire.Pdf;

namespace PDF_Booklet
{
    class Program
    {
        static void Main(string[] args)
        {
            //Load a PDF file
            PdfDocument doc = new PdfDocument();
            String srcPdf = @"..\read PDF.pdf";

            //Create PDF booklet
            float width = PdfPageSize.A4.Width * 2;
            float height = PdfPageSize.A4.Height;
            doc.CreateBooklet(srcPdf, width, height, true);

            //Save pdf file.
            doc.SaveToFile("Booklet.pdf");
            doc.Close();
            //Launching the Pdf file.
            System.Diagnostics.Process.Start("Booklet.pdf");
        }
    }
}
Imports System.Drawing
Imports Spire.Pdf

Namespace PDF_Booklet
	Class Program
		Private Shared Sub Main(args As String())
			'Load a PDF file
			Dim doc As New PdfDocument()
			Dim srcPdf As [String] = "..\read PDF.pdf"

			'Create PDF booklet
			Dim width As Single = PdfPageSize.A4.Width * 2
			Dim height As Single = PdfPageSize.A4.Height
			doc.CreateBooklet(srcPdf, width, height, True)

			'Save pdf file.
			doc.SaveToFile("Booklet.pdf")
			doc.Close()
			'Launching the Pdf file.
			System.Diagnostics.Process.Start("Booklet.pdf")
		End Sub
	End Class
End Namespace
Spire.PDF for .NET is a PDF component that enables you to create, read, edit and manipulate PDF files in C#, VB.NET
