
Knowledgebase (2370)
Children categories
Simple introduction about Word XML
Word XML is a special XML format, which makes Word be able to manipulate the Word documents stored in XML format. It can be divided into two types: WordML(supported by Word 2003) and WordXML(supported by Word 2007). If external applications support Word XML and the generated data follow the Word XML structure, then the data can be processed by Word. In this way, Word XML has become the bridge between Word and other external applications, any XML- formatted document based on Word XML structure can be opened, edited and saved in Word.
Using C#/VB.NET to convert Word to Word XML via Spire.Doc
Spire.Doc enables users to convert word document to Word XML format easily by using the doc.SaveToFile() method. Now, please follow the detail steps below:
Note: Before start, please download Spire.Doc and install it correctly, then add Spire.Doc.dll file from Bin folder as the reference of your project.
This is the screenshot of the original word document:

Step 1: Create a new document instance.
Document doc = new Document();
Step 2: Load the sample word document from file.
doc.LoadFromFile("Spire.Doc for .NET.docx");
Step 3: Save the word document as Word XML format.
For word 2003:
doc.SaveToFile("DocxToWordML.xml", FileFormat.WordML);

For word 2007:
doc.SaveToFile("DocxToWordXML.xml", FileFormat.WordXml);
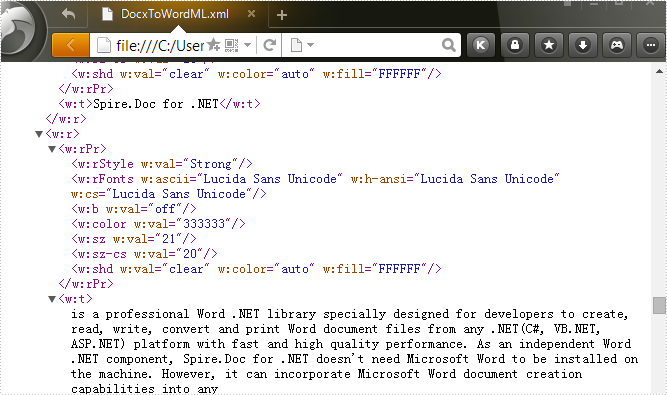
Effective screenshot:
Full codes:
using Spire.Doc;

namespace Convert_Word_to_Word_XML
{
    class Program
    {
        static void Main(string[] args)
        {
            Document doc = new Document();
            doc.LoadFromFile("Spire.Doc for .NET.docx");
            doc.SaveToFile("DocxToWordML.xml", FileFormat.WordML);
            //doc.SaveToFile("DocxToWordXML.xml", FileFormat.WordXml);
        }
    }
}
Imports Spire.Doc
Namespace Convert_Word_to_Word_XML
	Class Program
		Private Shared Sub Main(args As String())
			Dim doc As New Document()
			doc.LoadFromFile("Spire.Doc for .NET.docx")
			doc.SaveToFile("DocxToWordML.xml", FileFormat.WordML)
			'doc.SaveToFile("DocxToWordXML.xml", FileFormat.WordXml);
		End Sub
	End Class
End Namespace
After a PDF document is digitally signed with signature, the PDF has been locked to prevent changes or allow the detection of changes. In this article, we'll introduce how to detect if a signed PDF was modified using Spire.PDF.
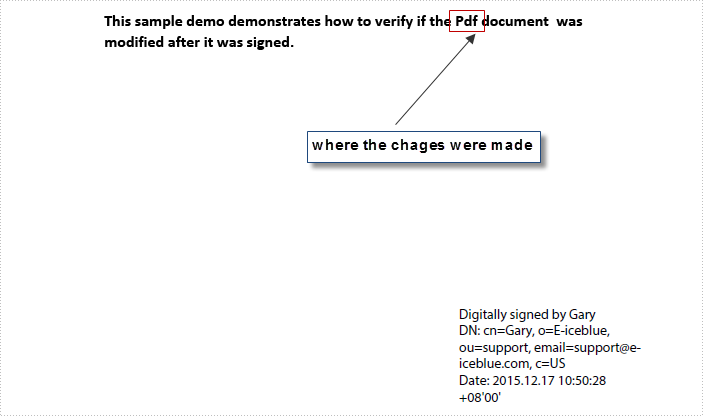
In order to test this function, we created a PDF document and signed the PDF with digital signature, then changed the word 'PDF' in the sample document into 'Pdf' and saved it as another file. Here is what the modified PDF document looking like:
Code Snippet:
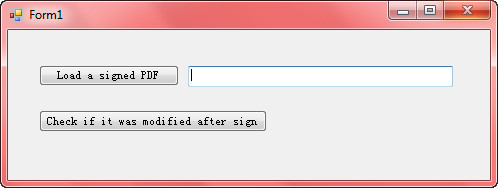
Step 1: Create a Window Forms Application and design form1 as following.
Step 2: Double click 'Load' button to write following code, which will allow us to find a PDF file from folder and return the file path in textBox1.Text.
private void btnLoad_Click(object sender, EventArgs e)
{
    OpenFileDialog fileName = new OpenFileDialog();
    fileName.InitialDirectory = Application.StartupPath;
    fileName.Filter = "All files|*.pdf";
    if (fileName.ShowDialog() == DialogResult.OK)
    {
        string Path = fileName.FileName.ToString();
        textBox1.Text = Path;
    }
}
Step 3: Enter following code to the button of 'Check'. In this part, we get all signatures in the PDF document, and then call PdfSignature.VerifyDocModified() method to detect if the document was altered after signed. If it was modified return true, otherwise false.
private void btnCheck_Click(object sender, EventArgs e)
{
    //get signatures from PDF
    List signatures = new List();
    using (PdfDocument pdf = new PdfDocument(textBox1.Text))
    {
        PdfFormWidget form = pdf.Form as PdfFormWidget;
        for (int i = 0; i < form.FieldsWidget.Count; i++)
        {
            PdfSignatureFieldWidget field = form.FieldsWidget[i] as PdfSignatureFieldWidget;
            if (field != null && field.Signature != null)
            {
                PdfSignature signature = field.Signature;
                signatures.Add(signature);
            }
        }
        PdfSignature signatureOne = signatures[0];
        //detect if the PDF was modified
        bool modified = signatureOne.VerifyDocModified();
        if (modified == true)
        {
            MessageBox.Show("The document was modified");
        }
    }
}
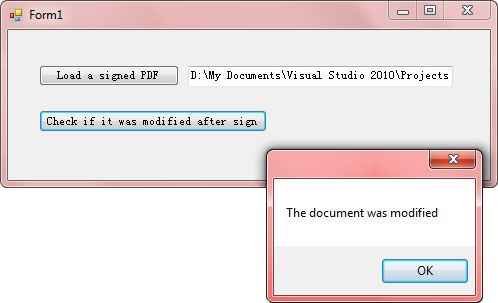
Run the program and load the modified document, you'll get following output after clicking 'Check' button.
Full Code:
private void btnLoad_Click(object sender, EventArgs e)
{
    OpenFileDialog fileName = new OpenFileDialog();
    fileName.InitialDirectory = Application.StartupPath;
    fileName.Filter = "All files|*.pdf";
    if (fileName.ShowDialog() == DialogResult.OK)
    {
        string Path = fileName.FileName.ToString();
        textBox1.Text = Path;
    }
}
private void btnCheck_Click(object sender, EventArgs e)
{
    //get signatures from PDF
    List signatures = new List();
    using (PdfDocument pdf = new PdfDocument(textBox1.Text))
    {
        PdfFormWidget form = pdf.Form as PdfFormWidget;
        for (int i = 0; i < form.FieldsWidget.Count; i++)
        {
            PdfSignatureFieldWidget field = form.FieldsWidget[i] as PdfSignatureFieldWidget;
            if (field != null && field.Signature != null)
            {
                PdfSignature signature = field.Signature;
                signatures.Add(signature);
            }
        }
        PdfSignature signatureOne = signatures[0];
        //detect if the PDF was modified
        bool modified = signatureOne.VerifyDocModified();
        if (modified == true)
        {
            MessageBox.Show("The document was modified");
        }
    }
}
The colorful excel font makes the whole excel document attractive and it is easy to give more importance to some data we'd like to show to others. With the help of Spire.XLS, developers can easily set Excel font and copy formatting from one place and apply it to another. This article will focus on demonstrating how to clone Excel font style directly when adding the new text to Excel worksheet in C#.
Note: Before Start, please ensure that you have download the latest version of Spire.XLS (V7.8.64 or above) and add Spire.xls.dll in the bin folder as the reference of Visual Studio.
Here comes to the code snippet of how to clone cell style for the text in Excel worksheets.
Step 1: Create a new excel document instance and get the first worksheet.
Workbook book = new Workbook();
Worksheet sheet = book.Worksheets[0];
Step 2: Add the text to the Excel sheet cell range A1.
sheet.Range["A1"].Text = "Text1";
Step 3: Set A1 cell range's CellStyle.
CellStyle style = book.Styles.Add("style");
style.Font.FontName = "Calibri";
style.Font.Color = Color.Red;
style.Font.Size = 12;
style.Font.IsBold = true;
style.Font.IsItalic = true;
sheet.Range["A1"].CellStyleName = style.Name
Step 4: Use the method style.clone() to clone the same style for B2 cell range.
CellStyle csOrieign = style.clone();
sheet.Range["B2"].Text = "Text2";
sheet.Range["B2"].CellStyleName = csOrieign.Name;
Step 5: Clone the same style for C3 cell range and then reset the font color for the text.
CellStyle csGreen = style.clone();
csGreen.Font.Color = Color.Green;
sheet.Range["C3"].Text = "Text3";
sheet.Range["C3"].CellStyleName = csGreen.Name;
Step 6: Save the document to file and set the excel version.
book.SaveToFile("sample2.xlsx", ExcelVersion.Version2010);
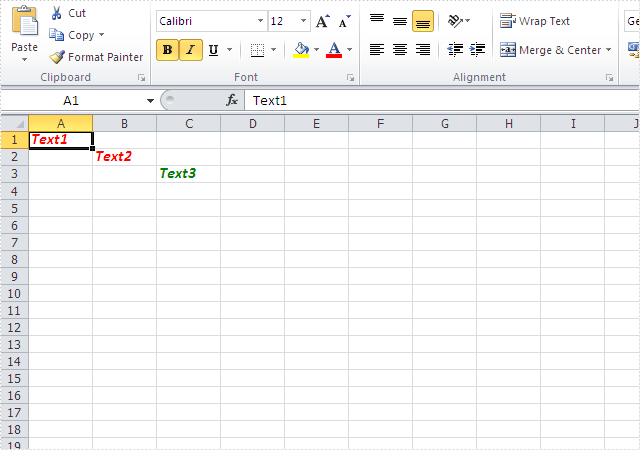
Effective screenshots:
Full codes:
using Spire.Xls;
using System.Drawing;
namespace CloneExcelFont
{
    class Program
    {
        static void Main(string[] args)
        {
            Workbook book = new Workbook();
            Worksheet sheet = book.Worksheets[0];

            sheet.Range["A1"].Text = "Text1";
            CellStyle style = book.Styles.Add("style");

            style.Font.FontName = "Calibri";
            style.Font.Color = Color.Red;
            style.Font.Size = 12;
            style.Font.IsBold = true;
            style.Font.IsItalic = true;
            sheet.Range["A1"].CellStyleName = style.Name;

            CellStyle csOrieign = style.clone();
            sheet.Range["B2"].Text = "Text2";
            sheet.Range["B2"].CellStyleName = csOrieign.Name;

            CellStyle csGreen = style.clone();
            csGreen.Font.Color = Color.Green;
            sheet.Range["C3"].Text = "Text3";
            sheet.Range["C3"].CellStyleName = csGreen.Name;

            book.SaveToFile("sample2.xlsx", ExcelVersion.Version2010);

        }
    }
}
