
Knowledgebase (2370)
Children categories
Spire.PDFViewer is a powerful and independent ASP.NET library, by which users can easily achieve functions such as load and view pdf files on website, switch to target page, fit page, page down/up, zoom in/out pdf files etc.
Then how to use Spire.PDFViewer for ASP.NET? This article will introduce the usage of Spire.PDFViewer for ASP.NET to you.
Before start, please download Spire.PDFViewer for ASP.NET and install it on your system.
Detail steps overview:
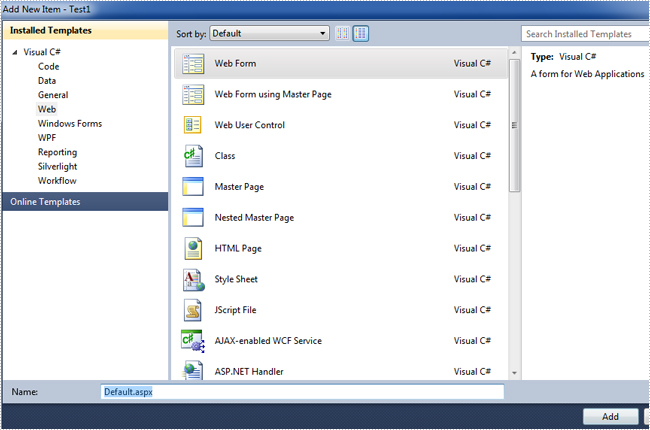
Step 1: Create a new ASP.NET Empty Web Application in Visual Studio.

Add a new web Form to Test1.

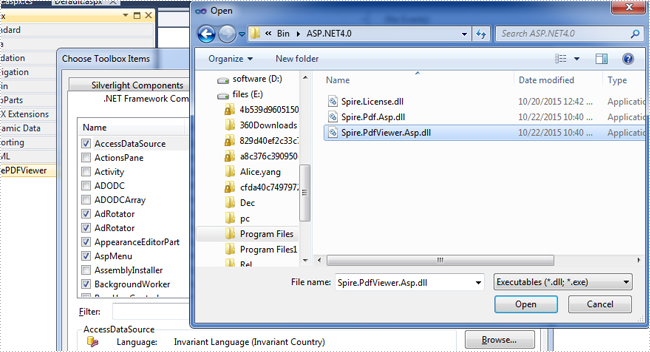
Then add the .dll files from the bin folder as the references of Test1.
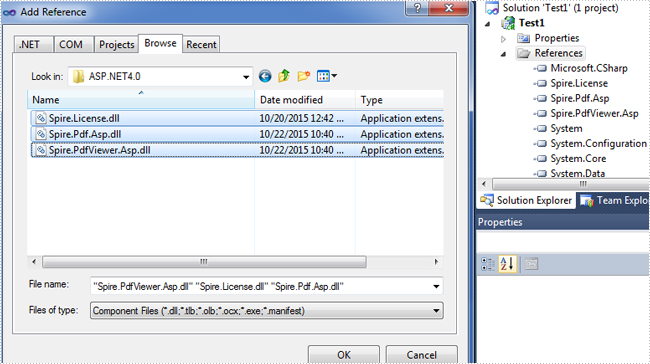
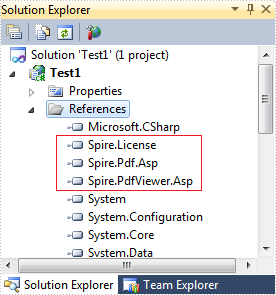
Now the three .dll files have been added into the References.
Step 2: Add the PDFViewer control and the PDFDocumentViewer control into toolbox.
First, right-click toolbox, select add tab to add a new tab named SpirePDFViewer.
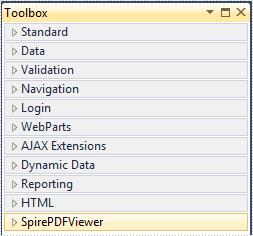
Second, add the PDFViewer control and the PDFDocumentViewer control into SpirePDFViewer.
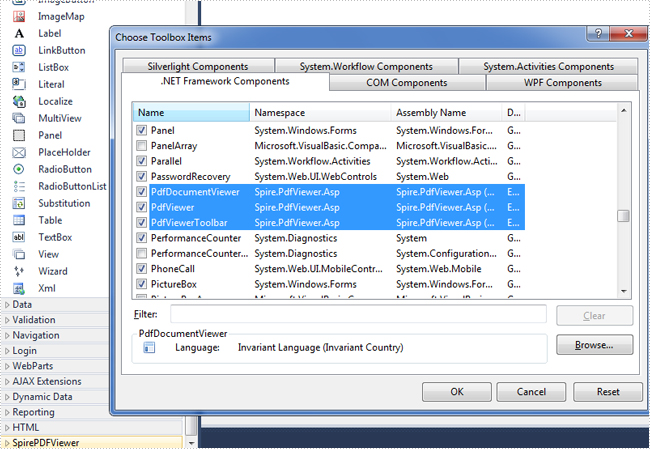
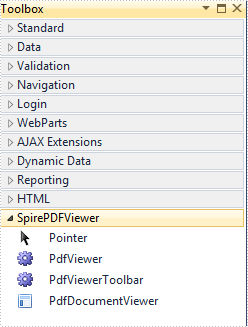
Now all of the controls have been added into SpirePDFViewer.
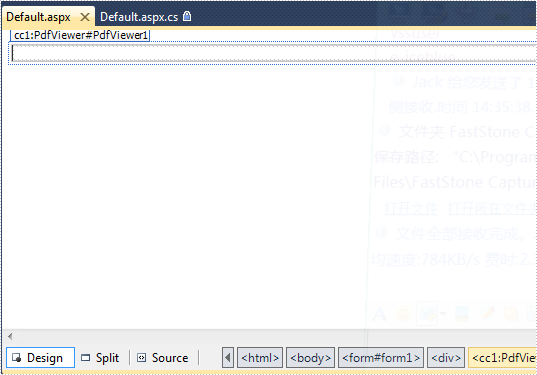
Step 3: Right-click Default.aspx, select view designer, and then drag the PDFViewer control from toolbox into Deafault.aspx.
Step 4: Double-click Default.aspx.cs, add the code below to load a PDF file, Note that you have to add the following if statement and !IsPostBack property before loading the pdf file.
protected void Page_Load(object sender, EventArgs e)
        {
            if (!IsPostBack)
            {
                //load the sample PDF file
                this.pdfViewer1.CacheInterval = 1000;
                this.pdfViewer1.CacheTime = 1200;
                this.pdfViewer1.CacheNumberImage = 1000;
                this.pdfViewer1.ScrollInterval = 300;
                this.pdfViewer1.ZoomFactor = 1f;
                this.pdfViewer1.CustomErrorMessages = "";
                this.pdfViewer1.LoadFromFile("PDF file/Test.pdf");
            }
        }
Effect screenshot:

Footnotes are notes placed at the bottom of a page. In MS Word, you can use footnotes to cite references, give explanations, or make comments without affecting the main text. In this article, you will learn how to insert or delete footnotes in a Word document using Spire.Doc for .NET.
- Insert a Footnote after a Specific Paragraph in Word in C# and VB.NET
- Insert a Footnote after a Specific Text in Word in C# and VB.NET
- Remove Footnotes in a Word Document in C# and VB.NET
Install Spire.Doc for .NET
To begin with, you need to add the DLL files included in the Spire.Doc for.NET package as references in your .NET project. The DLL files can be either downloaded from this link or installed via NuGet.
PM> Install-Package Spire.Doc
Insert a Footnote after a Specific Paragraph in Word in C# and VB.NET
The Paragraph.AppendFootnote(FootnoteType.Footnote) method provided by Spire.Doc for .NET allows you to insert a footnote after a specified paragraph. The following are the detailed steps.
- Create a Document instance
- Load a sample Word document using Document.LoadFromFile() method.
- Get the first section and then get a specified paragraph in the section.
- Add a footnote at the end of the paragraph using Paragraph.AppendFootnote(FootnoteType.Footnote) method.
- Set the text content, font and color of the footnote, and then set the format of the footnote superscript number.
- Save the result document using Document.SaveToFile() method.
- C#
- VB.NET
using Spire.Doc;
using Spire.Doc.Documents;
using Spire.Doc.Fields;
using System.Drawing;
namespace AddFootnote
{
class Program
{
static void Main(string[] args)
{
//Create a Document instance
Document document = new Document();
//Load a sample Word document
document.LoadFromFile("Sample.docx");
//Get the first section
Section section = document.Sections[0];
//Get a specified paragraph in the section
Paragraph paragraph = section.Paragraphs[3];
//Add a footnote at the end of the paragraph
Footnote footnote = paragraph.AppendFootnote(FootnoteType.Footnote);
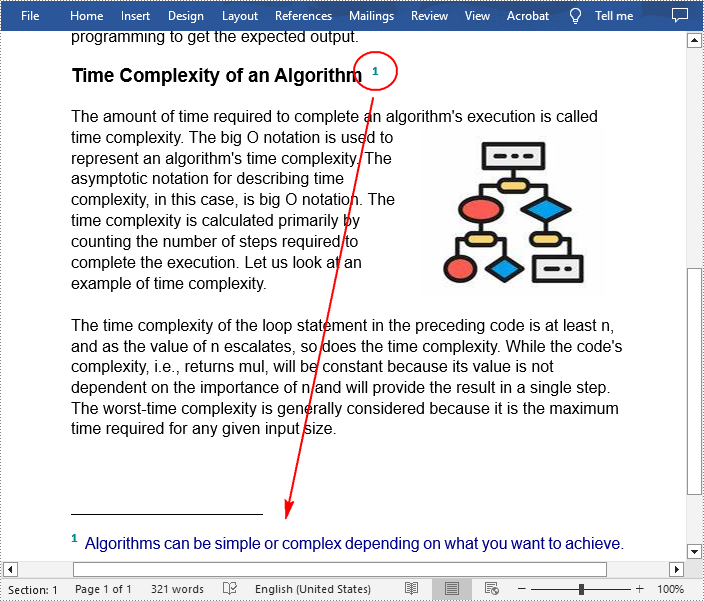
//Set the text content of the footnote
TextRange text = footnote.TextBody.AddParagraph().AppendText("Algorithms can be simple or complex depending on what you want to achieve.");
//Set the text font and color
text.CharacterFormat.FontName = "Arial";
text.CharacterFormat.FontSize = 12;
text.CharacterFormat.TextColor = Color.DarkBlue;
//Set the format of the footnote superscript number
footnote.MarkerCharacterFormat.FontName = "Calibri";
footnote.MarkerCharacterFormat.FontSize = 15;
footnote.MarkerCharacterFormat.Bold = true;
footnote.MarkerCharacterFormat.TextColor = Color.DarkCyan;
//Save the result document
document.SaveToFile("AddFootnote.docx", FileFormat.Docx);
}
}
}
Insert a Footnote after a Specific Text in Word in C# and VB.NET
With Spire.Doc for .NET, a footnote can also be inserted after a specified text located anywhere in the document. The following are the detailed steps.
- Create a Document instance.
- Load a Word document using Document.LoadFromFile() method.
- Find a specified text using Document.FindString() method.
- Get the text range of the specified text using TextSelection.GetAsOneRange() method.
- Get the paragraph where the text range is located using TextRange.OwnerParagraph property.
- Get the position index of the text range in the paragraph using Paragraph.ChildObjects.IndexOf() method.
- Add a footnote using Paragraph.AppendFootnote(FootnoteType.Footnote) method, and then insert the footnote after the specified text using Paragraph.ChildObjects.Insert() method
- Set the text content, font and color of the footnote, and then set the format of the footnote superscript number.
- Save the result document using Document.SaveToFile() method.
- C#
- VB.NET
using Spire.Doc;
using Spire.Doc.Documents;
using Spire.Doc.Fields;
using System.Drawing;
namespace InsertFootnote
{
class Program
{
static void Main(string[] args)
{
//Create a Document instance
Document document = new Document();
//Load a sample Word document
document.LoadFromFile("Sample.docx");
//Find a specified text string
TextSelection selection = document.FindString("big O notation", false, true);
//Get the text range of the specified text
TextRange textRange = selection.GetAsOneRange();
//Get the paragraph where the text range is located
Paragraph paragraph = textRange.OwnerParagraph;
//Get the position index of the text range in the paragraph
int index = paragraph.ChildObjects.IndexOf(textRange);
//Add a footnote
Footnote footnote = paragraph.AppendFootnote(FootnoteType.Footnote);
//Insert the footnote after the specified paragraph
paragraph.ChildObjects.Insert(index + 1, footnote);
//Set the text content of the footnote
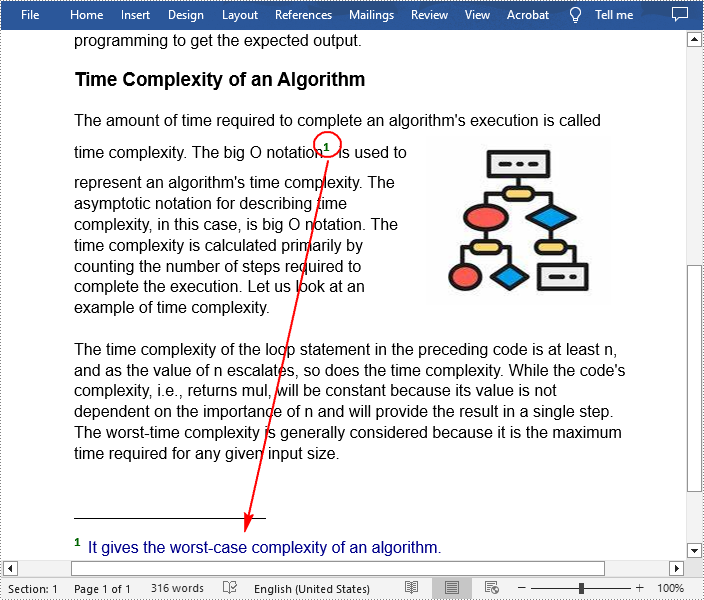
TextRange text = footnote.TextBody.AddParagraph().AppendText("It gives the worst-case complexity of an algorithm.");
//Set the text font and color
text.CharacterFormat.FontName = "Arial";
text.CharacterFormat.FontSize = 12;
text.CharacterFormat.TextColor = Color.DarkBlue;
//Set the format of the footnote superscript number
footnote.MarkerCharacterFormat.FontName = "Calibri";
footnote.MarkerCharacterFormat.FontSize = 15;
footnote.MarkerCharacterFormat.Bold = true;
footnote.MarkerCharacterFormat.TextColor = Color.DarkGreen;
//Save the result document
document.SaveToFile("InsertFootnote.docx", FileFormat.Docx);
}
}
}
Remove Footnotes in a Word Document in C# and VB.NET
It takes time and effort to search and delete the existing footnotes in your document manually. The following are the steps to remove all footnotes at once programmatically.
- Create a Document instance.
- Load a Word document using Document.LoadFromFile() method.
- Get a specified section using Document.Sections property.
- Traverse through each paragraph in the section to find the footnote.
- Remove the footnote using Paragraph.ChildObjects.RemoveAt() method.
- Save the result document using Document.SaveToFile() method.
- C#
- VB.NET
using Spire.Doc;
using Spire.Doc.Documents;
using Spire.Doc.Fields;
namespace RemoveFootnote
{
class Program
{
static void Main(string[] args)
{
//Create a Document instance
Document document = new Document();
//Load a sample Word document
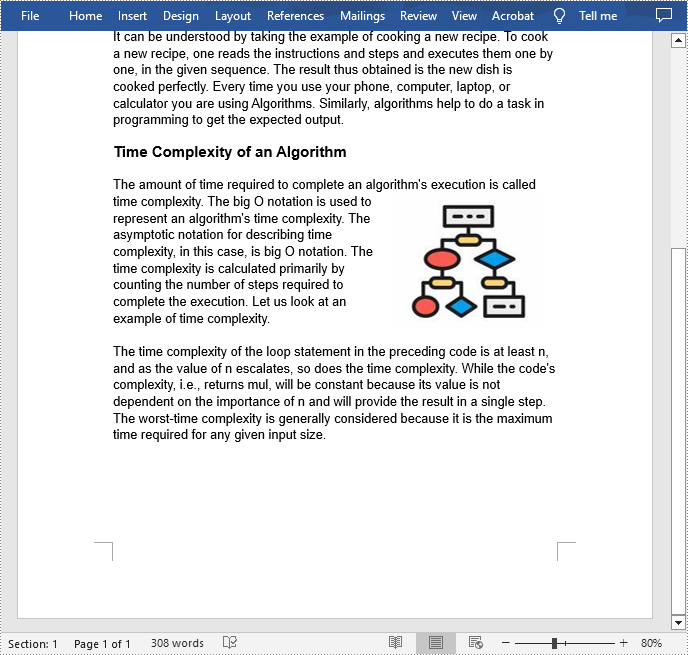
document.LoadFromFile("AddFootnote.docx");
//Get the first section
Section section = document.Sections[0];
//Traverse through each paragraph in the section to find the footnote
foreach (Paragraph para in section.Paragraphs)
{
int index = -1;
for (int i = 0, cnt = para.ChildObjects.Count; i < cnt; i++)
{
ParagraphBase pBase = para.ChildObjects[i] as ParagraphBase;
if (pBase is Footnote)
{
index = i;
break;
}
}
if (index > -1)
//Remove the footnote
para.ChildObjects.RemoveAt(index);
}
//Save the result document
document.SaveToFile("RemoveFootnote.docx", FileFormat.Docx);
}
}
}
Apply for a Temporary License
If you'd like to remove the evaluation message from the generated documents, or to get rid of the function limitations, please request a 30-day trial license for yourself.
When you create several Word documents that are closely related, you may want the header or footer of one document to be used as the header or footer of other documents. For example, you're creating internal documents with your company logo or name or other material been placed in header, you only have to create the header once and copy the header to other places.
In this article, I'll introduce you a simple and efficient solution to copy the entire header (including text and graphic) from one Word document and insert it to another.
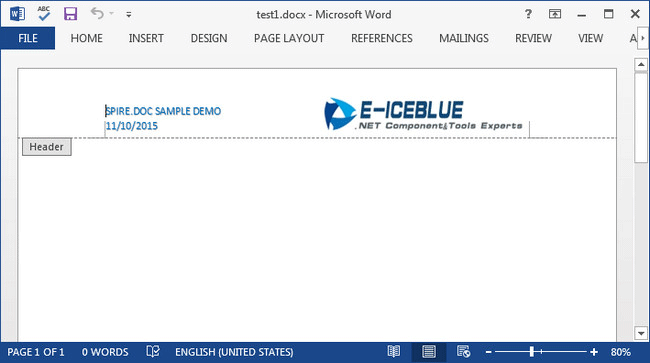
Source Document:
Detail Steps:
Step 1: Create a new instance of Document class and load the source file.
Document doc1 = new Document();
doc1.LoadFromFile("test1.docx");
Step 2: Get the header section from the source document.
HeaderFooter header = doc1.Sections[0].HeadersFooters.Header;
Step 3: Initialize a new instance of Document and load another file that you want to insert header.
Document doc2 = new Document("test2.docx");
Step 4: Call DocuentObject.Clone() method to copy each object in the header of source file, then call DocumentObjectCollection.Add() method to insert copied object into the header of destination file.
foreach (Section section in doc2.Sections)
{
    foreach (DocumentObject obj in header.ChildObjects)
    {
        section.HeadersFooters.Header.ChildObjects.Add(obj.Clone());
    }
}
Step 5: Save the changes and launch the file.
doc2.SaveToFile("test2.docx", FileFormat.Docx2013);
System.Diagnostics.Process.Start("test2.docx");
Destination Document:

Full Code:
Document doc1 = new Document();
doc1.LoadFromFile("test1.docx");
HeaderFooter header = doc1.Sections[0].HeadersFooters.Header;
Document doc2 = new Document("test2.docx");
foreach (Section section in doc2.Sections)
{
    foreach (DocumentObject obj in header.ChildObjects)
    {
        section.HeadersFooters.Header.ChildObjects.Add(obj.Clone());
    }
}
doc2.SaveToFile("test2.docx", FileFormat.Docx2013);
System.Diagnostics.Process.Start("test2.docx");
Dim doc1 As New Document()
doc1.LoadFromFile("test1.docx")
Dim header As HeaderFooter = doc1.Sections(0).HeadersFooters.Header
Dim doc2 As New Document("test2.docx")
For Each section As Section In doc2.Sections
	For Each obj As DocumentObject In header.ChildObjects
		section.HeadersFooters.Header.ChildObjects.Add(obj.Clone())
	Next
Next
doc2.SaveToFile("test2.docx", FileFormat.Docx2013)
System.Diagnostics.Process.Start("test2.docx")
