
Knowledgebase (2416)
Children categories
Group or Ungroup Rows and Columns in Excel with JavaScript in React
2026-09-04 08:50:04 Written by jie zouIn everyday Excel spreadsheet handling, grouping rows or columns lets you collapse detail data and show only summary information, making large tables cleaner and easier to read. Spire.XLS for JavaScript performs grouping and ungrouping directly in the browser based on WebAssembly, and manages input/output files through a virtual file system (VFS), with no backend service required.
This article covers two core features:
For installation and project configuration, refer to Integrate Spire.XLS for JavaScript in a React Project. The examples below assume Spire.XLS is installed and the WebAssembly module is initialized.
Group Rows or Columns
After grouping rows or columns, you can collapse the detail data inside a group and keep only the summary rows or columns you need, making the worksheet tidier. Spire.XLS for JavaScript groups rows with the GroupByRows() method and columns with the GroupByColumns() method. The main steps are as follows:
- Create a
Workbookobject and use theLoadFromFile()method to load the Excel document. - Use the
Workbook.Worksheets.get()method to get a specific worksheet. - Use the
Worksheet.GroupByRows()method to group rows. - Use the
Worksheet.GroupByColumns()method to group columns. - Use the
Workbook.SaveToFile()method to save the document to a specified path.
Here is a complete code example showing how to group rows or columns in React:
function App() {
  const groupRowsAndColumns = async () => {
    // Get the Spire.XLS WASM module
    const xlsModule = window.wasmModule?.spirexls;

    // Check whether the module is ready
    if (!xlsModule) {
      alert('Spire.Xls is not ready yet');
      return;
    }

    // Load the font and Excel file into the VFS
    await window.spire.FetchFileToVFS('ARIAL.TTF', '/Library/Fonts/', `${process.env.PUBLIC_URL}/font/`);
    const inputFileName = 'GroupRowsAndColumns.xlsx';
    await window.spire.FetchFileToVFS(inputFileName, '', `${process.env.PUBLIC_URL}data/`);

    // Load the workbook
    const workbook = new xlsModule.Workbook();
    workbook.LoadFromFile({ fileName: inputFileName });

    // Get the first worksheet
    const sheet = workbook.Worksheets.get(0);

    // Group rows
    sheet.GroupByRows(6, 10, false);
    sheet.GroupByRows(14, 16, false);

    // Group columns
    sheet.GroupByColumns(2, 7, false);

    // Save the document
    const outputFileName = 'GroupRowsAndColumns_output.xlsx';
    workbook.SaveToFile({ fileName: outputFileName, version: xlsModule.ExcelVersion.Version2010 });

    // Release resources
    workbook.Dispose();

    // Read the converted file from the VFS and trigger a download
    const fileArray = window.dotnetRuntime.Module.FS.readFile(outputFileName);
    const blob = new Blob([fileArray], { type: 'application/vnd.openxmlformats-officedocument.spreadsheetml.sheet' });
    const url = URL.createObjectURL(blob);
    const a = document.createElement('a');
    a.href = url;
    a.download = outputFileName;
    a.click();
    URL.revokeObjectURL(url);
  };

  return (
    <div style={{ textAlign: 'center', height: '300px' }}>
      <h1>Group Rows And Columns</h1>
      <button onClick={groupRowsAndColumns}>
        Start
      </button>
    </div>
  );
}

export default App;
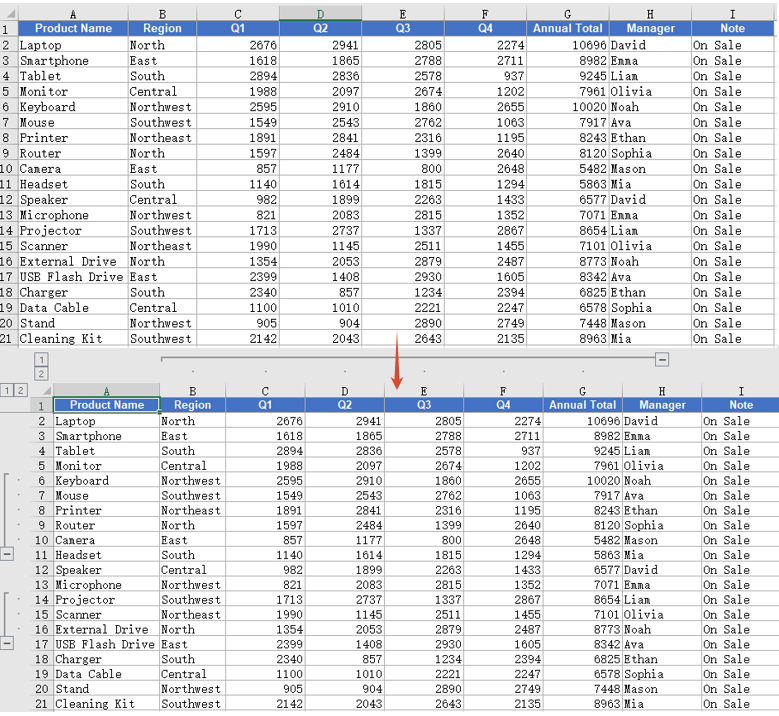
After grouping, group markers appear on the left side of the grouped rows or above the grouped columns. Click a marker to collapse or expand the detail data.
Ungroup Rows or Columns
When the grouping structure is no longer needed, you can ungroup the existing groups so that all rows and columns return to their normal display. Spire.XLS for JavaScript ungroups rows with the UngroupByRows() method and columns with the UngroupByColumns() method. The main steps are as follows:
- Create a
Workbookobject and use theLoadFromFile()method to load the Excel document that contains groups. - Use the
Workbook.Worksheets.get()method to get a specific worksheet. - Use the
Worksheet.UngroupByRows()method to ungroup rows. - Use the
Worksheet.UngroupByColumns()method to ungroup columns. - Use the
Workbook.SaveToFile()method to save the document to a specified path.
Here is a complete code example showing how to ungroup rows or columns in React:
function App() {
  const ungroupRowsAndColumns = async () => {
    // Get the Spire.XLS WASM module
    const xlsModule = window.wasmModule?.spirexls;

    // Check whether the module is ready
    if (!xlsModule) {
      alert('Spire.Xls is not ready yet');
      return;
    }

    // Load the font and Excel file into the VFS
    await window.spire.FetchFileToVFS('ARIAL.TTF', '/Library/Fonts/', `${process.env.PUBLIC_URL}/font/`);
    const inputFileName = 'GroupRowsAndColumns.xlsx';
    await window.spire.FetchFileToVFS(inputFileName, '', `${process.env.PUBLIC_URL}data/`);

    // Load the workbook
    const workbook = new xlsModule.Workbook();
    workbook.LoadFromFile({ fileName: inputFileName });

    // Get the first worksheet
    const sheet = workbook.Worksheets.get(0);

    // Ungroup rows
    sheet.UngroupByRows(6, 10);
    sheet.UngroupByRows(14, 16);

    // Ungroup columns
    sheet.UngroupByColumns(2, 7);

    // Save the document
    const outputFileName = 'UngroupRowsAndColumns_output.xlsx';
    workbook.SaveToFile({ fileName: outputFileName, version: xlsModule.ExcelVersion.Version2010 });

    // Release resources
    workbook.Dispose();

    // Read the converted file from the VFS and trigger a download
    const fileArray = window.dotnetRuntime.Module.FS.readFile(outputFileName);
    const blob = new Blob([fileArray], { type: 'application/vnd.openxmlformats-officedocument.spreadsheetml.sheet' });
    const url = URL.createObjectURL(blob);
    const a = document.createElement('a');
    a.href = url;
    a.download = outputFileName;
    a.click();
    URL.revokeObjectURL(url);
  };

  return (
    <div style={{ textAlign: 'center', height: '300px' }}>
      <h1>Ungroup Rows And Columns</h1>
      <button onClick={ungroupRowsAndColumns}>
        Start
      </button>
    </div>
  );
}

export default App;
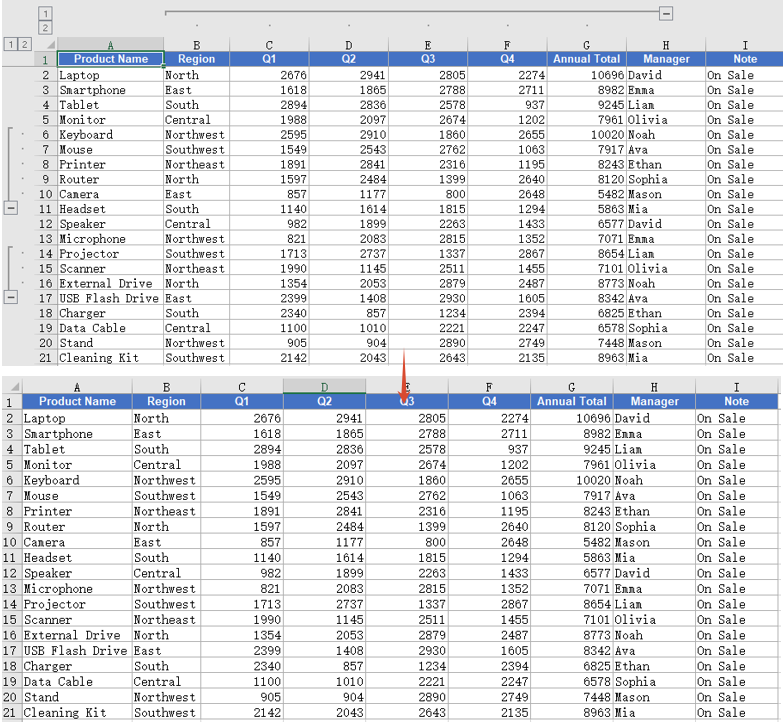
After ungrouping, the group markers on the rows or columns disappear and the data returns to the normal ungrouped display.
FAQ
Cannot collapse or expand detail data after grouping
Cause: The third parameter isCollapsed of the GroupByRows() and GroupByColumns() methods is set to false, so the groups are displayed expanded by default.
Solution: Set this parameter to true, and the groups will be displayed collapsed after saving:
sheet.GroupByRows(6, 10, true);
Some rows or columns still show group symbols after ungrouping
Cause: The UngroupByRows() and UngroupByColumns() methods only ungroup the rows or columns within the specified range. If these rows or columns also belong to a higher-level group, the higher-level group symbols are still retained.
Solution: Make sure the range passed when ungrouping matches the range used when grouping. If nested groups exist, call the ungroup methods repeatedly to ungroup level by level:
sheet.UngroupByRows(6, 10);
sheet.UngroupByRows(14, 16);
sheet.UngroupByColumns(2, 7);
Obtain a Free License
Spire.XLS for JavaScript offers a 30-day full-featured free trial license with no functional limitations. Apply here to evaluate before purchasing.
PDF has a fixed layout and is easy to distribute, but once its content has been generated, it is difficult to modify within the body text. For documents such as contracts, reports, and notices, you often need to indicate the confidentiality level, copyright ownership, or usage states such as "Draft" and "Sample" without affecting the reading of the body content. A text watermark is a common solution to this problem: it floats over the content as semi-transparent text, conveying the information clearly without harming the readability of the original.
Spire.PDF for JavaScript loads, draws, and saves PDFs directly in the browser via WebAssembly, managing input and output files through a virtual file system (VFS) without requiring a backend server. Text watermarking usually takes two forms: one places a single line of watermark text diagonally across the center of each page, which can be achieved directly through the transparency settings and coordinate-system transformations of the page canvas; the other tiles text repeatedly across the whole page, which can be done with the PdfTilingBrush tiling brush.
This article covers two core features:
For installation and project setup, refer to Integrating Spire.PDF for JavaScript in a React Project. The examples below assume Spire.PDF is installed and the WebAssembly module is initialized.
Add a Single-Line Text Watermark to PDF
A single-line text watermark places a line of diagonal text at the center of each page, suitable for marking confidentiality levels or copyright ownership. The approach is as follows: use a PdfTrueTypeFont based on a font that supports the characters you need, together with MeasureString, to measure the text size and compute the centering offset; then, page by page, set the transparency and rotate the coordinate system through SetTransparency, TranslateTransform, and RotateTransform; and finally draw the watermark text with DrawString.
function App() {
  const addSingleLineTextWatermark = async () => {
    // Get the Spire.PDF WASM module
    const pdfModule = window.wasmModule?.spirepdf;

    // Check whether the WASM module is ready
    if (!pdfModule) {
      alert('Spire.PDF is not ready yet');
      return;
    }

    // Load a TrueType font into VFS
    await window.spire.FetchFileToVFS('ARIAL UNICODE MS.TTF', '/Library/Fonts/', `${process.env.PUBLIC_URL}/font/`);

    // Load the PDF file to be watermarked into VFS
    const inputFileName = 'Lease_Agreement_EN.pdf';
    await window.spire.FetchFileToVFS(inputFileName, "", `${process.env.PUBLIC_URL}/data/`);

    // Create a PdfDocument object and load the PDF document
    let doc = new pdfModule.PdfDocument();
    doc.LoadFromFile(inputFileName);

    // Create a TrueType font: bold, 30 point
    let trueTypeFont = new pdfModule.PdfTrueTypeFont({
      fontFamily: 'Arial Unicode MS',
      size: 30,
      style: pdfModule.PdfFontStyle.Bold,
      unicode: true
    });


    // Create the watermark brush and specify the watermark text
    let brush = pdfModule.PdfBrushes.get_DarkGray();
    const text = 'CONFIDENTIAL - DO NOT DISCLOSE';

    // Measure the size of the watermark text
    let textSize = trueTypeFont.MeasureString({ text: text });

    // Compute two offsets to determine the coordinate translation, so that the watermark is centered diagonally
    let offset1 = (textSize.Width * Math.sqrt(2)) / 4;
    let offset2 = (textSize.Height * Math.sqrt(2)) / 4;
    let format = new pdfModule.PdfStringFormat({ alignment: pdfModule.PdfTextAlignment.Left });

    // Loop through all the pages in the document
    for (let i = 0; i < doc.Pages.Count; i++) {
      // Get the specified page
      let page = doc.Pages.get_Item(i);

      // Set the page transparency
      page.Canvas.SetTransparency(0.8);

      // Translate the coordinate system to the center of the page and compensate for the offset caused by the text size
      page.Canvas.TranslateTransform(
        page.Canvas.ClientSize.Width / 2 - offset1 - offset2,
        page.Canvas.ClientSize.Height / 2 + offset1 - offset2
      );

      // Rotate the coordinate system counterclockwise by 45 degrees
      page.Canvas.RotateTransform({ angle: -45 });

      // Draw the watermark text on the page
      page.Canvas.DrawString({ s: text, font: trueTypeFont, brush: brush, x: 0, y: 0, format: format });
    }

    // Define the output file name and save the document
    const outputFileName = 'SingleLineTextWatermark.pdf';
    doc.SaveToFile(outputFileName);
    doc.Close();

    // Read the generated file from VFS and trigger the download
    const fileArray = window.dotnetRuntime.Module.FS.readFile(outputFileName);
    const blob = new Blob([fileArray], { type: 'application/pdf' });
    const url = URL.createObjectURL(blob);
    const a = document.createElement('a');
    a.href = url;
    a.download = outputFileName;
    a.click();
    URL.revokeObjectURL(url);
  };

  return (
    <div style={{ textAlign: 'center', height: '300px' }}>
      <h1>Add Single-line Text Watermark To PDF</h1>
      <button onClick={addSingleLineTextWatermark}>
        Generate
      </button>
    </div>
  );
}

export default App;
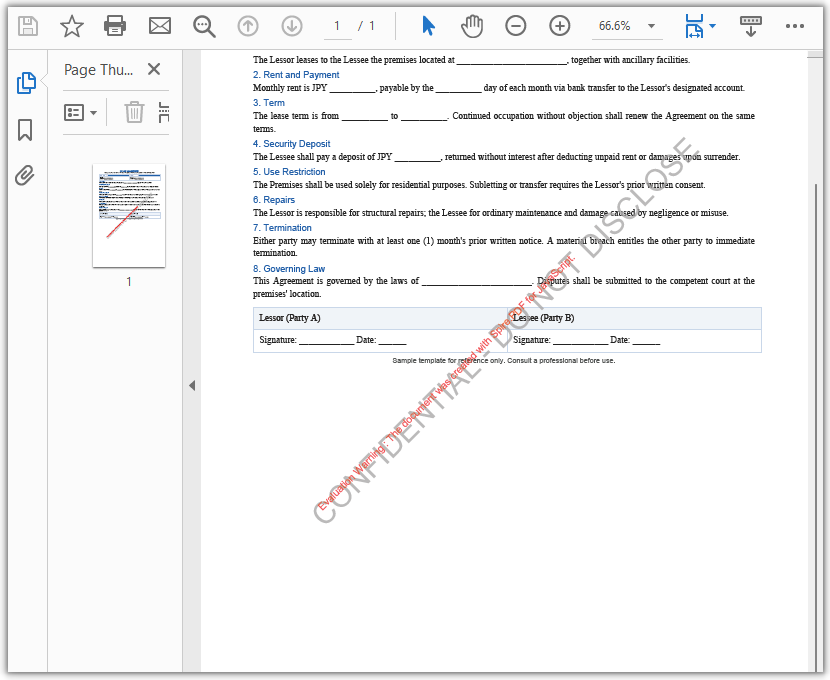
PDF document after adding the single-line text watermark
Add a Multiline Text Watermark to PDF
When you need the watermark to fill the entire page, use a multiline text watermark. The approach is as follows: use PdfTilingBrush to divide the page into tiling cells according to the page size; inside a cell, adjust the transparency and angle with SetTransparency and RotateTransform and draw the text with DrawString; finally fill the whole page with the brush using DrawRectangle.
function App() {
  const addMultilineTextWatermark = async () => {
    // Get the Spire.PDF WASM module
    const pdfModule = window.wasmModule?.spirepdf;

    // Check whether the WASM module is ready
    if (!pdfModule) {
      alert('Spire.PDF is not ready yet');
      return;
    }

    // Load the PDF file to be watermarked into VFS
    const inputFileName = 'Lease_Agreement_EN.pdf';
    await window.spire.FetchFileToVFS(inputFileName, "", `${process.env.PUBLIC_URL}/data/`);

    // Create a PdfDocument object and load the PDF document
    let doc = new pdfModule.PdfDocument();
    doc.LoadFromFile(inputFileName);

    // Get the first page of the document
    let page = doc.Pages.get_Item(0);

    // Create a tiling brush: use half the page width and one third of the page height as the tiling cell
    let size = new pdfModule.SizeF({
      width: page.Canvas.ClientSize.Width / 2,
      height: page.Canvas.ClientSize.Height / 3
    });
    let brush = new pdfModule.PdfTilingBrush({ size: size });

    // Set the watermark transparency to 30%
    brush.Graphics.SetTransparency(0.3);

    // Save the current state of the brush, then translate and rotate the coordinate system so that the watermark is arranged diagonally
    brush.Graphics.Save();
    brush.Graphics.TranslateTransform(brush.Size.Width / 2, brush.Size.Height / 2);
    brush.Graphics.RotateTransform({ angle: -45 });

    // Draw the tiled watermark
    let format = new pdfModule.PdfStringFormat({ alignment: pdfModule.PdfTextAlignment.Center });

    // Create font: bold, 25 point
    let font = new pdfModule.PdfFont({ fontFamily: pdfModule.PdfFontFamily.Helvetica, size: 25 });

    // Draw the watermark text
    brush.Graphics.DrawString({
      s: "CONFIDENTIAL",
      font: font,
      brush: pdfModule.PdfBrushes.get_DarkRed(),
      x: 0,
      y: -18,
      format: format
    });

    // Restore the previous state of the brush and set it back to opaque
    brush.Graphics.Restore();
    brush.Graphics.SetTransparency({ alpha: 1 });

    // Fill a whole-page rectangle with the tiling brush so that the watermark text tiles across the entire page
    let rect = new pdfModule.RectangleF({
      location: new pdfModule.PointF(0, 0),
      size: page.Canvas.ClientSize
    });
    page.Canvas.DrawRectangle({ brush: brush, rectangle: rect });

    // Define the output file name and save the document
    const outputFileName = 'MultilineTextWatermark.pdf';
    doc.SaveToFile(outputFileName);
    doc.Close();

    // Read the generated file from VFS and trigger the download
    const fileArray = window.dotnetRuntime.Module.FS.readFile(outputFileName);
    const blob = new Blob([fileArray], { type: 'application/pdf' });
    const url = URL.createObjectURL(blob);
    const a = document.createElement('a');
    a.href = url;
    a.download = outputFileName;
    a.click();
    URL.revokeObjectURL(url);
  };

  return (
    <div style={{ textAlign: 'center', height: '300px' }}>
      <h1>Add Multiline Text Watermark To PDF</h1>
      <button onClick={addMultilineTextWatermark}>
        Generate
      </button>
    </div>
  );
}

export default App;
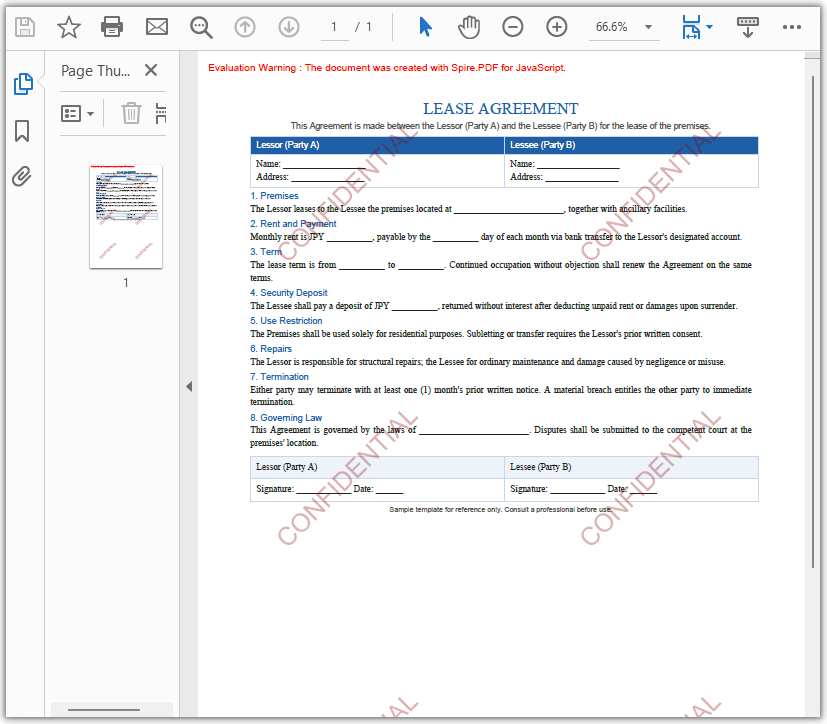
PDF document after adding the multiline text watermark
FAQ
How to set the font, size, and color of the watermark text
Reason: DrawString requires you to explicitly specify the font and brush used to draw the text.
Solution: The font, size, and color of the watermark text are determined by the font and brush passed to DrawString. For Latin text, create a PdfFont based on a built-in PdfFontFamily such as Helvetica, and set the color through the brush:
// Create a built-in font: Helvetica, 24 point
let font = new pdfModule.PdfFont({
  fontFamily: pdfModule.PdfFontFamily.Helvetica,
  size: 24
});

// Set the watermark color through the brush
let brush = pdfModule.PdfBrushes.get_DarkRed();

// Draw the watermark text on the page canvas
page.Canvas.DrawString({ s: 'CONFIDENTIAL', font: font, brush: brush, x: 0, y: 0, format: format });
If you need a font that is not built in — for example, to display non-Latin scripts such as Chinese or Japanese, or to apply a specific typeface — load the corresponding TrueType font into VFS and use PdfTrueTypeFont instead, as shown in the single-line text watermark example.
How to add a watermark to every page of a PDF
Reason: In the single-line text watermark example, a page loop applies the watermark to every page, while the multiline text watermark example only targets the first page through doc.Pages.get_Item(0).
Solution: To make the multiline watermark cover the entire document as well, move the creation of the tiling brush and the page fill into the page loop:
for (let i = 0; i < doc.Pages.Count; i++) {
  let page = doc.Pages.get_Item(i);

  // Create a tiling brush and set the transparency, rotation, and text
  let size = new pdfModule.SizeF({
    width: page.Canvas.ClientSize.Width / 2,
    height: page.Canvas.ClientSize.Height / 3
  });
  let brush = new pdfModule.PdfTilingBrush({ size: size });
  // …… set transparency, rotate, and draw the watermark text ……

  // Fill the current page with the tiling brush
  page.Canvas.DrawRectangle({
    brush: brush,
    rectangle: new pdfModule.RectangleF({ location: new pdfModule.PointF(0, 0), size: page.Canvas.ClientSize })
  });
}
How to control the transparency and rotation angle of the watermark
Reason: Too high or too low transparency affects the appearance of the watermark, and the rotation angle determines the direction of the watermark text.
Solution: Use SetTransparency to set the transparency, whose value ranges from 0 (fully transparent) to 1 (opaque); use RotateTransform to control the coordinate-system rotation angle, where a negative value means counterclockwise rotation. The single-line example sets the transparency to 0.8 and rotates by -45 degrees, and the multiline tiling example makes the same settings within the graphics context of the tiling brush:
// Single-line watermark: set the page transparency and rotate the page canvas
page.Canvas.SetTransparency(0.8);
page.Canvas.RotateTransform({ angle: -45 });

// Multiline tiled watermark: set the transparency and rotation within the graphics context of the tiling brush
brush.Graphics.SetTransparency(0.3);
brush.Graphics.RotateTransform({ angle: -45 });
Get a Free License
If you want to remove the evaluation messages in the resulting documents or get rid of functional limitations, contact sales to obtain a 30-day temporary license.
Reading Excel files directly in a web application is useful for many scenarios, such as displaying spreadsheet data on a webpage, importing business records, analyzing worksheet content, or extracting specific data for further processing. In React applications, developers may also need to distinguish between different Excel data types, including text, numbers, formulas, dates, and Boolean values.
Spire.XLS for JavaScript provides APIs for loading and manipulating Excel files in JavaScript applications. With it, you can access worksheets and cells, retrieve different types of cell values, and extract embedded images without requiring Microsoft Excel. This article demonstrates how to read Excel files with JavaScript in React, including reading worksheet data, retrieving different cell value types, and extracting images.
On this page:
- Install Spire.XLS for JavaScript in a React Project
- Read Excel Data with JavaScript in React
- Read Different Types of Cell Data from Excel
- Read Images from Excel Worksheets
- Conclusion
- FAQs
Install Spire.XLS for JavaScript in a React Project
Before working with Excel files, install Spire.XLS for JavaScript in your React project.
Open a terminal in the project directory and run:
npm i spire.office
After installing the package, copy the required Spire.XLS JavaScript and WebAssembly runtime files to the public directory of the React project.
For detailed instructions on setting up the library and its WebAssembly runtime, refer to: How to Integrate Spire.XLS for JavaScript in a React Project
Once the runtime is configured, Excel files can be loaded into the Spire virtual file system and processed in the browser.
Read Excel Data with JavaScript in React
A common requirement when reading Excel files is to retrieve all used data from a worksheet and display it in a web interface.
Spire.XLS provides the AllocatedRange property to obtain the range of cells that are currently in use. You can then loop through its rows and columns and retrieve each cell's value.
The main steps are as follows:
- Load and initialize the Spire.XLS WebAssembly module.
- Load the Excel file into the Spire virtual file system.
- Create a
Workbookobject and load the Excel file. - Access the desired worksheet.
- Get the worksheet's allocated range.
- Iterate through the cells and retrieve their values.
- Store the extracted values in React state and display them in an HTML table.
The following example reads data from the first worksheet of an Excel file named Data.xlsx and displays the retrieved values in a React table.
import React, { useState, useEffect } from 'react';

function App() {
  const [wasmModule, setWasmModule] = useState(null);
  const [tableData, setTableData] = useState([]);
  const [status, setStatus] = useState('Loading Excel runtime...');
  const [error, setError] = useState('');

  useEffect(() => {
    (async () => {
      try {
        const publicUrl = process.env.PUBLIC_URL || '';
        const spireModule = await import(
          /* webpackIgnore: true */
          `${publicUrl}/spire.xls.js`
        );

        const xlsModule = spireModule.spirexls || window.spirexls;

        if (!xlsModule) {
          throw new Error('Spire XLS module was not initialized.');
        }

        window.wasmModule = xlsModule;
        setWasmModule(xlsModule);
        setStatus('Excel runtime ready.');
      } catch (err) {
        console.error('Failed to load Spire XLS runtime:', err);
        setError(err.message || 'Failed to load Spire XLS runtime.');
        setStatus('');
      }
    })();
  }, []);

  const loadExcelToVfs = async (fileName) => {
    const publicUrl = process.env.PUBLIC_URL || '';
    const response = await fetch(`${publicUrl}/${fileName}`);

    if (!response.ok) {
      throw new Error(
        `Failed to load ${fileName}: ${response.status} ${response.statusText}`
      );
    }

    if (!window.dotnetRuntime?.Module?.FS) {
      throw new Error('Spire virtual file system is not ready.');
    }

    const fileBytes = new Uint8Array(await response.arrayBuffer());

    window.dotnetRuntime.Module.FS.writeFile(
      fileName,
      fileBytes,
      { flags: 'w+' }
    );

    return fileName;
  };

  const readExcelData = async () => {
    if (!wasmModule) {
      setError('Excel runtime is not ready yet.');
      return;
    }

    setError('');
    setStatus('Reading Excel file...');

    const workbook = new wasmModule.Workbook();

    try {
      const inputFile = await loadExcelToVfs('Data.xlsx');
      workbook.LoadFromFile(inputFile);

      const sheet = workbook.Worksheets.get(0);
      const range = sheet.AllocatedRange;
      const rows = [];

      if (range) {
        const firstRow = range.Row;
        const firstColumn = range.Column;

        const lastRow =
          range.LastRow || firstRow + range.RowCount - 1;

        const lastColumn =
          range.LastColumn || firstColumn + range.ColumnCount - 1;

        for (let r = firstRow; r <= lastRow; r++) {
          const row = [];

          for (let c = firstColumn; c <= lastColumn; c++) {
            row.push(sheet.get(r, c).Value);
          }

          rows.push(row);
        }
      }

      setTableData(rows);
      setStatus(`Loaded ${rows.length} rows.`);
    } catch (err) {
      console.error('Failed to read Excel file:', err);
      setError(err.message || 'Failed to read Excel file.');
      setStatus('');
    } finally {
      workbook.Dispose();
    }
  };

  return (
    <div style={{ textAlign: 'center', padding: 30 }}>
      <h1>Read Excel in JavaScript</h1>

      <button onClick={readExcelData} disabled={!wasmModule}>
        Read Excel File
      </button>

      {status && <p>{status}</p>}

      {error && (
        <p style={{ color: 'crimson' }}>
          {error}
        </p>
      )}

      {tableData.length > 0 && (
        <table
          border="1"
          cellPadding="8"
          style={{
            margin: '20px auto',
            borderCollapse: 'collapse'
          }}
        >
          <tbody>
            {tableData.map((row, ri) => (
              <tr key={ri}>
                {row.map((cell, ci) => (
                  <td key={ci}>{cell}</td>
                ))}
              </tr>
            ))}
          </tbody>
        </table>
      )}
    </div>
  );
}

export default App;
Code Explanation
The example first dynamically loads the Spire.XLS JavaScript runtime:
const spireModule = await import(
  /* webpackIgnore: true */
  `${publicUrl}/spire.xls.js`
);

const xlsModule = spireModule.spirexls || window.spirexls;
Since Spire.XLS uses a WebAssembly runtime, the source Excel file is then loaded into its virtual file system:
const fileBytes = new Uint8Array(await response.arrayBuffer());

window.dotnetRuntime.Module.FS.writeFile(
  fileName,
  fileBytes,
  { flags: 'w+' }
);
Next, create a Workbook object and load the Excel file:
const workbook = new wasmModule.Workbook();
workbook.LoadFromFile(inputFile);
The first worksheet can be accessed using:
const sheet = workbook.Worksheets.get(0);
To avoid iterating through unnecessary empty cells, the example retrieves the worksheet's used area through AllocatedRange:
const range = sheet.AllocatedRange;
The starting and ending rows and columns are then determined from this range. A nested loop is used to access each cell:
for (let r = firstRow; r <= lastRow; r++) {
  const row = [];

  for (let c = firstColumn; c <= lastColumn; c++) {
    row.push(sheet.get(r, c).Value);
  }

  rows.push(row);
}
Finally, the resulting two-dimensional array is stored in the tableData React state and rendered as an HTML table.
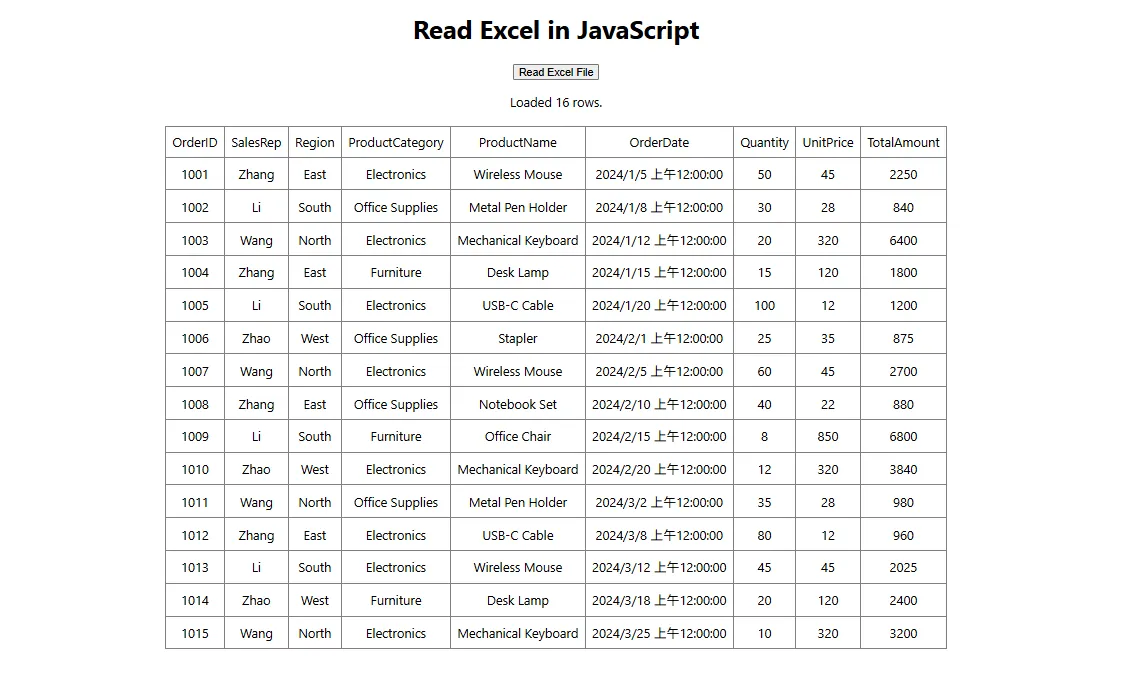
This approach is useful when building spreadsheet viewers, Excel import interfaces, reporting pages, or other applications where worksheet data needs to be presented directly in the browser.
Read Different Types of Cell Data from Excel
Excel cells can contain different kinds of data. Depending on the content you need to retrieve, Spire.XLS provides different properties or methods for accessing the underlying cell value.
The following table lists some commonly used options:
| Data to Read | API |
|---|---|
| Text | cell.Text |
| Number | cell.NumberValue |
| Formula | cell.Formula |
| Formula calculation result | cell.FormulaValue |
| Date and time | cell.DateTimeValue |
| Boolean value | cell.BooleanValue |
| Number or text value | cell.Value |
| Date, Boolean, or other value | cell.Value2 |
For example, first access a particular cell:
const cell = sheet.get(rowIndex, colIndex);
You can then retrieve its content according to the expected data type.
Read Text
Use the Text property to retrieve the text representation of a cell:
const text = sheet.get(rowIndex, colIndex).Text;
This is useful when the displayed textual content of a cell is required.
Read Numbers
To obtain a numeric value, use NumberValue:
const number = sheet.get(rowIndex, colIndex).NumberValue;
This can be useful when worksheet values will be used for calculations or numeric processing in JavaScript.
Read Formulas and Formula Results
Excel cells may contain formulas rather than static values. The formula expression itself can be retrieved through the Formula property:
const formula = sheet.get(rowIndex, colIndex).Formula;
For example, a formula cell may contain an expression such as:
=SUM(B2:B10)
If you need the calculated result of the formula instead of the formula expression, use:
const formulaResult = sheet.get(rowIndex, colIndex).FormulaValue;
Being able to retrieve both the formula and its result is useful for spreadsheet analysis and auditing applications.
Read Dates
Excel stores date and time information as a specialized cell value. You can retrieve it using:
const date = sheet.get(rowIndex, colIndex).DateTimeValue;
The returned date value can then be formatted or processed according to the requirements of the React application.
Read Boolean Values
For cells containing Boolean values such as TRUE or FALSE, use:
const bool = sheet.get(rowIndex, colIndex).BooleanValue;
Read General Cell Values
When a cell may contain either a number or text, the Value property provides a convenient general-purpose option:
const value = sheet.get(rowIndex, colIndex).Value;
For values such as dates, Boolean values, or other underlying Excel data types, Value2 can also be used:
const value = sheet.get(rowIndex, colIndex).Value2;
Choosing the appropriate property based on the expected Excel data type makes it easier to preserve the original meaning of the worksheet content when processing it in JavaScript.
Read Images from Excel Worksheets
In addition to cell data, Excel worksheets can contain embedded pictures. Spire.XLS for JavaScript allows you to access these images through the worksheet's Pictures collection.
The following example retrieves the first picture from a worksheet and saves it as a PNG file:
let pic = sheet.Pictures.get(0);

const outputFileName = 'ReadImages-out.png';

pic.Picture.Save(outputFileName);
Because the image is saved inside the Spire WebAssembly virtual file system, it can then be read back into JavaScript:
const modifiedFileArray = window.dotnetRuntime.Module.FS.readFile(outputFileName);
Next, create a JavaScript Blob from the resulting image data:
const modifiedFile = new Blob(
  [modifiedFileArray],
  { type: 'image/png' }
);
The resulting Blob can be used for further browser-side operations. For example, you can create an object URL and display the extracted image directly in a React component:
const imageUrl = URL.createObjectURL(modifiedFile);
Then use the generated URL as the source of an HTML image element:
<img src={imageUrl} alt="Extracted from Excel" />
If a worksheet contains multiple pictures, you can iterate through the Pictures collection and process each image individually.
This capability is useful for applications that need to extract product images, logos, charts saved as pictures, document assets, or other visual content embedded in Excel worksheets.
Conclusion
Reading Excel files in React makes it possible to bring spreadsheet data directly into browser-based workflows. With Spire.XLS for JavaScript, developers can load Excel workbooks, access worksheets and used ranges, iterate through cells, and retrieve data without relying on Microsoft Excel.
In addition to general cell values, Spire.XLS allows JavaScript applications to access specific data types such as text, numbers, formulas, formula results, dates, and Boolean values. Embedded worksheet images can also be retrieved and converted into browser-compatible objects for display or further processing.
These features can be used to build Excel viewers, data import tools, reporting systems, spreadsheet analysis interfaces, and other React applications that need to work with Excel content.
FAQs
Can JavaScript Read Excel Files in a React Application?
Yes. JavaScript can read Excel files in React with the help of an Excel-processing library such as Spire.XLS for JavaScript. After loading the Excel file into the WebAssembly virtual file system, you can access its worksheets, cells, formulas, images, and other spreadsheet content directly in the browser.
How Do I Read All Used Cells in an Excel Worksheet?
You can use the worksheet's AllocatedRange property to determine the range that contains data. After obtaining its starting and ending rows and columns, iterate through the range and access individual cells using:
sheet.get(rowIndex, colIndex)
This avoids unnecessarily iterating through large areas of empty worksheet cells.
How Can I Read an Excel Formula and Its Calculated Result Separately?
Use the Formula property to retrieve the formula expression:
const formula = sheet.get(rowIndex, colIndex).Formula;
Use CalculatedValue when you need the calculated value of the formula:
const result = sheet.get(rowIndex, colIndex).FormulaValue;
This makes it possible to inspect both the formula logic and its resulting value.
Can I Extract Images from Excel with JavaScript?
Yes. Images embedded in a worksheet can be accessed through the Pictures collection. After retrieving a picture, you can save it to the Spire virtual file system, read the generated image bytes, and convert them into a JavaScript Blob. The Blob can then be displayed, downloaded, or processed further in the browser.
Get a Free License
Spire.XLS for JavaScript offers a 30-day full-featured free trial license with no functional limitations. Apply here to evaluate before purchasing.
