
Knowledgebase (2370)
Children categories
How to Add, Select and Remove an Item in Combo Box in C#, VB.NET
2015-12-03 02:00:16 Written by KoohjiA combo box is a commonly-used GUI widget. It is a combination of a drop-down list or list box and a single-line textbox, allowing the user either to type a value directly into the control or choose from the list of existing options. In this article, we'll introduce how to programmatically manage the item of combo box in Word file using Spire.Doc.
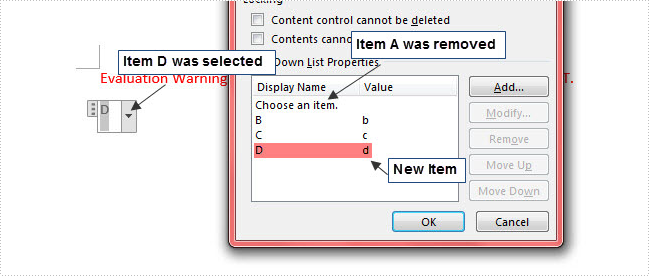
Here is a combo box in the sample Word document, which contains three items including A, B and C. In the following section, we'll add, select and remove an item in the combo box using code.

Code Snippet:
Step 1: Initialize a new instance of Document class and load the sample Word file.
Document document = new Document();
document.LoadFromFile( "test.docx");
Step 2: Get the combo box from the file.
foreach (Section section in document.Sections)
{
    foreach (Body body in section.ChildObjects)
    {
        foreach (DocumentObject bodyObj in body.ChildObjects)
        {
            if (bodyObj is StructureDocumentTag)
            {
                if ((bodyObj as StructureDocumentTag).SDTProperties.SDTType == SdtType.ComboBox)
                {
                    SdtComboBox combo = (bodyObj as StructureDocumentTag).SDTProperties.ControlProperties as SdtComboBox;

               }
            }
        }
    }

}
Step 3: Create a new item and set two parameters for it: display text and value. Call ListItems.Add() method to add the new item into combo box.
SdtListItem item = new SdtListItem("D","d");
combo.ListItems.Add(item);
Step 4: Call ListItems.RemoveAt() method to remove an item by its index.
combo.ListItems.RemoveAt(0);
Step 5: Call ListItems.SelectedValue() to choose an item from combo box.
combo.ListItems.SelectedValue = sdtItem;
Step 6: Save and launch the file.
document.SaveToFile("result.docx", FileFormat.Docx2013);
System.Diagnostics.Process.Start("result.docx");
Output:
Entire Code:
using Spire.Doc;
using Spire.Doc.Documents;
namespace IteminCombo
    class Program
    {
        static void Main(string[] args)
        {
            Document document = new Document();
            document.LoadFromFile("test.docx");
            foreach (Section section in document.Sections)
            {
                foreach (Body body in section.ChildObjects)
                {
                    foreach (DocumentObject bodyObj in body.ChildObjects)
                    {
                        if (bodyObj is StructureDocumentTag)
                        {
                            if ((bodyObj as StructureDocumentTag).SDTProperties.SDTType == SdtType.ComboBox)
                            {
                                SdtComboBox combo = (bodyObj as StructureDocumentTag).SDTProperties.ControlProperties as SdtComboBox;
                                SdtListItem item = new SdtListItem("D", "d");
                                combo.ListItems.Add(item);
                                foreach (SdtListItem sdtItem in combo.ListItems)
                                {
                                    if (string.CompareOrdinal(sdtItem.Value, "d") == 0)
                                    {
                                        combo.ListItems.SelectedValue = sdtItem;
                                    }
                                }
                                combo.ListItems.RemoveAt(1);
                            }
                        }
                    }
                }

            }
            document.SaveToFile("result.docx", FileFormat.Docx2013);
            System.Diagnostics.Process.Start("result.docx");
        }
    }
}
Dim document As New Document()
document.LoadFromFile("test.docx")
For Each section As Section In document.Sections
	For Each body As Body In section.ChildObjects
		For Each bodyObj As DocumentObject In body.ChildObjects
			If TypeOf bodyObj Is StructureDocumentTag Then
				If TryCast(bodyObj, StructureDocumentTag).SDTProperties.SDTType = SdtType.ComboBox Then
					Dim combo As SdtComboBox = TryCast(TryCast(bodyObj, StructureDocumentTag).SDTProperties.ControlProperties, SdtComboBox)
					Dim item As New SdtListItem("D", "d")
					combo.ListItems.Add(item)
					For Each sdtItem As SdtListItem In combo.ListItems
						If String.CompareOrdinal(sdtItem.Value, "d") = 0 Then
							combo.ListItems.SelectedValue = sdtItem
						End If
					Next
					combo.ListItems.RemoveAt(1)
				End If
			End If
		Next

	Next
Next
document.SaveToFile("result.docx", FileFormat.Docx2013)
System.Diagnostics.Process.Start("result.docx")
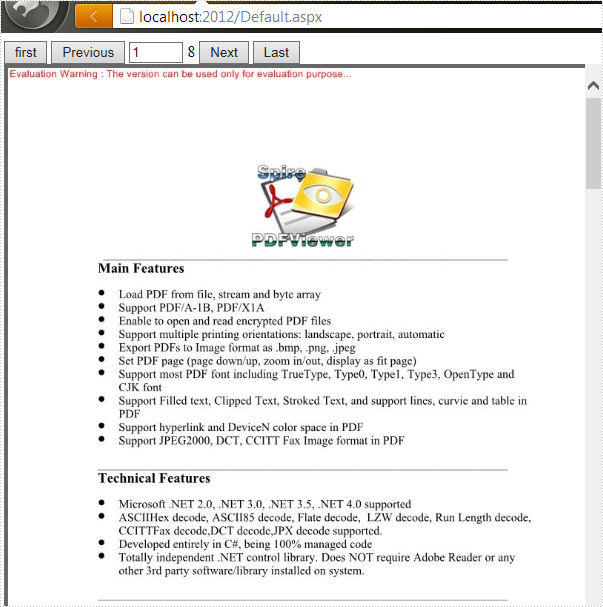
Turning to the previous page, the next page, the first page, the last page, or even switch to any existing target page is the frequently used manipulation, which helps us to save a lot of time on viewing a PDF document with multiple pages on website.
How can we achieve this function programmatically in ASP.NET? Spire.PDFViewer for ASP.NET provides developers the feature of paging which allows users to turn page according to their requirements. This article will demonstrate how to realize paging with Spire.PDFViewer for ASP.NET.
Note: Please download Spire.PDFViewer for ASP.NET and install it correctly.
Then follow the detail steps below:
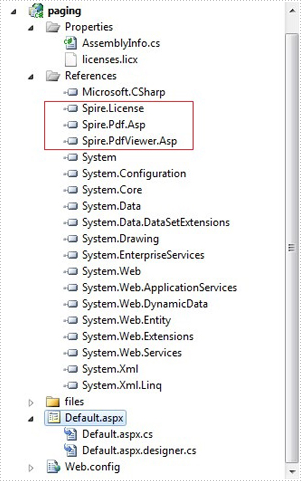
Step 1: create a new project and add the .dll files from bin folder of Spire.PDFViewer as references.
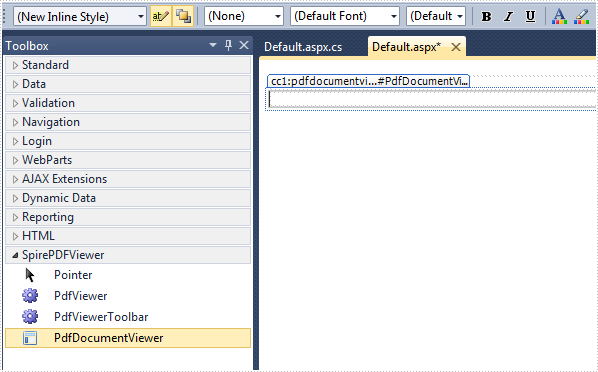
Step 2: Add the PDFDocumentViewer control of Spire.PDFViewer into toolbox and drag it into Deafault.aspx.
Step 3: Paging.
Main code:
Section 1: Call the LoadFromFile() method of PdfDocumentViewer to load a sample PDF file in Default.aspx.cs. Note that you have to add the following if statement and !IsPostBack property before loading the pdf file.
protected void Page_Load(object sender, EventArgs e)
        {
            if (!IsPostBack)
            {
                //load the sample PDF file
                this.PdfDocumentViewer1.CacheInterval = 1000;
                this.PdfDocumentViewer1.CacheTime = 1200;
                this.PdfDocumentViewer1.CacheNumberImage = 1000;
                this.PdfDocumentViewer1.ScrollInterval = 300;
                this.PdfDocumentViewer1.ZoomFactor = 1f;
                this.PdfDocumentViewer1.CustomErrorMessages = "";
                this.PdfDocumentViewer1.LoadFromFile("files/PDFViewer.pdf");
            }
        }
Section 2: Drag four buttons and a textbox from toolbox into Deafault.aspx, set their properties as below.
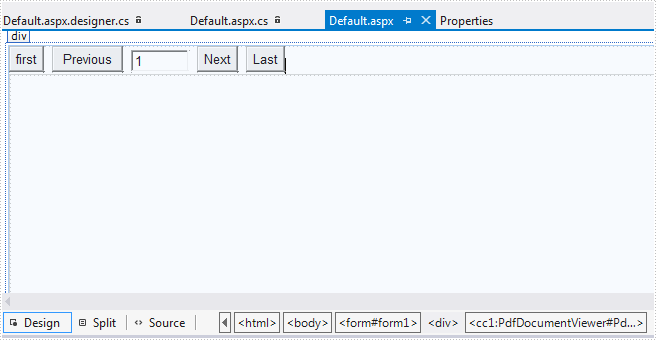
The generated source code in Deafault.aspx:
<div>
        <input type="button" id="btnFirst" value="first" onclick="pdfdocumentviewer1.FirstPage()" />
        <input type="button" id="btnPrevious" value="Previous" onclick="pdfdocumentviewer1.PreviousPage()" />
        <input type="text" id="PdfDocumentViewer1_PdfViewerCurrentPage" value="1" style="width: 50px;" />
        <span id="PdfDocumentViewer1_PdfViwerCountPage"></span>
        <input type="button" id="btnNext" value="Next" onclick="pdfdocumentviewer1.NextPage()" />
        <input type="button" id="btnLast" value="Last" onclick="pdfdocumentviewer1.LastPage()" />

        <cc1:PdfDocumentViewer id="PdfDocumentViewer1" runat="server">
        </cc1:PdfDocumentViewer>
</div>
Run the project and you'll get the following output:
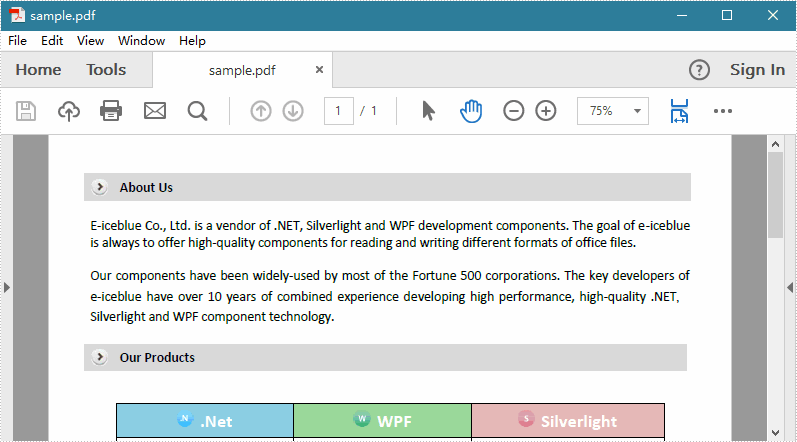
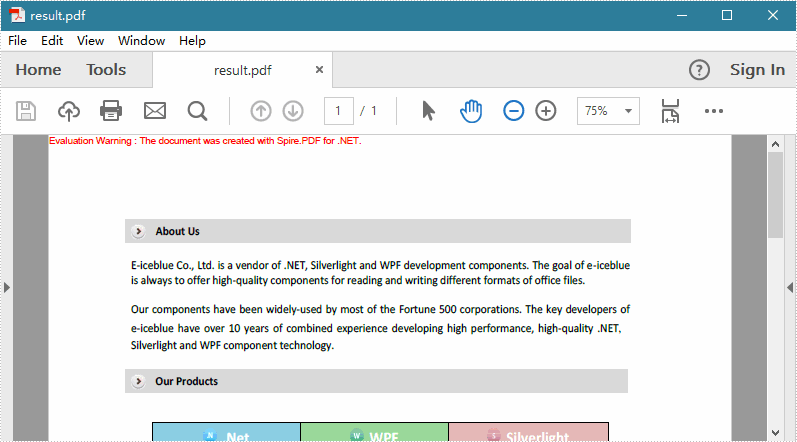
PDF margins are white spaces between body contents and page edge. Unlike Word, margins in PDF document are not easy to be modified as Adobe does not provide any functionality for users to manipulate margins freely. However, you can change the page scaling (enlarge/compress content) or crop page to get fitted margins. In this article, you will learn how to enlarge PDF margins by compressing content.
Step 1: Create a PdfDocument object to load the original PDF document.
PdfDocument origDoc = new PdfDocument();
origDoc.LoadFromFile("sample.pdf");
Step 2: Create another PdfDocument object.
PdfDocument destDoc = new PdfDocument();
Step 3: Set the increments that you want to add to the margins in the existing PDF document.
float top = 50;
float bottom = 50;
float left = 50;
float right = 50;
Step 4: Transfer the compressed content from the original document to the new PDF document.
foreach (PdfPageBase page in origDoc.Pages)
{
    PdfPageBase newPage = destDoc.Pages.Add(page.Size, new PdfMargins(0));
    newPage.Canvas.ScaleTransform((page.ActualSize.Width - left - right) / page.ActualSize.Width,
                        (page.ActualSize.Height - top - bottom) / page.ActualSize.Height);
    newPage.Canvas.DrawTemplate(page.CreateTemplate(), new PointF(left, top));
}
Step 5: Save to file.
destDoc.SaveToFile("result.pdf", FileFormat.PDF);
Original PDF:
Result:
Full Code:
using Spire.Pdf;
using Spire.Pdf.Graphics;
using System.Drawing;


namespace ChangeMargins
{
    class Program
    {
        static void Main(string[] args)
        {
            PdfDocument origDoc = new PdfDocument();
            origDoc.LoadFromFile("sample.pdf");
            PdfDocument destDoc = new PdfDocument();

            float top = 50;
            float bottom = 50;
            float left = 50;
            float right = 50;

            foreach (PdfPageBase page in origDoc.Pages)
            {
                PdfPageBase newPage = destDoc.Pages.Add(page.Size, new PdfMargins(0));
                newPage.Canvas.ScaleTransform((page.ActualSize.Width - left - right) / page.ActualSize.Width,
                                    (page.ActualSize.Height - top - bottom) / page.ActualSize.Height);
                newPage.Canvas.DrawTemplate(page.CreateTemplate(), new PointF(left, top));
            }

            destDoc.SaveToFile("result.pdf", FileFormat.PDF);
        }
    }
}
Imports Spire.Pdf
Imports Spire.Pdf.Graphics
Imports System.Drawing


Namespace ChangeMargins
	Class Program
		Private Shared Sub Main(args As String())
			Dim origDoc As New PdfDocument()
			origDoc.LoadFromFile("sample.pdf")
			Dim destDoc As New PdfDocument()

			Dim top As Single = 50
			Dim bottom As Single = 50
			Dim left As Single = 50
			Dim right As Single = 50

			For Each page As PdfPageBase In origDoc.Pages
				Dim newPage As PdfPageBase = destDoc.Pages.Add(page.Size, New PdfMargins(0))
				newPage.Canvas.ScaleTransform((page.ActualSize.Width - left - right) / page.ActualSize.Width, (page.ActualSize.Height - top - bottom) / page.ActualSize.Height)
				newPage.Canvas.DrawTemplate(page.CreateTemplate(), New PointF(left, top))
			Next

			destDoc.SaveToFile("result.pdf", FileFormat.PDF)
		End Sub
	End Class
End Namespace
