
Spire.Doc for .NET (338)
Children categories
Before going through the detailed steps, watch this quick video demonstrating how to convert Word files to PDF using a simple .NET approach.
Converting Word documents to PDF is a common requirement in many C# applications, but relying on Microsoft Office Interop can be cumbersome and inefficient. Fortunately, third-party libraries like Spire.Doc for .NET provide a powerful and seamless alternative for high-quality conversions without Interop dependencies. Whether you need to preserve formatting, secure PDFs with passwords, or optimize file size, Spire.Doc offers a flexible solution with minimal code.
In this guide, we’ll explore how to convert Word to PDF in C# using Spire.Doc, covering basic conversions, advanced customization, and best practices for optimal results.
- C# .NET Library for Converting Word to PDF
- Basic DOCX to PDF Conversion Example
- Advanced Word to PDF Conversion Options
- Adjust Word Documents for Optimal Conversion
- Conclusion
- FAQs
C# .NET Library for Converting Word to PDF
Spire.Doc for .NET is a robust API that enables developers to create, edit, and convert Word documents programmatically. It supports converting Word (DOC, DOCX) to PDF while preserving formatting, images, hyperlinks, and other elements.
With Spire.Doc, you can benefit from:
- High-fidelity conversion with minimal formatting loss
- Support for password-protected PDFs
- Customizable PDF settings (PDF/A compliance, font embedding, etc.)
- Batch conversion of multiple Word files
To get started, download Spire.Doc from the official website and reference the DLLs in your project. Or, you can install it via NuGet through the following command:
PM> Install-Package Spire.DocBasic DOCX to PDF Conversion Example
Converting Word documents to PDFs using Spire.Doc is a simple process that requires minimal code. The following example demonstrates how to load a DOCX file and save it as a PDF with default settings.
- C#
using Spire.Doc;

namespace ConvertWordToPdf
{
    class Program
    {
        static void Main(string[] args)
        {
            // Create a Document object
            Document doc = new Document();

            // Load a Word document
            doc.LoadFromFile("C:\\Users\\Administrator\\Desktop\\Input.docx");

            // Save the document to PDF
            doc.SaveToFile("ToPDF.pdf", FileFormat.PDF);

            // Dispose resources
            doc.Dispose();
        }
    }
}
In this example:
- A Document object is instantiated to manage the Word file.
- The LoadFromFile method loads the DOCX file from the specified path.
- The SaveToFile method converts and saves the document in PDF format.
- Finally, the Dispose method is called to release resources used by the Document object.
This straightforward approach allows for quick and efficient conversion of DOCX files into PDFs with just a few lines of code.
Result:

Advanced Word to PDF Conversion Options
To gain greater control over the conversion process, Spire.Doc offers the ToPdfParameterList class. With this class, you can:
- Convert to PDF/A (a standardized archival format)
- Apply password protection and permission restrictions
- Embed fonts to ensure consistent rendering
- Preserve bookmarks for better navigation
- Disable hyperlinks if necessary
Here’s a summary of available options:
| Option | Implemented by |
| Convert to PDF/A | PdfConformanceLevel |
| Protect PDF with a passoword | PdfSecurity |
| Restrict permessions (e.g., printing) | PdfSecurity |
| Embed all fonts | IsEmbeddedAllFonts |
| Embed specific fonts | EmbeddedFontNameList |
| Preserve bookmarks | CreateWordsBookmarks |
| Create bookmarks from headings | CreateWordBookmarksUsingHeadings |
| Disable hyperlinks | DisableLink |
Example 1: Convert Word to Password-Protected PDF
When sharing confidential Word documents as PDFs, a simple conversion isn't enough. Spire.Doc lets you add military-grade password protection by using the PdfSecurity.Encrypt method, preventing unauthorized access while maintaining perfect formatting.
The following code encrypts the generated PDF document with an open password:
- C#
using Spire.Doc;

namespace ConvertWordToPasswordProtectedPdf
{
    class Program
    {
        static void Main(string[] args)
        {
            // Create a Document object
            Document doc = new Document();

            // Load a Word document
            doc.LoadFromFile("C:\\Users\\Administrator\\Desktop\\Input.docx");

            // Create a ToPdfParameterList object
            ToPdfParameterList parameters = new ToPdfParameterList();

            // Set an open password
            parameters.PdfSecurity.Encrypt("openPsd");

            // Save the Word to PDF with options
            doc.SaveToFile("PasswordProtected.pdf", parameters);

            // Dispose resources
            doc.Dispose();
        }
    }
}
Advanced Contol:
Want even more control? Combine with document permessions:
- C#
parameters.PdfSecurity.Encrypt("openPsd", "permissionPsd", PdfPermissionsFlags.Print, PdfEncryptionKeySize.Key128Bit);
doc.SaveToFile("PasswordProtected.pdf", parameters);
Example 2: Ensure Consistent Text Rendering by Embedding Fonts in PDF
When converting Word to PDF, fonts may appear differently (or even as gibberish) if the viewer’s system lacks the original fonts used in your document. Spire.Doc solves this by embedding fonts directly into the PDF, guaranteeing that text displays exactly as intended—regardless of the device or software used to open the file.
The following code embeds all fonts when converting Word to PDF in C#:
- C#
using Spire.Doc;

namespace EmbedFonts
{
    class Program
    {
        static void Main(string[] args)
        {
            // Create a Document object
            Document doc = new Document();

            // Load a Word document
            doc.LoadFromFile("C:\\Users\\Administrator\\Desktop\\Sample.docx");

            // Create a ToPdfParameterList object
            ToPdfParameterList parameters = new ToPdfParameterList();

            // Embed all the fonts used in Word in the generated PDF
            parameters.IsEmbeddedAllFonts = true;

            // Save the document to PDF
            doc.SaveToFile("EmbedFonts.pdf", parameters);

            // Dispose resources
            doc.Dispose();
        }
    }
}
Advanced Contol:
To reduce file size, you can selectively embed fonts (e.g., only your custom font, not common ones like Arial):
- C#
parameters.PrivateFontPaths = new List()
 {
     new PrivateFontPath("YourCustomFont", "FontPath"),
     new PrivateFontPath("AnotherFont", "FontPath")
 };
 doc.SaveToFile("EmbedCustomFonts.pdf", parameters);
Adjust Word Documents for Optimal Conversion
To achieve the best PDF output, you may need to prepare your Word document before conversion. Consider the following adjustments:
- Change page size or margins for better layout
- Enhance document security by adding watermarks
- Compress images to reduce file size
Example: Reduce PDF Size by Compressing Images
Large image-heavy Word documents often create bloated PDFs that are difficult to share. With Spire.Doc, you can automatically optimize images during conversion, dramatically reducing file size while maintaining acceptable quality.
The following code reduces image quality to 50%, resulting in a smaller PDF:
- C#
using Spire.Doc;

namespace SetImageQualityWhenConverting
{
    class Program
    {
        static void Main(string[] args)
        {
            // Create a Document object
            Document doc = new Document();

            // Load a Word document
            doc.LoadFromFile("C:\\Users\\Administrator\\Desktop\\Input.docx");

            // Reduce image quality to 50%
            doc.JPEGQuality = 50;

            // Save the document to PDF
            doc.SaveToFile("CompressImage.pdf", FileFormat.PDF);

            // Dispose resources
            doc.Dispose();
        }
    }
}
Conclusion
Converting Word documents to PDF in C# doesn’t have to be complicated—Spire.Doc for .NET simplifies the process and offers extensive customization options, from basic conversions to advanced features like PDF encryption, font embedding, and image compression, all without Interop.
By following the techniques outlined in this guide, you can efficiently integrate Word-to-PDF functionality into your applications. For further assistance, explore Spire.Doc’s documentation or leverage its free trial to test its capabilities.
FAQs
Q1: How do I convert multiple Word files to PDFs in C#?
A: You can create a loop in your code to process multiple files at once. For example:
- C#
string[] files = Directory.GetFiles("input_folder", "*.docx");
foreach (string file in files)
{
    Document document = new Document();
    document.LoadFromFile(file);
    document.SaveToPDF(Path.ChangeExtension(file, ".pdf"), FileFormat.PDF);
    document.Dispose();
}
Q2: How to merge multiple Word files into a single PDF?
A: You can merge Word files first (using Spire.Doc), and then convert the combined document to PDF. For example:
- C#
Document mergedDoc = new Document();
string[] filesToMerge = Directory.GetFiles("input_folder ", "*.docx");
foreach (string file in filesToMerge)
{
    mergedDoc.InsertTextFromFile(file, FileFormat.Docx);
}
mergedDoc.SaveToFile("Merged.pdf", FileFormat.PDF);
mergedDoc.Dispose();
Q3: Why is my converted PDF missing text or formatting?
A: This issue may arise from missing custom fonts on your system. To resolve it, install the required fonts on the machine performing the conversion. Alternatively, you can embed the fonts directly into the PDF using Spire.Doc during the conversion process.
Q4: Is Spire.Doc free for Word-to-PDF conversion?
A: No, Spire.Doc is a paid library. However, a free version is available with limited functionality, allowing users to convert only the first three pages of a Word document to PDF. This option is ideal for small projects or personal use.
Get a Free License
To fully experience the capabilities of Spire.Doc for .NET without any evaluation limitations, you can request a free 30-day trial license.
Word header and footer presents additional information of Word document, which can be text, image or page number. This guide focuses on introducing how to insert image header and footer for Word document in C# and VB.NET.
Header/Footer plays an important role in Word document, which uses text, image or page number to demonstrate some additional information about this document. The information can be company name, logo, author name, document title etc. This guide will demonstrate detailed process to insert image header/footer in Word with C# and VB.NET via Spire.Doc for .NET. The following screenshot displays Word image header/footer result after programming.

Spire.Doc for .NET provides a HeaderFooter. class to enable developers to generate a new header or footer. Firstly, initialize a header instance of HeaderFooter class and then invoke AddParagraph() method to add a paragraph body for this header/footer instance. Next, invoke Paragraph.AppendPicture(Image image) method to append a picture for header/footer paragraph. If you want to add text for paragraph as well, please invoke Paragraph.AppendText(string text) method. Also, you can set format for header/footer paragraph, appended image and text to have a better layout. Code as following:
using System.Drawing;
using Spire.Doc;
using Spire.Doc.Documents;
using Spire.Doc.Fields;

namespace ImageHeaderFooter
{
    class Program
    {
        static void Main(string[] args)
        {
            //Load Document
            Document document = new Document();
            document.LoadFromFile(@"E:\Work\Documents\Spire.Doc for .NET.docx");

            //Initialize a Header Instance
            HeaderFooter header = document.Sections[0].HeadersFooters.Header;
            //Add Header Paragraph and Format
            Paragraph paragraph = header.AddParagraph();
            paragraph.Format.HorizontalAlignment = HorizontalAlignment.Right;
            //Append Picture for Header Paragraph and Format
            DocPicture headerimage = paragraph.AppendPicture(Image.FromFile(@"E:\Logo\doclog.png"));
            headerimage.VerticalAlignment = ShapeVerticalAlignment.Bottom;

            //Initialize a Footer Instance
            HeaderFooter footer = document.Sections[0].HeadersFooters.Footer;
            //Add Footer Paragraph and Format
            Paragraph paragraph2 = footer.AddParagraph();
            paragraph2.Format.HorizontalAlignment = HorizontalAlignment.Left;
            //Append Picture and Text for Footer Paragraph
            DocPicture footerimage = paragraph2.AppendPicture(Image.FromFile(@"E:\Logo\logo.jpeg"));
            TextRange TR = paragraph2.AppendText("Copyright © 2013 e-iceblue. All Rights Reserved.");
            TR.CharacterFormat.FontName = "Arial";
            TR.CharacterFormat.FontSize = 10;
            TR.CharacterFormat.TextColor = Color.Black;

            //Save and Launch
            document.SaveToFile("ImageHeaderFooter.docx", FileFormat.Docx);
            System.Diagnostics.Process.Start("ImageHeaderFooter.docx");
        }
    }
}
Imports System.Drawing
Imports Spire.Doc
Imports Spire.Doc.Documents
Imports Spire.Doc.Fields

Namespace ImageHeaderFooter
    Friend Class Program
        Shared Sub Main(ByVal args() As String)
            'Load Document
            Dim document As New Document()
            document.LoadFromFile("E:\Work\Documents\Spire.Doc for .NET.docx")

            'Initialize a Header Instance
            Dim header As HeaderFooter = document.Sections(0).HeadersFooters.Header
            'Add Header Paragraph and Format
            Dim paragraph As Paragraph = header.AddParagraph()
            paragraph.Format.HorizontalAlignment = HorizontalAlignment.Right
            'Append Picture for Header Paragraph and Format
            Dim headerimage As DocPicture = paragraph.AppendPicture(Image.FromFile("E:\Logo\doclog.png"))
            headerimage.VerticalAlignment = ShapeVerticalAlignment.Bottom

            'Initialize a Footer Instance
            Dim footer As HeaderFooter = document.Sections(0).HeadersFooters.Footer
            'Add Footer Paragraph and Format
            Dim paragraph2 As Paragraph = footer.AddParagraph()
            paragraph2.Format.HorizontalAlignment = HorizontalAlignment.Left
            'Append Picture and Text for Footer Paragraph
            Dim footerimage As DocPicture = paragraph2.AppendPicture(Image.FromFile("E:\Logo\logo.jpeg"))
            Dim TR As TextRange = paragraph2.AppendText("Copyright © 2013 e-iceblue. All Rights Reserved.")
            TR.CharacterFormat.FontName = "Arial"
            TR.CharacterFormat.FontSize = 10
            TR.CharacterFormat.TextColor = Color.Black

            'Save and Launch
            document.SaveToFile("ImageHeaderFooter.docx", FileFormat.Docx)
            System.Diagnostics.Process.Start("ImageHeaderFooter.docx")
        End Sub
    End Class
End Namespace
Spire.Doc, an easy-to-use component to perform Word tasks, allows developers to fast generate, write, edit and save Word (Word 97-2003, Word 2007, Word 2010) in C# and VB.NET for .NET, Silverlight and WPF.
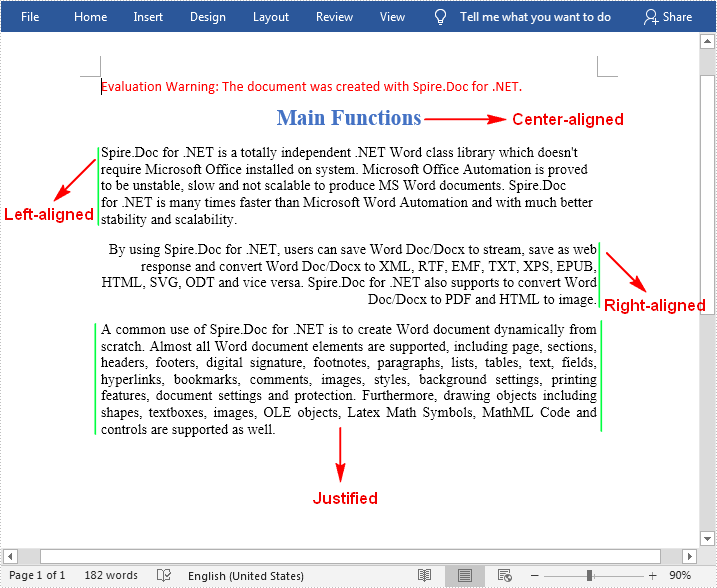
Text alignment is a paragraph formatting attribute that determines the appearance of the text in a whole paragraph. There are four types of text alignments available in Microsoft Word: left-aligned, center-aligned, right-aligned, and justified. In this article, you will learn how to programmatically set different text alignments for paragraphs in a Word document using Spire.Doc for .NET.
Install Spire.Doc for .NET
To begin with, you need to add the DLL files included in the Spire.Doc for .NET package as references in your .NET project. The DLL files can be either downloaded from this link or installed via NuGet.
PM> Install-Package Spire.Doc
Align Text in Word
The detailed steps are as follows:
- Create a Document instance.
- Load a sample Word document using Document.LoadFromFile() method.
- Get a specified section using Document.Sections[] property.
- Get a specified paragraph using Section.Paragraphs[] property.
- Get the paragraph format using Paragraph.Format property
- Set text alignment for the specified paragraph using ParagraphFormat.HorizontalAlignment property.
- Save the document to another file using Document.SaveToFile() method.
- C#
- VB.NET
using Spire.Doc;
using Spire.Doc.Documents;

namespace AlignText
{
    class Program
    {
        static void Main(string[] args)
        {
            //Create a Document instance
            Document doc = new Document();

            //Load a sample Word document
            doc.LoadFromFile(@"D:\Files\sample.docx");

            //Get the first section
            Section section = doc.Sections[0];

            //Get the first paragraph and make it center-aligned
            Paragraph p = section.Paragraphs[0];
            p.Format.HorizontalAlignment = HorizontalAlignment.Center;

            //Get the second paragraph and make it left-aligned
            Paragraph p1 = section.Paragraphs[1];
            p1.Format.HorizontalAlignment = HorizontalAlignment.Left;

            //Get the third paragraph and make it right-aligned
            Paragraph p2 = section.Paragraphs[2];
            p2.Format.HorizontalAlignment = HorizontalAlignment.Right;

            //Get the fourth paragraph and make it justified
            Paragraph p3 = section.Paragraphs[3];
            p3.Format.HorizontalAlignment = HorizontalAlignment.Justify;

            //Save the document
            doc.SaveToFile("WordAlignment.docx", FileFormat.Docx);
        }
    }
}
Apply for a Temporary License
If you'd like to remove the evaluation message from the generated documents, or to get rid of the function limitations, please request a 30-day trial license for yourself.
