
Spire.Doc for .NET (338)
Children categories
Mail Merge is a powerful feature in Microsoft Word that allows you to create multiple documents such as letters, labels, envelopes, and even e-mails from a single template document and a data source. It's particularly useful for tasks like sending personalized correspondence to a large number of recipients without having to write each letter individually.
In this article, you will learn how to perform a mail merge in a Word document using Spire.Doc for .NET.
- Understanding the Components of Mail Merge
- Create a Template Word Document
- Simple Mail Merge in a Word Document
- Mail Merge with a Region
- Mail Merge with Nested Regions
Install Spire.Doc for .NET
To begin with, you need to add the DLL files included in the Spire.Doc for .NET package as references in your .NET project. The DLL files can be either downloaded from this link or installed via NuGet.
PM> Install-Package Spire.Doc
Understanding the Components of Mail Merge
- Main Document: This is the template file where you design your letter, label, or other types of documents with placeholders (also known as merge fields) that will be filled in by data from the data source.
- Data Source: This is the spreadsheet or database containing the information you want to use to populate your main document. It can be an Excel sheet, Access database, CSV file, XML file or even a simple text file.
- Merge Fields: These are placeholders in the main document that will be replaced with data from the corresponding record in the data source.
Create a Template Word Document
To generate a template Word document with merge fields, it’s recommended that you use Word editors such as Microsoft Word. The visual interface of the Word editor allows you to design a unique layout, formatting, and other elements interactively for your template.
The following screenshot shows the addition of merge fields to a Word document using MS Word. Remember to use the "Image:FieldName" format if you want to merge an image into a merge field.
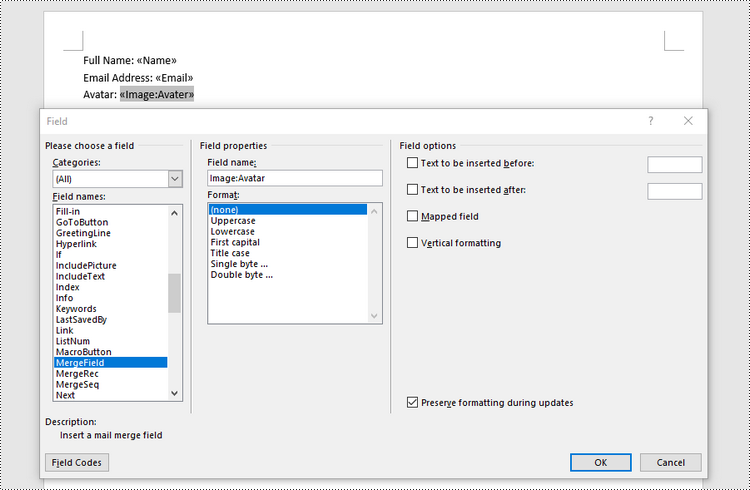
If you wish to create a template Word document using C# code, you can follow these steps.
- Create a Document object.
- Add a section.
- Add a paragraph to the section.
- Add merge fields to the paragraph using Paragraph.AppendField() method.
- Save the document to a Word file.
- C#
using Spire.Doc;
using Spire.Doc.Documents;

namespace CreateTemplate
{
    class Program
    {
        static void Main(string[] args)
        {
            // Create a Document object
            Document document = new Document();

            // Add a section
            Section section = document.AddSection();

            // Add a paragraph
            Paragraph paragraph = section.AddParagraph();

            // Add text and mail merge fields to the paragraph
            paragraph.AppendText("Full Name: ");
            paragraph.AppendField("Name", FieldType.FieldMergeField);
            paragraph.AppendBreak(BreakType.LineBreak);
            paragraph.AppendText("Email Address: ");
            paragraph.AppendField("Email", FieldType.FieldMergeField);
            paragraph.AppendBreak(BreakType.LineBreak);
            paragraph.AppendText("Avatar: ");
            paragraph.AppendField("Image:Avatar", FieldType.FieldMergeField);

            // Save the document
            document.SaveToFile("Template.docx", FileFormat.Docx2019);

            // Dispose resources
            document.Dispose();
        }
    }
}
Simple Mail Merge in a Word Document
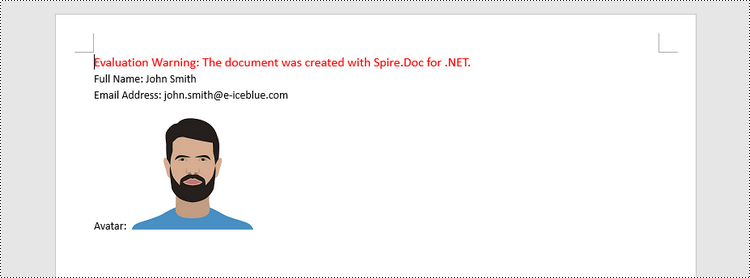
Spire.Doc offers the MailMerge.Execute() method to perform the specified mail merge operation in a Word document. This method has 6 overloads allowing users to perform a mail merge from different data sources, such as DataTable, DataView, and string arrays.
The steps to perform a mail merge using data provided in arrays are as follows.
- Create a Document object.
- Load a template Word document from a specified file path.
- Define an array to hold the field names.
- Define an array to hold the values that will be used to fill the fields
- Mail merge data into the fields using MailMerge.Execute() method.
- Save the document to a different Word file.
- C#
using Spire.Doc;
using Spire.Doc.Reporting;
using System.Drawing;

namespace MailMergeInDocument
{
    class Program
    {
        static void Main(string[] args)
        {
            // Create a Document object
            Document document = new Document();

            // Load the template Word document
            document.LoadFromFile("C:\\Users\\Administrator\\Desktop\\Template.docx");

            // Specify field names
            String[] fieldNames = {

                "Name",
                "Email",
                "Avatar"
            };

            // Specify values that'll be used to fill the fields
            String[] fieldValues = {

                "John Smith",
                "john.smith@e-iceblue.com",
                "C:\\Users\\Administrator\\Desktop\\avatar.png"
            };

            // Register an event which occurs when merging the image filed
            document.MailMerge.MergeImageField += new MergeImageFieldEventHandler(MailMerge_MergeImageField);

            // Mail merge data to the document
            document.MailMerge.Execute(fieldNames, fieldValues);

            // Save the document
            document.SaveToFile("MailMerge.docx", FileFormat.Docx2019);

            // Dispose resources
            document.Dispose();
        }

        // Fill an image field with a picture
        private static void MailMerge_MergeImageField(object sender, MergeImageFieldEventArgs field)
        {
            string filePath = field.FieldValue as string;

            if (!string.IsNullOrEmpty(filePath))
            {
                field.Image = Image.FromFile(filePath);
            }
        }
    }
}
Mail Merge with a Region
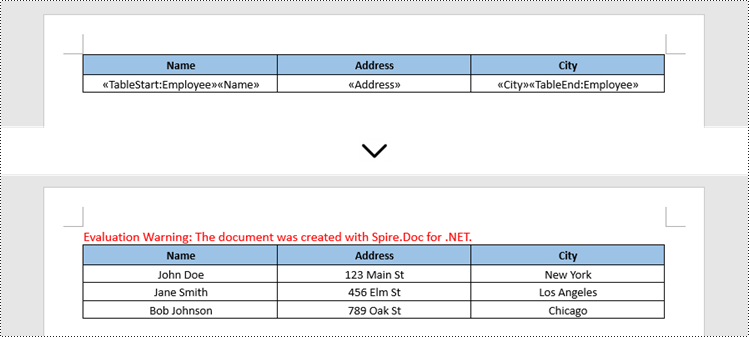
A region refers to a specific area within a document where you want to insert data from your data source. Mail Merge will repeat that region for each record in the data source. Spire.Doc offers the MailMerge.ExecuteWidthRegion() method to execute mail merge with a region.
The steps to perform a mail merge with a region using the data provided by a DataTable are as follows.
- Create a Document object.
- Load a template Word document from a specified file path.
- Create a DataTable object, which will be used as the data source.
- Execute mail merge with the region using MailMerge.ExecuteWidthRegion() method.
- Save the document to a different Word file.
- C#
using Spire.Doc;
using System.Data;

namespace MailMergeWithGroup
{
    class Program
    {
        static void Main(string[] args)
        {

            // Create a Document object
            Document document = new Document();

            // Load a template Word document
            document.LoadFromFile("C:\\Users\\Administrator\\Desktop\\Template.docx");

            // Create a datatable, specifying table name
            DataTable table = new DataTable("Employee");

            // Add sample data to table
            table.Columns.Add("Name");
            table.Columns.Add("Address");
            table.Columns.Add("City");
            table.Rows.Add("John Doe", "123 Main St", "New York");
            table.Rows.Add("Jane Smith", "456 Elm St", "Los Angeles");
            table.Rows.Add("Bob Johnson", "789 Oak St", "Chicago");

            // Mail merge within the region
            document.MailMerge.ExecuteWidthRegion(table);

            // Save the document
            document.SaveToFile("MailMergeWithRegion.docx", FileFormat.Docx2019);

            // Dispose resources
            document.Dispose();
        }
    }
}
Mail Merge with Nested Regions
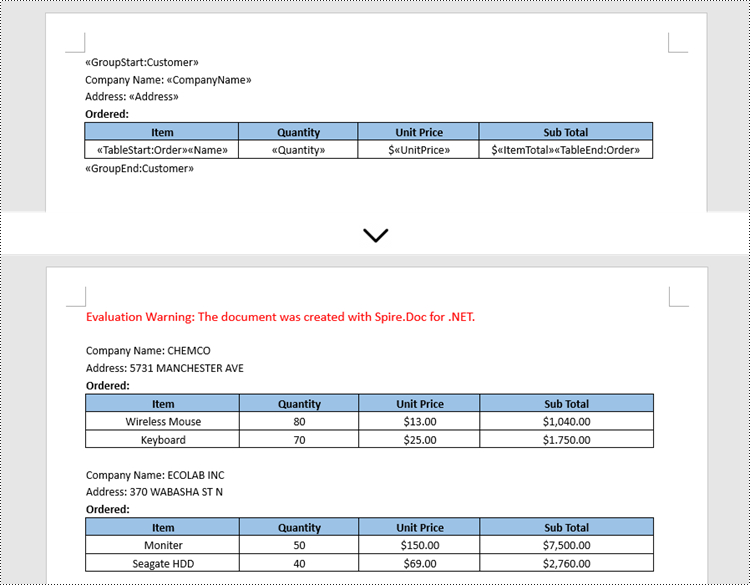
Mail merge for nested groups works by replacing merge fields within nested regions with data that is organized in a hierarchical structure. Nested regions allow you to create more complex layouts where the content of one region depends on the data in another region.
The steps to perform a mail merge with nested regions using the data from an XML file are as follows.
- Create a Document object.
- Load a template Word document from a specified file path.
- Read data from an XML file to a DataSet object.
- Create a List<DictionaryEntry> object to store the merge field information.
- Create DicitionaryEntry objects and add them to the list, which specify the merge field names and associated expressions.
- Execute mail merge with the nested regions using MailMerge.ExecuteWidthNestedRegion() method.
- Save the document to a different Word file.
- C#
using Spire.Doc;
using System.Collections;
using System.Data;

namespace MailMergeWithNestedRegions
{
    class Program
    {
        static void Main(string[] args)
        {
            // Create a Document object
            Document document = new Document();

            // Load a template Word document
            document.LoadFromFile("C:\\Users\\Administrator\\Desktop\\Template.docx");

            // Read data from an XML file to a DataSet object
            DataSet dataSet = new DataSet();
            dataSet.ReadXml("C:\\Users\\Administrator\\Desktop\\Orders.xml");

            // Create a List object to store the merge field information
            List list = new List();

            // Create two DicitionaryEntry objects and add them to the list (each object specifies the merge field name and associated expression)
            DictionaryEntry dictionaryEntry = new DictionaryEntry("Customer", string.Empty);
            list.Add(dictionaryEntry);

            dictionaryEntry = new DictionaryEntry("Order", "Customer_Id = %Customer.Customer_Id%");
            list.Add(dictionaryEntry);

            // Perform the mail merge operation with the nested region
            document.MailMerge.ExecuteWidthNestedRegion(dataSet, list);

            // Save to file
            document.SaveToFile("MailMergeWithNestedRegions.docx", FileFormat.Docx2019);

            // Dispose resources
            document.Dispose();
        }
    }
}
Apply for a Temporary License
If you'd like to remove the evaluation message from the generated documents, or to get rid of the function limitations, please request a 30-day trial license for yourself.
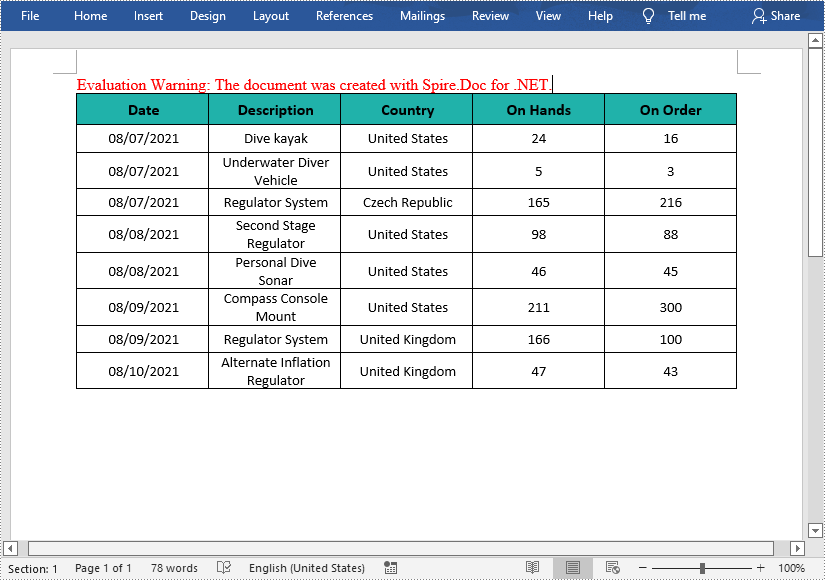
In MS Word, the tables can organize and present data in rows and columns, which makes the information easier to understand and analyze. In this article, you will learn how to programmatically create a table with data in a Word document using Spire.Doc for .NET.
Install Spire.Doc for .NET
To begin with, you need to add the DLL files included in the Spire.Doc for.NET package as references in your .NET project. The DLL files can be either downloaded from this link or installed via NuGet.
PM> Install-Package Spire.Doc
Create a Simple Table in Word
Below are some of the core classes and methods provided by Spire.Doc for .NET for creating and formatting tables in Word.
| Name | Description |
| Table Class | Represents a table in a Word document. |
| TableRow Class | Represents a row in a table. |
| TableCell Class | Represents a specific cell in a table. |
| Section.AddTbale() Method | Adds a new table to the specified section. |
| Table.ResetCells() Method | Resets row number and column number. |
| Table.Rows Property | Gets the table rows. |
| TableRow.Height Property | Sets the height of the specified row. |
| TableRow.Cells Property | Returns the cells collection. |
| TableRow.RowFormat Property | Gets the format of the specified row. |
The detailed steps are as follows
- Create a Document object and add a section to it.
- Prepare the data for the header row and other rows, storing them in a one-dimensional string array and a two-dimensional string array respectively.
- Add a table to the section using Section.AddTable() method.
- Insert data to the header row, and set the row formatting, including row height, background color, and text alignment.
- Insert data to the rest of the rows and apply formatting to these rows.
- Save the document to another file using Document.SaveToFile() method.
- C#
- VB.NET
using System;
using System.Drawing;
using Spire.Doc;
using Spire.Doc.Documents;
using Spire.Doc.Fields;

namespace WordTable
{
    class Program
    {
        static void Main(string[] args)
        {
            //Create a Document object
            Document doc = new Document();
            //Add a section
            Section s = doc.AddSection();

            //Define the data for the table
            String[] Header = { "Date", "Description", "Country", "On Hands", "On Order" };
            String[][] data = {
                                  new String[]{ "08/07/2021","Dive kayak","United States","24","16"},
                                  new String[]{ "08/07/2021","Underwater Diver Vehicle","United States","5","3"},
                                  new String[]{ "08/07/2021","Regulator System","Czech Republic","165","216"},
                                  new String[]{ "08/08/2021","Second Stage Regulator","United States","98","88"},
                                  new String[]{ "08/08/2021","Personal Dive Sonar","United States","46","45"},
                                  new String[]{ "08/09/2021","Compass Console Mount","United States","211","300"},
                                  new String[]{ "08/09/2021","Regulator System","United Kingdom","166","100"},
                                  new String[]{ "08/10/2021","Alternate Inflation Regulator","United Kingdom","47","43"},
                              };
            //Add a table
            Table table = s.AddTable(true);
            table.ResetCells(data.Length + 1, Header.Length);

            //Set the first row as table header
            TableRow FRow = table.Rows[0];
            FRow.IsHeader = true;

            //Set the height and color of the first row
            FRow.Height = 23;
            FRow.Cells[i].CellFormat.Shading.BackgroundPatternColor = Color.LightSeaGreen;
            for (int i = 0; i < Header.Length; i++)
            {
                //Set alignment for cells
                Paragraph p = FRow.Cells[i].AddParagraph();
                FRow.Cells[i].CellFormat.VerticalAlignment = VerticalAlignment.Middle;
                p.Format.HorizontalAlignment = HorizontalAlignment.Center;

                //Set data format
                TextRange TR = p.AppendText(Header[i]);
                TR.CharacterFormat.FontName = "Calibri";
                TR.CharacterFormat.FontSize = 12;
                TR.CharacterFormat.Bold = true;
            }

            //Add data to the rest of rows and set cell format
            for (int r = 0; r < data.Length; r++)
            {
                TableRow DataRow = table.Rows[r + 1];
                DataRow.Height = 20;
                for (int c = 0; c < data[r].Length; c++)
                {
                    DataRow.Cells[c].CellFormat.VerticalAlignment = VerticalAlignment.Middle;
                    Paragraph p2 = DataRow.Cells[c].AddParagraph();
                    TextRange TR2 = p2.AppendText(data[r][c]);
                    p2.Format.HorizontalAlignment = HorizontalAlignment.Center;

                    //Set data format
                    TR2.CharacterFormat.FontName = "Calibri";
                    TR2.CharacterFormat.FontSize = 11;
                }
            }

            //Save the document
            doc.SaveToFile("WordTable.docx", FileFormat.Docx2013);
        }
    }
}
Apply for a Temporary License
If you'd like to remove the evaluation message from the generated documents, or to get rid of the function limitations, please request a 30-day trial license for yourself.
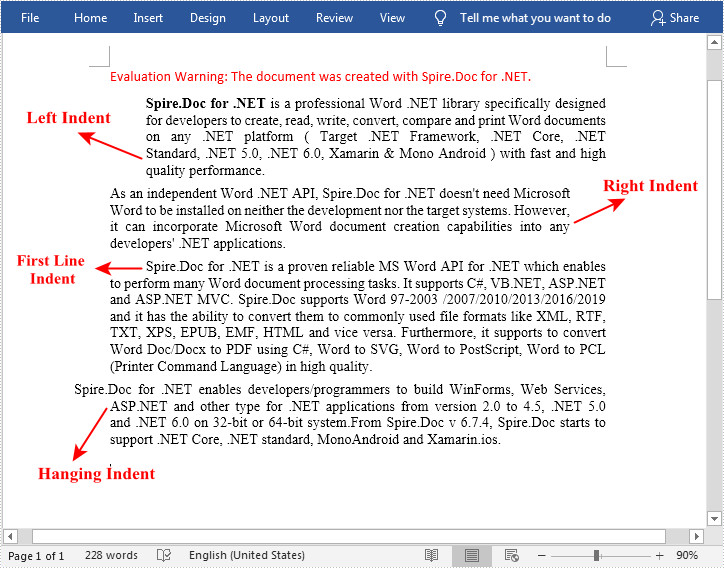
In Word documents, indentation is a paragraph format used to adjust the distance between paragraph body and page margin. It includes left indent, right indent, first line indent and hanging indent. Left indent and right indent can be applied to all lines of a paragraph, while first line indent can only be applied to first line of a paragraph. As for the hanging indent, it can be applied to every line of the paragraph except the first one. This article introduces how to programmatically set paragraph indents in a Word document using Spire.Doc for .NET.
Install Spire.Doc for .NET
To begin with, you need to add the DLL files included in the Spire.Doc for .NET package as references in your .NET project. The DLL files can be either downloaded from this link or installed via NuGet.
PM> Install-Package Spire.Doc
Set Paragraph Indents in Word
The table below lists some of the core classes and properties that are used to set different paragraph indents in a Word document.
| Name | Description |
| ParagraphFormat Class | Represents the format of a paragraph. |
| ParagraphFormat.LeftIndent Property | Returns or sets the value that represents the left indent for paragraph. |
| ParagraphFormat.RightIndent Property | Returns or sets the value that represents the right indent for paragraph. |
| ParagraphFormat.FirstLineIndent Property | Gets or sets the value for first line or hanging indent. Positive value represents first-line indent, and Negative value represents hanging indent. |
The detailed steps are as follows:
- Create a Document instance.
- Load a sample Word document using Document.LoadFromFile() method.
- Get a specified section using Document.Sections[] property.
- Get a specified paragraph using Section.Paragraphs[] property.
- Get the paragraph format using Paragraph.Format property, and then set the paragraph indent using the above listed properties of ParagraphFormat class.
- Save the document to another file using Document.SaveToFile() method.
- C#
- VB.NET
using Spire.Doc;
using Spire.Doc.Documents;

namespace WordIndent
{
    class Program
    {
        static void Main(string[] args)
        {
            //Create a Document instance
            Document doc = new Document();

            //Load a sample Word document
            doc.LoadFromFile("sample.docx");

            //Get the first paragraph and set left indent
            Paragraph para1 = doc.Sections[0].Paragraphs[0];
            para1.Format.LeftIndent = 30;

            //Get the second paragraph and set right indent
            Paragraph para2 = doc.Sections[0].Paragraphs[1];
            para2.Format.RightIndent = 30;

            //Get the third paragraph and set first line indent
            Paragraph para3 = doc.Sections[0].Paragraphs[2];
            para3.Format.FirstLineIndent = 30;

            //Get the fourth paragraph and set hanging indent
            Paragraph para4 = doc.Sections[0].Paragraphs[3];
            para4.Format.FirstLineIndent = -30;

            //Save the document to file
            doc.SaveToFile("Indent.docx", FileFormat.Docx2010);
        }
    }
}
Apply for a Temporary License
If you'd like to remove the evaluation message from the generated documents, or to get rid of the function limitations, please request a 30-day trial license for yourself.
