How to Convert PDF to CSV in Python (Fast & Accurate Table Extraction)

Working with PDFs that contain tables, reports, or invoice data? Manually copying that information into spreadsheets is slow, error-prone, and just plain frustrating. Fortunately, there's a smarter way: you can convert PDF to CSV in Python automatically — making your data easy to analyze, import, or automate.
In this guide, you’ll learn how to use Python for PDF to CSV conversion by directly extracting tables with Spire.PDF for Python — a pure Python library that doesn’t require any external tools.
✅ No Adobe or third-party tools required
✅ High-accuracy table recognition
✅ Ideal for structured data workflows
In this guide, we’ll cover:
- Convert PDF to CSV in Python Using Table Extraction
- Related Use Cases
- Why Use Spire.PDF for PDF to CSV Conversion in Python?
- Frequently Asked Questions
Convert PDF to CSV in Python Using Table Extraction
The best way to convert PDF to CSV using Python is by extracting tables directly — no need for intermediate formats like Excel. This method is fast, clean, and highly effective for documents with structured data such as invoices, bank statements, or reports. It gives you usable CSV output with minimal code and high accuracy, making it ideal for automation and data analysis workflows.
Step 1: Install Spire.PDF for Python
Before writing code, make sure to install the required library. You can install Spire.PDF for Python via pip:
pip install spire.pdf
You can also install Free Spire.PDF for Python if you're working on smaller tasks:
pip install spire.pdf.free
Step 2: Python Code — Extract Table from PDF and Save as CSV
- Python
from spire.pdf import PdfDocument, PdfTableExtractor
import csv
import os
# Load the PDF document
pdf = PdfDocument()
pdf.LoadFromFile("Sample.pdf")
# Create a table extractor
extractor = PdfTableExtractor(pdf)
# Ensure output directory exists
os.makedirs("output/Tables", exist_ok=True)
# Loop through each page in the PDF
for page_index in range(pdf.Pages.Count):
# Extract tables on the current page
tables = extractor.ExtractTable(page_index)
for table_index, table in enumerate(tables):
table_data = []
# Extract all rows and columns
for row in range(table.GetRowCount()):
row_data = []
for col in range(table.GetColumnCount()):
# Get cleaned cell text
cell_text = table.GetText(row, col).replace("\n", "").strip()
row_data.append(cell_text)
table_data.append(row_data)
# Write the table to a CSV file
output_path = os.path.join("output", "Tables", f"Page{page_index + 1}-Table{table_index + 1}.csv")
with open(output_path, "w", newline="", encoding="utf-8") as csvfile:
writer = csv.writer(csvfile)
writer.writerows(table_data)
# Release PDF resources
pdf.Dispose()
The conversion result:

What is PdfTableExtractor?
PdfTableExtractor is a utility class provided by Spire.PDF for Python that detects and extracts table structures from PDF pages. Unlike plain text extraction, it maintains the row-column alignment of tabular data, making it ideal for converting PDF tables to CSV with clean structure.
Best for:
- PDFs with structured tabular data
- Automated Python PDF to CSV conversion
- Fast Python-based data workflows
Relate Article: How to Convert PDFs to Excel XLSX Files with Python
Related Use Cases
If your PDF doesn't contain traditional tables — such as when it's formatted as paragraphs, key-value pairs, or scanned as an image — the following approaches can help you convert such PDFs to CSV using Python effectively:
Useful when data is in paragraph or report form — format it into table-like CSV using Python logic.
Perfect for image-based PDFs — use OCR to detect and export tables to CSV.
Why Choose Spire.PDF for Python?
Spire.PDF for Python is a robust PDF SDK tailored for developers. Whether you're building automated reports, analytics tools, or ETL pipelines — it just works.
Key Benefits:
- Accurate Table Recognition
Smartly extracts structured data from tables
- Pure Python, No Adobe Needed
Lightweight and dependency-free
- Multi-Format Support
Also supports conversion to text, images, Excel, and more
Frequently Asked Questions
Can I convert PDF to CSV using Python?
Yes, you can convert PDF to CSV in Python using Spire.PDF. It supports both direct table extraction to CSV and an optional workflow that converts PDFs to Excel first. No Adobe Acrobat or third-party tools are required.
What's the best way to extract tables from PDFs in Python?
The most efficient way is using Spire.PDF’s PdfTableExtractor class. It automatically detects tables on each page and lets you export structured data to CSV with just a few lines of Python code — ideal for invoices, reports, and automated processing.
Why would I convert PDF to Excel before CSV?
You might convert PDF to Excel first if the layout is complex or needs manual review. This gives you more control over formatting and cleanup before saving as CSV, but it's slower than direct extraction and not recommended for automation workflows.
Does Spire.PDF work without Adobe Acrobat?
Yes. Spire.PDF for Python is a 100% standalone library that doesn’t rely on Adobe Acrobat or any external software. It's a pure Python solution for converting, extracting, and manipulating PDF content programmatically.
Conclusion
Converting PDF to CSV in Python doesn’t have to be a hassle. With Spire.PDF for Python, you can:
- Automatically extract structured tables to CSV
- Build seamless, automated workflows in Python
- Handle both native PDFs and scanned ones (with OCR)
Get a Free License
Spire.PDF for Python offers a free edition suitable for basic tasks. If you need access to more features, you can also apply for a free license for evaluation use. Simply submit a request, and a license key will be sent to your email after approval.
How to Filter Excel Pivot Tables with Python: Step-by-Step Guide

Introduction
Pivot Tables in Excel are versatile tools that enable efficient data summarization and analysis. They allow users to explore data, uncover insights, and generate reports dynamically. One of the most powerful features of Pivot Tables is filtering, which lets users focus on specific data subsets without altering the original data structure.
What This Tutorial Covers
This tutorial provides a detailed, step-by-step guide on how to programmatically apply various types of filters to a Pivot Table in Excel using Python with the Spire.XLS for Python library. It covers the following topics:
- Benefits of Filtering Data in Pivot Tables
- Install Python Excel Library – Spire.XLS for Python
- Add Report Filter to Pivot Table
- Apply Row Field Filter in Pivot Table
- Apply Column Field Filter in Pivot Table
- FAQs
- Conclusion
Benefits of Filtering Data in Pivot Tables
Filtering is an essential feature of Pivot Tables that provides the following benefits:
- Enhanced Data Analysis: Quickly focus on specific segments or categories of your data to draw meaningful insights.
- Dynamic Data Updates: Filters automatically adjust to reflect changes when the underlying data is refreshed, keeping your analysis accurate.
- Improved Data Organization: Display only relevant data in your reports without altering or deleting the original dataset, preserving data integrity.
Install Python Excel Library – Spire.XLS for Python
Before working with Pivot Tables in Excel using Python, ensure the Spire.XLS for Python library is installed. The quickest way to do this is using pip, Python’s package manager. Simply run the following command in your terminal or command prompt:
pip install spire.xls
Once installed, you’re ready to start automating Pivot Table filtering in your Python projects.
Add Report Filter to Pivot Table
A report filter allows you to filter the entire Pivot Table based on a particular field and value. This type of filter is useful when you want to display data for a specific category or item globally across the Pivot Table, without changing the layout.
Steps to Add a Report Filter
- Initialize the Workbook: Create a Workbook object to manage your Excel file.
- Load the Excel File: Use Workbook.LoadFromFile() to load an existing file containing a Pivot Table.
- Access the Worksheet: Use Workbook.Worksheets[] to select the desired worksheet.
- Locate the Pivot Table: Use Worksheet.PivotTables[] to access the specific Pivot Table.
- Define the Report Filter: Create a PivotReportFilter object specifying the field to filter.
- Apply the Report Filter: Add the filter to the Pivot Table using XlsPivotTable.ReportFilters.Add().
- Save the Updated File: Use Workbook.SaveToFile() to save your changes.
Code Example
- Python
from spire.xls import *
# Create an object of the Workbook class
workbook = Workbook()
# Load an existing Excel file containing a Pivot Table
workbook.LoadFromFile("Sample.xlsx")
# Access the first worksheet
sheet = workbook.Worksheets[0]
# Access the first Pivot Table in the worksheet
pt = sheet.PivotTables[0]
# Create a report filter for the field "Product"
reportFilter = PivotReportFilter("Product", True)
# Add the report filter to the pivot table
pt.ReportFilters.Add(reportFilter)
# Save the updated workbook to a new file
workbook.SaveToFile("AddReportFilter.xlsx", FileFormat.Version2016)
workbook.Dispose()

Apply Row Field Filter in Pivot Table
Row field filters allow you to filter data displayed in the row fields of an Excel Pivot Table. These filters can be based on labels (specific text values) or values (numeric criteria).
Steps to Add a Row Field Filter
- Initialize the Workbook: Create a Workbook object to manage the Excel file.
- Load the Excel File: Use Workbook.LoadFromFile() to load your target file containing a Pivot Table.
- Access the Worksheet: Select the desired worksheet using Workbook.Worksheets[].
- Locate the Pivot Table: Access the specific Pivot Table using Worksheet.PivotTables[].
- Add a Row Field Filter: Add a label filter or value filter using
XlsPivotTable.RowFields[].AddLabelFilter() or
XlsPivotTable.RowFields[].AddValueFilter().
- Calculate Pivot Table Data: Use XlsPivotTable.CalculateData() to calculate the pivot table data.
- Save the Updated File: Save your changes using Workbook.SaveToFile().
Code Example
- Python
from spire.xls import *
# Create an object of the Workbook class
workbook = Workbook()
# Load an Excel file
workbook.LoadFromFile("Sample.xlsx")
# Get the first worksheet
sheet = workbook.Worksheets[0]
# Get the first pivot table
pt = sheet.PivotTables[0]
# Add a value filter to the first row field in the pivot table
pt.RowFields[0].AddValueFilter(PivotValueFilterType.GreaterThan, pt.DataFields[0], Int32(5000), None)
# Or add a label filter to the first row field in the pivot table
# pt.RowFields[0].AddLabelFilter(PivotLabelFilterType.Equal, "Mike", None)
# Calculate the pivot table data
pt.CalculateData()
# Save the resulting file
workbook.SaveToFile("AddRowFieldFilter.xlsx", FileFormat.Version2016)
workbook.Dispose()

Apply Column Field Filter in Pivot Table
Column field filters in Excel Pivot Tables allow you to filter data displayed in the column fields. Similar to row field filters, column field filters can be based on labels (text values) or values (numeric criteria).
Steps to Add Column Field Filter
- Initialize the Workbook: Create a Workbook object to manage your Excel file.
- Load the Excel File: Use Workbook.LoadFromFile() to open your file containing a Pivot Table.
- Access the Worksheet: Select the target worksheet using Workbook.Worksheets[].
- Locate the Pivot Table: Use Worksheet.PivotTables[] to access the desired Pivot Table.
- Add a Column Field Filter: Add a label filter or value filter using
XlsPivotTable.ColumnFields[].AddLabelFilter() or
XlsPivotTable.ColumnFields[].AddValueFilter().
- Calculate Pivot Table Data: Use XlsPivotTable.CalculateData() to calculate the Pivot Table data.
- Save the Updated File: Save your changes using Workbook.SaveToFile().
Code Example
- Python
from spire.xls import *
# Create an object of the Workbook class
workbook = Workbook()
# Load the Excel file
workbook.LoadFromFile("Sample.xlsx")
# Access the first worksheet
sheet = workbook.Worksheets[0]
# Access the first Pivot Table
pt = sheet.PivotTables[0]
# Add a label filter to the first column field
pt.ColumnFields[0].AddLabelFilter(PivotLabelFilterType.Equal, String("Laptop"), None)
# # Or add a value filter to the first column field
# pt.ColumnFields[0].AddValueFilter(PivotValueFilterType.Between, pt.DataFields[0], Int32(5000), Int32(10000))
# Calculate the pivot table data
pt.CalculateData()
# Save the updated workbook
workbook.SaveToFile("AddColumnFieldFilter.xlsx", FileFormat.Version2016)
workbook.Dispose()

Conclusion
Filtering Pivot Tables in Excel is crucial for effective data analysis, allowing users to zoom in on relevant information without disrupting the table’s structure. Using Spire.XLS for Python, developers can easily automate adding, modifying, and managing filters on Pivot Tables programmatically. This tutorial covered the primary filter types—report filters, row field filters, and column field filters—with detailed code examples to help you get started quickly.
FAQs
Q: Can I add multiple filters to the same Pivot Table?
A: Yes, you can add multiple report filters, row filters, and column filters simultaneously to customize your data views with Spire.XLS.
Q: Do filters update automatically if the source data changes?
A: Yes, after refreshing the Pivot Table or recalculating with CalculateData(), filters will reflect the latest data.
Q: Can I filter based on custom conditions?
A: Spire.XLS supports many filter types including label filters (equals, begins with, contains) and value filters (greater than, less than, between).
Q: Is it possible to remove filters programmatically?
A: Yes, you can remove filters by clearing or resetting the respective filter collections or fields.
Get a Free License
To fully experience the capabilities of Spire.XLS for .NET without any evaluation limitations, you can request a free 30-day trial license.
Extract Background Images from PowerPoint Presentations using C# .NET

PowerPoint presentations often contain background images that enhance the visual appeal of slides. Extracting these background images can be crucial for designers and content managers who wish to reuse, analyze, or archive slide visuals independently of the slide content.
This guide provides a clear, step-by-step approach to extracting background images from PowerPoint presentations in .NET using C# and the Spire.Presentation for .NET library.
Table of Contents
- Why Extract Background Images from PowerPoint
- Install .NET PowerPoint Library – Spire.Presentation for .NET
- Extract Background Images from PowerPoint in .NET using C#
- FAQs
- Conclusion
Why Extract Background Images from PowerPoint
Extracting background images from PowerPoint provides several key benefits:
- Reuse Designs: Repurpose background images in other presentations or design projects.
- Analyze Slides: Review and understand slide designs by examining background images separately.
- Archive Visuals: Store background images for documentation, backup, or future use.
Install .NET PowerPoint Library – Spire.Presentation for .NET
Spire.Presentation for .NET is a robust .NET PowerPoint library that enables developers to create, manipulate, and convert PowerPoint presentations without the need for Microsoft PowerPoint.
Key Features of Spire.Presentation for .NET
Here are some key features of Spire.Presentation for .NET:
- Create and edit PowerPoint presentations.
- Convert PowerPoint to other formats such as PDF, Images, HTML, Markdown, and XPS.
- Secure PowerPoint presentations
- Merge/split PowerPoint presentations.
- Slides management, including adding/removing slides, setting/extracting/removing backgrounds, and more.
- Image/shape/chart/smartart insertion and manipulation.
- Animate text/shapes.
Install Spire.Presentation for .NET
Before starting the background image extraction process, you will need to install Spire.Presentation for .NET into your C# project using one of the following methods:
Option1. Install via NuGet (Recommended)
Install-Package Spire.Presentation
Option 2: Manually Add DLLs to Your Project
- Download the Spire.Presentation package and extract the files.
- In Visual Studio, right-click References > Add Reference > Browse, then select the appropriate Spire.Presentation.dll based on your target framework.
Extract Background Images from PowerPoint in .NET using C#
Background images in PowerPoint can be applied directly to individual slides or inherited from slide masters. This section demonstrates how to extract both types of background images using Spire.Presentation.
Extract Background Images from Individual Slides
To extract background images from individual slides in PowerPoint, follow these steps:
- Create a Presentation object and load the presentation.
- Loop through all slides in the presentation.
- Check if the slide’s background fill type is image fill (FillFormatType.Picture).
- If yes, retrieve and save the background image.
Sample Code
- C#
using Spire.Presentation;
using Spire.Presentation.Drawing;
using System.IO;
namespace ExtractSlideBackgroundImages
{
internal class Program
{
static void Main(string[] args)
{
// Specify the input file path and output folder
string inputFile = @"example1.pptx";
string outputFolder = @"ExtractedBackgrounds\Slides";
// Load the PowerPoint presentation
Presentation presentation = new Presentation();
presentation.LoadFromFile(inputFile);
// Create the output folder
Directory.CreateDirectory(outputFolder);
// Loop through all slides
for (int i = 0; i < presentation.Slides.Count; i++)
{
// Check if the slide's background fill type is image fill
var fill = presentation.Slides[i].SlideBackground.Fill;
if (fill.FillType == FillFormatType.Picture)
{
// Extract and save the background image
var image = fill.PictureFill.Picture.EmbedImage;
if (image != null)
{
string outputPath = Path.Combine(outputFolder, $"SlideBackground_{i + 1}.png");
image.Image.Save(outputPath, ImageFormat.Png);
}
}
}
}
}
}
Extract Background Images from Slide Masters
Slide masters define the design and layout of slides, including background images. To extract background images from slide masters:
- Create a Presentation object and load the presentation.
- Loop through all slide masters in the presentation.
- For each master, check if its background fill type is image fill.
- If yes, extract and save the background image.
Sample Code
- C#
using Spire.Presentation;
using Spire.Presentation.Drawing;
using System.Drawing.Imaging;
using System.IO;
namespace ExtractBackgroundImages
{
internal class Program
{
static void Main(string[] args)
{
// Specify the input file path and output folder
string inputFile = @"example2.pptx";
string outputFolder = @"C:\ExtractedBackgrounds\Masters";
// Load the PowerPoint presentation
Presentation presentation = new Presentation();
presentation.LoadFromFile(inputFile);
// Create the output folder
Directory.CreateDirectory(outputFolder);
// Loop through all slide masters
for (int i = 0; i < presentation.Masters.Count; i++)
{
// Check if the slide master's background fill type is image fill
var fill = presentation.Masters[i].SlideBackground.Fill;
if (fill.FillType == FillFormatType.Picture)
{
// Extract and save the background image
var image = fill.PictureFill.Picture.EmbedImage;
if (image != null)
{
string outputPath = Path.Combine(outputFolder, $"MasterBackground_{i + 1}.png");
image.Image.Save(outputPath, ImageFormat.Png);
}
}
}
}
}
}
Conclusion
Extracting background images from PowerPoint presentations is a crucial technique for developers and designers who want to access slide visuals independently of content. By leveraging the Spire.Presentation for .NET library with C#, you can programmatically extract background images from both individual slides and slide masters with ease.
FAQs
Q: What image formats are supported for extraction?
A: Extracted images can be saved in PNG, JPEG, BMP, or other formats supported by .NET.
Q: In addition to background images, can I extract other images from PowerPoint slides?
A: Yes, you can extract other images, such as those embedded within slide content or shapes, using Spire.Presentation.
Q: Does Spire.Presentation supports extracting text from PowerPoint presentations?
A: Yes, Spire.Presentation can also extract text from slides, including text in shapes, tables, and more.
Get a Free License
To fully experience the capabilities of Spire.Presentation for .NET without any evaluation limitations, you can request a free 30-day trial license.
Spire.XLS for C++ 15.5.0 supports setting page size when converting Excel to PDF
We're pleased to announce the release of Spire.XLS for C++ 15.5.0. This release adds a list of new features, such as supports setting page size during Excel to PDF conversion, embedding images into cells, grouping shapes, and enabling revision mode. Details are shown below.
Here is a list of changes made in this release
| Category | ID | Description |
| Adjustment | - | Upgrades SkiaSharp->3.116.1 |
| New feature | - | Supports setting page size when converting Excel to PDF.
intrusive_ptr workbook = new Workbook(); intrusive_ptr sheet = workbook->GetWorksheets()->Add(L""0""); intrusive_ptr a1 = sheet->GetRange(L""A1""); a1->SetValue(L""taatat""); sheet->GetPageSetup()->SetPaperSize(PaperSizeType::PaperA0); workbook->SaveToFile(outputFile.c_str(), ExcelVersion::Version2013); workbook->Dispose(); |
| New feature | - | Supports grouping Shapes.
intrusive_ptr book = new Workbook(); book->GetWorksheets()->Clear(); intrusive_ptr sheet = book->GetWorksheets()->Add(L""0""); intrusive_ptr shape1 = sheet->GetPrstGeomShapes()->AddPrstGeomShape(1, 3, 50, 50, PrstGeomShapeType::RoundRect); intrusive_ptr shape2 = sheet->GetPrstGeomShapes()->AddPrstGeomShape(5, 3, 50, 50, PrstGeomShapeType::Triangle); wcout << sheet->GetName() << endl; intrusive_ptr groupShapeCollection = sheet->GetGroupShapeCollection(); vector> shapes; shapes.push_back(shape1); shapes.push_back(shape2); groupShapeCollection->Group(shapes); book->SaveToFile(outputFile.c_str(), ExcelVersion::Version2013); book->Dispose(); |
| New feature | - | Supports retrieving all shapes in an Excel document.
intrusive_ptr book = new Workbook();
book->LoadFromFile(inputFile.c_str());
intrusive_ptr sheet = dynamic_pointer_cast(book->GetWorksheets()->Get(0));
std::vector> images;
for (int i = 0; i < sheet->GetShapes()->GetCount(); ++i)
{
intrusive_ptr shape = dynamic_pointer_cast(sheet->GetShapes()->Get(i));
intrusive_ptr image = shape->SaveToImage();
shape->SaveToImage((outputFile + L""Bug_out_"" + std::to_wstring(i) + L"".png"").c_str());
}
|
| New feature | - | Supports enabling revision mode.
intrusive_ptr workbook = new Workbook(); workbook->LoadFromFile(inputFile.c_str()); workbook->TrackedChanges(true); workbook->SaveToFile(outputFile.c_str(), ExcelVersion::Version2013); |
| New feature | - | Supports embedding images into cells.
intrusive_ptr workbook = new Workbook(); workbook->LoadFromFile(inputFile.c_str()); intrusive_ptr sheet = dynamic_pointer_cast(workbook->GetWorksheets()->Get(0)); intrusive_ptr range = dynamic_pointer_cast(sheet->GetRange(L""D1"")); intrusive_ptr fs = new Stream(inputFile_Img.c_str()); range->InsertOrUpdateCellImage(fs, true); workbook->SaveToFile(outputFile.c_str(), ExcelVersion::Version2013); workbook->Dispose(); |
| New feature | - | Supports grouping PivotTables.
intrusive_ptr workbook(new Workbook()); workbook->LoadFromFile(inputFile.c_str()); intrusive_ptr pivotSheet = workbook->GetWorksheets()->Get(0); intrusive_ptr pivot = dynamic_pointer_cast(pivotSheet->GetPivotTables()->Get(0)); intrusive_ptr dateBaseField = pivot->GetPivotFields()->Get(L""number""); dateBaseField->CreateGroup(3000, 3800, 1); pivot->CalculateData(); workbook->SaveToFile(outputFile.c_str()); |
Spire.XLS for Python 15.5.0 supports grouping Shapes
We're pleased to announce the release of Spire.XLS for Python 15.5.0. This version supports grouping Shapes. Besides, some known bugs are fixed successfully, such as the issue where saving a chart to an image caused the program to report a "SpireException: Arg_InvalidCastException" error. More details are listed below.
Here is a list of changes made in this release
| Category | ID | Description |
| New feature | SPIREXLS-4191 | Supports grouping Shapes.
workbook = Workbook() workbook.LoadFromFile(inputFile) worksheet = workbook.Worksheets[0] shape1 = worksheet.PrstGeomShapes[0] shape2 = worksheet.PrstGeomShapes[1] groupShapeCollection = worksheet.GetGroupShapeCollection() groupShapeCollection.Group([shape1, shape2]) workbook.SaveToFile(outputFile, ExcelVersion.Version2013) workbook.Dispose() |
| New feature | SPIREXLS-4460 | Supports replacing the font.
wb = Workbook()
wb.LoadFromFile(inputFile)
sheet = wb.Worksheets[0]
# Create a cell style and set the color
style = wb.Styles.Add("Mystyle")
style.Font.FontName = "Arial"
style2 = wb.Styles.Add("Mystyle1")
style2.Font.FontName = "Times New Roman"
style3 = wb.Styles.Add("Mystyle2")
style3.Font.FontName = "Calibri"
wb.Worksheets[0].ReplaceAll("Brillux", style,"e-iceblue", style2)
wb.Worksheets[0].ReplaceAll("3342sdf",style, "text", style3)
wb.SaveToFile(outputFile)
wb.Dispose()
|
| New feature | SPIREXLS-4857 | Supported customizing PivotTable field names.
workbook = Workbook()
workbook.LoadFromFile(inputFile)
sheet = workbook.Worksheets.get_Item("Tabular Pivot")
table = sheet.PivotTables.get_Item(0)
table.PivotFields[1].CustomName = "fieldName1"
table.PivotFields[2].CustomName = "fieldName2"
table.RowFields[0].CustomName = "rowName"
table.ColumnFields[0].CustomName = "colName"
table.PivotFields[0].CustomName = "fieldName0"
table.DataFields[0].CustomName = "DataName"
table.CalculateData()
workbook.SaveToFile(outputFile, ExcelVersion.Version2013)
workbook.Dispose()
|
| New feature | SPIREXLS-5254 | Supports enabling revision mode.
workbook = Workbook() workbook.LoadFromFile(inputFile) workbook.TrackedChanges(True); workbook.SaveToFile(outputFile, ExcelVersion.Version2013); workbook.Dispose() |
| New feature | SPIREXLS-5482 | Supports embedding images into cells.
workbook = Workbook() workbook.LoadFromFile(inputFile) sheet = workbook.Worksheets[0] sheet.Range["D1"].InsertOrUpdateCellImage(inputFile_Img,True) workbook.SaveToFile(outputFile,ExcelVersion.Version2013) workbook.Dispose() |
| Adjustment | / | Upgrades SkiaSharp->3.116.1. |
| Adjustment | / | Adding support for the Linux ARM platform. |
| Bug | SPIREXLS-5643 SPIREXLS-5677 | Fixes the issue where saving a chart to an image caused the program to report a "SpireException: Arg_InvalidCastException" error. |
| Bug | SPIREXLS-5755 | Fixes the issue where loading a specific XLSM document caused the program to report a "SpireException: Arg_NullReferenceException" error. |
| Bug | SPIREXLS-5783 | Fixes the issue where loading a specific XLSX document caused the program to report an "Arg_IndexOutOfRangeException" error. |
How to Convert TXT to Excel in C#

In data processing and management scenarios, efficiently transforming raw text (TXT) files into structured Excel spreadsheets is a common requirement. For developers who are automating reports or processing log files, converting TXT to Excel using C# streamlines data organization and analysis. This guide explores how to achieve this using Spire.XLS for .NET, a powerful library designed to handle Excel XLS or XLSX files without requiring Microsoft Office.
- Why Convert TXT to Excel Programmatically?
- How to Convert Text Files to Excel in C# (Step-by-Step Guide)
- Pro Tips for TXT to Excel Conversion
Why Convert TXT to Excel Programmatically?
Text files are simple but lack the analytical power of Excel. Key advantages of converting TXT to XLS or XLSX format include:
- Automation: Process large or recurring files without manual intervention.
- Data Structuring: Organize raw text into rows, columns, and sheets.
- Advanced Features: Leverage Excel formulas, charts, and pivot tables.
- Integration: Embed conversion feature into .NET applications or APIs.
How to Convert Text Files to Excel in C# (Step-by-Step Guide)
Install Spire.XLS for .NET
Spire.XLS for .NET is a professional Excel document processing component, provides efficient and convenient APIs that allow developers to achieve TXT to Excel conversion through simple code.
Before getting started, you can choose one of these methods to install the library:
Method 1: NuGet Package Manager
- Open your project in Visual Studio.
- Right-click on the project in the Solution Explorer and select "Manage NuGet Packages."
- Search for "Spire.XLS" and click "Install".
Method 2: Package Manager Console
- Go to "Tools > NuGet Package Manager > Package Manager Console."
- Run the following command in the console:
PM> Install-Package Spire.XLS
Method 3: Manual Installation with DLL Files
- Visit the Spire.XLS Download Page and get the latest version.
- Extract the files and then add the Spire.Xls.dll to your project.
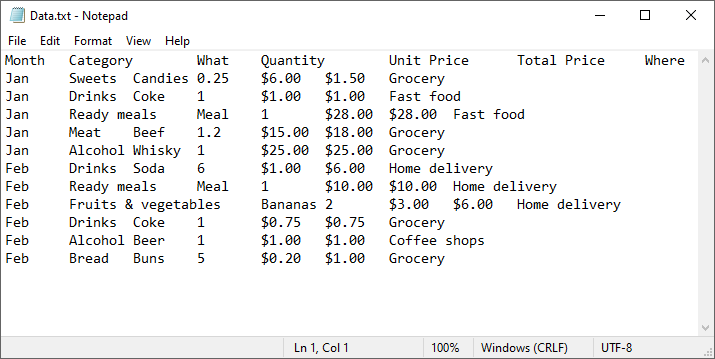
Import a Text File into Excel Using C#
Follow the below steps to write the data in a txt file into an Excel worksheet:
- Read TXT File: use the File.ReadAllLines() method to read all lines in a text file and returns them as an array of strings.
- Parse each line:
- Use the string.Trim() method to remove the leading/trailing whitespaces.
- Use the string.Split() method to split the data based on specified delimiters.
- Add the split text data to a list.
- Create a Workbook instance and get a worksheet
- Write Data to specified cells:
- Iterate through the rows and columns in the list.
- Assign the data in the list to the corresponding Excel cells through the Worksheet.Range[].Value property.
- Save the Excel File.
Code Example:
- C#
using Spire.Xls;
using System.IO;
using System.Collections.Generic;
class TxtToExcelConverter
{
static void Main()
{
// Open a text file and read all lines in it
string[] lines = File.ReadAllLines("Data.txt");
// Create a list to store the data in text file
List data = new List();
// Split data into rows and columns and add to the list
foreach (string line in lines)
{
data.Add(line.Trim().Split('\t')); // Adjust delimiter as needed
}
// Create a Workbook object
Workbook workbook = new Workbook();
// Get the first worksheet
Worksheet sheet = workbook.Worksheets[0];
// Iterate through the rows and columns in the data list
for (int row = 0; row < data.Count; row++)
{
for (int col = 0; col < data[row].Length; col++)
{
// Write the text data in specified cells
sheet.Range[row + 1, col + 1].Value = data[row][col];
// Set the header row to Bold
sheet.Range[1, col + 1].Style.Font.IsBold = true;
}
}
// Autofit columns
sheet.AllocatedRange.AutoFitColumns();
// Save the Excel file
workbook.SaveToFile("TXTtoExcel.xlsx", ExcelVersion.Version2016);
workbook.Dispose();
}
}
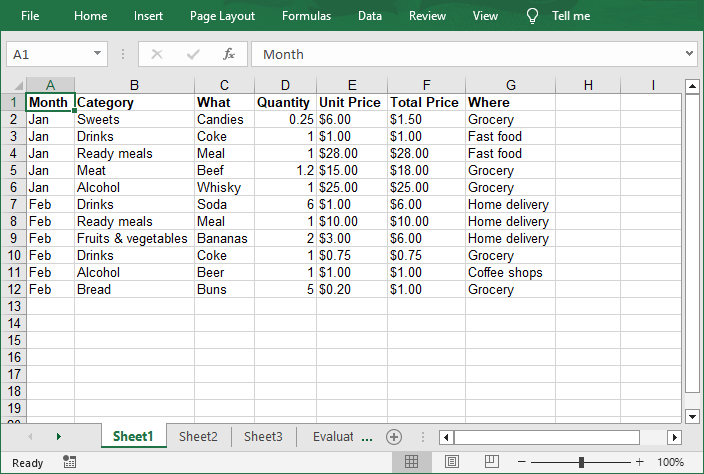
Result:

Pro Tips for TXT to Excel Conversion
- Handling Different Delimiters:
If your TXT file uses a different delimiter (e.g., space, comma, semicolon), modify the parameter of the Split(params char[] separator) method.
- Format Cells:
After a text file being converted to an Excel file, you can take advantage of the Spire.XLS library’s rich features to format cells, such as setting the background colors, adding cell borders, applying number formats, etc.
Conclusion
By following this step-by-step guide, you can efficiently transform unstructured text data into organized Excel spreadsheets, which is ideal for data analysis, reporting, and management. Remember to optimize your implementation for your specific delimiters and leverage Spire.XLS's advanced features for complex conversion scenarios.
Get a Free License
To fully experience the capabilities of Spire.XLS for .NET without any evaluation limitations, you can request a free 30-day trial license.
Spire.XLS for JavaScript 15.5.0 supports multiple new features
We are excited to announce the release of Spire.XLS for JavaScript 15.5.0. This version adds 19 new features, such as grouping Shapes, enabling revision mode, and embedding images into cells. Moreover, it also upgrades SkiaSharp and enhances the conversion from Shape to images. More details are listed below.
Here is a list of changes made in this release
| Category | ID | Description |
| New feature | - |
Supports 19 new features, including: Groupe Shapes. const workbook = wasmModule.Workbook.Create(); const sheet = workbook.Worksheets.get(0); const shape1 = sheet.PrstGeomShapes.AddPrstGeomShape(1, 3, 50, 50, spirexls.PrstGeomShapeType.RoundRect); const shape2 = sheet.PrstGeomShapes.AddPrstGeomShape(5, 3, 50, 50, spirexls.PrstGeomShapeType.Triangle); const groupShapeCollection = sheet.GroupShapeCollection; groupShapeCollection.Group([shape1, shape2]); workbook.SaveToFile(outputFileName,spirexls.ExcelVersion.Version2013); Enable revision mode. const workbook = wasmModule.Workbook.Create(); workbook.LoadFromFile(inputFileName); workbook.TrackedChanges = true; const outputFileName = "out.xlsx"; workbook.SaveToFile(outputFileName, spirexls.ExcelVersion.Version2013); Embed images into cells. const workbook = wasmModule.Workbook.Create();
workbook.LoadFromFile(inputFileName);
const params = {
fileName: imageName,
scale: true
}
const sheet = workbook.Worksheets.get(0);
sheet.Range.get("B1").InsertOrUpdateCellImage(params);
const outputFileName="out.xlsx";
workbook.SaveToFile(outputFileName);
|
| Adjustment | - | Upgrades SkiaSharp to version 3.116.1. |
| Bug | SPIREXLS-5726 | Fixes the issue that the text overflowed when converting Shape to images. |
Generate Word Documents from Templates in Java

In modern software development, generating dynamic Word documents from templates is a common requirement for applications that produce reports, contracts, invoices, or other business documents. Java developers seeking efficient solutions for document automation can leverage Spire.Doc for Java, a robust library for processing Word files without requiring Microsoft Office.
This guide explores how to use Spire.Doc for Java to create Word documents from templates. We will cover two key approaches: replacing text placeholders and modifying bookmark content.
- Java Libray for Creating Word Documents
- Generate a Word Document by Replacing Text Placeholders
- Generate a Word Document by Modifying Bookmark Content
- Conclusion
- FAQs
Java Library for Generating Word Documents
Spire.Doc for Java is a powerful library that enables developers to create, manipulate, and convert Word documents. It provides an intuitive API that allows for various operations, including the modification of text, images, and bookmarks in existing documents.
To get started, download the library from our official website and import it into your Java project. If you're using Maven, include the following dependency in your pom.xml file:
<repositories>
<repository>
<id>com.e-iceblue</id>
<name>e-iceblue</name>
<url>https://repo.e-iceblue.com/nexus/content/groups/public/</url>
</repository>
</repositories>
<dependencies>
<dependency>
<groupId>e-iceblue</groupId>
<artifactId>spire.doc</artifactId>
<version>14.7.0</version>
</dependency>
</dependencies>
Generate a Word Document by Replacing Text Placeholders
This method uses a template document containing marked placeholders (e.g., #name#, #date#) that are dynamically replaced with real data. Spire.Doc's Document.replace() method handles text substitutions efficiently, while additional APIs enable advanced replacements like inserting images at specified locations.
Steps to generate Word documents from templates by replacing text placeholders:
- Initialize Document: A new Document object is created to work with the Word file.
- Load the template: The template document with placeholders is loaded.
- Create replacement mappings: A HashMap is created to store placeholder-replacement pairs.
- Perform text replacement: The replace() method finds and replaces all instances of each placeholder.
- Handle image insertion: The custom replaceTextWithImage() method replaces a text placeholder with an image.
- Save the result: The modified document is saved to a specified path.
- Java
import com.spire.doc.Document;
import com.spire.doc.FileFormat;
import com.spire.doc.documents.TextSelection;
import com.spire.doc.fields.DocPicture;
import com.spire.doc.fields.TextRange;
import java.util.HashMap;
import java.util.Map;
public class ReplaceTextPlaceholders {
public static void main(String[] args) {
// Initialize a new Document object
Document document = new Document();
// Load the template Word file
document.loadFromFile("C:\\Users\\Administrator\\Desktop\\template.docx");
// Map to hold text placeholders and their replacements
Map<String, String> replaceDict = new HashMap<>();
replaceDict.put("#name#", "John Doe");
replaceDict.put("#gender#", "Male");
replaceDict.put("#birthdate#", "January 15, 1990");
replaceDict.put("#address#", "123 Main Street");
replaceDict.put("#city#", "Springfield");
replaceDict.put("#state#", "Illinois");
replaceDict.put("#postal#", "62701");
replaceDict.put("#country#", "United States");
// Replace placeholders in the document with corresponding values
for (Map.Entry<String, String> entry : replaceDict.entrySet()) {
document.replace(entry.getKey(), entry.getValue(), true, true);
}
// Path to the image file
String imagePath = "C:\\Users\\Administrator\\Desktop\\portrait.png";
// Replace the placeholder “#photo#” with an image
replaceTextWithImage(document, "#photo#", imagePath);
// Save the modified document
document.saveToFile("output/ReplacePlaceholders.docx", FileFormat.Docx);
// Release resources
document.dispose();
}
// Method to replace a placeholder in the document with an image
static void replaceTextWithImage(Document document, String stringToReplace, String imagePath) {
// Load the image from the specified path
DocPicture pic = new DocPicture(document);
pic.loadImage(imagePath);
// Find the placeholder in the document
TextSelection selection = document.findString(stringToReplace, false, true);
// Get the range of the found text
TextRange range = selection.getAsOneRange();
int index = range.getOwnerParagraph().getChildObjects().indexOf(range);
// Insert the image and remove the placeholder text
range.getOwnerParagraph().getChildObjects().insert(index, pic);
range.getOwnerParagraph().getChildObjects().remove(range);
}
}
Output:

Generate a Word Document by Modifying Bookmark Content
This approach uses Word bookmarks to identify locations in the document where content should be inserted or modified. The BookmarksNavigator class in Spire.Doc streamlines the process by enabling direct access to bookmarks, allowing targeted content replacement while automatically preserving the document's original structure and formatting.
Steps to generate Word documents from templates by modifying bookmark content:
- Initialize Document: A new Document object is initialized.
- Load the template: The template document with predefined bookmarks is loaded.
- Set up replacements: A HashMap is created to map bookmark names to their replacement values.
- Navigate to bookmarks: A BookmarksNavigator is instantiated to navigate through bookmarks in the document.
- Replace content: The replaceBookmarkContent() method updates the bookmark's content.
- Save the result: The modified document is saved to a specified path.
- Java
import com.spire.doc.*;
import com.spire.doc.documents.*;
import java.util.HashMap;
import java.util.Map;
public class ModifyBookmarkContent {
public static void main(String[] args) {
// Initialize a new Document object
Document document = new Document();
// Load the template Word file
document.loadFromFile("C:\\Users\\Administrator\\Desktop\\template.docx");
// Define bookmark names and their replacement values
Map<String, String> replaceDict = new HashMap<>();
replaceDict.put("name", "Tech Innovations Inc.");
replaceDict.put("year", "2015");
replaceDict.put("headquarter", "San Francisco, California, USA");
replaceDict.put("history", "Tech Innovations Inc. was founded by a group of engineers and " +
"entrepreneurs with a vision to revolutionize the technology sector. Starting " +
"with a focus on software development, the company expanded its portfolio to " +
"include artificial intelligence and cloud computing solutions.");
// Create a BookmarksNavigator to manage bookmarks in the document
BookmarksNavigator bookmarkNavigator = new BookmarksNavigator(document);
// Iterate through the bookmarks
for (Map.Entry<String, String> entry : replaceDict.entrySet()) {
// Navigate to a specific bookmark
bookmarkNavigator.moveToBookmark(entry.getKey());
// Replace content
bookmarkNavigator.replaceBookmarkContent(entry.getValue(), true);
}
// Save the modified document
document.saveToFile("output/ReplaceBookmarkContent.docx", FileFormat.Docx);
// Release resources
document.dispose();
}
}
Output:

Conclusion
Both methods provide effective ways to generate documents from templates, but they suit different scenarios:
Text Replacement Method is best when:
- You need simple text substitutions
- You need to insert images at specific locations
- You want to replace text anywhere in the document (not just specific locations)
Bookmark Method is preferable when:
- You're working with complex documents where precise location matters
- You need to replace larger sections of content or paragraphs
- You want to preserve bookmarks for future updates
Spire.Doc also offers Mail Merge capabilities, enabling high-volume document generation from templates. This feature excels at producing personalized documents like mass letters or reports by merging template fields with external data sources like databases.
FAQs
Q1: Can I convert the generated Word document to PDF?
A: Yes, Spire.Doc for Java supports converting documents to PDF and other formats. Simply use saveToFile() with FileFormat.PDF.
Q2: How can I handle complex formatting in generated documents?
A: Prepare your template with all required formatting in Word, then use placeholders or bookmarks in locations where dynamic content should appear. The formatting around these markers will be preserved.
Q3: What's the difference between mail merge and text replacement?
A: Mail merge is specifically designed for merging database-like data with documents and supports features like repeating sections for records. Text replacement is simpler but doesn't handle tabular data as elegantly.
Get a Free License
To fully experience the capabilities of Spire.Doc for Java without any evaluation limitations, you can request a free 30-day trial license.
How to Generate Barcode in Python (Step-by-Step Guide)

Barcodes are essential in inventory management, retail systems, logistics, and many other data-driven fields. For Python developers, generating barcodes in Python can be complex—especially when working with multiple formats or large-scale automation. That’s why a reliable Python barcode generator library is necessary to ensure flexible and efficient barcode creation, with support for various barcode types and batch processing.
This article provides an accurate and efficient approach to generating barcodes in Python using Spire.Barcode for Python.
- Get Started with Spire.Barcode for Python
- How to Generate Barcode in Python
- Supported Barcode Types
- Frequently Asked Questions
Get Started with Spire.Barcode for Python
Why Choose Spire.Barcode?
Spire.Barcode for Python is a professional and user-friendly Python Barcode API designed for developers who want to add barcode generation or reading features to their Python applications. Here’s why it stands out:
- Supports multiple barcode symbologies including Code 128, QR Code, EAN-13, UPC, and more
- High-quality image output with complete customization settings
- Comprehensive and easy-to-integrate API
- No need for third-party dependencies
- One library to generate and scan barcodes
Installation and Importing
To install Spire.Barcode for Python, simply run:
pip install spire.barcode
You can also install Free Spire.Barcode for Python for simple barcode generating tasks:
pip install spire.barcode.free
How to Generate Barcode in Python
To generate a barcode in Python, you typically need to define the barcode type (such as Code 128 or QR Code) and the content to encode. Using a library like Spire.Barcode, you can configure them in just a few lines of code.
Key Classes and Methods:
- BarcodeSettings: Defines properties such as type, data, color, text, etc.
- BarCodeGenerator: Generates barcode images based on settings.
- GenerateImage(): Outputs barcode as an image stream.
Step 1: Import the Required Modules
To start coding your Python barcode generator, import the necessary classes.
- Python
from spire.barcode import BarcodeSettings, BarCodeType, BarCodeGenerator, Code128SetMode, FontStyle, Color
Step2: Configure Barcode Settings
Create a BarcodeSettings object and define barcode properties:
- Python
# Create a BarcodeSettings object
barcodeSettings = BarcodeSettings()
# Set the barcode type
barcodeSettings.Type = BarCodeType.Code128
# Set the barcode data
barcodeSettings.Data = "ABC123456789"
# Set the barcode code128 set mode
barcodeSettings.Code128SetMode = Code128SetMode.Auto
# Choose the data display position
barcodeSettings.ShowTextOnBottom = True
# Set the bottom text and style
barcodeSettings.BottomText = "Code 128 Example"
barcodeSettings.SetTextFont("Arial", 12.0, FontStyle.Regular)
barcodeSettings.ShowBottomText = True
# Set the background color
barcodeSettings.BackColor = Color.get_Beige()
Step 3: Generate the Barcode Image
Create a BarCodeGenerator object using the configured BarcodeSettings, then generate the barcode image as a stream and save it to a local file:
- Python
# Create a BarCodeGenerator object
barcodeGenerator = BarCodeGenerator(barcodeSettings)
# Generate the barcode image
barcodeImage = barcodeGenerator.GenerateImage()
# Save the image
with open("output/Code 128.png", "wb") as fp:
fp.write(barcodeImage)
The generated barcode:

This script allows you to generate a Code 128 barcode and save it as an image. Just replace the BarCodeType and Data value to customize.
Generating Other Barcode Types
Spire.Barcode for Python supports a wide range of barcode symbologies, including the most commonly used types such as Code 39, UPC, QR Code, and EAN-13. This ensures developers can generate barcodes for various applications with compatibility and ease.
Barcode Type Support Overview
| Barcode Category | Barcode Types (Examples) | Free Version | Paid Version |
| 1D Linear Barcodes | Codabar, Code11, Code25, Interleaved25, Code39, Code39Extended, Code93, Code93Extended, Code128, EAN8, EAN13, EAN128, EAN14, UPCA, UPCE, MSI, PostNet, Planet, SCC14, SSCC18, ITF14, ITF6, PZN, OPC | ✅ (Partial) | ✅ (All) |
| 2D Barcodes | QRCode, DataMatrix, Pdf417, Pdf417Macro, Aztec, MicroQR | ✅ (QRCode only) | ✅ (All) |
| Stacked/Composite Codes | RSS14, RSS14Truncated, RSSLimited, RSSExpanded | ❌ | ✅ |
| Postal Barcodes | USPS, SwissPostParcel, DeutschePostIdentcode, DeutschePostLeitcode, RoyalMail4State, SingaporePost4State | ❌ | ✅ |
Advanced: Generate Barcodes in Bulk
You can easily generate multiple barcodes in bulk using Spire.Barcode for Python. This is especially useful for inventory management, batch labeling, or automated systems where each item requires a unique barcode.
Code Example
- Python
# Create a list of barcode data
data = ["Barcode 1", "Barcode 2", "Barcode 3"]
# Loop through the data to generate barcodes
for barcode_data in data:
# Create a BarcodeSettings object
settings = BarcodeSettings()
# Set the barcode type and data
settings.Type = BarCodeType.Code39
settings.Data = barcode_data
# Create a BarCodeGenerator object
generator = BarCodeGenerator(settings)
# Save the barcode image
barcode_stream = generator.GenerateImage()
with open(f"output/{barcode_data}.png", "wb") as file:
file.write(barcode_stream)
This Python script generates and saves a barcode image for each entry in the list, streamlining barcode creation workflow.
Conclusion
Generating barcodes in Python is simple and efficient with Spire.Barcode for Python. Whether you’re creating a single Code 128 barcode or automating batch QR code generation, this robust and flexible library gives you the control and quality needed for professional barcode integration. From supporting various symbologies to delivering high-quality output with minimal code, this Python barcode generator is an excellent tool for developers across industries.
Frequently Asked Questions
Q: How to create a barcode in Python?
You can create a barcode using libraries like Spire.Barcode for Python, which supports a variety of symbologies like Code 128, QR Code, and more. Just install the package, configure barcode settings, and save the output image.
Q: How is barcode generated?
Barcodes are generated by encoding data into a visual pattern of bars or modules. With Python, this is done through barcode libraries like Spire.Barcode, which translate string input into a corresponding image.
Q: How to create a code generator in Python?
If you're referring to a barcode generator, define the barcode type (e.g., Code 128), provide the data, and use a library like Spire.Barcode to generate and save the image. You can automate this process using loops and functions.
Q: How to generate QR code by Python?
You can use Spire.Barcode for Python to generate QR codes quickly and efficiently. Here's a full example that creates a QR code with embedded data:
- Python
from spire.barcode import BarcodeSettings, BarCodeGenerator, BarCodeType
# Create a BarcodeSettings object
barcodeSettings = BarcodeSettings()
# Set the barcode type to QRCode
barcodeSettings.Type = BarCodeType.QRCode
# Set the barcode data
barcodeSettings.Data = "ABC123456"
# Generate the barcode
barcodeGenerator = BarCodeGenerator(barcodeSettings)
barcodeGenerator.GenerateImage()
with open("output/QRCode.png", "wb") as f:
f.write(barcodeGenerator.GenerateImage())
Result:

This enables you to embed URLs, text, or IDs into scannable QR images.
See Also: How to Generate and Scan QR Codes with Python
Get a Free License
Spire.Barcode for Python offers a free trial license that removes limitations and watermarking. Get a free license today and explore the full capabilities of this powerful Python barcode library.
Edit PDF Using Python: A Practical Guide to PDF Modification

PDFs are widely used in reports, invoices, and digital forms due to their consistent formatting across platforms. However, their fixed layout makes editing difficult without specialized tools. For developers looking to edit PDF using Python, Spire.PDF for Python provides a comprehensive and easy-to-use solution. This Python PDF editor enables you to modify PDF files programmatically—changing text, replacing images, adding annotations, handling forms, and securing files—without relying on Adobe Acrobat or any external software.
In this article, we will explore how to use Spire.PDF for Python to programmatically edit PDFs in Python applications.
- Why Use Python and Spire.PDF to Edit PDF Documents?
- Getting Started with Spire.PDF for Python
- How to Edit an Existing PDF Using Spire.PDF for Python
- Frequently Asked Questions
Why Use Python and Spire.PDF to Edit PDF Documents?
Python is a highly versatile programming language that provides an excellent platform for automating and managing PDF documents. When it comes to edit PDF Python tasks, Spire.PDF for Python stands out as a comprehensive and easy-to-use solution for all your PDF manipulation needs.
Benefits of Using Python for PDF Editing
- Automation and Batch Processing: Streamline repetitive PDF editing tasks efficiently.
- Cost-Effective: Reduce manual work, saving time and resources when you Python-edit PDF files.
- Integration: Seamlessly incorporate PDF editing into existing Python-based systems and workflows.
Advantages of Spire.PDF for Python
Spire.PDF for Python is a standalone library that enables developers to create, read, edit, convert, and save PDF files without relying on external software. As a trusted Python PDF editor, it offers powerful features such as:
- Text and Image Editing
- Annotations and Bookmark Management
- Form Field Handling
- Security Settings (Encryption and Permissions)
- Conversion to Word, Excel, HTML, and Images
To learn more about these specific features, visit the Spire.PDF for Python tutorials.
With its intuitive API design, Spire.PDF makes it easier than ever to edit PDF files in Python quickly and effectively, ensuring a smooth development experience.
Getting Started with Spire.PDF for Python
Installation:
To install Spire.PDF for Python, simply run the following pip command:
pip install spire.pdf
Alternatively, you can install Free Spire.PDF for Python, a free version suitable for small projects, by running:
pip install spire.pdf.free
You can also download the library manually from the links.
Basic Setup Example:
The following example demonstrates how to create a simple PDF using Spire.PDF for Python:
- Python
from spire.pdf import PdfDocument, PdfFont, PdfBrushes, PdfFontFamily, PdfFontStyle
# Create a new PDF document
pdf = PdfDocument()
# Add a new page to the document
page = pdf.Pages.Add()
# Create a font
font = PdfFont(PdfFontFamily.TimesRoman, 28.0, PdfFontStyle.Bold)
# Create a brush
brush = PdfBrushes.get_Black()
# Draw the string using the font and brush
page.Canvas.DrawString("Hello, World", font, brush, 100.0, 100.0)
# Save the document
pdf.SaveToFile("output/NewPDF.pdf")
pdf.Close()
Result: The generated PDF displays the text "Hello, World" using Times Roman Bold.

With Spire.PDF installed, you're now ready to edit PDFs using Python. The sections below explain how to manipulate structure, content, security, and metadata.
How to Edit an Existing PDF Using Spire.PDF for Python
Spire.PDF for Python provides a simple yet powerful way to edit PDF using Python. With its intuitive API, developers can automate a wide range of PDF editing tasks including modifying document structure, page content, security settings, and properties. This section outlines the core categories of editing and their typical use cases.
Edit PDF Pages and Structure with Python
Structure editing lets you manipulate PDF page order, merge files, or insert/delete pages—ideal for document assembly workflows.
- Insert or Delete Pages
Use the Pages.Insert() and Pages.RemoveAt() methods of the PdfDocument class to insert or delete pages at specific positions.
Code Example
- Python
from spire.pdf import PdfDocument, PdfPageSize, PdfMargins, PdfPageRotateAngle
# Load a PDF document
pdf = PdfDocument()
pdf.LoadFromFile("Sample.pdf")
# Insert and delete pages
# Insert at beginning
pdf.Pages.Insert(0, PdfPageSize.A4(), PdfMargins(50.0, 60.0), PdfPageRotateAngle.RotateAngle90)
# Delete second page
pdf.Pages.RemoveAt(1)
# Save the document
pdf.SaveToFile("output/InsertDeletePage.pdf")
pdf.Close()
Result:

- Merge Two PDF Files
The AppendPage() method allows you to combine PDFs by inserting pages from one document into another.
Code Example
- Python
import os
from spire.pdf import PdfDocument
# Specify the PDF file path
pdfPath = "PDFs/"
# Read the PDF file names from the path and add them to a list
files = [pdfPath + file for file in os.listdir(pdfPath) if file.endswith(".pdf")]
# Load the first PDF file
pdf = PdfDocument()
pdf.LoadFromFile(files[0])
# Iterate through the other PDF files
for i in range(1, len(files)):
# Load the current PDF file
pdf2 = PdfDocument()
pdf2.LoadFromFile(files[i])
# Append the pages from the current PDF file to the first PDF file
pdf.AppendPage(pdf2)
# Save the merged PDF file
pdf.SaveToFile("output/MergePDFs.pdf")
pdf.Close()
Result:

You may also like: Splitting PDF Files with Python Code
Edit PDF Content with Python
As a Python PDF editor, Spire.PDF supports a variety of content-level operations, including modifying text, images, annotations, and interactive forms.
- Replace Text in a PDF
The PdfTextReplacer class can be used to find and replace text from a page. Note that precise replacement may require case and layout-aware handling.
Code Example
- Python
from spire.pdf import PdfDocument, PdfTextReplacer, ReplaceActionType, Color
# Load the PDF file
pdf = PdfDocument()
pdf.LoadFromFile("Sample.pdf")
# Iterate through the pages
for i in range(pdf.Pages.Count):
page = pdf.Pages.get_Item(i)
# Create a PdfTextReplacer object
replacer = PdfTextReplacer(page)
# Set the replacement options
replacer.Options.ReplaceType = ReplaceActionType.IgnoreCase
# Replace the text
replacer.ReplaceAllText("drones", "ROBOTS", Color.get_Aqua()) # Setting the color is optional
# Save the merged PDF file
pdf.SaveToFile("output/ReplaceText.pdf")
pdf.Close()
Result:

- Replace Images in a PDF
Spire.PDF for Python provides the PdfImageHelper class to help you replace images in a PDF file with ease. By retrieving image information from a specific page, you can use the ReplaceImage() method to directly substitute the original image with a new one.
Code Example
- Python
from spire.pdf import PdfDocument, PdfImageHelper, PdfImage
# Load the PDF file
pdf = PdfDocument()
pdf.LoadFromFile("Sample.pdf")
# Get a page
page = pdf.Pages.get_Item(0)
# Create a PdfImageHelper instance
imageHelper = PdfImageHelper()
# Get the image info of the first image on the page
imageInfo = imageHelper.GetImagesInfo(page)[0]
# Load a new image
newImage = PdfImage.FromFile("Image.png")
# Replace the image
imageHelper.ReplaceImage(imageInfo, newImage)
# Save the PDF file
pdf.SaveToFile("output/ReplaceImage.pdf")
pdf.Close()
Result:

- Add Comments or Notes
To add comments or notes with Python, use the PdfTextMarkupAnnotation class and add it to the page’s AnnotationsWidget collection.
Code Example
- Python
from spire.pdf import PdfDocument, PdfTextFinder, PdfTextMarkupAnnotation, PdfRGBColor, Color
# Load the PDF file
pdf = PdfDocument()
pdf.LoadFromFile("Sample.pdf")
# Get a page
page = pdf.Pages.get_Item(0)
#Create a PdfTextFinder instance and set the options
finder = PdfTextFinder(page)
finder.Options.Parameter.IgnoreCase = False
finder.Options.Parameter.WholeWord = True
# Find the text to comment
text = finder.Find("redefining entire industries")[0]
# Get the bound of the text
bound = text.Bounds[0]
# Add comment
commentText = ("This is a powerful expression, but a bit vague. "
"You might consider specifying which industries are "
"being redefined and how, to make the claim more "
"concrete and credible.")
comment = PdfTextMarkupAnnotation("Commenter", commentText, bound)
comment.TextMarkupColor = PdfRGBColor(Color.get_Yellow())
page.AnnotationsWidget.Add(comment)
# Save the PDF file
pdf.SaveToFile("output/CommentNote.pdf")
pdf.Close()
Result:

- Edit or Read Form Fields
Spire.PDF for Python allows you to programmatically fill out and read form fields in a PDF document. By accessing the FieldsWidget property of a PdfFormWidget object, you can iterate through all interactive form elements, such as text boxes, combo boxes, and checkboxes, and update or extract their values.
Code Example
- Python
from spire.pdf import PdfDocument, PdfFormWidget, PdfComboBoxWidgetFieldWidget, PdfCheckBoxWidgetFieldWidget, PdfTextBoxFieldWidget
# Load the PDF file
pdf = PdfDocument()
pdf.LoadFromFile("EmployeeInformationForm.pdf")
forms = pdf.Form
formWidgets = PdfFormWidget(forms).FieldsWidget
# Fill the forms
for i in range(formWidgets.Count):
formField = formWidgets.get_Item(i)
if formField.Name == "FullName":
textBox = PdfTextBoxFieldWidget(formField)
textBox.Text = "Amanda Ray Thompson"
elif formField.Name == "DateOfBirth":
textBox = PdfTextBoxFieldWidget(formField)
textBox.Text = "01/01/1980"
elif formField.Name == "Gender":
comboBox = PdfComboBoxWidgetFieldWidget(formField)
comboBox.SelectedIndex = [ 1 ]
elif formField.Name == "Department":
formField.Value = "Human Resources"
elif formField.Name == "AgreeTerms":
checkBox = PdfCheckBoxWidgetFieldWidget(formField)
checkBox.Checked = True
# Read the forms
formValues = []
for i in range(formWidgets.Count):
formField = formWidgets.get_Item(i)
if isinstance(formField, PdfTextBoxFieldWidget):
formValues.append(formField.Name + ": " + formField.Text)
elif isinstance(formField, PdfComboBoxWidgetFieldWidget):
formValues.append(formField.Name + ": " + formField.SelectedValue)
elif isinstance(formField, PdfCheckBoxWidgetFieldWidget):
formValues.append(formField.Name + ": " + str(formField.Checked))
# Write the form values to a file
with open("output/FormValues.txt", "w") as file:
file.write("\n".join(formValues))
# Save the PDF file
pdf.SaveToFile("output/FilledForm.pdf")
pdf.Close()
Result:

Explore more: How to Insert Page Numbers to PDF Using Python
Manage PDF Security with Python
PDF security editing is essential when dealing with sensitive documents. Spire.PDF supports encryption, password protection, digital signature handling, and permission settings.
- Add a Password and Set Permissions
The Encrypt() method lets you secure a PDF with user/owner passwords and define allowed actions like printing or copying.
Code Example
- Python
from spire.pdf import PdfDocument, PdfEncryptionAlgorithm, PdfDocumentPrivilege, PdfPasswordSecurityPolicy
# Load the PDF file
pdf = PdfDocument()
pdf.LoadFromFile("EmployeeInformationForm.pdf")
# Create a PdfSecurityPolicy object and set the passwords and encryption algorithm
securityPolicy = PdfPasswordSecurityPolicy("userPSD", "ownerPSD")
securityPolicy.EncryptionAlgorithm = PdfEncryptionAlgorithm.AES_128
# Set the document privileges
pdfPrivileges = PdfDocumentPrivilege.ForbidAll()
pdfPrivileges.AllowPrint = True
pdfPrivileges.AllowFillFormFields = True
# Apply the document privileges
securityPolicy.DocumentPrivilege = pdfPrivileges
# Encrypt the PDF with the security policy
pdf.Encrypt(securityPolicy)
# Save the PDF file
pdf.SaveToFile("output/EncryptedForm.pdf")
pdf.Close()
Result

- Remove the Password from a PDF
To open a protected file, provide the user password when calling LoadFromFile(), use Decrypt() to decrypt the document, and save it again unprotected.
Code Example
- Python
from spire.pdf import PdfDocument
# Load the encrypted PDF file with the owner password
pdf = PdfDocument()
pdf.LoadFromFile("output/EncryptedForm.pdf", "ownerPSD")
# Decrypt the PDF file
pdf.Decrypt()
# Save the PDF file
pdf.SaveToFile("output/DecryptedForm.pdf")
pdf.Close()
Recommended for you: Use Python to Add and Remove Digital Signature in PDF
Edit PDF Properties with Python
Use Spire.PDF to read and edit PDF metadata and viewer preferences—key features for document presentation and organization.
- Update Document Metadata
Update metadata such as title, author, or subject via the DocumentInformation property of the PDF document.
Code Example
- Python
from spire.pdf import PdfDocument
# Load the PDF file
pdf = PdfDocument()
pdf.LoadFromFile("EmployeeInformationForm.pdf")
# Set document metadata
pdf.DocumentInformation.Author = "John Doe"
pdf.DocumentInformation.Title = "Employee Information Form"
pdf.DocumentInformation.Producer = "Spire.PDF"
# Save the PDF file
pdf.SaveToFile("output/EditProperties.pdf")
pdf.Close()
Result:

- Set View Preferences
The ViewerPreferences property allows you to customize the viewing mode of a PDF (e.g., two-column layout).
Code Example
- Python
from spire.pdf import PdfDocument, PdfPageLayout, PrintScalingMode
# Load the PDF file
pdf = PdfDocument()
pdf.LoadFromFile("EmployeeInformationForm.pdf")
# Set the viewer preferences
pdf.ViewerPreferences.DisplayTitle = True
pdf.ViewerPreferences.HideToolbar = True
pdf.ViewerPreferences.HideWindowUI = True
pdf.ViewerPreferences.FitWindow = False
pdf.ViewerPreferences.HideMenubar = True
pdf.ViewerPreferences.PrintScaling = PrintScalingMode.AppDefault
pdf.ViewerPreferences.PageLayout = PdfPageLayout.OneColumn
# Save the PDF file
pdf.SaveToFile("output/EditViewerPreference.pdf")
pdf.Close()
Result:

Similar topic: Change PDF Version Easily with Python Code
Conclusion
Editing PDFs using Python is both practical and efficient with Spire.PDF for Python. Whether you're building automation tools, editing digital forms, or securing sensitive reports, Spire.PDF equips you with a comprehensive suite of editing features—all accessible via clean and simple Python code.
With capabilities that span content editing, form interaction, document structuring, and security control, this Python PDF editor is a go-to solution for developers and organizations aiming to streamline their PDF workflows.
Frequently Asked Questions
Q: Can I edit a PDF using Python?
A: Yes, Python offers powerful libraries like Spire.PDF for Python that enable you to edit text, images, forms, annotations, and even security settings in a PDF file.
Q: How to edit a PDF using coding?
A: By using libraries such as Spire.PDF for Python, you can load an existing PDF, modify its content or structure programmatically, and save the changes with just a few lines of code.
Q: What is the Python library for PDF editor?
A: Spire.PDF for Python is a popular choice. It offers comprehensive functionalities for creating, reading, editing, converting, and securing PDF documents without the need for additional software.
Q: Can I modify a PDF for free?
A: Yes, you can use the free edition of Spire.PDF for Python to edit PDF files, although it comes with some limitations, such as processing up to 10 pages per document. Additionally, you can apply for a 30-day temporary license that removes all limitations and watermarks for full functionality testing.