Как удалить комментарии из PDF: с Adobe или без
Независимо от того, готовите ли вы окончательный вариант договора, диссертацию или отчет для клиентов, удаление внутренних комментариев, выделений и заметок рецензентов помогает сохранить профессиональный вид документа и предотвращает случайную утечку данных.
В этом руководстве мы покажем вам, как удалить комментарии из PDF-документов тремя способами. В зависимости от ваших потребностей, вы можете использовать Adobe Acrobat, бесплатные онлайн-инструменты или автоматизированный Python-скрипт.
- Как удалить все комментарии в Adobe
- Удаление комментариев из PDF онлайн
- Автоматическое удаление аннотаций из PDF с помощью Python
- Часто задаваемые вопросы
Как удалить все комментарии в Adobe
Adobe Acrobat — один из самых популярных способов управления и очистки PDF-файлов. Он позволяет удалять комментарии с помощью встроенных функций. Вот как удалить все комментарии в Adobe двумя способами.
1. Массовое выделение через панель комментариев
Этот метод полезен, если вы хотите быстро и без проблем удалить аннотации из PDF. Вот подробные шаги:
- Шаг 1. Откройте PDF-файл в Adobe Acrobat.
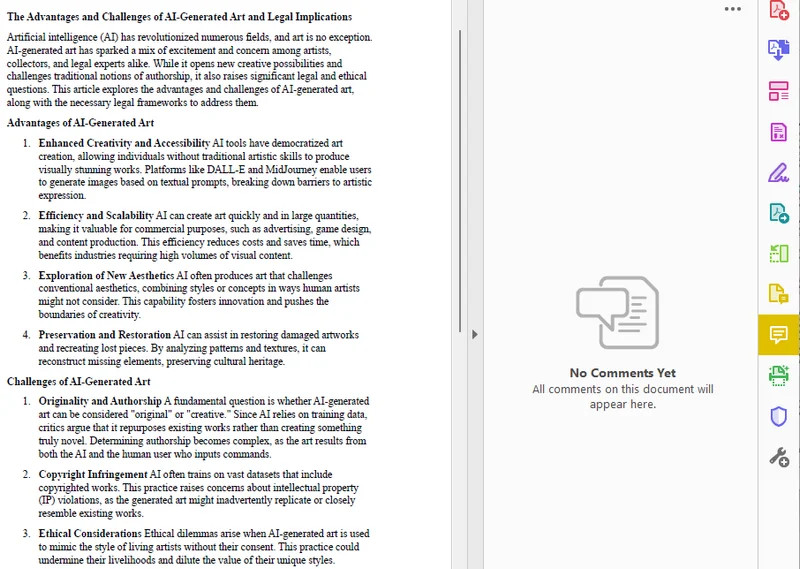
- Шаг 2. Откройте панель комментариев, нажав на значок Комментарий на правой панели инструментов.
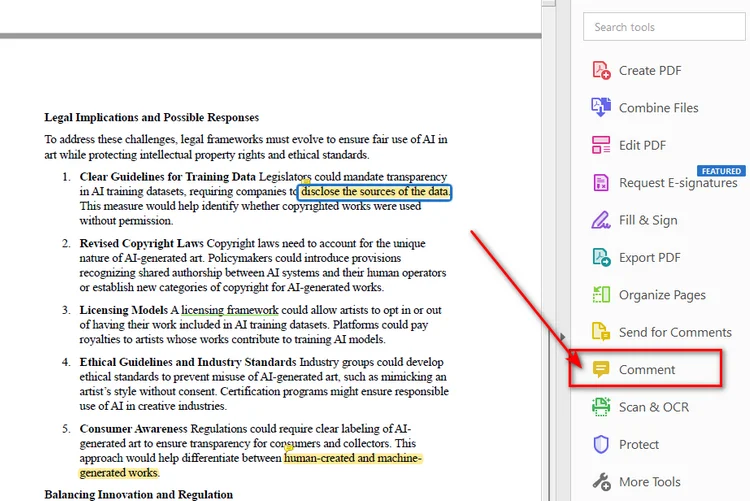
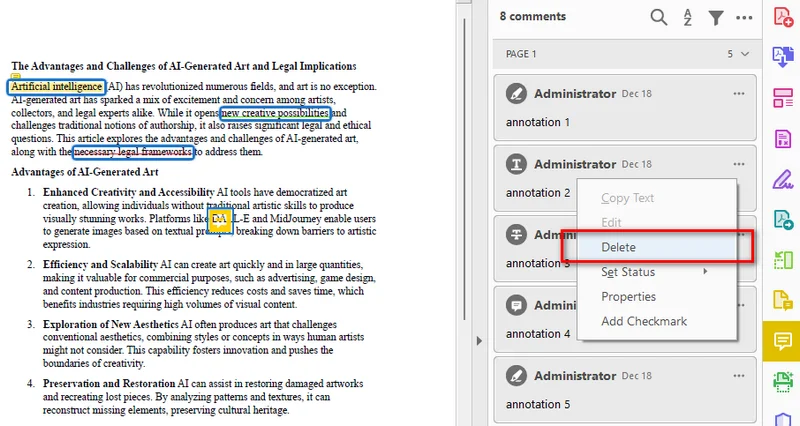
- Шаг 3. Нажмите левой кнопкой мыши на первый комментарий в верхней части панели.
- Шаг 4. Прокрутите список до самого низа, удерживайте клавишу Shift на клавиатуре и нажмите на последний комментарий, чтобы выделить все аннотации.
- Шаг 5. Нажмите правой кнопкой мыши в любом месте выделенного списка и выберите Удалить.
2. Использование функции «Очистить документ» (Sanitize)
Если вы работаете с конфиденциальным документом, ручное удаление может пропустить скрытые данные. Функция «Очистить документ» (Sanitize) в Acrobat позволяет удалить скрытую информацию, включая комментарии, метаданные и другой конфиденциальный контент.
- Шаг 1. Перейдите в верхнее меню и выберите Инструменты -> Редактирование (Redact).
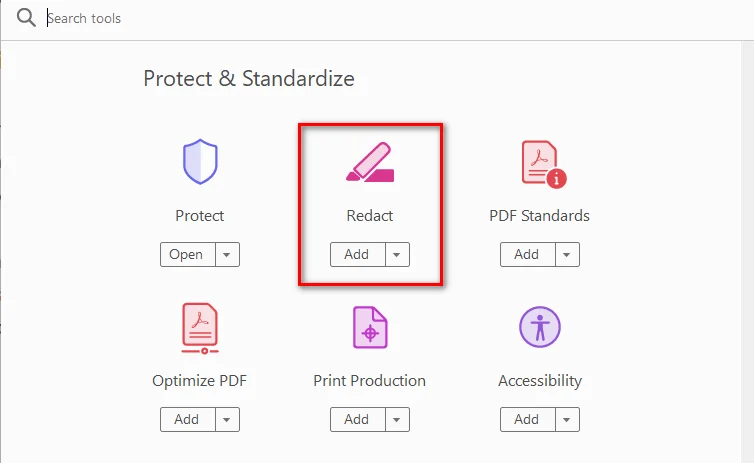
- Шаг 2. Нажмите кнопку Очистить документ на верхней панели.
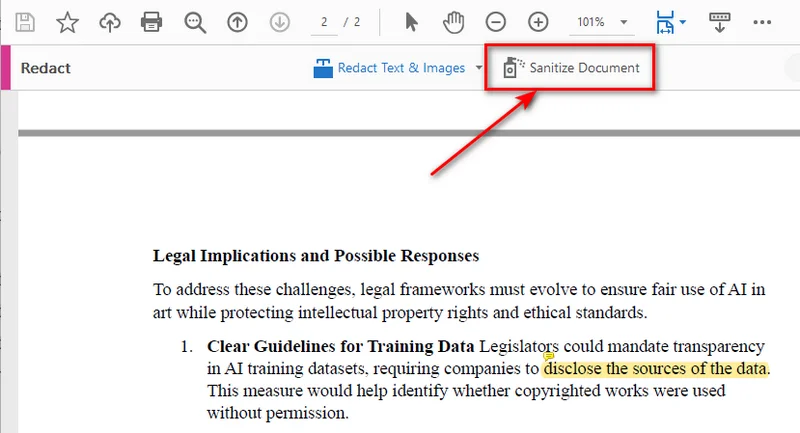
- Шаг 3. Появится всплывающее окно. Нажмите ОК, чтобы навсегда удалить все скрытые комментарии, историю правок и личные метаданные.
Примечание: При использовании этого способа Adobe автоматически создаст новую, чистую версию PDF. Ваш исходный файл останется нетронутым, что идеально подходит для сохранения внутренней копии с комментариями при создании чистового варианта для других.
Вам может быть интересно: Как сделать PDF доступным только для чтения в 2025 году (Полное руководство)
Как удалить комментарии из PDF онлайн (без Adobe)
Хотя Adobe Acrobat очень мощный инструмент, большинство его продвинутых функций, включая полное управление комментариями, требуют платной подписки. Если вам нужно удалить комментарии в PDF всего один или два раза, лучше использовать веб-редактор PDF. С такими платформами, как Smallpdf, вы можете загружать файлы прямо в браузере и сразу приступать к редактированию. Главные преимущества заключаются в том, что эти инструменты обычно бесплатны, легки и не требуют установки, что делает их удобным вариантом для быстрой правки PDF.
Шаги для удаления комментариев онлайн:
- Шаг 1. Найдите онлайн-редактор PDF в браузере.
- Шаг 2. Загрузите PDF-файл в редактор.
- Шаг 3. Нажмите на любую аннотацию на странице и выберите значок корзины, чтобы удалить комментарий.
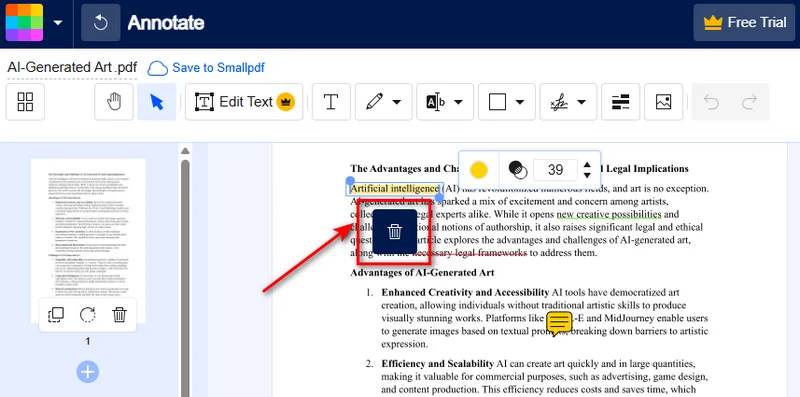
Хотя онлайн-инструменты бесплатны и удобны, помните о двух вещах: во-первых, избегайте загрузки PDF-файлов с конфиденциальными финансовыми данными или коммерческой тайной на сторонние серверы. Во-вторых, большинство веб-инструментов требуют удаления комментариев по одному. Если в вашем документе десятки заметок или содержатся конфиденциальные данные, попробуйте Adobe Acrobat или метод с использованием Python, описанный ниже.
Автоматическое удаление аннотаций из PDF с помощью Python
Для разработчиков или пользователей, которым необходимо регулярно обрабатывать множество PDF-файлов, автоматизация может значительно сэкономить время по сравнению с ручным редактированием. Если вам нужно автоматизировать рабочие процессы с документами или обрабатывать большие пакеты файлов, вы можете удалить все комментарии из PDF-документов с помощью Python-скрипта.
В официальных спецификациях PDF интерактивные элементы, такие как стикеры, текстовые разметки и фигуры, технически называются «аннотациями». Используя библиотеку Free Spire.PDF for Python, вы можете легко и автоматически очистить файл от этих элементов. Являясь автономным компонентом, она позволяет обрабатывать PDF-файлы локально без использования Adobe Acrobat, что полезно для автоматизированной пакетной обработки.
Python-код для очистки комментариев в PDF
С помощью Free Spire.PDF мы можем удалять аннотации из PDF в два основных этапа: пройтись циклом по каждой странице PDF, получить доступ к коллекции аннотаций каждой страницы и удалить все объекты аннотаций.
Пример кода:
from spire.pdf.common import *
from spire.pdf import *

# Загрузка целевого PDF-документа из вашей локальной папки
pdf = PdfDocument()
pdf.LoadFromFile("/input/sample.pdf")

# Цикл по всем страницам для удаления всех комментариев из PDF
for i in range(pdf.Pages.Count):
    page = pdf.Pages.get_Item(i)

    # Очистка всех стикеров, выделений и аннотаций на текущей странице
    page.AnnotationsWidget.Clear()

# Сохранение чистого PDF
pdf.SaveToFile("/output/commentremoved.pdf")
pdf.Close()
Часто задаваемые вопросы об удалении комментариев из PDF
В1: Как бесплатно удалить комментарии из PDF-документа?
О: Вы можете использовать бесплатные веб-инструменты, такие как Smallpdf, чтобы загрузить, очистить и скачать файл за считанные секунды. Однако, если безопасность является вашим главным приоритетом, лучше использовать библиотеку Free Spire.PDF. Она работает полностью в автономном режиме на вашем локальном компьютере, позволяя бесплатно очищать конфиденциальные документы без риска утечки данных.
В2: Удалит ли удаление комментариев также эффект выделения текста в PDF?
О: Да. В PDF-файлах выделения, подчеркивания и зачеркивания классифицируются как аннотации текстовой разметки. Когда вы удаляете аннотации из PDF с помощью инструмента «Очистить» в Adobe, онлайн-редакторов или Python-скриптов, эти визуальные выделения будут удалены вместе со стикерами.
В3: Как скрыть комментарии, а не удалять их в Adobe?
О: Если вы хотите сохранить отзывы на будущее, но вам нужен чистый вид документа прямо сейчас, вы можете открыть панель Комментарий в Adobe Acrobat и нажать значок Скрыть все комментарии в верхней части панели.
Заключение
Знание того, как удалить комментарии из PDF-файлов, помогает подготовить чистые и профессиональные документы перед их отправкой. Независимо от того, используете ли вы Adobe Acrobat, онлайн-редактор PDF или Python-скрипт с Free Spire.PDF, вы можете легко удалить комментарии в соответствии с вашими потребностями. Выбирайте Adobe Acrobat для детального ручного редактирования, онлайн-инструменты для быстрых разовых задач или автоматизацию на Python, когда вам нужно эффективно обрабатывать множество PDF-файлов.
Читайте также:
Converter PowerPoint para TIFF de alta resolução: 4 métodos práticos
Índice
- Método 1: Modificar o Registro do Windows e exportar do PowerPoint
- Método 2: Exportar slides do PowerPoint para TIFF com uma macro VBA
- Método 3: Converter PowerPoint para TIFF com o Convertio
- Método 4: Converter PowerPoint para TIFF de alta resolução usando Python
- Dicas extras: Combinar TIFFs de página única em um TIFF de várias páginas
- Tabela comparativa: Escolha o método certo
- Conclusão
- Perguntas frequentes (FAQs)
As apresentações do PowerPoint geralmente contêm gráficos, diagramas, designs de produtos, ilustrações técnicas e outros conteúdos visuais que podem precisar ser reutilizados fora do Microsoft PowerPoint. Converter slides para TIFF é particularmente útil para impressão profissional, arquivamento de documentos, publicação, envio por fax e fluxos de trabalho que exigem imagens raster sem perdas.
No entanto, simplesmente exportar slides do PowerPoint pode não produzir a resolução que você espera. No Windows, o PowerPoint normalmente exporta slides como imagens bitmap a 96 DPI por padrão. Isso geralmente é suficiente para visualização na tela, mas as imagens resultantes podem parecer borradas quando ampliadas ou impressas. Para uma saída pronta para impressão, 300 DPI é geralmente um alvo mais prático.
Este artigo apresenta quatro maneiras de converter apresentações do PowerPoint em arquivos TIFF de alta resolução. Os métodos variam desde o recurso de exportação integrado do PowerPoint até a automação VBA, um conversor online e uma solução baseada em Python para gerar arquivos TIFF de várias páginas em alta resolução.
Método 1: Modificar o Registro do Windows e exportar do PowerPoint
O PowerPoint pode salvar slides diretamente como imagens TIFF por meio de seu recurso padrão Salvar Como ou Exportar. A principal limitação é que o PowerPoint usa uma resolução de exportação padrão de 96 DPI no Windows.
Para gerar imagens de maior resolução, você pode adicionar um valor de registro que altera a resolução de exportação de bitmap do PowerPoint. Por exemplo, definir o valor como 300 produz uma imagem de 4000 × 2250 pixels a partir de um slide widescreen padrão de 16:9.
Editar o Registro do Windows incorretamente pode afetar o comportamento do sistema ou do aplicativo. Considere fazer backup da chave de registro relevante antes de fazer alterações.
Passo 1: Alterar a resolução de exportação do PowerPoint
- Feche o PowerPoint e outros aplicativos do Microsoft Office.
- Pressione Windows + R para abrir a caixa de diálogo Executar.
- Digite
regedite clique em OK. - Navegue até o seguinte local para o PowerPoint 2016, 2019, 2021, 2024 ou Microsoft 365:
HKEY_CURRENT_USER\Software\Microsoft\Office\16.0\PowerPoint\Options
- Clique com o botão direito em uma área vazia no painel direito.
- Selecione Novo → Valor DWORD (32 bits).
- Nomeie o novo valor como:
ExportBitmapResolution
- Clique duas vezes no valor e selecione Decimal.
- Digite
300no campo Dados do valor. - Clique em OK e feche o Editor do Registro.
Você pode usar outros valores, como 150 ou 200, quando precisar de um equilíbrio entre qualidade de imagem e tamanho do arquivo. Os cálculos de exportação da Microsoft mostram que um slide 16:9 produz aproximadamente 2000 × 1125 pixels a 150 DPI, 2667 × 1500 pixels a 200 DPI e 4000 × 2250 pixels a 300 DPI.
Passo 2: Exportar os slides como TIFF
- Abra a apresentação no PowerPoint.
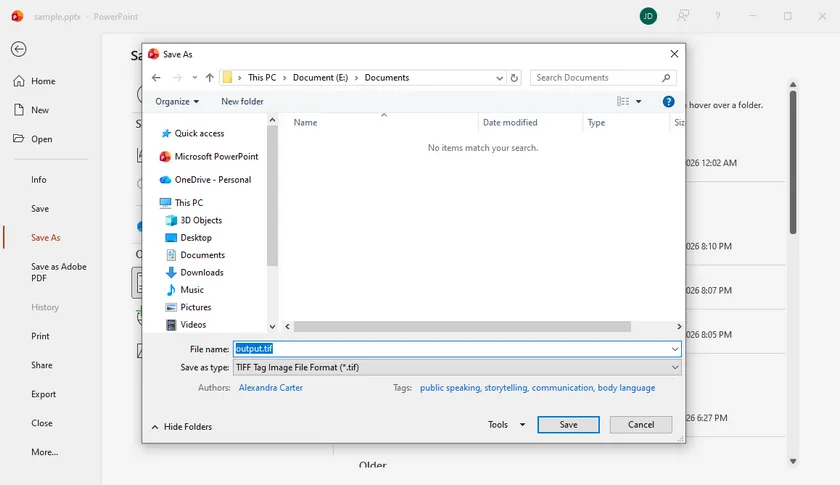
- Vá para Arquivo → Salvar Como ou Arquivo → Exportar → Alterar Tipo de Arquivo.
- Escolha TIFF Tag Image File Format (*.tif).
- Selecione uma pasta de destino e clique em Salvar.
- Quando solicitado, escolha Todos os Slides ou Apenas este.
Quando todos os slides são exportados, o PowerPoint cria uma pasta contendo um arquivo TIFF separado para cada slide.
Este método é conveniente quando você só precisa ocasionalmente de imagens TIFF de alta resolução e já tem o Microsoft PowerPoint instalado. Sua principal desvantagem é que ele modifica uma configuração do Office em nível de usuário e não oferece uma maneira conveniente de processar muitas apresentações automaticamente.
Método 2: Exportar slides do PowerPoint para TIFF com uma macro VBA
Uma macro VBA é mais eficiente quando uma apresentação contém muitos slides ou quando você repete frequentemente a mesma tarefa de exportação. Ao contrário da caixa de diálogo de exportação padrão, o método Slide.Export do PowerPoint permite especificar a largura e a altura da saída diretamente em pixels. A Microsoft documenta tanto ScaleWidth quanto ScaleHeight como dimensões opcionais em pixels para o slide exportado.
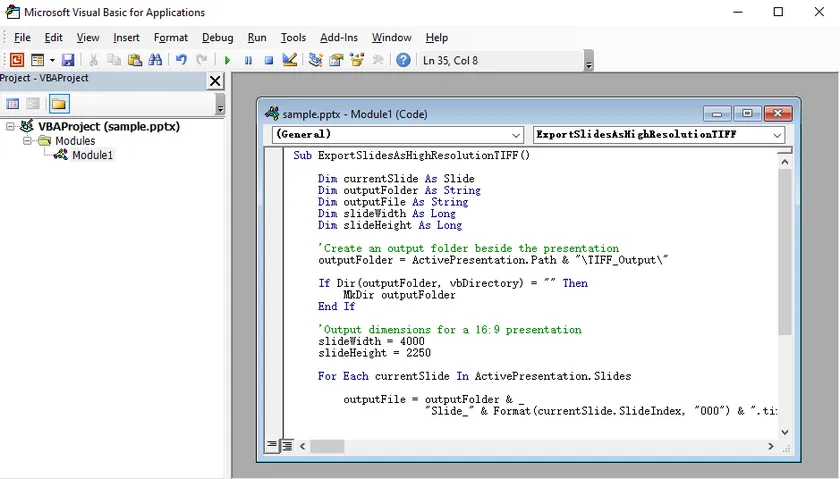
A macro a seguir exporta cada slide como uma imagem TIFF de 4000 × 2250 pixels, o que corresponde às dimensões 16:9 comumente associadas a um slide widescreen de 300 DPI.
Adicionar e executar a macro VBA
- Abra sua apresentação do PowerPoint.
- Pressione Alt + F11 para abrir o Editor do Visual Basic.
- Selecione Inserir → Módulo.
- Cole o seguinte código no módulo:
Sub ExportSlidesAsHighResolutionTIFF()

    Dim currentSlide As Slide
    Dim outputFolder As String
    Dim outputFile As String
    Dim slideWidth As Long
    Dim slideHeight As Long

    'Criar uma pasta de saída ao lado da apresentação
    outputFolder = ActivePresentation.Path & "\TIFF_Output\"

    If Dir(outputFolder, vbDirectory) = "" Then
        MkDir outputFolder
    End If

    'Dimensões de saída para uma apresentação 16:9
    slideWidth = 4000
    slideHeight = 2250

    For Each currentSlide In ActivePresentation.Slides

        outputFile = outputFolder & _
                     "Slide_" & Format(currentSlide.SlideIndex, "000") & ".tif"

        currentSlide.Export _
            outputFile, _
            "TIFF", _
            slideWidth, _
            slideHeight

    Next currentSlide

    MsgBox "Todos os slides foram exportados para:" & vbCrLf & outputFolder

End Sub
- Pressione F5 ou clique em Executar.
- Abra a pasta
TIFF_Outputcriada ao lado da apresentação.
A macro usa nomes de arquivo numerados como Slide_001.tif, Slide_002.tif e Slide_003.tif. A numeração com preenchimento de zeros ajuda a manter a ordem correta dos slides quando as imagens são classificadas por nome de arquivo.
Para uma apresentação 4:3, substitua as dimensões por valores que correspondam a essa proporção, como:
slideWidth = 3000
slideHeight = 2250
A vantagem do VBA é que ele automatiza toda a apresentação sem exigir outro aplicativo. Ele também lhe dá controle direto sobre as dimensões em pixels. No entanto, as macros devem estar habilitadas e o código é executado através do aplicativo PowerPoint instalado, tornando-o menos adequado para ambientes de servidor sem supervisão.
Método 3: Converter PowerPoint para TIFF com o Convertio
Um conversor online é útil quando você não pode instalar software, não tem acesso ao PowerPoint ou só precisa converter um pequeno número de arquivos.
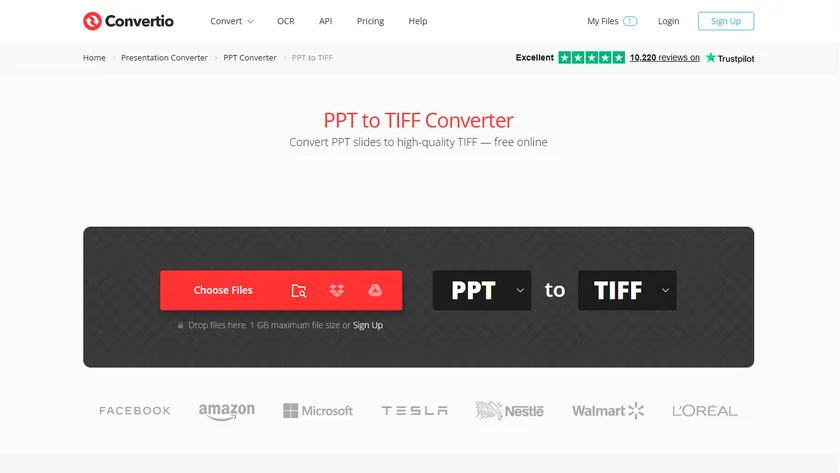
O Convertio fornece páginas dedicadas de conversão de PPT para TIFF e PPTX para TIFF. Ele aceita arquivos de um computador local e também pode suportar importações de armazenamento em nuvem ou de uma URL. O serviço converte a apresentação na nuvem e fornece o arquivo TIFF resultante para download.
Passos para converter PowerPoint online
- Abra o conversor de PowerPoint para TIFF do Convertio.
- Carregue uma apresentação
.pptou.pptx. - Clique em Converter.
- Aguarde a conclusão da conversão.
- Baixe o arquivo TIFF convertido.
Esta é a opção mais fácil para uma conversão rápida e única, pois não envolve alterações de registro, macros ou ferramentas de desenvolvimento. Também funciona em sistemas operacionais diferentes do Windows.
A principal limitação é o controle. Conversores online podem não fornecer configurações precisas de DPI, tamanho de pixel, compressão ou perfil de cor. Planos gratuitos também podem impor restrições ao tamanho do arquivo, frequência de conversão ou processamento em lote.
Mais importante ainda, carregar uma apresentação envia seu conteúdo para um servidor de terceiros. Evite este método para apresentações que contenham informações comerciais confidenciais, dados de clientes, registros financeiros, pesquisas não publicadas ou outros materiais sensíveis.
Método 4: Converter PowerPoint para TIFF de alta resolução usando Python
Para conversão automatizada ou integração em aplicativos de processamento de documentos, você pode usar o Spire.Presentation for Python junto com o Pillow. O Spire.Presentation pode renderizar cada slide em um tamanho de pixel especificado sem exigir que o Microsoft PowerPoint esteja instalado.
Ao contrário de salvar a apresentação diretamente como TIFF, o que pode produzir imagens de apenas 1280 × 720 pixels, o método SaveAsImageByWH() permite especificar a largura e a altura da saída. As imagens dos slides renderizados podem então ser combinadas em um único TIFF de várias páginas usando o Pillow.
Instalar as bibliotecas necessárias
Instale o Spire.Presentation for Python e o Pillow usando o pip:
pip install Spire.Presentation Pillow
Código Python: Converter PowerPoint para um TIFF de várias páginas
from spire.presentation import *
from PIL import Image
from io import BytesIO

# Criar um objeto Presentation
presentation = Presentation()

# Carregar uma apresentação do PowerPoint
presentation.LoadFromFile("Input.pptx")

# Armazenar as imagens dos slides convertidos
images = []

# Converter cada slide para uma imagem de alta resolução
for i in range(presentation.Slides.Count):
    slide = presentation.Slides[i]

    # Renderizar o slide a 4000 × 2250 pixels
    stream = slide.SaveAsImageByWH(4000, 2250)

    # Converter o fluxo de imagem para uma imagem PIL
    image = Image.open(BytesIO(stream.ToArray())).convert("RGB")
    images.append(image)

    stream.Dispose()

# Salvar todas as imagens dos slides como um TIFF de várias páginas
images[0].save(
    "Output/PowerPointToTIFF.tiff",
    format="TIFF",
    save_all=True,
    append_images=images[1:],
    compression="tiff_lzw",
    dpi=(300, 300)
)

# Descartar recursos
presentation.Dispose()
Como funciona
O código primeiro carrega a apresentação do PowerPoint e percorre seus slides. Cada slide é renderizado como uma imagem de 4000 × 2250 pixels, o que é adequado para uma apresentação 16:9 padrão destinada à impressão de alta qualidade.
O fluxo de imagem retornado por SaveAsImageByWH() é então aberto com o Pillow e adicionado a uma lista. Finalmente, o Pillow salva a primeira imagem como um arquivo TIFF e anexa as imagens restantes como páginas adicionais.
Os seguintes argumentos são importantes:
save_all=Truehabilita a saída de imagem de várias páginas.append_images=images[1:]adiciona os slides restantes ao arquivo TIFF.compression="tiff_lzw"aplica compressão LZW sem perdas para reduzir o tamanho do arquivo de saída.dpi=(300, 300)registra informações de resolução de 300 DPI nos metadados TIFF.
O detalhe visual real é determinado principalmente pelas dimensões de renderização de 4000 × 2250. A configuração de DPI informa principalmente aos aplicativos compatíveis quão densamente esses pixels devem ser impressos.
Para uma saída de resolução mais baixa com um tamanho de arquivo menor, você pode alterar as dimensões do slide para:
stream = slide.SaveAsImageByWH(2667, 1500)
Este método é adequado para processamento em lote, conversão no lado do servidor e fluxos de trabalho nos quais várias apresentações devem ser convertidas automaticamente. Ele também cria um TIFF de várias páginas diretamente, portanto, não há necessidade de mesclar as imagens individuais dos slides posteriormente.
Saiba mais
Além da conversão para TIFF, o Spire.Presentation for Python também pode ser usado para converter slides do PowerPoint para outros formatos de imagem, como PNG, JPG e SVG, dependendo dos requisitos de saída. Para fluxos de trabalho de compartilhamento de documentos mais amplos, as apresentações também podem ser convertidas para formatos como PDF e HTML. Essas opções facilitam a reutilização do conteúdo dos slides para sites, relatórios, arquivos, visualizações e distribuição multiplataforma.
Dicas extras: Combinar TIFFs de página única em um TIFF de várias páginas
Os métodos 1 e 2 exportam cada slide como um arquivo TIFF separado. Se você preferir um TIFF de várias páginas contendo todos os slides, o IrfanView é uma ferramenta prática do Windows que suporta a criação e edição de arquivos TIFF de várias páginas. Os métodos 3 e 4, no entanto, criam um TIFF de várias páginas diretamente e não exigem essa etapa adicional de mesclagem.
Combinar arquivos TIFF com o IrfanView
- Abra o IrfanView e vá para Arquivo → Miniaturas, ou pressione T.
- Na janela Miniaturas, navegue até a pasta que contém os arquivos TIFF exportados.
- Selecione todos os arquivos TIFF que deseja mesclar. Use Ctrl ou Shift enquanto clica para selecionar vários arquivos.
- Clique com o botão direito em um dos arquivos selecionados.
- Escolha Iniciar diálogo Multipage-TIF com arquivos selecionados.
- Revise a ordem dos arquivos na caixa de diálogo de várias páginas.
- Defina a pasta de destino e o nome do arquivo.
- Clique em Criar Imagem TIF.
Após o processamento, o IrfanView cria um único arquivo TIFF no qual cada slide aparece como uma página separada.
Verifique a ordem cuidadosamente antes de criar o arquivo. Nomear as imagens de origem com números preenchidos — como Slide_001, Slide_002 e Slide_010 — evita a classificação alfabética incorreta.
Ferramentas online gratuitas de mesclagem de TIFF são outra opção, mas as mesmas preocupações de privacidade se aplicam ao carregar imagens sensíveis.
Tabela comparativa: Escolha o método certo
| Método | Mais adequado para | Controle de resolução | Suporte a lote | Requer PowerPoint | Limitação principal |
|---|---|---|---|---|---|
| Registro + PowerPoint | Exportação manual ocasional | Baseado em DPI | Uma apresentação por vez | Sim | Requer modificação do registro |
| Macro VBA | Exportação repetida de slides | Dimensões exatas em pixels | Sim | Sim | Macros devem estar habilitadas |
| Convertio | Conversão rápida sem instalação | Limitado | Limitado pelo plano de serviço | Não | Privacidade e restrições de upload |
| Spire.Presentation for Python | Fluxos de trabalho de aplicativos automatizados | Programável | Sim | Não | Requer codificação e consideração de licenciamento |
Conclusão
A melhor maneira de converter PowerPoint para TIFF de alta resolução depende da frequência com que você realiza a conversão e de quanto controle você precisa.
Para uma exportação única no Windows, alterar a configuração de registro do PowerPoint e usar o recurso nativo de exportação TIFF é simples. Uma macro VBA é mais eficiente quando você precisa exportar cada slide repetidamente em dimensões fixas de pixel. O Convertio é conveniente para conversões ocasionais baseadas em navegador, desde que a apresentação não seja confidencial.
Para fluxos de trabalho de documentos automatizados, o Spire.Presentation for Python oferece maior controle sobre as dimensões de saída sem exigir o Microsoft PowerPoint. Combinado com o Pillow, ele também pode colocar todos os slides renderizados em um único arquivo TIFF de várias páginas.
Quando imagens de slides separadas não são convenientes, os arquivos TIFF exportados também podem ser combinados em um único TIFF de várias páginas com o IrfanView.
Perguntas frequentes (FAQs)
O PowerPoint pode exportar slides diretamente como arquivos TIFF?
Sim. No PowerPoint, selecione Arquivo → Salvar Como e escolha TIFF como formato de saída. O PowerPoint pode exportar o slide atual ou todos os slides da apresentação.
Por que os arquivos TIFF exportados do PowerPoint parecem borrados?
A resolução de exportação de bitmap padrão do PowerPoint no Windows é normalmente 96 DPI. Isso pode ser suficiente para telas, mas inadequado para ampliação ou impressão profissional. Alterar o valor do registro ExportBitmapResolution ou especificar dimensões de pixel maiores via VBA produz uma saída mais nítida.
300 DPI é sempre necessário?
Nem sempre. Cerca de 96 a 150 DPI podem ser suficientes para documentos baseados em tela e visualizações internas. Uma resolução de 300 DPI é mais apropriada para impressão de alta qualidade, publicação e diagramas detalhados. Resoluções mais altas também produzem arquivos TIFF maiores.
Aumentar o DPI melhora imagens de baixa qualidade dentro da apresentação?
Não. Uma resolução de exportação mais alta preserva os elementos do slide com mais clareza, mas não pode restaurar detalhes que faltam em uma imagem de origem de baixa resolução. Para obter o melhor resultado, use imagens originais de alta qualidade e desative a compressão de imagem desnecessária no PowerPoint.
Vários slides do PowerPoint podem ser armazenados em um arquivo TIFF?
Sim. O TIFF suporta várias páginas. O PowerPoint e o VBA normalmente exportam cada slide como uma imagem separada, que pode ser combinada usando o IrfanView. Em Python, você pode renderizar os slides com o Spire.Presentation e usar o Pillow para salvá-los diretamente como um único TIFF de várias páginas.
Veja também
PowerPoint를 고해상도 TIFF로 변환하는 4가지 실용적인 방법
목차
PowerPoint 프레젠테이션에는 Microsoft PowerPoint 외부에서 재사용해야 할 수 있는 차트, 다이어그램, 제품 디자인, 기술 도면 및 기타 시각적 콘텐츠가 포함되어 있는 경우가 많습니다. 슬라이드를 TIFF로 변환하는 것은 전문적인 인쇄, 문서 보관, 출판, 팩스 전송 및 무손실 래스터 이미지가 필요한 워크플로에 특히 유용합니다.
그러나 PowerPoint에서 슬라이드를 단순히 내보내는 것만으로는 기대하는 해상도가 나오지 않을 수 있습니다. Windows 환경에서 PowerPoint는 기본적으로 슬라이드를 96 DPI의 비트맵 이미지로 내보냅니다. 이는 화면 보기에는 충분하지만, 이미지를 확대하거나 인쇄할 경우 흐릿하게 보일 수 있습니다. 인쇄용 출력물에는 일반적으로 300 DPI가 더 실용적인 목표치입니다.
이 기사에서는 PowerPoint 프레젠테이션을 고해상도 TIFF 파일로 변환하는 네 가지 방법을 소개합니다. 이 방법들은 PowerPoint의 내장 내보내기 기능부터 VBA 자동화, 온라인 변환기, 그리고 고해상도 다중 페이지 TIFF 파일을 생성하기 위한 Python 기반 솔루션까지 다양합니다.
방법 1: Windows 레지스트리 수정 및 PowerPoint에서 내보내기
PowerPoint는 표준 다른 이름으로 저장 또는 내보내기 기능을 통해 슬라이드를 TIFF 이미지로 직접 저장할 수 있습니다. 주요 제한 사항은 Windows의 PowerPoint가 기본적으로 96 DPI의 내보내기 해상도를 사용한다는 점입니다.
더 높은 해상도의 이미지를 생성하려면 PowerPoint의 비트맵 내보내기 해상도를 변경하는 레지스트리 값을 추가할 수 있습니다. 예를 들어, 값을 300으로 설정하면 표준 16:9 와이드스크린 슬라이드에서 4000 × 2250 픽셀 이미지가 생성됩니다.
Windows 레지스트리를 잘못 편집하면 시스템이나 애플리케이션 동작에 영향을 줄 수 있습니다. 변경하기 전에 관련 레지스트리 키를 백업하는 것을 고려하십시오.
1단계: PowerPoint 내보내기 해상도 변경
- PowerPoint 및 기타 Microsoft Office 애플리케이션을 닫습니다.
- Windows + R을 눌러 실행 대화 상자를 엽니다.
regedit을 입력하고 확인을 클릭합니다.- PowerPoint 2016, 2019, 2021, 2024 또는 Microsoft 365의 경우 다음 경로로 이동합니다:
HKEY_CURRENT_USER\Software\Microsoft\Office\16.0\PowerPoint\Options
- 오른쪽 창의 빈 영역을 마우스 오른쪽 버튼으로 클릭합니다.
- 새로 만들기 → DWORD(32비트) 값을 선택합니다.
- 새 값의 이름을 다음과 같이 지정합니다:
ExportBitmapResolution
- 해당 값을 더블 클릭하고 10진수를 선택합니다.
- 값 데이터 필드에
300을 입력합니다. - 확인을 클릭하고 레지스트리 편집기를 닫습니다.
이미지 품질과 파일 크기 사이의 균형이 필요할 때 150 또는 200과 같은 다른 값을 사용할 수 있습니다. Microsoft의 내보내기 계산에 따르면 16:9 슬라이드는 150 DPI에서 약 2000 × 1125 픽셀, 200 DPI에서 2667 × 1500 픽셀, 300 DPI에서 4000 × 2250 픽셀을 생성합니다.
2단계: 슬라이드를 TIFF로 내보내기
- PowerPoint에서 프레젠테이션을 엽니다.
- 파일 → 다른 이름으로 저장 또는 파일 → 내보내기 → 파일 형식 변경으로 이동합니다.
- TIFF 태그 이미지 파일 형식(*.tif)을 선택합니다.
- 출력 폴더를 선택하고 저장을 클릭합니다.
- 메시지가 표시되면 모든 슬라이드 또는 현재 슬라이드만을 선택합니다.
모든 슬라이드가 내보내지면, PowerPoint는 각 슬라이드에 대한 개별 TIFF 파일이 포함된 폴더를 생성합니다.
이 방법은 가끔 고해상도 TIFF 이미지가 필요하고 Microsoft PowerPoint가 이미 설치되어 있을 때 편리합니다. 주요 단점은 사용자 수준의 Office 설정을 수정해야 하며, 많은 프레젠테이션을 자동으로 처리할 수 있는 편리한 방법이 없다는 점입니다.
방법 2: VBA 매크로를 사용하여 PowerPoint 슬라이드를 TIFF로 내보내기
프레젠테이션에 슬라이드가 많거나 동일한 내보내기 작업을 자주 반복해야 하는 경우 VBA 매크로가 더 효율적입니다. 표준 내보내기 대화 상자와 달리 PowerPoint의 Slide.Export 메서드를 사용하면 출력 너비와 높이를 픽셀 단위로 직접 지정할 수 있습니다. Microsoft는 ScaleWidth와 ScaleHeight를 내보낸 슬라이드의 선택적 픽셀 치수로 문서화하고 있습니다.
다음 매크로는 모든 슬라이드를 4000 × 2250 픽셀의 TIFF 이미지로 내보내며, 이는 300 DPI 와이드스크린 슬라이드와 일반적으로 관련된 16:9 비율과 일치합니다.
VBA 매크로 추가 및 실행
- PowerPoint 프레젠테이션을 엽니다.
- Alt + F11을 눌러 Visual Basic Editor를 엽니다.
- 삽입 → 모듈을 선택합니다.
- 다음 코드를 모듈에 붙여넣습니다:
Sub ExportSlidesAsHighResolutionTIFF()

    Dim currentSlide As Slide
    Dim outputFolder As String
    Dim outputFile As String
    Dim slideWidth As Long
    Dim slideHeight As Long

    '프레젠테이션 옆에 출력 폴더 생성
    outputFolder = ActivePresentation.Path & "\TIFF_Output\"

    If Dir(outputFolder, vbDirectory) = "" Then
        MkDir outputFolder
    End If

    '16:9 프레젠테이션을 위한 출력 치수
    slideWidth = 4000
    slideHeight = 2250

    For Each currentSlide In ActivePresentation.Slides

        outputFile = outputFolder & _
                     "Slide_" & Format(currentSlide.SlideIndex, "000") & ".tif"

        currentSlide.Export _
            outputFile, _
            "TIFF", _
            slideWidth, _
            slideHeight

    Next currentSlide

    MsgBox "모든 슬라이드가 다음 위치로 내보내졌습니다:" & vbCrLf & outputFolder

End Sub
- F5를 누르거나 실행을 클릭합니다.
- 프레젠테이션 옆에 생성된
TIFF_Output폴더를 엽니다.
이 매크로는 Slide_001.tif, Slide_002.tif, Slide_003.tif와 같이 번호가 매겨진 파일 이름을 사용합니다. 0으로 채워진 번호 매기기는 이미지를 파일 이름순으로 정렬할 때 올바른 슬라이드 순서를 유지하는 데 도움이 됩니다.
4:3 프레젠테이션의 경우, 해당 화면 비율에 맞는 치수로 교체하십시오:
slideWidth = 3000
slideHeight = 2250
VBA의 장점은 다른 애플리케이션 없이 전체 프레젠테이션을 자동화한다는 점입니다. 또한 픽셀 치수를 직접 제어할 수 있습니다. 그러나 매크로를 활성화해야 하며, 코드가 설치된 PowerPoint 애플리케이션을 통해 실행되므로 무인 서버 환경에는 적합하지 않습니다.
방법 3: Convertio를 사용하여 PowerPoint를 TIFF로 변환하기
온라인 변환기는 소프트웨어를 설치할 수 없거나, PowerPoint에 액세스할 수 없거나, 소수의 파일만 변환해야 할 때 유용합니다.
Convertio는 전용 PPT-to-TIFF 및 PPTX-to-TIFF 변환 페이지를 제공합니다. 로컬 컴퓨터에서 파일을 가져올 수 있으며 클라우드 저장소나 URL에서 가져오는 기능도 지원할 수 있습니다. 이 서비스는 클라우드에서 프레젠테이션을 변환하고 결과 TIFF 파일을 다운로드할 수 있도록 제공합니다.
온라인으로 PowerPoint를 변환하는 단계
- Convertio PowerPoint-to-TIFF 변환기를 엽니다.
.ppt또는.pptx프레젠테이션을 업로드합니다.- 변환을 클릭합니다.
- 변환이 완료될 때까지 기다립니다.
- 변환된 TIFF 파일을 다운로드합니다.
레지스트리 변경, 매크로 또는 개발 도구가 필요 없으므로 빠르고 일회성인 변환에 가장 쉬운 옵션입니다. Windows 이외의 운영 체제에서도 작동합니다.
주요 제한 사항은 제어 능력입니다. 온라인 변환기는 정확한 DPI, 픽셀 크기, 압축 또는 색상 프로필 설정을 제공하지 않을 수 있습니다. 무료 플랜은 파일 크기, 변환 빈도 또는 일괄 처리에 제한을 둘 수 있습니다.
더 중요한 점은 프레젠테이션을 업로드하면 그 내용이 타사 서버로 전송된다는 것입니다. 기밀 비즈니스 정보, 고객 데이터, 재무 기록, 미발표 연구 또는 기타 민감한 자료가 포함된 프레젠테이션에는 이 방법을 피하십시오.
방법 4: Python을 사용하여 PowerPoint를 고해상도 TIFF로 변환하기
자동화된 변환이나 문서 처리 애플리케이션에 통합하려면 Spire.Presentation for Python을 Pillow와 함께 사용할 수 있습니다. Spire.Presentation은 Microsoft PowerPoint를 설치하지 않고도 지정된 픽셀 크기로 각 슬라이드를 렌더링할 수 있습니다.
이미지를 1280 × 720 픽셀로만 생성할 수 있는 직접 저장 방식과 달리, SaveAsImageByWH() 메서드를 사용하면 출력 너비와 높이를 지정할 수 있습니다. 렌더링된 슬라이드 이미지는 Pillow를 사용하여 단일 다중 페이지 TIFF로 결합할 수 있습니다.
필수 라이브러리 설치
pip를 사용하여 Spire.Presentation for Python과 Pillow를 설치합니다:
pip install Spire.Presentation Pillow
Python 코드: PowerPoint를 다중 페이지 TIFF로 변환
from spire.presentation import *
from PIL import Image
from io import BytesIO

# Presentation 객체 생성
presentation = Presentation()

# PowerPoint 프레젠테이션 로드
presentation.LoadFromFile("Input.pptx")

# 변환된 슬라이드 이미지 저장
images = []

# 각 슬라이드를 고해상도 이미지로 변환
for i in range(presentation.Slides.Count):
    slide = presentation.Slides[i]

    # 슬라이드를 4000 × 2250 픽셀로 렌더링
    stream = slide.SaveAsImageByWH(4000, 2250)

    # 이미지 스트림을 PIL 이미지로 변환
    image = Image.open(BytesIO(stream.ToArray())).convert("RGB")
    images.append(image)

    stream.Dispose()

# 모든 슬라이드 이미지를 다중 페이지 TIFF로 저장
images[0].save(
    "Output/PowerPointToTIFF.tiff",
    format="TIFF",
    save_all=True,
    append_images=images[1:],
    compression="tiff_lzw",
    dpi=(300, 300)
)

# 리소스 해제
presentation.Dispose()
작동 원리
이 코드는 먼저 PowerPoint 프레젠테이션을 로드하고 슬라이드를 반복합니다. 각 슬라이드는 고품질 인쇄용 표준 16:9 프레젠테이션에 적합한 4000 × 2250 픽셀 이미지로 렌더링됩니다.
SaveAsImageByWH()가 반환한 이미지 스트림은 Pillow로 열려 리스트에 추가됩니다. 마지막으로, Pillow는 첫 번째 이미지를 TIFF 파일로 저장하고 나머지 이미지를 추가 페이지로 덧붙입니다.
다음 인수가 중요합니다:
save_all=True는 다중 페이지 이미지 출력을 활성화합니다.append_images=images[1:]는 나머지 슬라이드를 TIFF 파일에 추가합니다.compression="tiff_lzw"는 무손실 LZW 압축을 적용하여 출력 파일 크기를 줄입니다.dpi=(300, 300)은 TIFF 메타데이터에 300 DPI 해상도 정보를 기록합니다.
실제 시각적 세부 사항은 주로 4000 × 2250 렌더링 치수에 의해 결정됩니다. DPI 설정은 호환되는 애플리케이션에 해당 픽셀을 얼마나 밀도 있게 인쇄해야 하는지를 알려주는 역할을 합니다.
파일 크기가 더 작은 저해상도 출력을 원하면 슬라이드 치수를 다음과 같이 변경할 수 있습니다:
stream = slide.SaveAsImageByWH(2667, 1500)
이 방법은 일괄 처리, 서버 측 변환 및 여러 프레젠테이션을 자동으로 변환해야 하는 워크플로에 적합합니다. 또한 다중 페이지 TIFF를 직접 생성하므로 나중에 개별 슬라이드 이미지를 병합할 필요가 없습니다.
추가 정보
TIFF 변환 외에도 Spire.Presentation for Python은 출력 요구 사항에 따라 PowerPoint 슬라이드를 PNG, JPG, SVG와 같은 다른 이미지 형식으로 변환하는 데 사용할 수 있습니다. 더 광범위한 문서 공유 워크플로를 위해 프레젠테이션을 PDF 및 HTML과 같은 형식으로 변환할 수도 있습니다. 이러한 옵션을 사용하면 웹사이트, 보고서, 아카이브, 미리보기 및 플랫폼 간 배포를 위해 슬라이드 콘텐츠를 더 쉽게 재사용할 수 있습니다.
보너스 팁: 단일 페이지 TIFF를 다중 페이지 TIFF로 결합하기
방법 1과 2는 각 슬라이드를 별도의 TIFF 파일로 내보냅니다. 모든 슬라이드가 포함된 하나의 다중 페이지 TIFF를 선호하는 경우, IrfanView는 다중 페이지 TIFF 파일 생성 및 편집을 지원하는 실용적인 Windows 도구입니다. 반면 방법 3과 4는 다중 페이지 TIFF를 직접 생성하므로 이 추가 병합 단계가 필요하지 않습니다.
IrfanView로 TIFF 파일 결합하기
- IrfanView를 열고 파일 → 썸네일로 이동하거나 T를 누릅니다.
- 썸네일 창에서 내보낸 TIFF 파일이 포함된 폴더로 이동합니다.
- 병합할 모든 TIFF 파일을 선택합니다. 여러 파일을 선택하려면 클릭하는 동안 Ctrl 또는 Shift를 사용하십시오.
- 선택한 파일 중 하나를 마우스 오른쪽 버튼으로 클릭합니다.
- 선택한 파일로 다중 페이지 TIF 대화 상자 시작을 선택합니다.
- 다중 페이지 TIFF 대화 상자에서 파일 순서를 검토합니다.
- 출력 폴더와 파일 이름을 설정합니다.
- TIF 이미지 생성을 클릭합니다.
처리 후 IrfanView는 각 슬라이드가 별도의 페이지로 나타나는 단일 TIFF 파일을 생성합니다.
파일을 생성하기 전에 순서를 주의 깊게 확인하십시오. Slide_001, Slide_002, Slide_010과 같이 숫자를 채워 원본 이미지 이름을 지정하면 잘못된 알파벳순 정렬을 방지할 수 있습니다.
무료 온라인 TIFF 병합 도구도 다른 옵션이지만, 민감한 이미지를 업로드할 때 동일한 개인정보 보호 문제가 적용됩니다.
비교 표: 올바른 방법 선택하기
| 방법 | 가장 적합한 용도 | 해상도 제어 | 일괄 처리 지원 | PowerPoint 필요 여부 | 주요 제한 사항 |
|---|---|---|---|---|---|
| 레지스트리 + PowerPoint | 가끔 수행하는 수동 내보내기 | DPI 기반 | 한 번에 하나의 프레젠테이션 | 예 | 레지스트리 수정 필요 |
| VBA 매크로 | 반복적인 슬라이드 내보내기 | 정확한 픽셀 치수 | 예 | 예 | 매크로 활성화 필요 |
| Convertio | 설치 없는 빠른 변환 | 제한적 | 서비스 플랜에 따라 제한 | 아니요 | 개인정보 보호 및 업로드 제한 |
| Spire.Presentation for Python | 자동화된 애플리케이션 워크플로 | 프로그래밍 가능 | 예 | 아니요 | 코딩 및 라이선스 고려 필요 |
결론
PowerPoint를 고해상도 TIFF로 변환하는 가장 좋은 방법은 변환을 얼마나 자주 수행하는지, 그리고 얼마나 많은 제어가 필요한지에 따라 달라집니다.
Windows에서 일회성 내보내기를 하는 경우, PowerPoint의 레지스트리 설정을 변경하고 기본 TIFF 내보내기 기능을 사용하는 것이 간단합니다. VBA 매크로는 고정된 픽셀 치수로 모든 슬라이드를 반복적으로 내보내야 할 때 더 효율적입니다. Convertio는 프레젠테이션이 기밀이 아닌 경우 브라우저 기반의 가끔 수행하는 변환에 편리합니다.
자동화된 문서 워크플로의 경우, Spire.Presentation for Python은 Microsoft PowerPoint 없이도 출력 치수를 더 잘 제어할 수 있습니다. Pillow와 결합하면 렌더링된 모든 슬라이드를 단일 다중 페이지 TIFF 파일에 넣을 수도 있습니다.
별도의 슬라이드 이미지가 불편한 경우, 내보낸 TIFF 파일을 IrfanView를 사용하여 단일 다중 페이지 TIFF로 결합할 수도 있습니다.
자주 묻는 질문(FAQs)
PowerPoint에서 슬라이드를 TIFF 파일로 직접 내보낼 수 있나요?
네. PowerPoint에서 파일 → 다른 이름으로 저장을 선택하고 출력 형식으로 TIFF를 선택하십시오. PowerPoint는 현재 슬라이드나 프레젠테이션의 모든 슬라이드를 내보낼 수 있습니다.
PowerPoint에서 내보낸 TIFF 파일이 흐릿하게 보이는 이유는 무엇인가요?
Windows에서 PowerPoint의 기본 비트맵 내보내기 해상도는 일반적으로 96 DPI입니다. 이는 화면에는 충분할 수 있지만 확대나 전문적인 인쇄에는 부적절할 수 있습니다. ExportBitmapResolution 레지스트리 값을 변경하거나 VBA를 통해 더 큰 픽셀 치수를 지정하면 더 선명한 출력이 생성됩니다.
300 DPI가 항상 필요한가요?
항상 그렇지는 않습니다. 화면 기반 문서나 내부 미리보기에는 약 96~150 DPI로 충분할 수 있습니다. 300 DPI 해상도는 고품질 인쇄, 출판 및 상세한 다이어그램에 더 적합합니다. 해상도가 높을수록 TIFF 파일 크기도 커집니다.
DPI를 높이면 프레젠테이션 내의 저품질 이미지가 개선되나요?
아니요. 내보내기 해상도를 높이면 슬라이드 요소가 더 명확하게 유지되지만, 저해상도 원본 이미지에서 누락된 세부 정보를 복원할 수는 없습니다. 최상의 결과를 얻으려면 고품질 원본 이미지를 사용하고 PowerPoint에서 불필요한 이미지 압축을 비활성화하십시오.
여러 PowerPoint 슬라이드를 하나의 TIFF 파일에 저장할 수 있나요?
네. TIFF는 여러 페이지를 지원합니다. PowerPoint와 VBA는 일반적으로 각 슬라이드를 별도의 이미지로 내보내며, 이는 IrfanView를 사용하여 결합할 수 있습니다. Python에서는 Spire.Presentation으로 슬라이드를 렌더링하고 Pillow를 사용하여 단일 다중 페이지 TIFF로 직접 저장할 수 있습니다.
참고 항목
Convertire PowerPoint in TIFF ad alta risoluzione: 4 metodi pratici
Sommario
- Metodo 1: Modificare il Registro di Windows ed esportare da PowerPoint
- Metodo 2: Esportare le diapositive PowerPoint in TIFF con una macro VBA
- Metodo 3: Convertire PowerPoint in TIFF con Convertio
- Metodo 4: Convertire PowerPoint in TIFF ad alta risoluzione usando Python
- Suggerimenti bonus: Combinare TIFF a pagina singola in un TIFF multipagina
- Tabella comparativa: Scegliere il metodo giusto
- Conclusione
- Domande frequenti (FAQ)
Le presentazioni PowerPoint contengono spesso grafici, diagrammi, design di prodotti, illustrazioni tecniche e altri contenuti visivi che potrebbero dover essere riutilizzati al di fuori di Microsoft PowerPoint. La conversione delle diapositive in formato TIFF è particolarmente utile per la stampa professionale, l'archiviazione di documenti, la pubblicazione, l'invio via fax e i flussi di lavoro che richiedono immagini raster senza perdita di dati (lossless).
Tuttavia, la semplice esportazione delle diapositive da PowerPoint potrebbe non produrre la risoluzione desiderata. Su Windows, PowerPoint esporta normalmente le diapositive come immagini bitmap a 96 DPI per impostazione predefinita. Questo è generalmente sufficiente per la visualizzazione su schermo, ma le immagini risultanti potrebbero apparire sfocate se ingrandite o stampate. Per un output pronto per la stampa, 300 DPI è solitamente un obiettivo più pratico.
Questo articolo presenta quattro modi per convertire le presentazioni PowerPoint in file TIFF ad alta risoluzione. I metodi spaziano dalla funzione di esportazione integrata di PowerPoint all'automazione VBA, un convertitore online e una soluzione basata su Python per generare file TIFF multipagina ad alta risoluzione.
Metodo 1: Modificare il Registro di Windows ed esportare da PowerPoint
PowerPoint può salvare le diapositive direttamente come immagini TIFF tramite la sua funzione standard Salva con nome o Esporta. Il limite principale è che PowerPoint utilizza una risoluzione di esportazione predefinita di 96 DPI su Windows.
Per generare immagini a risoluzione più elevata, è possibile aggiungere un valore al registro che modifichi la risoluzione di esportazione bitmap di PowerPoint. Ad esempio, impostando il valore su 300 si ottiene un'immagine di 4000 × 2250 pixel da una diapositiva standard in formato panoramico 16:9.
La modifica errata del Registro di sistema di Windows può influire sul comportamento del sistema o delle applicazioni. Prendi in considerazione l'esecuzione di un backup della chiave di registro pertinente prima di apportare modifiche.
Passaggio 1: Modificare la risoluzione di esportazione di PowerPoint
- Chiudi PowerPoint e altre applicazioni Microsoft Office.
- Premi Windows + R per aprire la finestra di dialogo Esegui.
- Digita
regedite fai clic su OK. - Passa al seguente percorso per PowerPoint 2016, 2019, 2021, 2024 o Microsoft 365:
HKEY_CURRENT_USER\Software\Microsoft\Office\16.0\PowerPoint\Options
- Fai clic con il tasto destro del mouse su un'area vuota nel riquadro di destra.
- Seleziona Nuovo → Valore DWORD (32 bit).
- Nomina il nuovo valore:
ExportBitmapResolution
- Fai doppio clic sul valore e seleziona Decimale.
- Inserisci
300nel campo Dati valore. - Fai clic su OK e chiudi l'Editor del Registro di sistema.
È possibile utilizzare altri valori, come 150 o 200, quando è necessario un equilibrio tra qualità dell'immagine e dimensioni del file. I calcoli di esportazione di Microsoft mostrano che una diapositiva 16:9 produce circa 2000 × 1125 pixel a 150 DPI, 2667 × 1500 pixel a 200 DPI e 4000 × 2250 pixel a 300 DPI.
Passaggio 2: Esportare le diapositive come TIFF
- Apri la presentazione in PowerPoint.
- Vai su File → Salva con nome o File → Esporta → Cambia tipo di file.
- Scegli TIFF Tag Image File Format (*.tif).
- Seleziona una cartella di destinazione e fai clic su Salva.
- Quando richiesto, scegli Tutte le diapositive o Solo questa.
Quando tutte le diapositive vengono esportate, PowerPoint crea una cartella contenente un file TIFF separato per ogni diapositiva.
Questo metodo è conveniente quando si ha bisogno solo occasionalmente di immagini TIFF ad alta risoluzione e si ha già installato Microsoft PowerPoint. Il suo svantaggio principale è che modifica un'impostazione di Office a livello utente e non offre un modo pratico per elaborare automaticamente molte presentazioni.
Metodo 2: Esportare le diapositive PowerPoint in TIFF con una macro VBA
Una macro VBA è più efficiente quando una presentazione contiene molte diapositive o quando si ripete frequentemente la stessa operazione di esportazione. A differenza della finestra di dialogo di esportazione standard, il metodo Slide.Export di PowerPoint consente di specificare la larghezza e l'altezza dell'output direttamente in pixel. Microsoft documenta sia ScaleWidth che ScaleHeight come dimensioni in pixel opzionali per la diapositiva esportata.
La seguente macro esporta ogni diapositiva come immagine TIFF da 4000 × 2250 pixel, che corrisponde alle dimensioni 16:9 comunemente associate a una diapositiva widescreen a 300 DPI.
Aggiungere ed eseguire la macro VBA
- Apri la tua presentazione PowerPoint.
- Premi Alt + F11 per aprire l'editor di Visual Basic.
- Seleziona Inserisci → Modulo.
- Incolla il seguente codice nel modulo:
Sub ExportSlidesAsHighResolutionTIFF()

    Dim currentSlide As Slide
    Dim outputFolder As String
    Dim outputFile As String
    Dim slideWidth As Long
    Dim slideHeight As Long

    'Crea una cartella di output accanto alla presentazione
    outputFolder = ActivePresentation.Path & "\TIFF_Output\"

    If Dir(outputFolder, vbDirectory) = "" Then
        MkDir outputFolder
    End If

    'Dimensioni di output per una presentazione 16:9
    slideWidth = 4000
    slideHeight = 2250

    For Each currentSlide In ActivePresentation.Slides

        outputFile = outputFolder & _
                     "Slide_" & Format(currentSlide.SlideIndex, "000") & ".tif"

        currentSlide.Export _
            outputFile, _
            "TIFF", _
            slideWidth, _
            slideHeight

    Next currentSlide

    MsgBox "Tutte le diapositive sono state esportate in:" & vbCrLf & outputFolder

End Sub
- Premi F5 o fai clic su Esegui.
- Apri la cartella
TIFF_Outputcreata accanto alla presentazione.
La macro utilizza nomi di file numerati come Slide_001.tif, Slide_002.tif e Slide_003.tif. La numerazione con zeri iniziali aiuta a mantenere il corretto ordine delle diapositive quando le immagini vengono ordinate per nome file.
Per una presentazione 4:3, sostituisci le dimensioni con valori che corrispondono a quel rapporto d'aspetto, come:
slideWidth = 3000
slideHeight = 2250
Il vantaggio di VBA è che automatizza l'intera presentazione senza richiedere un'altra applicazione. Offre inoltre un controllo diretto sulle dimensioni in pixel. Tuttavia, le macro devono essere abilitate e il codice viene eseguito tramite l'applicazione PowerPoint installata, rendendolo meno adatto per ambienti server non presidiati.
Metodo 3: Convertire PowerPoint in TIFF con Convertio
Un convertitore online è utile quando non è possibile installare software, non si ha accesso a PowerPoint o si ha bisogno di convertire solo un piccolo numero di file.
Convertio fornisce pagine dedicate alla conversione da PPT a TIFF e da PPTX a TIFF. Accetta file da un computer locale e potrebbe anche supportare importazioni da cloud storage o URL. Il servizio converte la presentazione nel cloud e fornisce il file TIFF risultante per il download.
Passaggi per convertire PowerPoint online
- Apri il convertitore da PowerPoint a TIFF di Convertio.
- Carica una presentazione
.ppto.pptx. - Fai clic su Converti.
- Attendi il completamento della conversione.
- Scarica il file TIFF convertito.
Questa è l'opzione più semplice per una conversione rapida e una tantum, poiché non sono coinvolte modifiche al registro, macro o strumenti di sviluppo. Funziona anche su sistemi operativi diversi da Windows.
Il limite principale è il controllo. I convertitori online potrebbero non fornire impostazioni precise per DPI, dimensioni in pixel, compressione o profilo colore. I piani gratuiti possono anche imporre restrizioni sulle dimensioni del file, sulla frequenza di conversione o sull'elaborazione batch.
Ancora più importante, il caricamento di una presentazione invia i suoi contenuti a un server di terze parti. Evita questo metodo per presentazioni contenenti informazioni aziendali riservate, dati dei clienti, documenti finanziari, ricerche non pubblicate o altro materiale sensibile.
Metodo 4: Convertire PowerPoint in TIFF ad alta risoluzione usando Python
Per la conversione automatizzata o l'integrazione in applicazioni di elaborazione documenti, è possibile utilizzare Spire.Presentation for Python insieme a Pillow. Spire.Presentation può eseguire il rendering di ogni diapositiva a una dimensione in pixel specificata senza richiedere l'installazione di Microsoft PowerPoint.
A differenza del salvataggio diretto della presentazione come TIFF, che potrebbe produrre immagini a soli 1280 × 720 pixel, il metodo SaveAsImageByWH() consente di specificare la larghezza e l'altezza dell'output. Le immagini delle diapositive renderizzate possono quindi essere combinate in un unico TIFF multipagina utilizzando Pillow.
Installare le librerie richieste
Installa Spire.Presentation for Python e Pillow usando pip:
pip install Spire.Presentation Pillow
Codice Python: Convertire PowerPoint in un TIFF multipagina
from spire.presentation import *
from PIL import Image
from io import BytesIO

# Crea un oggetto Presentation
presentation = Presentation()

# Carica una presentazione PowerPoint
presentation.LoadFromFile("Input.pptx")

# Memorizza le immagini delle diapositive convertite
images = []

# Converti ogni diapositiva in un'immagine ad alta risoluzione
for i in range(presentation.Slides.Count):
    slide = presentation.Slides[i]

    # Esegui il rendering della diapositiva a 4000 × 2250 pixel
    stream = slide.SaveAsImageByWH(4000, 2250)

    # Converti il flusso dell'immagine in un'immagine PIL
    image = Image.open(BytesIO(stream.ToArray())).convert("RGB")
    images.append(image)

    stream.Dispose()

# Salva tutte le immagini delle diapositive come TIFF multipagina
images[0].save(
    "Output/PowerPointToTIFF.tiff",
    format="TIFF",
    save_all=True,
    append_images=images[1:],
    compression="tiff_lzw",
    dpi=(300, 300)
)

# Rilascia le risorse
presentation.Dispose()
Come funziona
Il codice carica prima la presentazione PowerPoint ed esegue un ciclo attraverso le sue diapositive. Ogni diapositiva viene renderizzata come immagine da 4000 × 2250 pixel, adatta per una presentazione standard 16:9 destinata alla stampa di alta qualità.
Il flusso di immagini restituito da SaveAsImageByWH() viene quindi aperto con Pillow e aggiunto a un elenco. Infine, Pillow salva la prima immagine come file TIFF e aggiunge le immagini rimanenti come pagine aggiuntive.
I seguenti argomenti sono importanti:
save_all=Trueabilita l'output di immagini multipagina.append_images=images[1:]aggiunge le diapositive rimanenti al file TIFF.compression="tiff_lzw"applica la compressione LZW senza perdita di dati per ridurre le dimensioni del file di output.dpi=(300, 300)registra le informazioni sulla risoluzione a 300 DPI nei metadati TIFF.
Il dettaglio visivo effettivo è determinato principalmente dalle dimensioni di rendering 4000 × 2250. L'impostazione DPI indica principalmente alle applicazioni compatibili quanto densamente tali pixel debbano essere stampati.
Per un output a risoluzione inferiore con dimensioni del file ridotte, è possibile modificare le dimensioni della diapositiva in:
stream = slide.SaveAsImageByWH(2667, 1500)
Questo metodo è adatto per l'elaborazione batch, la conversione lato server e i flussi di lavoro in cui più presentazioni devono essere convertite automaticamente. Crea anche un TIFF multipagina direttamente, quindi non è necessario unire le singole immagini delle diapositive in seguito.
Altro ancora
Oltre alla conversione TIFF, Spire.Presentation for Python può essere utilizzato anche per convertire diapositive PowerPoint in altri formati immagine, come PNG, JPG e SVG, a seconda dei requisiti di output. Per flussi di lavoro di condivisione documenti più ampi, le presentazioni possono anche essere convertite in formati come PDF e HTML. Queste opzioni facilitano il riutilizzo del contenuto delle diapositive per siti Web, report, archivi, anteprime e distribuzione multipiattaforma.
Suggerimenti bonus: Combinare TIFF a pagina singola in un TIFF multipagina
I metodi 1 e 2 esportano ogni diapositiva come file TIFF separato. Se preferisci un TIFF multipagina contenente tutte le diapositive, IrfanView è uno strumento Windows pratico che supporta la creazione e la modifica di file TIFF multipagina. I metodi 3 e 4, invece, creano direttamente un TIFF multipagina e non richiedono questo passaggio di unione aggiuntivo.
Combinare file TIFF con IrfanView
- Apri IrfanView e vai su File → Miniature, oppure premi T.
- Nella finestra Miniature, vai alla cartella contenente i file TIFF esportati.
- Seleziona tutti i file TIFF che desideri unire. Usa Ctrl o Shift mentre fai clic per selezionare più file.
- Fai clic con il tasto destro su uno dei file selezionati.
- Scegli Avvia finestra di dialogo Multipage-TIF con i file selezionati.
- Controlla l'ordine dei file nella finestra di dialogo multipagina TIFF.
- Imposta la cartella di output e il nome del file.
- Fai clic su Crea immagine TIF.
Dopo l'elaborazione, IrfanView crea un unico file TIFF in cui ogni diapositiva appare come una pagina separata.
Controlla attentamente l'ordine prima di creare il file. Nominare le immagini di origine con numeri riempiti di zeri — come Slide_001, Slide_002 e Slide_010 — impedisce un ordinamento alfabetico errato.
Gli strumenti online gratuiti per l'unione di TIFF sono un'altra opzione, ma si applicano le stesse preoccupazioni sulla privacy quando si caricano immagini sensibili.
Tabella comparativa: Scegliere il metodo giusto
| Metodo | Ideale per | Controllo risoluzione | Supporto batch | Richiede PowerPoint | Limite principale |
|---|---|---|---|---|---|
| Registro + PowerPoint | Esportazione manuale occasionale | Basato su DPI | Una presentazione alla volta | Sì | Richiede modifica del registro |
| Macro VBA | Esportazione ripetuta di diapositive | Dimensioni pixel esatte | Sì | Sì | Le macro devono essere abilitate |
| Convertio | Conversione rapida senza installazione | Limitato | Limitato dal piano di servizio | No | Privacy e restrizioni di caricamento |
| Spire.Presentation for Python | Flussi di lavoro applicativi automatizzati | Programmabile | Sì | No | Richiede programmazione e licenza |
Conclusione
Il modo migliore per convertire PowerPoint in TIFF ad alta risoluzione dipende da quanto spesso esegui la conversione e da quanto controllo richiedi.
Per un'esportazione una tantum su Windows, modificare l'impostazione del registro di PowerPoint e utilizzare la funzione di esportazione TIFF nativa è semplice. Una macro VBA è più efficiente quando è necessario esportare ogni diapositiva ripetutamente a dimensioni in pixel fisse. Convertio è conveniente per conversioni occasionali basate su browser, a condizione che la presentazione non sia riservata.
Per flussi di lavoro documentali automatizzati, Spire.Presentation for Python offre un maggiore controllo sulle dimensioni di output senza richiedere Microsoft PowerPoint. In combinazione con Pillow, può anche inserire tutte le diapositive renderizzate in un unico file TIFF multipagina.
Quando le immagini delle diapositive separate non sono convenienti, i file TIFF esportati possono anche essere combinati in un unico TIFF multipagina con IrfanView.
Domande frequenti (FAQ)
PowerPoint può esportare le diapositive direttamente come file TIFF?
Sì. In PowerPoint, seleziona File → Salva con nome e scegli TIFF come formato di output. PowerPoint può esportare la diapositiva corrente o ogni diapositiva della presentazione.
Perché i file TIFF esportati da PowerPoint sembrano sfocati?
La risoluzione di esportazione bitmap predefinita di PowerPoint su Windows è normalmente 96 DPI. Questo può essere sufficiente per gli schermi ma inadeguato per l'ingrandimento o la stampa professionale. Modificare il valore del registro ExportBitmapResolution o specificare dimensioni in pixel maggiori tramite VBA produce un output più nitido.
300 DPI sono sempre necessari?
Non sempre. Circa 96-150 DPI possono essere sufficienti per documenti basati su schermo e anteprime interne. Una risoluzione di 300 DPI è più appropriata per stampe di alta qualità, pubblicazioni e diagrammi dettagliati. Una risoluzione più elevata produce anche file TIFF più grandi.
L'aumento dei DPI migliora le immagini di bassa qualità all'interno della presentazione?
No. Una risoluzione di esportazione più elevata preserva gli elementi della diapositiva in modo più chiaro, ma non può ripristinare i dettagli mancanti da un'immagine sorgente a bassa risoluzione. Per ottenere il miglior risultato, utilizza immagini originali di alta qualità e disabilita la compressione delle immagini non necessaria in PowerPoint.
È possibile memorizzare più diapositive PowerPoint in un unico file TIFF?
Sì. Il formato TIFF supporta più pagine. PowerPoint e VBA normalmente esportano ogni diapositiva come immagine separata, che può essere combinata utilizzando IrfanView. In Python, puoi renderizzare le diapositive con Spire.Presentation e utilizzare Pillow per salvarle direttamente come un unico TIFF multipagina.
Vedi anche
Convertir PowerPoint en TIFF haute résolution : 4 méthodes pratiques
Table des matières
- Méthode 1 : Modifier le registre Windows et exporter depuis PowerPoint
- Méthode 2 : Exporter des diapositives PowerPoint en TIFF avec une macro VBA
- Méthode 3 : Convertir PowerPoint en TIFF avec Convertio
- Méthode 4 : Convertir PowerPoint en TIFF haute résolution avec Python
- Conseils bonus : Combiner des TIFF d'une page en un TIFF multipage
- Tableau comparatif : Choisir la bonne méthode
- Conclusion
- FAQ
Les présentations PowerPoint contiennent souvent des graphiques, des diagrammes, des conceptions de produits, des illustrations techniques et d'autres contenus visuels qui peuvent avoir besoin d'être réutilisés en dehors de Microsoft PowerPoint. La conversion de diapositives au format TIFF est particulièrement utile pour l'impression professionnelle, l'archivage de documents, la publication, l'envoi par fax et les flux de travail nécessitant des images matricielles sans perte.
Cependant, le simple fait d'exporter des diapositives depuis PowerPoint peut ne pas produire la résolution attendue. Sous Windows, PowerPoint exporte normalement les diapositives sous forme d'images bitmap à 96 DPI par défaut. C'est généralement suffisant pour un affichage à l'écran, mais les images résultantes peuvent paraître floues lorsqu'elles sont agrandies ou imprimées. Pour une sortie prête à l'impression, 300 DPI est généralement une cible plus pratique.
Cet article présente quatre façons de convertir des présentations PowerPoint en fichiers TIFF haute résolution. Les méthodes vont de la fonction d'exportation intégrée de PowerPoint à l'automatisation VBA, en passant par un convertisseur en ligne et une solution basée sur Python pour générer des fichiers TIFF multipages haute résolution.
Méthode 1 : Modifier le registre Windows et exporter depuis PowerPoint
PowerPoint peut enregistrer les diapositives directement sous forme d'images TIFF via sa fonction standard Enregistrer sous ou Exporter. La principale limite est que PowerPoint utilise une résolution d'exportation par défaut de 96 DPI sous Windows.
Pour générer des images de plus haute résolution, vous pouvez ajouter une valeur de registre qui modifie la résolution d'exportation bitmap de PowerPoint. Par exemple, définir la valeur sur 300 produit une image de 4000 × 2250 pixels à partir d'une diapositive standard au format 16:9.
Une modification incorrecte du registre Windows peut affecter le comportement du système ou des applications. Pensez à sauvegarder la clé de registre concernée avant d'effectuer des modifications.
Étape 1 : Modifier la résolution d'exportation de PowerPoint
- Fermez PowerPoint et les autres applications Microsoft Office.
- Appuyez sur Windows + R pour ouvrir la boîte de dialogue Exécuter.
- Saisissez
regeditet cliquez sur OK. - Accédez à l'emplacement suivant pour PowerPoint 2016, 2019, 2021, 2024 ou Microsoft 365 :
HKEY_CURRENT_USER\Software\Microsoft\Office\16.0\PowerPoint\Options
- Faites un clic droit sur une zone vide dans le volet de droite.
- Sélectionnez Nouveau → Valeur DWORD (32 bits).
- Nommez la nouvelle valeur :
ExportBitmapResolution
- Double-cliquez sur la valeur et sélectionnez Décimal.
- Saisissez
300dans le champ Données de la valeur. - Cliquez sur OK et fermez l'Éditeur du Registre.
Vous pouvez utiliser d'autres valeurs, comme 150 ou 200, lorsque vous avez besoin d'un équilibre entre la qualité de l'image et la taille du fichier. Les calculs d'exportation de Microsoft montrent qu'une diapositive 16:9 produit environ 2000 × 1125 pixels à 150 DPI, 2667 × 1500 pixels à 200 DPI et 4000 × 2250 pixels à 300 DPI.
Étape 2 : Exporter les diapositives au format TIFF
- Ouvrez la présentation dans PowerPoint.
- Allez dans Fichier → Enregistrer sous ou Fichier → Exporter → Modifier le type de fichier.
- Choisissez Format TIFF (Tagged Image File Format) (*.tif).
- Sélectionnez un dossier de destination et cliquez sur Enregistrer.
- Lorsque vous y êtes invité, choisissez Toutes les diapositives ou Juste celle-ci.
Lorsque toutes les diapositives sont exportées, PowerPoint crée un dossier contenant un fichier TIFF distinct pour chaque diapositive.
Cette méthode est pratique lorsque vous n'avez besoin qu'occasionnellement d'images TIFF haute résolution et que Microsoft PowerPoint est déjà installé. Son principal inconvénient est qu'elle modifie un paramètre Office au niveau de l'utilisateur et n'offre pas de moyen pratique de traiter automatiquement de nombreuses présentations.
Méthode 2 : Exporter des diapositives PowerPoint en TIFF avec une macro VBA
Une macro VBA est plus efficace lorsqu'une présentation contient de nombreuses diapositives ou lorsque vous répétez fréquemment la même tâche d'exportation. Contrairement à la boîte de dialogue d'exportation standard, la méthode Slide.Export de PowerPoint vous permet de spécifier directement la largeur et la hauteur de sortie en pixels. Microsoft documente ScaleWidth et ScaleHeight comme des dimensions en pixels optionnelles pour la diapositive exportée.
La macro suivante exporte chaque diapositive sous forme d'image TIFF de 4000 × 2250 pixels, ce qui correspond aux dimensions 16:9 couramment associées à une diapositive grand écran 300 DPI.
Ajouter et exécuter la macro VBA
- Ouvrez votre présentation PowerPoint.
- Appuyez sur Alt + F11 pour ouvrir l'éditeur Visual Basic.
- Sélectionnez Insertion → Module.
- Collez le code suivant dans le module :
Sub ExportSlidesAsHighResolutionTIFF()

    Dim currentSlide As Slide
    Dim outputFolder As String
    Dim outputFile As String
    Dim slideWidth As Long
    Dim slideHeight As Long

    'Créer un dossier de sortie à côté de la présentation
    outputFolder = ActivePresentation.Path & "\TIFF_Output\"

    If Dir(outputFolder, vbDirectory) = "" Then
        MkDir outputFolder
    End If

    'Dimensions de sortie pour une présentation 16:9
    slideWidth = 4000
    slideHeight = 2250

    For Each currentSlide In ActivePresentation.Slides

        outputFile = outputFolder & _
                     "Slide_" & Format(currentSlide.SlideIndex, "000") & ".tif"

        currentSlide.Export _
            outputFile, _
            "TIFF", _
            slideWidth, _
            slideHeight

    Next currentSlide

    MsgBox "Toutes les diapositives ont été exportées vers :" & vbCrLf & outputFolder

End Sub
- Appuyez sur F5 ou cliquez sur Exécuter.
- Ouvrez le dossier
TIFF_Outputcréé à côté de la présentation.
La macro utilise des noms de fichiers numérotés tels que Slide_001.tif, Slide_002.tif et Slide_003.tif. La numérotation avec des zéros permet de conserver l'ordre correct des diapositives lorsque les images sont triées par nom de fichier.
Pour une présentation 4:3, remplacez les dimensions par des valeurs correspondant à ce format, telles que :
slideWidth = 3000
slideHeight = 2250
L'avantage du VBA est qu'il automatise l'ensemble de la présentation sans nécessiter une autre application. Il vous donne également un contrôle direct sur les dimensions en pixels. Cependant, les macros doivent être activées et le code s'exécute via l'application PowerPoint installée, ce qui le rend moins adapté aux environnements serveurs sans surveillance.
Méthode 3 : Convertir PowerPoint en TIFF avec Convertio
Un convertisseur en ligne est utile lorsque vous ne pouvez pas installer de logiciel, que vous n'avez pas accès à PowerPoint ou que vous n'avez besoin de convertir qu'un petit nombre de fichiers.
Convertio propose des pages dédiées à la conversion PPT vers TIFF et PPTX vers TIFF. Il accepte les fichiers depuis un ordinateur local et peut également prendre en charge les importations depuis le stockage cloud ou une URL. Le service convertit la présentation dans le cloud et fournit le fichier TIFF résultant pour le téléchargement.
Étapes pour convertir PowerPoint en ligne
- Ouvrez le convertisseur PowerPoint vers TIFF de Convertio.
- Téléchargez une présentation
.pptou.pptx. - Cliquez sur Convertir.
- Attendez la fin de la conversion.
- Téléchargez le fichier TIFF converti.
C'est l'option la plus simple pour une conversion rapide et ponctuelle car elle ne nécessite aucune modification de registre, aucune macro ni aucun outil de développement. Elle fonctionne également sur d'autres systèmes d'exploitation que Windows.
La principale limite est le contrôle. Les convertisseurs en ligne peuvent ne pas fournir de paramètres précis de DPI, de taille de pixel, de compression ou de profil colorimétrique. Les plans gratuits peuvent également imposer des restrictions sur la taille des fichiers, la fréquence de conversion ou le traitement par lots.
Plus important encore, le téléchargement d'une présentation envoie son contenu vers un serveur tiers. Évitez cette méthode pour les présentations contenant des informations commerciales confidentielles, des données clients, des dossiers financiers, des recherches non publiées ou tout autre matériel sensible.
Méthode 4 : Convertir PowerPoint en TIFF haute résolution avec Python
Pour une conversion automatisée ou une intégration dans des applications de traitement de documents, vous pouvez utiliser Spire.Presentation for Python avec Pillow. Spire.Presentation peut rendre chaque diapositive à une taille de pixel spécifiée sans nécessiter l'installation de Microsoft PowerPoint.
Contrairement à l'enregistrement direct de la présentation au format TIFF, qui peut produire des images de seulement 1280 × 720 pixels, la méthode SaveAsImageByWH() vous permet de spécifier la largeur et la hauteur de sortie. Les images de diapositives rendues peuvent ensuite être combinées en un seul fichier TIFF multipage à l'aide de Pillow.
Installer les bibliothèques requises
Installez Spire.Presentation for Python et Pillow via pip :
pip install Spire.Presentation Pillow
Code Python : Convertir PowerPoint en TIFF multipage
from spire.presentation import *
from PIL import Image
from io import BytesIO

# Créer un objet Presentation
presentation = Presentation()

# Charger une présentation PowerPoint
presentation.LoadFromFile("Input.pptx")

# Stocker les images des diapositives converties
images = []

# Convertir chaque diapositive en image haute résolution
for i in range(presentation.Slides.Count):
    slide = presentation.Slides[i]

    # Rendre la diapositive à 4000 × 2250 pixels
    stream = slide.SaveAsImageByWH(4000, 2250)

    # Convertir le flux d'image en image PIL
    image = Image.open(BytesIO(stream.ToArray())).convert("RGB")
    images.append(image)

    stream.Dispose()

# Enregistrer toutes les images de diapositives sous forme de TIFF multipage
images[0].save(
    "Output/PowerPointToTIFF.tiff",
    format="TIFF",
    save_all=True,
    append_images=images[1:],
    compression="tiff_lzw",
    dpi=(300, 300)
)

# Libérer les ressources
presentation.Dispose()
Comment ça fonctionne
Le code charge d'abord la présentation PowerPoint et parcourt ses diapositives. Chaque diapositive est rendue sous forme d'image de 4000 × 2250 pixels, ce qui convient à une présentation 16:9 standard destinée à une impression de haute qualité.
Le flux d'image renvoyé par SaveAsImageByWH() est ensuite ouvert avec Pillow et ajouté à une liste. Enfin, Pillow enregistre la première image en tant que fichier TIFF et ajoute les images restantes en tant que pages supplémentaires.
Les arguments suivants sont importants :
save_all=Trueactive la sortie d'image multipage.append_images=images[1:]ajoute les diapositives restantes au fichier TIFF.compression="tiff_lzw"applique une compression LZW sans perte pour réduire la taille du fichier de sortie.dpi=(300, 300)enregistre les informations de résolution 300 DPI dans les métadonnées TIFF.
Le détail visuel réel est principalement déterminé par les dimensions de rendu 4000 × 2250. Le paramètre DPI indique principalement aux applications compatibles la densité d'impression de ces pixels.
Pour une sortie de résolution inférieure avec une taille de fichier plus petite, vous pouvez modifier les dimensions de la diapositive comme suit :
stream = slide.SaveAsImageByWH(2667, 1500)
Cette méthode est adaptée au traitement par lots, à la conversion côté serveur et aux flux de travail dans lesquels plusieurs présentations doivent être converties automatiquement. Elle crée également un TIFF multipage directement, il n'est donc pas nécessaire de fusionner les images de diapositives individuelles par la suite.
En savoir plus
Au-delà de la conversion TIFF, Spire.Presentation for Python peut également être utilisé pour convertir des diapositives PowerPoint vers d'autres formats d'image, tels que PNG, JPG et SVG, selon les besoins de sortie. Pour des flux de travail de partage de documents plus larges, les présentations peuvent également être converties vers des formats tels que PDF et HTML. Ces options facilitent la réutilisation du contenu des diapositives pour des sites Web, des rapports, des archives, des aperçus et une distribution multiplateforme.
Conseils bonus : Combiner des TIFF d'une page en un TIFF multipage
Les méthodes 1 et 2 exportent chaque diapositive sous forme de fichier TIFF distinct. Si vous préférez un TIFF multipage contenant toutes les diapositives, IrfanView est un outil Windows pratique qui prend en charge la création et la modification de fichiers TIFF multipages. Les méthodes 3 et 4, en revanche, créent directement un TIFF multipage et ne nécessitent pas cette étape de fusion supplémentaire.
Combiner des fichiers TIFF avec IrfanView
- Ouvrez IrfanView et allez dans Fichier → Miniatures, ou appuyez sur T.
- Dans la fenêtre des miniatures, accédez au dossier contenant les fichiers TIFF exportés.
- Sélectionnez tous les fichiers TIFF que vous souhaitez fusionner. Utilisez Ctrl ou Maj tout en cliquant pour sélectionner plusieurs fichiers.
- Faites un clic droit sur l'un des fichiers sélectionnés.
- Choisissez Démarrer la boîte de dialogue TIF multipage avec les fichiers sélectionnés.
- Vérifiez l'ordre des fichiers dans la boîte de dialogue multipage.
- Définissez le dossier de sortie et le nom du fichier.
- Cliquez sur Créer une image TIF.
Après le traitement, IrfanView crée un seul fichier TIFF dans lequel chaque diapositive apparaît comme une page distincte.
Vérifiez soigneusement l'ordre avant de créer le fichier. Nommer les images sources avec des numéros complétés par des zéros — tels que Slide_001, Slide_002 et Slide_010 — évite un tri alphabétique incorrect.
Les outils de fusion TIFF en ligne gratuits sont une autre option, mais les mêmes préoccupations en matière de confidentialité s'appliquent lors du téléchargement d'images sensibles.
Tableau comparatif : Choisir la bonne méthode
| Méthode | Idéal pour | Contrôle de résolution | Support par lots | Nécessite PowerPoint | Limite principale |
|---|---|---|---|---|---|
| Registre + PowerPoint | Exportation manuelle occasionnelle | Basé sur DPI | Une présentation à la fois | Oui | Nécessite une modification du registre |
| Macro VBA | Exportation répétée de diapositives | Dimensions exactes en pixels | Oui | Oui | Les macros doivent être activées |
| Convertio | Conversion rapide sans installation | Limité | Limité par le plan de service | Non | Confidentialité et restrictions de téléchargement |
| Spire.Presentation for Python | Flux de travail applicatifs automatisés | Programmable | Oui | Non | Nécessite du codage et une licence |
Conclusion
La meilleure façon de convertir PowerPoint en TIFF haute résolution dépend de la fréquence à laquelle vous effectuez la conversion et du niveau de contrôle dont vous avez besoin.
Pour une exportation ponctuelle sous Windows, modifier le paramètre de registre de PowerPoint et utiliser la fonction d'exportation TIFF native est simple. Une macro VBA est plus efficace lorsque vous devez exporter chaque diapositive à plusieurs reprises avec des dimensions de pixels fixes. Convertio est pratique pour les conversions occasionnelles via navigateur, à condition que la présentation ne soit pas confidentielle.
Pour les flux de travail documentaires automatisés, Spire.Presentation for Python offre un meilleur contrôle sur les dimensions de sortie sans nécessiter Microsoft PowerPoint. Combiné avec Pillow, il peut également placer toutes les diapositives rendues dans un seul fichier TIFF multipage.
Lorsque les images de diapositives séparées ne sont pas pratiques, les fichiers TIFF exportés peuvent également être combinés en un seul TIFF multipage avec IrfanView.
FAQ
PowerPoint peut-il exporter des diapositives directement sous forme de fichiers TIFF ?
Oui. Dans PowerPoint, sélectionnez Fichier → Enregistrer sous et choisissez TIFF comme format de sortie. PowerPoint peut exporter la diapositive actuelle ou toutes les diapositives de la présentation.
Pourquoi les fichiers TIFF exportés depuis PowerPoint semblent-ils flous ?
La résolution d'exportation bitmap par défaut de PowerPoint sous Windows est normalement de 96 DPI. Cela peut être suffisant pour les écrans mais insuffisant pour un agrandissement ou une impression professionnelle. Modifier la valeur de registre ExportBitmapResolution ou spécifier des dimensions de pixels plus grandes via VBA produit une sortie plus nette.
300 DPI est-il toujours nécessaire ?
Pas toujours. Environ 96 à 150 DPI peuvent suffire pour les documents à l'écran et les aperçus internes. Une résolution de 300 DPI est plus appropriée pour l'impression de haute qualité, la publication et les diagrammes détaillés. Une résolution plus élevée produit également des fichiers TIFF plus volumineux.
L'augmentation du DPI améliore-t-elle les images de basse qualité à l'intérieur de la présentation ?
Non. Une résolution d'exportation plus élevée préserve plus clairement les éléments de la diapositive, mais elle ne peut pas restaurer les détails manquants d'une image source basse résolution. Pour un meilleur résultat, utilisez des images originales de haute qualité et désactivez la compression d'image inutile dans PowerPoint.
Plusieurs diapositives PowerPoint peuvent-elles être stockées dans un seul fichier TIFF ?
Oui. Le format TIFF prend en charge plusieurs pages. PowerPoint et VBA exportent normalement chaque diapositive sous forme d'image distincte, qui peut être combinée à l'aide d'IrfanView. En Python, vous pouvez rendre les diapositives avec Spire.Presentation et utiliser Pillow pour les enregistrer directement sous forme de TIFF multipage unique.
Voir aussi
Convertir PowerPoint a TIFF de alta resolución: 4 métodos prácticos
Tabla de contenidos
- Método 1: Modificar el Registro de Windows y exportar desde PowerPoint
- Método 2: Exportar diapositivas de PowerPoint a TIFF con una macro VBA
- Método 3: Convertir PowerPoint a TIFF con Convertio
- Método 4: Convertir PowerPoint a TIFF de alta resolución usando Python
- Consejos adicionales: Combinar archivos TIFF de una página en un TIFF multipágina
- Tabla comparativa: Elija el método adecuado
- Conclusión
- Preguntas frecuentes
Las presentaciones de PowerPoint a menudo contienen gráficos, diagramas, diseños de productos, ilustraciones técnicas y otro contenido visual que puede necesitar ser reutilizado fuera de Microsoft PowerPoint. Convertir diapositivas a TIFF es particularmente útil para impresión profesional, archivo de documentos, publicación, envío por fax y flujos de trabajo que requieren imágenes ráster sin pérdida.
Sin embargo, simplemente exportar diapositivas desde PowerPoint puede no producir la resolución que espera. En Windows, PowerPoint normalmente exporta las diapositivas como imágenes de mapa de bits a 96 DPI de forma predeterminada. Esto es generalmente suficiente para ver en pantalla, pero las imágenes resultantes pueden aparecer borrosas al ampliarlas o imprimirlas. Para obtener una salida lista para imprimir, 300 DPI suele ser un objetivo más práctico.
Este artículo presenta cuatro formas de convertir presentaciones de PowerPoint a archivos TIFF de alta resolución. Los métodos van desde la función de exportación integrada de PowerPoint hasta la automatización VBA, un convertidor en línea y una solución basada en Python para generar archivos TIFF multipágina de alta resolución.
Método 1: Modificar el Registro de Windows y exportar desde PowerPoint
PowerPoint puede guardar diapositivas directamente como imágenes TIFF a través de su función estándar Guardar como o Exportar. La limitación principal es que PowerPoint utiliza una resolución de exportación predeterminada de 96 DPI en Windows.
Para generar imágenes de mayor resolución, puede agregar un valor de registro que cambie la resolución de exportación de mapa de bits de PowerPoint. Por ejemplo, establecer el valor en 300 produce una imagen de 4000 × 2250 píxeles a partir de una diapositiva panorámica estándar de 16:9.
Editar el Registro de Windows incorrectamente puede afectar el comportamiento del sistema o de la aplicación. Considere hacer una copia de seguridad de la clave de registro relevante antes de realizar cambios.
Paso 1: Cambiar la resolución de exportación de PowerPoint
- Cierre PowerPoint y otras aplicaciones de Microsoft Office.
- Presione Windows + R para abrir el cuadro de diálogo Ejecutar.
- Escriba
regedity haga clic en Aceptar. - Navegue a la siguiente ubicación para PowerPoint 2016, 2019, 2021, 2024 o Microsoft 365:
HKEY_CURRENT_USER\Software\Microsoft\Office\16.0\PowerPoint\Options
- Haga clic derecho en un área vacía en el panel derecho.
- Seleccione Nuevo → Valor de DWORD (32 bits).
- Nombre el nuevo valor:
ExportBitmapResolution
- Haga doble clic en el valor y seleccione Decimal.
- Ingrese
300en el campo Información del valor. - Haga clic en Aceptar y cierre el Editor del Registro.
Puede usar otros valores, como 150 o 200, cuando necesite un equilibrio entre la calidad de la imagen y el tamaño del archivo. Los cálculos de exportación de Microsoft muestran que una diapositiva de 16:9 produce aproximadamente 2000 × 1125 píxeles a 150 DPI, 2667 × 1500 píxeles a 200 DPI y 4000 × 2250 píxeles a 300 DPI.
Paso 2: Exportar las diapositivas como TIFF
- Abra la presentación en PowerPoint.
- Vaya a Archivo → Guardar como o Archivo → Exportar → Cambiar tipo de archivo.
- Elija Formato de archivo de imagen con etiquetas TIFF (*.tif).
- Seleccione una carpeta de salida y haga clic en Guardar.
- Cuando se le solicite, elija Todas las diapositivas o Solo esta.
Cuando se exportan todas las diapositivas, PowerPoint crea una carpeta que contiene un archivo TIFF separado para cada diapositiva.
Este método es conveniente cuando solo necesita imágenes TIFF de alta resolución ocasionalmente y ya tiene instalado Microsoft PowerPoint. Su principal desventaja es que modifica una configuración de Office a nivel de usuario y no ofrece una forma conveniente de procesar muchas presentaciones automáticamente.
Método 2: Exportar diapositivas de PowerPoint a TIFF con una macro VBA
Una macro VBA es más eficiente cuando una presentación contiene muchas diapositivas o cuando repite frecuentemente la misma tarea de exportación. A diferencia del cuadro de diálogo de exportación estándar, el método Slide.Export de PowerPoint le permite especificar el ancho y la altura de salida directamente en píxeles. Microsoft documenta tanto ScaleWidth como ScaleHeight como dimensiones de píxeles opcionales para la diapositiva exportada.
La siguiente macro exporta cada diapositiva como una imagen TIFF de 4000 × 2250 píxeles, lo que coincide con las dimensiones de 16:9 comúnmente asociadas con una diapositiva panorámica de 300 DPI.
Agregar y ejecutar la macro VBA
- Abra su presentación de PowerPoint.
- Presione Alt + F11 para abrir el Editor de Visual Basic.
- Seleccione Insertar → Módulo.
- Pegue el siguiente código en el módulo:
Sub ExportSlidesAsHighResolutionTIFF()

    Dim currentSlide As Slide
    Dim outputFolder As String
    Dim outputFile As String
    Dim slideWidth As Long
    Dim slideHeight As Long

    'Crear una carpeta de salida junto a la presentación
    outputFolder = ActivePresentation.Path & "\TIFF_Output\"

    If Dir(outputFolder, vbDirectory) = "" Then
        MkDir outputFolder
    End If

    'Dimensiones de salida para una presentación 16:9
    slideWidth = 4000
    slideHeight = 2250

    For Each currentSlide In ActivePresentation.Slides

        outputFile = outputFolder & _
                     "Slide_" & Format(currentSlide.SlideIndex, "000") & ".tif"

        currentSlide.Export _
            outputFile, _
            "TIFF", _
            slideWidth, _
            slideHeight

    Next currentSlide

    MsgBox "Todas las diapositivas se han exportado a:" & vbCrLf & outputFolder

End Sub
- Presione F5 o haga clic en Ejecutar.
- Abra la carpeta
TIFF_Outputcreada junto a la presentación.
La macro utiliza nombres de archivo numerados como Slide_001.tif, Slide_002.tif y Slide_003.tif. La numeración con ceros a la izquierda ayuda a mantener el orden correcto de las diapositivas cuando las imágenes se ordenan por nombre de archivo.
Para una presentación de 4:3, reemplace las dimensiones con valores que coincidan con esa relación de aspecto, tales como:
slideWidth = 3000
slideHeight = 2250
La ventaja de VBA es que automatiza toda la presentación sin requerir otra aplicación. También le da control directo sobre las dimensiones en píxeles. Sin embargo, las macros deben estar habilitadas y el código se ejecuta a través de la aplicación de PowerPoint instalada, lo que lo hace menos adecuado para entornos de servidor desatendidos.
Método 3: Convertir PowerPoint a TIFF con Convertio
Un convertidor en línea es útil cuando no puede instalar software, no tiene acceso a PowerPoint o solo necesita convertir una pequeña cantidad de archivos.
Convertio proporciona páginas dedicadas de conversión de PPT a TIFF y PPTX a TIFF. Acepta archivos desde una computadora local y también puede admitir importaciones desde almacenamiento en la nube o una URL. El servicio convierte la presentación en la nube y proporciona el archivo TIFF resultante para su descarga.
Pasos para convertir PowerPoint en línea
- Abra el convertidor de PowerPoint a TIFF de Convertio.
- Cargue una presentación
.ppto.pptx. - Haga clic en Convertir.
- Espere a que termine la conversión.
- Descargue el archivo TIFF convertido.
Esta es la opción más fácil para una conversión rápida y única porque no hay cambios en el registro, macros ni herramientas de desarrollo involucradas. También funciona en sistemas operativos distintos de Windows.
La limitación principal es el control. Los convertidores en línea pueden no proporcionar configuraciones precisas de DPI, tamaño de píxel, compresión o perfil de color. Los planes gratuitos también pueden imponer restricciones en el tamaño del archivo, la frecuencia de conversión o el procesamiento por lotes.
Más importante aún, cargar una presentación envía su contenido a un servidor de terceros. Evite este método para presentaciones que contengan información comercial confidencial, datos de clientes, registros financieros, investigaciones no publicadas u otro material sensible.
Método 4: Convertir PowerPoint a TIFF de alta resolución usando Python
Para la conversión automatizada o la integración en aplicaciones de procesamiento de documentos, puede usar Spire.Presentation for Python junto con Pillow. Spire.Presentation puede renderizar cada diapositiva a un tamaño de píxel específico sin necesidad de tener instalado Microsoft PowerPoint.
A diferencia de guardar directamente la presentación como TIFF, que puede producir imágenes de solo 1280 × 720 píxeles, el método SaveAsImageByWH() le permite especificar el ancho y la altura de salida. Las imágenes de diapositivas renderizadas se pueden combinar en un solo TIFF multipágina usando Pillow.
Instalar las bibliotecas requeridas
Instale Spire.Presentation for Python y Pillow usando pip:
pip install Spire.Presentation Pillow
Código Python: Convertir PowerPoint a un TIFF multipágina
from spire.presentation import *
from PIL import Image
from io import BytesIO

# Crear un objeto Presentation
presentation = Presentation()

# Cargar una presentación de PowerPoint
presentation.LoadFromFile("Input.pptx")

# Almacenar las imágenes de diapositivas convertidas
images = []

# Convertir cada diapositiva a una imagen de alta resolución
for i in range(presentation.Slides.Count):
    slide = presentation.Slides[i]

    # Renderizar la diapositiva a 4000 × 2250 píxeles
    stream = slide.SaveAsImageByWH(4000, 2250)

    # Convertir el flujo de imagen a una imagen PIL
    image = Image.open(BytesIO(stream.ToArray())).convert("RGB")
    images.append(image)

    stream.Dispose()

# Guardar todas las imágenes de diapositivas como un TIFF multipágina
images[0].save(
    "Output/PowerPointToTIFF.tiff",
    format="TIFF",
    save_all=True,
    append_images=images[1:],
    compression="tiff_lzw",
    dpi=(300, 300)
)

# Liberar recursos
presentation.Dispose()
Cómo funciona
El código primero carga la presentación de PowerPoint y recorre sus diapositivas. Cada diapositiva se renderiza como una imagen de 4000 × 2250 píxeles, lo cual es adecuado para una presentación estándar de 16:9 destinada a impresión de alta calidad.
El flujo de imagen devuelto por SaveAsImageByWH() se abre luego con Pillow y se agrega a una lista. Finalmente, Pillow guarda la primera imagen como un archivo TIFF y agrega las imágenes restantes como páginas adicionales.
Los siguientes argumentos son importantes:
save_all=Truehabilita la salida de imagen multipágina.append_images=images[1:]agrega las diapositivas restantes al archivo TIFF.compression="tiff_lzw"aplica compresión LZW sin pérdida para reducir el tamaño del archivo de salida.dpi=(300, 300)registra información de resolución de 300 DPI en los metadatos TIFF.
El detalle visual real está determinado principalmente por las dimensiones de renderizado de 4000 × 2250. La configuración de DPI indica principalmente a las aplicaciones compatibles qué tan densamente deben imprimirse esos píxeles.
Para una salida de menor resolución con un tamaño de archivo más pequeño, puede cambiar las dimensiones de la diapositiva a:
stream = slide.SaveAsImageByWH(2667, 1500)
Este método es adecuado para el procesamiento por lotes, la conversión del lado del servidor y los flujos de trabajo en los que se deben convertir múltiples presentaciones automáticamente. También crea un TIFF multipágina directamente, por lo que no es necesario combinar las imágenes de diapositivas individuales después.
Más información
Más allá de la conversión a TIFF, Spire.Presentation for Python también se puede utilizar para convertir diapositivas de PowerPoint a otros formatos de imagen, como PNG, JPG y SVG, según los requisitos de salida. Para flujos de trabajo de intercambio de documentos más amplios, las presentaciones también se pueden convertir a formatos como PDF y HTML. Estas opciones facilitan la reutilización del contenido de las diapositivas para sitios web, informes, archivos, vistas previas y distribución multiplataforma.
Consejos adicionales: Combinar archivos TIFF de una página en un TIFF multipágina
Los métodos 1 y 2 exportan cada diapositiva como un archivo TIFF separado. Si prefiere un TIFF multipágina que contenga todas las diapositivas, IrfanView es una herramienta práctica de Windows que admite la creación y edición de archivos TIFF multipágina. Los métodos 3 y 4, sin embargo, crean un TIFF multipágina directamente y no requieren este paso de combinación adicional.
Combinar archivos TIFF con IrfanView
- Abra IrfanView y vaya a Archivo → Miniaturas, o presione T.
- En la ventana de miniaturas, navegue a la carpeta que contiene los archivos TIFF exportados.
- Seleccione todos los archivos TIFF que desea combinar. Use Ctrl o Shift mientras hace clic para seleccionar varios archivos.
- Haga clic derecho en uno de los archivos seleccionados.
- Elija Iniciar diálogo Multipage-TIF con archivos seleccionados.
- Revise el orden de los archivos en el diálogo multipágina.
- Establezca la carpeta de salida y el nombre del archivo.
- Haga clic en Crear imagen TIF.
Después del procesamiento, IrfanView crea un solo archivo TIFF en el que cada diapositiva aparece como una página separada.
Verifique el orden cuidadosamente antes de crear el archivo. Nombrar las imágenes de origen con números con ceros a la izquierda, como Slide_001, Slide_002 y Slide_010, evita el orden alfabético incorrecto.
Las herramientas gratuitas de combinación de TIFF en línea son otra opción, pero se aplican las mismas preocupaciones de privacidad al cargar imágenes confidenciales.
Tabla comparativa: Elija el método adecuado
| Método | Mejor para | Control de resolución | Soporte por lotes | Requiere PowerPoint | Limitación principal |
|---|---|---|---|---|---|
| Registro + PowerPoint | Exportación manual ocasional | Basado en DPI | Una presentación a la vez | Sí | Requiere modificación del registro |
| Macro VBA | Exportación repetida de diapositivas | Dimensiones exactas en píxeles | Sí | Sí | Las macros deben estar habilitadas |
| Convertio | Conversión rápida sin instalación | Limitado | Limitado por plan de servicio | No | Privacidad y restricciones de carga |
| Spire.Presentation for Python | Flujos de trabajo de aplicaciones automatizadas | Programable | Sí | No | Requiere codificación y consideración de licencia |
Conclusión
La mejor manera de convertir PowerPoint a TIFF de alta resolución depende de la frecuencia con la que realice la conversión y de cuánto control necesite.
Para una exportación única en Windows, cambiar la configuración del registro de PowerPoint y usar la función de exportación TIFF nativa es sencillo. Una macro VBA es más eficiente cuando necesita exportar cada diapositiva repetidamente a dimensiones de píxeles fijas. Convertio es conveniente para conversiones ocasionales basadas en navegador, siempre que la presentación no sea confidencial.
Para flujos de trabajo de documentos automatizados, Spire.Presentation for Python proporciona un mayor control sobre las dimensiones de salida sin requerir Microsoft PowerPoint. Combinado con Pillow, también puede colocar todas las diapositivas renderizadas en un solo archivo TIFF multipágina.
Cuando las imágenes de diapositivas separadas no son convenientes, los archivos TIFF exportados también se pueden combinar en un solo TIFF multipágina con IrfanView.
Preguntas frecuentes
¿Puede PowerPoint exportar diapositivas directamente como archivos TIFF?
Sí. En PowerPoint, seleccione Archivo → Guardar como y elija TIFF como formato de salida. PowerPoint puede exportar la diapositiva actual o todas las diapositivas de la presentación.
¿Por qué los archivos TIFF exportados desde PowerPoint se ven borrosos?
La resolución de exportación de mapa de bits predeterminada de PowerPoint en Windows es normalmente 96 DPI. Esto puede ser suficiente para pantallas, pero inadecuado para ampliaciones o impresión profesional. Cambiar el valor del registro ExportBitmapResolution o especificar dimensiones de píxeles más grandes a través de VBA produce una salida más nítida.
¿Es siempre necesario 300 DPI?
No siempre. Alrededor de 96 a 150 DPI pueden ser suficientes para documentos basados en pantalla y vistas previas internas. Una resolución de 300 DPI es más apropiada para impresión de alta calidad, publicación y diagramas detallados. Una resolución más alta también produce archivos TIFF más grandes.
¿Aumentar el DPI mejora las imágenes de baja calidad dentro de la presentación?
No. Una mayor resolución de exportación conserva los elementos de la diapositiva con mayor claridad, pero no puede restaurar los detalles que faltan en una imagen de origen de baja resolución. Para obtener el mejor resultado, utilice imágenes originales de alta calidad y deshabilite la compresión de imagen innecesaria en PowerPoint.
¿Se pueden almacenar varias diapositivas de PowerPoint en un archivo TIFF?
Sí. TIFF admite varias páginas. PowerPoint y VBA normalmente exportan cada diapositiva como una imagen separada, que se puede combinar usando IrfanView. En Python, puede renderizar las diapositivas con Spire.Presentation y usar Pillow para guardarlas directamente como un solo TIFF multipágina.
Ver también
PowerPoint in hochauflösendes TIFF konvertieren: 4 praktische Methoden
Inhaltsverzeichnis
- Methode 1: Windows-Registrierung ändern und aus PowerPoint exportieren
- Methode 2: PowerPoint-Folien mit einem VBA-Makro als TIFF exportieren
- Methode 3: PowerPoint mit Convertio in TIFF konvertieren
- Methode 4: PowerPoint mit Python in ein hochauflösendes TIFF konvertieren
- Bonus-Tipps: Einzelseitige TIFFs zu einem mehrseitigen TIFF kombinieren
- Vergleichstabelle: Die richtige Methode wählen
- Fazit
- FAQs
PowerPoint-Präsentationen enthalten häufig Diagramme, Schaubilder, Produktdesigns, technische Illustrationen und andere visuelle Inhalte, die außerhalb von Microsoft PowerPoint wiederverwendet werden müssen. Die Konvertierung von Folien in das TIFF-Format ist besonders nützlich für den professionellen Druck, die Dokumentenarchivierung, Veröffentlichungen, Faxversand und Arbeitsabläufe, die verlustfreie Rasterbilder erfordern.
Das einfache Exportieren von Folien aus PowerPoint führt jedoch möglicherweise nicht zu der von Ihnen erwarteten Auflösung. Unter Windows exportiert PowerPoint Folien standardmäßig als Bitmap-Bilder mit 96 DPI. Dies reicht im Allgemeinen für die Bildschirmanzeige aus, aber die resultierenden Bilder können beim Vergrößern oder Drucken unscharf wirken. Für druckfertige Ausgaben ist eine Auflösung von 300 DPI in der Regel ein praktischeres Ziel.
Dieser Artikel stellt vier Möglichkeiten vor, PowerPoint-Präsentationen in hochauflösende TIFF-Dateien zu konvertieren. Die Methoden reichen von der integrierten Exportfunktion von PowerPoint über VBA-Automatisierung und einen Online-Konverter bis hin zu einer Python-basierten Lösung zum Erstellen hochauflösender, mehrseitiger TIFF-Dateien.
Methode 1: Windows-Registrierung ändern und aus PowerPoint exportieren
PowerPoint kann Folien über die Standardfunktion Speichern unter oder Exportieren direkt als TIFF-Bilder speichern. Die Haupteinschränkung besteht darin, dass PowerPoint unter Windows eine Standard-Exportauflösung von 96 DPI verwendet.
Um Bilder mit höherer Auflösung zu generieren, können Sie einen Registrierungswert hinzufügen, der die Bitmap-Exportauflösung von PowerPoint ändert. Wenn Sie den Wert beispielsweise auf 300 setzen, wird aus einer Standard-Breitbildfolie im 16:9-Format ein Bild mit 4000 × 2250 Pixeln.
Eine fehlerhafte Bearbeitung der Windows-Registrierung kann das Verhalten des Systems oder der Anwendung beeinträchtigen. Erwägen Sie, den entsprechenden Registrierungsschlüssel zu sichern, bevor Sie Änderungen vornehmen.
Schritt 1: Die PowerPoint-Exportauflösung ändern
- Schließen Sie PowerPoint und andere Microsoft Office-Anwendungen.
- Drücken Sie Windows + R, um den Ausführen-Dialog zu öffnen.
- Geben Sie
regeditein und klicken Sie auf OK. - Navigieren Sie für PowerPoint 2016, 2019, 2021, 2024 oder Microsoft 365 zum folgenden Pfad:
HKEY_CURRENT_USER\Software\Microsoft\Office\16.0\PowerPoint\Options
- Klicken Sie mit der rechten Maustaste auf einen leeren Bereich im rechten Fensterbereich.
- Wählen Sie Neu → DWORD-Wert (32-Bit).
- Benennen Sie den neuen Wert wie folgt:
ExportBitmapResolution
- Doppelklicken Sie auf den Wert und wählen Sie Dezimal.
- Geben Sie
300in das Feld Wert ein. - Klicken Sie auf OK und schließen Sie den Registrierungs-Editor.
Sie können auch andere Werte wie 150 oder 200 verwenden, wenn Sie ein Gleichgewicht zwischen Bildqualität und Dateigröße benötigen. Die Exportberechnungen von Microsoft zeigen, dass eine 16:9-Folie bei 150 DPI etwa 2000 × 1125 Pixel, bei 200 DPI 2667 × 1500 Pixel und bei 300 DPI 4000 × 2250 Pixel erzeugt.
Schritt 2: Die Folien als TIFF exportieren
- Öffnen Sie die Präsentation in PowerPoint.
- Gehen Sie zu Datei → Speichern unter oder Datei → Exportieren → Dateityp ändern.
- Wählen Sie TIFF-Tag-Bilddatei-Format (*.tif).
- Wählen Sie einen Ausgabeordner und klicken Sie auf Speichern.
- Wählen Sie bei der entsprechenden Aufforderung Alle Folien oder Nur diese eine.
Wenn alle Folien exportiert werden, erstellt PowerPoint einen Ordner, der für jede Folie eine separate TIFF-Datei enthält.
Diese Methode ist praktisch, wenn Sie nur gelegentlich hochauflösende TIFF-Bilder benötigen und Microsoft PowerPoint bereits installiert haben. Der Hauptnachteil besteht darin, dass sie eine benutzerspezifische Office-Einstellung ändert und keine bequeme Möglichkeit bietet, viele Präsentationen automatisch zu verarbeiten.
Methode 2: PowerPoint-Folien mit einem VBA-Makro als TIFF exportieren
Ein VBA-Makro ist effizienter, wenn eine Präsentation viele Folien enthält oder wenn Sie denselben Exportvorgang häufig wiederholen. Im Gegensatz zum Standard-Exportdialog ermöglicht die PowerPoint-Methode Slide.Export die direkte Angabe der Ausgabe-Breite und -Höhe in Pixeln. Microsoft dokumentiert sowohl ScaleWidth als auch ScaleHeight als optionale Pixelabmessungen für die exportierte Folie.
Das folgende Makro exportiert jede Folie als 4000 × 2250-Pixel-TIFF-Bild, was den 16:9-Abmessungen entspricht, die üblicherweise mit einer 300-DPI-Breitbildfolie assoziiert werden.
Das VBA-Makro hinzufügen und ausführen
- Öffnen Sie Ihre PowerPoint-Präsentation.
- Drücken Sie Alt + F11, um den Visual Basic-Editor zu öffnen.
- Wählen Sie Einfügen → Modul.
- Fügen Sie den folgenden Code in das Modul ein:
Sub ExportSlidesAsHighResolutionTIFF()

    Dim currentSlide As Slide
    Dim outputFolder As String
    Dim outputFile As String
    Dim slideWidth As Long
    Dim slideHeight As Long

    'Erstellen eines Ausgabeordners neben der Präsentation
    outputFolder = ActivePresentation.Path & "\TIFF_Output\"

    If Dir(outputFolder, vbDirectory) = "" Then
        MkDir outputFolder
    End If

    'Ausgabeabmessungen für eine 16:9-Präsentation
    slideWidth = 4000
    slideHeight = 2250

    For Each currentSlide In ActivePresentation.Slides

        outputFile = outputFolder & _
                     "Slide_" & Format(currentSlide.SlideIndex, "000") & ".tif"

        currentSlide.Export _
            outputFile, _
            "TIFF", _
            slideWidth, _
            slideHeight

    Next currentSlide

    MsgBox "Alle Folien wurden exportiert nach:" & vbCrLf & outputFolder

End Sub
- Drücken Sie F5 oder klicken Sie auf Ausführen.
- Öffnen Sie den Ordner
TIFF_Output, der neben der Präsentation erstellt wurde.
Das Makro verwendet nummerierte Dateinamen wie Slide_001.tif, Slide_002.tif und Slide_003.tif. Eine führende Null-Nummerierung hilft dabei, die richtige Folienreihenfolge beizubehalten, wenn die Bilder nach Dateinamen sortiert werden.
Für eine 4:3-Präsentation ersetzen Sie die Abmessungen durch Werte, die diesem Seitenverhältnis entsprechen, wie zum Beispiel:
slideWidth = 3000
slideHeight = 2250
Der Vorteil von VBA besteht darin, dass es die gesamte Präsentation automatisiert, ohne eine andere Anwendung zu erfordern. Es gibt Ihnen außerdem die direkte Kontrolle über die Pixelabmessungen. Makros müssen jedoch aktiviert sein, und der Code läuft über die installierte PowerPoint-Anwendung, was ihn für unbeaufsichtigte Serverumgebungen weniger geeignet macht.
Methode 3: PowerPoint mit Convertio in TIFF konvertieren
Ein Online-Konverter ist nützlich, wenn Sie keine Software installieren können, keinen Zugriff auf PowerPoint haben oder nur eine kleine Anzahl von Dateien konvertieren müssen.
Convertio bietet spezielle Seiten für die Konvertierung von PPT in TIFF und PPTX in TIFF. Es akzeptiert Dateien von einem lokalen Computer und unterstützt möglicherweise auch Importe aus Cloud-Speichern oder über eine URL. Der Dienst konvertiert die Präsentation in der Cloud und stellt die resultierende TIFF-Datei zum Download bereit.
Schritte zum Online-Konvertieren von PowerPoint
- Öffnen Sie den PowerPoint-zu-TIFF-Konverter von Convertio.
- Laden Sie eine
.ppt- oder.pptx-Präsentation hoch. - Klicken Sie auf Konvertieren.
- Warten Sie, bis die Konvertierung abgeschlossen ist.
- Laden Sie die konvertierte TIFF-Datei herunter.
Dies ist die einfachste Option für eine schnelle, einmalige Konvertierung, da keine Registrierungsänderungen, Makros oder Entwicklungstools erforderlich sind. Es funktioniert auch auf anderen Betriebssystemen als Windows.
Die Haupteinschränkung ist die Kontrolle. Online-Konverter bieten möglicherweise keine präzisen Einstellungen für DPI, Pixelgröße, Komprimierung oder Farbprofile. Kostenlose Pläne können zudem Einschränkungen bei Dateigröße, Konvertierungshäufigkeit oder Stapelverarbeitung haben.
Noch wichtiger ist, dass das Hochladen einer Präsentation deren Inhalt an einen Server eines Drittanbieters sendet. Vermeiden Sie diese Methode für Präsentationen, die vertrauliche Geschäftsinformationen, Kundendaten, Finanzunterlagen, unveröffentlichte Forschungsergebnisse oder anderes sensibles Material enthalten.
Methode 4: PowerPoint mit Python in ein hochauflösendes TIFF konvertieren
Für automatisierte Konvertierungen oder die Integration in Dokumentenverarbeitungsanwendungen können Sie Spire.Presentation for Python zusammen mit Pillow verwenden. Spire.Presentation kann jede Folie in einer angegebenen Pixelgröße rendern, ohne dass Microsoft PowerPoint installiert sein muss.
Im Gegensatz zum direkten Speichern der Präsentation als TIFF, was Bilder mit nur 1280 × 720 Pixeln erzeugen kann, ermöglicht die Methode SaveAsImageByWH() die Angabe der Ausgabe-Breite und -Höhe. Die gerenderten Folienbilder können dann mit Pillow zu einem einzigen mehrseitigen TIFF kombiniert werden.
Die erforderlichen Bibliotheken installieren
Installieren Sie Spire.Presentation for Python und Pillow über pip:
pip install Spire.Presentation Pillow
Python-Code: PowerPoint in ein mehrseitiges TIFF konvertieren
from spire.presentation import *
from PIL import Image
from io import BytesIO

# Erstellen eines Präsentationsobjekts
presentation = Presentation()

# Laden einer PowerPoint-Präsentation
presentation.LoadFromFile("Input.pptx")

# Speichern der konvertierten Folienbilder
images = []

# Konvertieren jeder Folie in ein hochauflösendes Bild
for i in range(presentation.Slides.Count):
    slide = presentation.Slides[i]

    # Rendern der Folie mit 4000 × 2250 Pixeln
    stream = slide.SaveAsImageByWH(4000, 2250)

    # Konvertieren des Bild-Streams in ein PIL-Bild
    image = Image.open(BytesIO(stream.ToArray())).convert("RGB")
    images.append(image)

    stream.Dispose()

# Speichern aller Folienbilder als mehrseitiges TIFF
images[0].save(
    "Output/PowerPointToTIFF.tiff",
    format="TIFF",
    save_all=True,
    append_images=images[1:],
    compression="tiff_lzw",
    dpi=(300, 300)
)

# Ressourcen freigeben
presentation.Dispose()
Funktionsweise
Der Code lädt zuerst die PowerPoint-Präsentation und durchläuft deren Folien. Jede Folie wird als 4000 × 2250-Pixel-Bild gerendert, was für eine Standard-16:9-Präsentation geeignet ist, die für den hochwertigen Druck vorgesehen ist.
Der von SaveAsImageByWH() zurückgegebene Bild-Stream wird dann mit Pillow geöffnet und einer Liste hinzugefügt. Schließlich speichert Pillow das erste Bild als TIFF-Datei und fügt die verbleibenden Bilder als zusätzliche Seiten hinzu.
Die folgenden Argumente sind wichtig:
save_all=Trueermöglicht die Ausgabe mehrseitiger Bilder.append_images=images[1:]fügt die verbleibenden Folien zur TIFF-Datei hinzu.compression="tiff_lzw"wendet eine verlustfreie LZW-Komprimierung an, um die Ausgabedateigröße zu reduzieren.dpi=(300, 300)zeichnet die 300-DPI-Auflösungsinformationen in den TIFF-Metadaten auf.
Das tatsächliche visuelle Detail wird primär durch die Rendering-Abmessungen von 4000 × 2250 bestimmt. Die DPI-Einstellung teilt kompatiblen Anwendungen hauptsächlich mit, wie dicht diese Pixel gedruckt werden sollen.
Für eine Ausgabe mit niedrigerer Auflösung und kleinerer Dateigröße können Sie die Folienabmessungen ändern auf:
stream = slide.SaveAsImageByWH(2667, 1500)
Diese Methode eignet sich für die Stapelverarbeitung, serverseitige Konvertierung und Arbeitsabläufe, bei denen mehrere Präsentationen automatisch konvertiert werden müssen. Sie erstellt außerdem direkt ein mehrseitiges TIFF, sodass die einzelnen Folienbilder danach nicht mehr zusammengeführt werden müssen.
Was noch
Über die TIFF-Konvertierung hinaus kann Spire.Presentation for Python auch verwendet werden, um PowerPoint-Folien in andere Bildformate wie PNG, JPG und SVG zu konvertieren, abhängig von den Anforderungen. Für umfassendere Dokumenten-Sharing-Workflows können Präsentationen auch in Formate wie PDF und HTML konvertiert werden. Diese Optionen erleichtern die Wiederverwendung von Folieninhalten für Websites, Berichte, Archive, Vorschauen und plattformübergreifende Verteilungen.
Bonus-Tipps: Einzelseitige TIFFs zu einem mehrseitigen TIFF kombinieren
Die Methoden 1 und 2 exportieren jede Folie als separate TIFF-Datei. Wenn Sie ein mehrseitiges TIFF bevorzugen, das alle Folien enthält, ist IrfanView ein praktisches Windows-Tool, das das Erstellen und Bearbeiten mehrseitiger TIFF-Dateien unterstützt. Die Methoden 3 und 4 erstellen jedoch direkt ein mehrseitiges TIFF und erfordern diesen zusätzlichen Zusammenführungsschritt nicht.
TIFF-Dateien mit IrfanView kombinieren
- Öffnen Sie IrfanView und gehen Sie zu Datei → Thumbnails oder drücken Sie T.
- Navigieren Sie im Thumbnails-Fenster zu dem Ordner, der die exportierten TIFF-Dateien enthält.
- Wählen Sie alle TIFF-Dateien aus, die Sie zusammenführen möchten. Verwenden Sie Strg oder Umschalt beim Klicken, um mehrere Dateien auszuwählen.
- Klicken Sie mit der rechten Maustaste auf eine der ausgewählten Dateien.
- Wählen Sie Mehrseitiges TIF-Dialogfeld mit ausgewählten Dateien starten.
- Überprüfen Sie die Dateireihenfolge im Dialogfeld für mehrseitige TIFFs.
- Legen Sie den Ausgabeordner und den Dateinamen fest.
- Klicken Sie auf TIF-Bild erstellen.
Nach der Verarbeitung erstellt IrfanView eine einzige TIFF-Datei, in der jede Folie als separate Seite erscheint.
Überprüfen Sie die Reihenfolge sorgfältig, bevor Sie die Datei erstellen. Das Benennen der Quelldateien mit führenden Nullen – wie Slide_001, Slide_002 und Slide_010 – verhindert eine falsche alphabetische Sortierung.
Kostenlose Online-TIFF-Zusammenführungstools sind eine weitere Option, aber die gleichen Datenschutzbedenken gelten beim Hochladen sensibler Bilder.
Vergleichstabelle: Die richtige Methode wählen
| Methode | Am besten geeignet für | Auflösungskontrolle | Stapelverarbeitung | Erfordert PowerPoint | Haupteinschränkung |
|---|---|---|---|---|---|
| Registrierung + PowerPoint | Gelegentlicher manueller Export | DPI-basiert | Eine Präsentation nach der anderen | Ja | Erfordert Registrierungsänderung |
| VBA-Makro | Wiederholter Folienexport | Genaue Pixelabmessungen | Ja | Ja | Makros müssen aktiviert sein |
| Convertio | Schnelle Konvertierung ohne Installation | Begrenzt | Begrenzt durch Serviceplan | Nein | Datenschutz- und Upload-Beschränkungen |
| Spire.Presentation for Python | Automatisierte Anwendungs-Workflows | Programmierbar | Ja | Nein | Erfordert Programmierung und Lizenzierung |
Fazit
Die beste Methode, um PowerPoint in ein hochauflösendes TIFF zu konvertieren, hängt davon ab, wie oft Sie die Konvertierung durchführen und wie viel Kontrolle Sie benötigen.
Für einen einmaligen Export unter Windows ist das Ändern der Registrierungseinstellung von PowerPoint und die Verwendung der nativen TIFF-Exportfunktion unkompliziert. Ein VBA-Makro ist effizienter, wenn Sie jede Folie wiederholt mit festen Pixelabmessungen exportieren müssen. Convertio ist praktisch für gelegentliche browserbasierte Konvertierungen, sofern die Präsentation nicht vertraulich ist.
Für automatisierte Dokumenten-Workflows bietet Spire.Presentation for Python eine größere Kontrolle über die Ausgabeabmessungen, ohne dass Microsoft PowerPoint erforderlich ist. In Kombination mit Pillow können alle gerenderten Folien auch in einer einzigen mehrseitigen TIFF-Datei platziert werden.
Wenn separate Folienbilder nicht praktisch sind, können die exportierten TIFF-Dateien auch mit IrfanView zu einem einzigen mehrseitigen TIFF kombiniert werden.
FAQs
Kann PowerPoint Folien direkt als TIFF-Dateien exportieren?
Ja. Wählen Sie in PowerPoint Datei → Speichern unter und wählen Sie TIFF als Ausgabeformat. PowerPoint kann die aktuelle Folie oder jede Folie der Präsentation exportieren.
Warum sehen aus PowerPoint exportierte TIFF-Dateien unscharf aus?
Die Standard-Bitmap-Exportauflösung von PowerPoint unter Windows beträgt normalerweise 96 DPI. Dies kann für Bildschirme ausreichen, ist aber für Vergrößerungen oder professionellen Druck unzureichend. Das Ändern des Registrierungswerts ExportBitmapResolution oder die Angabe größerer Pixelabmessungen über VBA führt zu einer schärferen Ausgabe.
Sind 300 DPI immer notwendig?
Nicht immer. Etwa 96 bis 150 DPI können für bildschirmbasierte Dokumente und interne Vorschauen ausreichen. Eine Auflösung von 300 DPI ist eher für hochwertigen Druck, Veröffentlichungen und detaillierte Diagramme geeignet. Eine höhere Auflösung erzeugt auch größere TIFF-Dateien.
Verbessert eine Erhöhung der DPI die Qualität minderwertiger Bilder innerhalb der Präsentation?
Nein. Eine höhere Exportauflösung bewahrt Folienelemente klarer, kann aber keine Details wiederherstellen, die in einem Quellbild mit niedriger Auflösung fehlen. Verwenden Sie für beste Ergebnisse hochwertige Originalbilder und deaktivieren Sie unnötige Bildkomprimierung in PowerPoint.
Können mehrere PowerPoint-Folien in einer TIFF-Datei gespeichert werden?
Ja. TIFF unterstützt mehrere Seiten. PowerPoint und VBA exportieren normalerweise jede Folie als separates Bild, die mit IrfanView kombiniert werden können. In Python können Sie die Folien mit Spire.Presentation rendern und mit Pillow direkt als ein einziges mehrseitiges TIFF speichern.
Siehe auch
Конвертация PowerPoint в TIFF высокого разрешения: 4 практических метода
Оглавление
- Способ 1: Изменение реестра Windows и экспорт из PowerPoint
- Способ 2: Экспорт слайдов PowerPoint в TIFF с помощью макроса VBA
- Способ 3: Конвертация PowerPoint в TIFF с помощью Convertio
- Способ 4: Конвертация PowerPoint в TIFF высокого разрешения с помощью Python
- Бонус: Объединение одностраничных TIFF в многостраничный файл
- Сравнительная таблица: Выбор подходящего метода
- Заключение
- Часто задаваемые вопросы
Презентации PowerPoint часто содержат графики, диаграммы, дизайны продуктов, технические иллюстрации и другой визуальный контент, который может потребоваться использовать вне Microsoft PowerPoint. Конвертация слайдов в формат TIFF особенно полезна для профессиональной печати, архивирования документов, публикации, отправки по факсу и рабочих процессов, требующих растровых изображений без потери качества.
Однако обычный экспорт слайдов из PowerPoint может не обеспечить ожидаемого разрешения. В Windows PowerPoint по умолчанию экспортирует слайды как растровые изображения с разрешением 96 DPI. Обычно этого достаточно для просмотра на экране, но при увеличении или печати изображения могут выглядеть размытыми. Для качественной печати целевым значением обычно является 300 DPI.
В этой статье представлены четыре способа конвертации презентаций PowerPoint в файлы TIFF высокого разрешения. Методы варьируются от встроенной функции экспорта PowerPoint до автоматизации через VBA, онлайн-конвертеров и решения на базе Python для создания многостраничных TIFF-файлов высокого разрешения.
Способ 1: Изменение реестра Windows и экспорт из PowerPoint
PowerPoint может сохранять слайды напрямую в виде изображений TIFF через стандартную функцию Сохранить как или Экспорт. Основное ограничение заключается в том, что в Windows PowerPoint по умолчанию использует разрешение экспорта 96 DPI.
Чтобы создавать изображения с более высоким разрешением, можно добавить значение в реестр, которое изменит разрешение экспорта растровых изображений в PowerPoint. Например, установка значения 300 позволит получить изображение размером 4000 × 2250 пикселей из стандартного широкоэкранного слайда 16:9.
Неправильное редактирование реестра Windows может повлиять на работу системы или приложений. Перед внесением изменений рекомендуется создать резервную копию соответствующего раздела реестра.
Шаг 1: Изменение разрешения экспорта PowerPoint
- Закройте PowerPoint и другие приложения Microsoft Office.
- Нажмите Windows + R, чтобы открыть диалоговое окно «Выполнить».
- Введите
regeditи нажмите OK. - Перейдите по следующему пути для PowerPoint 2016, 2019, 2021, 2024 или Microsoft 365:
HKEY_CURRENT_USER\Software\Microsoft\Office\16.0\PowerPoint\Options
- Нажмите правой кнопкой мыши на пустом месте в правой панели.
- Выберите Создать → Параметр DWORD (32 бита).
- Назовите новый параметр:
ExportBitmapResolution
- Дважды щелкните по параметру и выберите Десятичная система счисления.
- Введите
300в поле Значение. - Нажмите OK и закройте редактор реестра.
Вы можете использовать другие значения, например 150 или 200, если вам нужен баланс между качеством изображения и размером файла. Согласно расчетам Microsoft, слайд 16:9 при 150 DPI дает примерно 2000 × 1125 пикселей, при 200 DPI — 2667 × 1500 пикселей, а при 300 DPI — 4000 × 2250 пикселей.
Шаг 2: Экспорт слайдов в TIFF
- Откройте презентацию в PowerPoint.
- Перейдите в Файл → Сохранить как или Файл → Экспорт → Изменить тип файла.
- Выберите Формат TIFF (*.tif).
- Выберите папку для сохранения и нажмите Сохранить.
- При появлении запроса выберите Все слайды или Только текущий.
После экспорта всех слайдов PowerPoint создаст папку, содержащую отдельный TIFF-файл для каждого слайда.
Этот метод удобен, если вам лишь изредка нужны TIFF-изображения высокого разрешения и у вас уже установлен Microsoft PowerPoint. Главный недостаток заключается в том, что он изменяет настройки Office на уровне пользователя и не предлагает удобного способа автоматической обработки большого количества презентаций.
Способ 2: Экспорт слайдов PowerPoint в TIFF с помощью макроса VBA
Макрос VBA более эффективен, если презентация содержит много слайдов или если вы часто повторяете одну и ту же задачу экспорта. В отличие от стандартного диалогового окна экспорта, метод PowerPoint Slide.Export позволяет напрямую задавать ширину и высоту вывода в пикселях.
Следующий макрос экспортирует каждый слайд как TIFF-изображение размером 4000 × 2250 пикселей, что соответствует пропорциям 16:9 для широкоэкранного слайда при 300 DPI.
Добавление и запуск макроса VBA
- Откройте презентацию PowerPoint.
- Нажмите Alt + F11, чтобы открыть редактор Visual Basic.
- Выберите Вставка → Модуль.
- Вставьте следующий код в модуль:
Sub ExportSlidesAsHighResolutionTIFF()

    Dim currentSlide As Slide
    Dim outputFolder As String
    Dim outputFile As String
    Dim slideWidth As Long
    Dim slideHeight As Long

    'Создать папку вывода рядом с презентацией
    outputFolder = ActivePresentation.Path & "\TIFF_Output\"

    If Dir(outputFolder, vbDirectory) = "" Then
        MkDir outputFolder
    End If

    'Размеры вывода для презентации 16:9
    slideWidth = 4000
    slideHeight = 2250

    For Each currentSlide In ActivePresentation.Slides

        outputFile = outputFolder & _
                     "Slide_" & Format(currentSlide.SlideIndex, "000") & ".tif"

        currentSlide.Export _
            outputFile, _
            "TIFF", _
            slideWidth, _
            slideHeight

    Next currentSlide

    MsgBox "Все слайды были экспортированы в:" & vbCrLf & outputFolder

End Sub
- Нажмите F5 или кнопку Выполнить.
- Откройте папку
TIFF_Output, созданную рядом с презентацией.
Макрос использует нумерованные имена файлов, такие как Slide_001.tif, Slide_002.tif и т.д. Нумерация с ведущими нулями помогает сохранить правильный порядок слайдов при сортировке файлов по имени.
Для презентации 4:3 замените размеры на соответствующие этому соотношению сторон, например:
slideWidth = 3000
slideHeight = 2250
Преимущество VBA в том, что он автоматизирует весь процесс без необходимости в сторонних приложениях. Однако макросы должны быть разрешены, и код выполняется через установленное приложение PowerPoint, что делает его менее подходящим для серверных сред.
Способ 3: Конвертация PowerPoint в TIFF с помощью Convertio
Онлайн-конвертер полезен, если вы не можете установить программное обеспечение, не имеете доступа к PowerPoint или вам нужно конвертировать лишь небольшое количество файлов.
Convertio предоставляет специализированные страницы для конвертации PPT в TIFF и PPTX в TIFF. Сервис конвертирует презентацию в облаке и предоставляет готовый TIFF-файл для скачивания.
Шаги для конвертации PowerPoint онлайн
- Откройте конвертер PowerPoint в TIFF на сайте Convertio.
- Загрузите презентацию
.pptили.pptx. - Нажмите Конвертировать.
- Дождитесь завершения процесса.
- Скачайте полученный TIFF-файл.
Это самый простой вариант для быстрой разовой конвертации. Основной недостаток — отсутствие контроля. Онлайн-конвертеры могут не предоставлять точных настроек DPI, размера пикселей или профилей цвета. Кроме того, загрузка презентации на сторонний сервер делает этот метод непригодным для конфиденциальных документов.
Способ 4: Конвертация PowerPoint в TIFF высокого разрешения с помощью Python
Для автоматизации или интеграции в приложения можно использовать Spire.Presentation for Python вместе с библиотекой Pillow. Spire.Presentation может отрисовывать каждый слайд в заданном размере без необходимости установки Microsoft PowerPoint.
Установка необходимых библиотек
pip install Spire.Presentation Pillow
Код Python: Конвертация PowerPoint в многостраничный TIFF
from spire.presentation import *
from PIL import Image
from io import BytesIO

# Создание объекта презентации
presentation = Presentation()
presentation.LoadFromFile("Input.pptx")

images = []

# Конвертация каждого слайда в изображение высокого разрешения
for i in range(presentation.Slides.Count):
    slide = presentation.Slides[i]
    # Отрисовка слайда в 4000 × 2250 пикселей
    stream = slide.SaveAsImageByWH(4000, 2250)
    image = Image.open(BytesIO(stream.ToArray())).convert("RGB")
    images.append(image)
    stream.Dispose()

# Сохранение всех изображений как многостраничный TIFF
images[0].save(
    "Output/PowerPointToTIFF.tiff",
    format="TIFF",
    save_all=True,
    append_images=images[1:],
    compression="tiff_lzw",
    dpi=(300, 300)
)
presentation.Dispose()
Этот метод идеально подходит для пакетной обработки и серверных решений. Он позволяет создавать многостраничные TIFF-файлы напрямую, без необходимости последующего объединения изображений.
Дополнительные возможности
Помимо конвертации в TIFF, Spire.Presentation for Python позволяет конвертировать слайды в другие форматы, такие как PNG, JPG и SVG, а также в PDF.
Бонус: Объединение одностраничных TIFF в многостраничный файл
Если вы использовали способы 1 или 2, вы получили отдельные файлы. Для объединения их в один многостраничный TIFF можно использовать программу IrfanView:
- Откройте IrfanView, перейдите в Файл → Эскизы (Thumbnails) (или нажмите T).
- Выберите нужные файлы TIFF.
- Нажмите правой кнопкой мыши и выберите Start Multipage-TIF dialog with selected files.
- Нажмите Create TIF Image.
Сравнительная таблица: Выбор подходящего метода
| Метод | Для чего лучше всего | Контроль разрешения | Пакетная обработка | Требуется PowerPoint |
|---|---|---|---|---|
| Реестр + PowerPoint | Разовый экспорт | Через DPI | Нет | Да |
| Макрос VBA | Частый экспорт | Точный (пиксели) | Да | Да |
| Convertio | Быстрая конвертация | Ограничен | Ограничен | Нет |
| Spire.Presentation (Python) | Автоматизация | Программный | Да | Нет |
Заключение
Выбор метода зависит от частоты задач и требований к автоматизации. Для разовых задач на Windows достаточно изменения реестра. Для автоматизации рабочих процессов лучше всего подходит Python-библиотека Spire.Presentation, обеспечивающая полный контроль над качеством и форматом вывода.
Часто задаваемые вопросы
Может ли PowerPoint экспортировать слайды напрямую в TIFF?
Да, через «Сохранить как» или «Экспорт».
Почему TIFF из PowerPoint выглядят размытыми?
По умолчанию используется разрешение 96 DPI. Изменение параметра реестра ExportBitmapResolution решает эту проблему.
Всегда ли нужно 300 DPI?
Для печати — да. Для просмотра на экране достаточно 96–150 DPI.
См. также
.NET PDF to JPG Converter: Convert PDF Pages to Images in C#
Working with PDF documents is a common requirement in modern applications. Whether you are building a document management system , an ASP.NET web service , or a desktop viewer application , there are times when you need to display a PDF page as an image. Instead of embedding the full PDF viewer, you can convert PDF pages to JPG images and use them wherever images are supported.
In this guide, we will walk through a step-by-step tutorial on how to convert PDF files to JPG images using Spire.PDF for .NET. We’ll cover the basics of converting a single page, handling multiple pages, adjusting resolution and quality, saving images to streams, and even batch converting entire folders of PDFs.
By the end, you’ll have a clear understanding of how to implement PDF-to-image conversion in your .NET projects.
Table of Contents:
- Install .NET PDF-to-JPG Converter Library
- Core Method: SaveAsImage
- Steps to Convert PDF to JPG in C# .NET
- Convert a Single Page to JPG
- Convert Multiple Pages (All or Range)
- Advanced Conversion Options
- Troubleshooting & Best Practices
- Conclusion
- FAQs
Install .NET PDF-to-JPG Converter Library
To perform the conversion, we’ll use Spire.PDF for .NET , a library designed for developers who need full control over PDFs in C#. It supports reading, editing, and converting PDFs without requiring Adobe Acrobat or any third-party dependencies.
Installation via NuGet
You can install Spire.PDF directly into your project using NuGet Package Manager Console:
Install-Package Spire.PDF
Alternatively, open NuGet Package Manager in Visual Studio, search for Spire.PDF , and click Install.
Licensing Note
Spire.PDF offers a free version with limitations, allowing conversion of only the first few pages. For production use, a commercial license unlocks the full feature set.
Core Method: SaveAsImage
The heart of PDF-to-image conversion in Spire.PDF lies in the SaveAsImage() method provided by the PdfDocument class.
Here’s what you need to know:
-
Syntax (overload 1):
-
Image SaveAsImage(int pageIndex, PdfImageType imageType);
- pageIndex: The zero-based index of the PDF page you want to convert.
- imageType: The type of image to generate, typically PdfImageType.Bitmap.
-
Syntax (overload 2 with resolution):
-
Image SaveAsImage(int pageIndex, PdfImageType imageType, int dpiX, int dpiY);
- dpiX, dpiY: Horizontal and vertical resolution (dots per inch).
Higher DPI = better quality but larger file size.
Supported PdfImageType Values
- Bitmap → returns a raw image.
- Metafile → returns a vector image (less common for JPG export).
Most developers use Bitmap when exporting to JPG.
Steps to Convert PDF to JPG in C# .NET
- Import the Spire.Pdf and System.Drawing namespaces.
- Create a new PdfDocument instance.
- Load the PDF file from the specified path.
- Use SaveAsImage() to convert one or more pages into images.
- Save the generated image(s) in JPG format.
Convert a Single Page to JPG
Here’s a simple workflow to convert a single PDF page to a JPG image:
using Spire.Pdf.Graphics;
using Spire.Pdf;
using System.Drawing.Imaging;
using System.Drawing;

namespace ConvertSpecificPageToPng
{
    class Program
    {
        static void Main(string[] args)
        {
            // Create a PdfDocument object
            PdfDocument doc = new PdfDocument();

            // Load a sample PDF document
            doc.LoadFromFile("C:\\Users\\Administrator\\Desktop\\sample.pdf");

            // Convert a specific page to a bitmap image
            Image image = doc.SaveAsImage(0, PdfImageType.Bitmap);

            // Save the image as a JPG file
            image.Save("ToJPG.jpg", ImageFormat.Jpeg);

            // Disposes resources
            doc.Dispose();
        }
    }
}
Output:
Spire.PDF supports converting PDF to various other image formats like PNG, BMP, SVG, and TIFF. For more details, refer to the documentation: Convert PDF to Image in C#.
Convert Multiple Pages (All or Range)
Convert All Pages
The following loop iterates over all pages, converts each one into an image, and saves it to disk with page numbers in the filename.
for (int i = 0; i < doc.Pages.Count; i++)
{
    Image image = doc.SaveAsImage(i, PdfImageType.Bitmap);
    string fileName = string.Format("Output\\ToJPG-{0}.jpg", i);
    image.Save(fileName, ImageFormat.Jpeg);
}
Convert a Range of Pages
To convert a specific range of pages (e.g., pages 2 to 4), modify the for loop as follows:
for (int i = 1; i <= 3; i++)
{
    Image image = doc.SaveAsImage(i, PdfImageType.Bitmap);
    string fileName = string.Format("Output\\ToJPG-{0}.jpg", i);
    image.Save(fileName, ImageFormat.Jpeg);
}
Advanced Conversion Options
Set Image Resolution/Quality
By default, the output resolution might be too low for printing or detailed analysis. You can set DPI explicitly:
Image image = doc.SaveAsImage(0, PdfImageType.Bitmap, 300, 300);
image.Save("ToJPG.jpg", ImageFormat.Jpeg);
Tips:
- 72 DPI : Default, screen quality.
- 150 DPI : Good for previews and web.
- 300 DPI : High quality, suitable for printing.
Higher DPI results in sharper images but also increases memory and file size.
Save the Converted Images as Stream
Instead of writing directly to disk, you can store the output in memory streams. This is useful in:
- ASP.NET applications returning images to browsers.
- Web APIs sending images as HTTP responses.
- Database storage for binary blobs.
using (MemoryStream ms = new MemoryStream())
{
    pdf.SaveAsImage(0, PdfImageType.Bitmap, 300, 300).Save(ms, ImageFormat.Jpeg);
    byte[] imageBytes = ms.ToArray();
}
Here, the JPG image is stored as a byte array , ready for further processing.
Batch Conversion (Multiple PDFs)
In scenarios where you need to process multiple PDF documents at once, you can apply batch conversion as shown below:
string[] files = Directory.GetFiles("InputPDFs", "*.pdf");
foreach (string file in files)
{
    PdfDocument doc = new PdfDocument();
    doc.LoadFromFile(file);
    for (int i = 0; i < doc.Pages.Count; i++)
    {
        Image image = doc.SaveAsImage(i, PdfImageType.Bitmap);
        string fileName = Path.GetFileNameWithoutExtension(file);
        image.Save($"Output\\{fileName}-Page{i + 1}.jpg", ImageFormat.Jpeg);
    }
    doc.Dispose();
}
Troubleshooting & Best Practices
Working with PDF-to-image conversion in .NET can come with challenges. Here’s how to address them:
- Large PDFs consume memory
- Use lower DPI (e.g., 150 instead of 300).
- Process in chunks rather than loading everything at once.
- Images are blurry or low quality
- Increase DPI.
- Consider using PNG instead of JPG for sharp diagrams or text.
- File paths cause errors
- Always check that the output directory exists.
- Use Path.Combine() for cross-platform paths.
- Handling password-protected PDFs
- Provide the password when loading:
doc.LoadFromFile("secure.pdf", "password123");
- Dispose objects
- Always call Dispose() on PdfDocument and Image objects to release memory.
Conclusion
Converting PDF to JPG in .NET is straightforward with Spire.PDF for .NET . The library provides the SaveAsImage() method, allowing you to convert a single page or an entire document with just a few lines of code. With options for custom resolution, stream handling, and batch conversion , you can adapt the workflow to desktop apps, web services, or cloud platforms.
By following best practices like managing memory and adjusting resolution, you can ensure efficient, high-quality output that fits your project’s requirements.
If you’re exploring more advanced document processing, Spire also offers libraries for Word, Excel, and PowerPoint, enabling a complete .NET document solution.
FAQs
Q1. Can I convert PDFs to formats other than JPG?
Yes. Spire.PDF supports PNG, BMP, SVG, and other common formats.
Q2. What DPI should I use?
- 72 DPI for thumbnails.
- 150 DPI for web previews.
- 300 DPI for print quality.
Q3. Does Spire.PDF support encrypted PDFs?
Yes, but you need to provide the correct password when loading the file.
Q4. Can I integrate this in ASP.NET?
Yes. You can save images to memory streams and return them as HTTP responses.
Q5. Can I convert images back to PDF?
Yes. You can load JPG, PNG, or BMP files and insert them into PDF pages, effectively converting images back into a PDF.
Get a Free License
To fully experience the capabilities of Spire.PDF for .NET without any evaluation limitations, you can request a free 30-day trial license.
Come convertire rapidamente i file TXT in fogli di calcolo Excel
Indice
Installa con Maven
Install-Package Spire.XLS
Link Correlati

Contenuto della Pagina:
- Metodo 1. Importare testo in Microsoft Excel e salvare in formato Excel
- Metodo 2. Convertire TXT in formato Excel con C#
Introduzione
Lavorare con file di testo semplice (.txt) è comune, ma quando si tratta di gestire grandi insiemi di dati, i file TXT spesso mancano di struttura e usabilità. Convertendo TXT in Excel, puoi sfruttare le funzionalità di Excel come filtri, formule, tabelle pivot e visualizzazione dei dati. In questa guida, imparerai tre metodi efficaci per convertire i file TXT in formato Excel (XLSX o CSV) — utilizzando Microsoft Excel, un convertitore online gratuito da TXT a Excel e la programmazione in Python.
Differenze tra file TXT, CSV ed Excel
Prima di iniziare la conversione, è importante comprendere le differenze tra questi formati:
- File TXT – Memorizzano testo non strutturato o semplice, spesso separato da spazi, tabulazioni o delimitatori personalizzati.
- File CSV – Una forma strutturata di file di testo in cui i dati sono separati da virgole, rendendoli più facili da importare in fogli di calcolo o database.
- File Excel (XLS/XLSX) – Formati nativi di Microsoft Excel che supportano funzionalità avanzate di manipolazione dei dati, tra cui formule, grafici e fogli di lavoro multipli.
La conversione da TXT a Excel consente di trasformare i dati di testo grezzi in un formato strutturato e interattivo.
Metodo 1. Importare testo in Microsoft Excel e salvare in formato Excel
Per gli utenti che preferiscono non fare affidamento su strumenti esterni, Excel stesso fornisce un metodo affidabile per convertire i file TXT in fogli di calcolo strutturati. Con questo metodo, non è necessario scaricare altre API o software. Finché hai accesso a Microsoft Excel, puoi gestire la conversione in pochi secondi.
Segui i passaggi seguenti per iniziare:
Passaggio 1. Apri Microsoft Excel e vai su File > Apri > Sfoglia per aprire il tuo file TXT.
Passaggio 2. Apparirà una finestra per selezionare il file. Il formato file predefinito contiene solo file Excel, quindi dovresti regolare il formato del file dall'angolo in basso a destra su "Tutti i file" o "File di testo".
Passaggio 3. Apparirà l'Importazione guidata testo. Scegli il tipo di file (Delimitato o a larghezza fissa).
Seleziona il delimitatore corretto (come tabulazione, spazio o virgola).
Regola i formati dei dati delle colonne se necessario, quindi fai clic su Fine.
Passaggio 4. Salva il file come .xlsx o .csv.
Metodo 2. Convertire TXT in formato Excel con C#
Per sviluppatori o utenti avanzati che gestiscono grandi quantità di dati, il codice fornisce un modo affidabile per automatizzare la conversione da TXT a Excel. Permettimi di presentarti Spire.XLS for .NET, una libreria Excel professionale progettata per consentire agli sviluppatori di creare, leggere, modificare, convertire e stampare file Excel all'interno di applicazioni .NET senza dipendere da Microsoft Excel.
Spire.XLS for .NET supporta sia i formati XLS che XLSX, insieme a CSV, ODS, PDF, HTML e altri tipi di file, rendendolo una soluzione flessibile per la gestione dei dati dei fogli di calcolo. Con il suo ricco set di funzionalità, tra cui il calcolo di formule, la creazione di grafici, le tabelle pivot, l'importazione/esportazione di dati e la formattazione avanzata, aiuta gli sviluppatori ad automatizzare in modo efficiente le attività relative a Excel, garantendo al contempo alte prestazioni e facilità di integrazione.
Ora, segui i passaggi seguenti per convertire i tuoi file TXT in formato Excel con Spire.XLS for .NET:
Passaggio 1. Installa la DLL di Spire.XLS sul tuo computer con NuGet utilizzando il codice seguente o scaricala dal sito Web ufficiale.
Passaggio 2. Copia il codice seguente e non dimenticare di personalizzarlo in base alle esigenze specifiche del tuo file:
using Spire.Xls;
using System.IO;
using System.Collections.Generic;

class TxtToExcelConverter
{
    static void Main()
    {
        // Open a text file and read all lines in it
        string[] lines = File.ReadAllLines("Data.txt");

        // Create a list to store the data in text file
        List<string[]> data = new List<string[]>();

        // Split data into rows and columns and add to the list
        foreach (string line in lines)
        {
            data.Add(line.Trim().Split('\t')); // Adjust delimiter as needed
        }

        // Create a Workbook object
        Workbook workbook = new Workbook();

        // Get the first worksheet
        Worksheet sheet = workbook.Worksheets[0];

        // Iterate through the rows and columns in the data list
        for (int row = 0; row < data.Count; row++)
        {
            for (int col = 0; col < data[row].Length; col++)
            {
                // Write the text data in specified cells
                sheet.Range[row + 1, col + 1].Value = data[row][col];

                // Set the header row to Bold
                sheet.Range[1, col + 1].Style.Font.IsBold = true;
            }
        }

        // Autofit columns
        sheet.AllocatedRange.AutoFitColumns();

        // Save the Excel file
        workbook.SaveToFile("TXTtoExcel.xlsx", ExcelVersion.Version2016);
        workbook.Dispose();
    }
}
RISULTATO: 
Conclusione
La conversione di file TXT in formato Excel semplifica l'analisi, l'organizzazione e la condivisione dei dati. In questo post, abbiamo esplorato tre metodi:
- Importazione con Microsoft Excel – rapida e integrata per le conversioni manuali.
- Scripting in Python – potente e flessibile per l'automazione e grandi insiemi di dati.
Scegli il metodo che meglio si adatta alle tue esigenze e inizia a trasformare il testo semplice in fogli di calcolo Excel strutturati e utilizzabili.
Ottieni una licenza gratuita
Per sperimentare appieno le capacità di Spire.XLS for .NET senza alcuna limitazione di valutazione, puoi richiedere una licenza di prova gratuita di 30 giorni.
Vedi anche: