Spire.Presentation for Java 10.5.2 fixes an issue
We are pleased to announce the release of Spire.Presentation for Java 10.5.2. The latest version fixes the issue where the program threw an "Exception in thread "main" java.lang.NullPointerException" when adding LaTeX formulas. More details are listed below.
Here is a list of changes made in this release
| Category | ID | Description |
| Bug | SPIREPPT-2882 | Fixes the issue where the program threw an "Exception in thread "main" java.lang.NullPointerException" when adding Latex formulas. |
Spire.PDF 11.5.5 enhances the conversion from PDF to XPS and PDFA3B
We are delighted to announce the release of Spire.PDF 11.5.5. This version enhances the conversion from PDF to XPS and PDFA3B. Moreover, some known issues are fixed in this version, such as the issue that the program threw “Empty convert-string” error when saving PDF documents. More details are listed below.
Here is a list of changes made in this release
| Category | ID | Description |
| Bug | SPIREPDF-7239 | Fixes the issue that the characters of formulas were lost when converting PDF to XPS. |
| Bug | SPIREPDF-7437 | Fixes the issue that the program threw “Empty convert-string” error when saving PDF documents. |
| Bug | SPIREPDF-7441 | Fixes the issue that the program threw “IndexOutOfRangeException” error when converting PDF to PDFA3B. |
Spire.Presentation 10.5.10 supports converting SVG to Shape
We're glad to announce the release of Spire.Presentation 10.5.10. This version adds a new method ‘AddFromSVGAsShape()’ to supports converting SVGs to shapes. Check below for the details.
Here is a list of changes made in this release
| Category | ID | Description |
| New feature | - | Adds a new method ‘AddFromSVGAsShape()’ to convert SVG files into shapes.
Presentation ppt = new Presentation(); ppt.Slides[0].Shapes.AddFromSVGAsShapes(file.FullName); ppt.SaveToFile(fileName + ".pptx", FileFormat.Pptx2013); ppt.Dispose(); |
Spire.XLS 15.5.2 supports detecting and removing duplicate rows
We are excited to announce the release of Spire.XLS 15.5.2. This version supports detecting and removing duplicate rows and several new functions, such as TRIMRANGE and ERF.PRECISE. Besides, some known issues are fixed in this version, such as the issue that the sorting results were incorrect. More details are listed below.
Here is a list of changes made in this release
| Category | ID | Description |
| New feature | SPIREXLS-5787 | Supports detecting and deleting duplicate rows.
// Remove duplicate rows in the worksheet sheet.RemoveDuplicates(); // Remove duplicate rows within specified range sheet.RemoveDuplicates(int startRow, int startColumn, int endRow, int endColumn); // Remove duplicate rows based on specific columns and headers sheet.RemoveDuplicates(int startRow, int startColumn, int endRow, int endColumn, boolean hasHeaders, int[] columnOffsets) |
| New feature | SPIREXLS-5793 SPIREXLS-5797 SPIREXLS-5798 SPIREXLS-5801 | Supports new functions (TRIMRANGE, ERF.PRECISE, ERFC.PRECISE, and PERMUTATIONA).
sheet.Range["A45"].Formula = "=TRIMRANGE(A1:H10, 1, 1)"; sheet.Range["B4"].Formula = "=ERF.PRECISE(1)"; sheet.Range["B4"].Formula = "=ERFC.PRECISE(NULL)"; sheet.Range["B9"].Formula = "=PERMUTATIONA(A5,A5)" |
| Bug | SPIREXLS-5785 | Fixes the issue that getting the font of cell text was incorrect. |
| Bug | SPIREXLS-5792 | Fixes the issue that the sorting results were incorrect. |
| Bug | SPIREXLS-5796 | Fixes the issue that the program threw “ArgumentOutOfRangeExceltion” when loading an Excel document. |
How to Convert TXT to Excel in Python

Text files (.txt) are a common way to store data due to their simplicity, but they lack the structure and analytical power of Excel spreadsheets. Converting TXT files to Excel allows for better data organization, visualization, and manipulation.
While manual import text file to Excel works for small datasets, automating this process saves time and reduces errors. Python, with its powerful libraries, offers an efficient solution. In this guide, you’ll learn how to convert TXT to Excel in Python using Spire.XLS for Python, a robust API for Excel file manipulation.
Prerequisites
Install Python and Spire.XLS
- Install Python on your machine from python.org.
- Install the Spire.XLS for Python library via PyPI. Open your terminal and run the following command:
pip install Spire.XLS
Prepare a TXT File
Ensure your TXT file follows a consistent structure, typically with rows separated by newlines and columns separated by delimiters (e.g., commas, tabs, or spaces). For example, a sample text file might look like this: 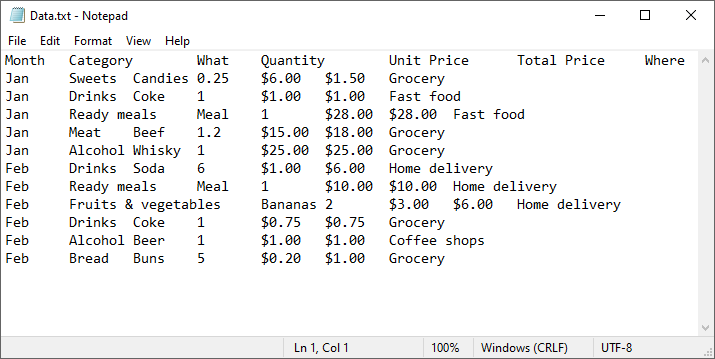
Step-by-Step Guide to Convert Text File to Excel
Step 1: Import Required Modules
In your Python script, import the necessary classes from Spire.XLS:
from spire.xls import *
from spire.xls.common import *
Step 2: Read and Parse the TXT File
Read the text file and split it into rows and columns using Python’s built-in functions. Define your delimiter (tab, in this case):
with open("Data.txt", "r") as file:
    lines = file.readlines()
data = [line.strip().split("\t") for line in lines]
Note: If different delimiter was used, replace the parameter "\t" of the split() method (e.g., spaces: split(" ")).
Step 3: Create an Excel Workbook
Initialize a workbook object and access the first worksheet:
workbook = Workbook()
sheet = workbook.Worksheets[0]
Step 4: Write Data to the Worksheet
Loop through the parsed data and populate the Excel cells.
for row_num, row_data in enumerate(data):
    for col_num, cell_data in enumerate(row_data):
        sheet.Range[row_num + 1, col_num + 1].Value = cell_data
        sheet.Range[1, col_num + 1].Style.Font.IsBold = True
Step 5: Save the Excel File
Export the workbook as an XLSX file (you can also use .xls for older formats):
workbook.SaveToFile("TXTtoExcel.xlsx", ExcelVersion.Version2016)
TXT to Excel Full Code Example
from spire.xls import *
from spire.xls.common import *

# Read TXT data
with open("Data.txt", "r") as file:
    lines = file.readlines()

# Split data by delimiter
data = [line.strip().split("\t") for line in lines]

# Create an Excel workbook
workbook = Workbook()

# Get the first worksheet
sheet = workbook.Worksheets[0]

# Iterate through each row and column in the list
for row_num, row_data in enumerate(data):
    for col_num, cell_data in enumerate(row_data):

        # Write the data into the corresponding Excel cells
        sheet.Range[row_num + 1, col_num + 1].Value = cell_data

        # Set the header row to bold
        sheet.Range[1, col_num + 1].Style.Font.IsBold = True

# Autofit column width
sheet.AllocatedRange.AutoFitColumns()

# Save as Excel (.xlsx or.xls) file
workbook.SaveToFile("TXTtoExcel.xlsx", ExcelVersion.Version2016)
workbook.Dispose()
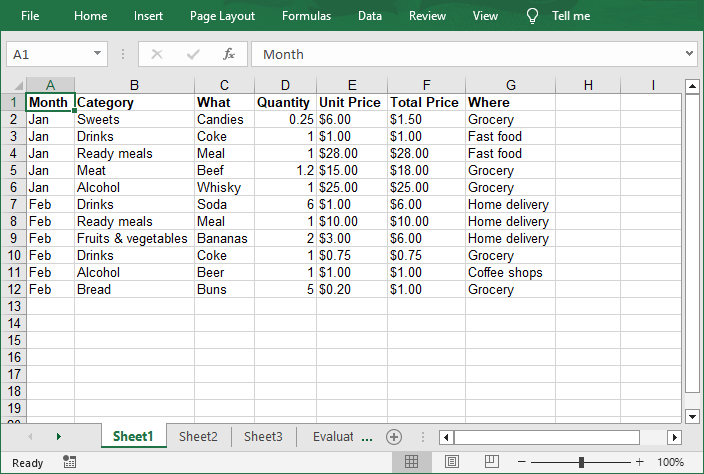
The Excel workbook converted from a text file:
Conclusion
Converting TXT files to Excel in Python using Spire.XLS automates data workflows, saving time and reducing manual effort. Whether you’re processing logs, survey results, or financial records, this method ensures structured, formatted outputs ready for analysis.
Pro Tip: Explore Spire.XLS’s advanced features—such as charts, pivot tables, and encryption—to further enhance your Excel files.
FAQs
Q1: Can Spire.XLS convert large TXT files?
Yes, the Python Excel library is optimized for performance and can process large files efficiently. However, ensure your system has sufficient memory for very large datasets (e.g., millions of rows). For optimal results, process data in chunks or use batch operations.
Q2: Can I convert Excel back to TXT using Spire.XLS?
Yes, Spire.XLS allows to read Excel cells and write their values to a text file. A comprehensive guide is available at: Convert Excel to TXT in Python
Q3: How to handle the encoding issues during conversion?
Specify encoding if the text file uses non-standard characters (e.g., utf-8):
with open("Data.txt", "r", encoding='utf-8') as file:
    lines = file.readlines()
Get a Free License
To fully experience the capabilities of Spire.XLS for Python without any evaluation limitations, you can request a free 30-day trial license.
Spire.PDF for Java 11.5.2 enhances the conversions from PDF to PDF/A and Word
We're pleased to announce the release of Spire.PDF for Java 11.5.2. The latest version enhances the conversions from PDF to PDF/A and Word. Moreover, some known bugs are fixed successfully in this update, such as the issue that the program threw a NullPointerException when adding annotations. More details are listed below.
Here is a list of changes made in this release
| Category | ID | Description |
| Bug | SPIREPDF-7353 SPIREPDF-7489 | Fixes the issue that the PDF to PDF/A validation failed. |
| Bug | SPIREPDF-7481 | Fixes the issue that content was lost when converting SVG to PDF. |
| Bug | SPIREPDF-7484 | Fixes the issue that the program threw a NullPointerException when adding annotations |
| Bug | SPIREPDF-7492 | Fixes the issue that extra horizontal lines appeared when converting a PDF to Word. |
Spire.Doc for Java 13.5.3 supports excluding table objects during document comparison
We're pleased to announce the release of Spire.Doc for Java 13.5.3. This version supports excluding table objects during document comparison, and setting underline color. Meanwhile, some issues that occurred when converting Word to PDF, creating and reading TOCs of Word documents have also been successfully fixed. More details are listed below.
Here is a list of changes made in this release
| Category | ID | Description |
| New feature | SPIREDOC-11111 | Supports excluding table objects during document comparison.
Compareoptions compareoptions = new Compareoptions(); compareoptions.setIgnoreTable(true); docunment.compare(docunment2, "Yang Merlin", compareoptions ); |
| New feature | SPIREDOC-10501 | Supports setting underline color.
textRange.getCharacterFormat().setUnderlineColor(Color.RED); |
| Bug | SPIREDOC-10310 | Fixes the issue where the text displayed incorrectly when converting Word to PDF. |
| Bug | SPIREDOC-11087 | Fixes the issue where reading the TOC of Word document returned null. |
| Bug | SPIREDOC-11093 | Fixes the issue where extra symbols appeared when reading the TOC of Word document. |
| Bug | SPIREDOC-11108 | Fixes the issue that incorrect content was retrieved when using the ‘BookmarksNavigator.getBookmarkContent()’ method. |
| Bug | SPIREDOC-11100 | Fixes the issue that LaTeX formulas rendered incorrectly. |
| Bug | SPIREDOC-11175 | Fixes the issue that it was failed to updating the Word page number fields. |
| Bug | SPIREDOC-11176 | Fixes the issue where an "ArrayIndexOutOfBoundsException" error occurred when creating a table of contents. |
| Bug | SPIREDOC-11178 | Fixes the issue that control content retrieval returned null. |
| Bug | SPIREDOC-11190 | Fixes the issue where the characters displayed incorrectly when converting Word to PDF. |
| Bug | SPIREDOC-11200 | Fixes the issue where the characters were lost when converting Word to PDF. |
| Bug | SPIREDOC-11204 | Fixes the issue where the headers were lost when converting Word to PDF. |
| Bug | SPIREDOC-11218 | Fixes the issue that the ‘Document.updateTOCPageNumbers()’ method did not take effect. |
| Bug | SPIREDOC-11224 | Fixes the issue that the font modifications did not apply. |
| Bug | SPIREDOC-11229 | Fixes the issue that the PDFs displayed incorrectly in Chrome and WPS after converting from a Word document. |
| Bug | SPIREDOC-11232 | Fixes the issue where a "NullPointerException" occurred when converting Word to PDF. |
| Bug | SPIREDOC-11250 | Fixes the issue that incorrect results were returned when calling the ‘Paragraph.getListText()’ method. |
How to Count Word Frequency in a Word Document Using Python
Want to count the frequency of words in a Word document? Whether you're analyzing content, generating reports, or building a document tool, Python makes it easy to find how often a specific word appears—across the entire document, within specific sections, or even in individual paragraphs. In this guide, you’ll learn how to use Python to count word occurrences accurately and efficiently, helping you extract meaningful insights from your Word files without manual effort.
- Count Frequency of Words in an Entire Word Document
- Count Word Frequency by Section
- Count Word Frequency by Paragraph
- To Wrap Up
- FAQ
In this tutorial, we’ll use Spire.Doc for Python, a powerful and easy-to-use library for Word document processing. It supports a wide range of features like reading, editing, and analyzing DOCX files programmatically—without requiring Microsoft Office.
You can install it via pip:
pip install spire.doc
Let’s see how it works in practice, starting with counting word frequency in an entire Word document.
How to Count Frequency of Words in an Entire Word Document
Let’s start by learning how to count how many times a specific word or phrase appears in an entire Word document. This is a common task—imagine you need to check how often the word "contract" appears in a 50-page file.
With the FindAllString() method from Spire.Doc for Python, you can quickly search through the entire document and get an exact count in just a few lines of code—saving you both time and effort.
Steps to count the frequency of a word in the entire Word document:
- Create an object of Document class and read a source Word document.
- Specify the keyword to find.
- Find all occurrences of the keyword in the document using Document.FindAllString() method.
- Count the number of matches and print it out.
The following code shows how to count the frequency of the keyword "AI-Generated Art" in the entire Word document:
from spire.doc import *
from spire.doc.common import *

# Create a Document object
document = Document()

# Load a Word document
document.LoadFromFile("E:/Administrator/Python1/input/AI-Generated Art.docx")

# Customize the keyword to find
keyword = "AI-Generated Art"

# Find all matches (False: distinguish case; True: full text search)
textSelections = document.FindAllString(keyword, False, True)

# Count the number of matches
count = len(textSelections)

# Print the result
print(f'"{keyword}" appears {count} times in the entire document.')

# Close the document
document.Close()

How to Count Word Frequency by Section in a Word Document Using Python
A Word document is typically divided into multiple sections, each containing its own paragraphs, tables, and other elements. Sometimes, instead of counting a word's frequency across the entire document, you may want to know how often it appears in each section. To achieve this, we’ll loop through all the document sections and search for the target word within each one. Let’s see how to count word frequency by section using Python.
Steps to count the frequency of a word by section in Word documents:
- Create a Document object and load the Word file.
- Define the target keyword to search.
- Loop through all sections in the document. Within each section, loop through all paragraphs.
- Use regular expressions to count keyword occurrences.
- Accumulate and print the count for each section and the total count.
This code demonstrates how to count how many times "AI-Generated Art" appears in each section of a Word document:
import re
from spire.doc import *
from spire.doc.common import *
# Create a Document object and load a Word file
document = Document()
document.LoadFromFile("E:/Administrator/Python1/input/AI.docx")
# Specify the keyword
keyword = "AI-Generated Art"
# The total count of the keyword
total_count = 0
# Get all sections
sections = document.Sections
# Loop through each section
for i in range(sections.Count):
section = sections.get_Item(i)
paragraphs = section.Paragraphs
section_count = 0
print(f"\n=== Section {i + 1} ===")
# Loop through each paragraph in the section
for j in range(paragraphs.Count):
paragraph = paragraphs.get_Item(j)
text = paragraph.Text
# Find all matches using regular expressions
count = len(re.findall(re.escape(keyword), text, flags=re.IGNORECASE))
section_count += count
total_count += count
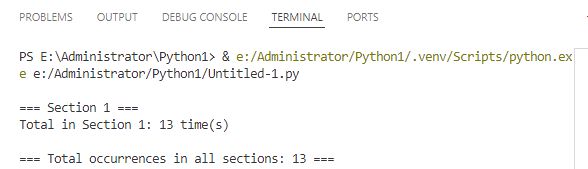
print(f'Total in Section {i + 1}: {section_count} time(s)')
print(f'\n=== Total occurrences in all sections: {total_count} ===')
# Close the document
document.Close()
How to Count Word Frequency by Paragraph in a Word Document
When it comes to tasks like sensitive word detection or content auditing, it's crucial to perform a more granular analysis of word frequency. In this section, you’ll learn how to count word frequency by paragraph in a Word document, which gives you deeper insight into how specific terms are distributed across your content. Let’s walk through the steps and see a code example in action.
Steps to count the frequency of words by paragraph in Word files:
- Instantiate a Document object and load a Word document from files.
- Specify the keyword to search for.
- Loop through each section and each paragraph in the document.
- Find and count the occurrence of the keyword using regular expressions.
- Print out the count for each paragraph where the keyword appears and the total number of occurrences.
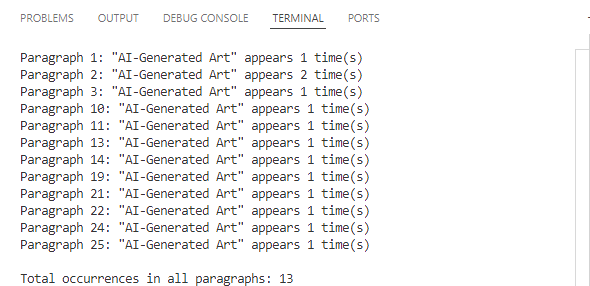
Use the following code to calculate the frequency of "AI-Generated Art" by paragraphs in a Word document:
import re
from spire.doc import *
from spire.doc.common import *

# Create a Document object
document = Document()

# Load a Word document
document.LoadFromFile("E:/Administrator/Python1/input/AI.docx")

# Customize the keyword to find
keyword = "AI-Generated Art"

# Initialize variables
total_count = 0
paragraph_index = 1

# Loop through sections and paragraphs
sections = document.Sections
for i in range(sections.Count):
    section = sections.get_Item(i)
    paragraphs = section.Paragraphs
    for j in range(paragraphs.Count):
        paragraph = paragraphs.get_Item(j)
        text = paragraph.Text

        # Find all occurrences of the keyword while ignoring case
        count = len(re.findall(re.escape(keyword), text, flags=re.IGNORECASE))

        # Print the result
        if count > 0:
            print(f'Paragraph {paragraph_index}: "{keyword}" appears {count} time(s)')
            total_count += count
        paragraph_index += 1

# Print the total count
print(f'\nTotal occurrences in all paragraphs: {total_count}')
document.Close()
To Wrap Up
The guide demonstrates how to count the frequency of specific words across an entire Word document, by section, and by paragraph using Python. Whether you're analyzing long reports, filtering sensitive terms, or building smart document tools, automating the task with Spire.Doc for Python can save time and boost accuracy. Give them a try in your own projects and take full control of your Word document content.
FAQs about Counting the Frequency of Words
Q1: How to count the number of times a word appears in Word?
A: You can count word frequency in Word manually using the “Find” feature, or automatically using Python and libraries like Spire.Doc. This lets you scan the entire document or target specific sections or paragraphs.
Q2: Can I analyze word frequency across multiple Word files?
A: Yes. By combining a loop in Python to load multiple documents, you can apply the same word-count logic to each file and aggregate the results—ideal for batch processing or document audits.
Spire.Presentation 10.5.8 enhances the conversion from Presentation to PDF
We are delighted to announce the release of Spire.Presentation 10.5.8. The latest version enhances the conversion from Presentation to PDF. Besides, the issue where Microsoft Powerpoint displayed an error message when opening a PPT file that was directly loaded and saved is fixed successfully. More details are listed below.
Here is a list of changes made in this release
| Category | ID | Description |
| Bug | SPIREPPT-2858 | Fixes the issue that there was incorrect text content when converting a specific PPT document to PDF. |
| Bug | SPIREPPT-2842 | Fixes the issue where Microsoft Powerpoint displayed an error message when opening a PPT file that was directly loaded and saved. |
Spire.XLS for Java 15.5.1 enhances the conversion from Excel to HTML
We are delighted to announce the release of Spire.XLS for Java 15.5.1. This version enhances the conversion from Excel to HTML. Besides, some known issues are fixed successfully in this version, such as the issue that the program threw an exception when calling Worksheet.findAllString for specific documents. More details are listed below.
Here is a list of changes made in this release
| Category | ID | Description |
| Bug | SPIREXLS-5737 | Fixes the issue that the program threw an exception when calling Worksheet.findAllString for specific documents. |
| Bug | SPIREXLS-5750 | Fixes the issue that the images shifted upward when converting specific Excel files to HTML. |
| Bug | SPIREXLS-5765 | Fixes the issue that the program threw “ArrayIndexOutOfBoundsException” when loading specific Excel files. |
| Bug | SPIREXLS-5773 | Optimizes the issue that the time consuming for specific Excel to HTML conversion was too much. |
| Bug | SPIREXLS-5786 | Fixes the issue that the program threw “Invalid end column index” when converting specific Excel files to HTML. |