Java : écrire des données dans des feuilles de calcul Excel
Table des matières
Installer avec Maven
<dependency>
    <groupId>e-iceblue</groupId>
        <artifactId>spire.xls</artifactId>
    <version>14.1.3</version></dependency>
Liens connexes
Excel a la capacité de stocker et d’organiser rapidement de grandes quantités de données dans des feuilles de calcul ordonnées. Mais cela prend du temps si nous saisissons manuellement les données dans les cellules les unes après les autres. Automatiser la création de fichiers Excel par programmation peut nous faire gagner beaucoup de temps et d’énergie. Cet article explique comment écrivez des données dans des feuilles de calcul Excel en Java à l'aide de Spire.XLS for Java.
- Écrire des valeurs de texte ou de nombres dans des cellules spécifiques
- Écrire des tableaux sur une feuille de calcul
- Écrire un DataTable dans une feuille de calcul
Installer Spire.XLS for Java
Tout d'abord, vous devez ajouter le fichier Spire.Xls.jar en tant que dépendance dans votre programme Java. Le fichier JAR peut être téléchargé à partir de ce lien. Si vous utilisez Maven, vous pouvez facilement importer le fichier JAR dans votre application en ajoutant le code suivant au fichier pom.xml de votre projet.
<repositories>
    <repository>
        <id>com.e-iceblue</id>
        <name>e-iceblue</name>
        <url>https://repo.e-iceblue.com/nexus/content/groups/public/</url>
    </repository>
</repositories>
<dependencies>
    <dependency>
        <groupId>e-iceblue</groupId>
        <artifactId>spire.xls</artifactId>
        <version>16.4.1</version>
    </dependency>
</dependencies>
Écrire des valeurs de texte ou de nombres dans des cellules spécifiques
Une certaine cellule d'une feuille de calcul est accessible par la méthode Worksheet.get (int row, int column). Ensuite, vous pouvez ajouter une valeur texte ou une valeur numérique à la cellule à l'aide de la méthode IXLSRange.setValue() ou IXLSRange.setNumberValue(). Voici les étapes détaillées.
- Créez un objet Workbook.
- Obtenez la première feuille de calcul à l’aide de la méthode Workbook.getWorksheets().get().
- Obtenez une cellule spécifique en utilisant la méthode Workhseet.get().
- Ajoutez une valeur texte ou une valeur numérique à la cellule à l'aide de la méthode IXLSRange.setValue() ou IXLSRange.setNumberValue().
- Enregistrez le classeur dans un fichier Excel à l'aide de la méthode Workbook.saveToFile().
- Java
import com.spire.xls.*;
public class WriteToCells {
public static void main(String[] args) {
//Create a Workbook object
Workbook workbook = new Workbook();
//Get the first worksheet
Worksheet worksheet = workbook.getWorksheets().get(0);
//Write data to specific cells
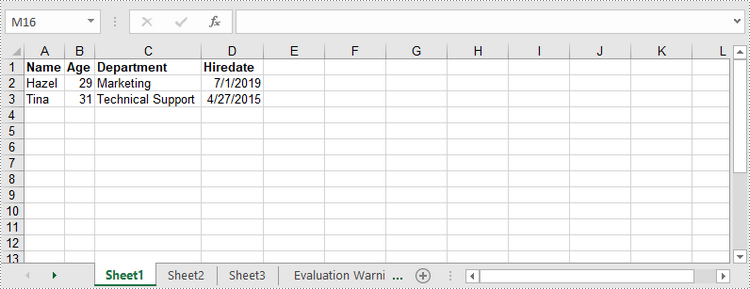
worksheet.get(1,1).setValue("Name");
worksheet.get(1,2).setValue("Age");
worksheet.get(1,3).setValue("Department");
worksheet.get(1,4).setValue("Hiredate");
worksheet.get(2,1).setValue("Hazel");
worksheet.get(2,2).setNumberValue(29);
worksheet.get(2,3).setValue("Marketing");
worksheet.get(2,4).setValue("2019-07-01");
worksheet.get(3,1).setValue("Tina");
worksheet.get(3,2).setNumberValue(31);
worksheet.get(3,3).setValue("Technical Support");
worksheet.get(3,4).setValue("2015-04-27");
//Auto fit column widths
worksheet.getAllocatedRange().autoFitColumns();
//Apply a style to the first row
CellStyle style = workbook.getStyles().addStyle("newStyle");
style.getFont().isBold(true);
worksheet.getRange().get(1,1,1,4).setStyle(style);
//Save to an Excel file
workbook.saveToFile("output/WriteToCells.xlsx", ExcelVersion.Version2016);
}
}
Écrire des tableaux sur une feuille de calcul
Spire.XLS for Java fournit la méthode Worksheet.insertArrary(), permettant aux programmeurs d'écrire un tableau unidimensionnel ou un tableau bidimensionnel dans la plage de cellules spécifiée d'une feuille de calcul. Les étapes pour écrire des tableaux dans une feuille de calcul sont les suivantes :
- Créez un objet Workbook.
- Obtenez la première feuille de calcul à l’aide de la méthode Workbook.getWorksheets().get().
- Créez un tableau unidimensionnel et un tableau bidimensionnel.
- Insérez les tableaux dans la feuille de calcul à l'aide de la méthode Worksheet.insertArray().
- Enregistrez le classeur dans un fichier Excel à l'aide de la méthode Workbook.saveToFile().
- Java
import com.spire.xls.*;
public class WriteArrayToWorksheet {
public static void main(String[] args) {
//Create a Workbook instance
Workbook workbook = new Workbook();
//Get the first worksheet
Worksheet worksheet = workbook.getWorksheets().get(0);
//Create a one-dimensional array
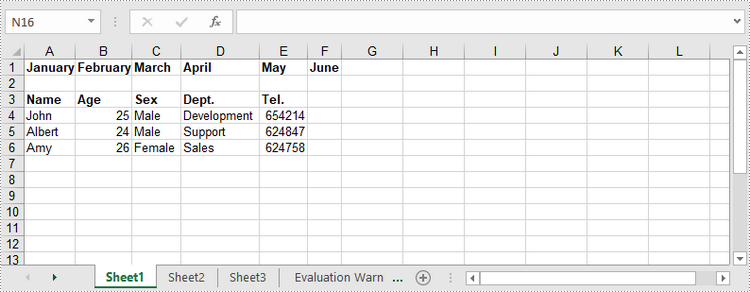
String[] oneDimensionalArray = new String[]{"January", "February", "March", "April","May", "June"};
//Write the array to the first row of the worksheet
worksheet.insertArray(oneDimensionalArray, 1, 1, false);
//Create a two-dimensional array
String[][] twoDimensionalArray = new String[][]{
{"Name", "Age", "Sex", "Dept.", "Tel."},
{"John", "25", "Male", "Development","654214"},
{"Albert", "24", "Male", "Support","624847"},
{"Amy", "26", "Female", "Sales","624758"}
};
//Write the array to the worksheet starting from the cell A3
worksheet.insertArray(twoDimensionalArray, 3, 1);
//Auto fit column width in the located range
worksheet.getAllocatedRange().autoFitColumns();
//Apply a style to the first and the third row
CellStyle style = workbook.getStyles().addStyle("newStyle");
style.getFont().isBold(true);
worksheet.getRange().get(1,1,1,6).setStyle(style);
worksheet.getRange().get(3,1,3,6).setStyle(style);
//Save to an Excel file
workbook.saveToFile("output/WriteArrays.xlsx", ExcelVersion.Version2016);
}
}
Écrire un DataTable dans une feuille de calcul
Pour importer des données d'un DataTable vers une feuille de calcul, utilisez la méthode Worksheet.insertDataTable(). Voici les étapes détaillées.
- Créez un objet Workbook.
- Obtenez la première feuille de calcul à l’aide de la méthode Workbook.getWorksheets().get().
- Créez un DataTable et écrivez le DataTable dans la feuille de calcul à l'emplacement spécifié à l'aide de la méthode Worksheet.insertDataTable().
- Enregistrez le classeur dans un fichier Excel à l'aide de la méthode Workbook.saveToFile().
- Java
import com.spire.data.table.DataRow;
import com.spire.data.table.DataTable;
import com.spire.xls.*;
public class WriteDataTableToWorksheet {
public static void main(String[] args) throws Exception {
//Create a Workbook instance
Workbook workbook = new Workbook();
//Get the first worksheet
Worksheet worksheet = workbook.getWorksheets().get(0);
//Create a DataTable object
DataTable dataTable = new DataTable();
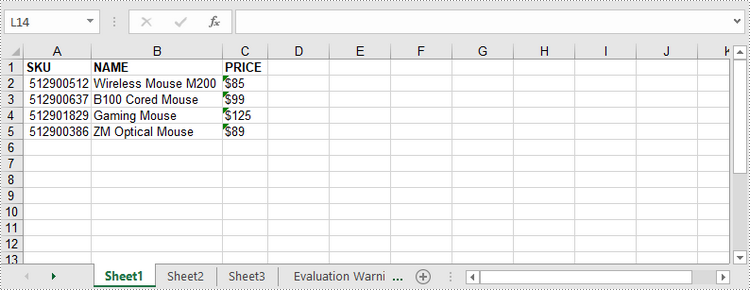
dataTable.getColumns().add("SKU", Integer.class);
dataTable.getColumns().add("NAME", String.class);
dataTable.getColumns().add("PRICE", String.class);
//Create rows and add data
DataRow dr = dataTable.newRow();
dr.setInt(0, 512900512);
dr.setString(1,"Wireless Mouse M200");
dr.setString(2,"$85");
dataTable.getRows().add(dr);
dr = dataTable.newRow();
dr.setInt(0,512900637);
dr.setString(1,"B100 Cored Mouse ");
dr.setString(2,"$99");
dataTable.getRows().add(dr);
dr = dataTable.newRow();
dr.setInt(0,512901829);
dr.setString(1,"Gaming Mouse");
dr.setString(2,"$125");
dataTable.getRows().add(dr);
dr = dataTable.newRow();
dr.setInt(0,512900386);
dr.setString(1,"ZM Optical Mouse");
dr.setString(2,"$89");
dataTable.getRows().add(dr);
//Write datatable to the worksheet
worksheet.insertDataTable(dataTable,true,1,1,true);
//Auto fit column width in the located range
worksheet.getAllocatedRange().autoFitColumns();
//Apply a style to the first row
CellStyle style = workbook.getStyles().addStyle("newStyle");
style.getFont().isBold(true);
worksheet.getRange().get(1,1,1,3).setStyle(style);
//Save to an Excel file
workbook.saveToFile("output/WriteDataTable.xlsx", ExcelVersion.Version2016);
}
}
Demander une licence temporaire
Si vous souhaitez supprimer le message d'évaluation des documents générés ou vous débarrasser des limitations fonctionnelles, veuillez demander une licence d'essai de 30 jours pour toi.
- Java insère un filigrane de texte et d'image dans une feuille de calcul Excel
- Java : créer, lire ou mettre à jour des documents Excel
- Java : diviser une feuille de calcul en plusieurs fichiers Excel
- Java : lire ou supprimer les propriétés du document à partir d'Excel
- Java : ajouter des propriétés de document à Excel
Java: Convert Excel to Office Open XML and Vice Versa
Table of Contents
Install with Maven
<dependency>
    <groupId>e-iceblue</groupId>
    <artifactId>spire.xls</artifactId>
    <version>14.1.3</version>
</dependency>
Related Links
Office Open XML (also referred to as OOXML) is a zipped, XML-based format for Excel, Word and Presentation documents. Sometimes, you may need to convert an Excel file to Office Open XML in order to make it readable on various applications and platforms. Likewise, you might also want to convert Office Open XML to Excel for data calculations. In this article, you will learn how to Convert Excel to Office Open XML and vice versa in Java using Spire.XLS for Java library.
Install Spire.XLS for Java
First of all, you're required to add the Spire.Xls.jar file as a dependency in your Java program. The JAR file can be downloaded from this link. If you use Maven, you can easily import the JAR file in your application by adding the following code to your project's pom.xml file.
<repositories>
    <repository>
        <id>com.e-iceblue</id>
        <name>e-iceblue</name>
        <url>https://repo.e-iceblue.com/nexus/content/groups/public/</url>
    </repository>
</repositories>
<dependencies>
    <dependency>
        <groupId>e-iceblue</groupId>
        <artifactId>spire.xls</artifactId>
        <version>16.4.1</version>
    </dependency>
</dependencies>
Convert Excel to Office Open XML in Java
The following are the steps to convert an Excel file to Office Open XML:
- Create an instance of Workbook class.
- Load an Excel file using Workbook.loadFromFile() method.
- Call Workbook.saveAsXml() method to save the Excel file as Office Open XML.
- Java
import com.spire.xls.Workbook;
public class ExcelToOpenXML {
public static void main(String []args){
//Create a Workbook instance
Workbook workbook = new Workbook();
//Load an Excel file
workbook.loadFromFile("Sample.xlsx");
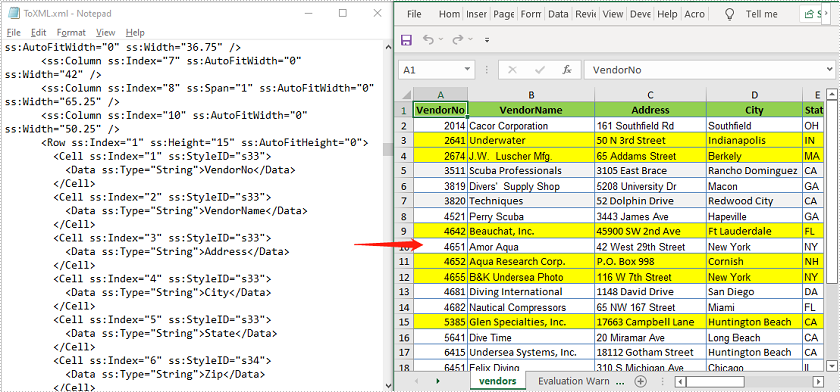
//Save as Office Open XML file format
workbook.saveAsXml("ToXML.xml");
}
}

Convert Office Open XML to Excel in Java
The following are the steps to convert an Office Open XML file to Excel:
- Create an instance of Workbook class.
- Load an Office Open XML file using Workbook.loadFromXml() file.
- Call Workbook.saveToFile() method to save the Office Open XML file as Excel.
- Java
import com.spire.xls.ExcelVersion;
    import com.spire.xls.Workbook;

    public class OpenXmlToExcel {
        public static void main(String []args){
            //Create an instance of Workbook class
            Workbook workbook = new Workbook();
            //Load an Office Open XML file
            workbook.loadFromXml("ToXML.xml");

            //Save as Excel XLSX file format
            workbook.saveToFile("ToExcel.xlsx", ExcelVersion.Version2016);
        }
    }
Apply for a Temporary License
If you'd like to remove the evaluation message from the generated documents, or to get rid of the function limitations, please request a 30-day trial license for yourself.
.Java: Converta Excel em Office Open XML e vice-versa
Índice
Instalar com Maven
<dependency>
    <groupId>e-iceblue</groupId>
    <artifactId>spire.xls</artifactId>
    <version>14.1.3</version>
</dependency>
Links Relacionados
Office Open XML (também conhecido como OOXML) é um formato compactado baseado em XML para documentos Excel, Word e Apresentação. Às vezes, pode ser necessário converter um arquivo Excel em Office Open XML para torná-lo legível em vários aplicativos e plataformas. Da mesma forma, você também pode converter o Office Open XML em Excel para cálculos de dados. Neste artigo, você aprenderá como converter Excel em Office Open XML e vice-versa em Java usando a biblioteca Spire.XLS for Java.
Instale Spire.XLS for Java
Primeiro de tudo, você deve adicionar o arquivo Spire.Xls.jar como uma dependência em seu programa Java. O arquivo JAR pode ser baixado neste link. Se você usa Maven, pode importar facilmente o arquivo JAR em seu aplicativo adicionando o código a seguir ao arquivo pom.xml do seu projeto.
<repositories>
    <repository>
        <id>com.e-iceblue</id>
        <name>e-iceblue</name>
        <url>https://repo.e-iceblue.com/nexus/content/groups/public/</url>
    </repository>
</repositories>
<dependencies>
    <dependency>
        <groupId>e-iceblue</groupId>
        <artifactId>spire.xls</artifactId>
        <version>16.4.1</version>
    </dependency>
</dependencies>
Converter Excel em Office Open XML em Java
A seguir estão as etapas para converter um arquivo Excel em Office Open XML:
- Crie uma instância da classe Workbook.
- Carregue um arquivo Excel usando o método Workbook.loadFromFile().
- Chame o método Workbook.saveAsXml() para salvar o arquivo Excel como Office Open XML.
- Java
import com.spire.xls.Workbook;

    public class ExcelToOpenXML {
        public static void main(String []args){
            //Create a Workbook instance
            Workbook workbook = new Workbook();
            //Load an Excel file
            workbook.loadFromFile("Sample.xlsx");

            //Save as Office Open XML file format
            workbook.saveAsXml("ToXML.xml");
        }
    }
Converter Office Open XML em Excel em Java
A seguir estão as etapas para converter um arquivo Office Open XML para Excel:
- Crie uma instância da classe Workbook.
- Carregue um arquivo Office Open XML usando o arquivo Workbook.loadFromXml().
- Chame o método Workbook.saveToFile() para salvar o arquivo Office Open XML como Excel.
- Java
import com.spire.xls.ExcelVersion;
    import com.spire.xls.Workbook;

    public class OpenXmlToExcel {
        public static void main(String []args){
            //Create an instance of Workbook class
            Workbook workbook = new Workbook();
            //Load an Office Open XML file
            workbook.loadFromXml("ToXML.xml");

            //Save as Excel XLSX file format
            workbook.saveToFile("ToExcel.xlsx", ExcelVersion.Version2016);
        }
    }
Solicite uma licença temporária
Se desejar remover a mensagem de avaliação dos documentos gerados ou se livrar das limitações de função, por favor solicite uma licença de teste de 30 dias para você mesmo.
Java: преобразование Excel в Office Open XML и наоборот
Оглавление
Установить с помощью Maven
<dependency>
    <groupId>e-iceblue</groupId>
    <artifactId>spire.xls</artifactId>
    <version>14.1.3</version>
</dependency>
Ссылки по теме
Office Open XML (также называемый OOXML) — это сжатый формат на основе XML для документов Excel, Word и Presentation. Иногда вам может потребоваться преобразовать файл Excel в Office Open XML, чтобы сделать его доступным для чтения в различных приложениях и платформах. Аналогичным образом вы также можете преобразовать Office Open XML в Excel для вычислений данных. В этой статье вы узнаете, как конвертировать Excel в Office Open XML и наоборот в Java. с помощью библиотеки Spire.XLS for Java library.
Установите Spire.XLS for Java
Прежде всего, вам необходимо добавить файл Spire.Xls.jar в качестве зависимости в вашу Java-программу. JAR-файл можно скачать по этой ссылке. Если вы используете Maven, вы можете легко импортировать файл JAR в свое приложение, добавив следующий код в файл pom.xml вашего проекта.
<repositories>
    <repository>
        <id>com.e-iceblue</id>
        <name>e-iceblue</name>
        <url>https://repo.e-iceblue.com/nexus/content/groups/public/</url>
    </repository>
</repositories>
<dependencies>
    <dependency>
        <groupId>e-iceblue</groupId>
        <artifactId>spire.xls</artifactId>
        <version>16.4.1</version>
    </dependency>
</dependencies>
Преобразование Excel в Office Open XML на Java
Ниже приведены шаги по преобразованию файла Excel в Office Open XML:
- Создайте экземпляр класса Workbook.
- Загрузите файл Excel с помощью метода Workbook.loadFromFile().
- Вызовите метод Workbook.saveAsXml(), чтобы сохранить файл Excel как Office Open XML.
- Java
import com.spire.xls.Workbook;

    public class ExcelToOpenXML {
        public static void main(String []args){
            //Create a Workbook instance
            Workbook workbook = new Workbook();
            //Load an Excel file
            workbook.loadFromFile("Sample.xlsx");

            //Save as Office Open XML file format
            workbook.saveAsXml("ToXML.xml");
        }
    }
Преобразование Office Open XML в Excel на Java
Ниже приведены шаги по преобразованию файла Office Open XML в Excel:
- Создайте экземпляр класса Workbook.
- Загрузите файл Office Open XML с помощью файла Workbook.loadFromXml().
- Вызовите метод Workbook.saveToFile(), чтобы сохранить файл Office Open XML как Excel.
- Java
import com.spire.xls.ExcelVersion;
    import com.spire.xls.Workbook;

    public class OpenXmlToExcel {
        public static void main(String []args){
            //Create an instance of Workbook class
            Workbook workbook = new Workbook();
            //Load an Office Open XML file
            workbook.loadFromXml("ToXML.xml");

            //Save as Excel XLSX file format
            workbook.saveToFile("ToExcel.xlsx", ExcelVersion.Version2016);
        }
    }
Подать заявку на временную лицензию
Если вы хотите удалить сообщение об оценке из сгенерированных документов или избавиться от ограничений функции, пожалуйста запросите 30-дневную пробную лицензию для себя.
Java: Konvertieren Sie Excel in Office Open XML und umgekehrt
Inhaltsverzeichnis
Mit Maven installieren
<dependency>
    <groupId>e-iceblue</groupId>
    <artifactId>spire.xls</artifactId>
    <version>14.1.3</version>
</dependency>
verwandte Links
Office Open XML (auch als OOXML bezeichnet) ist ein komprimiertes, XML-basiertes Format für Excel-, Word- und Präsentationsdokumente. Manchmal müssen Sie möglicherweise eine Excel-Datei in Office Open XML konvertieren, um sie für verschiedene Anwendungen und Plattformen lesbar zu machen. Ebenso möchten Sie möglicherweise Office Open XML für Datenberechnungen in Excel konvertieren. In diesem Artikel erfahren Sie, wie Sie Excel in Java in Office Open XML und umgekehrt konvertieren Verwendung der Spire.XLS for Java-Bibliothek.
Installieren Sie Spire.XLS for Java
Zunächst müssen Sie die Datei Spire.Xls.jar als Abhängigkeit zu Ihrem Java-Programm hinzufügen. Die JAR-Datei kann über diesen Link heruntergeladen werden. Wenn Sie Maven verwenden, können Sie die JAR-Datei einfach in Ihre Anwendung importieren, indem Sie den folgenden Code zur pom.xml-Datei Ihres Projekts hinzufügen.
<repositories>
    <repository>
        <id>com.e-iceblue</id>
        <name>e-iceblue</name>
        <url>https://repo.e-iceblue.com/nexus/content/groups/public/</url>
    </repository>
</repositories>
<dependencies>
    <dependency>
        <groupId>e-iceblue</groupId>
        <artifactId>spire.xls</artifactId>
        <version>16.4.1</version>
    </dependency>
</dependencies>
Konvertieren Sie Excel in Office Open XML in Java
Im Folgenden finden Sie die Schritte zum Konvertieren einer Excel-Datei in Office Open XML:
- Erstellen Sie eine Instanz der Workbook-Klasse.
- Laden Sie eine Excel-Datei mit der Methode Workbook.loadFromFile().
- Rufen Sie die Methode Workbook.saveAsXml() auf, um die Excel-Datei als Office Open XML zu speichern.
- Java
import com.spire.xls.Workbook;

    public class ExcelToOpenXML {
        public static void main(String []args){
            //Create a Workbook instance
            Workbook workbook = new Workbook();
            //Load an Excel file
            workbook.loadFromFile("Sample.xlsx");

            //Save as Office Open XML file format
            workbook.saveAsXml("ToXML.xml");
        }
    }
Konvertieren Sie Office Open XML in Java in Excel
Im Folgenden finden Sie die Schritte zum Konvertieren einer Office Open XML-Datei in Excel:
- Erstellen Sie eine Instanz der Workbook-Klasse.
- Laden Sie eine Office Open XML-Datei mit der Datei Workbook.loadFromXml().
- Rufen Sie die Methode Workbook.saveToFile() auf, um die Office Open XML-Datei als Excel zu speichern.
- Java
import com.spire.xls.ExcelVersion;
    import com.spire.xls.Workbook;

    public class OpenXmlToExcel {
        public static void main(String []args){
            //Create an instance of Workbook class
            Workbook workbook = new Workbook();
            //Load an Office Open XML file
            workbook.loadFromXml("ToXML.xml");

            //Save as Excel XLSX file format
            workbook.saveToFile("ToExcel.xlsx", ExcelVersion.Version2016);
        }
    }
Beantragen Sie eine temporäre Lizenz
Wenn Sie die Bewertungsmeldung aus den generierten Dokumenten entfernen oder die Funktionseinschränkungen beseitigen möchten, wenden Sie sich bitte an uns Fordern Sie eine 30-Tage-Testlizenz an für sich selbst.
Java: convierta Excel a Office Open XML y viceversa
Tabla de contenido
Instalar con Maven
<dependency>
    <groupId>e-iceblue</groupId>
    <artifactId>spire.xls</artifactId>
    <version>14.1.3</version>
</dependency>
enlaces relacionados
Office Open XML (también conocido como OOXML) es un formato comprimido basado en XML para documentos de Excel, Word y presentaciones. A veces, es posible que necesites convertir un archivo de Excel a Office Open XML para que sea legible en varias aplicaciones y plataformas. Del mismo modo, es posible que también desee convertir Office Open XML a Excel para realizar cálculos de datos. En este artículo, aprenderá cómo convertir Excel a Office Open XML y viceversa en Java utilizando la biblioteca Spire.XLS for Java.
Instalar Spire.XLS for Java
En primer lugar, debe agregar el archivo Spire.Xls.jar como una dependencia en su programa Java. El archivo JAR se puede descargar desde este enlace. Si usa Maven, puede importar fácilmente el archivo JAR en su aplicación agregando el siguiente código al archivo pom.xml de su proyecto.
<repositories>
    <repository>
        <id>com.e-iceblue</id>
        <name>e-iceblue</name>
        <url>https://repo.e-iceblue.com/nexus/content/groups/public/</url>
    </repository>
</repositories>
<dependencies>
    <dependency>
        <groupId>e-iceblue</groupId>
        <artifactId>spire.xls</artifactId>
        <version>16.4.1</version>
    </dependency>
</dependencies>
Convierta Excel a Office Open XML en Java
Los siguientes son los pasos para convertir un archivo de Excel a Office Open XML:
- Cree una instancia de la clase Libro de trabajo.
- Cargue un archivo de Excel utilizando el método Workbook.loadFromFile().
- Llame al método Workbook.saveAsXml() para guardar el archivo de Excel como Office Open XML.
- Java
import com.spire.xls.Workbook;

    public class ExcelToOpenXML {
        public static void main(String []args){
            //Create a Workbook instance
            Workbook workbook = new Workbook();
            //Load an Excel file
            workbook.loadFromFile("Sample.xlsx");

            //Save as Office Open XML file format
            workbook.saveAsXml("ToXML.xml");
        }
    }
Convierta Office Open XML a Excel en Java
Los siguientes son los pasos para convertir un archivo Office Open XML a Excel:
- Cree una instancia de la clase Libro de trabajo.
- Cargue un archivo Office Open XML utilizando el archivo Workbook.loadFromXml().
- Llame al método Workbook.saveToFile() para guardar el archivo Office Open XML como Excel.
- Java
import com.spire.xls.ExcelVersion;
    import com.spire.xls.Workbook;

    public class OpenXmlToExcel {
        public static void main(String []args){
            //Create an instance of Workbook class
            Workbook workbook = new Workbook();
            //Load an Office Open XML file
            workbook.loadFromXml("ToXML.xml");

            //Save as Excel XLSX file format
            workbook.saveToFile("ToExcel.xlsx", ExcelVersion.Version2016);
        }
    }
Solicitar una licencia temporal
Si desea eliminar el mensaje de evaluación de los documentos generados o deshacerse de las limitaciones de la función, por favor solicitar una licencia de prueba de 30 días para ti.
Java: Excel을 Office Open XML로 변환하고 그 반대로 변환
메이븐으로 설치
<dependency>
    <groupId>e-iceblue</groupId>
    <artifactId>spire.xls</artifactId>
    <version>14.1.3</version>
</dependency>
관련된 링크들
Office Open XML(OOXML이라고도 함)은 Excel, Word 및 프레젠테이션 문서를 위한 압축된 XML 기반 형식입니다. 때로는 다양한 응용 프로그램과 플랫폼에서 읽을 수 있도록 Excel 파일을 Office Open XML로 변환해야 할 수도 있습니다. 마찬가지로 데이터 계산을 위해 Office Open XML을 Excel로 변환할 수도 있습니다. 이 기사에서는 다음 방법을 배웁니다 Java에서 Excel을 Office Open XML로 변환하거나 그 반대로 변환 사용하여 Spire.XLS for Java 도서관.
Spire.XLS for Java 설치
우선, Spire.Xls.jar 파일을 Java 프로그램의 종속성으로 추가해야 합니다. JAR 파일은 이 링크. 에서 다운로드할 수 있습니다. Maven을 사용하는 경우 프로젝트의 pom.xml 파일에 다음 코드를 추가하여 애플리케이션에서 JAR 파일을 쉽게 가져올 수 있습니다.
<repositories>
    <repository>
        <id>com.e-iceblue</id>
        <name>e-iceblue</name>
        <url>https://repo.e-iceblue.com/nexus/content/groups/public/</url>
    </repository>
</repositories>
<dependencies>
    <dependency>
        <groupId>e-iceblue</groupId>
        <artifactId>spire.xls</artifactId>
        <version>16.4.1</version>
    </dependency>
</dependencies>
Excel을 Java의 Office Open XML로 변환
다음은 Excel 파일을 Office Open XML로 변환하는 단계입니다.
- Workbook 클래스의 인스턴스를 만듭니다.
- Workbook.loadFromFile() 메서드를 사용하여 Excel 파일을 로드합니다.
- Workbook.saveAsXml() 메서드를 호출하여 Excel 파일을 Office Open XML로 저장합니다.
- Java
import com.spire.xls.Workbook;

    public class ExcelToOpenXML {
        public static void main(String []args){
            //Create a Workbook instance
            Workbook workbook = new Workbook();
            //Load an Excel file
            workbook.loadFromFile("Sample.xlsx");

            //Save as Office Open XML file format
            workbook.saveAsXml("ToXML.xml");
        }
    }
Office Open XML을 Java의 Excel로 변환
다음은 Office Open XML 파일을 Excel로 변환하는 단계입니다.
- Workbook 클래스의 인스턴스를 만듭니다.
- Workbook.loadFromXml() 파일을 사용하여 Office Open XML 파일을 로드합니다.
- Workbook.saveToFile() 메서드를 호출하여 Office Open XML 파일을 Excel로 저장합니다.
- Java
import com.spire.xls.ExcelVersion;
    import com.spire.xls.Workbook;

    public class OpenXmlToExcel {
        public static void main(String []args){
            //Create an instance of Workbook class
            Workbook workbook = new Workbook();
            //Load an Office Open XML file
            workbook.loadFromXml("ToXML.xml");

            //Save as Excel XLSX file format
            workbook.saveToFile("ToExcel.xlsx", ExcelVersion.Version2016);
        }
    }
임시 라이센스 신청
생성된 문서에서 평가 메시지를 제거하고 싶거나, 기능 제한을 없애고 싶다면 30일 평가판 라이센스 요청 자신을 위해.
Java: converti Excel in Office Open XML e viceversa
Sommario
Installa con Maven
<dependency>
    <groupId>e-iceblue</groupId>
    <artifactId>spire.xls</artifactId>
    <version>14.1.3</version>
</dependency>
Link correlati
Office Open XML (noto anche come OOXML) è un formato compresso basato su XML per documenti Excel, Word e presentazioni. A volte potrebbe essere necessario convertire un file Excel in Office Open XML per renderlo leggibile su varie applicazioni e piattaforme. Allo stesso modo, potresti anche voler convertire Office Open XML in Excel per i calcoli dei dati. In questo articolo imparerai come convertire Excel in Office Open XML e viceversa in Java utilizzando la libreria Spire.XLS for Java.
Installa Spire.XLS for Java
Prima di tutto, devi aggiungere il file Spire.Xls.jar come dipendenza nel tuo programma Java. Il file JAR può essere scaricato da questo collegamento. Se utilizzi Maven, puoi importare facilmente il file JAR nella tua applicazione aggiungendo il seguente codice al file pom.xml del tuo progetto.
<repositories>
    <repository>
        <id>com.e-iceblue</id>
        <name>e-iceblue</name>
        <url>https://repo.e-iceblue.com/nexus/content/groups/public/</url>
    </repository>
</repositories>
<dependencies>
    <dependency>
        <groupId>e-iceblue</groupId>
        <artifactId>spire.xls</artifactId>
        <version>16.4.1</version>
    </dependency>
</dependencies>
Converti Excel in Office Open XML in Java
Di seguito sono riportati i passaggi per convertire un file Excel in Office Open XML:
- Crea un'istanza della classe Workbook.
- Carica un file Excel utilizzando il metodo Workbook.loadFromFile().
- Chiama il metodo Workbook.saveAsXml() per salvare il file Excel come Office Open XML.
- Java
import com.spire.xls.Workbook;

    public class ExcelToOpenXML {
        public static void main(String []args){
            //Create a Workbook instance
            Workbook workbook = new Workbook();
            //Load an Excel file
            workbook.loadFromFile("Sample.xlsx");

            //Save as Office Open XML file format
            workbook.saveAsXml("ToXML.xml");
        }
    }
Converti Office Open XML in Excel in Java
Di seguito sono riportati i passaggi per convertire un file Office Open XML in Excel:
- Crea un'istanza della classe Workbook.
- Caricare un file Office Open XML utilizzando il file Workbook.loadFromXml().
- Chiama il metodo Workbook.saveToFile() per salvare il file Office Open XML come Excel.
- Java
import com.spire.xls.ExcelVersion;
    import com.spire.xls.Workbook;

    public class OpenXmlToExcel {
        public static void main(String []args){
            //Create an instance of Workbook class
            Workbook workbook = new Workbook();
            //Load an Office Open XML file
            workbook.loadFromXml("ToXML.xml");

            //Save as Excel XLSX file format
            workbook.saveToFile("ToExcel.xlsx", ExcelVersion.Version2016);
        }
    }
Richiedi una licenza temporanea
Se desideri rimuovere il messaggio di valutazione dai documenti generati o eliminare le limitazioni della funzione, per favore richiedere una licenza di prova di 30 giorni per te.
Java : convertir Excel en Office Open XML et vice versa
Table des matières
Installer avec Maven
<dependency>
    <groupId>e-iceblue</groupId>
    <artifactId>spire.xls</artifactId>
    <version>14.1.3</version>
</dependency>
Liens connexes
Office Open XML (également appelé OOXML) est un format XML compressé pour les documents Excel, Word et Présentation. Parfois, vous devrez peut-être convertir un fichier Excel en Office Open XML afin de le rendre lisible sur diverses applications et plates-formes. De même, vous souhaiterez peut-être également convertir Office Open XML en Excel pour les calculs de données. Dans cet article, vous apprendrez comment convertir Excel en Office Open XML et vice versa en Java à l'aide de la bibliothèque Spire.XLS for Java library.
Installer Spire.XLS for Java
Tout d'abord, vous devez ajouter le fichier Spire.Xls.jar en tant que dépendance dans votre programme Java. Le fichier JAR peut être téléchargé à partir de ce lien. Si vous utilisez Maven, vous pouvez facilement importer le fichier JAR dans votre application en ajoutant le code suivant au fichier pom.xml de votre projet.
<repositories>
    <repository>
        <id>com.e-iceblue</id>
        <name>e-iceblue</name>
        <url>https://repo.e-iceblue.com/nexus/content/groups/public/</url>
    </repository>
</repositories>
<dependencies>
    <dependency>
        <groupId>e-iceblue</groupId>
        <artifactId>spire.xls</artifactId>
        <version>16.4.1</version>
    </dependency>
</dependencies>
Convertir Excel en Office Open XML en Java
Voici les étapes pour convertir un fichier Excel en Office Open XML :
- Créez une instance de la classe Workbook.
- Chargez un fichier Excel à l'aide de la méthode Workbook.loadFromFile().
- Appelez la méthode Workbook.saveAsXml() pour enregistrer le fichier Excel au format Office Open XML.
- Java
import com.spire.xls.Workbook;

    public class ExcelToOpenXML {
        public static void main(String []args){
            //Create a Workbook instance
            Workbook workbook = new Workbook();
            //Load an Excel file
            workbook.loadFromFile("Sample.xlsx");

            //Save as Office Open XML file format
            workbook.saveAsXml("ToXML.xml");
        }
    }
Convertir Office Open XML en Excel en Java
Voici les étapes pour convertir un fichier Office Open XML en Excel :
- Créez une instance de la classe Workbook.
- Chargez un fichier Office Open XML à l'aide du fichier Workbook.loadFromXml().
- Appelez la méthode Workbook.saveToFile() pour enregistrer le fichier Office Open XML au format Excel.
- Java
import com.spire.xls.ExcelVersion;
    import com.spire.xls.Workbook;

    public class OpenXmlToExcel {
        public static void main(String []args){
            //Create an instance of Workbook class
            Workbook workbook = new Workbook();
            //Load an Office Open XML file
            workbook.loadFromXml("ToXML.xml");

            //Save as Excel XLSX file format
            workbook.saveToFile("ToExcel.xlsx", ExcelVersion.Version2016);
        }
    }
Demander une licence temporaire
Si vous souhaitez supprimer le message d'évaluation des documents générés ou vous débarrasser des limitations fonctionnelles, veuillez demander une licence d'essai de 30 jours pour toi.
Java: Convert Excel to PDF
Table of Contents
Install with Maven
<dependency>
    <groupId>e-iceblue</groupId>
    <artifactId>spire.xls</artifactId>
    <version>14.1.3</version>
 </dependency>
Related Links
Using PDF as a format for sending documents ensures that no formatting changes will occur to the original document. Exporting Excel to PDF is a common practice in many cases. This article introduces how to convert a whole Excel document or a specific worksheet to PDF using Spire.XLS for Java.
Install Spire.XLS for Java
First of all, you're required to add the Spire.Xls.jar file as a dependency in your Java program. The JAR file can be downloaded from this link. If you use Maven, you can easily import the JAR file in your application by adding the following code to your project's pom.xml file.
<repositories>
    <repository>
        <id>com.e-iceblue</id>
        <name>e-iceblue</name>
        <url>https://repo.e-iceblue.com/nexus/content/groups/public/</url>
    </repository>
</repositories>
<dependencies>
    <dependency>
        <groupId>e-iceblue</groupId>
        <artifactId>spire.xls</artifactId>
        <version>16.4.1</version>
    </dependency>
</dependencies>
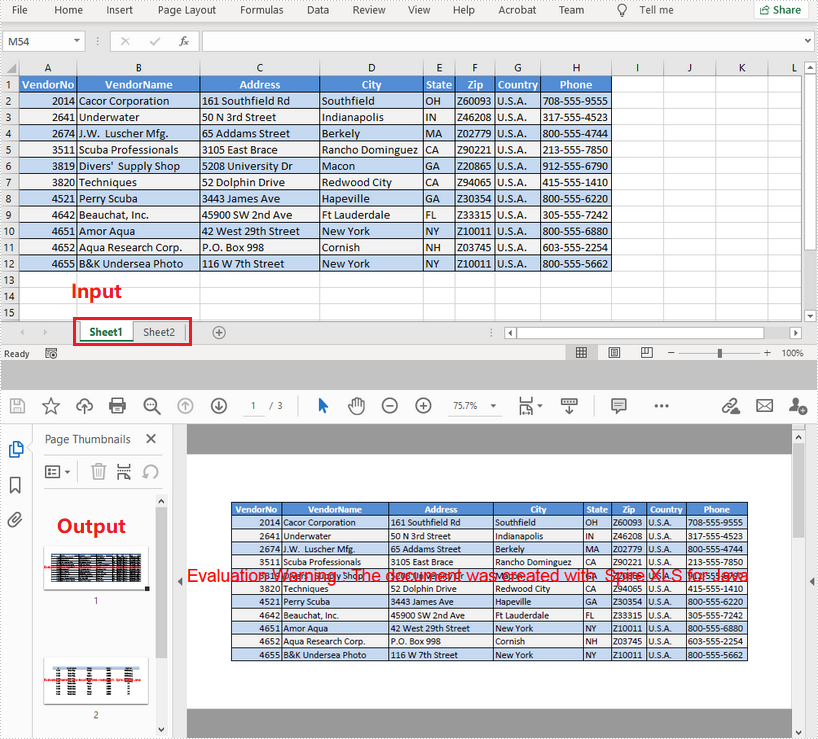
Convert a Whole Excel File to PDF
The following are the steps to convert a whole Excel document to PDF.
- Create a Workbook object.
- Load a sample Excel document using Workbook.loadFromFile() method.
- Set the Excel to PDF conversion options through the methods under the ConverterSetting object, which is returned by Workbook.getConverterSetting() method.
- Convert the whole Excel document to PDF using Workbook.saveToFile() method.
- Java
import com.spire.xls.FileFormat;
    import com.spire.xls.Workbook;

    public class ConvertExcelToPdf {

        public static void main(String[] args) {

            //Create a Workbook instance and load an Excel file
            Workbook workbook = new Workbook();
            workbook.loadFromFile("C:\\Users\\Administrator\\Desktop\\Sample.xlsx");

            //Set worksheets to fit to page when converting
            workbook.getConverterSetting().setSheetFitToPage(true);

            //Save the resulting document to a specified path
            workbook.saveToFile("output/ExcelToPdf.pdf", FileFormat.PDF);
        }
    }
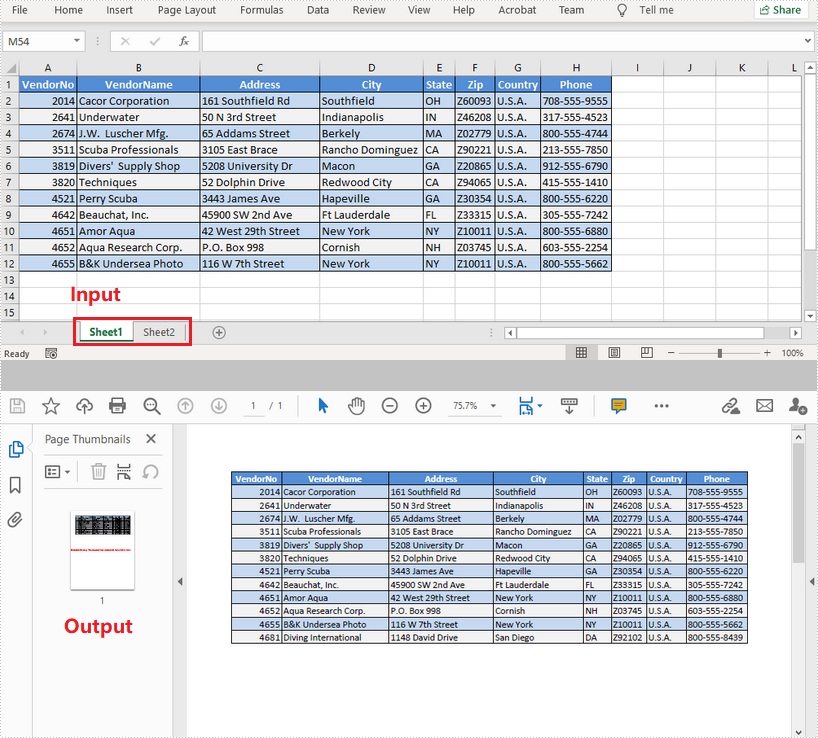
Convert a Specific Worksheet to PDF
The following are the steps to convert a specific worksheet to PDF.
- Create a Workbook object.
- Load a sample Excel document using Workbook.loadFromFile() method.
- Set the Excel to PDF conversion options through the methods under the ConverterSetting object, which is returned by Workbook.getConverterSetting() method.
- Get a specific worksheet using Workbook.getWorksheets().get() method.
- Convert the worksheet to PDF using Worksheet.saveToPdf() method.
- Java
import com.spire.xls.Workbook;
    import com.spire.xls.Worksheet;

    public class ConvertWorksheetToPdf {

        public static void main(String[] args) {

            //Create a Workbook instance and load an Excel file
            Workbook workbook = new Workbook();
            workbook.loadFromFile("C:\\Users\\Administrator\\Desktop\\Sample.xlsx");

            //Set worksheets to fit to width when converting
            workbook.getConverterSetting().setSheetFitToWidth(true);

            //Get the first worksheet
            Worksheet worksheet = workbook.getWorksheets().get(0);

            //Convert to PDF and save the resulting document to a specified path
            worksheet.saveToPdf("output/WorksheetToPdf.pdf");
        }
    }
Apply for a Temporary License
If you'd like to remove the evaluation message from the generated documents, or to get rid of the function limitations, please request a 30-day trial license for yourself.