Java: Excel 문서 생성, 읽기 또는 업데이트
메이븐으로 설치
<dependency>
    <groupId>e-iceblue</groupId>
    <artifactId>spire.xls</artifactId>
    <version>14.1.3</version></dependency>
관련된 링크들
Excel 스프레드시트는 사용자가 테이블의 데이터를 정렬, 분석 및 표시할 수 있는 널리 사용되는 파일 형식입니다. Excel 파일과 프로그래밍 방식으로 상호 작용하는 기능은 해당 기능을 소프트웨어에 자동화하고 통합하는 데 유용합니다. 이는 광범위한 데이터 세트, 복잡한 계산을 처리하거나 데이터를 동적으로 생성/업데이트할 때 특히 유용합니다. 이 기사에서는 다음 방법을 배웁니다 Java로 Excel 문서 생성, 읽기 또는 업데이트 Spire.XLS for Java사용합니다.
Spire.XLS for Java 설치
먼저 Spire.Xls.jar 파일을 Java 프로그램의 종속성으로 추가해야 합니다. JAR 파일은 이 링크에서 다운로드할 수 있습니다. Maven을 사용하는 경우 프로젝트의 pom.xml 파일에 다음 코드를 추가하여 애플리케이션에서 JAR 파일을 쉽게 가져올 수 있습니다.
<repositories>
    <repository>
        <id>com.e-iceblue</id>
        <name>e-iceblue</name>
        <url>https://repo.e-iceblue.com/nexus/content/groups/public/</url>
    </repository>
</repositories>
<dependencies>
    <dependency>
        <groupId>e-iceblue</groupId>
        <artifactId>spire.xls</artifactId>
        <version>16.4.1</version>
    </dependency>
</dependencies>
Java로 Excel 문서 만들기
Spire.XLS for Java는 Excel 문서를 생성하고 편집하는 데 사용할 수 있는 다양한 클래스와 인터페이스를 제공합니다. 다음은 이 기사와 관련된 중요한 클래스, 속성 및 메서드 목록입니다.
| 회원 | 설명 |
| 워크북 수업 | Excel 통합 문서 모델을 나타냅니다. |
| Workbook.getWorksheets().add() 메서드 | 통합 문서에 워크시트를 추가합니다. |
| Workbook.saveToFile() 메서드 | 통합 문서를 Excel 문서에 저장합니다. |
| 워크시트 수업 | 통합 문서의 워크시트를 나타냅니다. |
| Worksheet.getRange() 메서드 | 워크시트에서 특정 셀이나 셀 범위를 가져옵니다. |
| Worksheet.insertArray() 메서드 | 배열의 데이터를 워크시트로 가져옵니다. |
| CellRange 클래스 | 워크시트의 셀 또는 셀 범위를 나타냅니다. |
| CellRange.setValue() 메서드 | 셀의 값을 설정합니다. |
| CellRange.getValue() 메서드 | 셀의 값을 가져옵니다. |
다음은 Spire.XLS for Java 사용하여 처음부터 Excel 문서를 만드는 단계입니다.
- 통합 문서 개체를 만듭니다.
- Workbook.getWorksheets().add() 메서드를 사용하여 워크시트를 추가합니다.
- Worksheet.getRange.setValue() 메서드를 사용하여 특정 셀에 데이터를 씁니다.
- Worksheet.insertArray() 메서드를 사용하여 배열의 데이터를 워크시트로 가져옵니다.
- Workbook.saveToFile() 메서드를 사용하여 통합 문서를 Excel 문서에 저장합니다.
- Java
import com.spire.xls.*;
public class CreateSpreadsheet {
public static void main(String[] args) {
//Create a Workbook object
Workbook wb = new Workbook();
//Remove default worksheets
wb.getWorksheets().clear();
//Add a worksheet and name it "Employee"
Worksheet sheet = wb.getWorksheets().add("Employee");
//Merge the cells between A1 and G1
sheet.getRange().get("A1:G1").merge();
//Write data to A1 and apply formatting to it
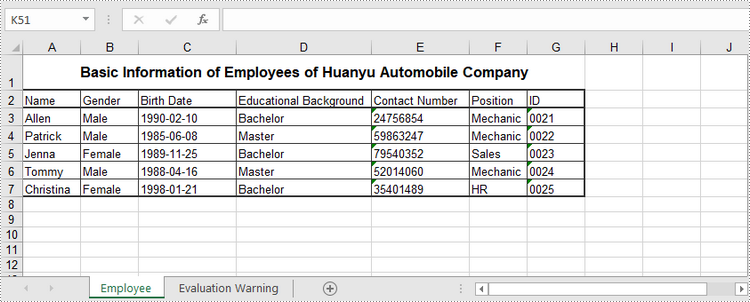
sheet.getRange().get("A1").setValue("Basic Information of Employees of Huanyu Automobile Company");
sheet.getRange().get("A1").setHorizontalAlignment(HorizontalAlignType.Center);
sheet.getRange().get("A1").setVerticalAlignment(VerticalAlignType.Center);
sheet.getRange().get("A1").getStyle().getFont().isBold(true);
sheet.getRange().get("A1").getStyle().getFont().setSize(13);
//Set row height of the first row
sheet.setRowHeight(1,30);
//Create a two-dimensional array
String[][] twoDimensionalArray = new String[][]{
{"Name", "Gender", "Birth Date", "Educational Background", "Contact Number", "Position", "ID"},
{"Allen", "Male", "1990-02-10", "Bachelor", "24756854", "Mechanic", "0021"},
{"Patrick", "Male", "1985-06-08", "Master", "59863247", "Mechanic", "0022"},
{"Jenna", "Female", "1989-11-25", "Bachelor", "79540352", "Sales", "0023"},
{"Tommy", "Male", "1988-04-16", "Master", "52014060", "Mechanic", "0024"},
{"Christina", "Female", "1998-01-21", "Bachelor", "35401489", "HR", "0025"}
};
//Import data from DataTable to worksheet
sheet.insertArray(twoDimensionalArray,2,1);
//Set row height of a range
sheet.getRange().get("A2:G7").setRowHeight(15);
//Set column width
sheet.setColumnWidth(2,15);
sheet.setColumnWidth(3,21);
sheet.setColumnWidth(4,15);
//Set border style of a range
sheet.getRange().get("A2:G7").borderAround(LineStyleType.Medium);
sheet.getRange().get("A2:G7").borderInside(LineStyleType.Thin);
sheet.getRange().get("A2:G2").borderAround(LineStyleType.Medium);
sheet.getRange().get("A2:G7").getBorders().setKnownColor(ExcelColors.Black);
//Save to a .xlsx file
wb.saveToFile("output/NewSpreadsheet.xlsx", FileFormat.Version2016);
}
}
Java에서 워크시트 데이터 읽기
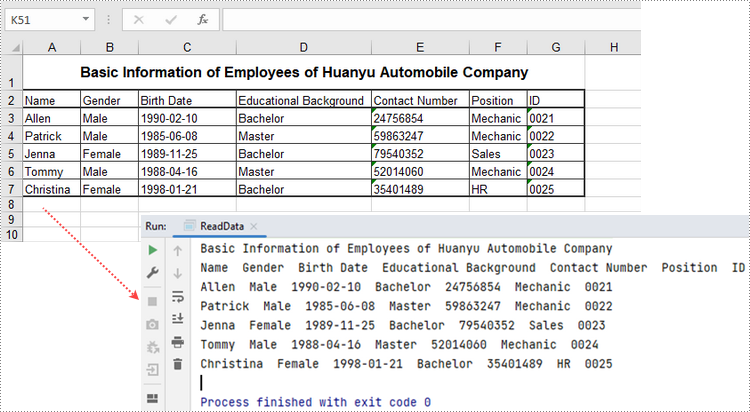
CellRange.getValue() 메서드는 셀의 숫자 값이나 텍스트 값을 문자열로 반환합니다. 전체 워크시트나 셀 범위의 데이터를 얻으려면 그 안의 셀을 반복하세요. 다음은 Spire.XLS for Java를 사용하여 워크시트의 데이터를 가져오는 단계입니다.
- 통합 문서 개체를 만듭니다.
- Workbook.loadFromFile() 메서드를 사용하여 Excel 문서를 로드합니다.
- Workbook.getWorksheets().get(index) 메서드를 사용하여 특정 워크시트를 가져옵니다.
- Worksheet.getAllocationRange() 메서드를 사용하여 데이터가 포함된 셀 범위를 가져옵니다.
- 행과 열을 반복하여 범위 내의 셀을 가져오고 CellRange.getValue() 메서드를 사용하여 각 셀의 값을 반환합니다.
- Java
import com.spire.xls.CellRange;
    import com.spire.xls.Workbook;
    import com.spire.xls.Worksheet;

    public class ReadData {

        public static void main(String[] args) {

            //Create a Workbook object
            Workbook wb = new Workbook();

            //Load an existing Excel file
            wb.loadFromFile("C:/Users/Administrator/Desktop/NewSpreadsheet.xlsx");

            //Get the first worksheet
            Worksheet sheet = wb.getWorksheets().get(0);

            //Get the cell range containing data
            CellRange locatedRange = sheet.getAllocatedRange();

            //Iterate through the rows
            for (int i = 0; i < locatedRange.getRows().length; i++) {

                //Iterate through the columns
                for (int j = 0; j < locatedRange.getColumnCount(); j++) {

                    //Get data of a specific cell
                    System.out.print(locatedRange.get(i + 1, j + 1).getValue() + "  ");
                }
                System.out.println();
            }
        }
    }
Java에서 Excel 문서 업데이트
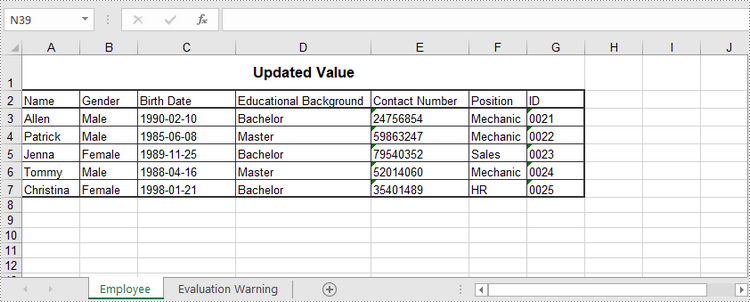
특정 셀의 값을 변경하려면 Worksheet.getRange().setValue() 메서드를 사용하여 해당 셀에 값을 다시 할당하면 됩니다. 자세한 단계는 다음과 같습니다.
- 통합 문서 개체를 만듭니다.
- Workbook.LoadFromFile() 메서드를 사용하여 Excel 문서를 로드합니다.
- Workbook.Worksheets[index] 속성을 통해 특정 워크시트를 가져옵니다.
- Worksheet.Range.Value 속성을 통해 특정 셀의 값을 변경합니다.
- Workbook.SaveToFile() 메서드를 사용하여 통합 문서를 Excel 파일에 저장합니다.
- Java
import com.spire.xls.ExcelVersion;
    import com.spire.xls.Workbook;
    import com.spire.xls.Worksheet;

    public class UpdateExcel {

        public static void main(String[] args) {

            //Create a Workbook object
            Workbook wb = new Workbook();

            //Load an existing Excel file
            wb.loadFromFile("C:/Users/Administrator/Desktop/NewSpreadsheet.xlsx");

            //Get the first worksheet
            Worksheet sheet = wb.getWorksheets().get(0);

            //Change the value of a specific cell
            sheet.getRange().get("A1").setValue("Updated Value");

            //Save to file
            wb.saveToFile("output/Updated.xlsx", ExcelVersion.Version2016);
        }
    }
임시 라이센스 신청
생성된 문서에서 평가 메시지를 제거하고 싶거나, 기능 제한을 없애고 싶다면 30일 평가판 라이센스 요청 자신을 위해.
Java: crea, leggi o aggiorna documenti Excel
Sommario
Installa con Maven
<dependency>
    <groupId>e-iceblue</groupId>
       <artifactId>spire.xls</artifactId>
    <version>14.1.3</version></dependency>
Link correlati
Il foglio di calcolo Excel è un formato di file popolare che consente agli utenti di organizzare, analizzare e visualizzare i dati in tabelle. La capacità di interagire a livello di codice con i file Excel è preziosa per automatizzare e integrare le sue funzionalità nel software. Ciò è particolarmente utile quando si ha a che fare con set di dati estesi, calcoli complessi o quando si generano/aggiornano dati in modo dinamico. In questo articolo imparerai come farlo creare, leggere o aggiornare documenti Excel in Java utilizzando Spire.XLS for Java.
- Crea un documento Excel in Java
- Leggere i dati di un foglio di lavoro in Java
- Aggiorna un documento Excel in Java
Installa Spire.XLS for Java
Innanzitutto, devi aggiungere il file Spire.Xls.jar come dipendenza nel tuo programma Java. Il file JAR può essere scaricato da questo collegamento. Se utilizzi Maven, puoi importare facilmente il file JAR nella tua applicazione aggiungendo il seguente codice al file pom.xml del tuo progetto.
<repositories>
    <repository>
        <id>com.e-iceblue</id>
        <name>e-iceblue</name>
        <url>https://repo.e-iceblue.com/nexus/content/groups/public/</url>
    </repository>
</repositories>
<dependencies>
    <dependency>
        <groupId>e-iceblue</groupId>
        <artifactId>spire.xls</artifactId>
        <version>16.4.1</version>
    </dependency>
</dependencies>
Crea un documento Excel in Java
Spire.XLS for Java offre una varietà di classi e interfacce che è possibile utilizzare per creare e modificare documenti Excel. Di seguito è riportato un elenco di classi, proprietà e metodi importanti coinvolti in questo articolo.
| Membro | Descrizione |
| Classe cartella di lavoro | Rappresenta un modello di cartella di lavoro di Excel. |
| Metodo Workbook.getWorksheets().add() | Aggiunge un foglio di lavoro alla cartella di lavoro. |
| Metodo Workbook.saveToFile() | Salva la cartella di lavoro in un documento Excel. |
| Classe di fogli di lavoro | Rappresenta un foglio di lavoro in una cartella di lavoro. |
| Metodo Worksheet.getRange() | Ottiene una cella o un intervallo di celle specifico dal foglio di lavoro. |
| Metodo Worksheet.insertArray() | Importa i dati da una matrice al foglio di lavoro. |
| Classe CellRange | Rappresenta una cella o un intervallo di celle nel foglio di lavoro. |
| Metodo CellRange.setValue() | Imposta il valore di una cella. |
| Metodo CellRange.getValue() | Ottiene il valore di una cella. |
Di seguito sono riportati i passaggi per creare un documento Excel da zero utilizzando Spire.XLS for Java.
- Creare un oggetto cartella di lavoro.
- Aggiungi un foglio di lavoro utilizzando il metodo Workbook.getWorksheets().add().
- Scrivi i dati in una cella specifica utilizzando il metodo Worksheet.getRange.setValue().
- Importa i dati da un array al foglio di lavoro utilizzando il metodo Worksheet.insertArray().
- Salva la cartella di lavoro in un documento Excel utilizzando il metodo Workbook.saveToFile().
- Java
import com.spire.xls.*;

    public class CreateSpreadsheet {

        public static void main(String[] args) {

            //Create a Workbook object
            Workbook wb = new Workbook();

            //Remove default worksheets
            wb.getWorksheets().clear();

            //Add a worksheet and name it "Employee"
            Worksheet sheet = wb.getWorksheets().add("Employee");

            //Merge the cells between A1 and G1
            sheet.getRange().get("A1:G1").merge();

            //Write data to A1 and apply formatting to it
            sheet.getRange().get("A1").setValue("Basic Information of Employees of Huanyu Automobile Company");
            sheet.getRange().get("A1").setHorizontalAlignment(HorizontalAlignType.Center);
            sheet.getRange().get("A1").setVerticalAlignment(VerticalAlignType.Center);
            sheet.getRange().get("A1").getStyle().getFont().isBold(true);
            sheet.getRange().get("A1").getStyle().getFont().setSize(13);

            //Set row height of the first row
            sheet.setRowHeight(1,30);

            //Create a two-dimensional array
            String[][] twoDimensionalArray = new String[][]{
                    {"Name", "Gender", "Birth Date", "Educational Background", "Contact Number", "Position", "ID"},
                    {"Allen", "Male", "1990-02-10", "Bachelor", "24756854", "Mechanic", "0021"},
                    {"Patrick", "Male", "1985-06-08", "Master", "59863247", "Mechanic", "0022"},
                    {"Jenna", "Female", "1989-11-25", "Bachelor", "79540352", "Sales", "0023"},
                    {"Tommy", "Male", "1988-04-16", "Master", "52014060", "Mechanic", "0024"},
                    {"Christina", "Female", "1998-01-21", "Bachelor", "35401489", "HR", "0025"}
            };

            //Import data from DataTable to worksheet
            sheet.insertArray(twoDimensionalArray,2,1);

            //Set row height of a range
            sheet.getRange().get("A2:G7").setRowHeight(15);

            //Set column width
            sheet.setColumnWidth(2,15);
            sheet.setColumnWidth(3,21);
            sheet.setColumnWidth(4,15);

            //Set border style of a range
            sheet.getRange().get("A2:G7").borderAround(LineStyleType.Medium);
            sheet.getRange().get("A2:G7").borderInside(LineStyleType.Thin);
            sheet.getRange().get("A2:G2").borderAround(LineStyleType.Medium);
            sheet.getRange().get("A2:G7").getBorders().setKnownColor(ExcelColors.Black);

            //Save to a .xlsx file
            wb.saveToFile("output/NewSpreadsheet.xlsx", FileFormat.Version2016);
        }
    }
Leggere i dati di un foglio di lavoro in Java
Il metodo CellRange.getValue() restituisce il valore numerico o il valore testo di una cella come stringa. Per ottenere i dati di un intero foglio di lavoro o di un intervallo di celle, scorrere le celle al suo interno. Di seguito sono riportati i passaggi per ottenere i dati di un foglio di lavoro utilizzando Spire.XLS for Java.
- Creare un oggetto cartella di lavoro.
- Carica un documento Excel utilizzando il metodo Workbook.loadFromFile().
- Ottieni un foglio di lavoro specifico utilizzando il metodo Workbook.getWorksheets().get(index).
- Ottieni l'intervallo di celle contenente i dati utilizzando il metodo Worksheet.getAllocatedRange().
- Scorrere le righe e le colonne per ottenere le celle all'interno dell'intervallo e restituire il valore di ciascuna cella utilizzando il metodo CellRange.getValue().
- Java
import com.spire.xls.CellRange;
    import com.spire.xls.Workbook;
    import com.spire.xls.Worksheet;

    public class ReadData {

        public static void main(String[] args) {

            //Create a Workbook object
            Workbook wb = new Workbook();

            //Load an existing Excel file
            wb.loadFromFile("C:/Users/Administrator/Desktop/NewSpreadsheet.xlsx");

            //Get the first worksheet
            Worksheet sheet = wb.getWorksheets().get(0);

            //Get the cell range containing data
            CellRange locatedRange = sheet.getAllocatedRange();

            //Iterate through the rows
            for (int i = 0; i < locatedRange.getRows().length; i++) {

                //Iterate through the columns
                for (int j = 0; j < locatedRange.getColumnCount(); j++) {

                    //Get data of a specific cell
                    System.out.print(locatedRange.get(i + 1, j + 1).getValue() + "  ");
                }
                System.out.println();
            }
        }
    }
Aggiorna un documento Excel in Java
Per modificare il valore di una determinata cella, è sufficiente riassegnarle un valore utilizzando il metodo Worksheet.getRange().setValue(). Di seguito sono riportati i passaggi dettagliati.
- Creare un oggetto cartella di lavoro.
- Carica un documento Excel utilizzando il metodo Workbook.LoadFromFile().
- Ottieni un foglio di lavoro specifico tramite la proprietà Workbook.Worksheets[index].
- Modificare il valore di una cella particolare tramite la proprietà Worksheet.Range.Value.
- Salva la cartella di lavoro in un file Excel utilizzando il metodo Workbook.SaveToFile().
- Java
import com.spire.xls.ExcelVersion;
    import com.spire.xls.Workbook;
    import com.spire.xls.Worksheet;

    public class UpdateExcel {

        public static void main(String[] args) {

            //Create a Workbook object
            Workbook wb = new Workbook();

            //Load an existing Excel file
            wb.loadFromFile("C:/Users/Administrator/Desktop/NewSpreadsheet.xlsx");

            //Get the first worksheet
            Worksheet sheet = wb.getWorksheets().get(0);

            //Change the value of a specific cell
            sheet.getRange().get("A1").setValue("Updated Value");

            //Save to file
            wb.saveToFile("output/Updated.xlsx", ExcelVersion.Version2016);
        }
    }
Richiedi una licenza temporanea
Se desideri rimuovere il messaggio di valutazione dai documenti generati o eliminare le limitazioni della funzione, per favore richiedere una licenza di prova di 30 giorni per te.
Java : créer, lire ou mettre à jour des documents Excel
Table des matières
Installer avec Maven
<dependency>
    <groupId>e-iceblue</groupId>
        <artifactId>spire.xls</artifactId>
    <version>14.1.3</version></dependency>
Liens connexes
La feuille de calcul Excel est un format de fichier populaire qui permet aux utilisateurs d'organiser, d'analyser et d'afficher des données dans des tableaux. La possibilité d'interagir par programmation avec des fichiers Excel est précieuse pour automatiser et intégrer ses fonctionnalités dans le logiciel. Ceci est particulièrement utile lorsqu’il s’agit d’ensembles de données étendus, de calculs complexes ou de génération/mise à jour dynamique de données. Dans cet article, vous apprendrez comment créer, lire ou mettre à jour un document Excel en Java à l'aide de Spire.XLS for Java.
- Créer un document Excel en Java
- Lire les données d'une feuille de calcul en Java
- Mettre à jour un document Excel en Java
Installer Spire.XLS for Java
Tout d'abord, vous devez ajouter le fichier Spire.Xls.jar en tant que dépendance dans votre programme Java. Le fichier JAR peut être téléchargé à partir de ce lien. Si vous utilisez Maven, vous pouvez facilement importer le fichier JAR dans votre application en ajoutant le code suivant au fichier pom.xml de votre projet.
<repositories>
    <repository>
        <id>com.e-iceblue</id>
        <name>e-iceblue</name>
        <url>https://repo.e-iceblue.com/nexus/content/groups/public/</url>
    </repository>
</repositories>
<dependencies>
    <dependency>
        <groupId>e-iceblue</groupId>
        <artifactId>spire.xls</artifactId>
        <version>16.4.1</version>
    </dependency>
</dependencies>
Créer un document Excel en Java
Spire.XLS for Java propose une variété de classes et d'interfaces que vous pouvez utiliser pour créer et modifier des documents Excel. Voici une liste des classes, propriétés et méthodes importantes impliquées dans cet article.
| Membre | Description |
| Classe de classeur | Représente un modèle de classeur Excel. |
| Méthode Workbook.getWorksheets().add() | Ajoute une feuille de calcul au classeur. |
| Méthode Workbook.saveToFile() | Enregistre le classeur dans un document Excel. |
| Classe de feuille de travail | Représente une feuille de calcul dans un classeur. |
| Méthode Worksheet.getRange() | Obtient une cellule ou une plage de cellules spécifique à partir d’une feuille de calcul. |
| Méthode Worksheet.insertArray() | Importe les données d'un tableau vers une feuille de calcul. |
| Classe CellRange | Représente une cellule ou une plage de cellules dans une feuille de calcul. |
| Méthode CellRange.setValue() | Définit la valeur d'une cellule. |
| Méthode CellRange.getValue() | Obtient la valeur d'une cellule. |
Voici les étapes pour créer un document Excel à partir de zéro à l’aide de Spire.XLS for Java.
- Créez un objet Workbook.
- Ajoutez une feuille de calcul à l’aide de la méthode Workbook.getWorksheets().add().
- Écrivez des données dans une cellule spécifique à l'aide de la méthode Worksheet.getRange.setValue().
- Importez les données d'un tableau vers la feuille de calcul à l'aide de la méthode Worksheet.insertArray().
- Enregistrez le classeur dans un document Excel à l'aide de la méthode Workbook.saveToFile().
- Java
import com.spire.xls.*;

    public class CreateSpreadsheet {

        public static void main(String[] args) {

            //Create a Workbook object
            Workbook wb = new Workbook();

            //Remove default worksheets
            wb.getWorksheets().clear();

            //Add a worksheet and name it "Employee"
            Worksheet sheet = wb.getWorksheets().add("Employee");

            //Merge the cells between A1 and G1
            sheet.getRange().get("A1:G1").merge();

            //Write data to A1 and apply formatting to it
            sheet.getRange().get("A1").setValue("Basic Information of Employees of Huanyu Automobile Company");
            sheet.getRange().get("A1").setHorizontalAlignment(HorizontalAlignType.Center);
            sheet.getRange().get("A1").setVerticalAlignment(VerticalAlignType.Center);
            sheet.getRange().get("A1").getStyle().getFont().isBold(true);
            sheet.getRange().get("A1").getStyle().getFont().setSize(13);

            //Set row height of the first row
            sheet.setRowHeight(1,30);

            //Create a two-dimensional array
            String[][] twoDimensionalArray = new String[][]{
                    {"Name", "Gender", "Birth Date", "Educational Background", "Contact Number", "Position", "ID"},
                    {"Allen", "Male", "1990-02-10", "Bachelor", "24756854", "Mechanic", "0021"},
                    {"Patrick", "Male", "1985-06-08", "Master", "59863247", "Mechanic", "0022"},
                    {"Jenna", "Female", "1989-11-25", "Bachelor", "79540352", "Sales", "0023"},
                    {"Tommy", "Male", "1988-04-16", "Master", "52014060", "Mechanic", "0024"},
                    {"Christina", "Female", "1998-01-21", "Bachelor", "35401489", "HR", "0025"}
            };

            //Import data from DataTable to worksheet
            sheet.insertArray(twoDimensionalArray,2,1);

            //Set row height of a range
            sheet.getRange().get("A2:G7").setRowHeight(15);

            //Set column width
            sheet.setColumnWidth(2,15);
            sheet.setColumnWidth(3,21);
            sheet.setColumnWidth(4,15);

            //Set border style of a range
            sheet.getRange().get("A2:G7").borderAround(LineStyleType.Medium);
            sheet.getRange().get("A2:G7").borderInside(LineStyleType.Thin);
            sheet.getRange().get("A2:G2").borderAround(LineStyleType.Medium);
            sheet.getRange().get("A2:G7").getBorders().setKnownColor(ExcelColors.Black);

            //Save to a .xlsx file
            wb.saveToFile("output/NewSpreadsheet.xlsx", FileFormat.Version2016);
        }
    }
Lire les données d'une feuille de calcul en Java
La méthode CellRange.getValue() renvoie la valeur numérique ou la valeur texte d'une cellule sous forme de chaîne. Pour obtenir les données d’une feuille de calcul entière ou d’une plage de cellules, parcourez les cellules qu’elle contient. Voici les étapes pour obtenir les données d'une feuille de calcul à l'aide de Spire.XLS for Java.
- Créez un objet Workbook.
- Chargez un document Excel à l'aide de la méthode Workbook.loadFromFile().
- Obtenez une feuille de calcul spécifique à l’aide de la méthode Workbook.getWorksheets().get(index).
- Obtenez la plage de cellules contenant les données à l’aide de la méthode Worksheet.getAllocatedRange().
- Parcourez les lignes et les colonnes pour obtenir les cellules dans la plage et renvoyez la valeur de chaque cellule à l'aide de la méthode CellRange.getValue().
- Java
import com.spire.xls.CellRange;
    import com.spire.xls.Workbook;
    import com.spire.xls.Worksheet;

    public class ReadData {

        public static void main(String[] args) {

            //Create a Workbook object
            Workbook wb = new Workbook();

            //Load an existing Excel file
            wb.loadFromFile("C:/Users/Administrator/Desktop/NewSpreadsheet.xlsx");

            //Get the first worksheet
            Worksheet sheet = wb.getWorksheets().get(0);

            //Get the cell range containing data
            CellRange locatedRange = sheet.getAllocatedRange();

            //Iterate through the rows
            for (int i = 0; i < locatedRange.getRows().length; i++) {

                //Iterate through the columns
                for (int j = 0; j < locatedRange.getColumnCount(); j++) {

                    //Get data of a specific cell
                    System.out.print(locatedRange.get(i + 1, j + 1).getValue() + "  ");
                }
                System.out.println();
            }
        }
    }
Mettre à jour un document Excel en Java
Pour modifier la valeur d'une certaine cellule, réattribuez-lui simplement une valeur à l'aide de la méthode Worksheet.getRange().setValue(). Voici les étapes détaillées.
- Créez un objet Workbook.
- Chargez un document Excel à l'aide de la méthode Workbook.LoadFromFile().
- Obtenez une feuille de calcul spécifique via la propriété Workbook.Worksheets[index].
- Modifiez la valeur d’une cellule particulière via la propriété Worksheet.Range.Value.
- Enregistrez le classeur dans un fichier Excel à l’aide de la méthode Workbook.SaveToFile().
- Java
import com.spire.xls.ExcelVersion;
    import com.spire.xls.Workbook;
    import com.spire.xls.Worksheet;

    public class UpdateExcel {

        public static void main(String[] args) {

            //Create a Workbook object
            Workbook wb = new Workbook();

            //Load an existing Excel file
            wb.loadFromFile("C:/Users/Administrator/Desktop/NewSpreadsheet.xlsx");

            //Get the first worksheet
            Worksheet sheet = wb.getWorksheets().get(0);

            //Change the value of a specific cell
            sheet.getRange().get("A1").setValue("Updated Value");

            //Save to file
            wb.saveToFile("output/Updated.xlsx", ExcelVersion.Version2016);
        }
    }
Demander une licence temporaire
Si vous souhaitez supprimer le message d'évaluation des documents générés ou vous débarrasser des limitations fonctionnelles, veuillez demander une licence d'essai de 30 jours pour toi.
Java: Write Data to Excel Worksheets
Table of Contents
Install with Maven
<dependency>
    <groupId>e-iceblue</groupId>
    <artifactId>spire.xls</artifactId>
    <version>14.1.3</version>
</dependency>
Related Links
Excel has the ability to store and organize large amounts of data into orderly spreadsheets quickly. But it is time-consuming if we manually enter data into cells one after another. Automating the creation of Excel files by programming can save us a lot of time and energy. This article introduces how to write data into Excel worksheets in Java by using Spire.XLS for Java.
- Write Text or Number Values to Specific Cells
- Write Arrays to a Worksheet
- Write a DataTable to a Worksheet
Install Spire.XLS for Java
First, you're required to add the Spire.Xls.jar file as a dependency in your Java program. The JAR file can be downloaded from this link. If you use Maven, you can easily import the JAR file in your application by adding the following code to your project's pom.xml file.
<repositories>
    <repository>
        <id>com.e-iceblue</id>
        <name>e-iceblue</name>
        <url>https://repo.e-iceblue.com/nexus/content/groups/public/</url>
    </repository>
</repositories>
<dependencies>
    <dependency>
        <groupId>e-iceblue</groupId>
        <artifactId>spire.xls</artifactId>
        <version>16.4.1</version>
    </dependency>
</dependencies>
Write Text or Number Values to Specific Cells
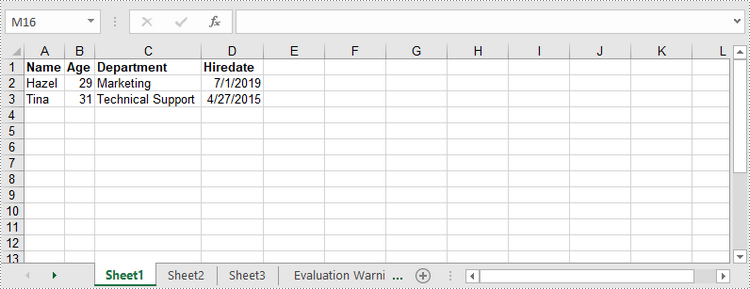
A certain cell in a worksheet can be accessed by Worksheet.get(int row, int column) method. Then, you can add a text value or a number value to the cell using the IXLSRange.setValue() or IXLSRange.setNumberValue() method. The following are the detailed steps.
- Create a Workbook object.
- Get the first worksheet using Workbook.getWorksheets().get() method.
- Get a specific cell using Workhseet.get() method.
- Add a text value or a number value to the cell using IXLSRange.setValue() or IXLSRange.setNumberValue() method.
- Save the workbook to an Excel file using Workbook.saveToFile() method.
- Java
import com.spire.xls.*;

    public class WriteToCells {

        public static void main(String[] args) {

            //Create a Workbook object
            Workbook workbook = new Workbook();

            //Get the first worksheet
            Worksheet worksheet = workbook.getWorksheets().get(0);

            //Write data to specific cells
            worksheet.get(1,1).setValue("Name");
            worksheet.get(1,2).setValue("Age");
            worksheet.get(1,3).setValue("Department");
            worksheet.get(1,4).setValue("Hiredate");
            worksheet.get(2,1).setValue("Hazel");
            worksheet.get(2,2).setNumberValue(29);
            worksheet.get(2,3).setValue("Marketing");
            worksheet.get(2,4).setValue("2019-07-01");
            worksheet.get(3,1).setValue("Tina");
            worksheet.get(3,2).setNumberValue(31);
            worksheet.get(3,3).setValue("Technical Support");
            worksheet.get(3,4).setValue("2015-04-27");

            //Auto fit column widths
            worksheet.getAllocatedRange().autoFitColumns();

            //Apply a style to the first row
            CellStyle style = workbook.getStyles().addStyle("newStyle");
            style.getFont().isBold(true);
            worksheet.getRange().get(1,1,1,4).setStyle(style);

            //Save to an Excel file
            workbook.saveToFile("output/WriteToCells.xlsx", ExcelVersion.Version2016);
        }
    }
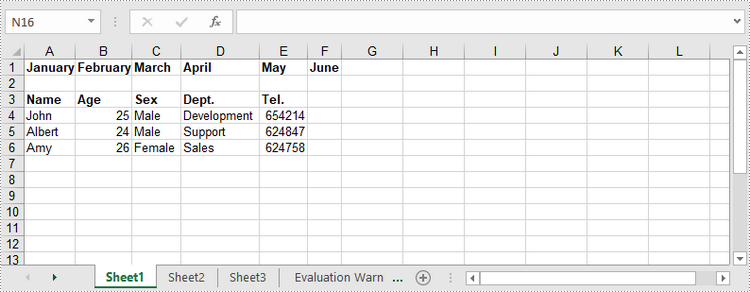
Write Arrays to a Worksheet
Spire.XLS for Java provides the Worksheet.insertArrary() method, allowing programmers to write one-dimensional array or two-dimensional array into the specified cell range of a worksheet. The steps to write arrays to a worksheet are as follows:
- Create a Workbook object.
- Get the first worksheet using Workbook.getWorksheets().get() method.
- Create a one-dimensional array and a two-dimensional array.
- Insert the arrays to worksheet using Worksheet.insertArray() method.
- Save the workbook to an Excel file using Workbook.saveToFile() method.
- Java
import com.spire.xls.*;

    public class WriteArrayToWorksheet {

        public static void main(String[] args) {

            //Create a Workbook instance
            Workbook workbook = new Workbook();

            //Get the first worksheet
            Worksheet worksheet = workbook.getWorksheets().get(0);

            //Create a one-dimensional array
            String[] oneDimensionalArray = new String[]{"January", "February", "March", "April","May", "June"};

            //Write the array to the first row of the worksheet
            worksheet.insertArray(oneDimensionalArray, 1, 1, false);

            //Create a two-dimensional array
            String[][] twoDimensionalArray = new String[][]{
                    {"Name", "Age", "Sex", "Dept.", "Tel."},
                    {"John", "25", "Male", "Development","654214"},
                    {"Albert", "24", "Male", "Support","624847"},
                    {"Amy", "26", "Female", "Sales","624758"}
            };

            //Write the array to the worksheet starting from the cell A3
            worksheet.insertArray(twoDimensionalArray, 3, 1);

            //Auto fit column width in the located range
            worksheet.getAllocatedRange().autoFitColumns();

            //Apply a style to the first and the third row
            CellStyle style = workbook.getStyles().addStyle("newStyle");
            style.getFont().isBold(true);
            worksheet.getRange().get(1,1,1,6).setStyle(style);
            worksheet.getRange().get(3,1,3,6).setStyle(style);

            //Save to an Excel file
            workbook.saveToFile("output/WriteArrays.xlsx", ExcelVersion.Version2016);
        }
    }
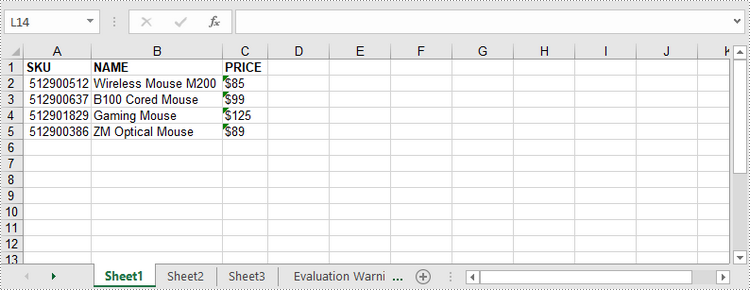
Write a DataTable to a Worksheet
To import data from a DataTable to a worksheet, use the Worksheet.insertDataTable() method. The following are the detailed steps.
- Create a Workbook object.
- Get the first worksheet using Workbook.getWorksheets().get() method.
- Create a DataTable, and write the DataTable to the worksheet at the specified location using Worksheet.insertDataTable() method.
- Save the workbook to an Excel file using Workbook.saveToFile() method.
- Java
import com.spire.data.table.DataRow;
    import com.spire.data.table.DataTable;
    import com.spire.xls.*;

    public class WriteDataTableToWorksheet {

        public static void main(String[] args) throws Exception {

            //Create a Workbook instance
            Workbook workbook = new Workbook();

            //Get the first worksheet
            Worksheet worksheet = workbook.getWorksheets().get(0);

            //Create a DataTable object
            DataTable dataTable = new DataTable();
            dataTable.getColumns().add("SKU", Integer.class);
            dataTable.getColumns().add("NAME", String.class);
            dataTable.getColumns().add("PRICE", String.class);

            //Create rows and add data
            DataRow dr = dataTable.newRow();
            dr.setInt(0, 512900512);
            dr.setString(1,"Wireless Mouse M200");
            dr.setString(2,"$85");
            dataTable.getRows().add(dr);
            dr = dataTable.newRow();
            dr.setInt(0,512900637);
            dr.setString(1,"B100 Cored Mouse ");
            dr.setString(2,"$99");
            dataTable.getRows().add(dr);
            dr = dataTable.newRow();
            dr.setInt(0,512901829);
            dr.setString(1,"Gaming Mouse");
            dr.setString(2,"$125");
            dataTable.getRows().add(dr);
            dr = dataTable.newRow();
            dr.setInt(0,512900386);
            dr.setString(1,"ZM Optical Mouse");
            dr.setString(2,"$89");
            dataTable.getRows().add(dr);

            //Write datatable to the worksheet
            worksheet.insertDataTable(dataTable,true,1,1,true);

            //Auto fit column width in the located range
            worksheet.getAllocatedRange().autoFitColumns();

            //Apply a style to the first row
            CellStyle style = workbook.getStyles().addStyle("newStyle");
            style.getFont().isBold(true);
            worksheet.getRange().get(1,1,1,3).setStyle(style);

            //Save to an Excel file
            workbook.saveToFile("output/WriteDataTable.xlsx", ExcelVersion.Version2016);
        }
    }
Apply for a Temporary License
If you'd like to remove the evaluation message from the generated documents, or to get rid of the function limitations, please request a 30-day trial license for yourself.
Java: gravar dados em planilhas do Excel
Índice
Instalar com Maven
<dependency>
    <groupId>e-iceblue</groupId>
    <artifactId>spire.xls</artifactId>
    <version>14.1.3</version>
</dependency>
Links Relacionados
O Excel tem a capacidade de armazenar e organizar rapidamente grandes quantidades de dados em planilhas ordenadas. Mas é demorado inserir manualmente os dados nas células, um após o outro. Automatizar a criação de arquivos Excel por meio de programação pode nos poupar muito tempo e energia. Este artigo apresenta como gravar dados em planilhas do Excel em Java usando Spire.XLS for Java.
- Escreva valores de texto ou números em células específicas
- Escreva matrizes em uma planilha
- Escreva um DataTable em uma planilha
Instale Spire.XLS for Java
Primeiro, é necessário adicionar o arquivo Spire.Xls.jar como uma dependência em seu programa Java. O arquivo JAR pode ser baixado neste link. Se você usa Maven, pode importar facilmente o arquivo JAR em seu aplicativo adicionando o código a seguir ao arquivo pom.xml do seu projeto.
<repositories>
    <repository>
        <id>com.e-iceblue</id>
        <name>e-iceblue</name>
        <url>https://repo.e-iceblue.com/nexus/content/groups/public/</url>
    </repository>
</repositories>
<dependencies>
    <dependency>
        <groupId>e-iceblue</groupId>
        <artifactId>spire.xls</artifactId>
        <version>16.4.1</version>
    </dependency>
</dependencies>
Escreva valores de texto ou números em células específicas
Uma determinada célula em uma planilha pode ser acessada pelo método Worksheet.get(int row, int column). Em seguida, você pode adicionar um valor de texto ou um valor numérico à célula usando o método IXLSRange.setValue() ou IXLSRange.setNumberValue(). A seguir estão as etapas detalhadas.
- Crie um objeto Pasta de trabalho.
- Obtenha a primeira planilha usando o método Workbook.getWorksheets().get().
- Obtenha uma célula específica usando o método Workhseet.get().
- Adicione um valor de texto ou um valor numérico à célula usando o método IXLSRange.setValue() ou IXLSRange.setNumberValue().
- Salve a pasta de trabalho em um arquivo Excel usando o método Workbook.saveToFile().
- Java
import com.spire.xls.*;

    public class WriteToCells {

        public static void main(String[] args) {

            //Create a Workbook object
            Workbook workbook = new Workbook();

            //Get the first worksheet
            Worksheet worksheet = workbook.getWorksheets().get(0);

            //Write data to specific cells
            worksheet.get(1,1).setValue("Name");
            worksheet.get(1,2).setValue("Age");
            worksheet.get(1,3).setValue("Department");
            worksheet.get(1,4).setValue("Hiredate");
            worksheet.get(2,1).setValue("Hazel");
            worksheet.get(2,2).setNumberValue(29);
            worksheet.get(2,3).setValue("Marketing");
            worksheet.get(2,4).setValue("2019-07-01");
            worksheet.get(3,1).setValue("Tina");
            worksheet.get(3,2).setNumberValue(31);
            worksheet.get(3,3).setValue("Technical Support");
            worksheet.get(3,4).setValue("2015-04-27");

            //Auto fit column widths
            worksheet.getAllocatedRange().autoFitColumns();

            //Apply a style to the first row
            CellStyle style = workbook.getStyles().addStyle("newStyle");
            style.getFont().isBold(true);
            worksheet.getRange().get(1,1,1,4).setStyle(style);

            //Save to an Excel file
            workbook.saveToFile("output/WriteToCells.xlsx", ExcelVersion.Version2016);
        }
    }
Escreva matrizes em uma planilha
Spire.XLS for Java fornece o método Worksheet.insertArrary(), permitindo aos programadores escrever um array unidimensional ou bidimensional no intervalo de células especificado de uma planilha. As etapas para gravar matrizes em uma planilha são as seguintes:
- Crie um objeto Pasta de trabalho.
- Obtenha a primeira planilha usando o método Workbook.getWorksheets().get().
- Crie uma matriz unidimensional e uma matriz bidimensional.
- Insira os arrays na planilha usando o método Worksheet.insertArray().
- Salve a pasta de trabalho em um arquivo Excel usando o método Workbook.saveToFile().
- Java
import com.spire.xls.*;

    public class WriteArrayToWorksheet {

        public static void main(String[] args) {

            //Create a Workbook instance
            Workbook workbook = new Workbook();

            //Get the first worksheet
            Worksheet worksheet = workbook.getWorksheets().get(0);

            //Create a one-dimensional array
            String[] oneDimensionalArray = new String[]{"January", "February", "March", "April","May", "June"};

            //Write the array to the first row of the worksheet
            worksheet.insertArray(oneDimensionalArray, 1, 1, false);

            //Create a two-dimensional array
            String[][] twoDimensionalArray = new String[][]{
                    {"Name", "Age", "Sex", "Dept.", "Tel."},
                    {"John", "25", "Male", "Development","654214"},
                    {"Albert", "24", "Male", "Support","624847"},
                    {"Amy", "26", "Female", "Sales","624758"}
            };

            //Write the array to the worksheet starting from the cell A3
            worksheet.insertArray(twoDimensionalArray, 3, 1);

            //Auto fit column width in the located range
            worksheet.getAllocatedRange().autoFitColumns();

            //Apply a style to the first and the third row
            CellStyle style = workbook.getStyles().addStyle("newStyle");
            style.getFont().isBold(true);
            worksheet.getRange().get(1,1,1,6).setStyle(style);
            worksheet.getRange().get(3,1,3,6).setStyle(style);

            //Save to an Excel file
            workbook.saveToFile("output/WriteArrays.xlsx", ExcelVersion.Version2016);
        }
    }
Escreva um DataTable em uma planilha
Para importar dados de um DataTable para uma planilha, use o método Worksheet.insertDataTable(). A seguir estão as etapas detalhadas.
- Crie um objeto Pasta de trabalho.
- Obtenha a primeira planilha usando o método Workbook.getWorksheets().get().
- Crie um DataTable e grave-o na planilha no local especificado usando o método Worksheet.insertDataTable().
- Salve a pasta de trabalho em um arquivo Excel usando o método Workbook.saveToFile().
- Java
import com.spire.data.table.DataRow;
    import com.spire.data.table.DataTable;
    import com.spire.xls.*;

    public class WriteDataTableToWorksheet {

        public static void main(String[] args) throws Exception {

            //Create a Workbook instance
            Workbook workbook = new Workbook();

            //Get the first worksheet
            Worksheet worksheet = workbook.getWorksheets().get(0);

            //Create a DataTable object
            DataTable dataTable = new DataTable();
            dataTable.getColumns().add("SKU", Integer.class);
            dataTable.getColumns().add("NAME", String.class);
            dataTable.getColumns().add("PRICE", String.class);

            //Create rows and add data
            DataRow dr = dataTable.newRow();
            dr.setInt(0, 512900512);
            dr.setString(1,"Wireless Mouse M200");
            dr.setString(2,"$85");
            dataTable.getRows().add(dr);
            dr = dataTable.newRow();
            dr.setInt(0,512900637);
            dr.setString(1,"B100 Cored Mouse ");
            dr.setString(2,"$99");
            dataTable.getRows().add(dr);
            dr = dataTable.newRow();
            dr.setInt(0,512901829);
            dr.setString(1,"Gaming Mouse");
            dr.setString(2,"$125");
            dataTable.getRows().add(dr);
            dr = dataTable.newRow();
            dr.setInt(0,512900386);
            dr.setString(1,"ZM Optical Mouse");
            dr.setString(2,"$89");
            dataTable.getRows().add(dr);

            //Write datatable to the worksheet
            worksheet.insertDataTable(dataTable,true,1,1,true);

            //Auto fit column width in the located range
            worksheet.getAllocatedRange().autoFitColumns();

            //Apply a style to the first row
            CellStyle style = workbook.getStyles().addStyle("newStyle");
            style.getFont().isBold(true);
            worksheet.getRange().get(1,1,1,3).setStyle(style);

            //Save to an Excel file
            workbook.saveToFile("output/WriteDataTable.xlsx", ExcelVersion.Version2016);
        }
    }
Solicite uma licença temporária
Se desejar remover a mensagem de avaliação dos documentos gerados ou se livrar das limitações de função, por favor solicite uma licença de teste de 30 dias para você mesmo.
Java: запись данных в листы Excel
Оглавление
Установить с помощью Maven
<dependency>
    <groupId>e-iceblue</groupId>
    <artifactId>spire.xls</artifactId>
    <version>14.1.3</version>
</dependency>
Ссылки по теме
Excel позволяет быстро хранить и систематизировать большие объемы данных в упорядоченные электронные таблицы. Но это отнимает много времени, если мы вручную вводим данные в ячейки одну за другой. Автоматизация создания файлов Excel с помощью программирования может сэкономить нам много времени и энергии. В этой статье рассказывается, как записывать данные в листы Excel на Java с помощью Spire.XLS for Java.
- Запись текстовых или числовых значений в определенные ячейки
- Запись массивов на лист
- Запись DataTable на лист
Установите Spire.XLS for Java
Во-первых, вам необходимо добавить файл Spire.Xls.jar в качестве зависимости в вашу программу Java. JAR-файл можно скачать по этой ссылке. Если вы используете Maven, вы можете легко импортировать файл JAR в свое приложение, добавив следующий код в файл pom.xml вашего проекта.
<repositories>
    <repository>
        <id>com.e-iceblue</id>
        <name>e-iceblue</name>
        <url>https://repo.e-iceblue.com/nexus/content/groups/public/</url>
    </repository>
</repositories>
<dependencies>
    <dependency>
        <groupId>e-iceblue</groupId>
        <artifactId>spire.xls</artifactId>
        <version>16.4.1</version>
    </dependency>
</dependencies>
Запись текстовых или числовых значений в определенные ячейки
Доступ к определенной ячейке на листе можно получить с помощью метода Worksheet.get(int row, int columns). Затем вы можете добавить в ячейку текстовое или числовое значение с помощью метода IXLSRange.setValue() или IXLSRange.setNumberValue(). Ниже приведены подробные шаги.
- Создайте объект книги.
- Получите первый лист, используя метод Workbook.getWorksheets().get().
- Получите конкретную ячейку, используя метод Workhseet.get().
- Добавьте текстовое или числовое значение в ячейку с помощью метода IXLSRange.setValue() или IXLSRange.setNumberValue().
- Сохраните книгу в файл Excel, используя метод Workbook.saveToFile().
- Java
import com.spire.xls.*;

    public class WriteToCells {

        public static void main(String[] args) {

            //Create a Workbook object
            Workbook workbook = new Workbook();

            //Get the first worksheet
            Worksheet worksheet = workbook.getWorksheets().get(0);

            //Write data to specific cells
            worksheet.get(1,1).setValue("Name");
            worksheet.get(1,2).setValue("Age");
            worksheet.get(1,3).setValue("Department");
            worksheet.get(1,4).setValue("Hiredate");
            worksheet.get(2,1).setValue("Hazel");
            worksheet.get(2,2).setNumberValue(29);
            worksheet.get(2,3).setValue("Marketing");
            worksheet.get(2,4).setValue("2019-07-01");
            worksheet.get(3,1).setValue("Tina");
            worksheet.get(3,2).setNumberValue(31);
            worksheet.get(3,3).setValue("Technical Support");
            worksheet.get(3,4).setValue("2015-04-27");

            //Auto fit column widths
            worksheet.getAllocatedRange().autoFitColumns();

            //Apply a style to the first row
            CellStyle style = workbook.getStyles().addStyle("newStyle");
            style.getFont().isBold(true);
            worksheet.getRange().get(1,1,1,4).setStyle(style);

            //Save to an Excel file
            workbook.saveToFile("output/WriteToCells.xlsx", ExcelVersion.Version2016);
        }
    }
Запись массивов на лист
Spire.XLS for Java предоставляет метод Worksheet.insertArrary(), позволяющий программистам записывать одномерный или двумерный массив в указанный диапазон ячеек рабочего листа. Шаги по записи массивов на лист следующие:
- Создайте объект книги.
- Получите первый лист, используя метод Workbook.getWorksheets().get().
- Создайте одномерный массив и двумерный массив.
- Вставьте массивы на рабочий лист, используя метод Worksheet.insertArray().
- Сохраните книгу в файл Excel, используя метод Workbook.saveToFile().
- Java
import com.spire.xls.*;

    public class WriteArrayToWorksheet {

        public static void main(String[] args) {

            //Create a Workbook instance
            Workbook workbook = new Workbook();

            //Get the first worksheet
            Worksheet worksheet = workbook.getWorksheets().get(0);

            //Create a one-dimensional array
            String[] oneDimensionalArray = new String[]{"January", "February", "March", "April","May", "June"};

            //Write the array to the first row of the worksheet
            worksheet.insertArray(oneDimensionalArray, 1, 1, false);

            //Create a two-dimensional array
            String[][] twoDimensionalArray = new String[][]{
                    {"Name", "Age", "Sex", "Dept.", "Tel."},
                    {"John", "25", "Male", "Development","654214"},
                    {"Albert", "24", "Male", "Support","624847"},
                    {"Amy", "26", "Female", "Sales","624758"}
            };

            //Write the array to the worksheet starting from the cell A3
            worksheet.insertArray(twoDimensionalArray, 3, 1);

            //Auto fit column width in the located range
            worksheet.getAllocatedRange().autoFitColumns();

            //Apply a style to the first and the third row
            CellStyle style = workbook.getStyles().addStyle("newStyle");
            style.getFont().isBold(true);
            worksheet.getRange().get(1,1,1,6).setStyle(style);
            worksheet.getRange().get(3,1,3,6).setStyle(style);

            //Save to an Excel file
            workbook.saveToFile("output/WriteArrays.xlsx", ExcelVersion.Version2016);
        }
    }
Запись DataTable на лист
Чтобы импортировать данные из DataTable на лист, используйте метод Worksheet.insertDataTable(). Ниже приведены подробные шаги.
- Создайте объект книги.
- Получите первый лист, используя метод Workbook.getWorksheets().get().
- Создайте DataTable и запишите DataTable на лист в указанном месте с помощью метода Worksheet.insertDataTable().
- Сохраните книгу в файл Excel, используя метод Workbook.saveToFile().
- Java
import com.spire.data.table.DataRow;
    import com.spire.data.table.DataTable;
    import com.spire.xls.*;

    public class WriteDataTableToWorksheet {

        public static void main(String[] args) throws Exception {

            //Create a Workbook instance
            Workbook workbook = new Workbook();

            //Get the first worksheet
            Worksheet worksheet = workbook.getWorksheets().get(0);

            //Create a DataTable object
            DataTable dataTable = new DataTable();
            dataTable.getColumns().add("SKU", Integer.class);
            dataTable.getColumns().add("NAME", String.class);
            dataTable.getColumns().add("PRICE", String.class);

            //Create rows and add data
            DataRow dr = dataTable.newRow();
            dr.setInt(0, 512900512);
            dr.setString(1,"Wireless Mouse M200");
            dr.setString(2,"$85");
            dataTable.getRows().add(dr);
            dr = dataTable.newRow();
            dr.setInt(0,512900637);
            dr.setString(1,"B100 Cored Mouse ");
            dr.setString(2,"$99");
            dataTable.getRows().add(dr);
            dr = dataTable.newRow();
            dr.setInt(0,512901829);
            dr.setString(1,"Gaming Mouse");
            dr.setString(2,"$125");
            dataTable.getRows().add(dr);
            dr = dataTable.newRow();
            dr.setInt(0,512900386);
            dr.setString(1,"ZM Optical Mouse");
            dr.setString(2,"$89");
            dataTable.getRows().add(dr);

            //Write datatable to the worksheet
            worksheet.insertDataTable(dataTable,true,1,1,true);

            //Auto fit column width in the located range
            worksheet.getAllocatedRange().autoFitColumns();

            //Apply a style to the first row
            CellStyle style = workbook.getStyles().addStyle("newStyle");
            style.getFont().isBold(true);
            worksheet.getRange().get(1,1,1,3).setStyle(style);

            //Save to an Excel file
            workbook.saveToFile("output/WriteDataTable.xlsx", ExcelVersion.Version2016);
        }
    }
Подать заявку на временную лицензию
Если вы хотите удалить сообщение об оценке из сгенерированных документов или избавиться от ограничений функции, пожалуйста запросите 30-дневную пробную лицензию для себя.
Java: Daten in Excel-Arbeitsblätter schreiben
Inhaltsverzeichnis
Mit Maven installieren
<dependency>
    <groupId>e-iceblue</groupId>
    <artifactId>spire.xls</artifactId>
    <version>14.1.3</version>
</dependency>
verwandte Links
Excel bietet die Möglichkeit, große Datenmengen schnell in übersichtlichen Tabellen zu speichern und zu organisieren. Es ist jedoch zeitaufwändig, wenn wir Daten nacheinander manuell in Zellen eingeben. Die Automatisierung der Erstellung von Excel-Dateien durch Programmierung kann uns viel Zeit und Energie sparen. In diesem Artikel erfahren Sie, wie das geht Schreiben Sie Daten in Excel-Arbeitsblätter in Java, indem Sie Spire.XLS for Javaverwenden.
- Schreiben Sie Text- oder Zahlenwerte in bestimmte Zellen
- Schreiben Sie Arrays in ein Arbeitsblatt
- Schreiben Sie eine Datentabelle in ein Arbeitsblatt
Installieren Sie Spire.XLS for Java
Zunächst müssen Sie die Datei Spire.Xls.jar als Abhängigkeit zu Ihrem Java-Programm hinzufügen. Die JAR-Datei kann über diesen Link heruntergeladen werden. Wenn Sie Maven verwenden, können Sie die JAR-Datei einfach in Ihre Anwendung importieren, indem Sie den folgenden Code zur pom.xml-Datei Ihres Projekts hinzufügen.
<repositories>
    <repository>
        <id>com.e-iceblue</id>
        <name>e-iceblue</name>
        <url>https://repo.e-iceblue.com/nexus/content/groups/public/</url>
    </repository>
</repositories>
<dependencies>
    <dependency>
        <groupId>e-iceblue</groupId>
        <artifactId>spire.xls</artifactId>
        <version>16.4.1</version>
    </dependency>
</dependencies>
Schreiben Sie Text- oder Zahlenwerte in bestimmte Zellen
Auf eine bestimmte Zelle in einem Arbeitsblatt kann mit der Methode Worksheet.get(int row, int Column) zugegriffen werden. Anschließend können Sie der Zelle mit der Methode IXLSRange.setValue() oder IXLSRange.setNumberValue() einen Textwert oder einen Zahlenwert hinzufügen. Im Folgenden finden Sie die detaillierten Schritte.
- Erstellen Sie ein Workbook-Objekt.
- Rufen Sie das erste Arbeitsblatt mit der Methode Workbook.getWorksheets().get() ab.
- Rufen Sie eine bestimmte Zelle mit der Methode Workhseet.get() ab.
- Fügen Sie der Zelle mit der Methode IXLSRange.setValue() oder IXLSRange.setNumberValue() einen Textwert oder einen Zahlenwert hinzu.
- Speichern Sie die Arbeitsmappe mit der Methode Workbook.saveToFile() in einer Excel-Datei.
- Java
import com.spire.xls.*;

    public class WriteToCells {

        public static void main(String[] args) {

            //Create a Workbook object
            Workbook workbook = new Workbook();

            //Get the first worksheet
            Worksheet worksheet = workbook.getWorksheets().get(0);

            //Write data to specific cells
            worksheet.get(1,1).setValue("Name");
            worksheet.get(1,2).setValue("Age");
            worksheet.get(1,3).setValue("Department");
            worksheet.get(1,4).setValue("Hiredate");
            worksheet.get(2,1).setValue("Hazel");
            worksheet.get(2,2).setNumberValue(29);
            worksheet.get(2,3).setValue("Marketing");
            worksheet.get(2,4).setValue("2019-07-01");
            worksheet.get(3,1).setValue("Tina");
            worksheet.get(3,2).setNumberValue(31);
            worksheet.get(3,3).setValue("Technical Support");
            worksheet.get(3,4).setValue("2015-04-27");

            //Auto fit column widths
            worksheet.getAllocatedRange().autoFitColumns();

            //Apply a style to the first row
            CellStyle style = workbook.getStyles().addStyle("newStyle");
            style.getFont().isBold(true);
            worksheet.getRange().get(1,1,1,4).setStyle(style);

            //Save to an Excel file
            workbook.saveToFile("output/WriteToCells.xlsx", ExcelVersion.Version2016);
        }
    }
Schreiben Sie Arrays in ein Arbeitsblatt
Spire.XLS for Java bietet die Methode Worksheet.insertArrary(), mit der Programmierer eindimensionale Arrays oder zweidimensionale Arrays in den angegebenen Zellbereich eines Arbeitsblatts schreiben können. Die Schritte zum Schreiben von Arrays in ein Arbeitsblatt sind wie folgt:
- Erstellen Sie ein Workbook-Objekt.
- Rufen Sie das erste Arbeitsblatt mit der Methode Workbook.getWorksheets().get() ab.
- Erstellen Sie ein eindimensionales Array und ein zweidimensionales Array.
- Fügen Sie die Arrays mit der Methode Worksheet.insertArray() in das Arbeitsblatt ein.
- Speichern Sie die Arbeitsmappe mit der Methode Workbook.saveToFile() in einer Excel-Datei.
- Java
import com.spire.xls.*;

    public class WriteArrayToWorksheet {

        public static void main(String[] args) {

            //Create a Workbook instance
            Workbook workbook = new Workbook();

            //Get the first worksheet
            Worksheet worksheet = workbook.getWorksheets().get(0);

            //Create a one-dimensional array
            String[] oneDimensionalArray = new String[]{"January", "February", "March", "April","May", "June"};

            //Write the array to the first row of the worksheet
            worksheet.insertArray(oneDimensionalArray, 1, 1, false);

            //Create a two-dimensional array
            String[][] twoDimensionalArray = new String[][]{
                    {"Name", "Age", "Sex", "Dept.", "Tel."},
                    {"John", "25", "Male", "Development","654214"},
                    {"Albert", "24", "Male", "Support","624847"},
                    {"Amy", "26", "Female", "Sales","624758"}
            };

            //Write the array to the worksheet starting from the cell A3
            worksheet.insertArray(twoDimensionalArray, 3, 1);

            //Auto fit column width in the located range
            worksheet.getAllocatedRange().autoFitColumns();

            //Apply a style to the first and the third row
            CellStyle style = workbook.getStyles().addStyle("newStyle");
            style.getFont().isBold(true);
            worksheet.getRange().get(1,1,1,6).setStyle(style);
            worksheet.getRange().get(3,1,3,6).setStyle(style);

            //Save to an Excel file
            workbook.saveToFile("output/WriteArrays.xlsx", ExcelVersion.Version2016);
        }
    }
Schreiben Sie eine Datentabelle in ein Arbeitsblatt
Um Daten aus einer DataTable in ein Arbeitsblatt zu importieren, verwenden Sie die Methode Worksheet.insertDataTable(). Im Folgenden finden Sie die detaillierten Schritte.
- Erstellen Sie ein Workbook-Objekt.
- Rufen Sie das erste Arbeitsblatt mit der Methode Workbook.getWorksheets().get() ab.
- Erstellen Sie eine Datentabelle und schreiben Sie die Datentabelle mit der Methode Worksheet.insertDataTable() an der angegebenen Stelle in das Arbeitsblatt.
- Speichern Sie die Arbeitsmappe mit der Methode Workbook.saveToFile() in einer Excel-Datei.
- Java
import com.spire.data.table.DataRow;
    import com.spire.data.table.DataTable;
    import com.spire.xls.*;

    public class WriteDataTableToWorksheet {

        public static void main(String[] args) throws Exception {

            //Create a Workbook instance
            Workbook workbook = new Workbook();

            //Get the first worksheet
            Worksheet worksheet = workbook.getWorksheets().get(0);

            //Create a DataTable object
            DataTable dataTable = new DataTable();
            dataTable.getColumns().add("SKU", Integer.class);
            dataTable.getColumns().add("NAME", String.class);
            dataTable.getColumns().add("PRICE", String.class);

            //Create rows and add data
            DataRow dr = dataTable.newRow();
            dr.setInt(0, 512900512);
            dr.setString(1,"Wireless Mouse M200");
            dr.setString(2,"$85");
            dataTable.getRows().add(dr);
            dr = dataTable.newRow();
            dr.setInt(0,512900637);
            dr.setString(1,"B100 Cored Mouse ");
            dr.setString(2,"$99");
            dataTable.getRows().add(dr);
            dr = dataTable.newRow();
            dr.setInt(0,512901829);
            dr.setString(1,"Gaming Mouse");
            dr.setString(2,"$125");
            dataTable.getRows().add(dr);
            dr = dataTable.newRow();
            dr.setInt(0,512900386);
            dr.setString(1,"ZM Optical Mouse");
            dr.setString(2,"$89");
            dataTable.getRows().add(dr);

            //Write datatable to the worksheet
            worksheet.insertDataTable(dataTable,true,1,1,true);

            //Auto fit column width in the located range
            worksheet.getAllocatedRange().autoFitColumns();

            //Apply a style to the first row
            CellStyle style = workbook.getStyles().addStyle("newStyle");
            style.getFont().isBold(true);
            worksheet.getRange().get(1,1,1,3).setStyle(style);

            //Save to an Excel file
            workbook.saveToFile("output/WriteDataTable.xlsx", ExcelVersion.Version2016);
        }
    }
Beantragen Sie eine temporäre Lizenz
Wenn Sie die Bewertungsmeldung aus den generierten Dokumenten entfernen oder die Funktionseinschränkungen beseitigen möchten, wenden Sie sich bitte an uns Fordern Sie eine 30-Tage-Testlizenz an für sich selbst.
Java: escribir datos en hojas de cálculo de Excel
Tabla de contenido
Instalar con Maven
<dependency>
    <groupId>e-iceblue</groupId>
    <artifactId>spire.xls</artifactId>
    <version>14.1.3</version>
</dependency>
enlaces relacionados
Excel tiene la capacidad de almacenar y organizar rápidamente grandes cantidades de datos en hojas de cálculo ordenadas. Pero lleva mucho tiempo si ingresamos datos manualmente en las celdas, una tras otra. Automatizar la creación de archivos Excel mediante programación puede ahorrarnos mucho tiempo y energía. Este artículo presenta cómo escriba datos en hojas de cálculo de Excel en Java utilizando Spire.XLS for Java.
- Escribir valores de texto o números en celdas específicas
- Escribir matrices en una hoja de trabajo
- Escribir una tabla de datos en una hoja de trabajo
Instalar Spire.XLS for Java
Primero, debe agregar el archivo Spire.Xls.jar como una dependencia en su programa Java. El archivo JAR se puede descargar desde este enlace. Si usa Maven, puede importar fácilmente el archivo JAR en su aplicación agregando el siguiente código al archivo pom.xml de su proyecto.
<repositories>
    <repository>
        <id>com.e-iceblue</id>
        <name>e-iceblue</name>
        <url>https://repo.e-iceblue.com/nexus/content/groups/public/</url>
    </repository>
</repositories>
<dependencies>
    <dependency>
        <groupId>e-iceblue</groupId>
        <artifactId>spire.xls</artifactId>
        <version>16.4.1</version>
    </dependency>
</dependencies>
Escribir valores de texto o números en celdas específicas
Se puede acceder a una determinada celda de una hoja de trabajo mediante el método Worksheet.get(int fila, int columna). Luego, puede agregar un valor de texto o un valor numérico a la celda usando el método IXLSRange.setValue() o IXLSRange.setNumberValue(). Los siguientes son los pasos detallados.
- Cree un objeto de libro de trabajo.
- Obtenga la primera hoja de trabajo utilizando el método Workbook.getWorksheets().get().
- Obtenga una celda específica usando el método Workhseet.get().
- Agregue un valor de texto o un valor numérico a la celda usando el método IXLSRange.setValue() o IXLSRange.setNumberValue().
- Guarde el libro en un archivo de Excel utilizando el método Workbook.saveToFile().
- Java
import com.spire.xls.*;

    public class WriteToCells {

        public static void main(String[] args) {

            //Create a Workbook object
            Workbook workbook = new Workbook();

            //Get the first worksheet
            Worksheet worksheet = workbook.getWorksheets().get(0);

            //Write data to specific cells
            worksheet.get(1,1).setValue("Name");
            worksheet.get(1,2).setValue("Age");
            worksheet.get(1,3).setValue("Department");
            worksheet.get(1,4).setValue("Hiredate");
            worksheet.get(2,1).setValue("Hazel");
            worksheet.get(2,2).setNumberValue(29);
            worksheet.get(2,3).setValue("Marketing");
            worksheet.get(2,4).setValue("2019-07-01");
            worksheet.get(3,1).setValue("Tina");
            worksheet.get(3,2).setNumberValue(31);
            worksheet.get(3,3).setValue("Technical Support");
            worksheet.get(3,4).setValue("2015-04-27");

            //Auto fit column widths
            worksheet.getAllocatedRange().autoFitColumns();

            //Apply a style to the first row
            CellStyle style = workbook.getStyles().addStyle("newStyle");
            style.getFont().isBold(true);
            worksheet.getRange().get(1,1,1,4).setStyle(style);

            //Save to an Excel file
            workbook.saveToFile("output/WriteToCells.xlsx", ExcelVersion.Version2016);
        }
    }
Escribir matrices en una hoja de trabajo
Spire.XLS for Java proporciona el método Worksheet.insertArrary(), que permite a los programadores escribir una matriz unidimensional o una matriz bidimensional en el rango de celdas especificado de una hoja de trabajo. Los pasos para escribir matrices en una hoja de trabajo son los siguientes:
- Cree un objeto de libro de trabajo.
- Obtenga la primera hoja de trabajo utilizando el método Workbook.getWorksheets().get().
- Cree una matriz unidimensional y una matriz bidimensional.
- Inserte las matrices en la hoja de trabajo usando el método Worksheet.insertArray().
- Guarde el libro en un archivo de Excel utilizando el método Workbook.saveToFile().
- Java
import com.spire.xls.*;

    public class WriteArrayToWorksheet {

        public static void main(String[] args) {

            //Create a Workbook instance
            Workbook workbook = new Workbook();

            //Get the first worksheet
            Worksheet worksheet = workbook.getWorksheets().get(0);

            //Create a one-dimensional array
            String[] oneDimensionalArray = new String[]{"January", "February", "March", "April","May", "June"};

            //Write the array to the first row of the worksheet
            worksheet.insertArray(oneDimensionalArray, 1, 1, false);

            //Create a two-dimensional array
            String[][] twoDimensionalArray = new String[][]{
                    {"Name", "Age", "Sex", "Dept.", "Tel."},
                    {"John", "25", "Male", "Development","654214"},
                    {"Albert", "24", "Male", "Support","624847"},
                    {"Amy", "26", "Female", "Sales","624758"}
            };

            //Write the array to the worksheet starting from the cell A3
            worksheet.insertArray(twoDimensionalArray, 3, 1);

            //Auto fit column width in the located range
            worksheet.getAllocatedRange().autoFitColumns();

            //Apply a style to the first and the third row
            CellStyle style = workbook.getStyles().addStyle("newStyle");
            style.getFont().isBold(true);
            worksheet.getRange().get(1,1,1,6).setStyle(style);
            worksheet.getRange().get(3,1,3,6).setStyle(style);

            //Save to an Excel file
            workbook.saveToFile("output/WriteArrays.xlsx", ExcelVersion.Version2016);
        }
    }
Escribir una tabla de datos en una hoja de trabajo
Para importar datos de una tabla de datos a una hoja de trabajo, utilice el método Worksheet.insertDataTable(). Los siguientes son los pasos detallados.
- Cree un objeto de libro de trabajo.
- Obtenga la primera hoja de trabajo utilizando el método Workbook.getWorksheets().get().
- Cree una tabla de datos y escriba la tabla de datos en la hoja de trabajo en la ubicación especificada utilizando el método Worksheet.insertDataTable().
- Guarde el libro en un archivo de Excel utilizando el método Workbook.saveToFile().
- Java
import com.spire.data.table.DataRow;
    import com.spire.data.table.DataTable;
    import com.spire.xls.*;

    public class WriteDataTableToWorksheet {

        public static void main(String[] args) throws Exception {

            //Create a Workbook instance
            Workbook workbook = new Workbook();

            //Get the first worksheet
            Worksheet worksheet = workbook.getWorksheets().get(0);

            //Create a DataTable object
            DataTable dataTable = new DataTable();
            dataTable.getColumns().add("SKU", Integer.class);
            dataTable.getColumns().add("NAME", String.class);
            dataTable.getColumns().add("PRICE", String.class);

            //Create rows and add data
            DataRow dr = dataTable.newRow();
            dr.setInt(0, 512900512);
            dr.setString(1,"Wireless Mouse M200");
            dr.setString(2,"$85");
            dataTable.getRows().add(dr);
            dr = dataTable.newRow();
            dr.setInt(0,512900637);
            dr.setString(1,"B100 Cored Mouse ");
            dr.setString(2,"$99");
            dataTable.getRows().add(dr);
            dr = dataTable.newRow();
            dr.setInt(0,512901829);
            dr.setString(1,"Gaming Mouse");
            dr.setString(2,"$125");
            dataTable.getRows().add(dr);
            dr = dataTable.newRow();
            dr.setInt(0,512900386);
            dr.setString(1,"ZM Optical Mouse");
            dr.setString(2,"$89");
            dataTable.getRows().add(dr);

            //Write datatable to the worksheet
            worksheet.insertDataTable(dataTable,true,1,1,true);

            //Auto fit column width in the located range
            worksheet.getAllocatedRange().autoFitColumns();

            //Apply a style to the first row
            CellStyle style = workbook.getStyles().addStyle("newStyle");
            style.getFont().isBold(true);
            worksheet.getRange().get(1,1,1,3).setStyle(style);

            //Save to an Excel file
            workbook.saveToFile("output/WriteDataTable.xlsx", ExcelVersion.Version2016);
        }
    }
Solicitar una licencia temporal
Si desea eliminar el mensaje de evaluación de los documentos generados o deshacerse de las limitaciones de la función, por favor solicitar una licencia de prueba de 30 días para ti.
Java: Excel 워크시트에 데이터 쓰기
메이븐으로 설치
<dependency>
    <groupId>e-iceblue</groupId>
    <artifactId>spire.xls</artifactId>
    <version>14.1.3</version>
</dependency>
관련된 링크들
Excel에는 대량의 데이터를 정돈된 스프레드시트에 신속하게 저장하고 구성하는 기능이 있습니다. 하지만 수동으로 셀에 데이터를 하나씩 입력하면 시간이 많이 걸립니다. 프로그래밍을 통해 Excel 파일 생성을 자동화하면 많은 시간과 에너지를 절약할 수 있습니다. 이 기사에서는 방법을 소개합니다 Spire.XLS for Java사용하여 Java로 Excel 워크시트에 데이터를 씁니다.
Spire.XLS for Java 설치
먼저 Spire.Xls.jar 파일을 Java 프로그램의 종속성으로 추가해야 합니다. JAR 파일은 이 링크에서 다운로드할 수 있습니다. Maven을 사용하는 경우 프로젝트의 pom.xml 파일에 다음 코드를 추가하여 애플리케이션에서 JAR 파일을 쉽게 가져올 수 있습니다.
<repositories>
    <repository>
        <id>com.e-iceblue</id>
        <name>e-iceblue</name>
        <url>https://repo.e-iceblue.com/nexus/content/groups/public/</url>
    </repository>
</repositories>
<dependencies>
    <dependency>
        <groupId>e-iceblue</groupId>
        <artifactId>spire.xls</artifactId>
        <version>16.4.1</version>
    </dependency>
</dependencies>
특정 셀에 텍스트 또는 숫자 값 쓰기
워크시트의 특정 셀은 Worksheet.get(int row, int columns) 메소드를 통해 접근할 수 있습니다. 그런 다음 IXLSRange.setValue() 또는 IXLSRange.setNumberValue() 메서드를 사용하여 셀에 텍스트 값이나 숫자 값을 추가할 수 있습니다. 자세한 단계는 다음과 같습니다.
- 통합 문서 개체를 만듭니다.
- Workbook.getWorksheets().get() 메서드를 사용하여 첫 번째 워크시트를 가져옵니다.
- Workhseet.get() 메서드를 사용하여 특정 셀을 가져옵니다.
- IXLSRange.setValue() 또는 IXLSRange.setNumberValue() 메서드를 사용하여 셀에 텍스트 값이나 숫자 값을 추가합니다.
- Workbook.saveToFile() 메서드를 사용하여 통합 문서를 Excel 파일에 저장합니다.
- Java
import com.spire.xls.*;

    public class WriteToCells {

        public static void main(String[] args) {

            //Create a Workbook object
            Workbook workbook = new Workbook();

            //Get the first worksheet
            Worksheet worksheet = workbook.getWorksheets().get(0);

            //Write data to specific cells
            worksheet.get(1,1).setValue("Name");
            worksheet.get(1,2).setValue("Age");
            worksheet.get(1,3).setValue("Department");
            worksheet.get(1,4).setValue("Hiredate");
            worksheet.get(2,1).setValue("Hazel");
            worksheet.get(2,2).setNumberValue(29);
            worksheet.get(2,3).setValue("Marketing");
            worksheet.get(2,4).setValue("2019-07-01");
            worksheet.get(3,1).setValue("Tina");
            worksheet.get(3,2).setNumberValue(31);
            worksheet.get(3,3).setValue("Technical Support");
            worksheet.get(3,4).setValue("2015-04-27");

            //Auto fit column widths
            worksheet.getAllocatedRange().autoFitColumns();

            //Apply a style to the first row
            CellStyle style = workbook.getStyles().addStyle("newStyle");
            style.getFont().isBold(true);
            worksheet.getRange().get(1,1,1,4).setStyle(style);

            //Save to an Excel file
            workbook.saveToFile("output/WriteToCells.xlsx", ExcelVersion.Version2016);
        }
    }
워크시트에 배열 쓰기
Spire.XLS for Java 프로그래머가 워크시트의 지정된 셀 범위에 1차원 배열 또는 2차원 배열을 쓸 수 있도록 Worksheet.insertArrary() 메서드를 제공합니다. 워크시트에 배열을 쓰는 단계는 다음과 같습니다.
- 통합 문서 개체를 만듭니다.
- Workbook.getWorksheets().get() 메서드를 사용하여 첫 번째 워크시트를 가져옵니다.
- 1차원 배열과 2차원 배열을 만듭니다.
- Worksheet.insertArray() 메서드를 사용하여 워크시트에 배열을 삽입합니다.
- Workbook.saveToFile() 메서드를 사용하여 통합 문서를 Excel 파일에 저장합니다.
- Java
import com.spire.xls.*;

    public class WriteArrayToWorksheet {

        public static void main(String[] args) {

            //Create a Workbook instance
            Workbook workbook = new Workbook();

            //Get the first worksheet
            Worksheet worksheet = workbook.getWorksheets().get(0);

            //Create a one-dimensional array
            String[] oneDimensionalArray = new String[]{"January", "February", "March", "April","May", "June"};

            //Write the array to the first row of the worksheet
            worksheet.insertArray(oneDimensionalArray, 1, 1, false);

            //Create a two-dimensional array
            String[][] twoDimensionalArray = new String[][]{
                    {"Name", "Age", "Sex", "Dept.", "Tel."},
                    {"John", "25", "Male", "Development","654214"},
                    {"Albert", "24", "Male", "Support","624847"},
                    {"Amy", "26", "Female", "Sales","624758"}
            };

            //Write the array to the worksheet starting from the cell A3
            worksheet.insertArray(twoDimensionalArray, 3, 1);

            //Auto fit column width in the located range
            worksheet.getAllocatedRange().autoFitColumns();

            //Apply a style to the first and the third row
            CellStyle style = workbook.getStyles().addStyle("newStyle");
            style.getFont().isBold(true);
            worksheet.getRange().get(1,1,1,6).setStyle(style);
            worksheet.getRange().get(3,1,3,6).setStyle(style);

            //Save to an Excel file
            workbook.saveToFile("output/WriteArrays.xlsx", ExcelVersion.Version2016);
        }
    }
워크시트에 DataTable 쓰기
DataTable의 데이터를 워크시트로 가져오려면 Worksheet.insertDataTable() 메서드를 사용합니다. 자세한 단계는 다음과 같습니다.
- 통합 문서 개체를 만듭니다.
- Workbook.getWorksheets().get() 메서드를 사용하여 첫 번째 워크시트를 가져옵니다.
- DataTable을 만들고 Worksheet.insertDataTable() 메서드를 사용하여 워크시트의 지정된 위치에 DataTable을 씁니다.
- Workbook.saveToFile() 메서드를 사용하여 통합 문서를 Excel 파일에 저장합니다.
- Java
import com.spire.data.table.DataRow;
    import com.spire.data.table.DataTable;
    import com.spire.xls.*;

    public class WriteDataTableToWorksheet {

        public static void main(String[] args) throws Exception {

            //Create a Workbook instance
            Workbook workbook = new Workbook();

            //Get the first worksheet
            Worksheet worksheet = workbook.getWorksheets().get(0);

            //Create a DataTable object
            DataTable dataTable = new DataTable();
            dataTable.getColumns().add("SKU", Integer.class);
            dataTable.getColumns().add("NAME", String.class);
            dataTable.getColumns().add("PRICE", String.class);

            //Create rows and add data
            DataRow dr = dataTable.newRow();
            dr.setInt(0, 512900512);
            dr.setString(1,"Wireless Mouse M200");
            dr.setString(2,"$85");
            dataTable.getRows().add(dr);
            dr = dataTable.newRow();
            dr.setInt(0,512900637);
            dr.setString(1,"B100 Cored Mouse ");
            dr.setString(2,"$99");
            dataTable.getRows().add(dr);
            dr = dataTable.newRow();
            dr.setInt(0,512901829);
            dr.setString(1,"Gaming Mouse");
            dr.setString(2,"$125");
            dataTable.getRows().add(dr);
            dr = dataTable.newRow();
            dr.setInt(0,512900386);
            dr.setString(1,"ZM Optical Mouse");
            dr.setString(2,"$89");
            dataTable.getRows().add(dr);

            //Write datatable to the worksheet
            worksheet.insertDataTable(dataTable,true,1,1,true);

            //Auto fit column width in the located range
            worksheet.getAllocatedRange().autoFitColumns();

            //Apply a style to the first row
            CellStyle style = workbook.getStyles().addStyle("newStyle");
            style.getFont().isBold(true);
            worksheet.getRange().get(1,1,1,3).setStyle(style);

            //Save to an Excel file
            workbook.saveToFile("output/WriteDataTable.xlsx", ExcelVersion.Version2016);
        }
    }
임시 라이센스 신청
생성된 문서에서 평가 메시지를 제거하고 싶거나, 기능 제한을 없애고 싶다면 30일 평가판 라이센스 요청 자신을 위해.
Java: scrivi dati su fogli di lavoro Excel
Sommario
Installa con Maven
<dependency>
    <groupId>e-iceblue</groupId>
    <artifactId>spire.xls</artifactId>
    <version>14.1.3</version></dependency>
Link correlati
Excel ha la capacità di archiviare e organizzare rapidamente grandi quantità di dati in fogli di calcolo ordinati. Ma è dispendioso in termini di tempo se inseriamo manualmente i dati nelle celle una dopo l'altra. Automatizzare la creazione di file Excel tramite la programmazione può farci risparmiare molto tempo ed energia. Questo articolo spiega come farlo scrivere dati in fogli di lavoro Excel in Java utilizzando Spire.XLS for Java.
- Scrivi valori di testo o numeri su celle specifiche
- Scrivere matrici in un foglio di lavoro
- Scrivere una DataTable in un foglio di lavoro
Installa Spire.XLS for Java
Innanzitutto, devi aggiungere il file Spire.Xls.jar come dipendenza nel tuo programma Java. Il file JAR può essere scaricato da questo collegamento. Se utilizzi Maven, puoi importare facilmente il file JAR nella tua applicazione aggiungendo il seguente codice al file pom.xml del tuo progetto.
<repositories>
    <repository>
        <id>com.e-iceblue</id>
        <name>e-iceblue</name>
        <url>https://repo.e-iceblue.com/nexus/content/groups/public/</url>
    </repository>
</repositories>
<dependencies>
    <dependency>
        <groupId>e-iceblue</groupId>
        <artifactId>spire.xls</artifactId>
        <version>16.4.1</version>
    </dependency>
</dependencies>
Scrivi valori di testo o numeri su celle specifiche
È possibile accedere a una determinata cella in un foglio di lavoro tramite il metodo Worksheet.get(int riga, int colonna). Quindi, puoi aggiungere un valore di testo o un valore numerico alla cella utilizzando il metodo IXLSRange.setValue() o IXLSRange.setNumberValue(). Di seguito sono riportati i passaggi dettagliati.
- Creare un oggetto cartella di lavoro.
- Ottieni il primo foglio di lavoro utilizzando il metodo Workbook.getWorksheets().get().
- Ottieni una cella specifica utilizzando il metodo Workhseet.get().
- Aggiungi un valore di testo o un valore numerico alla cella utilizzando il metodo IXLSRange.setValue() o IXLSRange.setNumberValue().
- Salva la cartella di lavoro in un file Excel utilizzando il metodo Workbook.saveToFile().
- Java
import com.spire.xls.*;

    public class WriteToCells {

        public static void main(String[] args) {

            //Create a Workbook object
            Workbook workbook = new Workbook();

            //Get the first worksheet
            Worksheet worksheet = workbook.getWorksheets().get(0);

            //Write data to specific cells
            worksheet.get(1,1).setValue("Name");
            worksheet.get(1,2).setValue("Age");
            worksheet.get(1,3).setValue("Department");
            worksheet.get(1,4).setValue("Hiredate");
            worksheet.get(2,1).setValue("Hazel");
            worksheet.get(2,2).setNumberValue(29);
            worksheet.get(2,3).setValue("Marketing");
            worksheet.get(2,4).setValue("2019-07-01");
            worksheet.get(3,1).setValue("Tina");
            worksheet.get(3,2).setNumberValue(31);
            worksheet.get(3,3).setValue("Technical Support");
            worksheet.get(3,4).setValue("2015-04-27");

            //Auto fit column widths
            worksheet.getAllocatedRange().autoFitColumns();

            //Apply a style to the first row
            CellStyle style = workbook.getStyles().addStyle("newStyle");
            style.getFont().isBold(true);
            worksheet.getRange().get(1,1,1,4).setStyle(style);

            //Save to an Excel file
            workbook.saveToFile("output/WriteToCells.xlsx", ExcelVersion.Version2016);
        }
    }
Scrivere matrici in un foglio di lavoro
Spire.XLS for Java fornisce il metodo Worksheet.insertArrary(), che consente ai programmatori di scrivere un array unidimensionale o bidimensionale nell'intervallo di celle specificato di un foglio di lavoro. I passaggi per scrivere array in un foglio di lavoro sono i seguenti:
- Creare un oggetto cartella di lavoro.
- Ottieni il primo foglio di lavoro utilizzando il metodo Workbook.getWorksheets().get().
- Creare una matrice unidimensionale e una matrice bidimensionale.
- Inserisci gli array nel foglio di lavoro utilizzando il metodo Worksheet.insertArray().
- Salva la cartella di lavoro in un file Excel utilizzando il metodo Workbook.saveToFile().
- Java
import com.spire.xls.*;

    public class WriteArrayToWorksheet {

        public static void main(String[] args) {

            //Create a Workbook instance
            Workbook workbook = new Workbook();

            //Get the first worksheet
            Worksheet worksheet = workbook.getWorksheets().get(0);

            //Create a one-dimensional array
            String[] oneDimensionalArray = new String[]{"January", "February", "March", "April","May", "June"};

            //Write the array to the first row of the worksheet
            worksheet.insertArray(oneDimensionalArray, 1, 1, false);

            //Create a two-dimensional array
            String[][] twoDimensionalArray = new String[][]{
                    {"Name", "Age", "Sex", "Dept.", "Tel."},
                    {"John", "25", "Male", "Development","654214"},
                    {"Albert", "24", "Male", "Support","624847"},
                    {"Amy", "26", "Female", "Sales","624758"}
            };

            //Write the array to the worksheet starting from the cell A3
            worksheet.insertArray(twoDimensionalArray, 3, 1);

            //Auto fit column width in the located range
            worksheet.getAllocatedRange().autoFitColumns();

            //Apply a style to the first and the third row
            CellStyle style = workbook.getStyles().addStyle("newStyle");
            style.getFont().isBold(true);
            worksheet.getRange().get(1,1,1,6).setStyle(style);
            worksheet.getRange().get(3,1,3,6).setStyle(style);

            //Save to an Excel file
            workbook.saveToFile("output/WriteArrays.xlsx", ExcelVersion.Version2016);
        }
    }
Scrivere una DataTable in un foglio di lavoro
Per importare dati da un DataTable a un foglio di lavoro, utilizzare il metodo Worksheet.insertDataTable(). Di seguito sono riportati i passaggi dettagliati.
- Creare un oggetto cartella di lavoro.
- Ottieni il primo foglio di lavoro utilizzando il metodo Workbook.getWorksheets().get().
- Crea un DataTable e scrivi il DataTable nel foglio di lavoro nella posizione specificata utilizzando il metodo Worksheet.insertDataTable().
- Salva la cartella di lavoro in un file Excel utilizzando il metodo Workbook.saveToFile().
- Java
import com.spire.data.table.DataRow;
    import com.spire.data.table.DataTable;
    import com.spire.xls.*;

    public class WriteDataTableToWorksheet {

        public static void main(String[] args) throws Exception {

            //Create a Workbook instance
            Workbook workbook = new Workbook();

            //Get the first worksheet
            Worksheet worksheet = workbook.getWorksheets().get(0);

            //Create a DataTable object
            DataTable dataTable = new DataTable();
            dataTable.getColumns().add("SKU", Integer.class);
            dataTable.getColumns().add("NAME", String.class);
            dataTable.getColumns().add("PRICE", String.class);

            //Create rows and add data
            DataRow dr = dataTable.newRow();
            dr.setInt(0, 512900512);
            dr.setString(1,"Wireless Mouse M200");
            dr.setString(2,"$85");
            dataTable.getRows().add(dr);
            dr = dataTable.newRow();
            dr.setInt(0,512900637);
            dr.setString(1,"B100 Cored Mouse ");
            dr.setString(2,"$99");
            dataTable.getRows().add(dr);
            dr = dataTable.newRow();
            dr.setInt(0,512901829);
            dr.setString(1,"Gaming Mouse");
            dr.setString(2,"$125");
            dataTable.getRows().add(dr);
            dr = dataTable.newRow();
            dr.setInt(0,512900386);
            dr.setString(1,"ZM Optical Mouse");
            dr.setString(2,"$89");
            dataTable.getRows().add(dr);

            //Write datatable to the worksheet
            worksheet.insertDataTable(dataTable,true,1,1,true);

            //Auto fit column width in the located range
            worksheet.getAllocatedRange().autoFitColumns();

            //Apply a style to the first row
            CellStyle style = workbook.getStyles().addStyle("newStyle");
            style.getFont().isBold(true);
            worksheet.getRange().get(1,1,1,3).setStyle(style);

            //Save to an Excel file
            workbook.saveToFile("output/WriteDataTable.xlsx", ExcelVersion.Version2016);
        }
    }
Richiedi una licenza temporanea
Se desideri rimuovere il messaggio di valutazione dai documenti generati o eliminare le limitazioni della funzione, per favore richiedere una licenza di prova di 30 giorni per te.