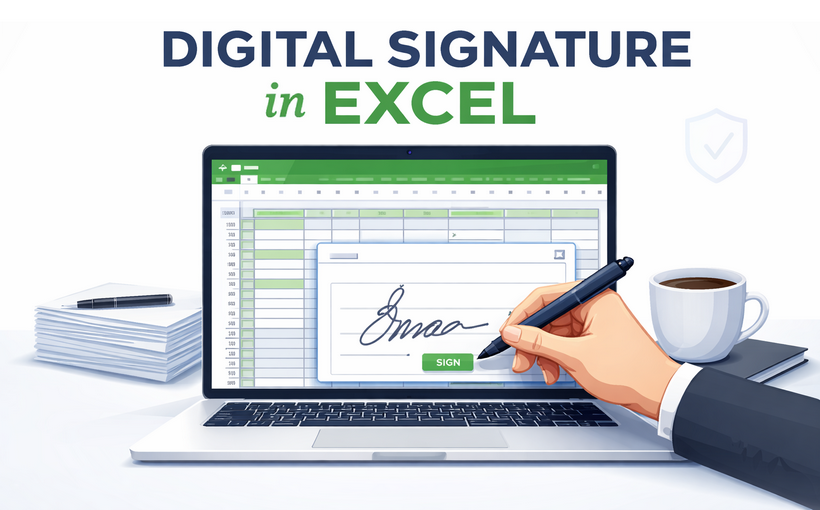
Ensuring the authenticity and integrity of Excel workbooks is essential in modern business operations. Whether the document is an invoice, a financial report, or a contract, inserting digital signature in Excel confirms that the file is genuine, has not been altered, and originates from a trusted source.
This article will guide you through how to add a digital signature in Excel, including the prerequisites for obtaining a digital certificate, adding visible or invisible signatures, and a C# programmatic approach for developers to automate batch signing. By the end, you will be able to confidently digitally sign Excel workbooks for legal, financial, or internal use.
- What is a Digital Signature in Excel?
- Prerequisite: Get a Digital Certificate
- Example 1: Add an Invisible Digital Signature in Excel
- Example 2: Insert a Visible Signature Line in Excel
- Bonus: Programmatically Add a Digital Signature Using C#
- FAQs About Adding Digital Signatures in Excel
What is a Digital Signature in Excel? (Visible vs. Invisible)
In Microsoft Excel, there are two primary types of signatures available:
1. Signature Line (Visible Signature)
This creates a visible line where a signer can type their name, draw a signature using a stylus or mouse, or upload an image of their physical signature. It is often used for contracts, approval forms, and legally binding agreements where a visible sign-off is required.
2. Digital Signature (Invisible/Backend)
This adds a cryptographic "seal" to the file. The signature does not appear inside the cells but is displayed in the signature bar. It certifies the entire workbook’s integrity and prevents unauthorized edits.
⚠️ Important Clarification: Typing a name into a cell or pasting an image does not constitute a digital signature. A true digital signature requires a digital certificate issued by a Certificate Authority (CA) or a self‑signed certificate for testing purposes.
Prerequisite: Get a Digital Certificate
Before you add a digital signature to Excel, you first need a digital certificate—an electronic ID that verifies your identity. Think of it as a “digital passport” for your signature. Below are the three ways to obtain one,
1. Free Self-Signed Certificate (For Personal/Test Use)
Microsoft Office includes a tool called SelfCert.exe that lets you create a free self-signed certificate. This is great for personal use, testing, or internal team documents, but it won’t be trusted by external parties since it’s not verified by a third-party CA.
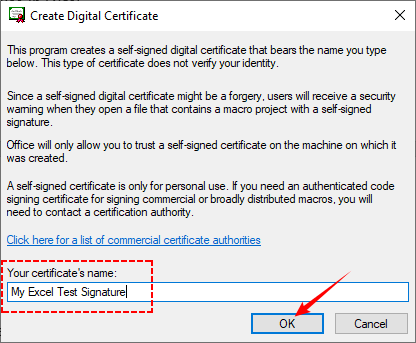
How to create your own digital certificate:
- Open File Explorer and navigate to: “C:\Program Files (x86)\Microsoft Office\root\Office16\” (or "C:\Program Files\Microsoft Office\root\Office16")
- Double-click SELF CERT.EXE, and a “Create Digital Certificate” window will appear.
- Name your certificate (e.g., “My Excel Test Signature”) and click "OK".
- You will see a success message indicating that the certificate is now installed and ready for use in Excel.
2. Third-Party Certificate (For Business/External Use)
For documents shared with clients, partners, or regulators, use a certificate from a trusted Certifying Authority (CA) (e.g., DigiCert, GlobalSign). These certificates are verified by a third party, so they’re universally trusted. Most CAs charge a fee (annual or one-time), but some offer free options for personal use.
3. Organizational Certificate (For Enterprise Users)
If you work for a large company, your IT department may issue a digital certificate as part of your organization’s security protocols. This is ideal for internal documents and compliance with company policies.
Where to get it? Contact your IT help desk—they will provide a .pfx file or install the certificate directly into your Windows certificate store.
Example 1: Add an Invisible Digital Signature in Excel
If you are sending a file that contains macros, formulas, or sensitive data that you do not want altered after sending, you should use an invisible digital signature.
Step 1: Open Your Workbook and Access the Info Panel
Launch Microsoft Excel and open the workbook you want to sign.
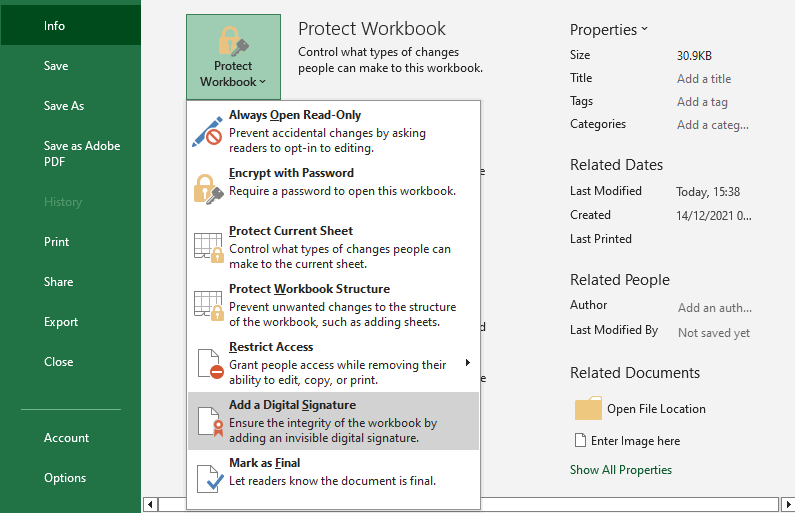
Step 2: Locate the “Add a Digital Signature” Option
- Click on “File” in the top‑left corner and select “Info”.
- In the “Info” panel, click the “Protect Workbook” dropdown arrow.
- From the dropdown menu, select “Add a Digital Signature”.
- Read the pop-up prompt and click “OK”.
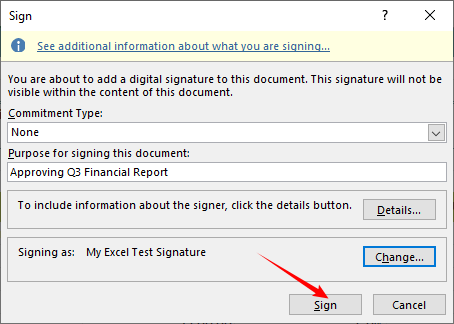
Step 3: Choose Your Digital Certificate and Sign
The “Sign” window will open. Here you configure the signature details.
- Select a “Commitment Type”.
- Type a purpose for signing (e.g., “Approving Q3 Financial Report”).
- Click “Change” if you want to select another certificate.
- Click the “Sign” button. Excel will save the workbook and apply the digital signature.
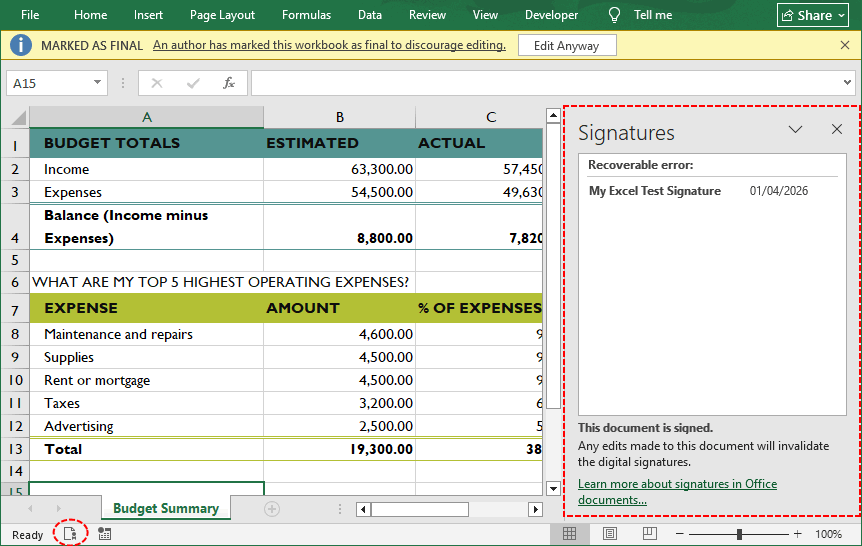
Step 4: Confirm and Verify the Signature
- A confirmation message will appear. Click “OK”.
- To verify, click the “Signature” button at the bottom of the Excel window, and a sidebar will open on the right, displaying the applied signature.
Pro Tip: Before applying a digital signature, you can lock certain Excel cells (e.g., formulas or totals) so that signers cannot edit them. This ensures both integrity and granular edit control.
Example 2: Insert a Visible Signature Line in Excel
This is the most common way to create a dedicated signature field where a user can formally sign the document, similar to a paper contract.
Step 1: Open Your Workbook
Open the Excel file where you need the signature.
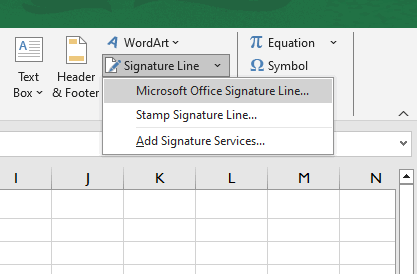
Step 2: Insert the Signature Line
- Select a cell where you want the signature to appear.
- Navigate to the “Insert” tab on the ribbon.
- In the “Text” group, click the “Signature Line” dropdown arrow (looks like a document with a pencil).
- Select “Microsoft Office Signature Line”.
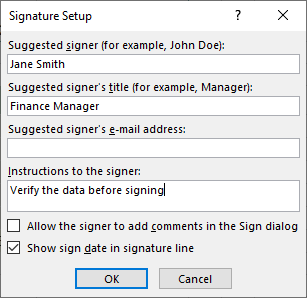
Step 3: Configure the Signature Setup
A dialog box titled "Signature Setup" will pop up. Here, you can fill in:
- Suggested signer: Full name of the person signing (e.g., “Jane Smith”).
- Suggested signer’s title: Job title (e.g., “Finance Manager”).
- Suggested signer’s email: Contact email address (optional).
- Instructions to the signer: Add any special notes (e.g., “Verify the data before signing”).
You can also check the boxes to allow the signer to add comments or to show the sign date. Click “OK”.
Step 4: Sign the Document
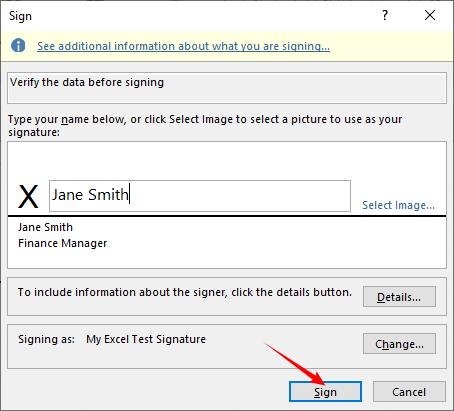
Once the line is inserted, double-click the signature line.
- To sign: Type your name, click "Select Image" to upload a scanned signature, or write it using a touch screen.
- To finalize: Click “Sign” to apply the digital signature.
The signature line (looks like a horizontal line with “X”) will now show your signature, and the workbook will be locked from edits. A yellow ribbon may appear indicating that the document has been marked as final.

For a complete security strategy, adding a digital signature should be paired with other protection measures, such as encrypting the workbook with a password, to ensure only authorized users can view or modify the data.
Bonus: Programmatically Add a Digital Signature Using C#
If you are a developer looking to automate the signing process, you can use the Spire.XLS for .NET library. This library allows you to programmatically add or delete Excel digital signatures in C# without needing Microsoft Office installed on the server.
Step 1: Install Spire.XLS
Open Visual Studio, go to “Tools > NuGet Package Manager > Package Manager Console”, and run:
Install-Package Spire.XLS
Or you can search for "Spire.XLS" in the NuGet Package Manager UI and install.
Step 2: Prepare a PFX Certificate
Use a valid PFX certificate (.pfx file) that contains both the public and private keys. You can:
- Obtain one from a Certificate Authority (CA).
- Export a self-signed certificate for testing using PowerShell.
Make sure the .pfx file is accessible from your application’s file system.
Step 3: C# Code to Add a Digital Signature in Excel
Below is a complete C# example that loads an existing Excel file, applies an invisible digital signature, and saves the signed workbook.
using Spire.Xls;
using System;

namespace AddSignatureInExcel
{
    class Program
    {
        static void Main(string[] args)
        {
            // Create a Workbook instance
            Workbook workbook = new Workbook();

            // Load an existing Excel file
            workbook.LoadFromFile("Input.xlsx");

            // Define the path to the certificate file and its password
            string certificatePath = @"C:\Users\Administrator\Desktop\My Excel Test Signature.pfx";
            string certificatePassword = "123abc";

            // (Optional) Set a signing time
            DateTime signingTime = new DateTime(2026, 4, 1, 7, 10, 36);

            // Add a digital signature to the workbook
            workbook.AddDigitalSignature(certificatePath, certificatePassword, "Test Signature", signingTime);

            // Save the signed file
            workbook.SaveToFile("AddDigitalSignature.xlsx", FileFormat.Version2016);
            workbook.Dispose();
        }
    }
}
In this code, the AddDigitalSignature method applies the digital signature using the PFX file. The parameters are:
- certificatePath: Path to your .pfx file.
- certificatePassword: Password for the private key.
- comments: A string that appears in the signature details (e.g., “Test Signature”).
- signTime: A DateTime representing the signing time (this is not a cryptographic timestamp but can be used for display purposes).
The digital signature added: 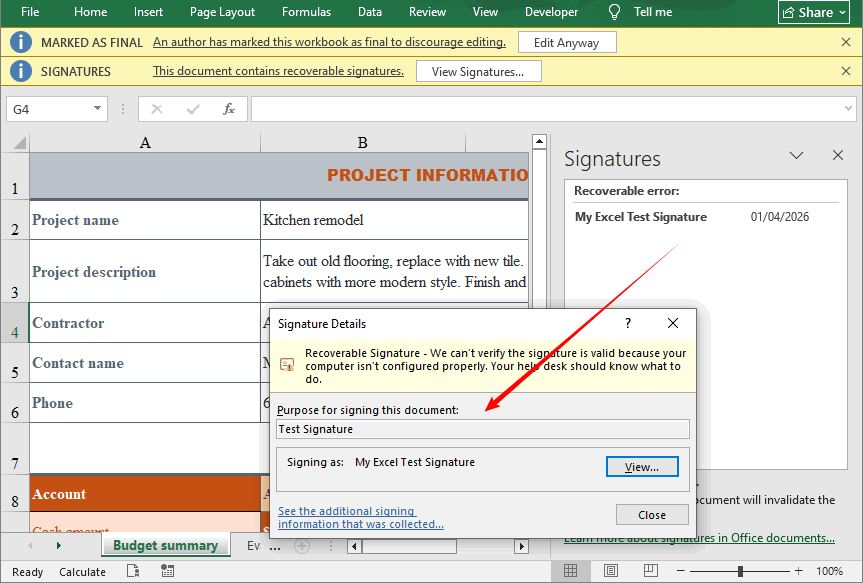
✅ Use Cases: Batch signing, server-side automation, enterprise workflow integration.
Wrapping it up
Adding a digital signature in Excel is essential for securing sensitive data—whether you use the manual steps for one-off files or the C# Spire.XLS method for automated batch signing. Both approaches create secure, legally binding digital signatures that protect your workbooks from tampering and verify authenticity.
Always use trusted digital certificates for external sharing, back up your credentials, and verify signatures before sharing or accepting Excel files. By following the procedures outlined in this guide, users can secure their Excel workbooks against unauthorized changes and verify the authenticity of signers with confidence.
FAQs About Adding Digital Signatures in Excel
Q1. How do I insert an electronic signature in Excel?
You have two main options: (a) Visible signature line – go to Insert > Signature Line, or (b) Invisible digital signature – go to File > Info > Protect Workbook > Add a Digital Signature. Choose based on whether you need a visible sign-off or backend integrity.
Q2. Can I add a digital signature to Excel for free?
Yes. Use the built‑in SelfCert.exe tool to create a free self‑signed certificate. However, this certificate is only trusted on your own computer. For external sharing, you may need a paid CA certificate.
Q3: How do I remove a digital signature from Excel?
Go to “File > Info > View Signatures”, right-click the signature, and select “Remove Signature”.
Q4: Can I add a signature to Excel without a certificate?
You can add a visual image signature, but it’s not a secure, verifiable digital signature.