
Have you ever faced the frustration of printing an Excel spreadsheet only to get pages of irrelevant data or endless blank sheets? Learning how to set print area in Excel is the essential solution that transforms chaotic print jobs into professional, precise documents.
In this step-by-step guide, we will explore multiple methods to set print area in Excel efficiently, ensuring your printed documents are well-organized and visually appealing.
- What is a Print Area in Excel
- Why Should You Set Print Area in Excel
- How to Set Print Area in Excel Manually
- Configure Print Area for Multiple Sheets Automatically Using VBA
- Batch Set Print Area for Multiple Excel Files Using Python
- Common Print Area Problems and How to Fix Them
- Conclusion: Quick Comparison of Print Area Methods
What is a Print Area in Excel?
A print area in Excel is a defined range of cells that you specify to print, excluding all other cells on the worksheet. When you define a print area, Excel remembers your selection and will only print those cells until you clear or change the setting.
Why Should You Set Print Area in Excel?
Setting a print area in Excel offers several key advantages:
- Efficiency: It saves paper and ink by ensuring only relevant data is printed.
- Cleaner Reports: It prevents unnecessary data from cluttering your printouts, making them more professional.
- Customization: It allows you to print specific sections without changing the layout of your data.
How to Set Print Area in Excel Manually
Excel provides several methods for customizing the print area. Below, we'll explore each method in detail, helping you choose the best option for your situation.
1. Set Print Area Using the Set Print Area Feature
The Set Print Area feature is the most common and straightforward method for defining the print range in Excel. It's ideal for users who need to print a specific selection without advanced configuration.
Steps:
-
Select the cells you want to print.
-
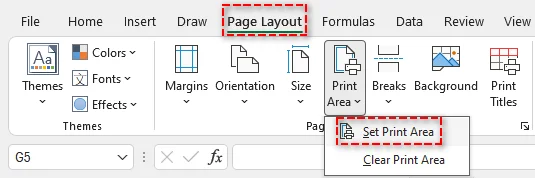
Go to the Page Layout tab on the Ribbon.
-
In the Page Setup group, click Print Area > Set Print Area.
This method saves your selection as the print area, and Excel will print only the selected cells.
Tip:
- If you want to remove the print area later, go to Page Layout > Clear Print Area. This will reset the print area and allow you to redefine it as needed.
You might also be interested in: Highlight Duplicates in Excel: 4 Easy Methods.
2. Define Print Area with the Page Setup Dialog
For users who need more control over the print settings, the Page Setup Dialog offers advanced options. This allows you to manually enter or adjust the print area more precisely.
Steps:
-
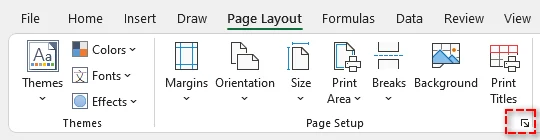
Go to the Page Layout tab on the Ribbon.
-
In the Page Setup group, click the small arrow icon in the bottom right corner to open the Page Setup Dialog.
-
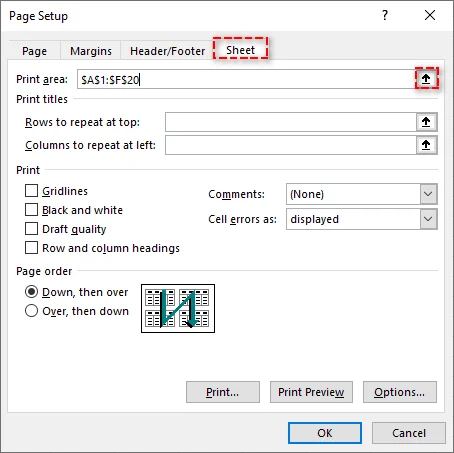
In the dialog, select the Sheet tab.
-
In the Print Area field, manually type the cell range (e.g., $A$1:$F$20) or use the range selector to visually select the cells.
-
Adjust other settings like print titles, gridlines, or headings as needed.
-
Click OK to apply the print area.
Tip:
- If you want the print area to automatically adjust as you add or remove data, consider converting your range into an Excel Table. Excel will update the print area dynamically when data changes.
3. Print Specific Cells Using Keyboard Shortcuts
If you prefer speed, you can set your print area using a simple keyboard shortcut. This method is perfect for quickly defining print areas without navigating through menus.
Steps:
-
Select the range you want to print.
-
Press Alt → P → R → S in sequence to set the print area.

This shortcut instantly defines your print area for the selected cells.
Tip:
- The keyboard shortcut works best when you frequently define print areas and want to save time. However, it may not offer the same customization options as the Page Setup dialog.
4. Set Multiple Print Areas on a Sheet
Excel also allows you to define multiple print areas within one worksheet. This is useful when you want to print non-contiguous sections separately.
Steps:
-
Select the first range to include in the print area.
-
Hold down the Ctrl key and select additional ranges.
-
Go to Page Layout > Print Area > Set Print Area.
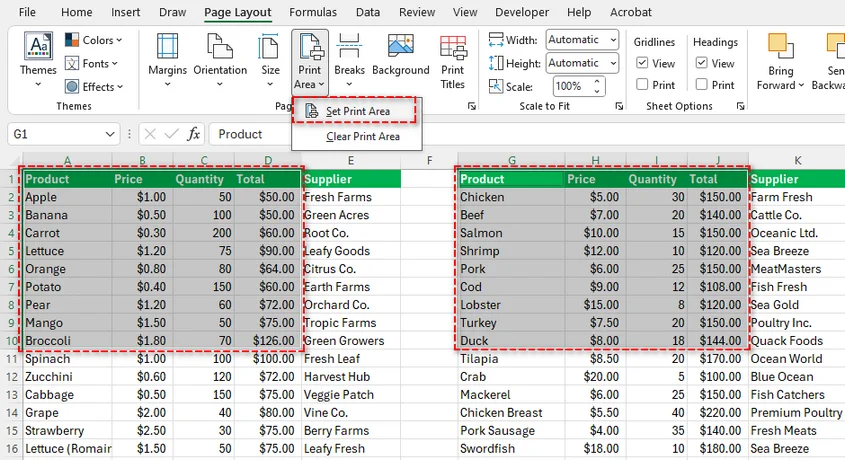
Each selected range will print on a separate page, making it ideal for reports with multiple sections.
Tip:
- After setting multiple print areas, Excel automatically inserts page breaks between each area. If you need to adjust where the page breaks occur, go to the Page Layout tab and use Breaks to modify them.
Configure Print Area for Multiple Sheets Automatically Using VBA
If you're working with large workbooks that contain multiple sheets, you can save time by automating the process of setting print areas across all sheets using VBA. This method is ideal for users who need to perform Excel print area settings frequently.
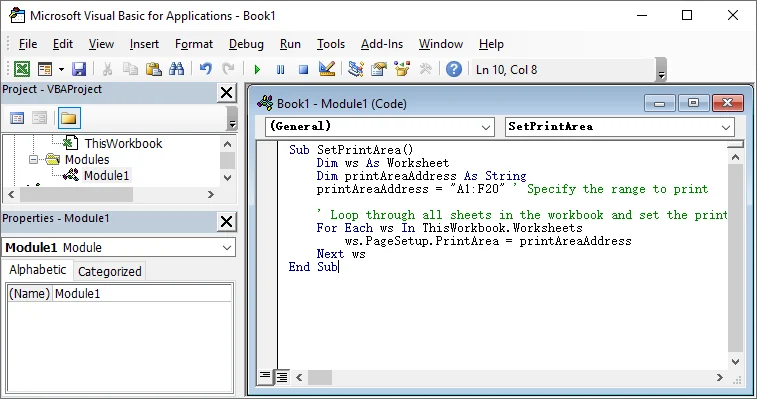
Here's a simple VBA code to set the print area for all sheets:
Sub SetPrintArea()
    Dim ws As Worksheet
    Dim printAreaAddress As String
    printAreaAddress = "A1:F20" ' Specify the range to print

    ' Loop through all sheets in the workbook and set the print area
    For Each ws In ThisWorkbook.Worksheets
        ws.PageSetup.PrintArea = printAreaAddress
    Next ws
End Sub
Steps to Use This VBA Code:
-
Press Alt + F11 to open the VBA editor.
-
Click Insert > Module to create a new module.
-
Paste the code into the module.
-
Press F5 to run the macro.
This code will apply the print area (e.g., A1:F20) to all sheets in your workbook.
Tip:
- You can change the printAreaAddress to any range you need, such as "B2:D15", depending on your print area requirements.
Need to learn more about the PageSetup.PrintArea property in this VBA script? See Microsoft's official guide: PageSetup.PrintArea property (Excel).
Batch Set Print Area for Multiple Excel Files Using Python
For batch processing multiple Excel files and defining print areas automatically, Python offers a powerful solution. By using the Spire.XLS for Python library, you can read and update Excel files in bulk without relying on Excel itself-making it perfect for server-side execution or automation tasks.
Here's how to batch process print areas for multiple Excel files using Python:
Steps:
-
Install the Spire.XLS library from PyPI using pip:
pip install spire-xls -
Use the following code to batch process Excel files and set print areas:
from spire.xls import *
import os

# Define the folder containing the Excel files
source_folder = "path_to_your_excel_files"  # Update with your folder path
target_folder = "path_to_modified_files"    # Path for saving modified files

# Create target folder if it doesn't exist
if not os.path.exists(target_folder):
    os.makedirs(target_folder)

# Define the print area range (adjust as needed)
print_area = "A1:F20"

# Loop through all Excel files in the folder
for file_name in os.listdir(source_folder):
    if file_name.endswith((".xlsx", ".xls")):
        try:
            # Load the workbook
            file_path = os.path.join(source_folder, file_name)
            workbook = Workbook()
            workbook.LoadFromFile(file_path)

            # Set the print area for the first worksheet
            sheet = workbook.Worksheets[0]
            sheet.PageSetup.PrintArea = print_area

            # Save the modified file
            new_file_name = f"modified_{file_name}"
            new_file_path = os.path.join(target_folder, new_file_name)
            workbook.SaveToFile(new_file_path, FileFormat.Version2016)

            print(f"Processed: {file_name} -> {new_file_name}")

        except Exception as e:
            print(f"Error processing {file_name}: {str(e)}")
            continue

print(f"\nBatch process completed! Modified files saved to: {target_folder}")
This Python script processes all Excel files in a folder, adjusts the print area for each file, and saves the modified files to a new directory.
Tip:
- In addition to adjusting print selection, Spire.XLS offers page setup options like margins, paper size, and scaling. For more details, refer to the official documentation: Python: Set Page Setup Options in Excel.
Common Print Area Problems and How to Fix Them
Sometimes, you may encounter issues when working with print areas. Below are some common problems and their solutions:
-
Print Area Not Recognized by Excel
- Problem: Excel may fail to recognize the print area, often due to corrupted settings or incorrect cell selection.
- Solution: Go to Page Layout > Clear Print Area, then redefine the print area.
-
Columns Cut Off in Print Preview
- Problem: Columns might be cut off in the print preview, leaving part of the content off the printed page.
- Solution: Adjust the margins or use Scale to Fit options under the Page Layout tab to ensure all content fits within the printable area.
-
Hidden Rows or Columns Included in Print Area
- Problem: Hidden rows or columns might be unintentionally included in the print area, causing unwanted data to be printed.
- Solution: Unhide any hidden rows or columns before setting the print area.
-
Gridlines Not Printed
- Problem: Even though gridlines are visible in Excel, they may not appear in the printed document.
- Solution: In the Page Layout tab, under Sheet Options, check the Print box next to Gridlines to ensure they appear on the printout.
Conclusion: Quick Comparison of Print Area Methods
Here's a quick comparison of the Excel print area methods:
| Method | Pros | Cons | Best For |
|---|---|---|---|
| Set Print Area Feature | Simple and intuitive | Not ideal for batch processing | One-time print setups, occasional use |
| Page Setup Dialog | Advanced settings and visual selection | More steps required | Custom print settings for complex documents |
| Keyboard Shortcuts | Fast and efficient | Limited to one print area | Regular users needing quick print area setups |
| VBA | Automates tasks across multiple sheets | Requires VBA knowledge | Large workbooks or recurring tasks |
| Python | Processes multiple files without opening Excel | Requires Python knowledge | Batch processing for large volumes of Excel files |
How to choose the best method:
- For simple, one-time tasks: Use the built-in Set Print Area Feature.
- For more control over print settings: Use Page Setup Dialog.
- For quick setups: Use Keyboard Shortcuts.
- For automating tasks across multiple sheets: Use VBA.
- For processing multiple files at once: Use Python.
FAQs: Excel Print Area
Q1: Can I set multiple print areas in one Excel sheet?
A1: Yes! By selecting non-adjacent ranges while holding Ctrl, you can define multiple print areas. Each selection will print on a separate page.
Q2: How to clear a previously defined print area?
A2: Go to Page Layout → Print Area → Clear Print Area, or use the keyboard shortcut Alt → P → R → C.
Q3: Does the print area save when I close Excel?
A3: Yes, when you save your workbook after setting a print area, Excel preserves this setting within the file.
Q4: Can the print area automatically update as data changes?
A4: Yes! Convert your range to an Excel Table (Ctrl + T), and the print area will adjust automatically as you add data.