
Spire.Doc for JavaScript (78)
Children categories
Lock and Remove Content Controls in Word Documents with JavaScript in React
2026-11-07 06:04:58 Written by Amy ZhaoAfter a template has been distributed, there are usually two opposite requirements. One is protection: a table, a roster or a set of clauses has been finalized, and the people filling in the template should not be able to modify or delete it by mistake, while the control structure is kept for later consolidation. The other is cleanup: the document has been finalized and archived, the content controls are no longer needed, and their tags and borders get in the way of reading, so the control shell should be removed and only the content kept.
Locking is done through SDTProperties.LockSettings; removal takes the control out of its parent object and puts its child content back in the original order. The two operations go in opposite directions, and both require distinguishing inline controls from block-level controls.
This article uses Spire.Doc for JavaScript to demonstrate both operations. Everything runs in the browser, and documents never leave the user's device.
This article covers two features:
Both features work with StructureDocumentTag (block-level) and StructureDocumentTagInline (inline):
| Object type | DocumentObjectType value |
Parent object during removal |
|---|---|---|
| Inline content control | StructureDocumentTagInline |
The paragraph that contains it |
| Block-level content control | StructureDocumentTag |
The section body or a table cell |
For installation and project setup, refer to Integrating Spire.Doc for JavaScript in a React Project. The examples below assume that Spire.Doc is installed and the WebAssembly module is initialized.
Lock a Content Control
Locking constrains what the person filling in the form can do in Word. LockSettings is an enumeration, and different values protect different objects: some protect only the control content, some protect only the control itself, and some protect both.
The available lock modes are as follows:
LockSettingsType value |
OOXML written | Protection effect |
|---|---|---|
UnLocked |
No w:lock written |
Not locked; the content can be edited and the control can be deleted |
ContentLocked |
w:lock w:val="contentLocked" |
The content cannot be edited; the control itself can be deleted |
SDTLocked |
w:lock w:val="sdtLocked" |
The control cannot be deleted; the content can still be edited |
SDTContentLocked |
w:lock w:val="sdtContentLocked" |
The content cannot be edited and the control cannot be deleted |
The specific steps are as follows:
- Get the Spire.Doc WASM module and confirm that it is ready.
- Load the font, create a document with one section, and write a member roster table with
AppendHTML(). - Add another section, write the title and the explanation, and create a block-level
StructureDocumentTagcontrol. - Clone the table into the control's
SDTContent, setLockSettingstoContentLocked, and remove the temporary section that built the table. - Save the result file with
SaveToFile(), read it from the VFS and trigger a browser download.
The code for locking a content control is as follows:
const FONT_FOLDER = '/Library/Fonts/';

const loadFontToVfs = async (fileName) => {
  const url = `${process.env.PUBLIC_URL || ''}/static/font/${fileName}`;
  const res = await fetch(url);
  if (!res.ok) {
    throw new Error(`Failed to load the font: ${url} returned HTTP ${res.status}`);
  }
  const bytes = new Uint8Array(await res.arrayBuffer());
  const tag = bytes.length >= 4 ? String.fromCharCode(bytes[0], bytes[1], bytes[2], bytes[3]) : '';
  const isFont = tag === 'ttcf' || tag === 'true' || tag === 'OTTO' || tag === 'wOFF' || tag === 'wOF2'
    || (bytes.length >= 4 && bytes[0] === 0x00 && bytes[1] === 0x01 && bytes[2] === 0x00 && bytes[3] === 0x00);
  if (!isFont) {
    throw new Error(`Invalid font file: ${url} did not return a font (usually a 404 or a single-page app falling back to index.html)`);
  }
  const FS = window.dotnetRuntime.Module.FS;
  FS.mkdirTree(FONT_FOLDER);
  FS.writeFile(FONT_FOLDER + fileName, bytes, { flags: 'w+' });
};

function App() {
  const lockContentControl = async () => {
    // Wait for the WASM runtime and Spire.Doc to finish loading
    if (window.spireReady) await window.spireReady;
    const wasmModule = window.wasmModule?.spiredoc;

    if (!wasmModule) {
      alert('Spire.Doc is not ready yet');
      return;
    }

    // Load the fonts (AppendHTML depends on fonts for layout, so at least one valid font must be written to the VFS)
    const fontErrors = [];
    let loadedFonts = 0;
    for (const fileName of ['arial.ttf', 'arialbd.ttf']) {
      try {
        await loadFontToVfs(fileName);
        loadedFonts += 1;
      } catch (e) {
        fontErrors.push(e.message || String(e));
      }
    }
    if (loadedFonts === 0) {
      alert(`Failed to load the fonts, so AppendHTML cannot lay out the table:\n${fontErrors.join('\n')}`);
      return;
    }

    // Create the document and build the table in the first section
    const doc = new wasmModule.Document();
    const tableSection = doc.AddSection();
    const tableParagraph = tableSection.AddParagraph();
    tableParagraph.AppendHTML(
      '<table border="1" cellspacing="0" cellpadding="4" style="border-collapse:collapse;width:100%">'
      + '<tr><th>  No.</th><th>Name</th><th>Role  </th></tr>'
      + '<tr><td>01</td><td>Emily Carter</td><td>Procurement Manager</td></tr>'
      + '<tr><td>02</td><td>Daniel Reed</td><td>Technical Director</td></tr>'
      + '</table>');

    // Add a new section with the title and the explanation
    const section = doc.AddSection();
    const titleParagraph = section.AddParagraph();
    const titleRange = titleParagraph.AppendText('Project Team Member List');
    titleRange.CharacterFormat.FontName = 'Arial';
    titleRange.CharacterFormat.FontSize = 19;
    titleRange.CharacterFormat.Bold = true;
    titleRange.CharacterFormat.TextColor = wasmModule.Color.FromArgb(255, 15, 110, 90);
    titleParagraph.Format.AfterSpacing = 14;

    const hintParagraph = section.AddParagraph();
    const hintRange = hintParagraph.AppendText('The table below is locked, so the list content cannot be modified directly.');
    hintRange.CharacterFormat.FontName = 'Arial';
    hintRange.CharacterFormat.FontSize = 9;
    hintRange.CharacterFormat.TextColor = wasmModule.Color.FromArgb(255, 89, 89, 89);
    hintParagraph.Format.AfterSpacing = 8;

    // Create the block-level content control
    const sdt = new wasmModule.StructureDocumentTag(doc);
    section.Body.ChildObjects.Add(sdt);
    sdt.SDTProperties.SDTType = wasmModule.SdtType.RichText;
    sdt.SDTProperties.Alias = 'Member List';
    sdt.SDTProperties.Tag = 'member-list';
    sdt.SDTProperties.Appearance = wasmModule.SdtAppearance.Tags;

    // Clone the table from the first section into the control content
    for (let i = 0; i < tableSection.Body.ChildObjects.Count; i++) {
      const obj = tableSection.Body.ChildObjects.get_Item(i);
      if (obj.DocumentObjectType === wasmModule.DocumentObjectType.Table) {
        sdt.SDTContent.ChildObjects.Add(obj.Clone());
      }
    }

    // Lock the control content
    sdt.SDTProperties.LockSettings = wasmModule.LockSettingsType.ContentLocked;

    // Remove the temporary section that built the table
    doc.Sections.Remove(tableSection);

    // Save the result file
    const outputFileName = 'LockContentControlContent.docx';
    doc.SaveToFile({ fileName: outputFileName, fileFormat: wasmModule.FileFormat.Docx2013 });
    doc.Dispose();

    // Read the generated file from the VFS and trigger the download
    const fileArray = window.dotnetRuntime.Module.FS.readFile(outputFileName);
    const blob = new Blob([fileArray], { type: 'application/vnd.openxmlformats-officedocument.wordprocessingml.document' });
    const url = URL.createObjectURL(blob);
    const a = document.createElement('a');
    a.href = url;
    a.download = outputFileName;
    a.click();
    URL.revokeObjectURL(url);
  };

  return (
    <div style={{ textAlign: 'center', height: '300px' }}>
      <h1>Lock Content Control</h1>
      <button onClick={lockContentControl}>Generate Document</button>
    </div>
  );
}

export default App;
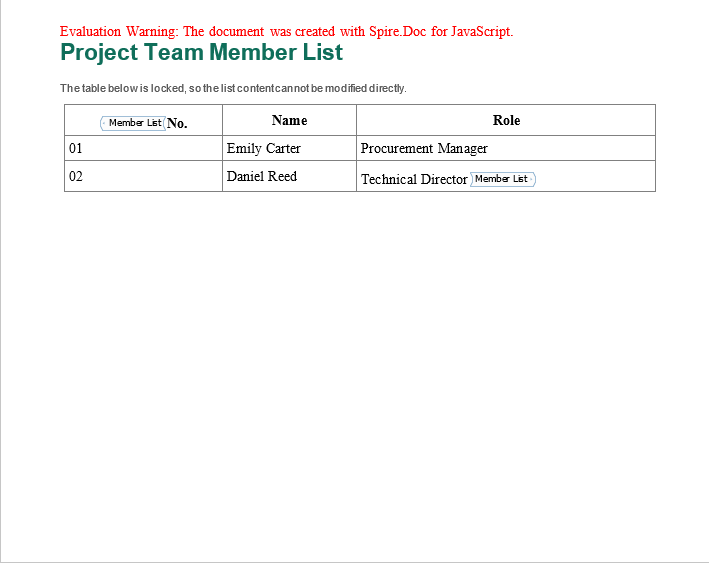
The locked member roster is shown below; the tag of the block-level control appears at the start and end of the table content:
Differences Between the Four Lock Modes
The four modes can be understood along two dimensions, "protect the content" and "protect the control":
UnLockedis the default state. Word writes no lock mark, and both the content and the control can be edited or deleted.ContentLockedprotects only the content: the person filling in the form cannot modify or delete the text and tables inside the control, but can still select the control and delete it as a whole.SDTLockedprotects only the control: the content can be modified, but the control itself cannot be deleted. It suits scenarios where the field structure has to be kept while the value may change.SDTContentLockedprotects both: neither the content nor the control can be deleted, which suits clauses and rosters that are only meant to be read after finalization.
Which mode to choose depends on the role of the field in the process. A structured field that still needs to be filled in uses SDTLocked; a passage that is finalized and only meant for reference uses SDTContentLocked; an attachment slot that is read-only but may be replaced as a whole uses ContentLocked.
Remove Content Controls and Keep the Content
When a document is archived, the tags and borders of content controls become a reading distraction; and if the document is handed to a colleague who is not familiar with controls, that person may also assume that the field has to be filled in. Removing a control has two meanings: one is to delete the content together with the control, and the other is to remove only the control shell and keep the text and tables inside. The latter is more common, and it requires more care about the order of operations.
Inline controls and block-level controls have different parent objects: an inline control sits in the ChildObjects of a paragraph, while a block-level control sits in the ChildObjects of the section body. The example reads RemoveContentControls.docx from public/data, so place that file in the project's public/data directory before running it. Before removal, the child objects inside the control are saved temporarily; after the control is removed, they are inserted back into the parent object in the original order, so that the content is neither lost nor misplaced.
The removal process involves the following members:
| Member | Purpose |
|---|---|
SDTContent.ChildObjects |
The content objects inside the control |
ChildObjects.Remove(child) |
Removes the control from its parent object |
ChildObjects.Insert(index, obj) |
Inserts the content back at the specified position |
Body.ChildObjects |
The object collection of the section body, which is the parent of a block-level control |
The specific steps are as follows:
- Get the Spire.Doc WASM module and confirm that it is ready.
- Load the font, read the
RemoveContentControls.docxto be processed into the VFS and load it as aDocument. - Iterate over the body objects: for an inline control in a paragraph, save its content, remove the control and insert the content back into the paragraph.
- For a block-level control, save its content, remove the control and insert the content back into the section body.
- Save the result file with
SaveToFile(), read it from the VFS and trigger a browser download.
The code for removing content controls while keeping the content is as follows:
function App() {
  const removeContentControls = async () => {
    // Get the Spire.Doc WASM module
    const wasmModule = window.wasmModule?.spiredoc;

    if (!wasmModule) {
      alert('Spire.Doc is not ready yet');
      return;
    }

    // Load the document to be processed
    await window.spire.FetchFileToVFS('RemoveContentControls.docx', '', `${process.env.PUBLIC_URL}/data/`);

    const doc = new wasmModule.Document();
    doc.LoadFromFile('RemoveContentControls.docx');

    // Iterate over the sections
    for (let s = 0; s < doc.Sections.Count; s++) {
      const section = doc.Sections.get_Item(s);
      for (let i = 0; i < section.Body.ChildObjects.Count; i++) {
        const obj = section.Body.ChildObjects.get_Item(i);

        // Handle the inline controls inside paragraphs
        if (obj.DocumentObjectType === wasmModule.DocumentObjectType.Paragraph) {
          for (let j = 0; j < obj.ChildObjects.Count; j++) {
            const child = obj.ChildObjects.get_Item(j);
            if (child.DocumentObjectType !== wasmModule.DocumentObjectType.StructureDocumentTagInline) continue;

            // Save the control content
            const inner = [];
            for (let k = 0; k < child.SDTContent.ChildObjects.Count; k++) {
              inner.push(child.SDTContent.ChildObjects.get_Item(k));
            }

            // Remove the control and insert the content back into the paragraph at the original position
            obj.ChildObjects.Remove(child);
            for (let n = 0; n < inner.length; n++) {
              obj.ChildObjects.Insert(j + n, inner[n]);
            }
            j += inner.length;
          }
        }

        // Handle the block-level controls
        if (obj.DocumentObjectType === wasmModule.DocumentObjectType.StructureDocumentTag) {
          // Save the control content
          const inner = [];
          for (let k = 0; k < obj.SDTContent.ChildObjects.Count; k++) {
            inner.push(obj.SDTContent.ChildObjects.get_Item(k));
          }

          // Remove the control and insert the content back into the section body at the original position
          for (let n = 0; n < inner.length; n++) {
            section.Body.ChildObjects.Insert(i + n, inner[n]);
          }
          section.Body.ChildObjects.Remove(obj);
          i += inner.length;
        }
      }
    }

    // Save the result file
    const outputFileName = 'RemoveContentControls_out.docx';
    doc.SaveToFile({ fileName: outputFileName, fileFormat: wasmModule.FileFormat.Docx2013 });
    doc.Dispose();

    // Read the generated file from the VFS and trigger the download
    const fileArray = window.dotnetRuntime.Module.FS.readFile(outputFileName);
    const blob = new Blob([fileArray], { type: 'application/vnd.openxmlformats-officedocument.wordprocessingml.document' });
    const url = URL.createObjectURL(blob);
    const a = document.createElement('a');
    a.href = url;
    a.download = outputFileName;
    a.click();
    URL.revokeObjectURL(url);
  };

  return (
    <div style={{ textAlign: 'center', height: '300px' }}>
      <h1>Remove Content Controls and Keep the Content</h1>
      <button onClick={removeContentControls}>Generate Document</button>
    </div>
  );
}

export default App;
The comparison before and after processing is shown below; the left figure is the original document with content controls, and the right figure is the document after the controls are removed:

Removal Differences Between Inline and Block-Level Controls
An inline control is only a child object of a paragraph, so removing it does not affect the paragraph structure, and the content can simply be inserted back into the paragraph; a block-level control occupies an entire position in the body, so after removal its content has to be inserted directly into Body.ChildObjects. The example uses j += inner.length and i += inner.length to skip the content that has just been inserted back, so that it is not processed twice.
If the control is empty, inner has a length of 0, the loop does not run, and the control is removed directly without leaving an empty paragraph. If the content should be deleted together with the control, simply omit the loop that inserts the content back; note, however, that when a block-level control is removed, the paragraph spacing it used to provide disappears as well.
FAQ
Can the content still be modified by code after a content control is locked
The lock setting is enforced by Word in the editing UI, and it constrains manual operations; reading and modifying the document through the object model is not restricted by these marks. If the business rules require strict prevention of modification, combine the control lock with document protection or read-only mode rather than relying on the content-control lock alone.
Will removing a content control lose the text and tables inside it
Whether the content is lost depends on how the control is removed. The example first saves the objects in SDTContent.ChildObjects to an array, removes the control and then inserts them back into the parent object, so the text, tables and formatting are all kept, only without the control shell. If the control is removed without inserting the content back, the content inside is lost with it.
Why does the content end up in the wrong position after removing a block-level control
The parent object of a block-level control is the section body, and the insertion position has to be calculated against the index in Body.ChildObjects. If the control is removed first and the content is then inserted at the original index, the indexes of the following objects have already shifted, and the content ends up in the wrong place. The example inserts the content at the original position first, then removes the control and skips the objects that have already been processed, so the order stays consistent.
What is the difference between content-control locking and document protection
Content-control locking applies only to a single control, is fine-grained, and does not affect other parts of the document; document protection applies to the whole document and usually restricts the editable regions or enforces read-only mode. The former suits protecting individual finalized fields in a fillable form, while the latter suits archiving a whole contract after signing. The two can be used at the same time.
Get a Free License
Spire.Doc for JavaScript offers a 30-day full-featured free trial license with no functional limitations. Apply here to evaluate before purchasing.
Read and Modify Content Controls in Word Documents with JavaScript in React
2026-11-07 05:18:30 Written by Amy ZhaoA document generated from a template and filled in by several people often contains dozens of content controls. Checking which fields have been changed and which controls still carry the template tags one by one through the properties panel is inefficient. If the alias, ID, tag and type of every control can be exported into a single table, the review work becomes much lighter. The same traversal can also be used in reverse: batch-modify the color and appearance of controls by type, so that fields with different purposes can be told apart at a glance in the document.
This article uses Spire.Doc for JavaScript to accomplish three tasks: read control properties and export a list, modify control color by type, and set display appearance by type. The document is loaded through a virtual file system in the browser, and the results are downloaded directly without going through a server.
This article covers three features:
- Read Content Control Properties
- Modify Content Control Color by Type
- Set Content Control Appearance by Type
Reading and modification rely on the same traversal logic, so the object types of the two kinds of controls should be clarified first:
| Object type | DocumentObjectType value |
Location |
|---|---|---|
| Inline content control | StructureDocumentTagInline |
In the ChildObjects of a paragraph |
| Block-level content control | StructureDocumentTag |
In the ChildObjects of a section body or a table cell |
For installation and project setup, refer to Integrating Spire.Doc for JavaScript in a React Project. The examples below assume that Spire.Doc is installed and the WebAssembly module is initialized.
Read Content Control Properties
The goal of reading is to summarize the key properties of every content control in the document into a text file. The example reads ContentControl.docx from public/data; place that file in the project's public/data directory before running it. Three storage locations need to be handled: inline controls in body paragraphs, inline controls in table cells, and block-level controls in the body. Only by traversing all three will the list be complete.
The properties that are read include:
| Property | Meaning |
|---|---|
SDTProperties.Alias |
The control alias, the name displayed in Word |
SDTProperties.Id |
The control ID, unique within the document |
SDTProperties.Tag |
The control tag, usually written in advance by the template |
SDTProperties.SDTType |
The control type, such as Text or DropDownList |
The specific steps are as follows:
- Get the Spire.Doc WASM module and confirm that it is ready.
- Load the font, read
ContentControl.docxinto the VFS and load it as aDocument. - Traverse body paragraphs and table cells to collect inline controls, then collect block-level controls in the body.
- Read the alias, ID, tag and type of each control in turn and join them into tab-separated text.
- Write the text to the VFS and trigger a download to get a list file that can be imported into spreadsheet software.
The code for reading content control properties is as follows:
function App() {
  const readContentControlProperties = async () => {
    // Get the Spire.Doc WASM module
    const wasmModule = window.wasmModule?.spiredoc;

    if (!wasmModule) {
      alert('Spire.Doc is not ready yet');
      return;
    }

    // Load the font and the document to be read
    await window.spire.FetchFileToVFS('ContentControl.docx', '', `${process.env.PUBLIC_URL}/data/`);

    const doc = new wasmModule.Document();
    doc.LoadFromFile('ContentControl.docx');

    // Collect inline controls and block-level controls
    const found = [];
    const blocks = [];

    const scanParagraph = (paragraph) => {
      for (let j = 0; j < paragraph.ChildObjects.Count; j++) {
        const child = paragraph.ChildObjects.get_Item(j);
        if (child.DocumentObjectType === wasmModule.DocumentObjectType.StructureDocumentTagInline) {
          found.push(child);
        }
      }
    };

    const scanTable = (table) => {
      for (let r = 0; r < table.Rows.Count; r++) {
        const row = table.Rows.get_Item(r);
        for (let c = 0; c < row.Cells.Count; c++) {
          const cell = row.Cells.get_Item(c);
          for (let k = 0; k < cell.ChildObjects.Count; k++) {
            const child = cell.ChildObjects.get_Item(k);
            if (child.DocumentObjectType === wasmModule.DocumentObjectType.Paragraph) scanParagraph(child);
            if (child.DocumentObjectType === wasmModule.DocumentObjectType.StructureDocumentTagInline) found.push(child);
          }
        }
      }
    };

    for (let s = 0; s < doc.Sections.Count; s++) {
      const section = doc.Sections.get_Item(s);
      for (let i = 0; i < section.Body.ChildObjects.Count; i++) {
        const obj = section.Body.ChildObjects.get_Item(i);
        if (obj.DocumentObjectType === wasmModule.DocumentObjectType.Paragraph) scanParagraph(obj);
        if (obj.DocumentObjectType === wasmModule.DocumentObjectType.Table) scanTable(obj);
        if (obj.DocumentObjectType === wasmModule.DocumentObjectType.StructureDocumentTag) blocks.push(obj);
      }
    }

    // Build the property list
    let report = 'Alias\tID\tTag\tType\r\n';
    for (const sdt of [...found, ...blocks]) {
      const properties = sdt.SDTProperties;
      const type = String(properties.SDTType).replace('SdtType.', '');
      report += `${properties.Alias}\t${properties.Id}\t${properties.Tag}\t${type}\r\n`;
    }

    // Write to the VFS and download the text file
    window.dotnetRuntime.Module.FS.writeFile('GetContentControlProperty.txt', report);
    doc.Dispose();

    const fileArray = window.dotnetRuntime.Module.FS.readFile('GetContentControlProperty.txt');
    const blob = new Blob([fileArray], { type: 'text/plain;charset=utf-8' });
    const url = URL.createObjectURL(blob);
    const a = document.createElement('a');
    a.href = url;
    a.download = 'GetContentControlProperty.txt';
    a.click();
    URL.revokeObjectURL(url);
  };

  return (
    <div style={{ textAlign: 'center', height: '300px' }}>
      <h1>Read Content Control Properties</h1>
      <button onClick={readContentControlProperties}>Export Property List</button>
    </div>
  );
}

export default App;
The body and table of the sample document are shown below:

The exported list is as follows:
| Alias | ID | Tag | Type |
|---|---|---|---|
| Name | 2001 | employee-name | Text |
| Department | 2002 | department | DropDownList |
| Hire Date | 2003 | hire-date | DatePicker |
| Laptop | 2004 | laptop | CheckBox |
| External Monitor | 2005 | monitor | CheckBox |
| Onboarding Notice | 2006 | onboarding-notice | RichText |
How to Cover Tables and Block-Level Controls During Traversal
Paragraphs directly in the body cover only some of the controls. Controls in a table require entering Table.Rows and Row.Cells before scanning the ChildObjects of the cell; block-level controls appear directly in Body.ChildObjects, and their content is not inside a paragraph. The example handles the three cases separately and merges the results for output.
During traversal, check DocumentObjectType before accessing properties. Reading SDTProperties on an ordinary paragraph returns an empty value or raises an exception; filtering by type first avoids such problems.
Modify Content Control Color by Type
When a document contains text, rich text, date and other controls at the same time, telling purposes apart by color is more intuitive than reading aliases one by one. The example reads ModifySTDColor.docx from public/data; place that file in the project's public/data directory before running it. For example, mark all text controls green and all rich text controls orange. The color is written to SDTProperties.Color and assigned according to the control type.
Modifying the color involves the following members:
| Member | Purpose |
|---|---|
SDTProperties.SDTType |
Determines the control type and therefore which color to assign |
SDTProperties.Color |
The control color, constructed with Color.FromArgb() |
Color.FromArgb(a, r, g, b) |
Creates a color from ARGB components |
The specific steps are as follows:
- Get the Spire.Doc WASM module and confirm that it is ready.
- Load the font, read
ModifySTDColor.docxinto the VFS and load it as aDocument. - Traverse paragraphs and block-level controls in the body and take out each content control object.
- Branch on
SDTType: assign green to text controls and orange to rich text controls. - Save the result file with
SaveToFile(), read it from the VFS and trigger a browser download.
The code for modifying content control color by type is as follows:
function App() {
  const modifySDTColor = async () => {
    // Get the Spire.Doc WASM module
    const wasmModule = window.wasmModule?.spiredoc;

    if (!wasmModule) {
      alert('Spire.Doc is not ready yet');
      return;
    }

    // Load the font and the document to be processed
    await window.spire.FetchFileToVFS('ModifySTDColor.docx', '', `${process.env.PUBLIC_URL}/data/`);

    const doc = new wasmModule.Document();
    doc.LoadFromFile('ModifySTDColor.docx');

    // Iterate over the sections and modify control colors by type
    for (let s = 0; s < doc.Sections.Count; s++) {
      const section = doc.Sections.get_Item(s);
      for (let i = 0; i < section.Body.ChildObjects.Count; i++) {
        const obj = section.Body.ChildObjects.get_Item(i);

        const applyColor = (sdt) => {
          switch (sdt.SDTProperties.SDTType) {
            case wasmModule.SdtType.RichText:
              sdt.SDTProperties.Color = wasmModule.Color.FromArgb(255, 237, 125, 49);
              break;
            case wasmModule.SdtType.Text:
              sdt.SDTProperties.Color = wasmModule.Color.FromArgb(255, 0, 128, 0);
              break;
          }
        };

        if (obj.DocumentObjectType === wasmModule.DocumentObjectType.StructureDocumentTag) {
          applyColor(obj);
        }

        if (obj.DocumentObjectType === wasmModule.DocumentObjectType.Paragraph) {
          for (let j = 0; j < obj.ChildObjects.Count; j++) {
            const child = obj.ChildObjects.get_Item(j);
            if (child.DocumentObjectType === wasmModule.DocumentObjectType.StructureDocumentTagInline) {
              applyColor(child);
            }
          }
        }
      }
    }

    // Save the result file
    const outputFileName = 'ModifySDTColor_out.docx';
    doc.SaveToFile({ fileName: outputFileName, fileFormat: wasmModule.FileFormat.Docx2013 });
    doc.Dispose();

    // Read the generated file from the VFS and trigger the download
    const fileArray = window.dotnetRuntime.Module.FS.readFile(outputFileName);
    const blob = new Blob([fileArray], { type: 'application/vnd.openxmlformats-officedocument.wordprocessingml.document' });
    const url = URL.createObjectURL(blob);
    const a = document.createElement('a');
    a.href = url;
    a.download = outputFileName;
    a.click();
    URL.revokeObjectURL(url);
  };

  return (
    <div style={{ textAlign: 'center', height: '300px' }}>
      <h1>Modify Content Control Color by Type</h1>
      <button onClick={modifySDTColor}>Generate Document</button>
    </div>
  );
}

export default App;
After the color is modified, the document looks like this: the tags of text controls are green and the tags of rich text controls are orange:

Control Color and Text Color Are Not the Same Thing
SDTProperties.Color sets the color of the control tag, not the color of the text inside the control. Text color belongs to TextRange.CharacterFormat.TextColor and has to be set for each text fragment. The two handle different parts: the former identifies the control itself, and the latter controls body typography.
The control color is visible only when Appearance is Tags. If the document uses the default appearance, the color will not show even after it is assigned; set SdtAppearance.Tags as well, or use the border appearance described later.
Set Content Control Appearance by Type
Appearance determines how content controls are presented in the Word editing view, and the example also reads ContentControl.docx from public/data. During the filling stage, field boundaries should be clear, so text, drop-down list and date controls can be set to the tag appearance; during the review stage, the layout should be clean, so check boxes can be set to the hidden appearance, keeping only the box glyphs. Setting them by type lets the same document serve different purposes.
Appearance is controlled by SDTProperties.Appearance; the common values are as follows:
| Value | Display effect | Suitable scenario |
|---|---|---|
SdtAppearance.Tags |
Shows alias tags on both sides of the content | Fill-in fields whose names need to be explicit |
SdtAppearance.BoundingBox |
Draws a border around the control range | Block-level content, a whole paragraph of explanation |
SdtAppearance.Hidden |
Hides the control frame | Controls that already have a visual mark, such as check boxes |
The specific steps are as follows:
- Get the Spire.Doc WASM module and confirm that it is ready.
- Load the font, read
ContentControl.docxinto the VFS and load it as aDocument. - Traverse paragraphs and block-level controls in the body and take out each content control object.
- Branch on
SDTTypeto setAppearance: tags for text, drop-down list and date, border for rich text, hidden for check boxes. - Save the result file with
SaveToFile(), read it from the VFS and trigger a browser download.
The code for setting content control appearance by type is as follows:
function App() {
  const setContentControlAppearance = async () => {
    // Get the Spire.Doc WASM module
    const wasmModule = window.wasmModule?.spiredoc;

    if (!wasmModule) {
      alert('Spire.Doc is not ready yet');
      return;
    }

    // Load the document to be processed
    await window.spire.FetchFileToVFS('ContentControl.docx', '', `${process.env.PUBLIC_URL}/data/`);

    const doc = new wasmModule.Document();
    doc.LoadFromFile('ContentControl.docx');

    // Iterate over the sections and set the display appearance by type
    for (let s = 0; s < doc.Sections.Count; s++) {
      const section = doc.Sections.get_Item(s);
      for (let i = 0; i < section.Body.ChildObjects.Count; i++) {
        const obj = section.Body.ChildObjects.get_Item(i);

        const applyAppearance = (sdt) => {
          switch (sdt.SDTProperties.SDTType) {
            case wasmModule.SdtType.Text:
            case wasmModule.SdtType.DropDownList:
            case wasmModule.SdtType.DatePicker:
              sdt.SDTProperties.Appearance = wasmModule.SdtAppearance.Tags;
              break;
            case wasmModule.SdtType.RichText:
              sdt.SDTProperties.Appearance = wasmModule.SdtAppearance.BoundingBox;
              break;
            case wasmModule.SdtType.CheckBox:
              sdt.SDTProperties.Appearance = wasmModule.SdtAppearance.Hidden;
              break;
          }
        };

        if (obj.DocumentObjectType === wasmModule.DocumentObjectType.StructureDocumentTag) {
          applyAppearance(obj);
        }

        if (obj.DocumentObjectType === wasmModule.DocumentObjectType.Paragraph) {
          for (let j = 0; j < obj.ChildObjects.Count; j++) {
            const child = obj.ChildObjects.get_Item(j);
            if (child.DocumentObjectType === wasmModule.DocumentObjectType.StructureDocumentTagInline) {
              applyAppearance(child);
            }
          }
        }
      }
    }

    // Save the result file
    const outputFileName = 'SetContentControlAppearance_out.docx';
    doc.SaveToFile({ fileName: outputFileName, fileFormat: wasmModule.FileFormat.Docx2013 });
    doc.Dispose();

    // Read the generated file from the VFS and trigger the download
    const fileArray = window.dotnetRuntime.Module.FS.readFile(outputFileName);
    const blob = new Blob([fileArray], { type: 'application/vnd.openxmlformats-officedocument.wordprocessingml.document' });
    const url = URL.createObjectURL(blob);
    const a = document.createElement('a');
    a.href = url;
    a.download = outputFileName;
    a.click();
    URL.revokeObjectURL(url);
  };

  return (
    <div style={{ textAlign: 'center', height: '300px' }}>
      <h1>Set Content Control Appearance by Type</h1>
      <button onClick={setContentControlAppearance}>Generate Document</button>
    </div>
  );
}

export default App;
The document after setting the appearance is shown below:

Appearance Only Affects the Editing View
Appearance is a visual hint for editors and does not change the control type, content or lock state. After the appearance is set to Hidden, the control no longer shows a frame in Word, but it can still be selected and filled in; neither printing nor PDF export leaves a tag or border behind. When the filling behavior needs to be restricted, use lock settings instead of relying on appearance.
FAQ
Why is there no visible change after setting the control color
SDTProperties.Color applies to the control tag and is displayed only when Appearance is Tags. If the document still uses the default appearance, the color will not appear on the page. Set Appearance to SdtAppearance.Tags and save the document again, and the tag will carry the configured color.
How to tell whether a control is inline or block-level
Read DocumentObjectType: StructureDocumentTagInline is an inline control located inside a paragraph, while StructureDocumentTag is a block-level control located directly in the section body or a table cell. Both expose their properties through SDTProperties, but they have different traversal entry points, and a block-level control does not go through a paragraph.
Why are the content controls in a table not read
Table content is not in the ChildObjects of body paragraphs; you have to enter Table.Rows, then access Row.Cells, and finally scan Cell.ChildObjects. The scanTable helper in the example handles this layer specifically. If only body paragraphs are traversed, the fields in the table will be missed.
Why does a newly created control read back with a different type
The type is determined by the content of the saved document. When creating a control, set SDTType explicitly, then write the content and save; if the type is omitted or left to the default, some controls are recognized as RichText when read back. When reading an existing document, SDTType reflects the type actually stored in the document, which can be used to verify that the template was generated as expected.
Get a Free License
Spire.Doc for JavaScript offers a 30-day full-featured free trial license with no functional limitations. Apply here to evaluate before purchasing.
Accept or Reject Tracked Changes in Word with JavaScript in React
2026-11-07 05:18:15 Written by Amy ZhaoA Word document written by several people usually records its changes as revisions: inserted content is underlined, deleted content is kept with strikethrough, and formatting adjustments are marked as well. When the document is finalized, these revisions have to be resolved. Accepting a revision confirms the change, and the inserted content becomes part of the body text; rejecting a revision undoes the change, and the document returns to its state before the edit. Once the revisions have been processed, the revision records are cleared and the document can circulate as a formal version.
This article uses Spire.Doc for JavaScript to accept and reject revisions in the browser. The document is loaded through the virtual file system (VFS); when processing is finished, it is saved and downloaded directly. The whole process runs on the client side with WebAssembly, with no Office installation and no backend service required.
This article covers three features:
- Accept All Revisions in a Word Document
- Reject All Revisions in a Word Document
- Check Whether a Document Still Contains Unprocessed Revisions
For installation and project setup, refer to Integrating Spire.Doc for JavaScript in a React Project. The examples below assume that Spire.Doc is installed and the WebAssembly module is initialized.
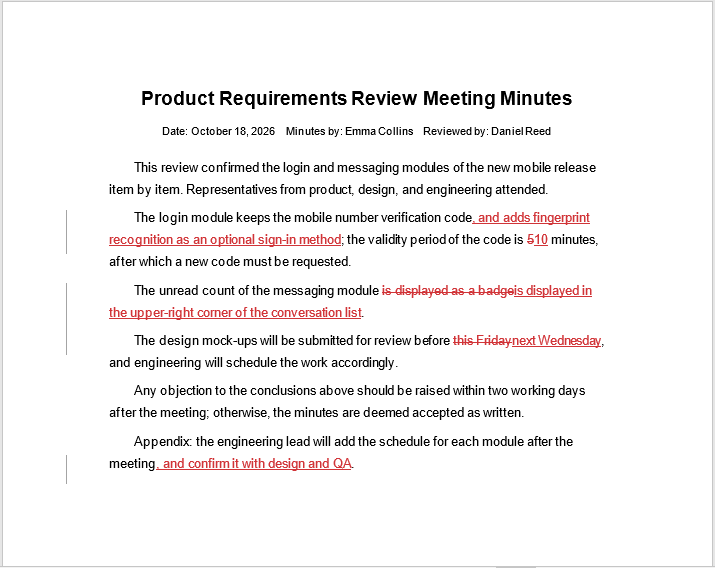
The sample document used in this article is a set of meeting minutes; its insertions, deletions, and replacements were all added by the reviewer during the review.
The meeting minutes with tracked changes:
Accept All Revisions in a Word Document
To accept all revisions in a Word document, call the Document.AcceptChanges() method. The method walks through the revision records in the document and handles each revision type separately; when it finishes, no revision marks remain in the document:
| Revision type | Result after accepting |
|---|---|
Insertion (RevisionType.Insertion) |
The inserted content is kept and becomes part of the body text |
Deletion (RevisionType.Deletion) |
The deleted content is removed permanently |
Format change (RevisionType.FormatChange) |
The changed formatting is adopted |
Move (RevisionType.Moving) |
The content stays at its new position |
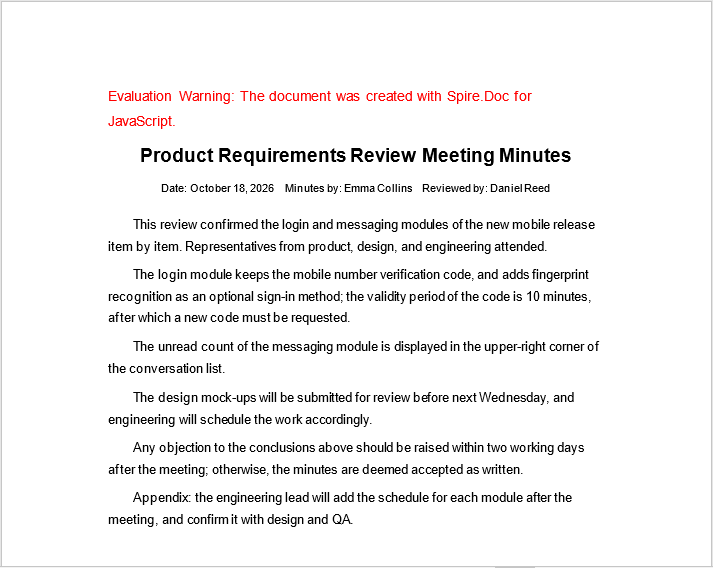
In the sample document, the reviewer changed the verification code validity period from 5 minutes to 10 minutes and moved the submission deadline for the design mock-ups from this Friday to next Wednesday. The code below loads the document and accepts all revisions; in the result file, the inserted content is kept and the deleted content is gone.
The specific steps are as follows:
- Get the Spire.Doc WASM module and confirm that it is ready.
- Load the font, read the sample document into the VFS and load it as a
Document. - Call
Document.AcceptChanges()to accept all revisions in the document. - Save the result file with
SaveToFile(). - Read the result file from the VFS and trigger a browser download.
The code for accepting all revisions in a Word document is as follows:
function App() {
  const acceptChanges = async () => {
    // Get the Spire.Doc WASM module
    const wasmModule = window.wasmModule?.spiredoc;

    // Check if the module is ready
    if (!wasmModule) {
      alert('Spire.Doc is not ready yet');
      return;
    }

    // Load the font and the document to be processed
    await window.spire.FetchFileToVFS('Sample.docx', '', `${process.env.PUBLIC_URL}/data/`);

    // Create a Document instance and load the document
    const doc = new wasmModule.Document();
    doc.LoadFromFile('Sample.docx');

    // Accept all revisions in the document
    doc.AcceptChanges();

    // Save the result file
    const outputFileName = 'AcceptChanges.docx';
    doc.SaveToFile({ fileName: outputFileName, fileFormat: wasmModule.FileFormat.Docx2013 });
    doc.Dispose();

    // Read the generated file from the VFS and trigger the download
    const fileArray = window.dotnetRuntime.Module.FS.readFile(outputFileName);
    const blob = new Blob([fileArray], { type: 'application/vnd.openxmlformats-officedocument.wordprocessingml.document' });
    const url = URL.createObjectURL(blob);
    const a = document.createElement('a');
    a.href = url;
    a.download = outputFileName;
    a.click();
    URL.revokeObjectURL(url);
  };

  return (
    <div style={{ textAlign: 'center', height: '300px' }}>
      <h1>Accept All Revisions in a Word Document</h1>
      <button onClick={acceptChanges}>
        Accept Revisions
      </button>
    </div>
  );
}

export default App;
The document after accepting all revisions:
Reject All Revisions in a Word Document
To reject all revisions in a Word document, call the Document.RejectChanges() method. The method also walks through the revision records in the document, but in the opposite direction: every change is undone, and the document returns to the state it had before the revisions were made:
| Revision type | Result after rejecting |
|---|---|
Insertion (RevisionType.Insertion) |
The inserted content is removed and the document returns to its state before the insertion |
Deletion (RevisionType.Deletion) |
The deleted content is restored to the body text |
Format change (RevisionType.FormatChange) |
The formatting is restored to what it was before the change |
Move (RevisionType.Moving) |
The content returns to its original position |
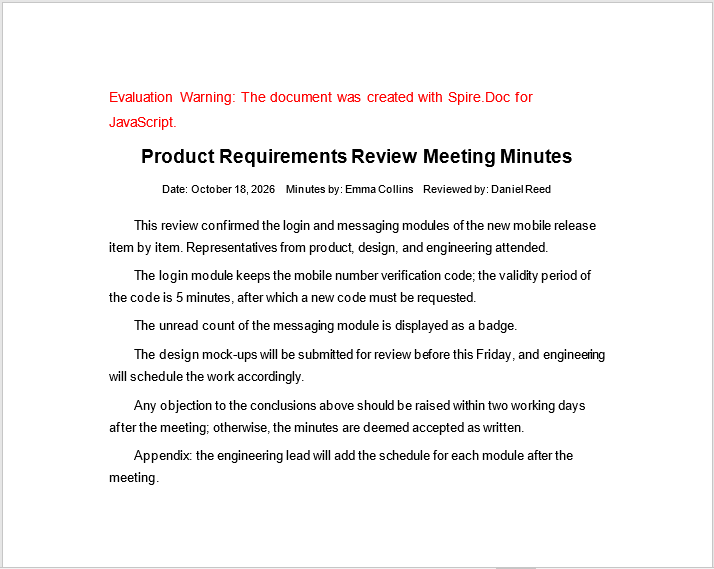
The code below loads the same meeting minutes, rejects all revisions and saves the result; in the result file every change is undone and the original text is restored.
The specific steps are as follows:
- Get the Spire.Doc WASM module and confirm that it is ready.
- Load the font, read the sample document into the VFS and load it as a
Document. - Call
Document.RejectChanges()to reject all revisions in the document. - Save the result file with
SaveToFile(). - Read the result file from the VFS and trigger a browser download.
The code for rejecting all revisions in a Word document is as follows:
function App() {
  const rejectChanges = async () => {
    // Get the Spire.Doc WASM module
    const wasmModule = window.wasmModule?.spiredoc;

    // Check if the module is ready
    if (!wasmModule) {
      alert('Spire.Doc is not ready yet');
      return;
    }

    // Load the font and the document to be processed
    await window.spire.FetchFileToVFS('Sample.docx', '', `${process.env.PUBLIC_URL}/data/`);

    // Create a Document instance and load the document
    const doc = new wasmModule.Document();
    doc.LoadFromFile('Sample.docx');

    // Reject all revisions in the document
    doc.RejectChanges();

    // Save the result file
    const outputFileName = 'RejectChanges.docx';
    doc.SaveToFile({ fileName: outputFileName, fileFormat: wasmModule.FileFormat.Docx2013 });
    doc.Dispose();

    // Read the generated file from the VFS and trigger the download
    const fileArray = window.dotnetRuntime.Module.FS.readFile(outputFileName);
    const blob = new Blob([fileArray], { type: 'application/vnd.openxmlformats-officedocument.wordprocessingml.document' });
    const url = URL.createObjectURL(blob);
    const a = document.createElement('a');
    a.href = url;
    a.download = outputFileName;
    a.click();
    URL.revokeObjectURL(url);
  };

  return (
    <div style={{ textAlign: 'center', height: '300px' }}>
      <h1>Reject All Revisions in a Word Document</h1>
      <button onClick={rejectChanges}>
        Reject Revisions
      </button>
    </div>
  );
}

export default App;
The document after rejecting all revisions:
Check Whether a Document Still Contains Unprocessed Revisions
To check whether a document still contains unprocessed revisions, read the Document.HasChanges property. The property is read-only: it returns true when revision records exist in the document, and false after all revisions have been accepted or rejected.
In batch processing, this property can decide whether an accept or reject operation is required: check first whether the document contains revisions, then process it according to the business rules, which avoids redundant writes to documents that have no revisions. The code below reads the property after loading the document, accepts all revisions only when revisions exist, and then saves the result.
The specific steps are as follows:
- Get the Spire.Doc WASM module and confirm that it is ready.
- Load the font, read the sample document into the VFS and load it as a
Document. - Read the
Document.HasChangesproperty to check whether unprocessed revisions remain in the document. - When revisions exist, call
Document.AcceptChanges()to process them all, then save the result file. - Read the result file from the VFS and trigger a browser download.
The code for checking whether a document still contains unprocessed revisions is as follows:
function App() {
  const checkChanges = async () => {
    // Get the Spire.Doc WASM module
    const wasmModule = window.wasmModule?.spiredoc;

    // Check if the module is ready
    if (!wasmModule) {
      alert('Spire.Doc is not ready yet');
      return;
    }

    // Load the font and the document to be processed
    await window.spire.FetchFileToVFS('Sample.docx', '', `${process.env.PUBLIC_URL}/data/`);

    // Create a Document instance and load the document
    const doc = new wasmModule.Document();
    doc.LoadFromFile('Sample.docx');

    // Check whether unprocessed revisions remain in the document
    if (doc.HasChanges) {
      // Accept all revisions when revisions exist
      doc.AcceptChanges();
    }

    // The property becomes false after the revisions have been processed
    console.log(doc.HasChanges);

    // Save the result file
    const outputFileName = 'CheckChanges.docx';
    doc.SaveToFile({ fileName: outputFileName, fileFormat: wasmModule.FileFormat.Docx2013 });
    doc.Dispose();

    // Read the generated file from the VFS and trigger the download
    const fileArray = window.dotnetRuntime.Module.FS.readFile(outputFileName);
    const blob = new Blob([fileArray], { type: 'application/vnd.openxmlformats-officedocument.wordprocessingml.document' });
    const url = URL.createObjectURL(blob);
    const a = document.createElement('a');
    a.href = url;
    a.download = outputFileName;
    a.click();
    URL.revokeObjectURL(url);
  };

  return (
    <div style={{ textAlign: 'center', height: '300px' }}>
      <h1>Check Whether a Document Still Contains Unprocessed Revisions</h1>
      <button onClick={checkChanges}>
        Check Revisions
      </button>
    </div>
  );
}

export default App;
FAQ
Why do revision marks still appear after revisions have been accepted
Accepting revisions modifies the document object in memory; if the result file is not saved, or if the original file rather than the processed file is opened, the revision marks remain in the document. In addition, the "Show Markup" option in Word only controls how revisions are displayed and does not change the revision records already saved in the document. Save the processed document as a new file, then open that file to confirm that the revisions have been cleared.
What is the difference between accepting and rejecting revisions
Accepting revisions confirms the reviewer's changes: inserted content is kept as body text, deleted content is removed, and formatting changes adopt the changed result. Rejecting revisions undoes those changes: inserted content is removed, deleted content is restored, and formatting returns to its state before the change. Both operations clear the revision records in the document, after which the document no longer distinguishes between the reviewer and the body text.
Can individual revisions be accepted or rejected one at a time
The current JavaScript binding provides the document-level Document.AcceptChanges() and Document.RejectChanges() methods. Document does not provide a collection for reading revisions one by one, nor an interface for accepting or rejecting a single revision. When a revision-by-revision decision is needed, handle it first in the Reviewing pane in Word, and then use the methods in this article to accept or reject the remaining revisions as a whole.
Are the author and time of revisions kept after accepting or rejecting them
No. When revisions are accepted or rejected, the revision records, together with the author and time recorded in them, are cleared, and the saved file no longer contains this information. If the origin of the changes has to be traced, keep the original document before processing, or archive the processing result and the original document separately.
Does calling AcceptChanges() on a document without revisions raise an error
No error is raised. Document.AcceptChanges() executes normally when the document contains no revision records, the document content stays unchanged, and the document can still be saved afterwards. To skip such documents in batch processing, read the Document.HasChanges property first and decide accordingly.
Get a Free License
Spire.Doc for JavaScript offers a 30-day full-featured free trial license with no functional limitations. Apply here to evaluate before purchasing.
Set Background Color for Selected Paragraphs and Text in a Word Document with JavaScript in React
2026-11-07 05:03:06 Written by Amy ZhaoIn a Word document, filling a key paragraph or sentence with a background color sets it apart and helps distinguish the layers of the content. The conclusion of a report, the key clause of a contract and the main points of training material are all suitable for marking with a background color. Compared with setting the color by hand one item at a time, processing in code is better suited to documents that follow a fixed format and is far easier to fit into an automated document-generation pipeline.
This article uses Spire.Doc for JavaScript to add a background color to selected paragraphs or text in a Word document in the browser. The document is loaded through the virtual file system (VFS), and the download is triggered as soon as processing is finished. The whole process runs on the client side with WebAssembly, requires no Office installation and depends on no backend service.
This article covers two features:
The two approaches serve different purposes: a paragraph background covers the whole paragraph area and appears as a solid rectangle, whereas a text background covers only the selected characters. The examples read Sample.docx from public/data; put that file into the public/data directory of the project before running them.
For installation and project setup, refer to Integrating Spire.Doc for JavaScript in a React Project. The examples below assume that Spire.Doc is installed and the WebAssembly module is initialized.
Set a Background Color for a Specific Paragraph
Spire.Doc for JavaScript adds a background color to a specific paragraph through the Paragraph.Format.BackColor property. Once the target paragraph object has been obtained, assigning a Color value to its Format.BackColor is all that is required. The background covers the line spacing and the blank area left by the first-line indent of the paragraph.
The members used in this section are listed below:
| Member | Purpose |
|---|---|
Section.Paragraphs |
The paragraph collection of the current section; retrieve a paragraph by index with get_Item(index) |
Paragraph.Format |
The formatting settings of the paragraph |
ParagraphFormat.BackColor |
The background color of the paragraph |
Color.FromArgb(a, r, g, b) |
Builds a color from its alpha, red, green and blue components |
The specific steps are as follows:
- Get the Spire.Doc WASM module and confirm that it is ready.
- Load the font and the sample document, create a
Documentobject and load the file into it. - Get the first section through
Document.Sections, then take the target paragraph fromSection.Paragraphs. - Assign a value to
Paragraph.Format.BackColorto set the paragraph background color. - Save the result file with
Document.SaveToFile(), read it from the VFS and trigger a browser download.
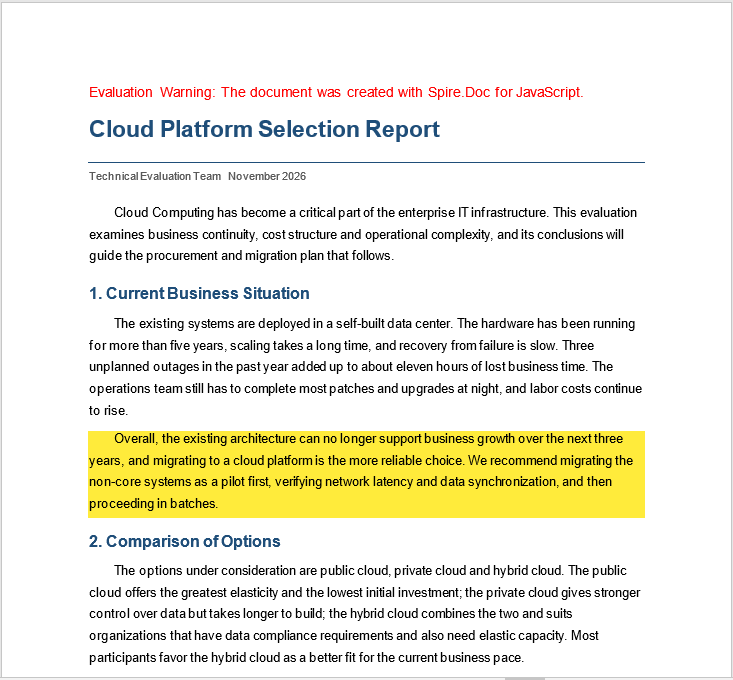
In the sample document, the paragraph that needs a background color is the 6th paragraph (index 5), the conclusion that begins "Overall, the existing architecture can no longer support…".
The code for adding a background color to a specific paragraph is as follows:
function App() {
  const setParagraphBackColor = async () => {
    // Get the Spire.Doc WASM module
    const wasmModule = window.wasmModule?.spiredoc;

    // Check if the module is ready
    if (!wasmModule) {
      alert('Spire.Doc is not ready yet');
      return;
    }

    // Load the sample document
    await window.spire.FetchFileToVFS('Sample.docx', '', `${process.env.PUBLIC_URL}/data/`);

    // Create a Document instance and load the document
    const doc = new wasmModule.Document();
    doc.LoadFromFile('Sample.docx');

    // Get the first section
    const section = doc.Sections.get_Item(0);

    // Get the 6th paragraph (index 5)
    const paragraph = section.Paragraphs.get_Item(5);

    // Set the background color of the paragraph
    paragraph.Format.BackColor = wasmModule.Color.FromArgb(255, 255, 235, 59);

    // Save the result file
    const outputFileName = 'ParagraphBackground.docx';
    doc.SaveToFile({ fileName: outputFileName, fileFormat: wasmModule.FileFormat.Docx2013 });
    doc.Dispose();

    // Read the generated file from the VFS and trigger the download
    const fileArray = window.dotnetRuntime.Module.FS.readFile(outputFileName);
    const blob = new Blob([fileArray], { type: 'application/vnd.openxmlformats-officedocument.wordprocessingml.document' });
    const url = URL.createObjectURL(blob);
    const a = document.createElement('a');
    a.href = url;
    a.download = outputFileName;
    a.click();
    URL.revokeObjectURL(url);
  };

  return (
    <div style={{ textAlign: 'center', height: '300px' }}>
      <h1>Set a Background Color for a Specific Paragraph</h1>
      <button onClick={setParagraphBackColor}>
        Set Paragraph Background Color
      </button>
    </div>
  );
}

export default App;
The document with a background color on the specified paragraph is shown below; the conclusion paragraph appears as a solid yellow block:
Set a Background Color for Specific Text
To add a background color to specific text, first locate the target text with Paragraph.Find(), obtain the text range with TextSelection.GetAsOneRange(), and then set the text background through TextRange.CharacterFormat.TextBackgroundColor. The color covers only the characters that were found; the rest of the paragraph is left untouched.
The members used in this section are listed below:
| Member | Purpose |
|---|---|
Paragraph.Find(given, caseSensitive, wholeWord) |
Finds text in the paragraph and returns a TextSelection |
TextSelection.GetAsOneRange() |
Converts the search result into a single TextRange |
TextRange.CharacterFormat |
The character formatting of the text range |
CharacterFormat.TextBackgroundColor |
The background color of the text range |
The three parameters of Paragraph.Find() are the text to find, whether the search is case-sensitive, and whether whole words only are matched. For example, Find('Cloud Computing', true, false) searches case-sensitively and does not require a whole-word match.
The specific steps are as follows:
- Get the Spire.Doc WASM module and confirm that it is ready.
- Load the font and the sample document, create a
Documentobject and load the file into it. - Get the first section through
Document.Sections, then take the target paragraph fromSection.Paragraphs. - Use
Paragraph.Find()to locate the given text in the paragraph. - Use
TextSelection.GetAsOneRange()to obtain the text range that was found. - Set the background color of the text range through
TextRange.CharacterFormat.TextBackgroundColor. - Save the result file with
Document.SaveToFile(), read it from the VFS and trigger a browser download.
In the sample document, the text to be colored, "Cloud Computing", is in the 3rd paragraph (index 2).
The code for adding a background color to specific text is as follows:
function App() {
  const setTextBackColor = async () => {
    // Get the Spire.Doc WASM module
    const wasmModule = window.wasmModule?.spiredoc;

    // Check if the module is ready
    if (!wasmModule) {
      alert('Spire.Doc is not ready yet');
      return;
    }

    // Load the sample document
    await window.spire.FetchFileToVFS('Sample.docx', '', `${process.env.PUBLIC_URL}/data/`);

    // Create a Document instance and load the document
    const doc = new wasmModule.Document();
    doc.LoadFromFile('Sample.docx');

    // Get the first section
    const section = doc.Sections.get_Item(0);

    // Get the 3rd paragraph (index 2)
    const paragraph = section.Paragraphs.get_Item(2);

    // Find the given text in the paragraph
    const selection = paragraph.Find('Cloud Computing', true, false);

    // Get the text range of the found text
    const range = selection.GetAsOneRange();

    // Set the background color of the text range
    range.CharacterFormat.TextBackgroundColor = wasmModule.Color.FromArgb(255, 144, 238, 144);

    // Save the result file
    const outputFileName = 'TextBackground.docx';
    doc.SaveToFile({ fileName: outputFileName, fileFormat: wasmModule.FileFormat.Docx2013 });
    doc.Dispose();

    // Read the generated file from the VFS and trigger the download
    const fileArray = window.dotnetRuntime.Module.FS.readFile(outputFileName);
    const blob = new Blob([fileArray], { type: 'application/vnd.openxmlformats-officedocument.wordprocessingml.document' });
    const url = URL.createObjectURL(blob);
    const a = document.createElement('a');
    a.href = url;
    a.download = outputFileName;
    a.click();
    URL.revokeObjectURL(url);
  };

  return (
    <div style={{ textAlign: 'center', height: '300px' }}>
      <h1>Set a Background Color for Specific Text</h1>
      <button onClick={setTextBackColor}>
        Set Text Background Color
      </button>
    </div>
  );
}

export default App;
The document with a background color on the specified text is shown below; the color covers only the phrase "Cloud Computing":

Set a Background Color for All the Text in a Paragraph
When every text block in a paragraph should carry a background color instead of one solid paragraph rectangle, iterate over the paragraph's ChildObjects and set TextBackgroundColor on each TextRange:
for (let i = 0; i < paragraph.ChildObjects.Count; i++) {
  const child = paragraph.ChildObjects.get_Item(i);
  if (child.DocumentObjectType === wasmModule.DocumentObjectType.TextRange) {
    child.CharacterFormat.TextBackgroundColor = wasmModule.Color.FromArgb(255, 144, 238, 144);
  }
}
Clear a Background Color That Has Been Set
Setting the color to fully transparent clears the background, and the paragraph and the text range are written in the same way:
// Clear the paragraph background color
paragraph.Format.BackColor = wasmModule.Color.FromArgb(0, 0, 0, 0);

// Clear the text background color
range.CharacterFormat.TextBackgroundColor = wasmModule.Color.FromArgb(0, 0, 0, 0);
After the color has been cleared, the corresponding shading fill is written back as auto, and no color is displayed in the document.
FAQ
What is the difference between a paragraph background and a text background
Paragraph.Format.BackColor sets a background for the whole paragraph area, including the line spacing and the blank space left by the first-line indent, and shows on the page as one solid rectangle; CharacterFormat.TextBackgroundColor acts only on the characters in a TextRange, so the color hugs the edge of the text. Use the former to emphasize a whole conclusion paragraph, and the latter to mark only the keyword in a sentence.
Why is the color that has been set not applied
Both BackColor and TextBackgroundColor require a Color object. Spire.Doc for JavaScript offers only one way to construct a Color, FromArgb(a, r, g, b); there are no predefined colors such as Color.Yellow. Assigning '#FFFF00' or 0xFFFF00 directly does not raise an exception, but the background is not applied on the page. Writing the color as Color.FromArgb(255, 255, 235, 59) is all that is needed.
Why does an error occur when the searched text does not exist
Paragraph.Find() does not return null when it finds nothing; it returns an empty TextSelection, and calling GetAsOneRange() on it throws Arg_NullReferenceException. Check whether the paragraph text contains the target content before searching:
if (paragraph.Text.includes('Cloud Computing')) {
  const range = paragraph.Find('Cloud Computing', true, false).GetAsOneRange();
  range.CharacterFormat.TextBackgroundColor = wasmModule.Color.FromArgb(255, 144, 238, 144);
}
Can a background color be set for several paragraphs at once
Paragraph.Format.BackColor applies to one paragraph at a time. To process several paragraphs, loop over Section.Paragraphs and assign the color to each of them. The following code sets a background color for the 5th and 6th paragraphs:
const section = doc.Sections.get_Item(0);

for (let i = 4; i <= 5; i++) {
  section.Paragraphs.get_Item(i).Format.BackColor = wasmModule.Color.FromArgb(255, 255, 235, 59);
}
Can text still be found when it is split into several runs
Yes. While a document is being edited, Word often splits one sentence into several runs; Paragraph.Find() matches across those runs, and the complete text range of the result is still obtained through GetAsOneRange().
Get a Free License
Spire.Doc for JavaScript offers a 30-day full-featured free trial license with no functional limitations. Apply here to evaluate before purchasing.
Remove Paragraphs from a Word Document with JavaScript in React
2026-11-07 05:02:48 Written by Amy ZhaoWhen a Word document from another system is tidied up, its body often still holds explanatory paragraphs that are no longer used, and copy-paste and repeated line breaks leave a large number of blank paragraphs. Such content takes up space and affects the consistency and readability of the document. Removing the paragraphs one by one by hand requires repeated manual work and is hard to fit into a batch web workflow; handling it on the backend would mean uploading the document to a server.
This article uses Spire.Doc for JavaScript to remove paragraphs from a Word document in the browser. The document is loaded through the virtual file system (VFS); when removal is finished, it is saved and downloaded directly. The whole process runs on the client side with WebAssembly, with no Office installation and no backend service required.
This article covers three features:
- Remove a Specific Paragraph from a Word Document
- Remove Blank Paragraphs from a Word Document
- Remove All Paragraphs from a Word Document
For installation and project setup, refer to Integrating Spire.Doc for JavaScript in a React Project. The examples below assume that Spire.Doc is installed and the WebAssembly module is initialized.
Remove a Specific Paragraph from a Word Document
A section in a Word document consists of a number of body objects, and the paragraphs among them are managed by the Section.Paragraphs collection. Spire.Doc for JavaScript offers two ways to remove items from the collection:
| Method | Based on |
|---|---|
Paragraphs.RemoveAt(index) |
The position of the paragraph (zero-based index) |
Paragraphs.Remove(paragraph) |
The paragraph object itself |
The index starts at 0, so the first paragraph corresponds to index 0. Each removal shifts the indexes of the following paragraphs forward by one. The sample document contains 11 paragraphs in total; the 6th paragraph (index 5) is a note left over from the 2019 edition, and it has to be removed before the formal release.
The specific steps are as follows:
- Get the Spire.Doc WASM module and confirm that it is ready.
- Load the font, read the sample document into the VFS and load it as a
Document. - Get the first section and call
Section.Paragraphs.RemoveAt()to remove the paragraph at index 5. - Save the result file with
SaveToFile(). - Read the result file from the VFS and trigger a browser download.
The code for removing a specific paragraph from a Word document is as follows:
function App() {
  const removeParagraph = async () => {
    // Get the Spire.Doc WASM module
    const wasmModule = window.wasmModule?.spiredoc;

    // Check if the module is ready
    if (!wasmModule) {
      alert('Spire.Doc is not ready yet');
      return;
    }

    // Load the document to be processed
    await window.spire.FetchFileToVFS('Sample.docx', '', `${process.env.PUBLIC_URL}/data/`);

    // Create a Document instance and load the document
    const doc = new wasmModule.Document();
    doc.LoadFromFile('Sample.docx');

    // Get the first section
    const section = doc.Sections.get_Item(0);

    // Remove the paragraph at index 5, that is the 6th paragraph in the body
    section.Paragraphs.RemoveAt(5);

    // Save the result file
    const outputFileName = 'RemoveParagraph.docx';
    doc.SaveToFile({ fileName: outputFileName, fileFormat: wasmModule.FileFormat.Docx2013 });
    doc.Dispose();

    // Read the generated file from the VFS and trigger the download
    const fileArray = window.dotnetRuntime.Module.FS.readFile(outputFileName);
    const blob = new Blob([fileArray], { type: 'application/vnd.openxmlformats-officedocument.wordprocessingml.document' });
    const url = URL.createObjectURL(blob);
    const a = document.createElement('a');
    a.href = url;
    a.download = outputFileName;
    a.click();
    URL.revokeObjectURL(url);
  };

  return (
    <div style={{ textAlign: 'center', height: '300px' }}>
      <h1>Remove a Specific Paragraph from a Word Document</h1>
      <button onClick={removeParagraph}>
        Remove Paragraph
      </button>
    </div>
  );
}

export default App;
In the document after the paragraph has been removed, the original 6th paragraph is no longer in the body:

Remove a Specific Paragraph by Paragraph Object
Paragraphs.RemoveAt() removes by position, whereas Paragraphs.Remove() takes a paragraph object directly. To remove a particular paragraph, retrieve it first with Paragraphs.get_Item(index) and then pass it to Remove():
// Remove by object: retrieve the paragraph at index 5 first, then remove it
const section = doc.Sections.get_Item(0);
const paragraph = section.Paragraphs.get_Item(5);
section.Paragraphs.Remove(paragraph);
Both forms produce the same result. When the paragraph reference is already available and its position no longer matters, removal by object is the more direct option.
Remove Blank Paragraphs from a Word Document
A blank paragraph is a paragraph in the body that contains no text, and it is common in documents copied from web pages or edited with repeated line breaks. To determine whether a paragraph is blank, read its Text property: a paragraph is treated as blank when the text is an empty string after leading and trailing whitespace is removed, and a paragraph that contains spaces only is also a blank paragraph.
Section.Body.ChildObjects is the collection of child objects in the section body; it contains paragraphs as well as other body objects such as tables. When iterating, use the DocumentObjectType property to tell object types apart and process paragraphs only. The sample document has 6 blank paragraphs between the body paragraphs, two of which contain spaces only:

The specific steps are as follows:
- Get the Spire.Doc WASM module and confirm that it is ready.
- Load the font, read the sample document into the VFS and load it as a
Document. - Iterate over every section in the document and obtain the
Body.ChildObjectscollection of the section body. - Iterate over the collection backwards, and for each object whose
DocumentObjectTypeisDocumentObjectType.Paragraphand whoseTextis empty after trimming, remove it withChildObjects.Remove(). - Save the result file with
SaveToFile(), read it from the VFS and trigger a browser download.
The code for removing blank paragraphs from a Word document is as follows:
function App() {
  const removeBlankParagraphs = async () => {
    // Get the Spire.Doc WASM module
    const wasmModule = window.wasmModule?.spiredoc;

    // Check if the module is ready
    if (!wasmModule) {
      alert('Spire.Doc is not ready yet');
      return;
    }

    // Load the document to be processed
    await window.spire.FetchFileToVFS('SampleWithBlankLines.docx', '', `${process.env.PUBLIC_URL}/data/`);

    // Create a Document instance and load the document
    const doc = new wasmModule.Document();
    doc.LoadFromFile('SampleWithBlankLines.docx');

    // Process the sections one by one; the sample document has only one section
    for (let s = 0; s < doc.Sections.Count; s++) {
      const body = doc.Sections.get_Item(s).Body;

      // Iterate backwards so that removal does not affect the indexes not yet processed
      for (let i = body.ChildObjects.Count - 1; i >= 0; i--) {
        const item = body.ChildObjects.get_Item(i);

        // Process paragraphs only; other body objects such as tables stay untouched
        if (item.DocumentObjectType !== wasmModule.DocumentObjectType.Paragraph) {
          continue;
        }

        // Empty after trimming, so it is treated as a blank paragraph
        if (item.Text.trim() === '') {
          body.ChildObjects.Remove(item);
        }
      }
    }

    // Save the result file
    const outputFileName = 'RemoveBlankParagraphs.docx';
    doc.SaveToFile({ fileName: outputFileName, fileFormat: wasmModule.FileFormat.Docx2013 });
    doc.Dispose();

    // Read the generated file from the VFS and trigger the download
    const fileArray = window.dotnetRuntime.Module.FS.readFile(outputFileName);
    const blob = new Blob([fileArray], { type: 'application/vnd.openxmlformats-officedocument.wordprocessingml.document' });
    const url = URL.createObjectURL(blob);
    const a = document.createElement('a');
    a.href = url;
    a.download = outputFileName;
    a.click();
    URL.revokeObjectURL(url);
  };

  return (
    <div style={{ textAlign: 'center', height: '300px' }}>
      <h1>Remove Blank Paragraphs from a Word Document</h1>
      <button onClick={removeBlankParagraphs}>
        Remove Blank Paragraphs
      </button>
    </div>
  );
}

export default App;
In the document after the blank paragraphs have been removed, the body paragraphs follow one another directly:

Remove All Paragraphs from a Word Document
To empty the body of the whole document, call Section.Paragraphs.Clear() on each section. The method removes every paragraph in the body of that section, with no need to work out the indexes one by one:
| Method | Scope |
|---|---|
Section.Paragraphs.Clear() |
All paragraphs in the body of that section |
Section.Paragraphs.RemoveAt(index) |
The paragraph at the specified position in the body of that section |
A document with several sections has to be cleared section by section. Tables are not part of the paragraph collection, so they remain after the paragraphs have been cleared.
The specific steps are as follows:
- Get the Spire.Doc WASM module and confirm that it is ready.
- Load the font, read the sample document into the VFS and load it as a
Document. - Iterate over every section in the document and call
Section.Paragraphs.Clear()on the paragraph collection of each section. - Save the result file with
SaveToFile(). - Read the result file from the VFS and trigger a browser download.
The code for removing all paragraphs from a Word document is as follows:
function App() {
  const removeAllParagraphs = async () => {
    // Get the Spire.Doc WASM module
    const wasmModule = window.wasmModule?.spiredoc;

    // Check if the module is ready
    if (!wasmModule) {
      alert('Spire.Doc is not ready yet');
      return;
    }

    // Load the document to be processed
    await window.spire.FetchFileToVFS('Sample.docx', '', `${process.env.PUBLIC_URL}/data/`);

    // Create a Document instance and load the document
    const doc = new wasmModule.Document();
    doc.LoadFromFile('Sample.docx');

    // Clear the body paragraphs of every section one by one
    for (let s = 0; s < doc.Sections.Count; s++) {
      doc.Sections.get_Item(s).Paragraphs.Clear();
    }

    // Save the result file
    const outputFileName = 'RemoveAllParagraphs.docx';
    doc.SaveToFile({ fileName: outputFileName, fileFormat: wasmModule.FileFormat.Docx2013 });
    doc.Dispose();

    // Read the generated file from the VFS and trigger the download
    const fileArray = window.dotnetRuntime.Module.FS.readFile(outputFileName);
    const blob = new Blob([fileArray], { type: 'application/vnd.openxmlformats-officedocument.wordprocessingml.document' });
    const url = URL.createObjectURL(blob);
    const a = document.createElement('a');
    a.href = url;
    a.download = outputFileName;
    a.click();
    URL.revokeObjectURL(url);
  };

  return (
    <div style={{ textAlign: 'center', height: '300px' }}>
      <h1>Remove All Paragraphs from a Word Document</h1>
      <button onClick={removeAllParagraphs}>
        Remove All Paragraphs
      </button>
    </div>
  );
}

export default App;
In the document after all paragraphs have been removed, no body content remains on the page:

FAQ
Why is a paragraph other than the expected one removed
Section.Paragraphs indexes by position, the index starts at 0, and blank paragraphs in the body are counted as well. The index at the same position usually points to different paragraphs in different documents: the sample document removes the 6th paragraph, but with another document index 5 may well be something else. Before removing, iterate over the collection and read the Text of each paragraph to confirm the position; alternatively, locate the target paragraph by its content and remove it with Paragraphs.Remove().
Why is there still a gap between paragraphs after the blank paragraphs have been removed
Gaps between paragraphs come from two sources: the blank paragraphs themselves, and the paragraph's own space before, space after and line spacing. Removing the blank paragraphs only removes the first source; the body paragraphs of the sample document have a 6-point space after, so gaps remain between them. For a tighter layout, adjust the spacing in the paragraph format instead, for example by setting the space after of every body paragraph to 0:
// Set the space after of every body paragraph to 0; the unit is points
const paragraphs = doc.Sections.get_Item(0).Paragraphs;
for (let i = 0; i < paragraphs.Count; i++) {
  paragraphs.get_Item(i).Format.AfterSpacing = 0;
}
Are tables in the document removed as well
No. Clear() acts on Section.Paragraphs, and that collection holds body paragraphs only; a table is another kind of body object and is not included in the collection, so it remains after the paragraphs have been cleared. Paragraphs inside table cells are likewise outside Section.Paragraphs, so iterating over the section body objects to remove blank paragraphs does not reach inside tables either.
Why does an index-out-of-range error occur when several paragraphs are removed at once
Each removal shifts the indexes of the following paragraphs forward by one, and the total count drops as well. When fixed indexes are removed in increasing order, the second removal is usually no longer the paragraph intended; once an index exceeds Paragraphs.Count - 1, RemoveAt() throws ArgumentOutOfRange_IndexMustBeLess. To remove several paragraphs, iterate from the end, always remove index 0, or adjust the index after each removal, as in the body-object walk.
Why does the saved document contain an extra English notice
When the document is saved with the evaluation version, Spire.Doc inserts an evaluation notice into the body (Evaluation Warning: The document was created with Spire.Doc for JavaScript.), and it is unrelated to the paragraph removal logic. After a temporary license is applied for or a commercial license is used, the paragraph no longer appears in the saved result.
Get a Free License
Spire.Doc for JavaScript offers a 30-day full-featured free trial license with no functional limitations. Apply here to evaluate before purchasing.
Add Check Box and Date Picker Content Controls to Word Documents with JavaScript in React
2026-11-07 05:00:34 Written by Amy ZhaoConfirmation forms, registration forms and signature pages usually need, in addition to text fields, two kinds of interactive elements: a set of items that can be checked, and a date in a consistent format. Boxes and dates drawn with ordinary characters may look similar, but they cannot record the checked state, and the date may be entered in various ways. Content controls turn these two kinds of input into structured objects: a check box stores its Checked state, and a date control stores the full date value and the display format.
This article uses Spire.Doc for JavaScript to create check box and date picker controls in the browser, and demonstrates how to load an existing document and toggle check box states in bulk. The processing is performed in WebAssembly: it does not depend on Office and requires no backend service.
This article covers the following topics:
The two kinds of controls correspond to the following types and property objects:
| Control type | SDTType value |
Control property class | Key properties |
|---|---|---|---|
| Check box content control | SdtType.CheckBox |
SdtCheckBox |
Checked |
| Date picker content control | SdtType.DatePicker |
SdtDate |
DateFormat, FullDate, CalendarType |
For installation and project setup, refer to Integrating Spire.Doc for JavaScript in a React Project. The examples below assume that Spire.Doc is installed and the WebAssembly module is initialized.
Add a Check Box Content Control
A check box content control represents a binary yes/no choice and usually appears in groups, for example a confirmation checklist, an equipment list or a set of service options. The control itself stores only the checked state, so the box symbol shown in the document has to be written into the control content as well.
The following members are involved in adding a check box content control:
| Member | Purpose |
|---|---|
SdtType.CheckBox |
Sets the control type to check box |
SdtCheckBox |
Control properties object of the check box |
SdtCheckBox.Checked |
Whether the box is currently checked |
TextRange |
Carries the box symbol displayed inside the control |
CharacterFormat.FontName |
Font used by the symbol; the example uses MS Gothic |
The specific steps are as follows:
- Get the Spire.Doc WASM module and confirm that it is ready.
- Load the font, create a document with the
Documentclass and add a section, then write the title and description. - For each item, create a
StructureDocumentTagInlinecontrol and setSDTTypetoSdtType.CheckBox. - Create a
SdtCheckBoxand setChecked, then write the matching box character intoSDTContent. - Save the result file with
SaveToFile(), read it from the VFS and trigger a browser download.
The code for adding a check box content control is as follows:
function App() {
  const addCheckBox = async () => {
    // Get the Spire.Doc WASM module
    const wasmModule = window.wasmModule?.spiredoc;

    if (!wasmModule) {
      alert('Spire.Doc is not ready yet');
      return;
    }

    // Load the font
    await window.spire.FetchFileToVFS('arial.ttf', '/Library/Fonts/', `${process.env.PUBLIC_URL}/font/`);
    await window.spire.FetchFileToVFS('arialbd.ttf', '/Library/Fonts/', `${process.env.PUBLIC_URL}/font/`);

    // Create a document and add a section
    const doc = new wasmModule.Document();
    const section = doc.AddSection();

    // Add the title and subtitle
    const titleParagraph = section.AddParagraph();
    const titleRange = titleParagraph.AppendText('Training Registration Confirmation');
    titleRange.CharacterFormat.FontName = 'Arial';
    titleRange.CharacterFormat.FontSize = 19;
    titleRange.CharacterFormat.Bold = true;
    titleRange.CharacterFormat.TextColor = wasmModule.Color.FromArgb(255, 15, 110, 90);
    titleParagraph.Format.AfterSpacing = 6;

    const subtitleParagraph = section.AddParagraph();
    const subtitleRange = subtitleParagraph.AppendText('Document Automation Essentials — November 12, 2026');
    subtitleRange.CharacterFormat.FontName = 'Arial';
    subtitleRange.CharacterFormat.FontSize = 9;
    subtitleRange.CharacterFormat.TextColor = wasmModule.Color.FromArgb(255, 89, 89, 89);
    subtitleParagraph.Format.AfterSpacing = 16;

    // Registrant information
    const info = section.AddParagraph();
    info.AppendText('Name: John Smith    Department: R&D Department');
    info.Format.AfterSpacing = 10;

    // Hint for the confirmation items
    const hint = section.AddParagraph();
    const hintRange = hint.AppendText('Please confirm the following items:');
    hintRange.CharacterFormat.FontName = 'Arial';
    hintRange.CharacterFormat.Bold = true;
    hint.Format.AfterSpacing = 6;

    // Add a check box control for each item
    const items = [
      ['I have read the course guidelines', 'read-notice', true],
      ['I need lunch arranged', 'need-lunch', false],
      ['I need printed handouts', 'need-handout', true],
    ];

    for (const [label, tag, checked] of items) {
      const paragraph = section.AddParagraph();
      paragraph.Format.LeftIndent = 24;

      // Create an inline content control
      const sdt = new wasmModule.StructureDocumentTagInline(doc);
      paragraph.ChildObjects.Add(sdt);

      // Set the control type to check box
      sdt.SDTProperties.SDTType = wasmModule.SdtType.CheckBox;
      sdt.SDTProperties.Alias = label;
      sdt.SDTProperties.Tag = tag;

      // Set the checked state
      const box = new wasmModule.SdtCheckBox();
      box.Checked = checked;
      sdt.SDTProperties.ControlProperties = box;

      // Write the box symbol that matches the state
      const symbol = new wasmModule.TextRange(doc);
      symbol.Text = checked ? '☒' : '☐';
      symbol.CharacterFormat.FontName = 'MS Gothic';
      symbol.CharacterFormat.FontSize = 12;
      sdt.SDTContent.ChildObjects.Add(symbol);

      // Append the item name after the control
      paragraph.AppendText('  ' + label);
    }

    // Add the closing note
    const noteParagraph = section.AddParagraph();
    noteParagraph.Format.BeforeSpacing = 10;
    const noteRange = noteParagraph.AppendText('Please return this form to the training team by November 8.');
    noteRange.CharacterFormat.FontName = 'Arial';
    noteRange.CharacterFormat.FontSize = 9;
    noteRange.CharacterFormat.TextColor = wasmModule.Color.FromArgb(255, 89, 89, 89);

    // Save the result file
    const outputFileName = 'AddCheckBoxContentControl.docx';
    doc.SaveToFile({ fileName: outputFileName, fileFormat: wasmModule.FileFormat.Docx2013 });
    doc.Dispose();

    // Read the generated file from the VFS and trigger the download
    const fileArray = window.dotnetRuntime.Module.FS.readFile(outputFileName);
    const blob = new Blob([fileArray], { type: 'application/vnd.openxmlformats-officedocument.wordprocessingml.document' });
    const url = URL.createObjectURL(blob);
    const a = document.createElement('a');
    a.href = url;
    a.download = outputFileName;
    a.click();
    URL.revokeObjectURL(url);
  };

  return (
    <div style={{ textAlign: 'center', height: '300px' }}>
      <h1>Add Check Box Content Control</h1>
      <button onClick={addCheckBox}>Generate Document</button>
    </div>
  );
}

export default App;
Document after adding a check box content control:
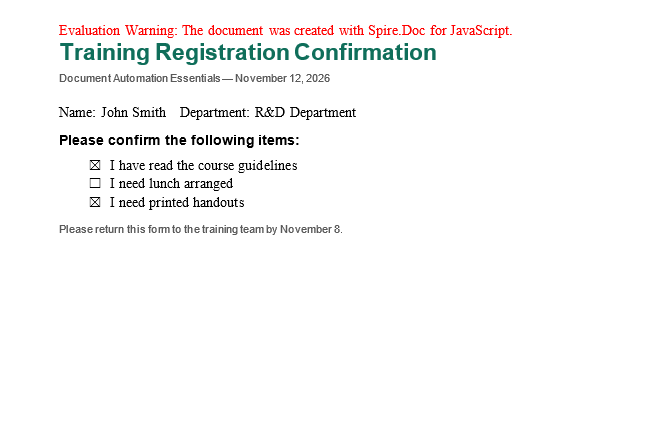
The Checked State and the Displayed Symbol Must Stay in Sync
SdtCheckBox.Checked stores the logical state of the control, while the box shown by Word comes from the characters in the control content. The two are independent: if Checked is set without writing a symbol, the resulting check box is blank in Word; if only the symbol is changed without changing Checked, the state read by a program disagrees with what is displayed.
The example handles both at once with a conditional expression: when checked is true it writes ☒ (U+2612), otherwise ☐ (U+2610), and sets the font to MS Gothic so that both characters have a matching glyph. When an existing document is modified later, the same rule has to be applied to keep the two in sync.
Add a Date Picker Content Control
A date picker content control lets the person filling in the form select a date from a calendar and displays it in a preset format, which avoids 2026.11.3, 2026-11-03 and November 3, 2026 all appearing in the same document. The control stores the full date value, while the display format is determined by DateFormat; the two are set separately.
The following members are involved in adding a date picker content control:
| Member | Purpose |
|---|---|
SdtType.DatePicker |
Sets the control type to date picker |
SdtDate |
Control properties object of the date control |
SdtDate.DateFormat |
Display format, such as yyyy.MM.dd |
SdtDate.FullDate |
Full date value; requires a JavaScript Date object |
SdtDate.CalendarType |
Calendar type; the example uses CalendarType.Default |
The specific steps are as follows:
- Get the Spire.Doc WASM module and confirm that it is ready.
- Load the font, create a document with the
Documentclass and add a section, then write the title and contract number. - Create a
StructureDocumentTagInlinecontrol in the paragraph and setSDTTypetoSdtType.DatePicker. - Create a
SdtDate, setDateFormat,CalendarTypeandFullDate, and assign it toControlProperties. - Write the formatted date text, save the file and read it from the VFS for download.
The code for adding a date picker content control is as follows:
function App() {
  const addDatePicker = async () => {
    // Get the Spire.Doc WASM module
    const wasmModule = window.wasmModule?.spiredoc;

    if (!wasmModule) {
      alert('Spire.Doc is not ready yet');
      return;
    }

    // Load the font
    await window.spire.FetchFileToVFS('arial.ttf', '/Library/Fonts/', `${process.env.PUBLIC_URL}/font/`);
    await window.spire.FetchFileToVFS('arialbd.ttf', '/Library/Fonts/', `${process.env.PUBLIC_URL}/font/`);

    // Create a document and add a section
    const doc = new wasmModule.Document();
    const section = doc.AddSection();

    // Add the title and subtitle
    const titleParagraph = section.AddParagraph();
    const titleRange = titleParagraph.AppendText('Service Agreement Signing Information');
    titleRange.CharacterFormat.FontName = 'Arial';
    titleRange.CharacterFormat.FontSize = 19;
    titleRange.CharacterFormat.Bold = true;
    titleRange.CharacterFormat.TextColor = wasmModule.Color.FromArgb(255, 15, 110, 90);
    titleParagraph.Format.AfterSpacing = 6;

    const subtitleParagraph = section.AddParagraph();
    const subtitleRange = subtitleParagraph.AppendText('Contract No. XM-2026-0527');
    subtitleRange.CharacterFormat.FontName = 'Arial';
    subtitleRange.CharacterFormat.FontSize = 9;
    subtitleRange.CharacterFormat.TextColor = wasmModule.Color.FromArgb(255, 89, 89, 89);
    subtitleParagraph.Format.AfterSpacing = 16;

    // Add the explanatory text before the control
    const paragraph = section.AddParagraph();
    paragraph.AppendText('Signing date:  ');

    // Create an inline content control and add it to the paragraph
    const sdt = new wasmModule.StructureDocumentTagInline(doc);
    paragraph.ChildObjects.Add(sdt);

    // Set the control type to date picker
    sdt.SDTProperties.SDTType = wasmModule.SdtType.DatePicker;
    sdt.SDTProperties.Alias = 'Signing Date';
    sdt.SDTProperties.Tag = 'sign-date';
    sdt.SDTProperties.Appearance = wasmModule.SdtAppearance.Tags;

    // Set the date format and date value
    const date = new wasmModule.SdtDate();
    date.CalendarType = wasmModule.CalendarType.Default;
    date.DateFormat = 'yyyy.MM.dd';
    date.FullDate = new Date(2026, 10, 3);
    sdt.SDTProperties.ControlProperties = date;

    // Write the formatted date text
    const content = new wasmModule.TextRange(doc);
    content.Text = '2026.11.03';
    sdt.SDTContent.ChildObjects.Add(content);

    // Add the signing location
    const place = section.AddParagraph();
    place.AppendText('Signing location: Meeting Room, 3rd Floor, Building A, Beichen Science Park');

    // Add a note about the format
    const noteParagraph = section.AddParagraph();
    noteParagraph.Format.BeforeSpacing = 10;
    const noteRange = noteParagraph.AppendText('The display format of the date control is determined by DateFormat; the example uses yyyy.MM.dd.');
    noteRange.CharacterFormat.FontName = 'Arial';
    noteRange.CharacterFormat.FontSize = 9;
    noteRange.CharacterFormat.TextColor = wasmModule.Color.FromArgb(255, 89, 89, 89);

    // Save the result file
    const outputFileName = 'AddDatePickerContentControl.docx';
    doc.SaveToFile({ fileName: outputFileName, fileFormat: wasmModule.FileFormat.Docx2013 });
    doc.Dispose();

    // Read the generated file from the VFS and trigger the download
    const fileArray = window.dotnetRuntime.Module.FS.readFile(outputFileName);
    const blob = new Blob([fileArray], { type: 'application/vnd.openxmlformats-officedocument.wordprocessingml.document' });
    const url = URL.createObjectURL(blob);
    const a = document.createElement('a');
    a.href = url;
    a.download = outputFileName;
    a.click();
    URL.revokeObjectURL(url);
  };

  return (
    <div style={{ textAlign: 'center', height: '300px' }}>
      <h1>Add Date Picker Content Control</h1>
      <button onClick={addDatePicker}>Generate Document</button>
    </div>
  );
}

export default App;
Document after adding a date picker content control:
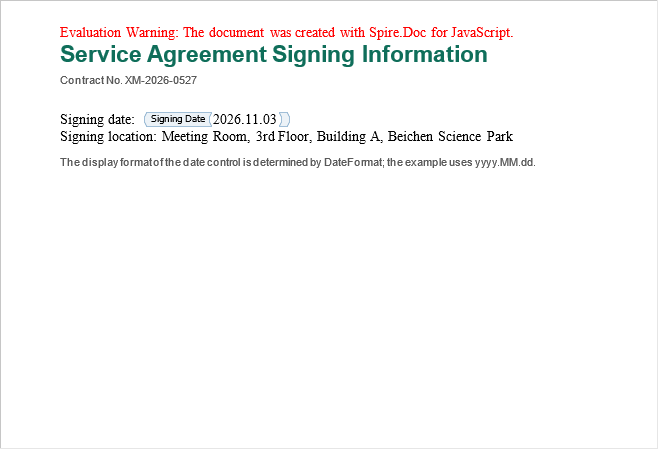
Date Formats and the Month in the JavaScript Date Object
DateFormat uses Word's date format placeholders, and upper and lower case have different meanings:
| Placeholder | Meaning | Example |
|---|---|---|
yyyy |
Four-digit year | 2026 |
MM |
Two-digit month, zero-padded | 11 |
dd |
Two-digit day, zero-padded | 03 |
FullDate requires a JavaScript Date object; passing a string triggers a type validation error. Note that the month in the Date constructor is zero-based, so new Date(2026, 10, 3) means November 3, 2026, not October.
Toggle Check Box States in Bulk
After confirmation forms are collected, a common requirement is to reverse all check states, or to reset them according to new registrations. Clicking each box by hand is slow and easy to get wrong. Iterating over the check box controls in the document with code, flipping Checked and updating the box symbols, handles every item in one pass.
The traversal is the same as above: first check whether a body object is a paragraph, then whether a child object of the paragraph is a StructureDocumentTagInline, and finally filter by SdtType.CheckBox. The example reads CheckBoxContentControl.docx from public/data, so put that file in the project's public/data directory before running it.
| Member | Purpose |
|---|---|
Document.LoadFromFile(path) |
Loads a document from the VFS |
SDTProperties.ControlProperties |
Gets the SdtCheckBox object |
SdtCheckBox.Checked |
Reads or writes the checked state |
SDTContent.ChildObjects |
Iterates over the symbol text inside the control and updates it |
The specific steps are as follows:
- Get the Spire.Doc WASM module and confirm that it is ready.
- Load the font, read
CheckBoxContentControl.docxinto the VFS and load it as aDocument. - Iterate over the body objects of each section and the child objects of each paragraph, and filter out the check box content controls.
- Flip
Checked, then update the text of everyTextRangeinside the control to the matching box symbol. - Save the result file with
SaveToFile(), read it from the VFS and trigger a browser download.
The code for toggling the check box states in bulk is as follows:
function App() {
  const updateCheckBox = async () => {
    // Get the Spire.Doc WASM module
    const wasmModule = window.wasmModule?.spiredoc;

    if (!wasmModule) {
      alert('Spire.Doc is not ready yet');
      return;
    }

    // Load the document to be processed
    await window.spire.FetchFileToVFS('CheckBoxContentControl.docx', '', `${process.env.PUBLIC_URL}/data/`);

    const doc = new wasmModule.Document();
    doc.LoadFromFile('CheckBoxContentControl.docx');

    // Iterate over the sections and find check box content controls
    for (let s = 0; s < doc.Sections.Count; s++) {
      const section = doc.Sections.get_Item(s);
      for (let i = 0; i < section.Body.ChildObjects.Count; i++) {
        const obj = section.Body.ChildObjects.get_Item(i);
        if (obj.DocumentObjectType !== wasmModule.DocumentObjectType.Paragraph) continue;

        for (let j = 0; j < obj.ChildObjects.Count; j++) {
          const child = obj.ChildObjects.get_Item(j);
          if (child.DocumentObjectType !== wasmModule.DocumentObjectType.StructureDocumentTagInline) continue;
          if (child.SDTProperties.SDTType !== wasmModule.SdtType.CheckBox) continue;

          // Toggle the checked state
          const box = child.SDTProperties.ControlProperties;
          box.Checked = !box.Checked;

          // Update the box symbol inside the control
          for (let k = 0; k < child.SDTContent.ChildObjects.Count; k++) {
            const inner = child.SDTContent.ChildObjects.get_Item(k);
            if (inner.DocumentObjectType === wasmModule.DocumentObjectType.TextRange) {
              inner.Text = box.Checked ? '☒' : '☐';
            }
          }
        }
      }
    }

    // Save the result file
    const outputFileName = 'UpdateCheckBox.docx';
    doc.SaveToFile({ fileName: outputFileName, fileFormat: wasmModule.FileFormat.Docx2013 });
    doc.Dispose();

    // Read the generated file from the VFS and trigger the download
    const fileArray = window.dotnetRuntime.Module.FS.readFile(outputFileName);
    const blob = new Blob([fileArray], { type: 'application/vnd.openxmlformats-officedocument.wordprocessingml.document' });
    const url = URL.createObjectURL(blob);
    const a = document.createElement('a');
    a.href = url;
    a.download = outputFileName;
    a.click();
    URL.revokeObjectURL(url);
  };

  return (
    <div style={{ textAlign: 'center', height: '300px' }}>
      <h1>Toggle Check Box States</h1>
      <button onClick={updateCheckBox}>Generate Document</button>
    </div>
  );
}

export default App;
The comparison before and after processing is shown below; the left image is the original document and the right image is the document after toggling:
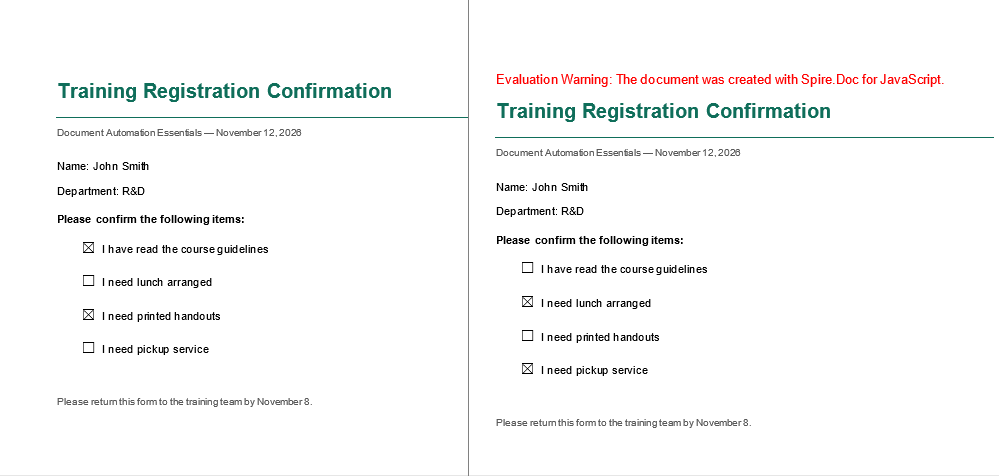
FAQ
Why is no box displayed for a check box content control in Word
Cause: Checked only determines the logical state; Word does not draw a symbol from it. The box inside the control comes from the characters in SDTContent — the example writes ☒ (U+2612) or ☐ (U+2610) and specifies the MS Gothic font. Without this content the control appears blank in the document.
Solution: Write the box character into SDTContent at the same time as setting Checked, and choose the character according to the state so that the displayed symbol matches the stored value.
Why does passing a string to FullDate raise an error
Cause: SdtDate.FullDate expects a JavaScript Date object, not a formatted string. Assigning a string to it raises a type error when the property is saved or read.
Solution: Use date.FullDate = new Date(2026, 10, 3) and write the displayed text separately through a TextRange; keep in mind that the month argument is zero-based.
Why does the box in the document not change after toggling Checked
Cause: The logical state and the displayed content are separate. After the program changes Checked, the characters in SDTContent remain as they were, so the document still shows the old symbol.
Solution: Iterate over SDTContent.ChildObjects after changing Checked and update each TextRange.Text to the matching box character. Changing only one of the two leaves the state and the display inconsistent.
Is there a difference between MM and mm in a date format
Cause: In Word date formats, M/MM stands for the month and m/mm for the minute; d/dd stands for the day and y/yyyy for the year. Writing yyyy.mm.dd displays the minute in the month position, which is not the intended result.
Solution: Use yyyy.MM.dd as the example does, and check the case of every placeholder in the format string.
Get a Free License
Spire.Doc for JavaScript offers a 30-day full-featured free trial license with no functional limitations. Apply here to evaluate before purchasing.
Add Text, Rich Text and Picture Content Controls to Word Documents with JavaScript in React
2026-11-07 04:59:37 Written by Amy ZhaoDocuments such as contract templates, onboarding registration forms and project initiation applications usually need a number of editable positions left in a fixed layout. A plain paragraph with an underline can produce a similar effect, but the person filling it in may delete the instructions by accident, and there is no way to restrict the type of content that can be entered. Word content controls are designed for exactly this purpose: they wrap a piece of content into a separate object with a type and properties, which both constrains the filling range and makes the content easy for programs to recognize and process in batches.
Inserting content controls one by one in desktop software is suitable for a small number of documents; once documents have to be generated in batches in a web workflow, manual operation becomes impractical. Uploading files to a server for processing, on the other hand, takes the documents off the user's device. This article uses Spire.Doc for JavaScript to add content controls directly in the browser: documents are read into memory through the virtual file system (VFS), written back to the VFS after processing and then downloaded. The whole process does not depend on Office and requires no backend service.
This article covers the following topics:
All three control types are created by StructureDocumentTagInline; they differ in the value of SDTProperties.SDTType and in the control properties:
| Control type | SDTType value |
Control property class |
|---|---|---|
| Text content control | SdtType.Text |
SdtText |
| Rich text content control | SdtType.RichText |
SdtText |
| Picture content control | SdtType.Picture |
DocPicture |
For installation and project setup, refer to Integrating Spire.Doc for JavaScript in a React Project. The examples below assume that Spire.Doc is installed and the WebAssembly module is initialized.
Add a Text Content Control
A text content control accepts plain text input and is suitable for fields that do not allow complex formatting, such as a project name, a contact person or a department name. Create an inline control with StructureDocumentTagInline, set SDTType to SdtType.Text, and then use SdtText to control whether multiple lines are allowed.
The following members are involved in adding a text content control:
| Member | Purpose |
|---|---|
StructureDocumentTagInline(document) |
Creates an inline content control object |
SDTProperties.SDTType |
Sets the control type, here SdtType.Text |
SDTProperties.ControlProperties |
Type-specific properties; SdtText for a text control |
SdtText.IsMultiline |
Whether multiple lines of input are allowed |
SDTContent.ChildObjects |
Holds the text content inside the control |
The specific steps are as follows:
- Get the Spire.Doc WASM module and confirm that it is ready.
- Load the font, create a document with the
Documentclass and add a section. - Create a
StructureDocumentTagInlinecontrol in the paragraph and setSDTTypetoSdtType.Text. - Set the multiline property with
SdtText, and writeTextRangecontent intoSDTContent. - Save the result file with
SaveToFile(), read it from the VFS and trigger a browser download.
The code for adding a text content control is as follows:
function App() {
  const addTextControl = async () => {
    // Get the Spire.Doc WASM module
    const wasmModule = window.wasmModule?.spiredoc;

    if (!wasmModule) {
      alert('Spire.Doc is not ready yet');
      return;
    }

    // Load the font
    await window.spire.FetchFileToVFS('arial.ttf', '/Library/Fonts/', `${process.env.PUBLIC_URL}/font/`);
    await window.spire.FetchFileToVFS('arialbd.ttf', '/Library/Fonts/', `${process.env.PUBLIC_URL}/font/`);

    // Create a document and add a section
    const doc = new wasmModule.Document();
    const section = doc.AddSection();

    // Add the title paragraph
    const titleParagraph = section.AddParagraph();
    const titleRange = titleParagraph.AppendText('Project Initiation Application');
    titleRange.CharacterFormat.FontName = 'Arial';
    titleRange.CharacterFormat.FontSize = 19;
    titleRange.CharacterFormat.Bold = true;
    titleRange.CharacterFormat.TextColor = wasmModule.Color.FromArgb(255, 15, 110, 90);
    titleParagraph.Format.AfterSpacing = 6;

    // Add the subtitle
    const subtitleParagraph = section.AddParagraph();
    const subtitleRange = subtitleParagraph.AppendText('Technical Committee — November 2026');
    subtitleRange.CharacterFormat.FontName = 'Arial';
    subtitleRange.CharacterFormat.FontSize = 9;
    subtitleRange.CharacterFormat.TextColor = wasmModule.Color.FromArgb(255, 89, 89, 89);
    subtitleParagraph.Format.AfterSpacing = 16;

    // Add the text before the control
    const paragraph = section.AddParagraph();
    paragraph.AppendText('Project name:  ');

    // Create an inline content control and add it to the paragraph
    const sdt = new wasmModule.StructureDocumentTagInline(doc);
    paragraph.ChildObjects.Add(sdt);

    // Set the control type to text
    sdt.SDTProperties.SDTType = wasmModule.SdtType.Text;
    const textProperties = new wasmModule.SdtText(true);
    textProperties.IsMultiline = true;
    sdt.SDTProperties.ControlProperties = textProperties;

    // Set the alias, tag and appearance
    sdt.SDTProperties.Alias = 'Project Name';
    sdt.SDTProperties.Tag = 'project-name';
    sdt.SDTProperties.Appearance = wasmModule.SdtAppearance.Tags;

    // Write the content of the control
    const content = new wasmModule.TextRange(doc);
    content.Text = 'Intelligent Document Processing Platform (Phase II)';
    sdt.SDTContent.ChildObjects.Add(content);

    // Add a filling note
    const noteParagraph = section.AddParagraph();
    noteParagraph.Format.BeforeSpacing = 10;
    const noteRange = noteParagraph.AppendText('Note: keep the project name within 30 characters and consistent with the project approval document.');
    noteRange.CharacterFormat.FontName = 'Arial';
    noteRange.CharacterFormat.FontSize = 9;
    noteRange.CharacterFormat.TextColor = wasmModule.Color.FromArgb(255, 89, 89, 89);

    // Save the result file
    const outputFileName = 'AddTextContentControl.docx';
    doc.SaveToFile({ fileName: outputFileName, fileFormat: wasmModule.FileFormat.Docx2013 });
    doc.Dispose();

    // Read the generated file from the VFS and trigger the download
    const fileArray = window.dotnetRuntime.Module.FS.readFile(outputFileName);
    const blob = new Blob([fileArray], { type: 'application/vnd.openxmlformats-officedocument.wordprocessingml.document' });
    const url = URL.createObjectURL(blob);
    const a = document.createElement('a');
    a.href = url;
    a.download = outputFileName;
    a.click();
    URL.revokeObjectURL(url);
  };

  return (
    <div style={{ textAlign: 'center', height: '300px' }}>
      <h1>Add Text Content Control</h1>
      <button onClick={addTextControl}>Generate Document</button>
    </div>
  );
}

export default App;
Document after adding a text content control:
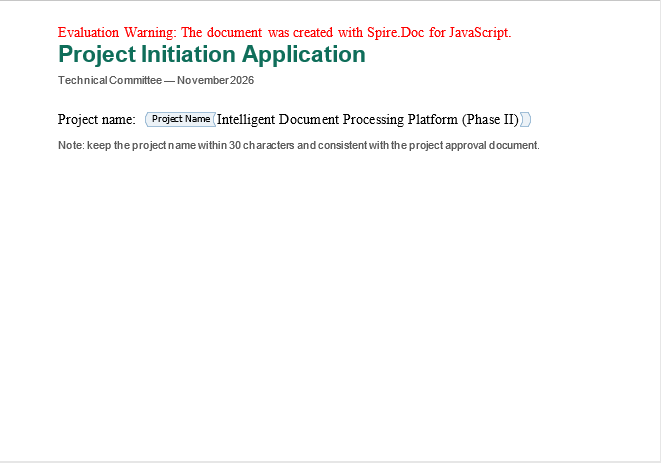
Alias, Tag and Appearance of a Content Control
SDTProperties has three groups of properties that are unrelated to the content itself but closely related to later processing:
| Property | Purpose |
|---|---|
Alias |
The name shown in Word, so that the person filling in the form can recognize the control |
Tag |
A machine-readable marker, usually in hyphenated English, for locating the control by business field |
Appearance |
How the control is displayed in the document; Tags shows alias tags on both sides of the content |
The example sets Appearance to SdtAppearance.Tags so that the generated document directly shows the control boundaries and aliases, which makes the result easy to check. If it is not set, Word uses the default display and the control looks no different from ordinary text.
Add a Rich Text Content Control
A rich text content control is also based on SdtText, but its type is SdtType.RichText. It allows fonts, font sizes, colors and bold formatting to be preserved inside the control, which makes it suitable for passages that need emphasis, such as version highlights, approval comments or supplementary contract clauses.
Compared with the text content control, the steps are basically the same, with one difference: SDTType uses SdtType.RichText, and the content of the control can be split into several TextRange objects that are formatted separately.
The specific steps are as follows:
- Get the Spire.Doc WASM module and confirm that it is ready.
- Load the font, create a document with the
Documentclass and add a section. - Create a
StructureDocumentTagInlinecontrol in the paragraph and setSDTTypetoSdtType.RichText. - Create several
TextRangeobjects in order, set their colors and bold settings, and add them toSDTContent. - Save the result file with
SaveToFile(), read it from the VFS and trigger a browser download.
The code for adding a rich text content control is as follows:
function App() {
  const addRichTextControl = async () => {
    // Get the Spire.Doc WASM module
    const wasmModule = window.wasmModule?.spiredoc;

    if (!wasmModule) {
      alert('Spire.Doc is not ready yet');
      return;
    }

    // Load the font
    await window.spire.FetchFileToVFS('arial.ttf', '/Library/Fonts/', `${process.env.PUBLIC_URL}/font/`);
    await window.spire.FetchFileToVFS('arialbd.ttf', '/Library/Fonts/', `${process.env.PUBLIC_URL}/font/`);

    // Create a document and add a section
    const doc = new wasmModule.Document();
    const section = doc.AddSection();

    // Add the title paragraph
    const titleParagraph = section.AddParagraph();
    const titleRange = titleParagraph.AppendText('Release Notes');
    titleRange.CharacterFormat.FontName = 'Arial';
    titleRange.CharacterFormat.FontSize = 19;
    titleRange.CharacterFormat.Bold = true;
    titleRange.CharacterFormat.TextColor = wasmModule.Color.FromArgb(255, 15, 110, 90);
    titleParagraph.Format.AfterSpacing = 6;

    // Add the subtitle
    const subtitleParagraph = section.AddParagraph();
    const subtitleRange = subtitleParagraph.AppendText('Northstar Document Platform — 2026.11');
    subtitleRange.CharacterFormat.FontName = 'Arial';
    subtitleRange.CharacterFormat.FontSize = 9;
    subtitleRange.CharacterFormat.TextColor = wasmModule.Color.FromArgb(255, 89, 89, 89);
    subtitleParagraph.Format.AfterSpacing = 16;

    // Add the text before the control
    const paragraph = section.AddParagraph();
    paragraph.AppendText('Release highlights:  ');

    // Create an inline content control and add it to the paragraph
    const sdt = new wasmModule.StructureDocumentTagInline(doc);
    paragraph.ChildObjects.Add(sdt);

    // Set the control type to rich text
    sdt.SDTProperties.SDTType = wasmModule.SdtType.RichText;
    const textProperties = new wasmModule.SdtText(true);
    textProperties.IsMultiline = true;
    sdt.SDTProperties.ControlProperties = textProperties;

    // Set the alias, tag and appearance
    sdt.SDTProperties.Alias = 'Release Highlights';
    sdt.SDTProperties.Tag = 'release-highlights';
    sdt.SDTProperties.Appearance = wasmModule.SdtAppearance.Tags;

    // First text fragment: green body text
    const firstRange = new wasmModule.TextRange(doc);
    firstRange.Text = 'This release supports';
    firstRange.CharacterFormat.FontName = 'Arial';
    firstRange.CharacterFormat.TextColor = wasmModule.Color.FromArgb(255, 0, 128, 0);
    sdt.SDTContent.ChildObjects.Add(firstRange);

    // Second text fragment: orange bold keyword
    const secondRange = new wasmModule.TextRange(doc);
    secondRange.Text = 'content controls';
    secondRange.CharacterFormat.FontName = 'Arial';
    secondRange.CharacterFormat.Bold = true;
    secondRange.CharacterFormat.TextColor = wasmModule.Color.FromArgb(255, 237, 125, 49);
    sdt.SDTContent.ChildObjects.Add(secondRange);

    // Third text fragment: green body text
    const thirdRange = new wasmModule.TextRange(doc);
    thirdRange.Text = ' for batch writing and format validation.';
    thirdRange.CharacterFormat.FontName = 'Arial';
    thirdRange.CharacterFormat.TextColor = wasmModule.Color.FromArgb(255, 0, 128, 0);
    sdt.SDTContent.ChildObjects.Add(thirdRange);

    // Add a tip
    const noteParagraph = section.AddParagraph();
    noteParagraph.Format.BeforeSpacing = 10;
    const noteRange = noteParagraph.AppendText('Tip: the content inside a rich text control can be split into several TextRange objects, each with its own font, color and bold setting.');
    noteRange.CharacterFormat.FontName = 'Arial';
    noteRange.CharacterFormat.FontSize = 9;
    noteRange.CharacterFormat.TextColor = wasmModule.Color.FromArgb(255, 89, 89, 89);

    // Save the result file
    const outputFileName = 'AddRichTextContentControl.docx';
    doc.SaveToFile({ fileName: outputFileName, fileFormat: wasmModule.FileFormat.Docx2013 });
    doc.Dispose();

    // Read the generated file from the VFS and trigger the download
    const fileArray = window.dotnetRuntime.Module.FS.readFile(outputFileName);
    const blob = new Blob([fileArray], { type: 'application/vnd.openxmlformats-officedocument.wordprocessingml.document' });
    const url = URL.createObjectURL(blob);
    const a = document.createElement('a');
    a.href = url;
    a.download = outputFileName;
    a.click();
    URL.revokeObjectURL(url);
  };

  return (
    <div style={{ textAlign: 'center', height: '300px' }}>
      <h1>Add Rich Text Content Control</h1>
      <button onClick={addRichTextControl}>Generate Document</button>
    </div>
  );
}

export default App;
Document after adding a rich text content control:
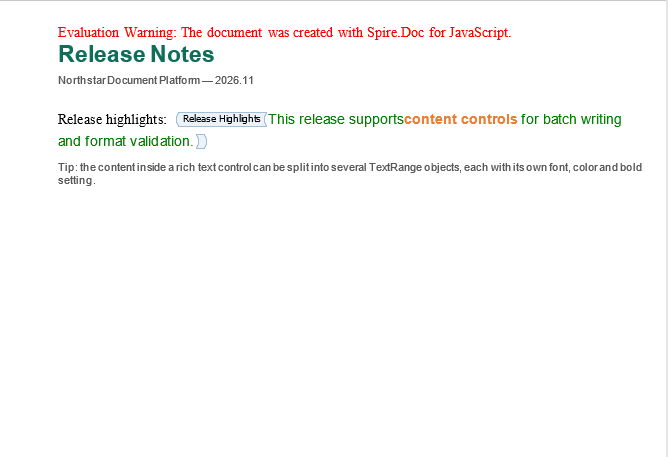
Combining Multiple Formats in a Rich Text Control
The content of a rich text control is made up of several TextRange objects joined in order. Each added TextRange appends a piece of text with its own formatting inside the control: it is possible to recolor only a keyword or to make a whole passage bold. Note that the CharacterFormat of a TextRange only affects that fragment and does not apply to the other content in the control; if the whole passage should share the same formatting, set it on each fragment.
Add a Picture Content Control
A picture content control holds a replaceable picture and is suitable for scenarios such as company logos, product diagrams and signature or seal positions. It is created in the same way as the previous two types: set SDTType to SdtType.Picture and use a DocPicture object as the control content.
A picture content control does not set its properties through ControlProperties; instead, the DocPicture is added directly to SDTContent. The example reads logo.png from public/data, so put that picture in the project's public/data directory before running it. Picture dimensions are measured in points and can be adjusted after LoadImage():
| Member | Purpose |
|---|---|
DocPicture(document) |
Creates a picture object |
DocPicture.LoadImage(path) |
Loads a picture from the VFS |
DocPicture.Width / Height |
Display size of the picture, in points |
The specific steps are as follows:
- Get the Spire.Doc WASM module and confirm that it is ready.
- Load the font and the sample picture into the VFS, then create a document and add a section.
- Create a
StructureDocumentTagInlinecontrol and setSDTTypetoSdtType.Picture. - Create a
DocPicture, load the picture, set its width and height, and add it toSDTContent. - Save the result file with
SaveToFile(), read it from the VFS and trigger a browser download.
The code for adding a picture content control is as follows:
function App() {
  const addPictureControl = async () => {
    // Get the Spire.Doc WASM module
    const wasmModule = window.wasmModule?.spiredoc;

    if (!wasmModule) {
      alert('Spire.Doc is not ready yet');
      return;
    }

    // Load the font and the sample picture
    await window.spire.FetchFileToVFS('arial.ttf', '/Library/Fonts/', `${process.env.PUBLIC_URL}/font/`);
    await window.spire.FetchFileToVFS('arialbd.ttf', '/Library/Fonts/', `${process.env.PUBLIC_URL}/font/`);
    await window.spire.FetchFileToVFS('logo.png', '', `${process.env.PUBLIC_URL}/data/`);

    // Create a document and add a section
    const doc = new wasmModule.Document();
    const section = doc.AddSection();

    // Add the title paragraph
    const titleParagraph = section.AddParagraph();
    const titleRange = titleParagraph.AppendText('Brand Identity');
    titleRange.CharacterFormat.FontName = 'Arial';
    titleRange.CharacterFormat.FontSize = 19;
    titleRange.CharacterFormat.Bold = true;
    titleRange.CharacterFormat.TextColor = wasmModule.Color.FromArgb(255, 15, 110, 90);
    titleParagraph.Format.AfterSpacing = 6;

    // Add the subtitle
    const subtitleParagraph = section.AddParagraph();
    const subtitleRange = subtitleParagraph.AppendText('Use the following logo on all external documents');
    subtitleRange.CharacterFormat.FontName = 'Arial';
    subtitleRange.CharacterFormat.FontSize = 9;
    subtitleRange.CharacterFormat.TextColor = wasmModule.Color.FromArgb(255, 89, 89, 89);
    subtitleParagraph.Format.AfterSpacing = 16;

    // Add the text before the picture
    const label = section.AddParagraph();
    label.AppendText('Company logo: ');

    // Create an inline content control and add it to a new paragraph
    const paragraph = section.AddParagraph();
    const sdt = new wasmModule.StructureDocumentTagInline(doc);
    paragraph.ChildObjects.Add(sdt);

    // Set the control type to picture
    sdt.SDTProperties.SDTType = wasmModule.SdtType.Picture;
    sdt.SDTProperties.Alias = 'Company Logo';
    sdt.SDTProperties.Tag = 'brand-logo';

    // Load the picture and set its display size
    const picture = new wasmModule.DocPicture(doc);
    picture.LoadImage('logo.png');
    picture.Width = 160;
    picture.Height = 54;
    sdt.SDTContent.ChildObjects.Add(picture);

    // Add a note about the size
    const noteParagraph = section.AddParagraph();
    noteParagraph.Format.BeforeSpacing = 10;
    const noteRange = noteParagraph.AppendText('The size of a picture content control is measured in points; the example uses 160 × 54 points.');
    noteRange.CharacterFormat.FontName = 'Arial';
    noteRange.CharacterFormat.FontSize = 9;
    noteRange.CharacterFormat.TextColor = wasmModule.Color.FromArgb(255, 89, 89, 89);

    // Save the result file
    const outputFileName = 'AddPictureContentControl.docx';
    doc.SaveToFile({ fileName: outputFileName, fileFormat: wasmModule.FileFormat.Docx2013 });
    doc.Dispose();

    // Read the generated file from the VFS and trigger the download
    const fileArray = window.dotnetRuntime.Module.FS.readFile(outputFileName);
    const blob = new Blob([fileArray], { type: 'application/vnd.openxmlformats-officedocument.wordprocessingml.document' });
    const url = URL.createObjectURL(blob);
    const a = document.createElement('a');
    a.href = url;
    a.download = outputFileName;
    a.click();
    URL.revokeObjectURL(url);
  };

  return (
    <div style={{ textAlign: 'center', height: '300px' }}>
      <h1>Add Picture Content Control</h1>
      <button onClick={addPictureControl}>Generate Document</button>
    </div>
  );
}

export default App;
Document after adding a picture content control:
FAQ
What is the difference between a content control and ordinary text
Ordinary text is just a run of characters in a paragraph, so a program can only find it by position or by its text content. A content control is a separate object with a type, alias, tag and lock state, whose business meaning can be read directly through SDTProperties. In Word it also indicates the fillable area with a tag or a border. For templates that need to collect data and be reused repeatedly, content controls are usually easier to maintain.
What can I do if the generated content control shows no border in Word
With the default appearance, the control looks much the same as ordinary text. Set SDTProperties.Appearance to SdtAppearance.Tags to show alias tags on both sides of the control, or to SdtAppearance.BoundingBox to show a border in Word's editing view. Appearance only affects the display; it does not change the control type or the content.
How should I choose between a text content control and a rich text content control
If the field only accepts plain text and the person filling it in should not change the font or color, choose a text content control. If formats such as bold and color have to be preserved inside the control, or the content is itself a passage with emphasis, choose a rich text content control. In code the two differ only in SDTType and in how the content fragments are organized.
Why does the size set for a picture content control differ slightly from the actual size
When both DocPicture.Width and Height are set, the picture is scaled proportionally according to its original aspect ratio, so the final size may differ from the set values by one or two points. For an exact size, set only one dimension and let the other be calculated from the ratio, or crop the source picture to the target ratio before inserting it.
Get a Free License
Spire.Doc for JavaScript offers a 30-day full-featured free trial license with no functional limitations. Apply here to evaluate before purchasing.
Add Drop-Down List and Combo Box Content Controls to Word Documents with JavaScript in React
2026-11-06 01:09:49 Written by Amy ZhaoFields such as evaluation conclusions, department names and product line ownership usually take only a limited set of values. If the person filling in the form is allowed to type freely, it is easy to end up with "R&D Department", "R&D Center" and "R&D" used side by side, and the records have to be cleaned up one by one before they can be summarized. Word's drop-down list and combo box content controls write the allowed values into the document in advance, so the person filling in the form can only pick from them, and the data format is unified at the source.
The difference between the two lies in whether values outside the preset range are allowed: a drop-down list accepts only the options in the list, while a combo box also allows the user to enter something outside it. Which one to choose depends on whether the business needs to keep exceptions.
This article uses Spire.Doc for JavaScript to create both kinds of controls in the browser, and demonstrates how to update the list items and selected value of an existing combo box. All processing is performed in WebAssembly; documents never pass through a server.
This article covers the following topics:
- Add a Drop-Down List Content Control
- Add a Combo Box Content Control
- Update Combo Box List Items and Selected Value
Both kinds of controls mount their list data through SDTProperties.ControlProperties, and SdtListItem is a single item in the list:
| Control type | SDTType value |
Control property class | Allows custom input |
|---|---|---|---|
| Drop-down list content control | SdtType.DropDownList |
SdtDropDownList |
No |
| Combo box content control | SdtType.ComboBox |
SdtComboBox |
Yes |
For installation and project setup, refer to Integrating Spire.Doc for JavaScript in a React Project. The examples below assume that Spire.Doc is installed and the WebAssembly module is initialized.
Add a Drop-Down List Content Control
A drop-down list suits fields whose values are completely fixed, such as rating levels, approval conclusions and expense categories. When creating one, first set SDTType to SdtType.DropDownList, then construct an SdtDropDownList and add each option to ListItems as an SdtListItem.
The following members are involved in adding a drop-down list content control:
| Member | Purpose |
|---|---|
SdtType.DropDownList |
Sets the control type to drop-down list |
SdtDropDownList |
Control properties object of the drop-down list |
ListItems.Add(item) |
Appends an option to the list |
SdtListItem(displayText) |
Creates an option whose display text and value are the same |
SdtListItem(displayText, value) |
Creates an option with separate display text and value |
ListItems.get_Item(index) |
Gets an option by index, starting at 0 |
The specific steps are as follows:
- Get the Spire.Doc WASM module and confirm that it is ready.
- Load the font, create a document with the
Documentclass and add a section, then write the title and description. - Create a
StructureDocumentTagInlinecontrol in the paragraph and setSDTTypetoSdtType.DropDownList. - Create an
SdtDropDownList, add theSdtListItemoptions one by one, and assign it toControlProperties. - Write the text of the currently selected option into
SDTContent, save the file and read it from the VFS for download.
The code for adding a drop-down list content control is as follows:
function App() {
  const addDropDownList = async () => {
    // Get the Spire.Doc WASM module
    const wasmModule = window.wasmModule?.spiredoc;

    if (!wasmModule) {
      alert('Spire.Doc is not ready yet');
      return;
    }

    // Load the font
    await window.spire.FetchFileToVFS('arial.ttf', '/Library/Fonts/', `${process.env.PUBLIC_URL}/font/`);
    await window.spire.FetchFileToVFS('arialbd.ttf', '/Library/Fonts/', `${process.env.PUBLIC_URL}/font/`);

    // Create a document and add a section
    const doc = new wasmModule.Document();
    const section = doc.AddSection();

    // Add the title and subtitle
    const titleParagraph = section.AddParagraph();
    const titleRange = titleParagraph.AppendText('Supplier Rating Form');
    titleRange.CharacterFormat.FontName = 'Arial';
    titleRange.CharacterFormat.FontSize = 19;
    titleRange.CharacterFormat.Bold = true;
    titleRange.CharacterFormat.TextColor = wasmModule.Color.FromArgb(255, 15, 110, 90);
    titleParagraph.Format.AfterSpacing = 6;

    const subtitleParagraph = section.AddParagraph();
    const subtitleRange = subtitleParagraph.AppendText('Procurement Department    Q3 2026');
    subtitleRange.CharacterFormat.FontName = 'Arial';
    subtitleRange.CharacterFormat.FontSize = 9;
    subtitleRange.CharacterFormat.TextColor = wasmModule.Color.FromArgb(255, 89, 89, 89);
    subtitleParagraph.Format.AfterSpacing = 16;

    // Add the explanatory text before the control
    const paragraph = section.AddParagraph();
    paragraph.AppendText('Evaluation Result:  ');

    // Create an inline content control and add it to the paragraph
    const sdt = new wasmModule.StructureDocumentTagInline(doc);
    paragraph.ChildObjects.Add(sdt);

    // Set the control type to drop-down list
    sdt.SDTProperties.SDTType = wasmModule.SdtType.DropDownList;
    sdt.SDTProperties.Alias = 'Evaluation Result';
    sdt.SDTProperties.Tag = 'evaluation-result';
    sdt.SDTProperties.Appearance = wasmModule.SdtAppearance.Tags;

    // Build the drop-down list and add the options
    const list = new wasmModule.SdtDropDownList();
    list.ListItems.Add(new wasmModule.SdtListItem('Excellent'));
    list.ListItems.Add(new wasmModule.SdtListItem('Good'));
    list.ListItems.Add(new wasmModule.SdtListItem('Qualified'));
    list.ListItems.Add(new wasmModule.SdtListItem('Needs Improvement'));
    sdt.SDTProperties.ControlProperties = list;

    // Write the text of the currently selected option
    const content = new wasmModule.TextRange(doc);
    content.Text = list.ListItems.get_Item(1).DisplayText;
    sdt.SDTContent.ChildObjects.Add(content);

    // Add the closing note
    const noteParagraph = section.AddParagraph();
    noteParagraph.Format.BeforeSpacing = 10;
    const noteRange = noteParagraph.AppendText('A drop-down list only allows choices from the preset options, which suits fixed values such as conclusions and ratings.');
    noteRange.CharacterFormat.FontName = 'Arial';
    noteRange.CharacterFormat.FontSize = 9;
    noteRange.CharacterFormat.TextColor = wasmModule.Color.FromArgb(255, 89, 89, 89);

    // Save the result file
    const outputFileName = 'AddDropDownListContentControl.docx';
    doc.SaveToFile({ fileName: outputFileName, fileFormat: wasmModule.FileFormat.Docx2013 });
    doc.Dispose();

    // Read the generated file from the VFS and trigger the download
    const fileArray = window.dotnetRuntime.Module.FS.readFile(outputFileName);
    const blob = new Blob([fileArray], { type: 'application/vnd.openxmlformats-officedocument.wordprocessingml.document' });
    const url = URL.createObjectURL(blob);
    const a = document.createElement('a');
    a.href = url;
    a.download = outputFileName;
    a.click();
    URL.revokeObjectURL(url);
  };

  return (
    <div style={{ textAlign: 'center', height: '300px' }}>
      <h1>Add Drop-Down List Content Control</h1>
      <button onClick={addDropDownList}>Generate Document</button>
    </div>
  );
}

export default App;
Document after adding a drop-down list content control:
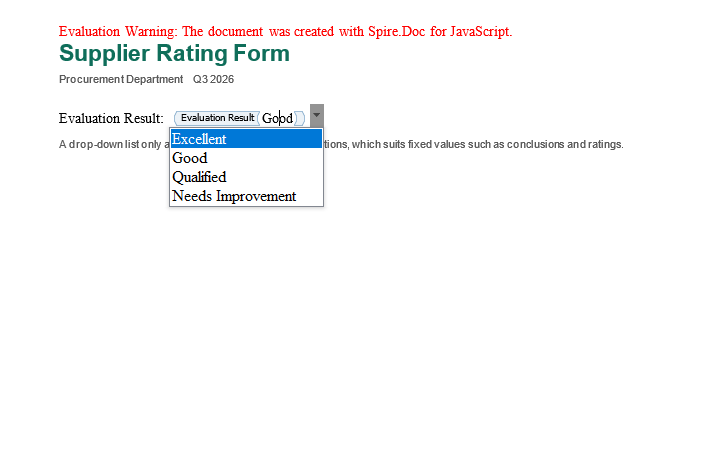
Display Text and Value of an Option
SdtListItem has two constructors:
| Form | Display text | Internal value |
|---|---|---|
new SdtListItem('Good') |
Good | Good |
new SdtListItem('Good', 'good') |
Good | good |
When only one argument is passed, the display text and the internal value are the same, which suits options that are themselves business terms. When two arguments are passed, the document displays the first one, while a program can read and compare the second one; setting the internal value to a stable English identifier keeps the meaning of the data unchanged even after the interface wording is adjusted.
Add a Combo Box Content Control
A combo box provides a list of candidates while allowing the person filling in the form to enter content outside the list. It suits fields such as product lines and supplier names that are "usually fixed, occasionally exceptional". The code structure is almost identical to that of the drop-down list; only the type changes to SdtType.ComboBox and the control property class to SdtComboBox.
The specific steps are as follows:
- Get the Spire.Doc WASM module and confirm that it is ready.
- Load the font, create a document with the
Documentclass and add a section, then write the title and description. - Create a
StructureDocumentTagInlinecontrol in the paragraph and setSDTTypetoSdtType.ComboBox. - Create an
SdtComboBox, add the candidate options, assign it toControlProperties, and write the text of the selected option. - Save the result file with
SaveToFile(), read it from the VFS and trigger a browser download.
The code for adding a combo box content control is as follows:
function App() {
  const addComboBox = async () => {
    // Get the Spire.Doc WASM module
    const wasmModule = window.wasmModule?.spiredoc;

    if (!wasmModule) {
      alert('Spire.Doc is not ready yet');
      return;
    }

    // Load the font
    await window.spire.FetchFileToVFS('arial.ttf', '/Library/Fonts/', `${process.env.PUBLIC_URL}/font/`);
    await window.spire.FetchFileToVFS('arialbd.ttf', '/Library/Fonts/', `${process.env.PUBLIC_URL}/font/`);

    // Create a document and add a section
    const doc = new wasmModule.Document();
    const section = doc.AddSection();

    // Add the title and subtitle
    const titleParagraph = section.AddParagraph();
    const titleRange = titleParagraph.AppendText('Product Line Registration Form');
    titleRange.CharacterFormat.FontName = 'Arial';
    titleRange.CharacterFormat.FontSize = 19;
    titleRange.CharacterFormat.Bold = true;
    titleRange.CharacterFormat.TextColor = wasmModule.Color.FromArgb(255, 15, 110, 90);
    titleParagraph.Format.AfterSpacing = 6;

    const subtitleParagraph = section.AddParagraph();
    const subtitleRange = subtitleParagraph.AppendText('Marketing Department    November 2026');
    subtitleRange.CharacterFormat.FontName = 'Arial';
    subtitleRange.CharacterFormat.FontSize = 9;
    subtitleRange.CharacterFormat.TextColor = wasmModule.Color.FromArgb(255, 89, 89, 89);
    subtitleParagraph.Format.AfterSpacing = 16;

    // Add the explanatory text before the control
    const paragraph = section.AddParagraph();
    paragraph.AppendText('Partner Product Line:  ');

    // Create an inline content control and add it to the paragraph
    const sdt = new wasmModule.StructureDocumentTagInline(doc);
    paragraph.ChildObjects.Add(sdt);

    // Set the control type to combo box
    sdt.SDTProperties.SDTType = wasmModule.SdtType.ComboBox;
    sdt.SDTProperties.Alias = 'Partner Product Line';
    sdt.SDTProperties.Tag = 'product-line';
    sdt.SDTProperties.Appearance = wasmModule.SdtAppearance.Tags;

    // Build the combo box and add the candidates
    const combo = new wasmModule.SdtComboBox();
    combo.ListItems.Add(new wasmModule.SdtListItem('Office Suite'));
    combo.ListItems.Add(new wasmModule.SdtListItem('Document Services'));
    combo.ListItems.Add(new wasmModule.SdtListItem('Data Platform'));
    combo.ListItems.Add(new wasmModule.SdtListItem('Presentation Components'));
    sdt.SDTProperties.ControlProperties = combo;

    // Write the text of the currently selected option
    const content = new wasmModule.TextRange(doc);
    content.Text = combo.ListItems.get_Item(1).DisplayText;
    sdt.SDTContent.ChildObjects.Add(content);

    // Add the closing note
    const noteParagraph = section.AddParagraph();
    noteParagraph.Format.BeforeSpacing = 10;
    const noteRange = noteParagraph.AppendText('A combo box keeps the preset options available while allowing content outside the list.');
    noteRange.CharacterFormat.FontName = 'Arial';
    noteRange.CharacterFormat.FontSize = 9;
    noteRange.CharacterFormat.TextColor = wasmModule.Color.FromArgb(255, 89, 89, 89);

    // Save the result file
    const outputFileName = 'AddComboBoxContentControl.docx';
    doc.SaveToFile({ fileName: outputFileName, fileFormat: wasmModule.FileFormat.Docx2013 });
    doc.Dispose();

    // Read the generated file from the VFS and trigger the download
    const fileArray = window.dotnetRuntime.Module.FS.readFile(outputFileName);
    const blob = new Blob([fileArray], { type: 'application/vnd.openxmlformats-officedocument.wordprocessingml.document' });
    const url = URL.createObjectURL(blob);
    const a = document.createElement('a');
    a.href = url;
    a.download = outputFileName;
    a.click();
    URL.revokeObjectURL(url);
  };

  return (
    <div style={{ textAlign: 'center', height: '300px' }}>
      <h1>Add Combo Box Content Control</h1>
      <button onClick={addComboBox}>Generate Document</button>
    </div>
  );
}

export default App;
Document after adding a combo box content control:
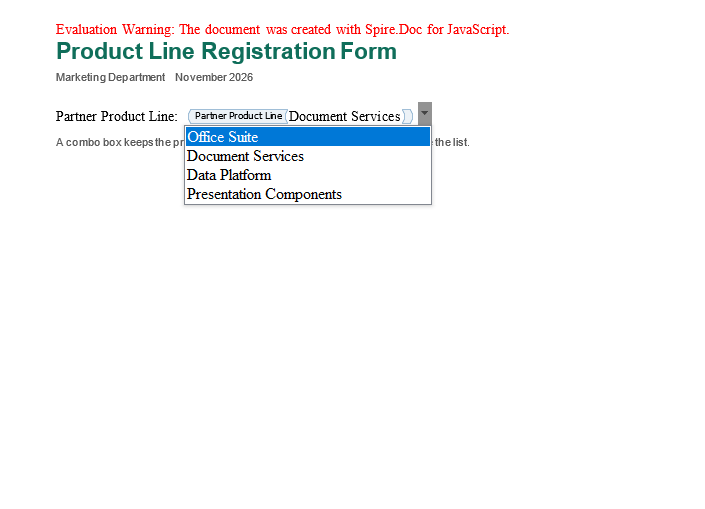
Update Combo Box List Items and Selected Value
In practice, options change over time: a product line is retired and has to be removed from the list; a new product line has to be added; and for some forms a recommended value has to be selected in advance. All of these operations can be performed on a loaded document without regenerating the whole file.
To update the control, first iterate over the paragraphs and tables in the body, find the control whose DocumentObjectType is StructureDocumentTagInline and whose type is ComboBox, then call the add and remove methods of ListItems on its ControlProperties. The example reads ComboBox.docx from public/data, so put that file in the project's public/data directory before running it.
| Member | Purpose |
|---|---|
ListItems.RemoveAt(index) |
Removes the option at the specified index |
ListItems.Add(item) |
Appends a new option |
ListItems.Count |
Current number of options |
ListItems.SelectedValue |
Selected value; must be assigned an SdtListItem object |
The specific steps are as follows:
- Get the Spire.Doc WASM module and confirm that it is ready.
- Load the font, read
ComboBox.docxinto the VFS and load it as aDocument. - Iterate over the body objects of each section and the child objects of each paragraph, and filter out the combo box content controls.
- Remove the old option with
RemoveAt, append a new one withAdd, then compare byValueand setSelectedValue. - Save the result file with
SaveToFile(), read it from the VFS and trigger a browser download.
The code for updating the combo box list items and selected value is as follows:
function App() {
  const updateComboBoxItems = async () => {
    // Get the Spire.Doc WASM module
    const wasmModule = window.wasmModule?.spiredoc;

    if (!wasmModule) {
      alert('Spire.Doc is not ready yet');
      return;
    }

    // Load the document to be processed
    await window.spire.FetchFileToVFS('ComboBox.docx', '', `${process.env.PUBLIC_URL}/data/`);

    const doc = new wasmModule.Document();
    doc.LoadFromFile('ComboBox.docx');

    // Iterate over the sections and find combo box content controls
    for (let s = 0; s < doc.Sections.Count; s++) {
      const section = doc.Sections.get_Item(s);
      for (let i = 0; i < section.Body.ChildObjects.Count; i++) {
        const obj = section.Body.ChildObjects.get_Item(i);
        if (obj.DocumentObjectType !== wasmModule.DocumentObjectType.Paragraph) continue;

        for (let j = 0; j < obj.ChildObjects.Count; j++) {
          const child = obj.ChildObjects.get_Item(j);
          if (child.DocumentObjectType !== wasmModule.DocumentObjectType.StructureDocumentTagInline) continue;
          if (child.SDTProperties.SDTType !== wasmModule.SdtType.ComboBox) continue;

          const combo = child.SDTProperties.ControlProperties;

          // Remove the old option at index 1 and append a new one
          combo.ListItems.RemoveAt(1);
          combo.ListItems.Add(new wasmModule.SdtListItem('Smart Documents', 'Smart Documents'));

          // Find the new option by Value and set it as the selected value
          for (let k = 0; k < combo.ListItems.Count; k++) {
            const item = combo.ListItems.get_Item(k);
            if (item.Value === 'Smart Documents') {
              combo.ListItems.SelectedValue = item;
            }
          }
        }
      }
    }

    // Save the result file
    const outputFileName = 'UpdateComboBoxItems.docx';
    doc.SaveToFile({ fileName: outputFileName, fileFormat: wasmModule.FileFormat.Docx2013 });
    doc.Dispose();

    // Read the generated file from the VFS and trigger the download
    const fileArray = window.dotnetRuntime.Module.FS.readFile(outputFileName);
    const blob = new Blob([fileArray], { type: 'application/vnd.openxmlformats-officedocument.wordprocessingml.document' });
    const url = URL.createObjectURL(blob);
    const a = document.createElement('a');
    a.href = url;
    a.download = outputFileName;
    a.click();
    URL.revokeObjectURL(url);
  };

  return (
    <div style={{ textAlign: 'center', height: '300px' }}>
      <h1>Update Combo Box List Items and Selected Value</h1>
      <button onClick={updateComboBoxItems}>Generate Document</button>
    </div>
  );
}

export default App;
The comparison before and after processing is shown below; the left image is the original document and the right image is the document after updating:
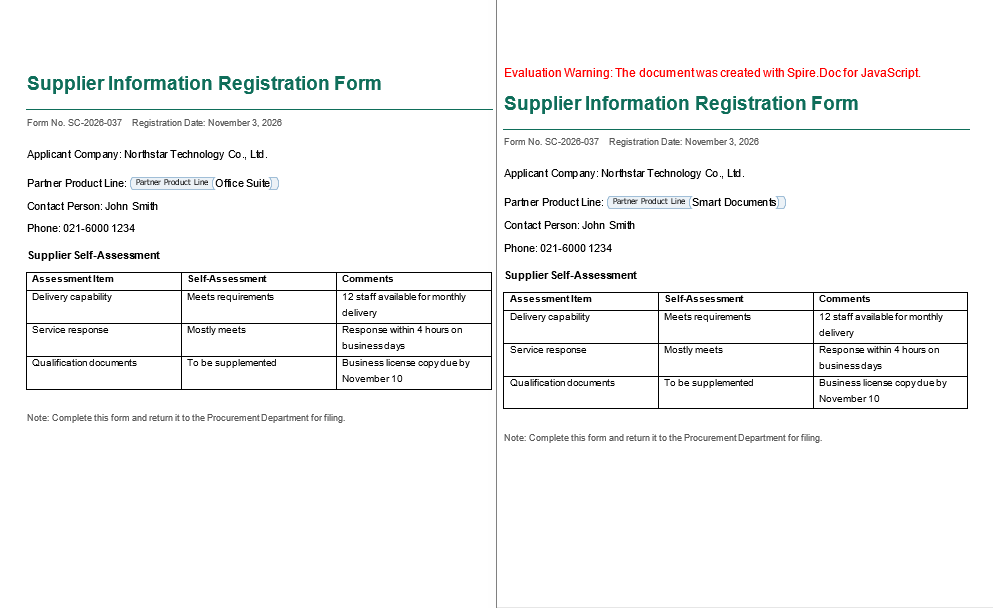
Traversal Order When Locating the Control
The example scans only the inline controls in paragraphs directly under the body, which is the most common location. If a control is inside a table cell, first check whether the object is a Table, then walk row by row and cell by cell into Cell.ChildObjects to find it; if the control is a block-level StructureDocumentTag, compare it directly at the Body.ChildObjects level. When traversing, check DocumentObjectType before reading properties so that ordinary paragraphs are not treated as controls by mistake.
FAQ
How to Choose Between a Drop-Down List and a Combo Box
Cause: The two controls differ mainly in whether values outside the preset options are allowed, and this has to be decided together with the business rules for the field.
Solution: If the field's values must be strictly limited to the preset range, use a drop-down list; if the list only provides common candidates and the business allows content outside it, use a combo box. A drop-down list is better for fields such as ratings, statuses and categories that need a consistent vocabulary, while a combo box is better for fields such as names and product lines that may expand with the business.
Why the Text Displayed by the Control Does Not Change After Setting SelectedValue
Cause: SelectedValue must be assigned an SdtListItem object; assigning a string directly has no effect.
Solution: In the example, iterate over ListItems, compare Value to find the target item, then assign that item object to SelectedValue. After the change, save the file and Word displays the selected item.
Why the Wrong Item Is Selected After RemoveAt
Cause: After RemoveAt deletes an element, the indexes of the remaining options shift forward. If you delete first and then access by the original index, you may get a different option.
Solution: After deleting, iterate over ListItems again and find the target item by Value or DisplayText, rather than reusing the index from before the deletion.
How to Select an Option by the Text the User Sees
Cause: Value and DisplayText can be different, so which one to compare against depends on what the business treats as authoritative.
Solution: If the interface text is authoritative, change the comparison condition to item.DisplayText === 'Smart Documents'; if a stable internal identifier is authoritative, keep comparing Value. Do not mix the two, or selection may fail after the wording is adjusted.
Get a Free License
Spire.Doc for JavaScript offers a 30-day full-featured free trial license with no functional limitations. Apply here to evaluate before purchasing.
Count Words, Characters, Paragraphs, Lines and Pages in Word Documents with JavaScript in React
2026-11-06 01:07:13 Written by Amy ZhaoWord count, character count, paragraph count, line count and page count measure the content size and the layout result of a Word document: the word count reflects the total volume of text, the character count is used to account for length, the paragraph count shows the structure of the content, and the line count and page count are directly related to the print layout. When this kind of counting is performed on a web page, uploading the file to a server adds an extra transfer, while relying on desktop software makes it difficult to fit the process into an automated workflow.
This article reads these statistics in the browser with Spire.Doc for JavaScript. The whole process runs in the browser on WebAssembly, requires no Office installation and depends on no backend service, and the file always remains on the user's device.
This article covers the following topics:
- Count the Words, Characters, Paragraphs, Lines and Pages of a Word Document
- Count the Words and Characters of a Specified Paragraph
For installation and project setup, refer to Integrating Spire.Doc for JavaScript in a React Project. The examples below assume that Spire.Doc is installed and the WebAssembly module is initialized.
Count the Words, Characters, Paragraphs, Lines and Pages of a Word Document
The word count, character count, paragraph count, line count and page count of a Word document are read mainly through Document.BuiltinDocumentProperties. The property returns a BuiltinDocumentProperties object, and the statistics correspond to its properties as follows:
| Property | Meaning |
|---|---|
BuiltinDocumentProperties.WordCount |
Word count |
BuiltinDocumentProperties.CharCount |
Character count (excluding spaces) |
BuiltinDocumentProperties.CharCountWithSpace |
Character count (including spaces) |
BuiltinDocumentProperties.ParagraphCount |
Paragraph count |
BuiltinDocumentProperties.LinesCount |
Line count |
BuiltinDocumentProperties.PageCount |
Page count |
The statistics in the built-in properties come from the statistics saved inside the document. For a newly created document, or a document generated by another tool into which statistics have not yet been written, the word count, character count and paragraph count may be 0, so the example calls Document.UpdateWordCount() before reading to recalculate these three values. The line count and page count are layout statistics; UpdateWordCount() does not recalculate them, and their values depend on the statistics already saved in the document.
The specific steps are as follows:
- Get the Spire.Doc WASM module and confirm that it is ready.
- Load the sample document and the font into the virtual file system (VFS), create a
Documentobject and load the file. - Call
Document.UpdateWordCount()to recalculate the word count, character count and paragraph count. - Read each statistic through
Document.BuiltinDocumentProperties. - Assemble the statistics as text, save them as a TXT file and trigger a browser download.
The code for counting the words, characters, paragraphs, lines and pages of a Word document is as follows:
function App() {
  const countDocument = async () => {
    // Get the Spire.Doc WASM module
    const docModule = window.wasmModule?.spiredoc;

    // Make sure the WASM module has fully loaded
    if (!docModule) {
      alert('Spire.Doc is not ready yet');
      return;
    }

    // Load the sample document and the font into VFS
    await window.spire.FetchFileToVFS('Sample Document.docx', "", `${process.env.PUBLIC_URL}/data/`);
    await window.spire.FetchFileToVFS('ARIALUNI.TTF', "/Library/Fonts/", `${process.env.PUBLIC_URL}/font/`);

    // Create a Document instance and load the document
    const doc = new docModule.Document();
    doc.LoadFromFile('Sample Document.docx');

    // Recalculate the word count, character count and paragraph count
    doc.UpdateWordCount();

    // Get the built-in document properties
    const properties = doc.BuiltinDocumentProperties;

    // Read each statistic
    const wordCount = properties.WordCount;
    const charCount = properties.CharCount;
    const charCountWithSpace = properties.CharCountWithSpace;
    const paragraphCount = properties.ParagraphCount;
    const lineCount = properties.LinesCount;
    const pageCount = properties.PageCount;

    // Assemble the results
    const report = [
      'Word count: ' + wordCount,
      'Characters (no spaces): ' + charCount,
      'Characters (with spaces): ' + charCountWithSpace,
      'Paragraphs: ' + paragraphCount,
      'Lines: ' + lineCount,
      'Pages: ' + pageCount,
    ].join('\r\n');

    doc.Dispose();

    // Save the results as a TXT file and trigger the download
    const outputFileName = 'Word Count Results.txt';
    const blob = new Blob([report], { type: 'text/plain;charset=utf-8' });
    const url = URL.createObjectURL(blob);
    const a = document.createElement('a');
    a.href = url;
    a.download = outputFileName;
    a.click();
    URL.revokeObjectURL(url);
  };

  return (
    <div style={{ textAlign: 'center', height: '300px' }}>
      <h1>Count Word Document Statistics</h1>
      <button onClick={countDocument}>
        Count Document Statistics
      </button>
    </div>
  );
}

export default App;
After the code above runs, the downloaded "Word Count Results.txt" contains the following:
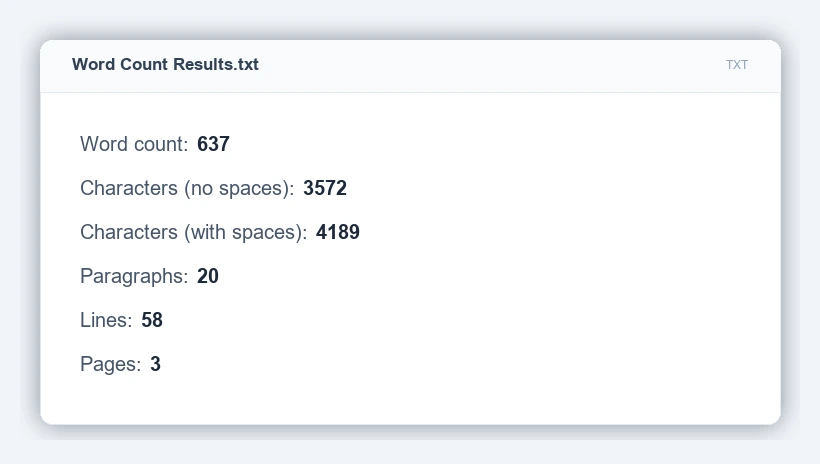
Count the Words and Characters of a Specified Paragraph
The words and characters of a specified paragraph in a Word document can be read with the three properties Paragraph.WordCount, Paragraph.CharCount and Paragraph.CharCountIncludeSpace. Unlike the built-in properties of the whole document, paragraph-level statistics are calculated directly from the paragraph content, and the document statistics do not have to be updated before reading.
| Property | Meaning |
|---|---|
Paragraph.WordCount |
Word count of the current paragraph |
Paragraph.CharCount |
Character count of the current paragraph, excluding spaces |
Paragraph.CharCountIncludeSpace |
Character count of the current paragraph, including spaces |
The specific steps are as follows:
- Get the Spire.Doc WASM module and confirm that it is ready.
- Load the sample document and the font into the virtual file system (VFS), create a
Documentobject and load the file. - Get the second paragraph in the first section through
Document.Sections.get_Item(0).Paragraphs.get_Item(1). - Read the statistics of that paragraph through
Paragraph.WordCount,Paragraph.CharCountandParagraph.CharCountIncludeSpace. - Assemble the statistics as text, save them as a TXT file and trigger a browser download.
The code for counting the words and characters of a specified paragraph in a Word document is as follows:
function App() {
  const countParagraph = async () => {
    // Get the Spire.Doc WASM module
    const docModule = window.wasmModule?.spiredoc;

    // Make sure the WASM module has fully loaded
    if (!docModule) {
      alert('Spire.Doc is not ready yet');
      return;
    }

    // Load the sample document and the font into VFS
    await window.spire.FetchFileToVFS('Sample Document.docx', "", `${process.env.PUBLIC_URL}/data/`);
    await window.spire.FetchFileToVFS('ARIALUNI.TTF', "/Library/Fonts/", `${process.env.PUBLIC_URL}/font/`);

    // Create a Document instance and load the document
    const doc = new docModule.Document();
    doc.LoadFromFile('Sample Document.docx');

    // Get the second paragraph in the first section (index starts at 0)
    const paragraph = doc.Sections.get_Item(0).Paragraphs.get_Item(1);

    // Read the words and characters of that paragraph
    const wordCount = paragraph.WordCount;
    const charCount = paragraph.CharCount;
    const charCountIncludeSpace = paragraph.CharCountIncludeSpace;

    // Assemble the results
    const report = [
      'Word count: ' + wordCount,
      'Characters (no spaces): ' + charCount,
      'Characters (with spaces): ' + charCountIncludeSpace,
    ].join('\r\n');

    doc.Dispose();

    // Save the results as a TXT file and trigger the download
    const outputFileName = 'Paragraph Statistics.txt';
    const blob = new Blob([report], { type: 'text/plain;charset=utf-8' });
    const url = URL.createObjectURL(blob);
    const a = document.createElement('a');
    a.href = url;
    a.download = outputFileName;
    a.click();
    URL.revokeObjectURL(url);
  };

  return (
    <div style={{ textAlign: 'center', height: '300px' }}>
      <h1>Paragraph Statistics</h1>
      <button onClick={countParagraph}>
        Count Paragraph Statistics
      </button>
    </div>
  );
}

export default App;
After the code above runs, the downloaded "Paragraph Statistics.txt" contains the following:
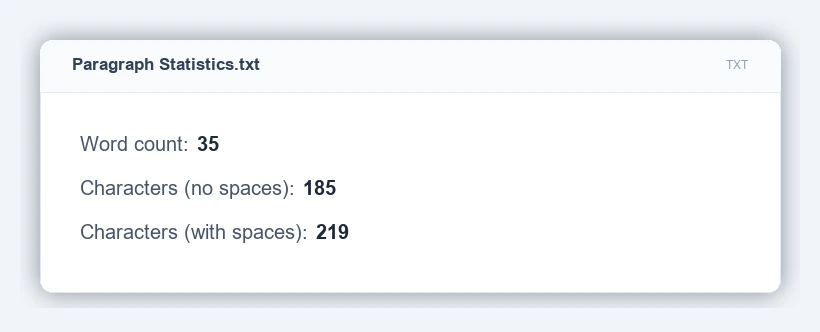
FAQ
Why is the calculated word count or character count 0
Cause: The statistics in the built-in properties come from the statistics saved inside the document. For a newly created document, or a document generated by some tools without statistics written into it, the word count, character count and paragraph count read back may be 0.
Solution: The example calls Document.UpdateWordCount() before reading, which recalculates these three values from the current content; the call updates the statistics without modifying the document body.
Why do the line count and page count differ from what Word displays
Cause: The line count and page count are layout statistics kept in the built-in properties of the document, and Document.UpdateWordCount() does not recalculate them, so the values returned are those already saved in the document. When the content has been edited but the document has not been saved again, these values may remain in their previous state and differ from what Word currently displays.
Solution: To verify them, open the "Word Count" dialog in Word; for the words and characters of a paragraph, read Paragraph.WordCount and Paragraph.CharCount directly.
What is the difference between the word count and the two character counts
Cause: The three statistics measure different things: WordCount returns the word count of the document, while CharCount and CharCountWithSpace return the character count without and with spaces respectively, both including punctuation.
Solution: When accounting for length or layout capacity, use the character count with spaces, that is, CharCountWithSpace.
How do I count the words and characters of other paragraphs
Cause: The indexes of Sections.get_Item() and Paragraphs.get_Item() both start at 0, and the Paragraphs.get_Item(1) in the example points to the second paragraph in the first section.
Solution: Change the index to count the corresponding paragraph; check Paragraphs.Count before reading to avoid an index out of range.
Get a Free License
Spire.Doc for JavaScript offers a 30-day full-featured free trial license with no functional limitations. Apply here to evaluate before purchasing.
Add Multi-Row Text and Image Watermarks to Word Documents with JavaScript in React
2026-11-05 10:01:28 Written by Amy ZhaoMicrosoft Word's built-in watermark feature can place only one watermark at a time, and its position and number are fixed by the built-in layout, so it cannot tile the whole page with multiple rows and columns. For contracts, internal documents and presentation drafts that need full-page coverage, the watermark can be implemented by adding a shape or a picture to the header and then cloning it by row and column.
This article adds multi-row, multi-column text watermarks and image watermarks to Word documents in the browser with Spire.Doc for JavaScript. The whole process runs in the browser on WebAssembly, requires no Office installation and depends on no backend service, and the file always remains on the user's device.
This article covers the following topics:
- Add Multi-Row Text Watermarks
- Add Multi-Row Image Watermarks
- Adjust the Tiling Rows, Columns and Spacing
The two kinds of watermarks are implemented as follows:
| Watermark type | Carrier object | How it is created | Key properties |
|---|---|---|---|
| Text watermark | WordArt shape | new ShapeObject(doc, ShapeType.TextPlainText) |
WordArt.Text, WordArt.FontFamily, Rotation, FillColor |
| Image watermark | Picture object | new DocPicture(doc) with LoadImage() |
TextWrappingStyle, Width, Height |
For installation and project setup, refer to Integrating Spire.Doc for JavaScript in a React Project. The examples below assume that Spire.Doc is installed and the WebAssembly module is initialized. The examples read Sample.docx and logo.png from the project's public/data directory and the font file from the public/font directory, so put the corresponding files into these two directories before running them.
Add Multi-Row Text Watermarks
To add a multi-row, multi-column text watermark, a WordArt shape is created in the header, then cloned in a loop over rows and columns, and each copy is given its own vertical and horizontal coordinates. The watermark object lives in the header, so it is repeated on every page together with the header and does not have to be added page by page.
The following members are involved in adding multi-row text watermarks:
| Member | Purpose |
|---|---|
ShapeObject |
Shape object that carries the watermark text |
ShapeType.TextPlainText |
Sets the shape to ordinary WordArt |
ShapeObject.Width, Height |
Width and height of the shape, in points |
ShapeObject.VerticalPosition, HorizontalPosition |
Vertical and horizontal coordinates of the shape on the page |
ShapeObject.Rotation |
Rotation angle, in degrees |
WordArt.Text, WordArt.FontFamily |
WordArt content and font |
ShapeObject.FillColor, StrokeColor |
Text fill color and outline color |
ShapeObject.Clone() |
Clones the shape for tiling |
HeaderFooter.AddParagraph() |
Adds a paragraph in the header to carry the watermark |
Paragraph.ChildObjects.Add() |
Adds the shape to the header paragraph |
The specific steps are as follows:
- Get the Spire.Doc WASM module and confirm that it is ready.
- Load the sample document and the font into the virtual file system (VFS), create a
Documentobject and load the document. - Create a
ShapeObject, set its shape type toShapeType.TextPlainText, and set its width, height, rotation angle, WordArt content, font, fill color and outline color. - Iterate over every section of the document, get the header through
HeadersFooters.Header, and add a paragraph withAddParagraph(). - Clone the shape with
Clone()in a loop over rows and columns, give each copy its ownVerticalPositionandHorizontalPosition, and add it to theChildObjectsof the header paragraph. - Save the result file with
SaveToFile(), read it from the VFS and trigger a browser download.
The code for adding multi-row text watermarks is as follows:
function App() {
  const addTextWatermark = async () => {
    // Get the Spire.Doc WASM module
    const wasmModule = window.wasmModule?.spiredoc;

    if (!wasmModule) {
      alert('Spire.Doc is not ready yet');
      return;
    }

    // Load the sample document and the font
    await window.spire.FetchFileToVFS('Sample.docx', '', `${process.env.PUBLIC_URL}/data/`);
    await window.spire.FetchFileToVFS('arial.ttf', '/Library/Fonts/', `${process.env.PUBLIC_URL}/font/`);
    await window.spire.FetchFileToVFS('arialbd.ttf', '/Library/Fonts/', `${process.env.PUBLIC_URL}/font/`);

    // Create a Document instance and load the document
    const doc = new wasmModule.Document();
    doc.LoadFromFile('Sample.docx');

    // Create a WordArt shape and set its size, position, rotation and style
    let shape = new wasmModule.ShapeObject(doc, wasmModule.ShapeType.TextPlainText);
    shape.Width = 60;
    shape.Height = 15;
    shape.VerticalPosition = 25;
    shape.HorizontalPosition = 20;
    shape.Rotation = 320;
    shape.WordArt.Text = 'INTERNAL USE';
    shape.WordArt.FontFamily = 'Arial';
    shape.FillColor = wasmModule.Color.FromArgb(255, 255, 0, 0);
    shape.StrokeColor = wasmModule.Color.FromArgb(255, 255, 0, 0);

    // Iterate over all sections and add the watermark to the header of each section
    for (let n = 0; n < doc.Sections.Count; n++) {
      const section = doc.Sections.get_Item(n);
      const header = section.HeadersFooters.Header;
      const paragraph = header.AddParagraph();

      // 5 rows and 6 columns: clone the shape and set the coordinates of each copy
      for (let i = 0; i < 5; i++) {
        for (let j = 0; j < 6; j++) {
          shape = shape.Clone();
          shape.VerticalPosition = 50 + 150 * i;
          shape.HorizontalPosition = 20 + 85 * j;
          paragraph.ChildObjects.Add(shape);
        }
      }
    }

    // Save the result file
    const outputFileName = 'AddTextWatermark.docx';
    doc.SaveToFile({ fileName: outputFileName, fileFormat: wasmModule.FileFormat.Docx2013 });
    doc.Dispose();

    // Read the generated file from the VFS and trigger the download
    const fileArray = window.dotnetRuntime.Module.FS.readFile(outputFileName);
    const blob = new Blob([fileArray], { type: 'application/vnd.openxmlformats-officedocument.wordprocessingml.document' });
    const url = URL.createObjectURL(blob);
    const a = document.createElement('a');
    a.href = url;
    a.download = outputFileName;
    a.click();
    URL.revokeObjectURL(url);
  };

  return (
    <div style={{ textAlign: 'center', height: '300px' }}>
      <h1>Add Multi-Row Text Watermarks</h1>
      <button onClick={addTextWatermark}>Generate Document</button>
    </div>
  );
}

export default App;
After adding multi-row, multi-column text watermarks, the document looks like this:
Add Multi-Row Image Watermarks
To add a multi-row, multi-column image watermark, a picture is loaded into the header, then cloned by row and column and given its own coordinates. Compared with a text watermark, the appearance of an image watermark is determined by the picture itself, and the code only has to control the wrapping style and the arrangement of the copies.
The following members are involved in adding multi-row image watermarks:
| Member | Purpose |
|---|---|
DocPicture |
Object that carries the watermark image |
DocPicture.LoadImage(path) |
Loads the watermark image from the VFS |
TextWrappingStyle.Behind |
Places the picture behind the body text |
DocPicture.VerticalPosition, HorizontalPosition |
Vertical and horizontal coordinates of each copy |
DocPicture.Clone() |
Clones the picture object for tiling |
HeaderFooter.AddParagraph() |
Adds a paragraph in the header to carry the watermark |
Paragraph.ChildObjects.Add() |
Adds the picture to the header paragraph |
The specific steps are as follows:
- Get the Spire.Doc WASM module and confirm that it is ready.
- Load the sample document and the watermark image into the virtual file system (VFS), create a
Documentobject and load the document. - Iterate over every section of the document, get the header through
HeadersFooters.Header, and add a paragraph withAddParagraph(). - Create a
DocPicture, callLoadImage()to load the watermark image, and setTextWrappingStyletoTextWrappingStyle.Behind. - Clone the picture with
Clone()in a loop over rows and columns, give each copy its ownVerticalPositionandHorizontalPosition, and add it to theChildObjectsof the header paragraph. - Save the result file with
SaveToFile(), read it from the VFS and trigger a browser download.
The code for adding multi-row image watermarks is as follows:
function App() {
  const addImageWatermark = async () => {
    // Get the Spire.Doc WASM module
    const wasmModule = window.wasmModule?.spiredoc;

    if (!wasmModule) {
      alert('Spire.Doc is not ready yet');
      return;
    }

    // Load the sample document and the watermark image
    await window.spire.FetchFileToVFS('Sample.docx', '', `${process.env.PUBLIC_URL}/data/`);
    await window.spire.FetchFileToVFS('logo.png', '', `${process.env.PUBLIC_URL}/data/`);

    // Create a Document instance and load the document
    const doc = new wasmModule.Document();
    doc.LoadFromFile('Sample.docx');

    // Iterate over all sections and add the watermark to the header of each section
    for (let n = 0; n < doc.Sections.Count; n++) {
      const section = doc.Sections.get_Item(n);
      const header = section.HeadersFooters.Header;
      const paragraph = header.AddParagraph();

      // Create a picture object and load the watermark image
      const picture = new wasmModule.DocPicture(doc);
      picture.LoadImage('logo.png');
      picture.TextWrappingStyle = wasmModule.TextWrappingStyle.Behind;

      // 5 rows and 3 columns: clone the picture and set the coordinates of each copy
      for (let p = 0; p < 5; p++) {
        for (let q = 0; q < 3; q++) {
          const pic = picture.Clone();
          pic.VerticalPosition = 50 + 150 * p;
          pic.HorizontalPosition = 10 + 150 * q;
          paragraph.ChildObjects.Add(pic);
        }
      }
    }

    // Save the result file
    const outputFileName = 'AddImageWatermark.docx';
    doc.SaveToFile({ fileName: outputFileName, fileFormat: wasmModule.FileFormat.Docx2013 });
    doc.Dispose();

    // Read the generated file from the VFS and trigger the download
    const fileArray = window.dotnetRuntime.Module.FS.readFile(outputFileName);
    const blob = new Blob([fileArray], { type: 'application/vnd.openxmlformats-officedocument.wordprocessingml.document' });
    const url = URL.createObjectURL(blob);
    const a = document.createElement('a');
    a.href = url;
    a.download = outputFileName;
    a.click();
    URL.revokeObjectURL(url);
  };

  return (
    <div style={{ textAlign: 'center', height: '300px' }}>
      <h1>Add Multi-Row Image Watermarks</h1>
      <button onClick={addImageWatermark}>Generate Document</button>
    </div>
  );
}

export default App;
After adding multi-row, multi-column image watermarks, the document looks like this:
Adjust the Tiling Rows, Columns and Spacing
Adjusting the tiling rows, columns and spacing means changing the loop counts and the two coefficients in the coordinate formula: the number of rows and columns determines how many watermarks there are, while the row gap and column gap determine the distance between neighboring watermarks. Together they decide how dense the tiling is on the page.
The coordinate formula used for tiling is as follows:
| Parameter | Example value | Purpose |
|---|---|---|
Rows rows |
4 | Number of watermarks arranged vertically |
Columns cols |
5 | Number of watermarks arranged horizontally |
Row gap rowGap |
180 | Vertical distance between two neighboring rows, in points |
Column gap colGap |
100 | Horizontal distance between two neighboring columns, in points |
| Start coordinates | 40, 20 | Vertical and horizontal coordinates of the first row and first column |
The coordinates of each watermark are calculated as follows:
VerticalPosition = start vertical coordinate + row gap × row indexHorizontalPosition = start horizontal coordinate + column gap × column index
The specific steps are as follows:
- Estimate the width and height available for the watermarks from the page size and the page margins.
- Decide the number of rows and columns, and the start coordinates of the first row and first column.
- Change the loop counts and the row gap and column gap in the coordinate formula, and adjust the width and height of the shape as needed.
- Save the file and preview it, then fine-tune the spacing according to the actual result.
The code for adjusting the tiling rows, columns and spacing is as follows. The example uses 4 rows and 5 columns, a row gap of 180 points and a column gap of 100 points, and changes the watermark to dark gray:
// Number of rows, columns and the spacing
const rows = 4;
const cols = 5;
const rowGap = 180;
const colGap = 100;

// Create the base shape and clone it later with Clone()
const base = new wasmModule.ShapeObject(doc, wasmModule.ShapeType.TextPlainText);
base.Width = 80;
base.Height = 20;
base.Rotation = 315;
base.WordArt.Text = 'CONFIDENTIAL';
base.WordArt.FontFamily = 'Arial';
base.FillColor = wasmModule.Color.FromArgb(255, 70, 70, 70);
base.StrokeColor = wasmModule.Color.FromArgb(255, 70, 70, 70);

for (let n = 0; n < doc.Sections.Count; n++) {
  const header = doc.Sections.get_Item(n).HeadersFooters.Header;
  const paragraph = header.AddParagraph();

  for (let i = 0; i < rows; i++) {
    for (let j = 0; j < cols; j++) {
      const shape = base.Clone();
      shape.VerticalPosition = 40 + rowGap * i;
      shape.HorizontalPosition = 20 + colGap * j;
      paragraph.ChildObjects.Add(shape);
    }
  }
}
After adjusting the rows, columns and spacing, the text watermark looks like this:

FAQ
Why does the watermark not appear on the first page
Cause: Headers are set per section. The example writes to HeadersFooters.Header, which applies to the normal pages of the section. When a document uses "Different first page", the first page uses HeadersFooters.FirstPageHeader instead; when it uses "Different odd and even pages", even pages use HeadersFooters.EvenHeader. The sample document uses neither option, so the watermark appears on every page.
Solution: Add the watermark to HeadersFooters.FirstPageHeader or HeadersFooters.EvenHeader as well when the corresponding option is enabled.
Why do the rightmost columns fall outside the page
Cause: HorizontalPosition is measured in points and starts from the left page margin. With text watermarks 60 points wide, a column gap of 85 points and 6 columns, the right edge of the last column is about 20 + 85 × 5 + 60 = 505 points, which is already close to the right edge of the page once the left margin is added. If the column gap or the number of columns is increased further, the rightmost objects go beyond the page.
Solution: Before adjusting, estimate the total width as "start coordinate + gap × (count − 1) + object width" and compare it with the page width.
Why does the set position differ from the actual position on the page
Cause: Shapes in the header are positioned absolutely: horizontally from the left page margin and vertically from the top of the header area. The sample document has a left margin of 90 points and the header sits 36 points from the top of the page, so with HorizontalPosition = 20 the watermark actually appears at about 110 points from the left edge of the page.
Solution: After changing the template or adjusting the page margins, re-estimate the start coordinates.
Do duplicated image watermarks significantly increase the file size
Usually not. The copies share the same image: Clone() duplicates the picture object and the layout properties, while the image itself is stored only once in the document. The example produces 15 image watermarks, and the word/media/ directory of the docx still contains a single image file, which the other copies reference. The increase in file size comes mainly from the shape and positioning data rather than from the image data.
What if the image watermark covers the body text
The example places the picture behind the body text with TextWrappingStyle.Behind, so the pictures have a negative z-order in the generated document and the body text stays on top. If the watermark is still too prominent, reduce its opacity or use a lighter version when preparing the image; the example uses a semi-transparent, light-colored PNG.
Get a Free License
Spire.Doc for JavaScript offers a 30-day full-featured free trial license with no functional limitations. Apply here to evaluate before purchasing.
