
.NET (1327)
Children categories
How to add hyperlinks to external files in Excel for WPF Applications
2016-06-03 09:16:14 Written by KoohjiWhen demonstrating an excel report, you may also want to share information from other external files or websites. In Excel, we can add both URL hyperlinks and external files by right-clicking on cells, selecting hyperlink and then adding URL address or choosing files from disk. This article is aimed to explain how to add hyperlinks to external files in excel programmatically using Spire.XLS for WPF. To add URL hyperlinks, please refer to this article: How to Insert Hyperlink in Excel for WPF Applications.
Please see the effective screenshot below after adding hyperlinks to external files:

Code Snippets:
Use the following namespace:
using System.Windows;
using Spire.Xls;
Step 1: Initialize a new Workbook object, load the sample excel file and get its first worksheet.
Workbook workbook = new Workbook();
workbook.LoadFromFile("Sample.xlsx");
Worksheet sheet = workbook.Worksheets[0];
Step 2: Get the cell/cell range that you want to add hyperlink to, then call the sheet.HyperLinks.Add(CellRange range) method to add the hyperlink to the cell/cell range.
CellRange range1 = sheet.Range["D18"];
HyperLink hyperlink1 = sheet.HyperLinks.Add(range1);
Step 3: Specify the hyperlink style and the hyperlink target, here we set its style to file and target to an external excel file.
hyperlink1.Type = HyperLinkType.File;
hyperlink1.Address = "SalesInfo.xlsx";
Step 4: Repeat step 2 and step 3 to add a hyperlink to another specific cell, set the hyperlink style to file and set its target to a word file.
CellRange range2 = sheet.Range["E18"];
HyperLink hyperlink2 = sheet.HyperLinks.Add(range2);
hyperlink2.Type = HyperLinkType.File;
hyperlink2.Address = "Report.doc";
Step 5: Save and launch the file.
workbook.SaveToFile("LinktoFile.xlsx", FileFormat.Version2010);
System.Diagnostics.Process.Start("LinktoFile.xlsx");
Full Codes:
using Spire.Xls;
using System.Windows;

namespace WpfApplication1
{
    public partial class MainWindow : Window
    {
        public MainWindow()
        {
            InitializeComponent();
        }
        private void button1_Click(object sender, RoutedEventArgs e)
        {
            Workbook workbook = new Workbook();
            workbook.LoadFromFile("Vendors Information.xlsx");
            Worksheet sheet = workbook.Worksheets[0];

            HyperLink Link = sheet.HyperLinks.Add(sheet.Range["A5"]);
            Link.TextToDisplay = sheet.Range["A5"].Text;
            Link.Type = HyperLinkType.Url;
            Link.Address = "https://en.wikipedia.org/wiki/Canada";

            HyperLink NewLink = sheet.HyperLinks.Add(sheet.Range["D13"]);
            NewLink.TextToDisplay = "https://www.google.com";
            NewLink.Type = HyperLinkType.Url;
            NewLink.Address = "https://www.google.com";

            workbook.SaveToFile("Hyperlink.xlsx", ExcelVersion.Version2010);
            System.Diagnostics.Process.Start("Hyperlink.xlsx");
        }
    }
}
Imports Spire.Xls
Imports System.Windows

Namespace WpfApplication1
	Public Partial Class MainWindow
		Inherits Window
		Public Sub New()
			InitializeComponent()
		End Sub
		Private Sub button1_Click(sender As Object, e As RoutedEventArgs)
			Dim workbook As New Workbook()
			workbook.LoadFromFile("Vendors Information.xlsx")
			Dim sheet As Worksheet = workbook.Worksheets(0)

			Dim Link As HyperLink = sheet.HyperLinks.Add(sheet.Range("A5"))
			Link.TextToDisplay = sheet.Range("A5").Text
			Link.Type = HyperLinkType.Url
			Link.Address = "https://en.wikipedia.org/wiki/Canada"

			Dim NewLink As HyperLink = sheet.HyperLinks.Add(sheet.Range("D13"))
			NewLink.TextToDisplay = "https://www.google.com"
			NewLink.Type = HyperLinkType.Url
			NewLink.Address = "https://www.google.com"

			workbook.SaveToFile("Hyperlink.xlsx", ExcelVersion.Version2010)
			System.Diagnostics.Process.Start("Hyperlink.xlsx")
		End Sub
	End Class
End Namespace
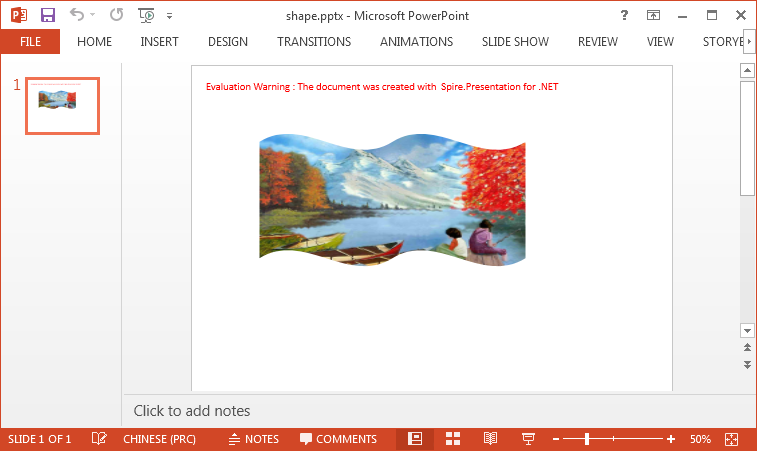
In order to change the look of a shape, users can add a solid, gradient, pattern or picture fill to it. Spire.Presentation supports all fill types listed. This article will introduce how to add a picture fill to a shape in C# and VB.NET.
Code Snippets:
Step 1: Initialize an instance of Presentation class.
Presentation ppt = new Presentation();
Step 2: Add a shape to the first slide.
IAutoShape shape = (IAutoShape)ppt.Slides[0].Shapes.AppendShape(ShapeType.DoubleWave, new RectangleF(100, 100, 400, 200));
Step 3: Set the FillType as picture and fill the shape with an image.
string picUrl = @"C:\Users\Administrator\Desktop\image.jpg";
shape.Fill.FillType = FillFormatType.Picture;
shape.Fill.PictureFill.Picture.Url = picUrl;
Step 4: Set the picture fill mode to stretch.
shape.Fill.PictureFill.FillType = PictureFillType.Stretch;
Step 5: Save to file.
ppt.SaveToFile("shape.pptx", FileFormat.Pptx2010);
Output:
Full Code:
using Spire.Presentation;
using Spire.Presentation.Drawing;
using System.Drawing;

namespace FillShape
{

    class Program
    {

        static void Main(string[] args)
        {
            Presentation ppt = new Presentation();

            IAutoShape shape = (IAutoShape)ppt.Slides[0].Shapes.AppendShape(ShapeType.DoubleWave, new RectangleF(100, 100, 400, 200));
            string picUrl = @"C:\Users\Administrator\Desktop\image.jpg";
            shape.Fill.FillType = FillFormatType.Picture;
            shape.Fill.PictureFill.Picture.Url = picUrl;
            shape.Fill.PictureFill.FillType = PictureFillType.Stretch;
            shape.ShapeStyle.LineColor.Color = Color.Transparent;

            ppt.SaveToFile("shape.pptx", FileFormat.Pptx2010);
            System.Diagnostics.Process.Start("shape.pptx");
        }
    }
}
Imports Spire.Presentation
Imports Spire.Presentation.Drawing
Imports System.Drawing

Namespace FillShape

	Class Program

		Private Shared Sub Main(args As String())
			Dim ppt As New Presentation()

			Dim shape As IAutoShape = DirectCast(ppt.Slides(0).Shapes.AppendShape(ShapeType.DoubleWave, New RectangleF(100, 100, 400, 200)), IAutoShape)
			Dim picUrl As String = "C:\Users\Administrator\Desktop\image.jpg"
			shape.Fill.FillType = FillFormatType.Picture
			shape.Fill.PictureFill.Picture.Url = picUrl
			shape.Fill.PictureFill.FillType = PictureFillType.Stretch
			shape.ShapeStyle.LineColor.Color = Color.Transparent

			ppt.SaveToFile("shape.pptx", FileFormat.Pptx2010)
			System.Diagnostics.Process.Start("shape.pptx")
		End Sub
	End Class
End Namespace
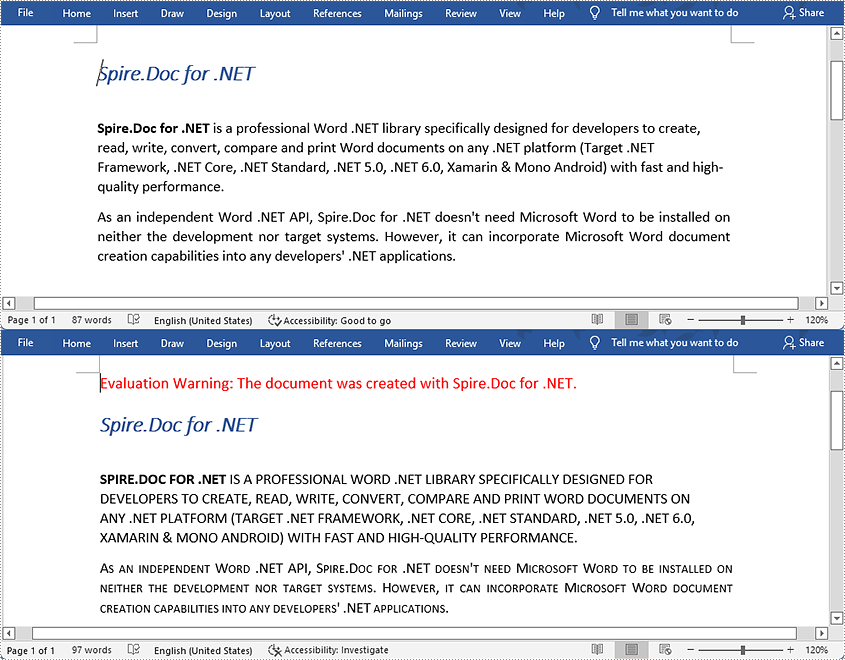
Capitals are quite suitable for stressing texts in Word. A paragraph written with capitalized letters is easy to notice, and capitalized letters imply the importance of the paragraph. This article teaches you the method of changing the case of existing text to all capitals with Spire.Doc for .NET by programming.
Install Spire.Doc for .NET
To begin with, you need to add the DLL files included in the Spire.Doc for.NET package as references in your .NET project. The DLL files can be either downloaded from this link or installed via NuGet.
PM> Install-Package Spire.Doc
Change the Case of a Specified Paragraph to All Capitals
The detailed steps are as follows:
- Create an object of Document and load a sample Word document from file using Document.LoadFromFile() method.
- Get the second paragraph using Document.Sections[].Paragraph[] property and set its characters to AllCaps through TextRange.CharacterFormat.AllCaps property.
- Get the third paragraph using Document.Sections[].Paragraph[] property and set its characters to IsSmallCaps by TextRange.CharacterFormat.IsSmallCaps property.
- Save the document to a new Word file using Document.SaveToFile() method.
Note: AllCaps means to capitalize all the letters and set them to the same size, and IsSmallCaps means to capitalize all the letters but set the original majuscules bigger than the minuscules.
- C#
- VB.NET
using System;
using Spire.Doc;
using Spire.Doc.Documents;
using Spire.Doc.Fields;

namespace changecase
{
    class Program
    {
        static void Main(string[] args)
        {
            //Create a new document and load from file
            string input = @"D:\testp\test.docx"; ;
            Document doc = new Document();
            doc.LoadFromFile(input);
            TextRange textRange;
            //Get the second paragraph and set its characters to AllCaps
            Paragraph para1 = doc.Sections[0].Paragraphs[2];

            foreach (DocumentObject obj in para1.ChildObjects)
            {
                if (obj is TextRange)
                {
                    textRange = obj as TextRange;
                    textRange.CharacterFormat.AllCaps = true;
                }
            }

            //Get the third paragraph and set its characters to IsSmallCaps
            Paragraph para2 = doc.Sections[0].Paragraphs[3];
            foreach (DocumentObject obj in para2.ChildObjects)
            {
                if (obj is TextRange)
                {
                    textRange = obj as TextRange;
                    textRange.CharacterFormat.IsSmallCaps = true;
                }
            }

            //Save the document to a new Word file
            string output = "ChangeCase.docx";
            doc.SaveToFile(output, FileFormat.Docx2013);
        }
    }
}
Apply for a Temporary License
If you'd like to remove the evaluation message from the generated documents, or to get rid of the function limitations, please request a 30-day trial license for yourself.
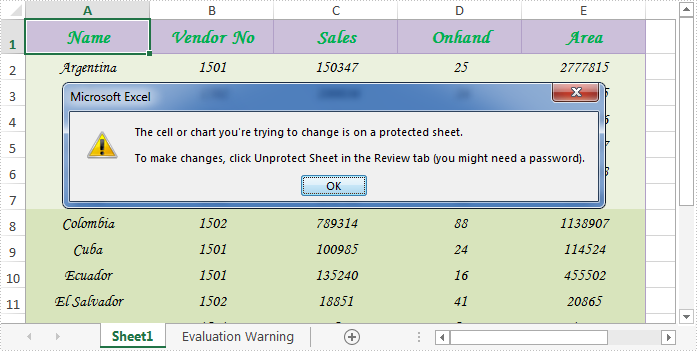
When sharing an excel worksheet, we may want to protect some valuable or important data from being changed by others. With Spire.XLS, we can easily achieve this by locking excel cells. Once locked, we will not be able to modify data from the protected cells until we unlock them. This article will explain how to lock or unlock excel cells in WPF using Spire.XLS for WPF.
Generally, there are two main steps when locking cells in an excel worksheet:
- Locking specific cells.
- Applying sheet protection – locking cells has no effect until we protect the worksheet.
Detail steps and code snippets are as following:
Step 1: Initialize a new instance of Workbook class, load the sample excel file and get its first worksheet.
Workbook workbook = new Workbook();
workbook.LoadFromFile("Sample.xlsx");
Worksheet sheet = workbook.Worksheets[0];
Step 2: Lock or unlock specified cells.
By default, all cells in an Excel worksheet are locked, so we need to unlock them first, next lock the specified cells and protect the worksheet with password.
sheet.Range.Style.Locked = false;
sheet.Range["A1:B3"].Style.Locked = true;
sheet.Protect("123", SheetProtectionType.All);
If you want to unlock excel cells, please use the following line of code:
sheet.Range["A1:B3"].Style.Locked = false;
Step 3: Save the changes and launch the file.
workbook.SaveToFile("locked.xlsx");
System.Diagnostics.Process.Start("locked.xlsx");
Effective screenshot after locking excel cells:
Full codes:
using Spire.Xls;
using System.Windows;

namespace WpfApplication1
{
    public partial class MainWindow : Window
    {
        public MainWindow()
        {
            InitializeComponent();
        }
        private void button1_Click(object sender, RoutedEventArgs e)
        {
            Workbook workbook = new Workbook();
            workbook.LoadFromFile("Sample.xlsx");
            Worksheet sheet = workbook.Worksheets[0];

            //Lock excel cells
            sheet.Range.Style.Locked = false;
            sheet.Range["A1:B3"].Style.Locked = true;
            sheet.Protect("123", SheetProtectionType.All);

            //Unlock excel cells
            // sheet.Range["A1:B3"].Style.Locked = false;

            workbook.SaveToFile("locked.xlsx");
            System.Diagnostics.Process.Start("locked.xlsx");
        }

    }
}
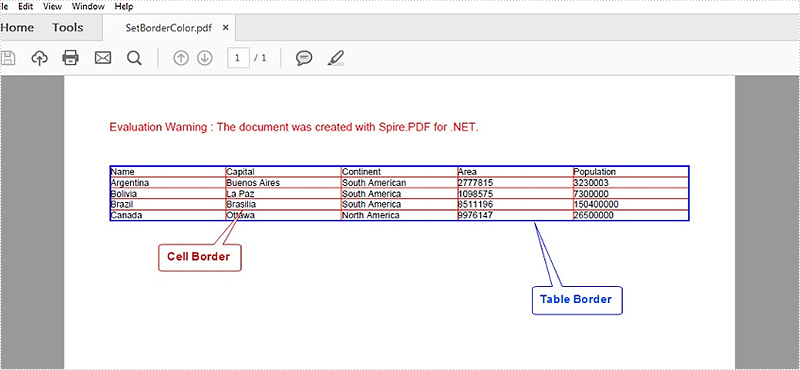
In order to format a table in PDF, Spire.PDF provides a PdfTableStyle class that represents parameters of PDF light table and a PdfCellStyle class that represents information about cell style. This article will introduce how to set the border color of a table including table border and cell border by using the two classes mentioned above.
Code Snippets:
Step 1: Define a multidimensional array of string.
string[][] dataSource =new string[5][] {new string[] {"Name", "Capital", "Continent", "Area", "Population"},
  new string[] {"Argentina","Buenos Aires", "South American", "2777815", "3230003"},
  new string[] {"Bolivia","La Paz","South America","1098575","7300000"},
  new string[] {"Brazil","Brasilia","South America","8511196","150400000"},
  new string[] {"Canada","Ottawa","North America","9976147","26500000"}
};
Step 2: Initialize a new instance of PdfDocument class and add a page to it.
PdfDocument pdf = new PdfDocument();
PdfPageBase page = pdf.Pages.Add();
Step 3: Initialize a new instance of PdfTbale class, filling the table with the data predefined.
PdfTable table = new PdfTable();
table.DataSource = dataSource;
Step 4: Initialize an instance of PdfTableStyle class, and set the color of table border as Blue, then apply the style to PdfTable.Style.
PdfTableStyle style = new PdfTableStyle();
style.BorderPen = new PdfPen(Color.Blue, 1f);
table.Style = style;
Step 5: The syntax to set style of cell border is much different from setting table border style, since PdfTable class doesn't contain a property of CellStyle. Instead, CellStyle is a property included in BeginRowLayoutEventArgs class, which is an argument of StratRowLayout event. Therefore we customize a method as below to set the color of cell border.
public static void table_BeginRowLayout(object sender, BeginRowLayoutEventArgs args)
{
    PdfCellStyle cellStyle = new PdfCellStyle();
    cellStyle.BorderPen = new PdfPen(Color.Red, 0.5f);
    args.CellStyle = cellStyle;
}
In the Main method, "table_BeginRowLayout" must be added to BeginRowLayout event to ensure the custom method will be invoked when the event occurs.
table.BeginRowLayout += new BeginRowLayoutEventHandler(table_BeginRowLayout);
Step 6: Draw the table on PDF page and save to file.
table.Draw(page, new PointF(0,40));
pdf.SaveToFile(@"SetBorderColor.pdf");
Output:
Full Code:
using Spire.Pdf;
using Spire.Pdf.Tables;
using Spire.Pdf.Graphics;
using System.Drawing;

namespace SetBorderColorOfTable
{
    class Program
    {
        static void Main(string[] args)
        {
            //input data
            string[][] dataSource =new string[5][] {new string[] {"Name", "Capital", "Continent", "Area", "Population"},
              new string[] {"Argentina","Buenos Aires", "South American", "2777815", "3230003"},
              new string[] {"Bolivia","La Paz","South America","1098575","7300000"},
              new string[] {"Brazil","Brasilia","South America","8511196","150400000"},
              new string[] {"Canada","Ottawa","North America","9976147","26500000"}
            };

            //initialize an instance of PdfDocument
            PdfDocument pdf = new PdfDocument();
            PdfPageBase page = pdf.Pages.Add();

            //initialize an instance of PdfTable
            PdfTable table = new PdfTable();
            table.DataSource = dataSource;

            //set the color of table border
            PdfTableStyle style = new PdfTableStyle();
            style.BorderPen = new PdfPen(Color.Blue, 1f);
            table.Style = style;

            //add custom method to BeginRowLayout event
            table.BeginRowLayout += new BeginRowLayoutEventHandler(table_BeginRowLayout);

            //draw table on PDF and save file
            table.Draw(page, new PointF(0,40));
            pdf.SaveToFile(@"SetBorderColor.pdf");
            System.Diagnostics.Process.Start(@"SetBorderColor.pdf");
        }
        //customize a method to set color of cell border
        public static void table_BeginRowLayout(object sender, BeginRowLayoutEventArgs args)
        {
            PdfCellStyle cellStyle = new PdfCellStyle();
            cellStyle.BorderPen = new PdfPen(Color.Red, 0.5f);
            args.CellStyle = cellStyle;
        }
    }
}
By using Acrobat, we can edit the PDF bookmark actions and set the zoom level to "Inherit Zoom". Then no matter which bookmark you click, the PDF page will stay the same size as the previous page you are viewing and it won't be changed. Spire.PDF also enables developers to set the Bookmark actions to inherit zoom by setting PdfDestination.Zoom as 0. This article will show you how to update bookmarks in a PDF document in C#.
Firstly, view the original screenshot of the PDF bookmark property:
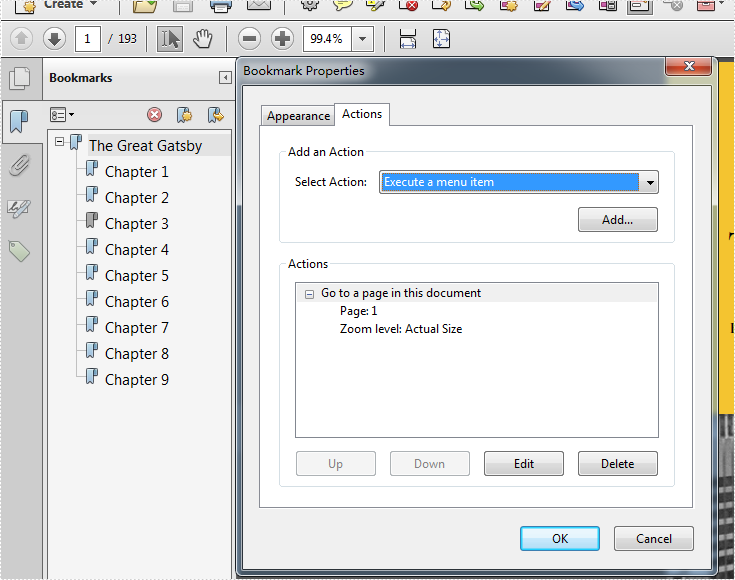
Here comes to the step of how to use Spire.PDF to set the PDF bookmark actions.
Step 1: Create a new PDF document and load the document from file.
PdfDocument pdfdoc = new PdfDocument();
pdfdoc.LoadFromFile("TheGreatGatsby.pdf");
Step 2: Get bookmarks collections of the PDF file.
PdfBookmarkCollection bookmarks = pdfdoc.Bookmarks;
Step 3: Set Zoom level as 0, which the value is inherit zoom.
foreach (PdfBookmark bookMark in bookmarks)
 {
   //value 1 is the actual size, other value is the customized size.
   bookMark.Destination.Zoom =0;
 }
Step 4: Save the document to file.
pdfdoc.SaveToFile("result.pdf");
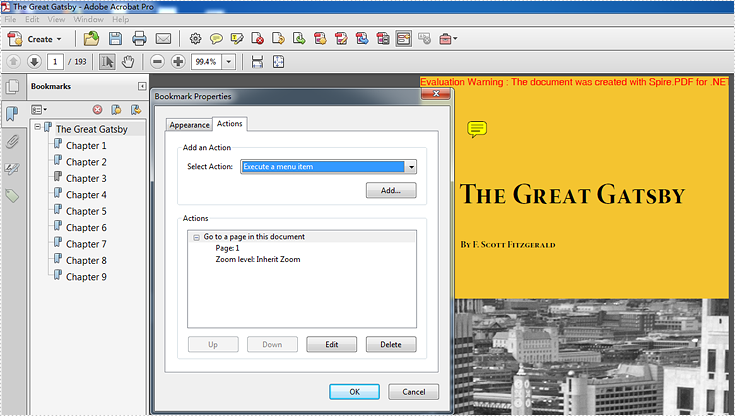
Effective screenshot after setting the zoom level to Inherit zoom.
Full codes:
using Spire.Pdf;
using Spire.Pdf.Bookmarks;


namespace SetInheritZoomProperty
{
    class Program
    {
        static void Main(string[] args)
        {

            PdfDocument pdfdoc = new PdfDocument();
            pdfdoc.LoadFromFile("TheGreatGatsby.pdf");

            PdfBookmarkCollection bookmarks = pdfdoc.Bookmarks;

            foreach (PdfBookmark bookMark in bookmarks)
            {
                bookMark.Destination.Zoom = 0;

            }

            pdfdoc.SaveToFile("result.pdf");
        }
    }
}
In some cases, we may need to add some textboxes to a chart in excel. While Spire.XLS provides us an easy solution to add textbox to an excel chart. This article will demonstrate how to add a textbox with borderline and a textbox without borderline to an excel chart in WPF using Spire.XLS in WPF.
Detail Steps and Code Snippets:
Use namespace:
using System.Windows;
using Spire.Xls;
using Spire.Xls.Core.Spreadsheet.Shapes;
Step 1: Create an excel workbook and get its first worksheet.
Workbook workbook = new Workbook();
Worksheet sheet = workbook.Worksheets[0];
Step 2: Add a blank chart to the first worksheet.
Chart chart = sheet.Charts.Add();
Step 3: Add textboxes to the chart.
Invoking ITextBoxes.AddTextBox(int row, int column, int height, int width) method to add a textbox with borderline to the chart, then add some text to the textbox.
XlsTextBoxShape textbox = chart.TextBoxes.AddTextBox(50, 100, 100, 300) as XlsTextBoxShape;
textbox.Text = "Textbox with borderline";
However, Spire.XLS also enables us to add textbox without borderline to an excel chart by setting the line weight of the textbox to zero:
XlsTextBoxShape textbox1 = chart.TextBoxes.AddTextBox(300, 100, 100, 300) as XlsTextBoxShape;
textbox1.Text = "Textbox without borderline";
textbox1.Line.Weight = 0;
Step 4: Save and launch the file.
workbook.SaveToFile("AddTextbox.xlsx", ExcelVersion.Version2010);
System.Diagnostics.Process.Start("AddTextbox.xlsx");
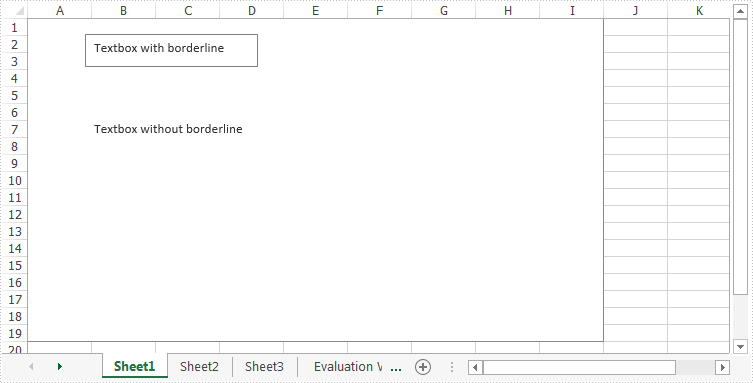
Effective screenshot:
Full codes:
using Spire.Xls;
using Spire.Xls.Core.Spreadsheet.Shapes;
using System.Windows;

namespace WpfApplication1
{
    public partial class MainWindow : Window
    {
        public MainWindow()
        {
            InitializeComponent();
        }
        private void button2_Click(object sender, RoutedEventArgs e)
        {
            Workbook workbook = new Workbook();
            Worksheet sheet = workbook.Worksheets[0];

            //Add Chart
            Chart chart = sheet.Charts.Add();

            //Add Textbox with Borderline
            XlsTextBoxShape textbox = chart.TextBoxes.AddTextBox(50, 100, 100, 300) as XlsTextBoxShape;
            textbox.Text = "Textbox with borderline";

            //Add Textbox without Borderline
            XlsTextBoxShape textbox1 = chart.TextBoxes.AddTextBox(300, 100, 100, 300) as XlsTextBoxShape;
            textbox1.Text = "Textbox without borderline";
            textbox1.Line.Weight = 0;

            //Save and Launch the File
            workbook.SaveToFile("AddTextbox.xlsx", ExcelVersion.Version2010);
            System.Diagnostics.Process.Start("AddTextbox.xlsx");
        }
    }
}
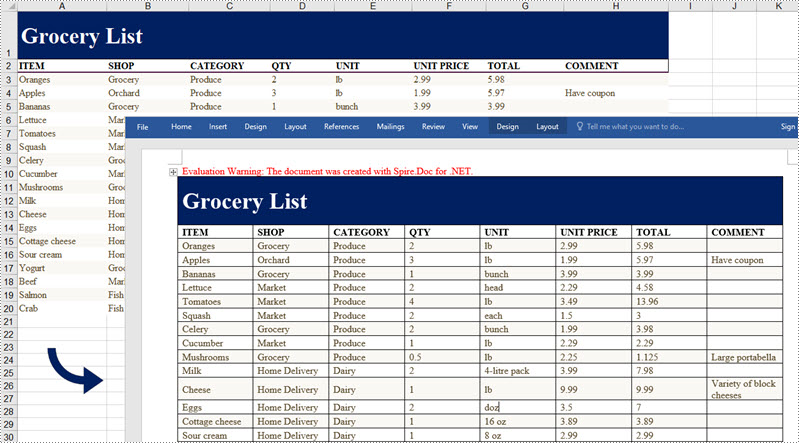
C#/VB.NET: Convert Excel Data to Word Tables with Formatting
2022-09-16 05:55:00 Written by AdministratorIf you're creating a written report on a company's monthly expenditures, you might need to include a spreadsheet to show the financial figures and make them easier to read. This article demonstrates how to convert Excel data into a Word table maintaining the formatting in C# and VB.NET using Spire.Office for .NET.
Install Spire.Office for .NET
To begin with, you need to add the DLL files included in the Spire.Office for .NET package as references in your .NET project. The DLL files can be either downloaded from this link or installed via NuGet.
PM> Install-Package Spire.Office
Export Excel Data to a Word Table with Formatting
Below are the steps to convert Excel data to a Word table and keep the formatting using Spire.Office for .NET.
- Create a Workbook object and load a sample Excel file using Workbook.LoadFromFile() method.
- Get a specific worksheet through Workbook.Worksheets[index] property.
- Create a Document object, and add a section to it.
- Add a table using Section.AddTable() method.
- Detect the merged cells in the worksheet and merge the corresponding cells of the Word tale using the custom method MergeCells().
- Get value of a specific Excel cell through CellRange.Value property and add it to a cell of the Word table using TableCell.AddParagraph().AppendText() method.
- Copy the font style and cell style from Excel to the Word table using the custom method CopyStyle().
- Save the document to a Word file using Document.SaveToFile() method.
- C#
- VB.NET
using Spire.Doc;
using Spire.Doc.Documents;
using Spire.Doc.Fields;
using Spire.Xls;

namespace ConvertExcelToWord
{
    internal class Program
    {
        static void Main(string[] args)
        {

            //Load an Excel file
            Workbook workbook = new Workbook();
            workbook.LoadFromFile(@"C:\Users\Administrator\Desktop\sample.xlsx");

            //Get the first worksheet
            Worksheet sheet = workbook.Worksheets[0];

            //Create a Word document
            Document doc = new Document();
            Section section = doc.AddSection();
            section.PageSetup.Orientation = PageOrientation.Landscape;

            //Add a table
            Table table = section.AddTable(true);
            table.ResetCells(sheet.LastRow, sheet.LastColumn);

            //Merge cells
            MergeCells(sheet, table);

            for (int r = 1; r <= sheet.LastRow; r++)
            {
                //Set row Height
                table.Rows[r - 1].Height = (float)sheet.Rows[r - 1].RowHeight;

                for (int c = 1; c <= sheet.LastColumn; c++)
                {
                    CellRange xCell = sheet.Range[r, c];
                    TableCell wCell = table.Rows[r - 1].Cells[c - 1];

                    //Export data from Excel to Word table
                    TextRange textRange = wCell.AddParagraph().AppendText(xCell.NumberText);

                    //Copy font and cell style from Excel to Word
                    CopyStyle(textRange, xCell, wCell);
                }
            }

            //Save the document to a Word file
            doc.SaveToFile("ExportToWord.docx", Spire.Doc.FileFormat.Docx);
        }
        //Merge cells if any
        private static void MergeCells(Worksheet sheet, Table table)
        {
            if (sheet.HasMergedCells)
            {
                //Get merged cell ranges from Excel
                CellRange[] ranges = sheet.MergedCells;

                //Merge corresponding cells in Word table
                for (int i = 0; i < ranges.Length; i++)
                {
                    int startRow = ranges[i].Row;
                    int startColumn = ranges[i].Column;
                    int rowCount = ranges[i].RowCount;
                    int columnCount = ranges[i].ColumnCount;
                    if (rowCount > 1 && columnCount > 1)
                    {
                        for (int j = startRow; j <= startRow + rowCount; j++)
                        {
                            table.ApplyHorizontalMerge(j - 1, startColumn - 1, startColumn - 1 + columnCount - 1);
                        }
                        table.ApplyVerticalMerge(startColumn - 1, startRow - 1, startRow - 1 + rowCount - 1);
                    }
                    if (rowCount > 1 && columnCount == 1)
                    {
                        table.ApplyVerticalMerge(startColumn - 1, startRow - 1, startRow - 1 + rowCount - 1);
                    }
                    if (columnCount > 1 && rowCount == 1)
                    {
                        table.ApplyHorizontalMerge(startRow - 1, startColumn - 1, startColumn - 1 + columnCount - 1);
                    }
                }
            }
        }

        //Copy cell style of Excel to Word table
        private static void CopyStyle(TextRange wTextRange, CellRange xCell, TableCell wCell)
        {
            //Copy font style
            wTextRange.CharacterFormat.TextColor = xCell.Style.Font.Color;
            wTextRange.CharacterFormat.FontSize = (float)xCell.Style.Font.Size;
            wTextRange.CharacterFormat.FontName = xCell.Style.Font.FontName;
            wTextRange.CharacterFormat.Bold = xCell.Style.Font.IsBold;
            wTextRange.CharacterFormat.Italic = xCell.Style.Font.IsItalic;
            //Copy backcolor
            wCell.CellFormat.Shading.BackgroundPatternColor = xCell.Style.Color;
            //Copy horizontal alignment
            switch (xCell.HorizontalAlignment)
            {
                case HorizontalAlignType.Left:
                    wTextRange.OwnerParagraph.Format.HorizontalAlignment = HorizontalAlignment.Left;
                    break;
                case HorizontalAlignType.Center:
                    wTextRange.OwnerParagraph.Format.HorizontalAlignment = HorizontalAlignment.Center;
                    break;
                case HorizontalAlignType.Right:
                    wTextRange.OwnerParagraph.Format.HorizontalAlignment = HorizontalAlignment.Right;
                    break;
            }
            //Copy vertical alignment
            switch (xCell.VerticalAlignment)
            {
                case VerticalAlignType.Bottom:
                    wCell.CellFormat.VerticalAlignment = VerticalAlignment.Bottom;
                    break;
                case VerticalAlignType.Center:
                    wCell.CellFormat.VerticalAlignment = VerticalAlignment.Middle;
                    break;
                case VerticalAlignType.Top:
                    wCell.CellFormat.VerticalAlignment = VerticalAlignment.Top;
                    break;
            }
        }
    }
}
Apply for a Temporary License
If you'd like to remove the evaluation message from the generated documents, or to get rid of the function limitations, please request a 30-day trial license for yourself.
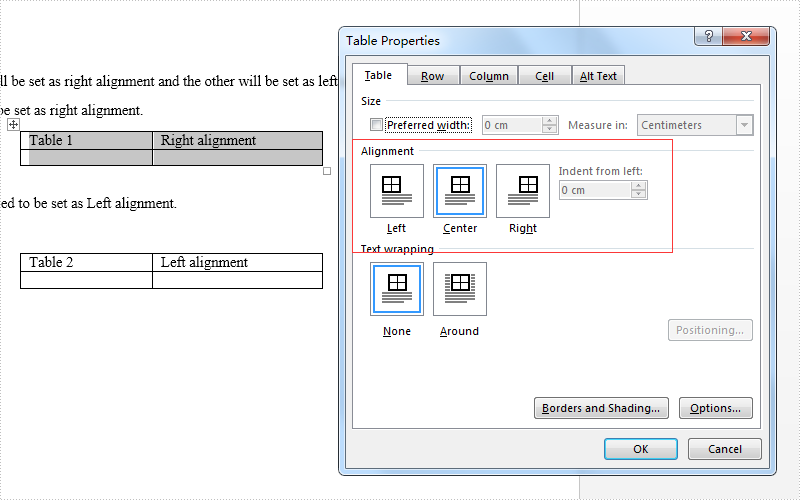
Usually there are three kinds of alignment style for a word table: left aligned, centered and right aligned. On Microsoft word, we can go to table properties to set the alignment for the whole table. Spire.Doc also offers a property table.TableFormat.HorizontalAlignment to enable developers to set the table alignment style easily in C#. This article will demonstrate how to align a table in C#.
Firstly, view the how to align a table for Microsoft word:
Here come to the code snippet of how Spire.Doc align a table.
Step 1: Create a word document and load from file.
Document doc = new Document();
doc.LoadFromFile("sample.docx");
Step 2: Get the first section and two tables from the word document.
Section section = doc.Sections[0];
Table table = section.Tables[0] as Table;
Table table1 = section.Tables[1] as Table;
Step 3: Set the different alignment properties for each table.
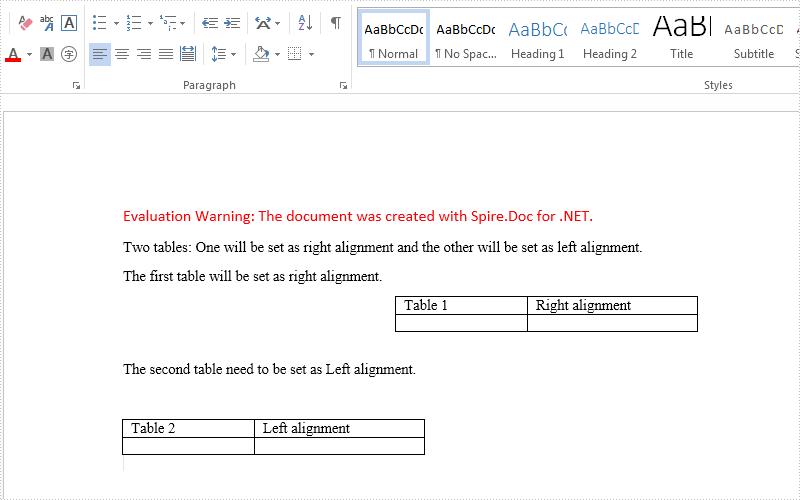
table.Format.HorizontalAlignment = RowAlignment.Right;
table.Format.LeftIndent = 34;

table1.Format.HorizontalAlignment = RowAlignment.Left;
table1.Format.LeftIndent = 34;
Step 4: Save the document to file:
doc.SaveToFile("result.docx", FileFormat.Docx);
Effective screenshots after align the table format:
Full codes:
using Spire.Doc;
using Spire.Doc.Documents;
namespace AlignTable
{
    class Program
    {

        static void Main(string[] args)
        {

            Document doc = new Document();
            doc.LoadFromFile("sample.docx");

            Section section = doc.Sections[0];
            Table table = section.Tables[0] as Table;
            Table table1 = section.Tables[1] as Table;

            table.Format.HorizontalAlignment = RowAlignment.Right;
            table.Format.LeftIndent = 34;

            table1.Format.HorizontalAlignment = RowAlignment.Left;
            table1.Format.LeftIndent = 34;

            doc.SaveToFile("result.docx", FileFormat.Docx);
        }
    }
}
Adding layers can help us to make the information that we don't want others to view become invisible in a pdf file. Spire.PDF, as a powerful and independent pdf library, enables us to add layers to pdf files without having Adobe Acrobat been installed on system.
This article will introduce how to add different types of layers to a pdf file in WPF using Spire.PDF for WPF.
Below is the effective screenshot after adding layers:

Detail Steps and Code Snippets:
Use namespace:
using System.Drawing;
using System.Windows;
using Spire.Pdf;
using Spire.Pdf.Graphics;
Step 1: Create a new PDF file and add a new page to it.
PdfDocument doc = new PdfDocument();
PdfPageBase page = doc.Pages.Add();
Step 2: Add image layer.
Add a layer named Image Layer to the page, call DrawImage(PdfImage image, float x, float y, float width, float height) method to add an image to the layer.
PdfPageLayer layer = page.PageLayers.Add("Image Layer");
layer.Graphics.DrawImage(PdfImage.FromFile("image.jpg"), 0, 100, 300, 30);
Step 3: Add line layer.
Add a layer named Line Layer to the page, call DrawLine(PdfPen pen, PointF point1, PointF point2) method to draw a red line to the layer.
layer = page.PageLayers.Add("Line Layer");
layer.Graphics.DrawLine(new PdfPen(PdfBrushes.Red, 1), new PointF(0, 200), new PointF(300, 200));
Step 4: Add string layer.
Add a layer named String Layer to the page, call DrawString(string s, PdfFontBase font, PdfPen pen, float x, float y) method to draw some string to the layer.
layer = page.PageLayers.Add("String Layer");
layer.Graphics.DrawString("Add layer to pdf using Spire.PDF", new PdfFont(PdfFontFamily.Courier, 12), new PdfPen(PdfBrushes.Navy,1),0,300);
Step 5: Save and launch the file.
doc.SaveToFile("AddLayers.pdf", FileFormat.PDF);
System.Diagnostics.Process.Start("AddLayers.pdf");
Full codes:
private void button1_Click(object sender, RoutedEventArgs e)
{
    PdfDocument doc = new PdfDocument();
    PdfPageBase page = doc.Pages.Add();

    PdfPageLayer layer = page.PageLayers.Add("Image Layer");
    layer.Graphics.DrawImage(PdfImage.FromFile("image.jpg"), 0, 100, 300, 30);

    layer = page.PageLayers.Add("Line Layer");
    layer.Graphics.DrawLine(new PdfPen(PdfBrushes.Red, 1), new PointF(0, 200), new PointF(300, 200));

    layer = page.PageLayers.Add("String Layer");
    layer.Graphics.DrawString("Add layer to pdf using Spire.PDF", new PdfFont(PdfFontFamily.Courier, 12), new PdfPen(PdfBrushes.Navy,1),0,300);

    doc.SaveToFile("AddLayers.pdf", FileFormat.PDF);
    System.Diagnostics.Process.Start("AddLayers.pdf");
}
