
.NET (1327)
Children categories
Manually adjusting table columns can be time-consuming, especially if you have a large document with multiple tables. This is where the AutoFit tables feature in Word comes into play. It allows you to adjust the size of your table automatically, eliminating the need for manual adjustments. By setting AutoFit, the table will always adapt to display the content in the most suitable way. In this article, you will learn how to autofit tables in a Word document in C# using Spire.Doc for .NET.
- Set Tables to AutoFit to Contents in Word in C#
- Set Tables to AutoFit to Window in Word in C#
- Set Tables to Fixed Column Width in Word in C#
Install Spire.Doc for .NET
To begin with, you need to add the DLL files included in the Spire.Doc for.NET package as references in your .NET project. The DLL files can be either downloaded from this link or installed via NuGet.
PM> Install-Package Spire.Doc
Set Tables to AutoFit to Contents in Word in C#
The AutoFit to Contents option in Word adjusts the size of table columns and rows according to the content within the cells. Once set, each column is automatically resized to ensure that all content is displayed completely without excessive empty space.
With Spire.Doc for .NET, you can use the Table.AutoFit(AutoFitBehaviorType.AutoFitToContents) method to autofit tables to content. The following are the detailed steps:
- Create a Document instance.
- Load a Word document using Document.LoadFromFile() method.
- Get a specified section in the document through Document.Sections[] property.
- Get a specified table in the section through Section.Tables[] property.
- AutoFit the table to contents using Table.AutoFit(AutoFitBehaviorType.AutoFitToContents) method.
- Save the result document using Document.SaveToFile() method.
- C#
using Spire.Doc;

namespace AutoFitToContents
{
    class Program
    {

        static void Main(string[] args)
        {
            // Create a Document instance
            Document doc = new Document();

            // Load a Word document
            doc.LoadFromFile("TableTemp.docx");

            // Get the first section in the document
            Section section = doc.Sections[0];

            // Get the first table in the section
            Table table = section.Tables[0] as Table;

            // AutoFit the table to contents
            table.AutoFit(AutoFitBehaviorType.AutoFitToContents);

            // Save the result document
            doc.SaveToFile("AutoFitToContents.docx", FileFormat.Docx);
        }
    }
}

Set Tables to AutoFit to Window in Word in C#
The AutoFit to Window option in Word enables the table to automatically adjust its width to fit the width of the Word window. Once set, the table will expand or contract to fill the entire page width (between the left and right margins).
To autofit tables to page, use the Table.AutoFit(AutoFitBehaviorType.AutoFitToWindow) method. The following are the detailed steps:
- Create a Document instance.
- Load a Word document using Document.LoadFromFile() method.
- Get a specified section in the document through Document.Sections[] property.
- Get a specified table in the section through Section.Tables[] property.
- AutoFit the table to Word window using Table.AutoFit(AutoFitBehaviorType.AutoFitToWindow) method.
- Save the result document using Document.SaveToFile() method.
- C#
using Spire.Doc;

namespace AutoFitToWindow
{
    class Program
    {

        static void Main(string[] args)
        {
            // Create a Document instance
            Document doc = new Document();

            // Load a Word document
            doc.LoadFromFile("TableTemp.docx");

            // Get the first section in the document
            Section section = doc.Sections[0];

            // Get the first table in the section
            Table table = section.Tables[0] as Table;

            // AutoFit the table to page
            table.AutoFit(AutoFitBehaviorType.AutoFitToWindow);

            // Save the result document
            doc.SaveToFile("AutoFitToWindow.docx", FileFormat.Docx);
        }
    }
}

Set Tables to Fixed Column Width in Word in C#
The Fixed Column Width option in Word allows you to maintain a specific, unchanging width for each column in the table. Once set, the column width of the table will remain fixed regardless of any changes to the content within the cells or the size of the document window.
The Table.AutoFit(AutoFitBehaviorType.FixedColumnWidths) method can be used to set fixed column width for Word tables. The following are the detailed steps to:
- Create a Document instance.
- Load a Word document using Document.LoadFromFile() method.
- Get a specified section in the document through Document.Sections[] property.
- Get a specified table in the section through Section.Tables[] property.
- Fix the column widths of the table using Table.AutoFit(AutoFitBehaviorType.FixedColumnWidths) method.
- Iterate through each row and then set the new column widths using Table.Rows[index].Cells[index].SetCellWidth() method.
- Save the result document using Document.SaveToFile() method.
- C#
using Spire.Doc;

namespace FixedColumnWidth
{
    class Program
    {

        static void Main(string[] args)
        {
            // Create a Document instance
            Document doc = new Document();

            // Load a Word document
            doc.LoadFromFile("TableTemp.docx");

            // Get the first section in the document
            Section section = doc.Sections[0];

            // Get the first table in the section
            Table table = section.Tables[0] as Table;

            // Set to fixed column width
            table.AutoFit(AutoFitBehaviorType.FixedColumnWidths);

            // Iterate through each row in the table
            for (int i = 0; i < table.Rows.Count; i++)
            {
                // Reset the width of the first column
                table.Rows[i].Cells[0].SetCellWidth(120f, CellWidthType.Point);
                // Reset the width of the second column
                table.Rows[i].Cells[1].SetCellWidth(60f, CellWidthType.Point);
                // Reset the width of the third column
                table.Rows[i].Cells[2].SetCellWidth(40f, CellWidthType.Point);
                // Reset the width of the fourth column
                table.Rows[i].Cells[3].SetCellWidth(90f, CellWidthType.Point);

            }

            // Save the result document
            doc.SaveToFile("FixedColumnWidth.docx", FileFormat.Docx);
        }
    }
}

Get a Free License
To fully experience the capabilities of Spire.Doc for .NET without any evaluation limitations, you can request a free 30-day trial license.
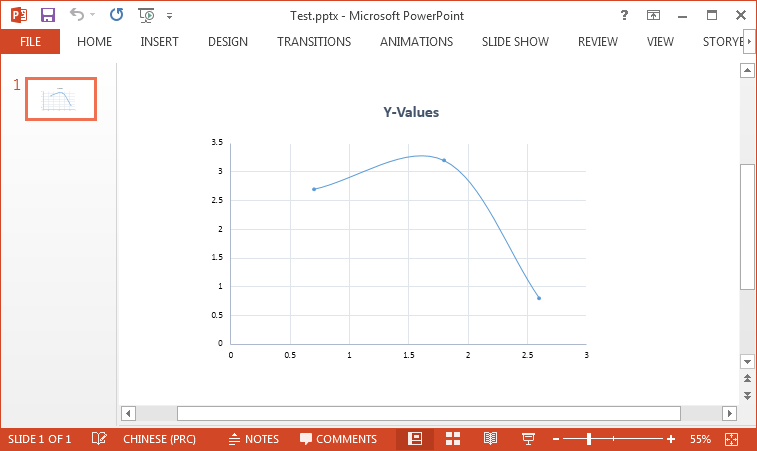
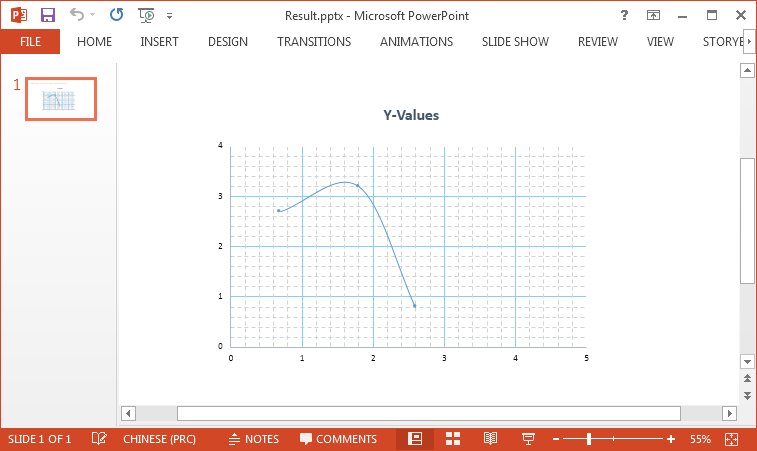
Axis is a significant part of charts. In order to make the data easier to read, we may need to modify the axis values or display the minor grid lines. This article demonstrates how to format axis of chart in PowerPoint using Spire.Presenation.
Here is the test document:
Code Snippet:
Step 1: Initialize a new instance of Presentation class and load a sample PowerPoint document.
Presentation ppt = new Presentation(@"C:\Users\Administrator\Desktop\Test.pptx", FileFormat.Pptx2010);
Step 2: Get the chart from the document.
IChart chart = ppt.Slides[0].Shapes[0] as IChart;
Step 3: Set bounds of axis value. Before we assign values, we must set IsAutoMax and IsAutoMin as false, otherwise MS PowerPoint will automatically set the values.
chart.PrimaryValueAxis.IsAutoMax = false;
chart.PrimaryValueAxis.IsAutoMin= false;
chart.SecondaryValueAxis.IsAutoMax = false;
chart.SecondaryValueAxis.IsAutoMin= false;
chart.PrimaryValueAxis.MinValue = 0f;
chart.PrimaryValueAxis.MaxValue = 5.0f;
chart.SecondaryValueAxis.MinValue = 0f;
chart.SecondaryValueAxis.MaxValue = 4.0f;
Step 4: For the same reason, IsAutoMajor and IsAutoMinor must be set as false before assigning values to MajorUnit and MinorUnit.
chart.PrimaryValueAxis.IsAutoMajor = false;
chart.PrimaryValueAxis.IsAutoMinor= false;
chart.SecondaryValueAxis.IsAutoMajor = false;
chart.SecondaryValueAxis.IsAutoMinor = false;
chart.PrimaryValueAxis.MajorUnit = 1.0f;
chart.PrimaryValueAxis.MinorUnit = 0.2f;
chart.SecondaryValueAxis.MajorUnit = 1.0f;
chart.SecondaryValueAxis.MinorUnit =0.2f;
Step 5: Set and format minor grid lines.
chart.PrimaryValueAxis.MinorGridLines.FillType = FillFormatType.Solid;
chart.SecondaryValueAxis.MinorGridLines.FillType = FillFormatType.Solid;
chart.PrimaryValueAxis.MinorGridLines.Width = 0.1f;
chart.SecondaryValueAxis.MinorGridLines.Width = 0.1f;
chart.PrimaryValueAxis.MinorGridLines.SolidFillColor.Color = Color.LightGray;
chart.SecondaryValueAxis.MinorGridLines.SolidFillColor.Color = Color.LightGray;
chart.PrimaryValueAxis.MinorGridLines.DashStyle = LineDashStyleType.Dash;
chart.SecondaryValueAxis.MinorGridLines.DashStyle = LineDashStyleType.Dash;
Step 6: Set and format major grid lines.
chart.PrimaryValueAxis.MajorGridTextLines.Width = 0.3f;
chart.PrimaryValueAxis.MajorGridTextLines.SolidFillColor.Color = Color.LightSkyBlue;
chart.SecondaryValueAxis.MajorGridTextLines.Width = 0.3f;
chart.SecondaryValueAxis.MajorGridTextLines.SolidFillColor.Color = Color.LightSkyBlue;
Step 7: Save the file.
ppt.SaveToFile("Result.pptx", FileFormat.Pptx2010);
Output:
Full Code:
using Spire.Presentation;
using Spire.Presentation.Charts;
using Spire.Presentation.Drawing;
using System.Drawing;

namespace FormatAxis
{
    class Program
    {
        static void Main(string[] args)
        {
            Presentation ppt = new Presentation(@"C:\Users\Administrator\Desktop\Test.pptx", FileFormat.Pptx2010);
            IChart chart = ppt.Slides[0].Shapes[0] as IChart;

            chart.PrimaryValueAxis.IsAutoMax = false;
            chart.PrimaryValueAxis.IsAutoMin = false;
            chart.SecondaryValueAxis.IsAutoMax = false;
            chart.SecondaryValueAxis.IsAutoMin = false;
            chart.PrimaryValueAxis.MinValue = 0f;
            chart.PrimaryValueAxis.MaxValue = 5.0f;
            chart.SecondaryValueAxis.MinValue = 0f;
            chart.SecondaryValueAxis.MaxValue = 4.0f;

            chart.PrimaryValueAxis.IsAutoMajor = false;
            chart.PrimaryValueAxis.IsAutoMinor = false;
            chart.SecondaryValueAxis.IsAutoMajor = false;
            chart.SecondaryValueAxis.IsAutoMinor = false;
            chart.PrimaryValueAxis.MajorUnit = 1.0f;
            chart.PrimaryValueAxis.MinorUnit = 0.2f;
            chart.SecondaryValueAxis.MajorUnit = 1.0f;
            chart.SecondaryValueAxis.MinorUnit = 0.2f;

            chart.PrimaryValueAxis.MinorGridLines.FillType = FillFormatType.Solid;
            chart.SecondaryValueAxis.MinorGridLines.FillType = FillFormatType.Solid;
            chart.PrimaryValueAxis.MinorGridLines.Width = 0.1f;
            chart.SecondaryValueAxis.MinorGridLines.Width = 0.1f;
            chart.PrimaryValueAxis.MinorGridLines.SolidFillColor.Color = Color.LightGray;
            chart.SecondaryValueAxis.MinorGridLines.SolidFillColor.Color = Color.LightGray;
            chart.PrimaryValueAxis.MinorGridLines.DashStyle = LineDashStyleType.Dash;
            chart.SecondaryValueAxis.MinorGridLines.DashStyle = LineDashStyleType.Dash;

            chart.PrimaryValueAxis.MajorGridTextLines.Width = 0.3f;
            chart.PrimaryValueAxis.MajorGridTextLines.SolidFillColor.Color = Color.LightSkyBlue;
            chart.SecondaryValueAxis.MajorGridTextLines.Width = 0.3f;
            chart.SecondaryValueAxis.MajorGridTextLines.SolidFillColor.Color = Color.LightSkyBlue;

            ppt.SaveToFile("Result.pptx", FileFormat.Pptx2010);
            System.Diagnostics.Process.Start("Result.pptx");

        }
    }
}
Imports Spire.Presentation
Imports Spire.Presentation.Charts
Imports Spire.Presentation.Drawing
Imports System.Drawing

Namespace FormatAxis
	Class Program
		Private Shared Sub Main(args As String())
			Dim ppt As New Presentation("C:\Users\Administrator\Desktop\Test.pptx", FileFormat.Pptx2010)
			Dim chart As IChart = TryCast(ppt.Slides(0).Shapes(0), IChart)

			chart.PrimaryValueAxis.IsAutoMax = False
			chart.PrimaryValueAxis.IsAutoMin = False
			chart.SecondaryValueAxis.IsAutoMax = False
			chart.SecondaryValueAxis.IsAutoMin = False
			chart.PrimaryValueAxis.MinValue = 0F
			chart.PrimaryValueAxis.MaxValue = 5F
			chart.SecondaryValueAxis.MinValue = 0F
			chart.SecondaryValueAxis.MaxValue = 4F

			chart.PrimaryValueAxis.IsAutoMajor = False
			chart.PrimaryValueAxis.IsAutoMinor = False
			chart.SecondaryValueAxis.IsAutoMajor = False
			chart.SecondaryValueAxis.IsAutoMinor = False
			chart.PrimaryValueAxis.MajorUnit = 1F
			chart.PrimaryValueAxis.MinorUnit = 0.2F
			chart.SecondaryValueAxis.MajorUnit = 1F
			chart.SecondaryValueAxis.MinorUnit = 0.2F

			chart.PrimaryValueAxis.MinorGridLines.FillType = FillFormatType.Solid
			chart.SecondaryValueAxis.MinorGridLines.FillType = FillFormatType.Solid
			chart.PrimaryValueAxis.MinorGridLines.Width = 0.1F
			chart.SecondaryValueAxis.MinorGridLines.Width = 0.1F
			chart.PrimaryValueAxis.MinorGridLines.SolidFillColor.Color = Color.LightGray
			chart.SecondaryValueAxis.MinorGridLines.SolidFillColor.Color = Color.LightGray
			chart.PrimaryValueAxis.MinorGridLines.DashStyle = LineDashStyleType.Dash
			chart.SecondaryValueAxis.MinorGridLines.DashStyle = LineDashStyleType.Dash

			chart.PrimaryValueAxis.MajorGridTextLines.Width = 0.3F
			chart.PrimaryValueAxis.MajorGridTextLines.SolidFillColor.Color = Color.LightSkyBlue
			chart.SecondaryValueAxis.MajorGridTextLines.Width = 0.3F
			chart.SecondaryValueAxis.MajorGridTextLines.SolidFillColor.Color = Color.LightSkyBlue

			ppt.SaveToFile("Result.pptx", FileFormat.Pptx2010)
			System.Diagnostics.Process.Start("Result.pptx")

		End Sub
	End Class
End Namespace
How to Copy a Page within a PDF File or between PDF Files in WPF
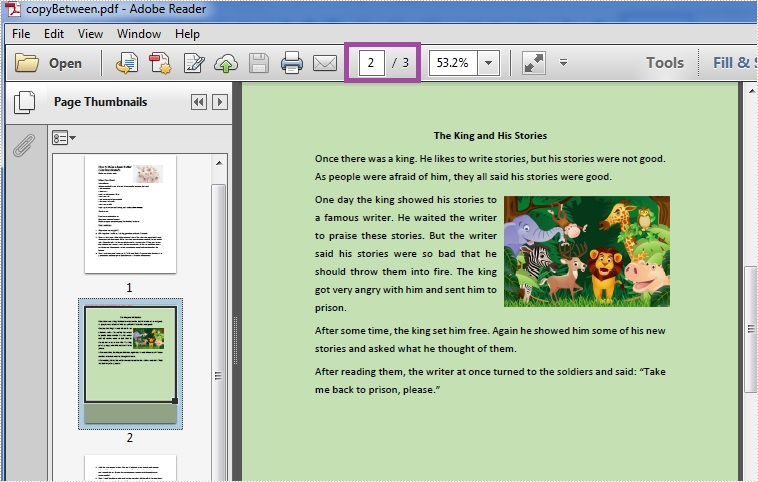
2016-04-29 08:43:03 Written by KoohjiIn some cases, we need to copy one or more pages of a pdf file, while copy pdf pages can be classified into two categories: copy pages within a pdf file and copy pages between pdf files. With the help of Spire.PDF, we can easily achieve this task programmatically instead of using Adobe Acrobat and dragging the page to copy it manually.
This article will demonstrate how to copy a page within a pdf file or between pdf files in WPF using Spire.PDF for WPF.
Before using the code, please add the following namespace first:
using System.Drawing;
using System.Windows;
using Spire.Pdf;
using Spire.Pdf.Graphics;
Copy Page within a PDF File
Step 1: Initialize a new instance of PdfDocument class and load the sample pdf file.
PdfDocument doc1 = new PdfDocument();
doc1.LoadFromFile("Stories.pdf");
Step 2: Get the first page of the pdf file, then get its page size and call CreateTemplate() method to create a new pdf template based on the first page.
PdfPageBase page = doc1.Pages[0];
SizeF size = page.Size;
PdfTemplate template = page.CreateTemplate();
Step 3: Copy the first page within the pdf file.
Add a new page that is the same size as the first page to the pdf file, draw the template to the new page by invoking DrawTemplate(PdfTemplate template, PointF location) method.
page = doc1.Pages.Add(size, new PdfMargins(0,0));
page.Canvas.DrawTemplate(template,new PointF(0,0));
Step 4: Save and launch the file.
doc1.SaveToFile("copyWithin.pdf");
System.Diagnostics.Process.Start("copyWithin.pdf");
Effective Screenshot:

Copy Page between PDF Files
Step 1: Initialize a new instance of PdfDocument class named doc1 and load the first pdf file.
PdfDocument doc1 = new PdfDocument();
doc1.LoadFromFile("Stories.pdf");
Step 2: Initialize a new instance of PdfDocument class named doc2 and load the second pdf file.
PdfDocument doc2 = new PdfDocument();
doc2.LoadFromFile("Instruction.pdf");
Step 3: Get the first page of doc1, then get its page size and create a new template based on the first page.
PdfPageBase page = doc1.Pages[0];
SizeF size = page.Size;
PdfTemplate template = page.CreateTemplate();
Step 4: Copy the first page from doc1 to doc2.
Invoking Insert(int index, SizeF size, PdfMargins margins) method to insert a new page that is the same size as the first page to the specified location of doc2, next draw the template to the new page.
doc2.Pages.Insert(1, size, new PdfMargins(0,0));
doc2.Pages[1].Canvas.DrawTemplate(template,new PointF(0,0));
If you want to copy the page to doc2 as its last page, please use the following code to add a new page to the end of doc2, then draw the template to the new page.
doc2.Pages.Add(size, new PdfMargins(0, 0));
Step 5: Save and launch the file.
doc2.SaveToFile("copyBetween.pdf");
System.Diagnostics.Process.Start("copyBetween.pdf");
Effective Screenshot:
Full codes:
Copy page within a pdf file:
private void button1_Click(object sender, RoutedEventArgs e)
{
    PdfDocument doc1 = new PdfDocument();
    doc1.LoadFromFile("Stories.pdf");

    PdfPageBase page = doc1.Pages[0];
    SizeF size = page.Size;
    PdfTemplate template = page.CreateTemplate();

    page = doc1.Pages.Add(size, new PdfMargins(0,0));
    page.Canvas.DrawTemplate(template, new PointF(0,0));

    doc1.SaveToFile("copyWithin.pdf");
    System.Diagnostics.Process.Start("copyWithin.pdf");
}
Copy page between pdf files:
private void button1_Click(object sender, RoutedEventArgs e)
{
    PdfDocument doc1 = new PdfDocument();
    doc1.LoadFromFile("Stories.pdf");

    PdfDocument doc2 = new PdfDocument();
    doc2.LoadFromFile("Instruction.pdf");

    PdfPageBase page = doc1.Pages[0];
    SizeF size = page.Size;
    PdfTemplate template = page.CreateTemplate();

doc2.Pages.Insert(1, size, new PdfMargins(0,0));
    doc2.Pages[1].Canvas.DrawTemplate(template, new PointF(0,0));

    doc2.SaveToFile("copyBetween.pdf");
    System.Diagnostics.Process.Start("copyBetween.pdf");
}
How to highlight different searched texts with different colors in WPF
2016-04-28 01:44:46 Written by KoohjiNowadays, many files are saved as PDF format. PDF has many advantages and its Find and Highlight feature makes it easier for us to find important information inside a lengthy PDF document.
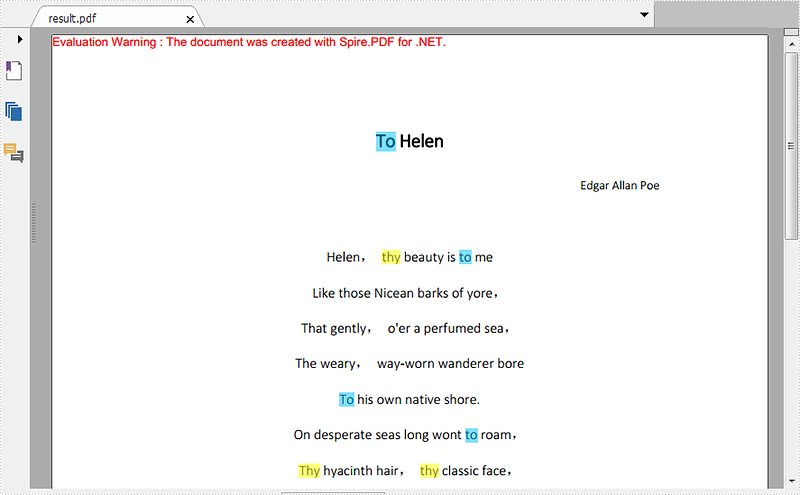
In the following sections, I will demonstrate how to highlight different searched texts with different colors in WPF.
The code snippets are as followed:
Step 1: Initialize a new instance of PdfDocument class and load the PDF document from the file.
PdfDocument pdf = new PdfDocument("ToHelen.pdf");
Step 2: Call FindText() method to search the string "thy" in the first page of the file, then return to Result1. Traverse result1 and call ApplyHighLight() method to highlight all elements in result1. Set the highlight color as yellow.
PdfTextFind[] result1 = null;
result1 = pdf.Pages[0].FindText("thy").Finds;
foreach (PdfTextFind find in result1)
{
    find.ApplyHighLight(System.Drawing.Color.Yellow);
}
Step 3: Repeat step 2 to highlight all the texts "to" on Page 1 with the color of DeepSkyBlue.
PdfTextFind[] result2 = null;
result2 = pdf.Pages[0].FindText("to").Finds;
foreach (PdfTextFind find in result2)
{
    find.ApplyHighLight(System.Drawing.Color.DeepSkyBlue);
}
Step 4: Save the PDF document and launch the file.
pdf.SaveToFile("HighlightedToHelen.pdf", Spire.Pdf.FileFormat.PDF);
System.Diagnostics.Process.Start("HighlightedToHelen.pdf");
Effective screenshot:
Full Codes:
//load the PDF document from the file
PdfDocument pdf = new PdfDocument("ToHelen.pdf");

//highlight searched text "thy" with Yellow
PdfTextFind[] result1 = null;
result1 = pdf.Pages[0].FindText("thy").Finds;
foreach (PdfTextFind find in result1)
{
    find.ApplyHighLight(System.Drawing.Color.Yellow);
}

//highlight searched text “to” with DeepSkyBlue
PdfTextFind[] result2 = null;
result2 = pdf.Pages[0].FindText("to").Finds;
foreach (PdfTextFind find in result2)
{
    find.ApplyHighLight(System.Drawing.Color.DeepSkyBlue);
}

//save and launch the file
pdf.SaveToFile("HighlightedToHelen.pdf", Spire.Pdf.FileFormat.PDF);
System.Diagnostics.Process.Start("HighlightedToHelen.pdf");
'load the PDF document from the file
Dim pdf As New PdfDocument("ToHelen.pdf")

'highlight searched text "thy" with Yellow
Dim result1 As PdfTextFind() = Nothing
result1 = pdf.Pages(0).FindText("thy").Finds
For Each find As PdfTextFind In result1
	 find.ApplyHighLight(System.Drawing.Color.Yellow)
Next

'highlight searched text "to" with DeepSkyBlue
Dim result2 As PdfTextFind() = Nothing
result2 = pdf.Pages(0).FindText("to").Finds
For Each find As PdfTextFind In result2
	 find.ApplyHighLight(System.Drawing.Color.DeepSkyBlue)
Next

'save and launch the file
pdf.SaveToFile("HighlightedToHelen.pdf", Spire.Pdf.FileFormat.PDF)
System.Diagnostics.Process.Start("HighlightedToHelen.pdf")
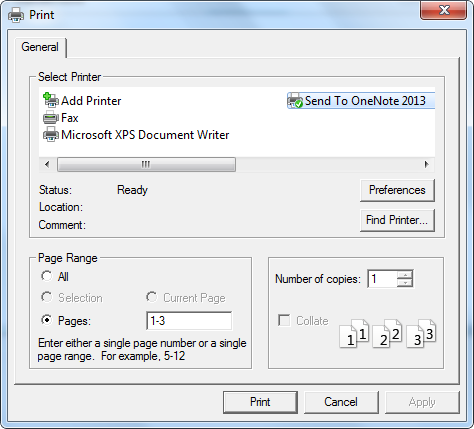
Spire.XLS supports to silently print an Excel file as well as print document with a print dialog, which is provided by System.Windows.Controls namespace in WPF, allowing users to select a specified printer and also the print pages. This article demonstrates how to print Excel file from a WPF application by invoking the print dialog in C# and VB.NET.
Necessary Namespaces:
using System.Windows;
using System.Windows.Controls;
using System.Drawing.Printing;
using Spire.Xls;
Code Snippet:
Step 1: Initialize an instance of Workbook and load a sample Excel file that you want to print.
Workbook workbook = new Workbook();
workbook.LoadFromFile("sample.xlsx");
Step 2: Create a new object of PrintDialog and set its properties such as PageRangeSelection and UserPageRangeEnabled.
PrintDialog dialog = new PrintDialog();
dialog.UserPageRangeEnabled = true;
PageRange rang = new PageRange(1, 3);
dialog.PageRange = rang;
PageRangeSelection seletion = PageRangeSelection.UserPages;
dialog.PageRangeSelection =seletion;
Step 3: Get the print document and invoke the print dialog to print.
PrintDocument pd = workbook.PrintDocument;
if (dialog.ShowDialog() == true)
{
    pd.Print();
}
Output:
Full Code:
using Spire.Xls;
using System.Drawing;
using System.Drawing.Printing;
using System.Windows;
using System.Windows.Controls;

namespace WpfApplication1
{
    public partial class MainWindow : Window
    {
        public MainWindow()
        {
            InitializeComponent();
        }
        private void button1_Click(object sender, RoutedEventArgs e)
        {
            Workbook workbook = new Workbook();
            workbook.LoadFromFile("sample.xlsx");
            PrintDialog dialog = new PrintDialog();
            dialog.UserPageRangeEnabled = true;
            PageRange rang = new PageRange(1, 3);
            dialog.PageRange = rang;
            PageRangeSelection seletion = PageRangeSelection.UserPages;
            dialog.PageRangeSelection = seletion;
            PrintDocument pd = workbook.PrintDocument;
            if (dialog.ShowDialog() == true)
            {
                pd.Print();
            }
        }
    }
}
Imports Spire.Xls
Imports System.Drawing
Imports System.Drawing.Printing
Imports System.Windows
Imports System.Windows.Controls

Namespace WpfApplication1
	Public Partial Class MainWindow
		Inherits Window
		Public Sub New()
			InitializeComponent()
		End Sub
		Private Sub button1_Click(sender As Object, e As RoutedEventArgs)
			Dim workbook As New Workbook()
			workbook.LoadFromFile("sample.xlsx")
			Dim dialog As New PrintDialog()
			dialog.UserPageRangeEnabled = True
			Dim rang As New PageRange(1, 3)
			dialog.PageRange = rang
			Dim seletion As PageRangeSelection = PageRangeSelection.UserPages
			dialog.PageRangeSelection = seletion
			Dim pd As PrintDocument = workbook.PrintDocument
			If dialog.ShowDialog() = True Then
				pd.Print()
			End If
		End Sub
	End Class
End Namespace
It's well known that we can add a variety of bullet styles to paragraphs in Word, such as various symbols, pictures, fonts and numbers. Bullet makes these paragraphs to be a bulleted list, so that we can easily create a well-structured and professional document.
This article will demonstrate how to set bullet style for word paragraphs in WPF applications using Spire.Doc for WPF.
Below is the effective screenshot after setting bullet style:

Code snippets:
Use namespace:
using System.Windows;
using Spire.Doc;
using Spire.Doc.Documents;
Step 1: Create a new instance of Document class and load the sample word document from file.
Document doc = new Document();
doc.LoadFromFile("Instruction.docx");
Step 2: Create a bulleted list.
Get the first section, then apply bullet style to paragraphs from 5th to 13th and set bullet position.
Section sec = doc.Sections[0];
for (int i = 4; i < 13; i++)
{
    Paragraph paragraph = sec.Paragraphs[i];
    paragraph.ListFormat.ApplyBulletStyle();
    paragraph.ListFormat.CurrentListLevel.NumberPosition = -20;
}
In addition, we can also use following code to create a numbered list:
paragraph.ListFormat.ApplyNumberedStyle();
Step 3: Save and launch the file.
doc.SaveToFile("Bullet.docx", FileFormat.Docx);
System.Diagnostics.Process.Start("Bullet.docx");
Full codes:
private void button1_Click(object sender, RoutedEventArgs e)
{
    //Load Document
    Document doc = new Document();
    doc.LoadFromFile("Instruction.docx");

    //Set Bullet Style
    Section sec = doc.Sections[0];
    for (int i = 4; i < 13; i++)
    {
    Paragraph paragraph = sec.Paragraphs[i];

    //Create a bulleted list
    paragraph.ListFormat.ApplyBulletStyle();

        //Create a numbered list
    // paragraph.ListFormat.ApplyNumberedStyle();

        paragraph.ListFormat.CurrentListLevel.NumberPosition = -20;
    }

    //Save and Launch
    doc.SaveToFile("Bullet.docx", FileFormat.Docx);
    System.Diagnostics.Process.Start("Bullet.docx");
}
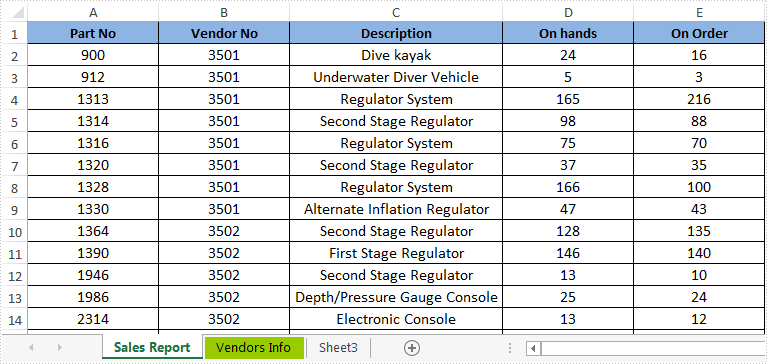
Renaming excel worksheet can makes readers clearly understand what we want to present at their first sight, at the same time, we can also set tab color for a specific worksheet, in order to distinguish it from others and find it in a very short time.
This section will demonstrate how to rename and set tab color for excel worksheet in WPF using Spire.XLS for WPF.
Please follow the detail steps and code snippets below:
Use namespace:
using System.Drawing;
using System.Windows;
using Spire.Xls;
Step 1: Initialize a new instance of Workbook class and load the sample excel document from file.
Workbook workbook = new Workbook();
workbook.LoadFromFile("Sample.xlsx");
Step 2: Get the worksheets that need to be renamed and set tab color for. Here we choose the first and the second worksheets.
Worksheet sheet = workbook.Worksheets[0];
Worksheet sheet1 = workbook.Worksheets[1];
Step 3: Rename and set tab color.
Rename the first and the second worksheets.
sheet.Name = "Sales Report";
sheet1.Name = "Vendors Info";
Set tab color of the second worksheet as Lawn Green.
sheet1.TabColor = Color.LawnGreen;
Step 4: Save the changes and launch the file.
workbook.SaveToFile("Rename.xlsx");
System.Diagnostics.Process.Start("Rename.xlsx");
Result:
Full codes:
using Spire.Xls;
using System.Drawing;
using System.Windows;

namespace WpfApplication1
{
    public partial class MainWindow : Window
    {
        public MainWindow()
        {
            InitializeComponent();
        }
        private void button1_Click(object sender, RoutedEventArgs e)
        {
            //Load the excel file
            Workbook workbook = new Workbook();
            workbook.LoadFromFile("Sample.xlsx");

            Worksheet sheet = workbook.Worksheets[0];
            Worksheet sheet1 = workbook.Worksheets[1];

            //rename worksheets
            sheet.Name = "Sales Report";
            sheet1.Name = "Vendors Info";

            //set tab color
            sheet1.TabColor = Color.LawnGreen;

            //save and launch the file
            workbook.SaveToFile("Rename.xlsx");
            System.Diagnostics.Process.Start("Rename.xlsx");
        }
    }
}
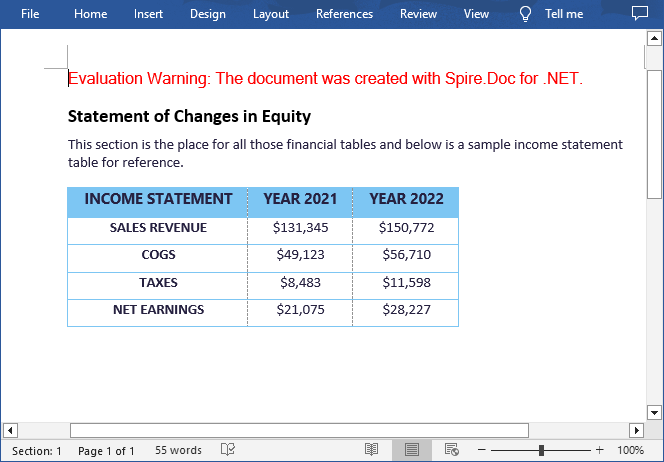
The ability to add or delete rows and columns in a Word table is crucial for maintaining the accuracy, clarity, and relevance of the information presented. By adding additional rows and columns, you can modify the original structure of a table to accommodate changes in the underlying data. Conversely, removing unnecessary rows and columns helps to streamline your document and make it easier to read. In this article, you will learn how to add or delete table rows and columns in Word in C# using Spire.Doc for .NET.
- Add or Insert Rows in a Word Table in C#
- Add or Insert Columns in a Word Table in C#
- Delete Rows and Columns from a Word Table in C#
Install Spire.Doc for .NET
To begin with, you need to add the DLL files included in the Spire.Doc for.NET package as references in your .NET project. The DLL files can be either downloaded from this link or installed via NuGet.
PM> Install-Package Spire.Doc
Add or Insert Rows in a Word Table in C#
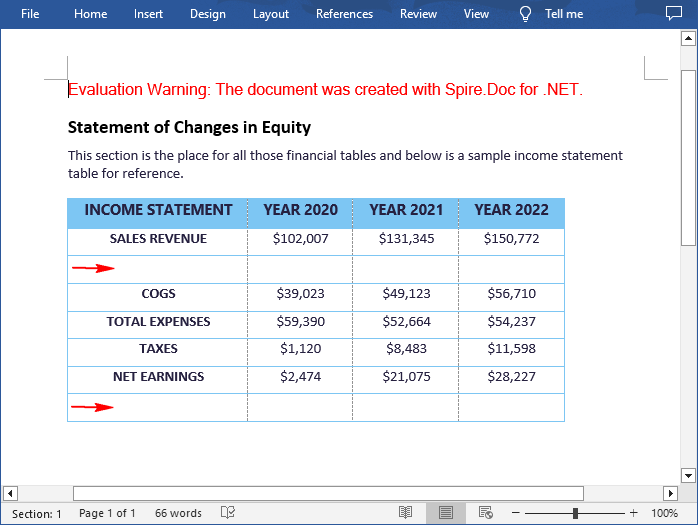
Spire.Doc for .NET allows to add a row to the end of a Word table or insert a row at a specific location in a Word table using the Table.AddRow() or Table.Rows.Insert() method. The following are the detailed steps.
- Create a Document object.
- Load a Word document using Document.LoadFromFile() method.
- Get the first section using Document.Sections[] property.
- Get a specified table in the section using Section.Tables[] property.
- Insert a row at a specific location in the table using Table.Rows.Insert(intindex, TableRow row) method.
- Add a row to the end of the table using Table.AddRow() method.
- Save the result document using Document.SaveToFile() method.
- C#
using Spire.Doc;

namespace AddRows
{
    class Program
    {
        static void Main(string[] args)
        {
            //Create a Document object
            Document doc = new Document();

            //Load a Word document
            doc.LoadFromFile("Tables.docx");

            //Get the first section
            Section section = doc.Sections[0];

            //Get the first table in the section
            Table table = section.Tables[0] as Table;

            //Insert a row into the table as the third row
            table.Rows.Insert(2, table.AddRow());

            //Add a row at the end of the table
            table.AddRow();

            //Save the result document
            doc.SaveToFile("AddRows.docx", FileFormat.Docx2016);
        }
    }
}
Add or Insert Columns in a Word Table in C#
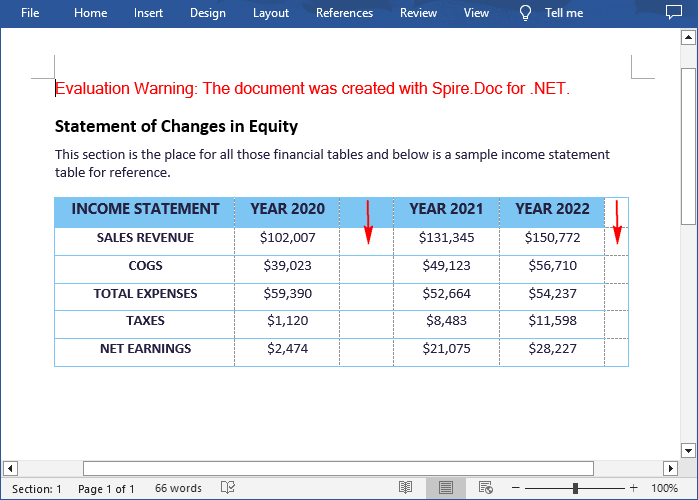
Spire.Doc for .NET does not have a direct method for adding or inserting columns in a Word table. However, you can achieve this task by adding or inserting cells at a specific location in each table row using the TableRow.AddCell() or TableRow.Cells.Insert() method. The following are the detailed steps.
- Create a Document object.
- Load a Word document using Document.LoadFromFile() method.
- Get the first section using Document.Sections[] property.
- Get a specified table in the section using Section.Tables[] property.
- Loop through to get each row in the table.
- Create a TableCell object, and then insert it at a specific location in each row using TableRow.Cells.Insert() method.
- Set the cell width using TableRow.Cells[].SetCellWidth() method.
- Add a cell to the end of each row using TableRow.AddCell() method.
- Save the result document using Document.SaveToFile() method.
- C#
using Spire.Doc;

namespace AddColumns
{
    class Program
    {
        static void Main(string[] args)
        {
            //Create a Document object
            Document doc = new Document();

            //Load a Word document
            doc.LoadFromFile("Tables.docx");

            //Get the first section
            Section section = doc.Sections[0];

            //Get the first table in the section
            Table table = section.Tables[0] as Table;

            //Loop through the rows in the table
            for (int i = 0; i < table.Rows.Count; i++)
            {
                //Get a specified row
                TableRow row = table.Rows[i];

                //Create a TableCell object
                TableCell cell = new TableCell(table.Document);

                //Insert the cell as the third cell of the row
                row.Cells.Insert(2, cell);

                //Set the cell width
                row.Cells[2].SetCellWidth(40, CellWidthType.Point);

                //Add a cell to the end of the row
                row.AddCell();
            }

            //Save the result document
            doc.SaveToFile("AddColumns.docx", FileFormat.Docx2016);

        }
    }
}
Delete Rows and Columns from a Word Table in C#
To remove a specific row from a Word table, you can use the Table.Rows.RemoveAt() method directly. While to remove a specific column, you need to remove the corresponding cell from each table row using the TableRow.Cells.RemoveAt() method. The following are the detailed steps.
- Create a Document object.
- Load a Word document using Document.LoadFromFile() method.
- Get the first section using Document.Sections[] property.
- Get a specified table in the section using Section.Tables[] property.
- Remove a specific row from the table using Table.Rows.RemoveAt(int index) method.
- Loop through to get each row in the table.
- Remove a specific cell from each row using TableRow.Cells.RemoveAt(int index) method.
- Save the result document using Document.SaveToFile() method.
- C#
using Spire.Doc;

namespace AddColumns
{
    class Program
    {
        static void Main(string[] args)
        {
            //Create a Document object
            Document doc = new Document();

            //Load a Word document
            doc.LoadFromFile("Tables.docx");

            //Get the first section
            Section section = doc.Sections[0];

            //Get the first table in the section
            Table table = section.Tables[0] as Table;

            //Remove the 4th row
            table.Rows.RemoveAt(3);

            //Loop through the rows in the table
            for (int i = 0; i < table.Rows.Count; i++)
            {
                //Get a specified row
                TableRow row = table.Rows[i];

                //Remove the 2nd cell from the row
                row.Cells.RemoveAt(1);
            }

            //Save the result document
            doc.SaveToFile("RemoveRowsColumns.docx", FileFormat.Docx2016);

        }
    }
}
Apply for a Temporary License
If you'd like to remove the evaluation message from the generated documents, or to get rid of the function limitations, please request a 30-day trial license for yourself.
How to Open and View Excel in Windows Form using Spire.Speadsheet
2016-04-19 03:20:45 Written by KoohjiSpire.Spreadsheet is a .NET Excel viewer control that allows programmers to load Excel spreadsheet in Windows form, manipulate the data in it and save to file. This guide will introduce how to add Spire.Spreadsheet controls to Toolbox and how to create a Windows Form Application to display Excel spreadsheet.
Add Spire.Spreadsheet Controls to Toolbox
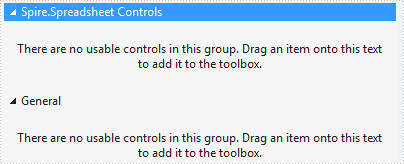
Right-click on the white space of the Toolbox – "Add Tab" - name the new Tab "Spire.Spreadsheet Controls":
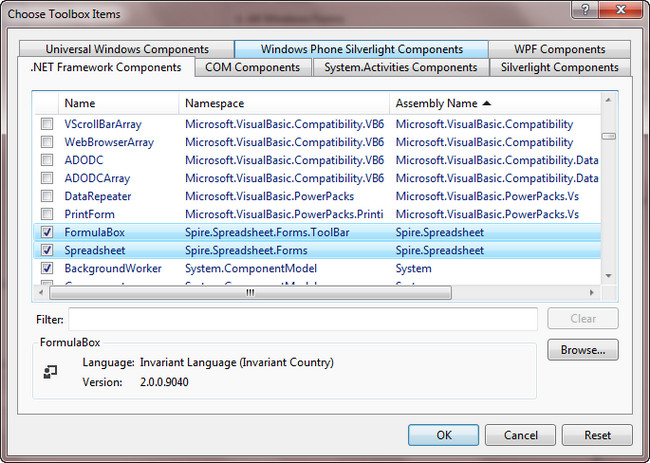
Right-click on the blank part below "Spire.Spreadsheet Controls" - "Choose Items" - ".NET Framework Components" - "Browse" to the "Bin" folder - find the file "Spire.Spreadsheet.dll" - "Open".
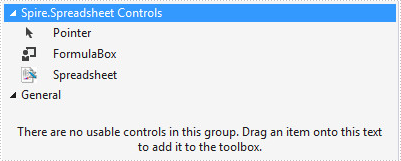
Click "OK". Then you have added controls to Toolbox successfully.
Create a Windows Form Application to Display Spreadsheet
Create a Windows Form Application, drag Spreadsheet control to form1 and add an openToolStrip in menuStrip to open an Excel file.
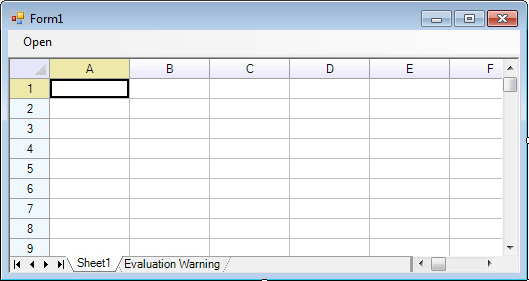
Double click openToolStrip to write code. The spreadsheet1 that represents Spreadsheet control can easily load an Excel file by LoadFromFile() method.
private void openToolStripMenuItem_Click(object sender, EventArgs e)
{
    OpenFileDialog ofDialog = new OpenFileDialog();
    ofDialog.Filter = "All files|*.*|Microsoft Excel Files(*.xls;*.xlsx;*.ods;*.xlsb)|*.xls;*.xlsx;*.xlsb;*.ods";
    if (ofDialog.ShowDialog() == DialogResult.OK)
        spreadsheet1.LoadFromFile(ofDialog.FileName);
}
Run the program and open an existing Excel file, you’ll get following output:
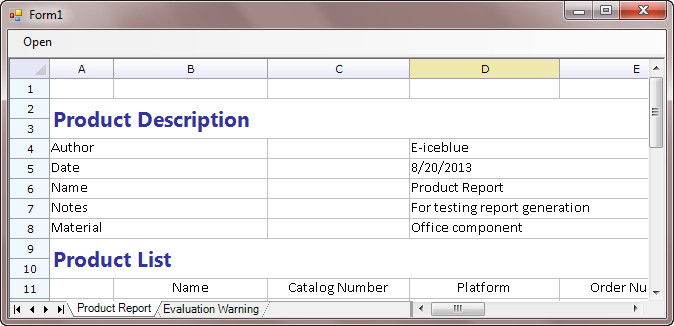
It seems very easy to rotate the PDF page. However, we often find that the rotation is applied to the whole PDF document when we try to rotate a particular page. Is there an easy and fast way to rotate a certain PDF page within the DPF document?
In the following sections, I will demonstrate how to rotate a certain PDF page within PDF document in WPF with several lines of codes.
The code snippets are as followed:
Step 1: Initialize a new instance of PdfDocument class and load the PDF document from the file.
PdfDocument doc = new PdfDocument();
doc.LoadFromFile("LeavesOfGrass.pdf");
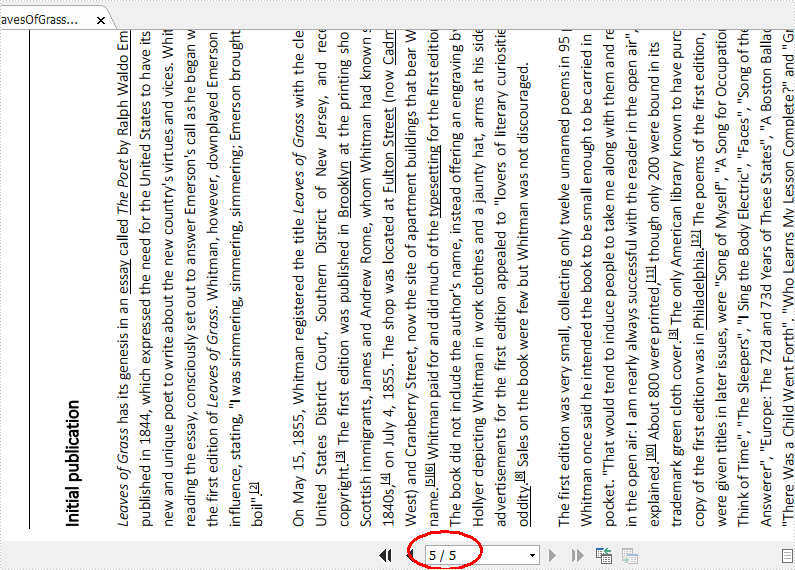
Step 2: For rotation, Spire.PDF enables you to define 0, 90, 180 and 270 degrees. In this example, my PDF file has five pages. I want to rotate the fifth page by 270 degrees and make other pages remain the same.
PdfPageBase page = doc.Pages[4];
page.Rotation = PdfPageRotateAngle.RotateAngle270;
Step 3: Save the PDF document and launch the file.
doc.SaveToFile("RotatedLeavesOfGrass.pdf");
System.Diagnostics.Process.Start("RotatedLeavesOfGrass.pdf");
Effective screenshot:

Full Codes:
using System.Windows;
using Spire.Pdf;

namespace Rotate_PDF_page
{
    ///
    /// Interaction logic for MainWindow.xaml
    ///
    public partial class MainWindow : Window
    {
        public MainWindow()
        {
            InitializeComponent();
        }

        private void button1_Click(object sender, RoutedEventArgs e)
        {
            PdfDocument doc = new PdfDocument();
            doc.LoadFromFile("LeavesOfGrass.pdf");
            PdfPageBase page = doc.Pages[4];
            page.Rotation = PdfPageRotateAngle.RotateAngle270;
            doc.SaveToFile("RotatedLeavesOfGrass.pdf");
            System.Diagnostics.Process.Start("RotatedLeavesOfGrass.pdf");
        }
    }
}
Imports System.Windows
Imports Spire.Pdf

Namespace Rotate_PDF_page
	'''
	''' Interaction logic for MainWindow.xaml
	'''
	Public Partial Class MainWindow
		Inherits Window
		Public Sub New()
			InitializeComponent()
		End Sub

		Private Sub button1_Click(sender As Object, e As RoutedEventArgs)
			Dim doc As New PdfDocument()
			doc.LoadFromFile("LeavesOfGrass.pdf")
			Dim page As PdfPageBase = doc.Pages(4)
			page.Rotation = PdfPageRotateAngle.RotateAngle270
			doc.SaveToFile("RotatedLeavesOfGrass.pdf")
			System.Diagnostics.Process.Start("RotatedLeavesOfGrass.pdf")
		End Sub
	End Class
End Namespace
