
.NET (1327)
Children categories
Spire.PDF allows us to reset the values of PDF form fields using the PdfResetAction. The following code example demonstrates how we can use Spire.PDF to implement this function.
Code snippet:
Step 1: Create a PDF document and add a new page to it.
PdfDocument document = new PdfDocument();
PdfPageBase page = document.Pages.Add();
Step 2: Create a text box field, set properties for the text box field and add it to the document.
PdfTextBoxField textBoxField = new PdfTextBoxField(page, "Name");
textBoxField.BorderColor = new PdfRGBColor(Color.AliceBlue);
textBoxField.BorderStyle = PdfBorderStyle.Solid;
textBoxField.Bounds = new RectangleF(50, 50, 100, 20);
textBoxField.Text = "Shawn Smith";
document.Form.Fields.Add(textBoxField);
Step 3: Create a button field, set properties for the button field and add it to the document.
PdfButtonField button = new PdfButtonField(page, "Reset");
button.Bounds = new RectangleF(80, 100, 50, 20);
button.BorderColor = new PdfRGBColor(Color.AliceBlue);
button.BorderStyle = PdfBorderStyle.Solid;
button.ToolTip = "Reset";
button.Font = new PdfFont(PdfFontFamily.Helvetica, 9f);
document.Form.Fields.Add(button);
Step 4: Create a reset action for the button field using PdfResetAction class.
PdfResetAction resetAction = new PdfResetAction();
button.Actions.GotFocus = resetAction;
Step 5: Save and close the PDF document.
document.SaveToFile("Output.pdf");
document.Close();
Screenshot before and after resetting value:

Full code:
using System.Drawing;
using Spire.Pdf;
using Spire.Pdf.Actions;
using Spire.Pdf.Fields;
using Spire.Pdf.Graphics;

namespace Reset_form_fields_in_PDF
{
    class Program
    {
        static void Main(string[] args)
        {
            //Create a PDF document
            PdfDocument document = new PdfDocument();

            //Add a new page
            PdfPageBase page = document.Pages.Add();

            //Create a text box field.
            PdfTextBoxField textBoxField = new PdfTextBoxField(page, "Name");

            //Set properties for the text box field.
            textBoxField.BorderColor = new PdfRGBColor(Color.AliceBlue);
            textBoxField.BorderStyle = PdfBorderStyle.Solid;
            textBoxField.Bounds = new RectangleF(50, 50, 100, 20);
            textBoxField.Text = "Shawn Smith";

            //Add the text box field to the document
            document.Form.Fields.Add(textBoxField);

            //Create a button field.
            PdfButtonField button = new PdfButtonField(page, "Reset");

            //Set properties for the button field
            button.Bounds = new RectangleF(80, 100, 50, 20);
            button.BorderColor = new PdfRGBColor(Color.AliceBlue);
            button.BorderStyle = PdfBorderStyle.Solid;
            button.ToolTip = "Reset";
            button.Font = new PdfFont(PdfFontFamily.Helvetica, 9f);

            //Add the button field to the document
            document.Form.Fields.Add(button);

            //Create a reset action for the button field
            PdfResetAction resetAction = new PdfResetAction();
            button.Actions.GotFocus = resetAction;

            //Save and close the PDF document
            document.SaveToFile("Output.pdf");
            document.Close();
        }
    }
}
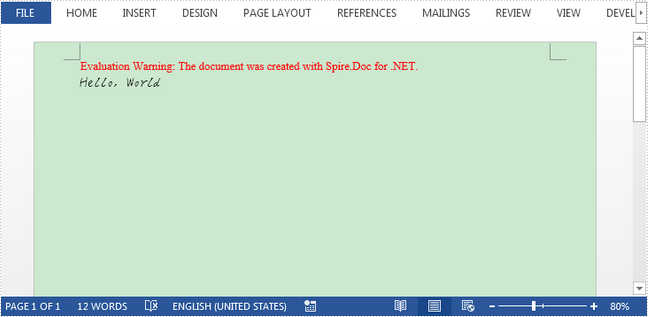
RTF is a document language used for encoding formatted text and graphics for easy transfer between applications. This article presents how to insert a piece of RTF encoded string to Word document using Spire.Doc.
Step 1: Initialize an instance of Document class, add a section to it.
Document doc = new Document();
Section section = doc.
Step 2: Add a paragraph to the section.
Paragraph para = section.AddParagraph();
Step 3: Declare a String variable to store the RTF string.
String rtfString = @"{\rtf1\ansi\deff0 {\fonttbl {\f0 hakuyoxingshu7000;}}\f0\fs28 Hello, World}";
Step 4: Append RTF string to paragraph.
para.AppendRTF(rtfString);
Step 5: Save the file.
doc.SaveToFile("Output.docx");
Output:
Full Code:
using Spire.Doc;
using Spire.Doc.Documents;
using System;
namespace InsertRTF
{
 class Program
    {

     static void Main(string[] args)
     {
         Document doc = new Document();
         Section section = doc.AddSection();
         Paragraph para = section.AddParagraph();

         String rtfString = @"{\rtf1\ansi\deff0 {\fonttbl {\f0 hakuyoxingshu7000;}}\f0\fs28 Hello, World}";
         para.AppendRTF(rtfString);

         doc.SaveToFile("Output.docx");

     }

    }
}
Imports Spire.Doc
Imports Spire.Doc.Documents
Namespace InsertRTF
	Class Program

		Private Shared Sub Main(args As String())
			Dim doc As New Document()
			Dim section As Section = doc.AddSection()
			Dim para As Paragraph = section.AddParagraph()

			Dim rtfString As [String] = "{\rtf1\ansi\deff0 {\fonttbl {\f0 hakuyoxingshu7000;}}\f0\fs28 Hello, World}"
			para.AppendRTF(rtfString)

			doc.SaveToFile("Output.docx")

		End Sub

	End Class
End Namespace
The track changes has been used to keep track of the every changes that made to the Word document. It helps to record every edit, insertion, deletion, or modification in a word document. We have demonstrated how to accept/reject the tracked changes on word document in C#. This article will show you how to enable track changes of the document.
Step 1: Create a new word document and load the document from file.
Document document = new Document();
document.LoadFromFile("Sample.docx", FileFormat.Docx2010);
Step 2: Enable the track changes.
document.TrackChanges = true;
Step 3: Save the document to file.
document.SaveToFile("Enable Trackchanges.docx", FileFormat.Docx2010);
Effective screenshot:

Full codes:
using Spire.Doc;
namespace EnableTrack
{
    class Program
    {
        static void Main(string[] args)
        {
            Document document = new Document();
            document.LoadFromFile("Sample.docx", FileFormat.Docx2010);
            document.TrackChanges = true;
         document.SaveToFile("Enable Trackchanges.docx", FileFormat.Docx2010);

        }
    }
}
Lock Specified Sections of Word Documents in C#, VB.NET
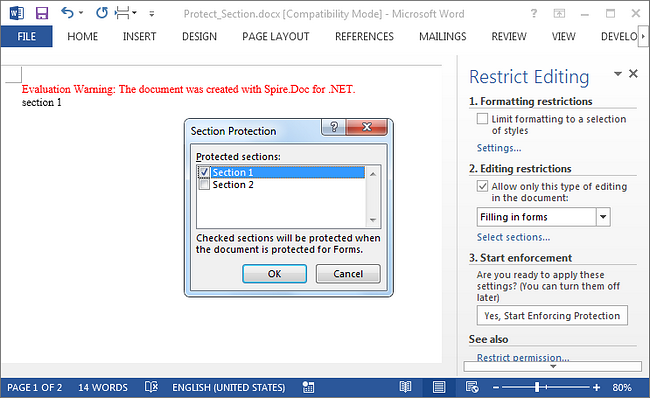
2017-03-15 08:04:50 Written by AdministratorSection protection allows users to be able to edit only the forms (if any) rather than any other content within it. When we protect a document, we can specify that the specific sections of the document be protected. This is useful in case we want to protect parts of a Word document.
Following code snippets demonstrate the same.
Step 1: Initialize an instance of Document class.
Document doc = new Document();
Step 2: Add two sections to the document.
Section s1 = doc.AddSection();
Section s2 = doc.AddSection();
Step 3: Append some text to section 1 and section 2.
s1.AddParagraph().AppendText("section 1");
s2.AddParagraph().AppendText("section 2");
Step 4: Protect the document with AllowOnlyFormFields protection type.
doc.Protect(ProtectionType.AllowOnlyFormFields, "123");
Step 5: Unprotect section 2.
s2.ProtectForm = false;
Step 6: Save the document.
doc.SaveToFile("Protect_Section.docx");
Result:
Run the program, we should get the file in which section 1 is protected to allow only editing in form fields while section 2 can be edited freely.
Full Code:
using Spire.Doc;
namespace LockSection
{
    class Program
    {
        static void Main(string[] args)
        {
            Document doc = new Document();
            Section s1 = doc.AddSection();
            Section s2 = doc.AddSection();

            s1.AddParagraph().AppendText("section 1");
            s2.AddParagraph().AppendText("section 2");

            //protect all sections
            doc.Protect(ProtectionType.AllowOnlyFormFields, "123");
            //unprotect section 2
            s2.ProtectForm = false;

            doc.SaveToFile("Protect_Section.docx");
        }
    }
}
Imports Spire.Doc
Namespace LockSection
	Class Program
		Private Shared Sub Main(args As String())
			Dim doc As New Document()
			Dim s1 As Section = doc.AddSection()
			Dim s2 As Section = doc.AddSection()

			s1.AddParagraph().AppendText("section 1")
			s2.AddParagraph().AppendText("section 2")

			'protect all sections
			doc.Protect(ProtectionType.AllowOnlyFormFields, "123")
			'unprotect section 2
			s2.ProtectForm = False

			doc.SaveToFile("Protect_Section.docx")
		End Sub
	End Class
End Namespace
A Sound action is used to embed and play a sound file in PDF document. In Spire.PDF, we can create a sound action by using the PdfSoundAction class. Attributes like sound, volume and repeat can be specified for the sound action.
Refer below code example:
Step 1: Create a new PDF document and add a page to it.
PdfDocument document = new PdfDocument();
PdfPageBase page = document.Pages.Add();
Step 2: Create a sound action and set its attributes.
PdfSoundAction soundAction = new PdfSoundAction(@"C:\Users\Administrator\Desktop\because of you.wav");
soundAction.Sound.Bits = 15;
soundAction.Sound.Channels = PdfSoundChannels.Stereo;
soundAction.Sound.Encoding = PdfSoundEncoding.Signed;
soundAction.Volume = 0.8f;
soundAction.Repeat = true;
Step 3: Set the sound action to be executed when the PDF document is opened.
document.AfterOpenAction = soundAction;
Step 4: Save and close the PDF document.
document.SaveToFile("Output.pdf");
document.Close();
Full code:
using Spire.Pdf;
using Spire.Pdf.Actions;
using Spire.Pdf.General;

namespace PDF_Sound_Action
{
    class Program
    {
        static void Main(string[] args)
        {
            //Create a new PDF document
            PdfDocument document = new PdfDocument();
            //Add a page
            PdfPageBase page = document.Pages.Add();

            //Create a sound action
            PdfSoundAction soundAction = new PdfSoundAction(@"C:\Users\Administrator\Desktop\because of you.wav");
            soundAction.Sound.Bits = 15;
            soundAction.Sound.Channels = PdfSoundChannels.Stereo;
            soundAction.Sound.Encoding = PdfSoundEncoding.Signed;
            soundAction.Volume = 0.8f;
            soundAction.Repeat = true;

            // Set the sound action to be executed when the PDF document is opened
            document.AfterOpenAction = soundAction;

            //Save and close the PDF document
            document.SaveToFile("Output.pdf");
            document.Close();
        }
    }
}
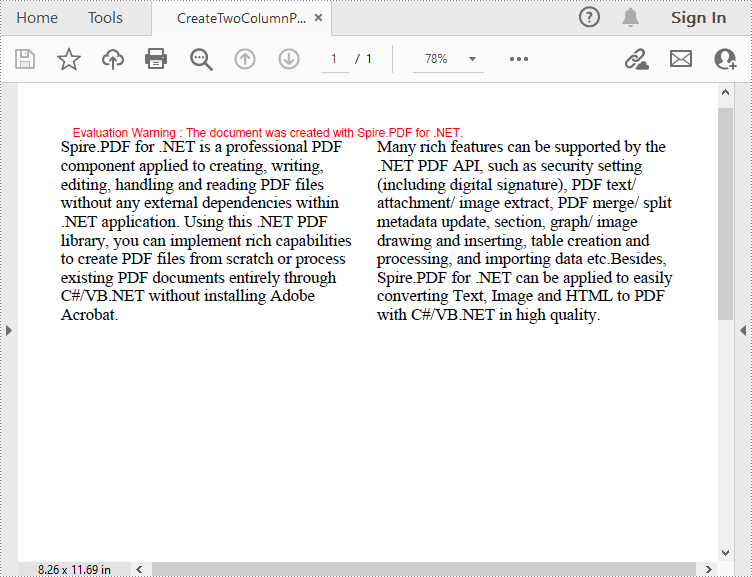
When designing magazines or newspapers, you may need to display content in multiple columns on a single page to improve readability. In this article, you will learn how to programmatically create a two-column PDF from scratch using Spire.PDF for .NET.
Install Spire.PDF for .NET
To begin with, you need to add the DLL files included in the Spire.PDF for .NET package as references in your .NET project. The DLLs files can be either downloaded from this link or installed via NuGet.
PM> Install-Package Spire.PDF
Create a Two-Column PDF from Scratch in C# and VB.NET
Spire.PDF for .NET allows you to create a two-column PDF by drawing text at two separate rectangle areas in a PDF page. Below are the detailed steps to achieve the task.
- Create a PdfDocument instance.
- Add a new page in the PDF using PdfDocument.Pages.Add() method.
- Define paragraph text, then set the text font and text alignment.
- Draw text at two separate rectangle areas in the PDF using PdfPageBase.Canvas.DrawString (String, PdfFontBase, PdfBrush, RectangleF, PdfStringFormat) method.
- Save the result file using PdfDocument.SaveToFile() method.
- C#
- VB.NET
using Spire.Pdf;
using Spire.Pdf.Graphics;
using System.Drawing;

namespace CreateTwoColumnPDF
{
    class Program
    {
        static void Main(string[] args)
        {
            //Create a PdfDocument instance
            PdfDocument doc = new PdfDocument();

            //Add a new page
            PdfPageBase page = doc.Pages.Add();

            //Define paragraph text
            string s1 = "Spire.PDF for .NET is a professional PDF component applied to creating, writing, "
                        + "editing, handling and reading PDF files without any external dependencies within "
                        + ".NET application. Using this .NET PDF library, you can implement rich capabilities "
                        + "to create PDF files from scratch or process existing PDF documents entirely through "
                        + "C#/VB.NET without installing Adobe Acrobat.";

            string s2 = "Many rich features can be supported by the .NET PDF API, such as security setting "
                        + "(including digital signature), PDF text/ attachment/ image extract, PDF merge/ split "
                        + ", metadata update, section, graph/ image drawing and inserting, table creation and "
                        + "processing, and importing data etc.Besides, Spire.PDF for .NET can be applied to easily "
                        + "converting Text, Image and HTML to PDF with C#/VB.NET in high quality.";

            //Get width and height of page
            float pageWidth = page.GetClientSize().Width;
            float pageHeight = page.GetClientSize().Height;

            //Create a PdfSolidBrush instance
            PdfSolidBrush brush = new PdfSolidBrush(new PdfRGBColor(Color.Black));

            //Create a PdfFont instance
            PdfFont font = new PdfFont(PdfFontFamily.TimesRoman, 14f);

            //Set the text alignment via PdfStringFormat class
            PdfStringFormat format = new PdfStringFormat(PdfTextAlignment.Left);

            //Draw text
            page.Canvas.DrawString(s1, font, brush, new RectangleF(0, 20, pageWidth / 2 - 8f, pageHeight),format);
            page.Canvas.DrawString(s2, font, brush, new RectangleF(pageWidth / 2 + 8f, 20, pageWidth / 2, pageHeight), format);

            //Save the result document
            doc.SaveToFile("CreateTwoColumnPDF.pdf.pdf");
        }
    }
}
Apply for a Temporary License
If you'd like to remove the evaluation message from the generated documents, or to get rid of the function limitations, please request a 30-day trial license for yourself.
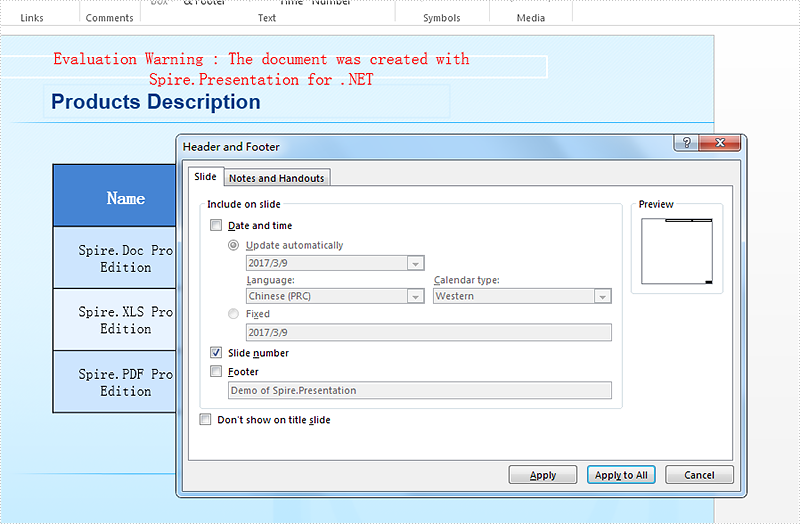
Whether to display the additional information for presentation slides on header and footer area
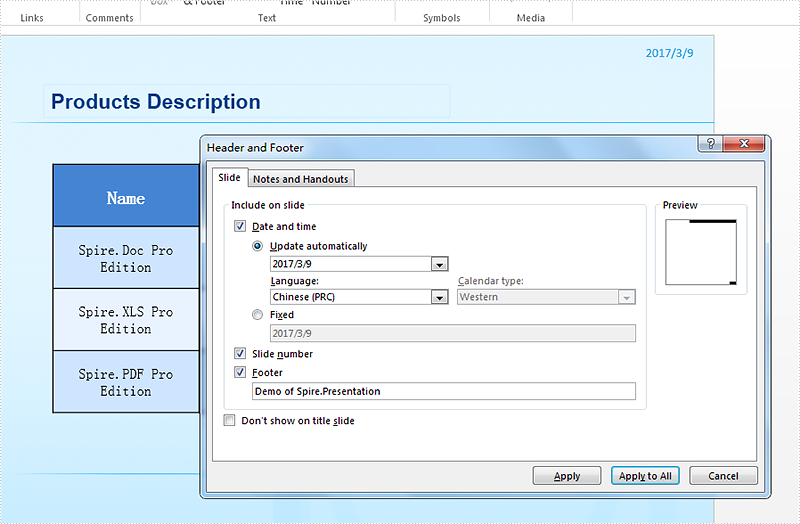
2017-03-09 07:15:10 Written by KoohjiWhen we operate the Microsoft PowerPoint documents, we can set whether to show some additional information of slides to readers, such as “Date and Time”, “Slide number” and footer. This article will demonstrate how to set whether to show these information to readers in C# with the help of Spire.Presentation.
Firstly, view the screenshot of the property of slide appearance on the header and footer area.
Step 1: Create a presentation instance and load the document from file.
Presentation ppt = new Presentation();
ppt.LoadFromFile("Sample.pptx", FileFormat.Pptx2010);
Step 2: Set the appearance property for slide number, footer and date time.
ppt.SlideNumberVisible = true;

ppt.FooterVisible = false;

ppt.DateTimeVisible = false;
Step 3: Save the document to file.
ppt.SaveToFile("Result.pptx", FileFormat.Pptx2010);
Effective screenshot of the slide appearance on header and footer area.
Full codes of how to set the additional information of presentation slides’ header and footer area:
using Spire.Presentation;
using Spire.Xls;
namespace AdditionalInfo
{

    class Program
    {

        static void Main(string[] args)
        {
            Presentation ppt = new Presentation();
            ppt.LoadFromFile("Sample.pptx", FileFormat.Pptx2010);

            ppt.SlideNumberVisible = true;

            ppt.FooterVisible = false;

            ppt.DateTimeVisible = false;

            ppt.SaveToFile("Result.pptx", FileFormat.Pptx2010);

        }
    }
}
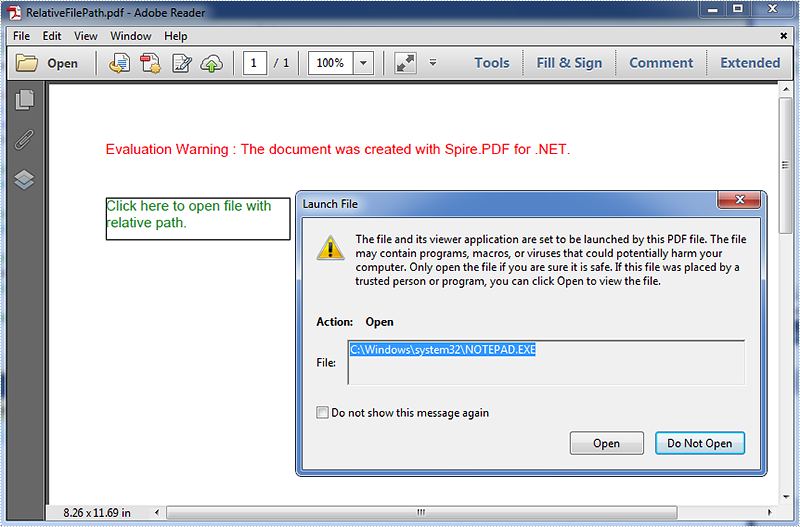
PDF actions can refer to external files by using either absolute or relative file paths. While using the relative path in action, the file can be moved into a different location. In Spire.PDF, we can use the PdfLaunchAction to link to files with relative paths.
Code snippet:
Step 1: Create a new PDF document and add a page to it.
PdfDocument document = new PdfDocument();
PdfPageBase page = document.Pages.Add();
Step 2: Create a PDF launch action that refers to an external file with relative path.
PdfLaunchAction launchAction = new PdfLaunchAction(@"..\..\test.txt", PdfFilePathType.Relative);
Step 3: Create a PDF action annotation with the launch action. Add the annotation to the page.
string text = "Click here to open file with relative path";
PdfTrueTypeFont font = new PdfTrueTypeFont(new Font("Arial", 13f));
RectangleF rect = new RectangleF(50, 50, 230, 15);
page.Canvas.DrawString(text, font, PdfBrushes.ForestGreen, rect);
PdfActionAnnotation annotation = new PdfActionAnnotation(rect, launchAction);
(page as PdfNewPage).Annotations.Add(annotation);
Step 4: Save the document.
document.SaveToFile("RelativeFilePath.pdf");
Screenshot:
Full code:
using System.Drawing;
using Spire.Pdf;
using Spire.Pdf.Actions;
using Spire.Pdf.Annotations;
using Spire.Pdf.Graphics;

namespace Link_to_files_with_relative_paths
{
    class Program
    {
        static void Main(string[] args)
        {
            //Create a new PDF document and add a page to it
            PdfDocument document = new PdfDocument();
            PdfPageBase page = document.Pages.Add();

            //Create a PDF Launch Action
            PdfLaunchAction launchAction = new PdfLaunchAction(@"..\..\test.txt", PdfFilePathType.Relative);

            //Create a PDF Action Annotation with the PDF Launch Action
            string text = "Click here to open file with relative path";
            PdfTrueTypeFont font = new PdfTrueTypeFont(new Font("Arial", 13f));
            RectangleF rect = new RectangleF(50, 50, 230, 15);
            page.Canvas.DrawString(text, font, PdfBrushes.ForestGreen, rect);
            PdfActionAnnotation annotation = new PdfActionAnnotation(rect, launchAction);
             //Add the PDF Action Annotation to page
            (page as PdfNewPage).Annotations.Add(annotation);

            //Save and close the document
            document.SaveToFile("RelativeFilePath.pdf");
            document.Close();
        }
    }
}
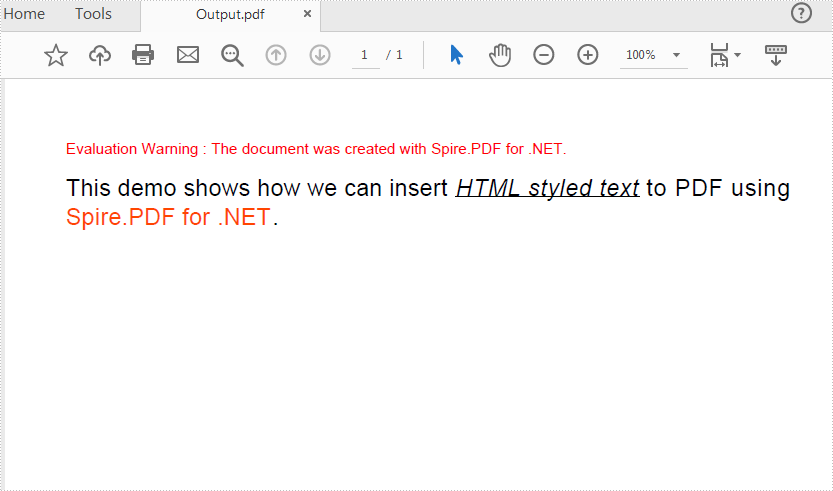
Spire.PDF provides support to render simple HTML string in a PDF document by using PdfHTMLTextElement class. (Only available on .NET, .Net Core/ .NET Standard doesn't offer PdfHTMLTextElement & PdfMetafileLayoutFormat class) This class supports a set of basic HTML tags including Font, B, I, U, Sub, Sup and BR. For complex HTML rendering with CSS, please check Convert HTML String to PDF.
Following code snippets demonstrates how we can insert HTML styled text to PDF.
Step 1: Create a new PDF document, add a page to it.
PdfDocument doc = new PdfDocument();
PdfNewPage page = doc.Pages.Add() as PdfNewPage;
Step 2: Define HTML string.
string htmlText= "This demo shows how we can insert <u><i>HTML styled text</i></u> to PDF using "
                 + "<font color='#FF4500'>Spire.PDF for .NET</font>. ";
Step 3: Render HTML text.
PdfFont font = new PdfFont(PdfFontFamily.Helvetica, 5);
PdfBrush brush = PdfBrushes.Black;
PdfHTMLTextElement richTextElement = new PdfHTMLTextElement(htmlText, font, brush);
richTextElement.TextAlign = TextAlign.Left;
Step 4: Format page layout to enable that the HTML text will break into multiple pages if the content exceeds one page.
PdfMetafileLayoutFormat format = new PdfMetafileLayoutFormat();
format.Layout = PdfLayoutType.Paginate;
format.Break = PdfLayoutBreakType.FitPage;
Step 5: Draw HTML string on page.
richTextElement.Draw(page, new RectangleF(0, 20, page.GetClientSize().Width, page.GetClientSize().Height/2),format);
Step 6: Save the document.
doc.SaveToFile("Output.pdf");
Output:
Full Code:
using Spire.Pdf;
using Spire.Pdf.Graphics;
using System.Drawing;


namespace InsertHTMLStyledTexttoPDF
{
    class Program
    {
        static void Main(string[] args)
        {
            //Create a Pdf document
            PdfDocument doc = new PdfDocument();

            //Add a new page
            PdfNewPage page = doc.Pages.Add() as PdfNewPage;

            //HTML string
            string htmlText = "This demo shows how we can insert HTML styled text to PDF using "
                             + "Spire.PDF for .NET. ";

            //Render HTML text
            PdfFont font = new PdfFont(PdfFontFamily.Helvetica, 5);
            PdfBrush brush = PdfBrushes.Black;
            PdfHTMLTextElement richTextElement = new PdfHTMLTextElement(htmlText, font, brush);
            richTextElement.TextAlign = TextAlign.Left;

            //Format Layout
            PdfMetafileLayoutFormat format = new PdfMetafileLayoutFormat();
            format.Layout = PdfLayoutType.Paginate;
            format.Break = PdfLayoutBreakType.FitPage;

            //Draw htmlString
            richTextElement.Draw(page, new RectangleF(0, 20, page.GetClientSize().Width, page.GetClientSize().Height / 2), format);
            doc.SaveToFile("Output.pdf");
        }
    }
}
Imports Spire.Pdf
Imports Spire.Pdf.Graphics
Imports System.Drawing


Namespace InsertHTMLStyledTexttoPDF
	Class Program
		Private Shared Sub Main(args As String())
			'Create a Pdf document
			Dim doc As New PdfDocument()

			'Add a new page
			Dim page As PdfNewPage = TryCast(doc.Pages.Add(), PdfNewPage)

			'HTML string
			Dim htmlText As String = "This demo shows how we can insert HTML styled text to PDF using " + "Spire.PDF for .NET. "

			'Render HTML text
			Dim font As New PdfFont(PdfFontFamily.Helvetica, 5)
			Dim brush As PdfBrush = PdfBrushes.Black
			Dim richTextElement As New PdfHTMLTextElement(htmlText, font, brush)
			richTextElement.TextAlign = TextAlign.Left

			'Format Layout
			Dim format As New PdfMetafileLayoutFormat()
			format.Layout = PdfLayoutType.Paginate
			format.Break = PdfLayoutBreakType.FitPage

			'Draw htmlString
			richTextElement.Draw(page, New RectangleF(0, 20, page.GetClientSize().Width, page.GetClientSize().Height / 2), format)
			doc.SaveToFile("Output.pdf")
		End Sub
	End Class
End Namespace

PDF is one of the most popular formats for distributing, archiving, and presenting digital documents. However, when PDFs include high-resolution images, scanned pages, or embedded fonts, their file sizes can grow considerably. Large PDF files can slow down upload and download speeds, take up unnecessary storage space, and even cause issues with email attachments and website performance.
This complete guide shows you how to compress PDF documents in C# using the Spire.PDF for .NET library. It covers multiple compression strategies—image compression, font optimization, and content compression—with practical, ready-to-use C# code examples to help you streamline PDF size effectively in your .NET applications.
Table of Contents
- Why Compress PDF Files
- Install the Library for PDF Compression in .NET
- How to Optimize PDF File Size in C# (Methods and Code Examples)
- Conclusion
- FAQs
Why Compress PDF Files?
Compressing PDF files can bring significant benefits, especially in professional and enterprise environments:
- Faster upload and download speeds
- Reduced storage consumption
- Easier email sharing with smaller attachments
- Improved performance in web-based PDF viewers
- Better experience on mobile and low-bandwidth environments
Whether you're working with reports, invoices, or scanned documents, PDF compression ensures efficient document handling and delivery.
Install the Library for PDF Compression in .NET
Spire.PDF for .NET is a robust and developer-friendly library that enables developers to create, edit, convert, and compress PDF documents without relying on Adobe Acrobat. It supports various compression options to minimize PDF file sizes effectively.
Installation Steps
You can easily install Spire.PDF for .NET via NuGet using one of the following methods:
Option 1: Using NuGet Package Manager
- Open your project in Visual Studio.
- Right-click on the project → Manage NuGet Packages.
- Search for Spire.PDF.
- Click Install.
Option 2: Using the Package Manager Console
Install-Package Spire.PDF
Once installed, you can start using the built-in compression APIs to optimize PDF file size.
How to Optimize PDF File Size in C# (Methods and Code Examples)
Spire.PDF provides multiple techniques to reduce PDF size. In this section, you'll learn how to implement three key methods: compressing images, optimizing fonts, and compressing overall document content.
Method 1. Compressing Images
High-resolution images embedded in PDF files often consume the most space. Spire.PDF offers flexible image compression options that allow you to reduce file size by compressing either all images or individual images in the document.
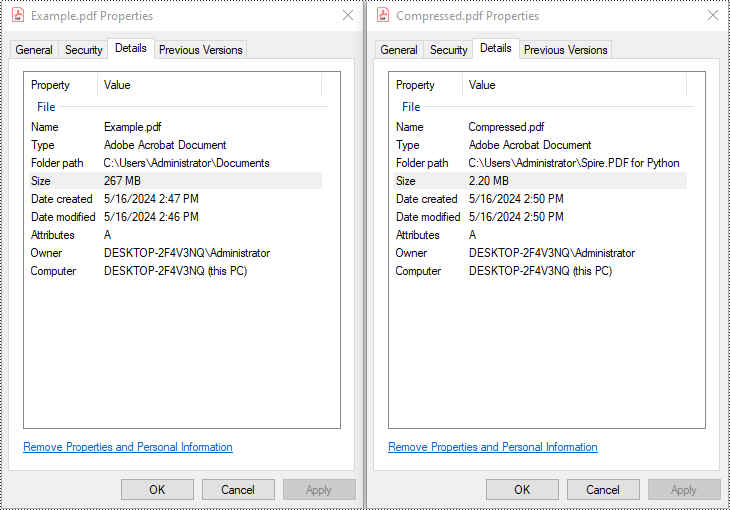
Example 1: Compress All Images with PdfCompressor
You can compress the images in a PDF document by creating a PdfCompressor object, enabling CompressImage and ResizeImages properties, and setting the ImageQuality to a predefined level such as Low, Medium, or High.
using Spire.Pdf.Conversion.Compression;

namespace CompressImages
{
    class Program
    {
        static void Main(string[] args)
        {
            // Create a PdfCompressor object and load the PDF file
            PdfCompressor compressor = new PdfCompressor("C:\\Users\\Administrator\\Documents\\Example.pdf");

            // Get the image compression options
            ImageCompressionOptions imageCompression = compressor.Options.ImageCompressionOptions;

            // Enable Image resizing
            imageCompression.ResizeImages = true;

            // Enable image compression
            imageCompression.CompressImage = true;

            // Set the image quality to Medium (available options: Low, Medium, High)
            imageCompression.ImageQuality = ImageQuality.Medium;


            // Compress the PDF file according to the compression options and save it to a new file
            compressor.CompressToFile("Compressed.pdf");
        }
    }
}
Example 2: Compress Images Individually Using TryCompressImage()
If you need more precise control over image compression, you can use the PdfImageHelper class to access the images on each page and compress them individually using the TryCompressImage() method.
using Spire.Pdf;
using Spire.Pdf.Utilities;

namespace CompressImagesIndividually
{
    internal class Program
    {
        static void Main(string[] args)
        {
            // Create a PdfDocument object
            PdfDocument pdf = new PdfDocument();
            // Load the PDF file
            pdf.LoadFromFile("C:\\Users\\Administrator\\Documents\\Example.pdf");

            // Disable the incremental update
            pdf.FileInfo.IncrementalUpdate = false;

            // Create an instance of PdfImageHelper to work with images
            PdfImageHelper imageHelper = new PdfImageHelper();

            // Iterate through each page in the document
            foreach (PdfPageBase page in pdf.Pages)
            {
                // Retrieve information about the images on the page
                foreach (PdfImageInfo info in imageHelper.GetImagesInfo(page))
                {
                    // Attempt to compress the image
                    info.TryCompressImage();
                }
            }

            // Save the updated file
            pdf.SaveToFile("Compressed.pdf");
            pdf.Close();
        }
    }
}
Method 2. Optimize Fonts
Fonts embedded in a PDF file can contribute significantly to its size, especially when multiple fonts or large font sets are used. You can compress or unembed fonts that aren't essential for document rendering through the TextCompressionOptions property.
using Spire.Pdf.Conversion.Compression;

namespace OptimizeFonts
{
    internal class Program
    {
        static void Main(string[] args)
        {
            // Create a PdfCompressor object and load the PDF file
            PdfCompressor compressor = new PdfCompressor("C:\\Users\\Administrator\\Documents\\Example.pdf");

            // Get the text compression options
            TextCompressionOptions textCompression = compressor.Options.TextCompressionOptions;

            // Compress the fonts
            textCompression.CompressFonts = true;

            // Unembed the fonts
            // textCompression.UnembedFonts = true;

            // Compress the PDF file according to the compression options and save it to a new file
            compressor.CompressToFile("CompressFonts.pdf");
        }
    }
}
Method 3. Optimizing Document Content
Beyond images and fonts, overall document content can be optimized by setting the CompressionLevel property of the document to PdfCompressionLevel.Best.
using Spire.Pdf;
using Spire.Pdf.Conversion.Compression;

namespace OptimizeDocumentContent
{
    internal class Program
    {
        static void Main(string[] args)
        {
            // Create a PdfDocument object
            PdfDocument pdf = new PdfDocument();
            // Load the PDF file
            pdf.LoadFromFile("C:\\Users\\Administrator\\Documents\\Example.pdf");

            // Disable the incremental update
            pdf.FileInfo.IncrementalUpdate = false;

            // Set the compression level to best
            pdf.CompressionLevel = PdfCompressionLevel.Best;

            // Save the updated file
            pdf.SaveToFile("OptimizeDocumentContent.pdf");
            pdf.Close();
        }
    }
}
Conclusion
Compressing PDF files in C# using Spire.PDF for .NET is straightforward, efficient, and highly customizable. Whether your goal is to reduce file size for web uploads, email attachments, or storage management, this library offers flexible solutions such as:
- Compressing images
- Optimizing fonts
- Minimizing document content
By applying one or a combination of these techniques, you can significantly reduce PDF file sizes while preserving readability and document structure—making your files easier to share, store, and distribute.
FAQs
Q1: Is it possible to compress PDF files in bulk?
A1: Yes. You can loop through multiple PDF files in a directory and apply compression using the same logic programmatically.
Q2: Can I compress a PDF and then convert it to PDF/A or other formats?
A2: Absolutely. You can compress the PDF first, then convert it to PDF/A, ensuring long-term archival with optimized size.
Q3: Can I preserve hyperlinks, bookmarks, and metadata during compression?
A3: Yes. Compression will not remove document structure like links, bookmarks, or metadata. Spire.PDF preserves document integrity.
Q4: Does Spire.PDF support other PDF operations besides compression?
A4: Yes. Besides compression, Spire.PDF offers a wide range of PDF features, such as:
- Merging/Splitting PDFs
- Extracting text, images and tables
- Adding watermarks
- Digitally signing and encrypting PDFs
For detailed tutorials and sample projects, you can visit the Spire.PDF tutorial page and explore the GitHub demo repository to see practical code examples.
Get a Free License
To fully experience the capabilities of Spire.PDF for .NET without any evaluation limitations, you can request a free 30-day trial license.
