
.NET (1327)
Children categories
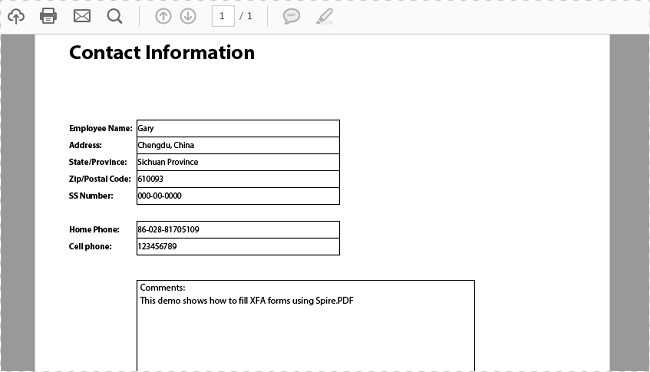
XFA forms are XML-based forms created by Adobe's LiveCycle Designer tool, which offer enhanced features over the old AcroForms, like changeable text fields and support for running JavaScript. Spire.PDF supports to access the XFA forms in an existing PDF file and fill the fields with data.
Step 1: Initialize an instance of PdfDocument class and load a sample PDF file containing dynamic XFA forms.
PdfDocument doc = new PdfDocument();
doc.LoadFromFile("DynamicXFA.pdf");
Step 2: Get all form widgets from the document.
PdfFormWidget formWidget = doc.Form as PdfFormWidget;
Step 3: Get a list of XFA Fields.
List<XfaField> xfafields = formWidget.XFAForm.XfaFields;
Step 4: Traverse each XfaField in the list and judge if it is an XfaTextField, if yes, convert the type of XfaField as an XfaTextField and then assign value to the field based on the field name.
foreach (XfaField xfaField in xfaFields)
{
    if (xfaField is XfaTextField)
    {
        XfaTextField xf = xfaField as XfaTextField;
        switch (xfaField.Name)
        {
            case "EmployeeName":
                xf.Value = "Gary";
                break;
            case "Address":
                xf.Value = "Chengdu, China";
                break;
            case "StateProv":
                xf.Value = "Sichuan Province";
                break;
            case "ZipCode":
                xf.Value = "610093";
                break;
            case "SSNumber":
                xf.Value = "000-00-0000";
                break;
            case "HomePhone":
                xf.Value = "86-028-81705109";
                break;
            case "CellPhone":
                xf.Value = "123456789";
                break;
            case "Comments":
                xf.Value = "This demo shows how to fill XFA forms using Spire.PDF";
                break;
            default:
                break;
        }
    }
}
Step 5: Save the file.
doc.SaveToFile("FillXfaField.pdf",FileFormat.PDF);
Output:
Full Code:
using Spire.Pdf;
using Spire.Pdf.Widget;
using System.Collections;
using System.Collections.Generic;

namespace FillXFAFormFields
{
    class Program
    {
        private static IEnumerable xfaFields;
        static void Main(string[] args)
        {
            PdfDocument doc = new PdfDocument();
            doc.LoadFromFile("DynamicXFA.pdf");

            PdfFormWidget formWidget = doc.Form as PdfFormWidget;
            List <xfafields> = formWidget.XFAForm.XfaFields;
            foreach (XfaField xfaField in xfafields)
            {
                if (xfaField is XfaTextField)
                {
                    XfaTextField xf = xfaField as XfaTextField;
                    switch (xfaField.Name)
                    {
                        case "EmployeeName":
                            xf.Value = "Gary";
                            break;
                        case "Address":
                            xf.Value = "Chengdu, China";
                            break;
                        case "StateProv":
                            xf.Value = "Sichuan Province";
                            break;
                        case "ZipCode":
                            xf.Value = "610093";
                            break;
                        case "SSNumber":
                            xf.Value = "000-00-0000";
                            break;
                        case "HomePhone":
                            xf.Value = "86-028-81705109";
                            break;
                        case "CellPhone":
                            xf.Value = "123456789";
                            break;
                        case "Comments":
                            xf.Value = "This demo shows how to fill XFA forms using Spire.PDF";
                            break;
                        default:
                            break;
                    }
                }
            }
            doc.SaveToFile("FillXfaField.pdf", FileFormat.PDF);
        }
    }
}
Imports Spire.Pdf
Imports Spire.Pdf.Widget
Imports System.Collections.Generic


Namespace FillXFAFormFields
	Class Program
		Private Shared xfaFields As IEnumerable(Of XfaField)
		Private Shared Sub Main(args As String())
			Dim doc As New PdfDocument()
			doc.LoadFromFile("DynamicXFA.pdf")

			Dim formWidget As PdfFormWidget = TryCast(doc.Form, PdfFormWidget)
			Dim xfafields__1 As List(Of XfaField) = formWidget.XFAForm.XfaFields
			For Each xfaField As XfaField In xfaFields
				If TypeOf xfaField Is XfaTextField Then
					Dim xf As XfaTextField = TryCast(xfaField, XfaTextField)
					Select Case xfaField.Name
						Case "EmployeeName"
							xf.Value = "Gary"
							Exit Select
						Case "Address"
							xf.Value = "Chengdu, China"
							Exit Select
						Case "StateProv"
							xf.Value = "Sichuan Province"
							Exit Select
						Case "ZipCode"
							xf.Value = "610093"
							Exit Select
						Case "SSNumber"
							xf.Value = "000-00-0000"
							Exit Select
						Case "HomePhone"
							xf.Value = "86-028-81705109"
							Exit Select
						Case "CellPhone"
							xf.Value = "123456789"
							Exit Select
						Case "Comments"
							xf.Value = "This demo shows how to fill XFA forms using Spire.PDF"
							Exit Select
						Case Else
							Exit Select
					End Select
				End If
			Next
			doc.SaveToFile("FillXfaField.pdf", FileFormat.PDF)
		End Sub
	End Class
End Namespace
Simplifying your Excel workbooks by removing redundant or unused worksheets can be a beneficial organizational practice. This process allows you to eliminate clutter and improve file structure by focusing only on the most relevant data. Removing unneeded worksheets frees up storage space, streamlines navigation, and keeps your workbooks clean and efficient.
In this article, you will learn how to remove worksheets from an Excel workbook in C# by using the Spire.XLS for .NET library.
- Remove a Worksheet by Its Index from a Workbook
- Remove a Worksheet by Its Name from a Workbook
- Remove All Worksheets from a Workbook at Once
Install Spire.XLS for .NET
To begin with, you need to add the DLL files included in the Spire.XLS for .NET package as references in your .NET project. The DLL files can be either downloaded from this link or installed via NuGet.
PM> Install-Package Spire.XLS
Remove a Worksheet by Its Index from a Workbook in C#
Spire.XLS for .NET provides the WorksheetsCollection.RemoveAt(int index) method, which allows you to remove a specific worksheet by its index from a workbook. Here are the detailed steps:
- Create a Workbook object.
- Load an Excel file from a given path.
- Get the worksheets collection from the document using Workbook.Worksheets property.
- Remove a worksheet by its index using WorksheetsCollection.RemoveAt(int index) method.
- Save the workbook to a different Excel document.
- C#
using Spire.Xls;
using Spire.Xls.Collections;

namespace RemoveWorksheetByIndex
{
    class Program
    {
        static void Main(string[] args)
        {
            // Create a Workbook object
            Workbook wb = new Workbook();

            // Load an Excel file
            wb.LoadFromFile(@"C:\Users\Administrator\Desktop\Input.xlsx");

            // Get the worksheets collection from the document
            WorksheetsCollection worksheets = wb.Worksheets;

            // Remove a specific worksheet by its index
            worksheets.RemoveAt(0);

            // Save the workbook to a different Excel file
            wb.SaveToFile("RemoveByIndex.xlsx", ExcelVersion.Version2016);

            // Dispose resources
            wb.Dispose();
        }
    }
}
Remove a Worksheet by Its Name from a Workbook in C#
If you already know the name of the worksheet that you want to remove, you can do so by using the WorksheetsCollection.Remove(string sheetName) method. The detailed steps are as follows:
- Create a Workbook object.
- Load an Excel file from a given path.
- Get the worksheets collection from the document using Workbook.Worksheets property.
- Remove a worksheet by its name using WorksheetsCollection.Remove(string sheetName) method.
- Save the workbook to a different Excel document.
- C#
using Spire.Xls;
using Spire.Xls.Collections;

namespace RemoveWorksheetByName
{
    class Program
    {
        static void Main(string[] args)
        {
            // Create a Workbook object
            Workbook wb = new Workbook();

            // Load an Excel file
            wb.LoadFromFile(@"C:\Users\Administrator\Desktop\Input.xlsx");

            // Get the worksheets collection from the document
            WorksheetsCollection worksheets = wb.Worksheets;

            // Remove a specific worksheet by its name
            worksheets.Remove("sheet2")

            // Save the workbook to a different Excel file
            wb.SaveToFile("RemoveByName.xlsx", ExcelVersion.Version2016);

            // Dispose resources
            wb.Dispose();
        }
    }
}
Remove All Worksheets from a Workbook at Once in C#
To remove all worksheets at once, you can use the WorksheetsCollection.Clear() method. Here are the detailed steps:
- Create a Workbook object.
- Load an Excel file from a given path.
- Get the worksheets collection from the document using Workbook.Worksheets property.
- Remove all worksheet at once using WorksheetsCollection.Clear() method.
- Save the workbook to a different Excel document.
- C#
using Spire.Xls;
using Spire.Xls.Collections;

namespace RemoveAllWorksheets
{
    class Program
    {
        static void Main(string[] args)
        {
            // Create a Workbook object
            Workbook wb = new Workbook();

            // Load an Excel file
            wb.LoadFromFile(@"C:\Users\Administrator\Desktop\Input.xlsx");

            // Get the worksheets collection from the document
            WorksheetsCollection worksheets = wb.Worksheets;

            // Remove all worksheets
            worksheets.Clear();

            // Save the workbook to a different Excel file
            wb.SaveToFile("RemoveAllWorksheets.xlsx", ExcelVersion.Version2016);

            // Dispose resources
            wb.Dispose();
        }
    }
}
Apply for a Temporary License
If you'd like to remove the evaluation message from the generated documents, or to get rid of the function limitations, please request a 30-day trial license for yourself.
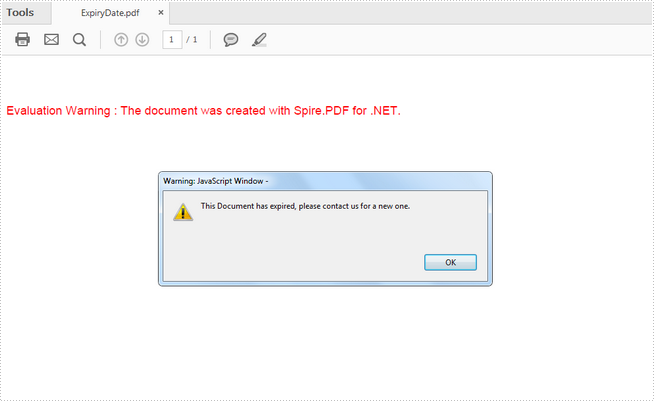
There is no concept of expiration date defined in the PDF specifications format, however, there is a workaround that we can apply expiration using JavaScript. Spire.PDF supports to add java script actions to PDF files as well. This article presents how to add a JavaScript expiration date to a PDF document using Spire.PDF in C# and VB.NET.
Step 1: Create an object of PdfDocument class and add a blank page to it.
PdfDocument doc = new PdfDocument();
doc.Pages.Add();
Step 2: Define the JavaScript code.
string javaScript = "var rightNow = new Date();"
                    + "var endDate = new Date('October 20, 2016 23:59:59');"
                    + "if(rightNow.getTime() > endDate)"
                    + "app.alert('This Document has expired, please contact us for a new one.',1);"
                    + "this.closeDoc();";
Step 3: Create a PdfJavaScriptAction object that performs the java script action in PDF document.
PdfJavaScriptAction js = new PdfJavaScriptAction(javaScript);
Step 4: Set the JavaScript as PDF open action.
doc.AfterOpenAction = js;
Step 5: Save the file.
doc.SaveToFile("ExpiryDate.pdf", FileFormat.PDF);
Output:
Full Code:
using Spire.Pdf;
using Spire.Pdf.Actions;

namespace AddExpiryDate
{
    class Program
    {
        static void Main(string[] args)
        {
            PdfDocument doc = new PdfDocument();
            doc.Pages.Add();

            string javaScript = "var rightNow = new Date();"
                     + "var endDate = new Date('October 20, 2016 23:59:59');"
                     + "if(rightNow.getTime() > endDate)"
                     + "app.alert('This Document has expired, please contact us for a new one.',1);"
                     + "this.closeDoc();";
            PdfJavaScriptAction js = new PdfJavaScriptAction(javaScript);
            doc.AfterOpenAction = js;
            doc.SaveToFile("ExpiryDate.pdf", FileFormat.PDF);
        }
    }
}
Imports Spire.Pdf
Imports Spire.Pdf.Actions

Namespace AddExpiryDate
	Class Program
		Private Shared Sub Main(args As String())
			Dim doc As PdfDocument = New PdfDocument()
doc.Pages.Add()

String javaScript = "var rightNow = new Date();"
                    + "var endDate = new Date('October 20, 2016 23:59:59');"
                    + "if(rightNow.getTime() > endDate)"
                    + "app.alert('This Document has expired, please contact us for a new one.',1);"
                    Dim "this.closeDoc();" As +
Dim js As PdfJavaScriptAction = New PdfJavaScriptAction(javaScript)
doc.AfterOpenAction = js
doc.SaveToFile("ExpiryDate.pdf", FileFormat.PDF)
		End Sub
	End Class
End Namespace
Allow users to edit ranges for the protected Excel worksheet in C#
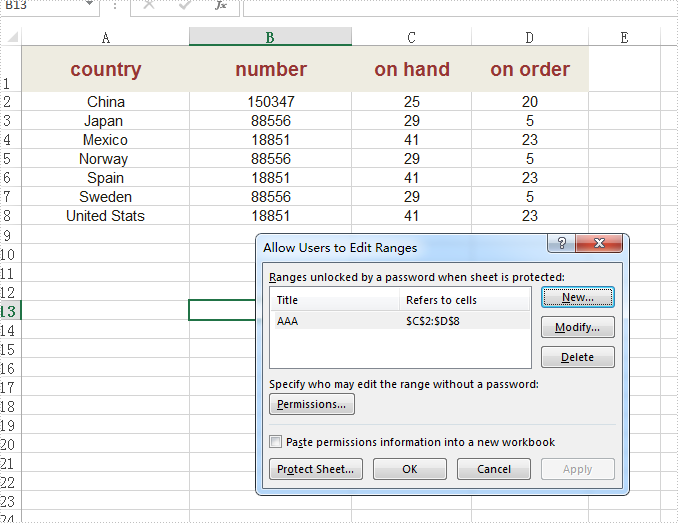
2017-02-08 06:59:17 Written by KoohjiSpire.XLS supports to protect the whole excel workbook and specified worksheet with password. When we deal with the protected worksheet, sometimes we need to allow users to edit some specified ranges of the excel worksheet. This article will focus on demonstrating how to use the AddAllowEditRange method offered by Spire.XLS to set the specified range on a protected worksheet to be editable by users.
Step 1: Initialize an instance of Workbook and load the document from file.
Workbook workbook = new Workbook();
workbook.LoadFromFile("Sample.xlsx");
Step 2: Get the first worksheet from the workbook.
Worksheet sheet = workbook.Worksheets[0];
Step 3: Define the specified ranges of Excel to allow users to edit while sheet is protected.
sheet.AddAllowEditRange("AAA", sheet.Range["C2:D8"], "");
Step 4: Protect the worksheet.
sheet.Protect("AAA", SheetProtectionType.All);
Step 5: Save the document to file.
workbook.SaveToFile("AllowEditRange.xlsx", ExcelVersion.Version2010);
Effective screenshot of Allow users to edit ranges:
Full codes:
using Spire.Xls;
namespace EditRanges
{
    class Program
    {

        static void Main(string[] args)
        {
            Workbook workbook = new Workbook();
            workbook.LoadFromFile("Sample.xlsx");

            Worksheet sheet = workbook.Worksheets[0];

            sheet.AddAllowEditRange("AAA", sheet.Range["C2:D8"], "");
            sheet.Protect("AAA", SheetProtectionType.All);

            workbook.SaveToFile("AllowEditRange.xlsx", ExcelVersion.Version2010);

        }
    }
}
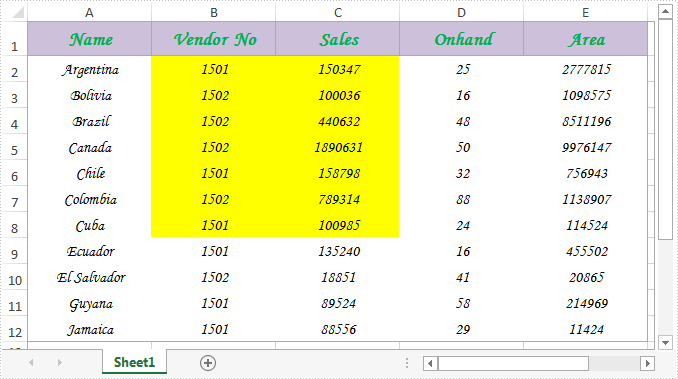
Spire.Xls.CellRange class provides a method named Intersect(CellRange range) that is used to find the intersection of certain ranges. This is very useful when we need to get the common value(s) of two ranges in an excel worksheet.
In below picture, we take range A2:C8 and range B2:D8 as an example. Cells filled in yellow color are the intersection of the two ranges.
Now refer to the following detail steps:
Step 1: Instantiate an object of Workbook class and load the Excel document.
Workbook workbook = new Workbook();
workbook.LoadFromFile("Sample.xlsx");
Step 2: Get the first worksheet.
Worksheet sheet = workbook.Worksheets[0];
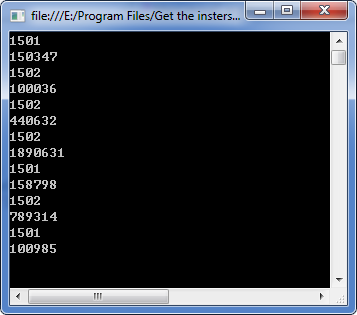
Step 3: Get the intersection of the two ranges and print the common values of them.
CellRange range = sheet.Range["A2:C8"].Intersect(sheet.Range["B2:D8"]);
foreach (CellRange r in range)
{
    Console.WriteLine(r.Value);
}
Output:
Full code:
using System;
using Spire.Xls;

namespace Get_the_instersection_of_two_ranges
{
    class Program
    {
        static void Main(string[] args)
        {
            Workbook workbook = new Workbook();
            workbook.LoadFromFile("Sample.xlsx");
            Worksheet sheet = workbook.Worksheets[0];
            CellRange range = sheet.Range["A2:C8"].Intersect(sheet.Range["B2:D8"]);
            foreach (CellRange r in range)
            {
                Console.WriteLine(r.Value);
            }
            Console.ReadKey();
        }
    }
}
Imports Spire.Xls

Namespace Get_the_instersection_of_two_ranges
	Class Program
		Private Shared Sub Main(args As String())
			Dim workbook As New Workbook()
			workbook.LoadFromFile("Sample.xlsx")
			Dim sheet As Worksheet = workbook.Worksheets(0)
			Dim range As CellRange = sheet.Range("A2:C8").Intersect(sheet.Range("B2:D8"))
			For Each r As CellRange In range
				Console.WriteLine(r.Value)
			Next
			Console.ReadKey()
		End Sub
	End Class
End Namespace
Animation is a great way to draw viewers' attention to a presentation. We can apply animation effects to text, shapes or any other objects on PowerPoint slides. To make the animations more attractive, we usually set sound effects for them. This article demonstrates how to obtain these sound effects by using Spire.Presentation and C#.
Below shape is set with a fly in animation which has a sound effect named "Applause".
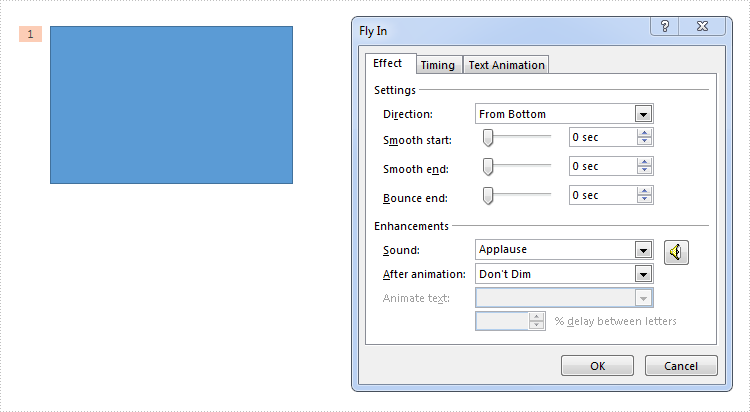
Refer below steps to get the sound effect from the shape:
Step 1: Load the PowerPoint document.
Presentation ppt = new Presentation(@"test.pptx", FileFormat.Pptx2013);
Step 2: Get the audio in a time node.
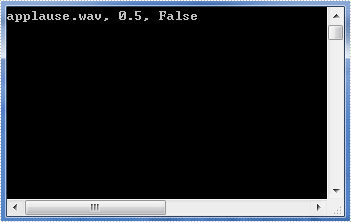
ISlide slide = ppt.Slides[0];
TimeNodeAudio audio = slide.Timeline.MainSequence[0].TimeNodeAudios[0];
Step 3: Now we can get the properties of the audio, such as sound name, volume or detect if it's mute.
string soundName = audio.SoundName;
float volume = audio.Volume;
bool isMute = audio.IsMute;
Output:
Full code:
using System;
using Spire.Presentation;
using Spire.Presentation.Drawing.TimeLine;

namespace Get_Sound_Effect
{
    class Program
    {
        static void Main(string[] args)
        {
            Presentation ppt = new Presentation(@"test.pptx", FileFormat.Pptx2013);
            ISlide slide = ppt.Slides[0];
            TimeNodeAudio audio = slide.Timeline.MainSequence[0].TimeNodeAudios[0];
            string soundName = audio.SoundName;
            float volume = audio.Volume;
            bool isMute = audio.IsMute;
            Console.WriteLine("{0}, {1}, {2}", soundName, volume, isMute);
            Console.ReadKey();
        }
    }
}
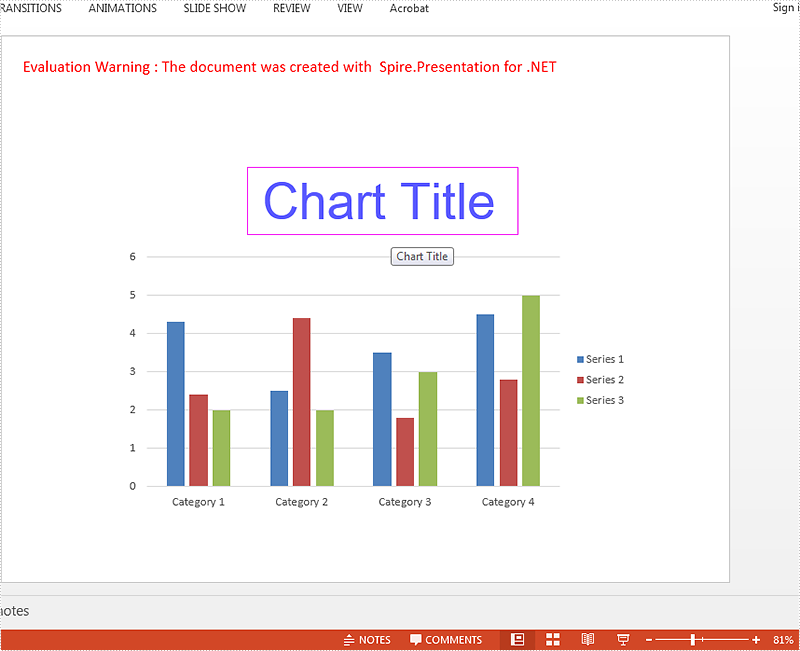
We have already shown you how to set font for the text on Chart legend and Chart Axis in C# by using Spire.Presentation. This article will focus on demonstrating how to set font for text on chart title in C#.
Here comes the code snippets:
Step 1: Create a presentation instance and load the document from file.
Presentation presentation = new Presentation();
presentation.LoadFromFile("sample.pptx", FileFormat.Pptx2010);
Step 2: Get the chart that need to be formatted the font for the text on chart title.
IChart chart = presentation.Slides[0].Shapes[0] as IChart;
Step 3: Set the font for the text on chart title area.
chart.ChartTitle.TextProperties.Paragraphs[0].DefaultCharacterProperties.LatinFont = new TextFont("Arial Unicode MS");
chart.ChartTitle.TextProperties.Paragraphs[0].DefaultCharacterProperties.Fill.SolidColor.KnownColor = KnownColors.Blue;
chart.ChartTitle.TextProperties.Paragraphs[0].DefaultCharacterProperties.FontHeight = 50;
Step 4: Save the document to file:
presentation.SaveToFile("result.pptx", FileFormat.Pptx2010);
Effective screenshot after formatting the font for the chart title.
Full codes:
using Spire.Presentation;
using Spire.Presentation.Charts;

namespace SetFont
{
    class Program
    {
        static void Main(string[] args)
        {
            Presentation presentation = new Presentation();
            presentation.LoadFromFile("sample.pptx", FileFormat.Pptx2010);

            IChart chart = presentation.Slides[0].Shapes[0] as IChart;

            chart.ChartTitle.TextProperties.Paragraphs[0].DefaultCharacterProperties.LatinFont = new TextFont("Arial Unicode MS");
            chart.ChartTitle.TextProperties.Paragraphs[0].DefaultCharacterProperties.Fill.SolidColor.KnownColor = KnownColors.Blue;
            chart.ChartTitle.TextProperties.Paragraphs[0].DefaultCharacterProperties.FontHeight = 50;

            presentation.SaveToFile("result.pptx", FileFormat.Pptx2010);
        }
    }
}
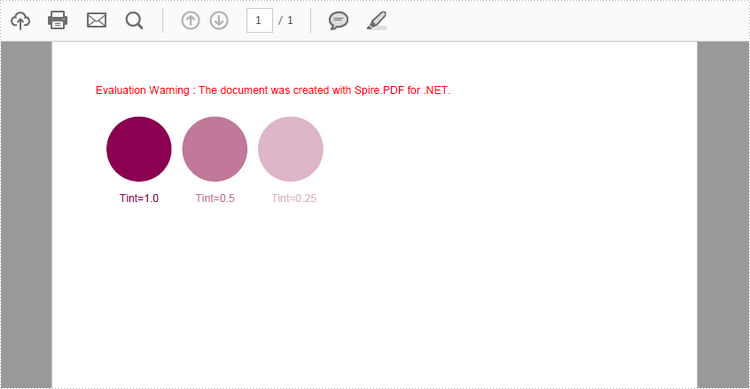
Colors created without screens or dots are referred to in the industry as spot or solid colors. Spot colors are the preferred method of producing stationery inexpensively, and also the method used where color accuracy is deemed essential, for instance a company logo.
This article presents how to define a spot color based on RGB color spaces, create variations of a spot color with different tint value, and how to apply the spot color to text and graphic objects using Spire.PDF.
Step 1: Create a PdfDcoument object and add a page to it.
PdfDocument pdf = new PdfDocument();
PdfPageBase page = pdf.Pages.Add();
Step 2: Define the spot color "MySpotColor" from the built-in color.
PdfSeparationColorSpace cs = new PdfSeparationColorSpace("MySpotColor", Color.Purple);
Step 3: Set the spot color with a tint value of 1.
PdfSeparationColor color = new PdfSeparationColor(cs, 1f);
Step 4: Apply the spot color while drawing content on the page.
PdfSolidBrush brush = new PdfSolidBrush(color);
page.Canvas.DrawPie(brush, 10, 30, 60, 60, 360, 360);
page.Canvas.DrawString("1.0 tint!", new PdfFont(PdfFontFamily.Helvetica, 10f), brush, new PointF(20,100));
Step 5: Set the spot color with a tint value of 0.5 and apply it to some other content.
color = new PdfSeparationColor(cs, 0.5f);
brush = new PdfSolidBrush(color);
page.Canvas.DrawPie(brush, 80, 30, 60, 60, 360, 360);
page.Canvas.DrawString("Tint=0.5", new PdfFont(PdfFontFamily.Helvetica, 10f), brush, new PointF(92,100));
Step 6: Save the file.
pdf.SaveToFile("SpotColor.pdf");
Output:
Full Code:
using Spire.Pdf;
using Spire.Pdf.ColorSpace;
using Spire.Pdf.Graphics;
using System.Drawing;


namespace SpotColor
{
    class Program
    {
        static void Main(string[] args)
        {
            PdfDocument pdf = new PdfDocument();
            PdfPageBase page = pdf.Pages.Add();

            PdfSeparationColorSpace cs = new PdfSeparationColorSpace("MySpotColor", Color.Purple);
            PdfSeparationColor color = new PdfSeparationColor(cs, 1f);
            PdfSolidBrush brush = new PdfSolidBrush(color);
            page.Canvas.DrawPie(brush, 10, 30, 60, 60, 360, 360);
            page.Canvas.DrawString("Tint=1.0", new PdfFont(PdfFontFamily.Helvetica, 10f), brush, new PointF(22, 100));

            color = new PdfSeparationColor(cs, 0.5f);
            brush = new PdfSolidBrush(color);
            page.Canvas.DrawPie(brush, 80, 30, 60, 60, 360, 360);
            page.Canvas.DrawString("Tint=0.5", new PdfFont(PdfFontFamily.Helvetica, 10f), brush, new PointF(92, 100));

            color = new PdfSeparationColor(cs, 0.25f);
            brush = new PdfSolidBrush(color);
            page.Canvas.DrawPie(brush, 150, 30, 60, 60, 360, 360);
            page.Canvas.DrawString("Tint=0.25", new PdfFont(PdfFontFamily.Helvetica, 10f), brush, new PointF(162, 100));
            pdf.SaveToFile("SpotColor.pdf");
        }
    }
}
Imports Spire.Pdf
Imports Spire.Pdf.ColorSpace
Imports Spire.Pdf.Graphics
Imports System.Drawing


Namespace SpotColor
	Class Program
		Private Shared Sub Main(args As String())
			Dim pdf As New PdfDocument()
			Dim page As PdfPageBase = pdf.Pages.Add()

			Dim cs As New PdfSeparationColorSpace("MySpotColor", Color.Purple)
			Dim color__1 As New PdfSeparationColor(cs, 1F)
			Dim brush As New PdfSolidBrush(color__1)
			page.Canvas.DrawPie(brush, 10, 30, 60, 60, 360, _
				360)
			page.Canvas.DrawString("Tint=1.0", New PdfFont(PdfFontFamily.Helvetica, 10F), brush, New PointF(22, 100))

			color__1 = New PdfSeparationColor(cs, 0.5F)
			brush = New PdfSolidBrush(color__1)
			page.Canvas.DrawPie(brush, 80, 30, 60, 60, 360, _
				360)
			page.Canvas.DrawString("Tint=0.5", New PdfFont(PdfFontFamily.Helvetica, 10F), brush, New PointF(92, 100))

			color__1 = New PdfSeparationColor(cs, 0.25F)
			brush = New PdfSolidBrush(color__1)
			page.Canvas.DrawPie(brush, 150, 30, 60, 60, 360, _
				360)
			page.Canvas.DrawString("Tint=0.25", New PdfFont(PdfFontFamily.Helvetica, 10F), brush, New PointF(162, 100))
			pdf.SaveToFile("SpotColor.pdf")
		End Sub
	End Class
End Namespace
Spire.Presentation for .NET offers classes of InnerShadowEffect and OuterShadowEffect to enable developers to set the shadow effects for the Text on the presentation slides. This article will focus on how to apply the Font outer shadow effects for the Text in C#.
Firstly, view the effective screenshot for the Text after apply the outer shadow effects via Spire.Presentation.
Step 1: Create an instance of Presentation class.
Presentation presentation = new Presentation();
Step 2: Get reference of the slide.
ISlide slide = presentation.Slides[0];
Step 3: Add a new rectangle shape to the first slide.
IAutoShape shape = slide.Shapes.AppendShape(ShapeType.Rectangle, new RectangleF(120, 70, 450, 300));
shape.Fill.FillType = Spire.Presentation.Drawing.FillFormatType.None;
Step 4: Add the text to the shape and set the font for the text.
shape.AppendTextFrame("Text shading on slides");
shape.TextFrame.Paragraphs[0].TextRanges[0].LatinFont = new TextFont("Arial Black");
shape.TextFrame.Paragraphs[0].TextRanges[0].Fill.FillType = FillFormatType.Solid;
shape.TextFrame.Paragraphs[0].TextRanges[0].Fill.SolidColor.Color = Color.Black;
Step 5: Add outer shadow and set all necessary parameters.
Spire.Presentation.Drawing.OuterShadowEffect Shadow = new Spire.Presentation.Drawing.OuterShadowEffect();

Shadow.BlurRadius = 0;
Shadow.Direction = 50;
Shadow.Distance = 10;
Shadow.ColorFormat.Color = Color.Green;
Step 6: Apply the shadow effects to the shape.
shape.TextFrame.TextRange.EffectDag.OuterShadowEffect = Shadow;
Step 7: Save the document.
presentation.SaveToFile("Result.pptx", FileFormat.Pptx2010);
We can also use the code as below to set the inner shadow for the text font. It is almost the same as how to set the outer shadow effects.
Spire.Presentation.Drawing.InnerShadowEffect Shadow = new Spire.Presentation.Drawing.InnerShadowEffect();
Full codes of how to apply the shadow effects for the text font:
using Spire.Presentation;
using Spire.Presentation.Drawing;
using System.Drawing;
namespace SetShadowEffect
{
    class Program
    {
        static void Main(string[] args)
        {
            Presentation presentation = new Presentation();
            ISlide slide = presentation.Slides[0];

            IAutoShape shape = slide.Shapes.AppendShape(ShapeType.Rectangle, new RectangleF(120, 70, 450, 300));
            shape.Fill.FillType = Spire.Presentation.Drawing.FillFormatType.None;

            shape.AppendTextFrame("Text shading on slides");
            shape.TextFrame.Paragraphs[0].TextRanges[0].LatinFont = new TextFont("Arial Black");
            shape.TextFrame.Paragraphs[0].TextRanges[0].Fill.FillType = FillFormatType.Solid;
            shape.TextFrame.Paragraphs[0].TextRanges[0].Fill.SolidColor.Color = Color.Black;

            //Spire.Presentation.Drawing.InnerShadowEffect Shadow = new Spire.Presentation.Drawing.InnerShadowEffect();

            //Add Outer shadow and set all necessary parameters
            Spire.Presentation.Drawing.OuterShadowEffect Shadow = new Spire.Presentation.Drawing.OuterShadowEffect();

            Shadow.BlurRadius = 0;
            Shadow.Direction = 50;
            Shadow.Distance = 10;
            Shadow.ColorFormat.Color = Color.Green;

            shape.TextFrame.TextRange.EffectDag.OuterShadowEffect = Shadow;

            presentation.SaveToFile("Result.pptx", FileFormat.Pptx2010);

        }
    }
}
Using Spire.XLS, the password of an encrypted workbook can be removed or modified in case you know the open password. This article presents how to load a password protected Excel workbook, remove the protection or reset the password and then save the changes to the original file.
Step 1: Initialize an instance of Workbook class.
Workbook wb = new Workbook();
Step 2: Specify the open password and then load the encrypted Excel file.
wb.OpenPassword = "oldpassword";
wb.LoadFromFile(@"C:\Users\Administrator\Desktop\Encrypted.xlsx");
Step 3: Remove the password protection with UnProtect() method or reset the password by Protect() method.
//unprotect workbook
wb.UnProtect();

//reset password
wb.Protect("newpassword");
Step 4: Save the changes to file.
wb.SaveToFile(@"C:\Users\Administrator\Desktop\Encrypted.xlsx, ExcelVersion.Version2010");
Full Code:
using Spire.Xls;
namespace RemovePassword
{
    class Program
    {

        static void Main(string[] args)
        {
            Workbook wb = new Workbook();
            wb.OpenPassword = "oldpassword";
            wb.LoadFromFile(@"C:\Users\Administrator\Desktop\Encrypted.xlsx");

            ////unprotect workbook
            //wb.UnProtect();
            //reset password
            wb.Protect("newpassword");
            wb.SaveToFile(@"C:\Users\Administrator\Desktop\Encrypted.xlsx", ExcelVersion.Version2010);
        }
    }
}
Imports Spire.Xls
Namespace RemovePassword
	Class Program

		Private Shared Sub Main(args As String())
			Dim wb As New Workbook()
			wb.OpenPassword = "oldpassword"
			wb.LoadFromFile("C:\Users\Administrator\Desktop\Encrypted.xlsx")

			'''/unprotect workbook
			'wb.UnProtect();
			'reset password
			wb.Protect("newpassword")
			wb.SaveToFile("C:\Users\Administrator\Desktop\Encrypted.xlsx", ExcelVersion.Version2010)
		End Sub
	End Class
End Namespace
