
Knowledgebase (2370)
Children categories
A tagged PDF is a PDF document that contains tags that are pretty similar to HTML code. Tags provide a logical structure that governs how the content of the PDF is presented through assistive technology. Each tag identifies the associated content element, for example heading level 1 <H1>, paragraph <P>, image <Figure>, or table <Table>. In this article, you will learn how to create a tagged PDF document in Java using Spire.PDF for Java.
Install Spire.PDF for Java
First of all, you're required to add the Spire.Pdf.jar file as a dependency in your Java program. The JAR file can be downloaded from this link. If you use Maven, you can easily import the JAR file in your application by adding the following code to your project's pom.xml file.
<repositories>
    <repository>
        <id>com.e-iceblue</id>
        <name>e-iceblue</name>
        <url>https://repo.e-iceblue.com/nexus/content/groups/public/</url>
    </repository>
</repositories>
<dependencies>
    <dependency>
        <groupId>e-iceblue</groupId>
        <artifactId>spire.pdf</artifactId>
        <version>12.7.0</version>
    </dependency>
</dependencies>
Create a Tagged PDF in Java
To add structure elements in a tagged PDF document, we must first create an object of PdfTaggedContent class. Then, add an element to the root using PdfTaggedContent.getStructureTreeRoot().appendChildElement() method. The following are the detailed steps to add a "heading" element to a tagged PDF using Spire.PDF for Java.
- Create a PdfDocument object and add a page to it using PdfDocument.getPages().add() method.
- Create an object of PdfTaggedContent class.
- Make the document compliance to PDF/UA identification using PdfTaggedContent.setPdfUA1Identification() method.
- Add a "document" element to the root of the document using PdfTaggedContent.getStructureTreeRoot().appendChildElement() method.
- Add a "heading" element under the "document" element using PdfStructureElement.appendChildElement() method.
- Add a start tag using PdfStructureElement.beginMarkedContent() method, which indicates the beginning of the heading element.
- Draw heading text on the page using PdfPageBase.getCanvas().drawString() method.
- Add an end tag using PdfStructureElement.beginMarkedContent() method, which implies the heading element ends here.
- Save the document to a PDF file using PdfDocument.saveToFile() method.
The following code snippet provides an example on how to create various elements including document, heading, paragraph, figure and table in a tagged PDF document in Java.
- Java
import com.spire.pdf.*;
import com.spire.pdf.graphics.*;
import com.spire.pdf.interchange.taggedpdf.PdfStandardStructTypes;
import com.spire.pdf.interchange.taggedpdf.PdfStructureElement;
import com.spire.pdf.interchange.taggedpdf.PdfTaggedContent;
import com.spire.pdf.tables.PdfTable;
import java.awt.*;
import java.awt.geom.Point2D;
import java.awt.geom.Rectangle2D;
public class CreateTaggedPdf {
public static void main(String[] args) throws Exception {
//Create a PdfDocument object
PdfDocument doc = new PdfDocument();
//Add a page
PdfPageBase page = doc.getPages().add(PdfPageSize.A4, new PdfMargins(20));
//Set tab order
page.setTabOrder(TabOrder.Structure);
//Create an object of PdfTaggedContent class
PdfTaggedContent taggedContent = new PdfTaggedContent(doc);
//Set language and title for the document
taggedContent.setLanguage("en-US");
taggedContent.setTitle("Create Tagged PDF in Java");
//Set PDF/UA1 identification
taggedContent.setPdfUA1Identification();
//Create font and brush
PdfTrueTypeFont font = new PdfTrueTypeFont(new Font("Times New Roman",Font.PLAIN,14), true);
PdfSolidBrush brush = new PdfSolidBrush(new PdfRGBColor(Color.BLACK));
//Add a "document" element
PdfStructureElement document = taggedContent.getStructureTreeRoot().appendChildElement(PdfStandardStructTypes.Document);
//Add a "heading" element
PdfStructureElement heading1 = document.appendChildElement(PdfStandardStructTypes.HeadingLevel1);
heading1.beginMarkedContent(page);
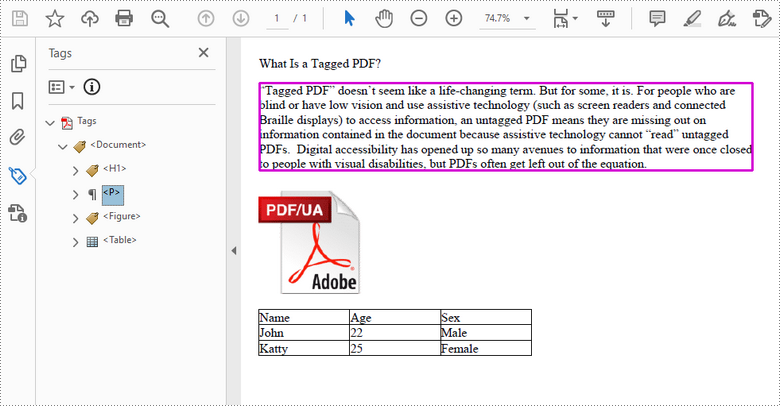
String headingText = "What Is a Tagged PDF?";
page.getCanvas().drawString(headingText, font, brush, new Point2D.Float(0, 0));
heading1.endMarkedContent(page);
//Add a "paragraph" element
PdfStructureElement paragraph = document.appendChildElement(PdfStandardStructTypes.Paragraph);
paragraph.beginMarkedContent(page);
String paragraphText = "Tagged PDF doesn’t seem like a life-changing term. But for some, it is. For people who are " +
"blind or have low vision and use assistive technology (such as screen readers and connected Braille displays) to " +
"access information, an untagged PDF means they are missing out on information contained in the document because assistive " +
"technology cannot “read” untagged PDFs. Digital accessibility has opened up so many avenues to information that were once " +
"closed to people with visual disabilities, but PDFs often get left out of the equation.";
Rectangle2D.Float rect = new Rectangle2D.Float(0, 30, (float) page.getCanvas().getClientSize().getWidth(), (float) page.getCanvas().getClientSize().getHeight());
page.getCanvas().drawString(paragraphText, font, brush, rect);
paragraph.endMarkedContent(page);
//Add a "figure" element
PdfStructureElement figure = document.appendChildElement(PdfStandardStructTypes.Figure);
figure.beginMarkedContent(page);
PdfImage image = PdfImage.fromFile("C:\\Users\\Administrator\\Desktop\\pdfua.png");
page.getCanvas().drawImage(image, new Point2D.Float(0, 150));
figure.endMarkedContent(page);
//Add a "table" element
PdfStructureElement table = document.appendChildElement(PdfStandardStructTypes.Table);
table.beginMarkedContent(page);
PdfTable pdfTable = new PdfTable();
pdfTable.getStyle().getDefaultStyle().setFont(font);
String[] data = {"Name;Age;Sex",
"John;22;Male",
"Katty;25;Female"
};
String[][] dataSource = new String[data.length][];
for (int i = 0; i < data.length; i++) {
dataSource[i] = data[i].split("[;]", -1);
}
pdfTable.setDataSource(dataSource);
pdfTable.getStyle().setShowHeader(true);
pdfTable.draw(page.getCanvas(), new Point2D.Float(0, 280), 300f);
table.endMarkedContent(page);
//Save the document to file
doc.saveToFile("output/CreatePDFUA.pdf");
}
}
Apply for a Temporary License
If you'd like to remove the evaluation message from the generated documents, or to get rid of the function limitations, please request a 30-day trial license for yourself.
A tagged PDF (also known as PDF/UA) is a type of PDF that includes an underlying tag tree, similar to HTML, that defines the structure of the document. These tags can help screen readers to navigate throughout the document without any loss of information. This article introduces how to create a tagged PDF from scratch in C# and VB.NET using Spire.PDF for .NET.
Install Spire.PDF for .NET
To begin with, you need to add the DLL files included in the Spire.PDF for.NET package as references in your .NET project. The DLL files can be either downloaded from this link or installed via NuGet.
PM> Install-Package Spire.PDF
Create a Tagged PDF with Rich Elements
To add structure elements in a tagged PDF document, we must first create an object of PdfTaggedContent class. Then, add an element to the root using PdfTaggedContent.StructureTreeRoot.AppendChildElement() method. The following are the detailed steps to add a "heading" element to a tagged PDF using Spire.PDF for .NET.
- Create a PdfDocument object and add a page to it using PdfDocument.Pages.Add() method.
- Create an object of PdfTaggedContent class.
- Make the document compliance to PDF/UA identification using PdfTaggedContent.SetPdfUA1Identification() method.
- Add a "document" element to the root of the document using PdfTaggedContent.StructureTreeRoot.AppendChildElement() method.
- Add a "heading" element under the "document" element using PdfStructureElement.AppendChildElement() method.
- Add a start tag using PdfStructureElement.BeginMarkedContent() method, which indicates the beginning of the heading element.
- Draw heading text on the page using PdfPageBase.Canvas.DrawString() method.
- Add an end tag using PdfStructureElement.BeginMarkedContent() method, which implies the heading element ends here.
- Save the document to a PDF file using PdfDocument.SaveToFile() method.
The following code snippet provides an example on how to create various elements including document, heading, paragraph, figure and table in a tagged PDF document in C# and VB.NET.
- C#
- VB.NET
using Spire.Pdf;
using Spire.Pdf.Graphics;
using Spire.Pdf.Interchange.TaggedPdf;
using Spire.Pdf.Tables;
using System.Data;
using System.Drawing;

namespace CreatePDFUA
{
    class Program
    {
        static void Main(string[] args)
        {
            //Create a PdfDocument object
            PdfDocument doc = new PdfDocument();

            //Add a page
            PdfPageBase page = doc.Pages.Add(PdfPageSize.A4, new PdfMargins(20));

            //Set tab order
            page.SetTabOrder(TabOrder.Structure);

            //Create an object of PdfTaggedContent class
            PdfTaggedContent taggedContent = new PdfTaggedContent(doc);

            //Set language and title for the document
            taggedContent.SetLanguage("en-US");
            taggedContent.SetTitle("test");

            //Set PDF/UA1 identification
            taggedContent.SetPdfUA1Identification();

            //Create font and brush
            PdfTrueTypeFont font = new PdfTrueTypeFont(new Font("Times New Roman", 14), true);
            PdfSolidBrush brush = new PdfSolidBrush(Color.Black);

            //Add a "document" element
            PdfStructureElement document = taggedContent.StructureTreeRoot.AppendChildElement(PdfStandardStructTypes.Document);

            //Add a "heading" element
            PdfStructureElement heading1 = document.AppendChildElement(PdfStandardStructTypes.HeadingLevel1);
            heading1.BeginMarkedContent(page);
            string headingText = "What Is a Tagged PDF?";
            page.Canvas.DrawString(headingText, font, brush, new PointF(0, 0));
            heading1.EndMarkedContent(page);

            //Add a "paragraph" element
            PdfStructureElement paragraph = document.AppendChildElement(PdfStandardStructTypes.Paragraph);
            paragraph.BeginMarkedContent(page);
            string paragraphText = "“Tagged PDF” doesn’t seem like a life-changing term. But for some, it is. For people who are " +
                "blind or have low vision and use assistive technology (such as screen readers and connected Braille displays) to " +
                "access information, an untagged PDF means they are missing out on information contained in the document because assistive " +
                "technology cannot “read” untagged PDFs.  Digital accessibility has opened up so many avenues to information that were once " +
                "closed to people with visual disabilities, but PDFs often get left out of the equation.";
            RectangleF rect = new RectangleF(0, 30, page.Canvas.ClientSize.Width, page.Canvas.ClientSize.Height);
            page.Canvas.DrawString(paragraphText, font, brush, rect);
            paragraph.EndMarkedContent(page);

            //Add a "figure" element to
            PdfStructureElement figure = document.AppendChildElement(PdfStandardStructTypes.Figure);
            figure.BeginMarkedContent(page);
            PdfImage image = PdfImage.FromFile(@"C:\Users\Administrator\Desktop\pdfua.png");
            page.Canvas.DrawImage(image, new PointF(0, 150));
            figure.EndMarkedContent(page);

            //Add a "table" element
            PdfStructureElement table = document.AppendChildElement(PdfStandardStructTypes.Table);
            table.BeginMarkedContent(page);
            PdfTable pdfTable = new PdfTable();
            pdfTable.Style.DefaultStyle.Font = font;
            DataTable dataTable = new DataTable();
            dataTable.Columns.Add("Name");
            dataTable.Columns.Add("Age");
            dataTable.Columns.Add("Sex");
            dataTable.Rows.Add(new string[] { "John", "22", "Male" });
            dataTable.Rows.Add(new string[] { "Katty", "25", "Female" });
            pdfTable.DataSource = dataTable;
            pdfTable.Style.ShowHeader = true;
            pdfTable.Draw(page.Canvas, new PointF(0, 280), 300f);
            table.EndMarkedContent(page);

            //Save the document to file
            doc.SaveToFile("CreatePDFUA.pdf");
        }
    }
}

Apply for a Temporary License
If you'd like to remove the evaluation message from the generated documents, or to get rid of the function limitations, please request a 30-day trial license for yourself.
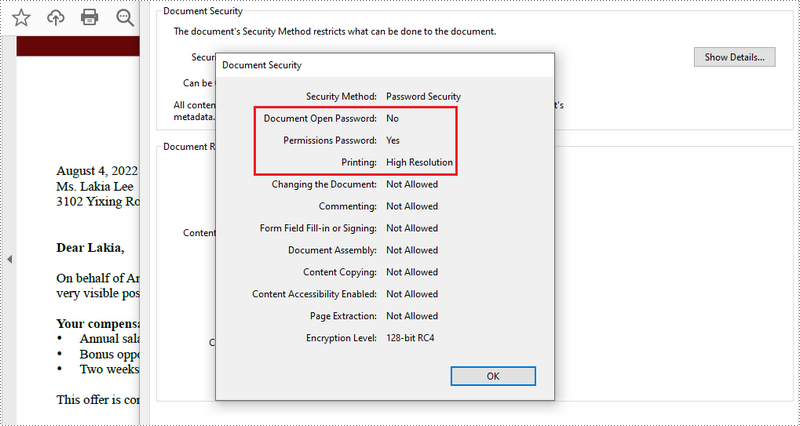
PDF documents can be secured in several ways. When PDFs are protected with a permission password, readers can open the document without needing to enter a password, but they may not have permission to further manipulate the document, such as printing or copying the content. In this article, you will learn how to set security permissions for a PDF document in Java using Spire.PDF for Java library.
Install Spire.PDF for Java
First, you're required to add the Spire.Pdf.jar file as a dependency in your Java program. The JAR file can be downloaded from this link. If you use Maven, you can easily import the JAR file in your application by adding the following code to your project's pom.xml file.
<repositories>
    <repository>
        <id>com.e-iceblue</id>
        <name>e-iceblue</name>
        <url>https://repo.e-iceblue.com/nexus/content/groups/public/</url>
    </repository>
</repositories>
<dependencies>
    <dependency>
        <groupId>e-iceblue</groupId>
        <artifactId>spire.pdf</artifactId>
        <version>12.7.0</version>
    </dependency>
</dependencies>
Add Security Permissions to a PDF Document in Java
Below are the steps to apply security permissions to a PDF document using Spire.PDF for Java.
- Create a PdfDocument object.
- Load a sample PDF file using PdfDocument.loadFileFile() method.
- Specify open password and permission password. The open password can be set to empty so that the generated document will not require a password to open.
- Encrypt the document with the open password and permission password, and set the security permissions using PdfDocument.getSecurity().encypt() method. This method takes PdfPermissionsFlags enumeration as a parameter, which defines user access permissions for an encrypted document.
- Save the document to another PDF file using PdfDocument.saveToFile() method.
- Java
//Create a PdfDocument object
PdfDocument pdf= new PdfDocument();

//Load a sample PDF file
pdf.loadFromFile("C:\\Users\\Administrator\\Desktop\\sample.pdf");
String output = "output/changeSecurityPermission_output.pdf";

// Create a PdfSecurityPolicy with the specified user password and owner password
PdfSecurityPolicy securityPolicy = new PdfPasswordSecurityPolicy("userpassword", "ownerpassword");

// Create a PdfDocumentPrivilege with desired permissions (e.g., allow filling form fields)
PdfDocumentPrivilege privilege = new PdfDocumentPrivilege();
privilege.setAllowFillFormFields(true);
privilege.setAllowPrint(true);

// Encrypt the PDF document using the specified security policy
pdf.encrypt(securityPolicy);

// Save the encrypted PDF document to the output file path
pdf.saveToFile(output, FileFormat.PDF);

// Close the PDF document to release resources
pdf.close();

// Dispose of the PDF document to free up system resources
pdf.dispose();
Apply for a Temporary License
If you'd like to remove the evaluation message from the generated documents, or to get rid of the function limitations, please request a 30-day trial license for yourself.
