
Knowledgebase (2370)
Children categories
The sample demonstrates how to add bookmark into Word for Silverlight via Spire.Doc.

Table in Microsoft Word is used to present data information which can assist to explain specified paragraph contents. In order to have a better appearance, people can set Word table style. This guide shows how to use Spire.Doc to set table style in Word with C#/VB.NET.
Download Spire.Doc (or Spire.Office) with .NET Framework 2.0 (or above) together. Once make sure Spire.Doc (or Spire.Office) are correctly installed on system, follow the steps below to set Word table style
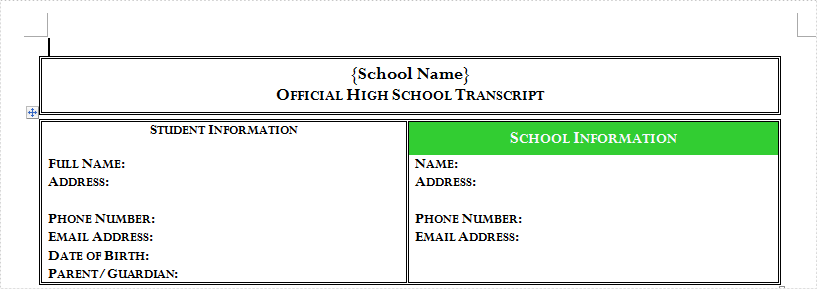
In this example, a Word document with table has been prepared. It is a student transcript template from Office.com.
Step 1: Create a C#/VB.NET project in Visual Studio. Add Spire.Doc.dll as reference.
Document document = new Document();
document.LoadFromFile(@"E:\work\Documents\Student Transcript.docx");
Dim document As New Document()
document.LoadFromFile("E:\work\Documents\Student Transcript.docx")
Step 2: Set Table Style
Get table which you want to set style
Because table1 type is different from document.Sections[0].Tables[1] type, so use (Table) to transformed forcibly.
Table table1 = (Table)document.Sections[0].Tables[1];
Dim table1 As Table = CType(document.Sections(0).Tables(1), Table)
Set table row height.
table1.Rows[0].Height = 25;
table1.Rows(0).Height = 25
Set Table Style
In order to have distinction. Keep the first cell in first row as before and set style for the second cell. Firstly, set alignment and background color for the second cell. Secondly, declare a paragraph style, including font size, color and apply this style in cell.
table1.Rows[0].Cells[1].CellFormat.VerticalAlignment = VerticalAlignment.Middle;
table1.Rows[0].Cells[1].CellFormat.BackColor = Color.LimeGreen;

ParagraphStyle style = new ParagraphStyle(document);
style.Name = "TableStyle";
style.CharacterFormat.FontSize = 14;
style.CharacterFormat.TextColor = Color.GhostWhite;
document.Styles.Add(style);
table1.Rows[0].Cells[1].Paragraphs[0].ApplyStyle(style.Name);
table1.Rows(0).Cells(1).CellFormat.VerticalAlignment = VerticalAlignment.Middle
table1.Rows(0).Cells(1).CellFormat.BackColor = Color.LimeGreen

Dim style As New ParagraphStyle(document)
style.Name = "TableStyle"
style.CharacterFormat.FontSize = 14
style.CharacterFormat.TextColor = Color.GhostWhite
document.Styles.Add(style)
table1.Rows(0).Cells(1).Paragraphs(0).ApplyStyle(style.Name)
Step 3: Save and Launch
document.SaveToFile("WordTable.docx", FileFormat.Docx);
System.Diagnostics.Process.Start("WordTable.docx");
document.SaveToFile("WordTable.docx", FileFormat.Docx)
System.Diagnostics.Process.Start("WordTable.docx")
Effective Screenshot:
This guide shows how to set Word table style such as size and color via Spire.Doc. However, Spire.Doc can do a lot on operating Word document Click to learn more
Sorting data in Excel is a fundamental skill that enhances data organization and analysis. By rearranging rows based on specific criteria—such as alphabetical order, numerical value, or date—users can easily identify trends, patterns, and outliers. In this article, you will learn how to sort data in Excel using C# with Spire.XLS for .NET.
Install Spire.XLS for .NET
To begin with, you need to add the DLL files included in the Spire.XLS for .NET package as references in your .NET project. The DLL files can be either downloaded from this link or installed via NuGet.
PM> Install-Package Spire.XLS
Sort a Single Column in Excel in C#
Sorting a single column in Excel enables quick organization of your data in ascending or descending order for easier analysis. However, this method leaves other columns unchanged, potentially leading to misalignment of related data.
Spire.XLS for .NET provides the Workbook.DataSorter.SortColumns.Add(int key, SortComparisonType sortComparisonType, OrderBy orderBy) method. This method enables developers to set sorting criteria by selecting a specific column, defining the comparison type, and specifying the sort order (ascending or descending). To apply the sorting to the defined range, use the Workbook.DataSorter.Sort(CellRange range) method.
Here are the steps to sort a single column in Excel using C#:
- Create a Workbook object.
- Load an Excel file using the Workbook.LoadFromFile() method.
- Get a specific worksheet using the Workbook.Worksheets[index] property.
- Get the column where you want to sort data using the Worksheet.Range property.
- Create sorting criteria for the selected column using the Workbook.DataSorter.SortColumns.Add() method.
- Execute sorting within the column using the Workbook.DataSorter.Sort() method.
- Save the workbook to a different Excel file.
- C#
using Spire.Xls;
namespace SortSingleColumn
{
class Program
{
static void Main(string[] args)
{
// Create a Workbook object
Workbook workbook = new Workbook();
// Load an Excel file
workbook.LoadFromFile("C:\\Users\\Administrator\\Desktop\\Input.xlsx");
// Get a specific worksheet
Worksheet sheet = workbook.Worksheets[0];
// Get the cell range (a single column) where you want to sort data
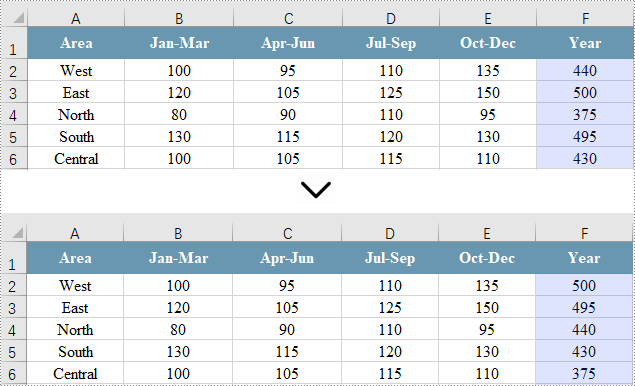
CellRange cellRange = sheet.Range["F1:F6"];
// Sort values in the specified column in descending order
workbook.DataSorter.SortColumns.Add(5, SortComparsionType.Values, OrderBy.Descending);
// Sort in the specified cell range
workbook.DataSorter.Sort(cellRange);
// Save the workbook
workbook.SaveToFile("SortSingleColumn.xlsx", ExcelVersion.Version2013);
// Dispose resources
workbook.Dispose();
}
}
}
Sort Multiple Columns in Excel in C#
Sorting data across multiple columns ensures that all related data across the selected columns remains aligned and meaningful, which is useful for complex datasets where relationships between data points matter.
Sorting data across multiple columns is similar to sorting a single column. The main difference lies in the CellRange parameter used in Workbook.DataSorter.Sort(CellRange range), which specifies multiple columns instead of just one.
Here are the steps to sort multiple column in Excel using C#:
- Create a Workbook object.
- Load an Excel file using the Workbook.LoadFromFile() method.
- Get a specific worksheet using the Workbook.Worksheets[index] property.
- Get the cell range (columns) where you want to sort data using the Worksheet.Range property.
- Create sorting criteria for the selected column using the Workbook.DataSorter.SortColumns.Add() method.
- Execute sorting within the range using the Workbook.DataSorter.Sort() method.
- Save the workbook to a different Excel file.
- C#
using Spire.Xls;
namespace SortMultipleColumns
{
class Program
{
static void Main(string[] args)
{
// Create a new workbook
Workbook workbook = new Workbook();
// Load an Excel file
workbook.LoadFromFile("C:\\Users\\Administrator\\Desktop\\Input.xlsx");
// Get a specific worksheet
Worksheet sheet = workbook.Worksheets[0];
// Get the cell range (multiple columns) where you want to sort data
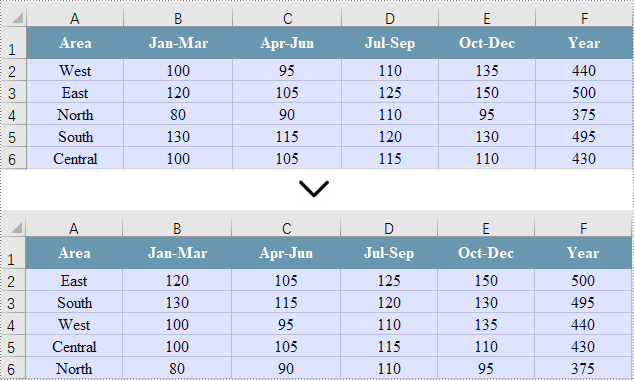
CellRange cellRange = sheet.Range["A1:F6"];
// Sort values in the specified column in descending order
workbook.DataSorter.SortColumns.Add(5, SortComparsionType.Values, OrderBy.Descending);
// Sort in the specified cell range
workbook.DataSorter.Sort(cellRange);
// Save the workbook
workbook.SaveToFile("SortMultipleColumns.xlsx", ExcelVersion.Version2013);
// Dispose resources
workbook.Dispose();
}
}
}
Sort by a Custom List in C#
Sorting by a custom list in Excel allows you to arrange data based on specific, non-alphabetical criteria tailored to your needs, ensuring the order is meaningful for your analysis or reporting.
To accomplish this, create an array of strings that defines the custom sorting order. Next, set the sorting criteria using the Workbook.DataSorter.SortColumns.Add(int key, OrderBy orderBy) method. Finally, invoke the Workbook.DataSorter.Sort(CellRange range) method to sort the specified cell range.
Here are the steps to sort data by a custom list in Excel using C#:
- Create a Workbook object.
- Load an Excel file using the Workbook.LoadFromFile() method.
- Get a specific worksheet using the Workbook.Worksheets[index] property.
- Get the cell range where you want to sort data using the Worksheet.Range property.
- Define the custom sorting order with an array of strings.
- Create sorting criteria for the selected column using the Workbook.DataSorter.SortColumns.Add() method.
- Execute sorting within the range using the Workbook.DataSorter.Sort() method.
- Save the workbook to a different Excel file.
- C#
using Spire.Xls;
namespace SortMultipleColumns
{
class Program
{
static void Main(string[] args)
{
// Create a new workbook
Workbook workbook = new Workbook();
// Load an Excel file
workbook.LoadFromFile("C:\\Users\\Administrator\\Desktop\\Input.xlsx");
// Get a specific worksheet
Worksheet sheet = workbook.Worksheets[0];
// Get the cell range where you want to sort data
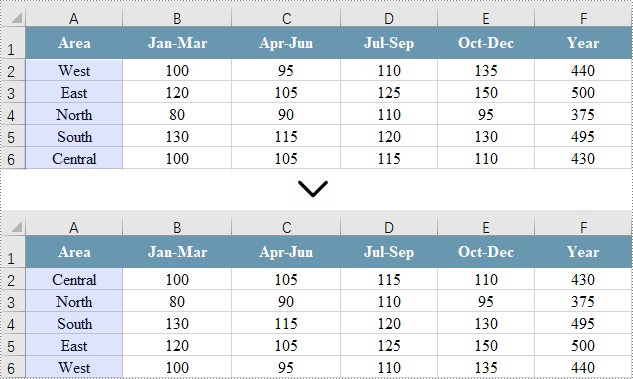
CellRange cellRange = sheet.Range["A1:F6"];
String[] customList = { "Central", "North", "South", "East", "West" };
// Sort a specified column using the custom list
workbook.DataSorter.SortColumns.Add(0, customList);
// Sort in the specified cell range
workbook.DataSorter.Sort(cellRange);
// Save the workbook
workbook.SaveToFile("SortByCustomList.xlsx", ExcelVersion.Version2013);
// Dispose resources
workbook.Dispose();
}
}
}
Apply for a Temporary License
If you'd like to remove the evaluation message from the generated documents, or to get rid of the function limitations, please request a 30-day trial license for yourself.
