
Knowledgebase (2370)
Children categories
Word watermark can be text or image, which appears behind document contents and will not influence integrity of document body. It often adds interest or identifies document status, for example, marking document as private or important. This is the guide you are looking for about how to insert text watermark in Word with WPF.
Spire.Doc for WPF, a professional WPF component on manipulating Word document, enables users to insert text watermark in Word document and set format for this watermark. Comparing with “Insert Watermark” Command in Microsoft Word, Spire.Doc for WPF provides a Spire.Doc.TextWatermark class. Firstly initialize a new instance of Textwatermark with TextWatermark TXTWatermark = new TextWatermark() and then set text watermark as document watermark type by code:document.Watermark = TXTWatermark.
Besides, TextWatermark class includes several parameters for watermark formatting setting, including text, font style, layout etc. The following screenshot is the document without watermark. After the code below, you will find a result screenshot with text watermark being adding at the bottom of the page.

Download Spire.Doc for WPF and install it on your system. After adding button in MainWindow, double click this button to use the following code to insert text watermark in Word with WPF.
using System.Windows;
using System.Drawing;
using Spire.Doc;
using Spire.Doc.Documents;

namespace Doc_x_Watermark
{
   public partial class MainWindow : Window
    {
        public MainWindow()
        {
            InitializeComponent();
        }

        private void button1_Click(object sender, RoutedEventArgs e)
        {
            //Load Document
            Document document = new Document();
            document.LoadFromFile(@"E:\work\Documents\New Zealand.docx");

            //Insert Text Watermark and Set Format
            TextWatermark TXTWatermark = new TextWatermark();
            TXTWatermark.Text = "NZ Brief Introduction ";
            TXTWatermark.FontSize = 45;
            TXTWatermark.FontName = "Broadway BT";
            TXTWatermark.Layout = WatermarkLayout.Diagonal;
            TXTWatermark.Color = Color.Purple;
            document.Watermark = TXTWatermark;

            //Save and Launch
            document.SaveToFile("TXTWatermark.docx", FileFormat.Docx);
            System.Diagnostics.Process.Start("TXTWatermark.docx");
        }
    }
}
Imports System.Windows
Imports System.Drawing
Imports Spire.Doc
Imports Spire.Doc.Documents

Class MainWindow

    Private Sub Button1_Click(sender As System.Object, e As System.Windows.RoutedEventArgs) Handles Button1.Click
        'Load Document
        Dim document As New Document()
        document.LoadFromFile("E:\work\Documents\New Zealand.docx")

        'Insert Text Watermark and Set Format
        Dim TXTWatermark As New TextWatermark()
        TXTWatermark.Text = "NZ Brief Introduction"
        TXTWatermark.FontSize = 45
        TXTWatermark.FontName = "Broadway BT"
        TXTWatermark.Layout = WatermarkLayout.Diagonal
        TXTWatermark.Color = Color.Purple
        document.Watermark = TXTWatermark

        'Save and Launch
        document.SaveToFile("TXTWatermark.docx", FileFormat.Docx)
        System.Diagnostics.Process.Start("TXTWatermark.docx")

    End Sub
End Class
After running, you can get the result as following:

Spire.Doc is a Microsoft Word component which enables users to perform a wide range of Word document processing tasks directly, such as generate, read, write and modify Word document in WPF, .NET and Silverlight.
In Excel files, headers and footers provide rich content at the top and bottom of worksheet pages. The content can include a logo, company name, page number, date, and time, etc. This article shows you how to add text, images, as well as fields (like page numbers) to Excel headers or footers using Spire.XLS for .NET.
- Add an Image and Formatted Text to Excel Header
- Add the Current Date and Page Numbers to Excel Footer
Spire.XLS for .NET provides the PageSetup class to work with the page setup in Excel including headers and footers. Specifically, it contains LeftHeader property, CenterHeader property, RightHeader property, LeftFooter property, etc. to represent the left section, center section and right section of a header or footer. To add fields to headers or footers, or to apply formatting to text, you’ll need to use the scripts listed in the following table.
| Script | Description |
| &P | The current page numbers. |
| &N | The total number of pages. |
| &D | The current data. |
| &T | The current time. |
| &G | A picture. |
| &A | The worksheet name. |
| &F | The file name. |
| &B | Make text bold. |
| &I | Italicize text. |
| &U | Underline text. |
| &"font name" | Represents a font name, for example, &"Arial". |
| & + Integer | Represents font size, for example, &12. |
| &K + Hex color code | Represents font color, for example, &KFF0000. |
Install Spire.XLS for .NET
To begin with, you need to add the DLL files included in the Spire.XLS for.NET package as references in your .NET project. The DLL files can be either downloaded from this link or installed via NuGet.
PM> Install-Package Spire.XLS
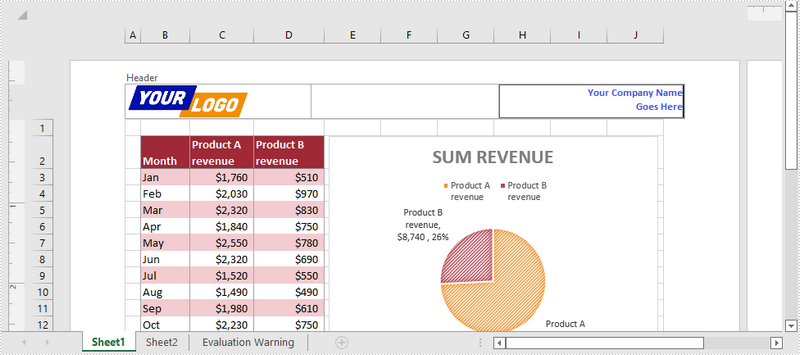
Add an Image and Formatted Text to Excel Header
The following are the steps to add an image and formatted text to the header of an existing Excel document using Spire.XLS for .NET.
- Create a Workbook object, and load a sample Excel file using Workbook.LoadFromFile() method.
- Get a specific worksheet through the Workbook.Worksheets[index] property.
- Load an image, scale it and set it as the image source of the left header through the PageSetup.LeftHeaderImage property.
- Display image in the left header section by setting the PageSetup.LeftHeader property to “&G”.
- Save the workbook to another Excel file using Workbook.SaveToFile() method.
- C#
- VB.NET
using Spire.Xls;
using System.Drawing;

namespace AddImageAndTextToHeader
{
    class Program
    {
        static void Main(string[] args)
        {
            //Create a Workbook object
            Workbook wb = new Workbook();

            //Load an existing Excel file
            wb.LoadFromFile(@"C:\Users\Administrator\Desktop\sample.xlsx");

            //Get the first worksheet
            Worksheet sheet = wb.Worksheets[0];

            //Load an image
            Image image = Image.FromFile(@"C:\Users\Administrator\Desktop\your-logo.png");

            //Scale the image
            Bitmap bitmap = new Bitmap(image, new Size(image.Width / 2, image.Height / 2));

            //Add image to header’s left section
            sheet.PageSetup.LeftHeaderImage = bitmap;
            sheet.PageSetup.LeftHeader = "&G";

            //Add formatted text to header’s right section
            sheet.PageSetup.RightHeader = "&\"Calibri\"&B&10&K4253E2Your Company Name \n Goes Here";

            //Save the file
            wb.SaveToFile("Header.xlsx", ExcelVersion.Version2016);
        }
    }
}
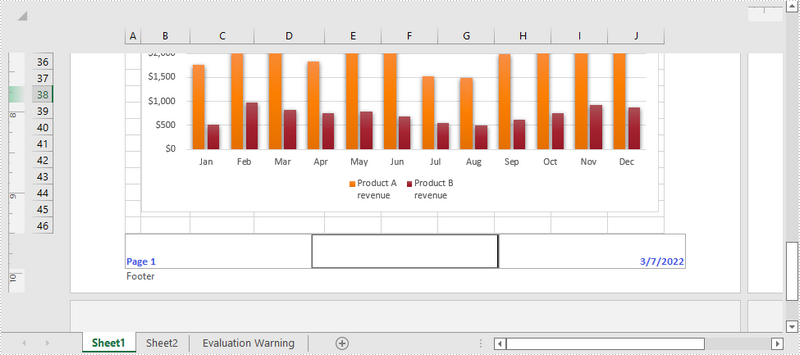
Add the Current Date and Page Numbers to Excel Footer
The following are the steps to add the current date and page numbers to the footer of an existing Excel document using Spire.XLS for .NET.
- Create a Workbook object, and load a sample Excel file using Workbook.LoadFromFile() method.
- Get a specific worksheet through the Workbook.Worksheets[index] property.
- Add page numbers with formatting to the left footer section by setting the PageSetup.LeftFooter property to “&\"Calibri\"&B&10&K4253E2Page &P”. You can customize the page numbers’ formatting according to your preference.
- Add the current date to the right footer section by setting the PageSetup.RightFooter property to “&\"Calibri\"&B&10&K4253E2&D”. Likewise, you can change the appearance of the date string as desired.
- Save the workbook to another Excel file using Workbook.SaveToFile() method.
- C#
- VB.NET
using Spire.Xls;

namespace AddDateAndPageNumberToFooter
{
    class Program
    {
        static void Main(string[] args)
        {
            //Create a Workbook object
            Workbook wb = new Workbook();

            //Load an exsting Excel file
            wb.LoadFromFile(@"C:\Users\Administrator\Desktop\sample.xlsx");

            //Get the first worksheet
            Worksheet sheet = wb.Worksheets[0];

            //Add page number to footer's left section
            sheet.PageSetup.LeftFooter = "&\"Calibri\"&B&10&K4253E2Page &P";

            //Add current date to footer's right section
            sheet.PageSetup.RightFooter = "&\"Calibri\"&B&10&K4253E2&D";

            //Save the file
            wb.SaveToFile("Footer.xlsx", ExcelVersion.Version2016);
        }
    }
}
Apply for a Temporary License
If you'd like to remove the evaluation message from the generated documents, or to get rid of the function limitations, please request a 30-day trial license for yourself.
During software development, developers may need to convert Word to HTML. Different from many available ways on Internet, in this example, the solution for converting Word to HTML enables WPF developers load a predefined Doc, Docx, or RTF document, fill it with data, convert the document to HTML.
Spire.Doc for WPF is a professional component specializing in manipulating Word document for WPF. To convert a Word to HTML simply in WPF, developers need to invoke document.LoadFromFile(), which is used to load document and document.SaveToFile(), which is used to convert document.
The following screenshot shows parts of contents of original Word document. The target HTML is at the bottom after this coding. It is shown in Firefox, same as the original document.

Download and install Spire.Doc for WPF on your system. Then, add a button in MainWindow and double click it to use the following code to convert Word to HTML in WPF
using Spire.Doc;
using System.Windows;

namespace WpfApplication1
{
    public partial class MainWindow : Window
    {
        public MainWindow()
        {
            InitializeComponent();
        }
        private void button1_Click(object sender, RoutedEventArgs e)
        {
            //Load Document
            Document document = new Document();
            document.LoadFromFile(@"E:\work\Documents\Humor Them.docx");

            //Convert to HTML
            document.SaveToFile("ToHTML.html", FileFormat.Html);

            //Launch Document
            System.Diagnostics.Process.Start("ToHTML.html");

        }


    }
}
Imports Spire.Doc
Imports System.Windows

Namespace WpfApplication1
	Public Partial Class MainWindow
		Inherits Window
		Public Sub New()
			InitializeComponent()
		End Sub
		Private Sub button1_Click(sender As Object, e As RoutedEventArgs)
			'Load Document
			Dim document As New Document()
			document.LoadFromFile("E:\work\Documents\Humor Them.docx")

			'Convert to HTML
			document.SaveToFile("ToHTML.html", FileFormat.Html)

			'Launch Document
			System.Diagnostics.Process.Start("ToHTML.html")

		End Sub


	End Class
End Namespace
After running, you can get the result as following:

Spire.Doc is an Microsoft Word component which enables users to perform a wide range of Word document processing tasks directly, such as generate, read, write and modify Word document in WPF, .NET and Silverlight.
