
Program Guide (133)
Children categories
Excel documents are widely used in many applications, and it is often necessary to customize their appearance to improve their readability. One way to achieve this is by setting a background color or image for the document, which can enhance its visual appeal and give it a more professional look. This article will demonstrate how to set background color and image for Excel in Java using Spire.XLS for Java.
Install Spire.XLS for Java
First, you're required to add the Spire.Xls.jar file as a dependency in your Java program. The JAR file can be downloaded from this link. If you use Maven, you can easily import the JAR file in your application by adding the following code to your project's pom.xml file.
<repositories>
    <repository>
        <id>com.e-iceblue</id>
        <name>e-iceblue</name>
        <url>https://repo.e-iceblue.com/nexus/content/groups/public/</url>
    </repository>
</repositories>
<dependencies>
    <dependency>
        <groupId>e-iceblue</groupId>
        <artifactId>spire.xls</artifactId>
        <version>16.6.5</version>
    </dependency>
</dependencies>
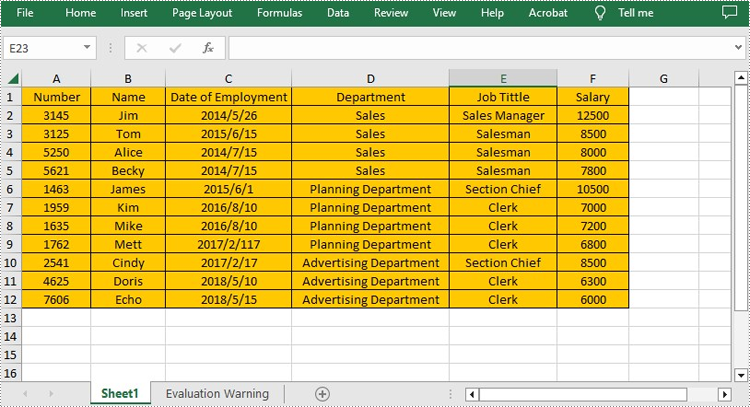
Set Background Color for Excel in Java
With Spire.XLS for Java, not only can you set the background color for the entire range of cells used in the worksheet, but you can also set it for a specific range of cells within the worksheet. The following are the steps to set background color for Excel.
- Create a Workbook instance.
- Load a sample Excel file using Workbook.loadFromFile() method.
- Get a specific worksheet from the workbook using Workbook.getWorksheets.get(index) method.
- Use Worksheet.getAllocatedRange().getStyle().setColor() method to set background color for the used cell range or Worksheet.getCellRange().getStyle().setColor() method to set background color for a specified cell range in the worksheet.
- Save the result file using Workbook.saveToFile() method.
- Java
import com.spire.xls.ExcelVersion;
        import com.spire.xls.Workbook;
        import com.spire.xls.Worksheet;

        import java.awt.*;

public class BackgroundColor{
    public static void main(String[] args){
        //Create a Workbook instance
        Workbook workbook = new Workbook();
        //Load an Excel file
        workbook.loadFromFile("sample.xlsx");

        //Get the first worksheet
        Worksheet sheet = workbook.getWorksheets().get(0);
        //Set background color for the used cell range in the worksheet
        sheet.getAllocatedRange().getStyle().setColor(Color.orange);
        //Set background color for a specified cell range in the worksheet
        //sheet.getCellRange("A1:E19").getStyle().setColor(Color.pink);

        //Save the file
        workbook.saveToFile("SetBackColor.xlsx", ExcelVersion.Version2013);
    }
}
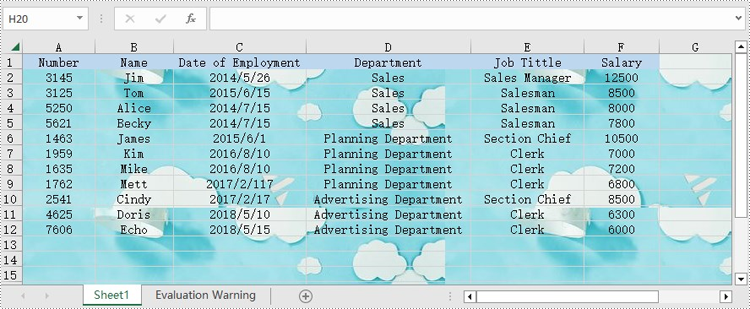
Set Background Image for Excel in Java
Spire.XLS for Java also offers Worksheet.getPageSetup().setBackgoundImage() method for users to set the image background. The following are the steps to achieve this.
- Create a Workbook instance.
- Load a sample Excel file using Workbook.loadFromFile() method.
- Get a specific worksheet from the workbook using Workbook.getWorksheets.get(index) method.
- Set the image as the background image of the worksheet using Worksheet. getPageSetup().setBackgoundImage() method.
- Save the result file using Workbook.saveToFile() method.
- Java
import com.spire.xls.ExcelVersion;
import com.spire.xls.Workbook;
import com.spire.xls.Worksheet;

import javax.imageio.ImageIO;
import java.awt.image.BufferedImage;
import java.io.File;
import java.io.IOException;

public class BackgroundImage {
    public static void main(String[] args) throws IOException {
        //Create a Workbook instance
        Workbook workbook = new Workbook();
        //Load an Excel file
        workbook.loadFromFile("sample.xlsx");

        //Get the first worksheet
        Worksheet sheet = workbook.getWorksheets().get(0);
        //Load an image
        BufferedImage image = ImageIO.read( new File("background.jpg"));
        //Set the image as the background image of the worksheet
        sheet.getPageSetup().setBackgoundImage(image);

        //Save the file
        workbook.saveToFile("SetBackImage.xlsx", ExcelVersion.Version2013);
    }
}
Apply for a Temporary License
If you'd like to remove the evaluation message from the generated documents, or to get rid of the function limitations, please request a 30-day trial license for yourself.
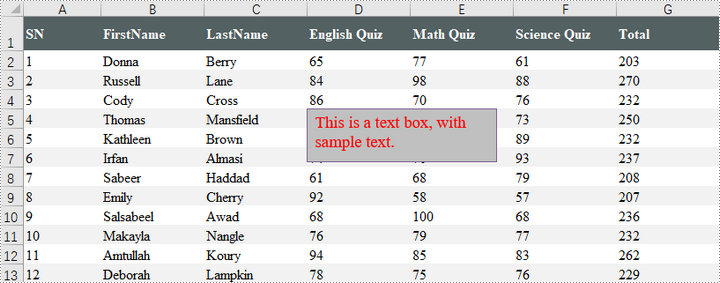
Textboxes in Excel are versatile tools that enhance the functionality of your spreadsheets. They allow users to add annotations, labels, or supplementary information, making it easier to convey important messages or insights. Whether you're looking to highlight critical data points, provide detailed explanations, or create visually appealing reports, effectively managing textboxes is essential.
In this article, you will learn how to insert a textbox, extract text from a textbox, and delete a textbox in Excel using Java and Spire.XLS for Java.
- Insert a Textbox to Excel in Java
- Extract Text from a Textbox in Excel in Java
- Delete a Textbox in Excel in Java
Install Spire.XLS for Java
First of all, you're required to add the Spire.Xls.jar file as a dependency in your Java program. The JAR file can be downloaded from this link. If you use Maven, you can easily import the JAR file in your application by adding the following code to your project's pom.xml file.
<repositories>
    <repository>
        <id>com.e-iceblue</id>
        <name>e-iceblue</name>
        <url>https://repo.e-iceblue.com/nexus/content/groups/public/</url>
    </repository>
</repositories>
<dependencies>
    <dependency>
        <groupId>e-iceblue</groupId>
        <artifactId>spire.xls</artifactId>
        <version>16.6.5</version>
    </dependency>
</dependencies>
Insert a Textbox to Excel in Java
A textbox can be inserted into a worksheet using the Worksheet.getTextBoxes().addTextBox() method. This method returns an ITextBoxShape object, which provides various methods like setText(), setHAlignment(), and getFill() for configuring the text and formatting of the textbox.
To add a textbox with personalized text and formatting in Excel, follow these steps:
- Create a Workbook object.
- Load an Excel file from the specified file path.
- Retrieve a specific worksheet from the workbook.
- Insert a textbox at the desired location using Worksheet.getTextBoxes().addTextBox() method.
- Set the textbox text using ITextBoxShape.setText() method.
- Customize the textbox's appearance using other methods available in the ITextBoxShape object.
- Save the workbook as a new Excel file.
- Java
import com.spire.xls.*;
import com.spire.xls.core.ITextBoxShape;

import java.awt.*;

public class AddTextbox {

    public static void main(String[] args) {

        // Create a Workbook object
        Workbook workbook = new Workbook();

        // Load an Excel document
        workbook.loadFromFile("C:\\Users\\Administrator\\Desktop\\Input.xlsx");

        // Get a specific sheet
        Worksheet sheet = workbook.getWorksheets().get(0);

        // Add a textbox to the specified location
        ITextBoxShape textBoxShape = sheet.getTextBoxes().addTextBox(5, 4, 60, 200);

        // Set text of the textbox
        textBoxShape.setText("This is a text box, with sample text.");

        // Create a font
        ExcelFont font = workbook.createFont();
        font.setFontName("Times New Roman");
        font.setSize(14);
        font.setColor(Color.red);

        // Apply font to the text
        textBoxShape.getRichText().setFont(0, textBoxShape.getText().length() - 1, font);

        // Set horizontal alignment
        textBoxShape.setHAlignment(CommentHAlignType.Left);

        // Set the fill color of the shape
        textBoxShape.getFill().setFillType(ShapeFillType.SolidColor);
        textBoxShape.getFill().setForeColor(Color.LIGHT_GRAY);

        // Save the Excel file
        workbook.saveToFile("output/AddTextBox.xlsx", ExcelVersion.Version2010);

        // Dispose resources
        workbook.dispose();
    }
}
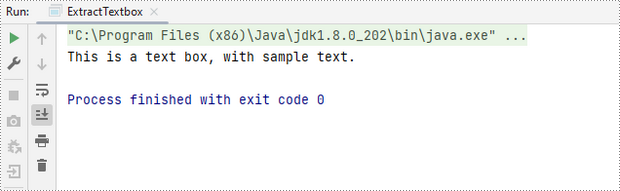
Extract Text from a Textbox in Excel in Java
You can access a specific textbox using the Worksheet.getTextBoxes().get() method. After retrieving it, the text can be accessed with the ITextBox.getText() method.
Here are the steps to extract text from a textbox in Excel:
- Create a Workbook object.
- Load an Excel file from the specified file path.
- Retrieve a specific worksheet from the workbook.
- Access the desired textbox using Worksheet.getTextBoxes().get() method.
- Get the textbox's text using ITextBox.getText() method.
- Java
import com.spire.xls.Workbook;
import com.spire.xls.Worksheet;
import com.spire.xls.core.ITextBox;

public class ExtractTextbox {

    public static void main(String[] args) {

        // Create a Workbook object
        Workbook workbook = new Workbook();

        // Load an Excel file
        workbook.loadFromFile("C:\\Users\\Administrator\\Desktop\\TextBox.xlsx");

        // Get a specific worksheet
        Worksheet sheet = workbook.getWorksheets().get(0);

        // Get a specific textbox
        ITextBox textBox = sheet.getTextBoxes().get(0);

        // Get text from the textbox
        String text = textBox.getText();

        // Print out result
        System.out.println(text);
    }
}
Delete a Textbox in Excel in Java
To delete a specific textbox from a worksheet, utilize the ITextBoxes.get().Remove() method. If you want to clear all textboxes, first obtain the count with the Worksheet.getTextBoxes().getCount() method, then loop through the collection to remove each textbox one by one.
Here's how to remove a textbox from Excel:
- Create a Workbook object.
- Load an Excel file from the desired file path.
- Access a specific worksheet within the workbook.
- Retrieve the textbox collection using Worksheet.getTextBoxes() method.
- Delete the targeted textbox using ITextBoxes.get().Remove() method.
- Save the modified workbook to a new Excel file.
- Java
import com.spire.xls.ExcelVersion;
import com.spire.xls.Workbook;
import com.spire.xls.Worksheet;
import com.spire.xls.core.ITextBoxes;

public class DeleteTextbox {

    public static void main(String[] args) {

        // Create a Workbook object
        Workbook workbook = new Workbook();

        // Load an Excel file
        workbook.loadFromFile("C:\\Users\\Administrator\\Desktop\\TextBox.xlsx");

        // Get a specific worksheet
        Worksheet sheet = workbook.getWorksheets().get(0);

        // Get textbox collection from the worksheet
        ITextBoxes textBoxes = sheet.getTextBoxes();

        // Remove a specific textbox
        textBoxes.get(0).remove();

        // Save the updated document to a different Excel file
        workbook.saveToFile("output/DeleteTextbox.xlsx", ExcelVersion.Version2016);

        // Dispose resources
        workbook.dispose();
    }
}
Apply for a Temporary License
If you'd like to remove the evaluation message from the generated documents, or to get rid of the function limitations, please request a 30-day trial license for yourself.
When you work with Excel worksheets on a daily basis, you sometimes need to convert them to images for storage or preventing data from being changed when shared with others. This article will show you how to convert a whole Excel worksheet or a specific cell range to an image using Spire.XLS for Java.
Install Spire.XLS for Java
First of all, you're required to add the Spire.Xls.jar file as a dependency in your Java program. The JAR file can be downloaded from this link. If you use Maven, you can easily import the JAR file in your application by adding the following code to your project's pom.xml file.
<repositories>
    <repository>
        <id>com.e-iceblue</id>
        <name>e-iceblue</name>
        <url>https://repo.e-iceblue.com/nexus/content/groups/public/</url>
    </repository>
</repositories>
<dependencies>
    <dependency>
        <groupId>e-iceblue</groupId>
        <artifactId>spire.xls</artifactId>
        <version>16.6.5</version>
    </dependency>
</dependencies>
Convert a Whole Excel Worksheet to Image
The following steps will demonstrate how to convert a whole Excel worksheet to an image.
- Create a Workbook instance.
- Load a sample Excel document using Workbook.loadFromFile() method.
- Get a specific worksheet of the document using Workbook.getWorksheets().get() method.
- Convert the worksheet to an image using Worksheet.saveToImage() method.
- Java
import com.spire.xls.*;

public class ExcelToImage {
    public static void main(String[] args){

        //Create a workbook instance
        Workbook workbook = new Workbook();
        //Load a sample Excel document
        workbook.loadFromFile("C:\\Users\\Test1\\Desktop\\sample.xlsx");

        //Get the first worksheet
        Worksheet sheet = workbook.getWorksheets().get(0);

        //Save the sheet to an image
        sheet.saveToImage("output/SheetToImage.png");
    }
}
Convert a Specific Cell Range to Image
Spire.XLS for Java supports converting a specific cell range to an image by using the Worksheet.toImage (int firstRow,int firstColumn,int lastRow,int lastColumn) method. Detailed steps are listed below.
- Create a Workbook instance.
- Load a sample Excel document using Workbook.loadFromFile() method.
- Get a specific worksheet of the document using Workbook.getWorksheets().get() method.
- Create a BufferedImage instance.
- Convert a specific cell range to the ButteredImage object using Worksheet.toImage () method.
- Save the BufferedImage object to a .png image.
- Java
import com.spire.xls.Workbook;
import com.spire.xls.Worksheet;
import javax.imageio.ImageIO;
import java.awt.image.BufferedImage;
import java.io.*;

public class SpecificCellsToImage {
    public static void main(String[] args) throws IOException {

        //Create a workbook instance
        Workbook workbook = new Workbook();
        //Load a sample Excel document
        workbook.loadFromFile("C:\\Users\\Test1\\Desktop\\sample.xlsx");

        //Get the first worksheet
        Worksheet sheet = workbook.getWorksheets().get(0);

        //Convert a specific cell range to the BufferedImage object
        BufferedImage bufferedImage = sheet.toImage(1, 1, 7, 4);
        //Save as a .png image
ImageIO.write(bufferedImage,"PNG",new File("output/specificCellsToImage.png"));
    }
}
Apply for a Temporary License
If you'd like to remove the evaluation message from the generated documents, or to get rid of the function limitations, please request a 30-day trial license for yourself.
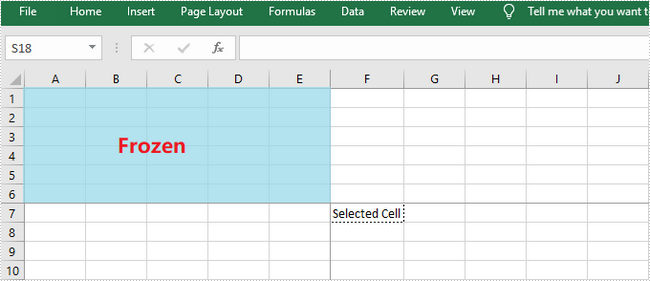
Excel Panes can be frozen to make certain rows or columns visible even when scrolling through the worksheet. This feature is helpful for viewing or editing data in a large worksheet. For example, once the header row is frozen, we can easily find cells in the lower part of the worksheet without having to go back to the top to check the name of the header. This article will introduce how to freeze rows or/and columns in Excel using Spire.XLS for Java.
Spire.XLS for Java provides the Worksheet.freezePanes(int rowIndex, int columnIndex) method to freeze all rows and columns above and left of the selected cell which is specified by the rowIndex and the columnIndex.
This tutorial provides the code examples for the following cases:
Install Spire.XLS for Java
First, you're required to add the Spire.Xls.jar file as a dependency in your Java program. The JAR file can be downloaded from this link. If you use Maven, you can easily import the JAR file in your application by adding the following code to your project's pom.xml file.
<repositories>
    <repository>
        <id>com.e-iceblue</id>
        <name>e-iceblue</name>
        <url>https://repo.e-iceblue.com/nexus/content/groups/public/</url>
    </repository>
</repositories>
<dependencies>
    <dependency>
        <groupId>e-iceblue</groupId>
        <artifactId>spire.xls</artifactId>
        <version>16.6.5</version>
    </dependency>
</dependencies>
Freeze the Top Row
In order to freeze the top row, we should select the cell (2, 1) – "A2" and freeze the row above. The following are the steps to freeze the top row using Spire.XLS for Java.
- Create a Workbook object.
- Load an Excel file using Workbook.loadFromFile() method.
- Get a specific worksheet using Workbook.getWorksheets().get() method.
- Freeze the top row by passing (2, 1) to the Worksheet.freezePanes(int rowIndex, int columnIndex) method as the parameter.
- Save the workbook to another Excel file using Workbook.saveToFile() method.
- Java
import com.spire.xls.ExcelVersion;
import com.spire.xls.Workbook;
import com.spire.xls.Worksheet;

public class FreezeTopRow {

    public static void main(String[] args) {

        //Create a Workbook instance
        Workbook workbook = new Workbook();

        //Load an Excel document
        workbook.loadFromFile("C:\\Users\\Administrator\\Desktop\\sample.xlsx");

        //Get the first worksheet
        Worksheet sheet = workbook.getWorksheets().get(0);

        //Freeze the first row
        sheet.freezePanes(2, 1);

        //Save to another file
        workbook.saveToFile("output/FreezeTopRow.xlsx", ExcelVersion.Version2016);
    }
}

Freeze the First Column
To freeze the first column, we should select the cell (1, 2) – "B1" and freeze the column on the left. The following are the steps to freeze the first column using Spire.XLS for Java.
- Create a Workbook object.
- Load an Excel file using Workbook.loadFromFile() method.
- Get a specific worksheet using Workbook.getWorksheets().get() method.
- Freeze the top row by passing (1, 2) to the Worksheet.freezePanes(int rowIndex, int columnIndex) method as the parameter.
- Save the workbook to another Excel file using Workbook.saveToFile() method.
- Java
import com.spire.xls.ExcelVersion;
import com.spire.xls.Workbook;
import com.spire.xls.Worksheet;

public class FreezeFirstColumn {

    public static void main(String[] args) {

        //Create a Workbook instance
        Workbook workbook = new Workbook();

        //Load an Excel document
        workbook.loadFromFile("C:\\Users\\Administrator\\Desktop\\sample.xlsx");

        //Get the first worksheet
        Worksheet sheet = workbook.getWorksheets().get(0);

        //Freeze the first column
        sheet.freezePanes(1, 2);

        //Save to another file
        workbook.saveToFile("output/FreezeFirstColumn.xlsx", ExcelVersion.Version2016);
    }
}
Freeze the First Row and the First Column
To freeze the first row and the first column, the selected cell should be cell (2, 2) – "B2". The following are the detailed steps.
- Create a Workbook object.
- Load an Excel file using Workbook.loadFromFile() method.
- Get a specific worksheet using Workbook.getWorksheets().get() method.
- Freeze the first row and the first column by passing (2, 2) to the Worksheet.freezePanes(int rowIndex, int columnIndex) method as the parameter.
- Save the workbook to another Excel file using Workbook.saveToFile() method.
- Java
import com.spire.xls.ExcelVersion;
import com.spire.xls.Workbook;
import com.spire.xls.Worksheet;

public class FreezeFirstRowAndFirstColumn {

    public static void main(String[] args) {

        //Create a Workbook instance
        Workbook workbook = new Workbook();

        //Load an Excel document
        workbook.loadFromFile("C:\\Users\\Administrator\\Desktop\\sample.xlsx");

        //Get the first worksheet
        Worksheet sheet = workbook.getWorksheets().get(0);

        //Freeze the first row and the first column
        sheet.freezePanes(2, 2);

        //Save to another file
        workbook.saveToFile("output/FreezeFirstRowAndFirstColumn.xlsx", ExcelVersion.Version2016);
    }
}
Apply for a Temporary License
If you'd like to remove the evaluation message from the generated documents, or to get rid of the function limitations, please request a 30-day trial license for yourself.
Formatting numbers in Excel cells is a critical step when working with spreadsheets, especially in professional or data-driven environments. Proper number formatting ensures that data is presented clearly, consistently, and in a way that aligns with its purpose—whether it's financial data, percentages, dates, or scientific values. When automating Excel tasks using Java, applying the correct number format programmatically can save time, reduce errors, and enhance the readability of reports or dashboards. This article explores how to use Spire.XLS for Java to set number formats in Excel cells, enabling you to create polished and well-structured spreadsheets with ease.
- How to Set Number Formats in Excel with Java
- Add Values in Specified Number Formats to Excel Cells with Java
Install Spire.XLS for Java
First of all, you're required to add the Spire.Xls.jar file as a dependency in your Java program. The JAR file can be downloaded from this link. If you use Maven, you can easily import the JAR file in your application by adding the following code to your project's pom.xml file.
<repositories>
    <repository>
        <id>com.e-iceblue</id>
        <name>e-iceblue</name>
        <url>https://repo.e-iceblue.com/nexus/content/groups/public/</url>
    </repository>
</repositories>
<dependencies>
    <dependency>
        <groupId>e-iceblue</groupId>
        <artifactId>spire.xls</artifactId>
        <version>16.6.5</version>
    </dependency>
</dependencies>
How to Set Number Formats in Excel with Java
Spire.XLS for Java provides the CellRange.setNumberFormat() method, enabling developers to set number formats for cells using Excel's number format codes. The table below highlights commonly used symbols in Excel number format codes and their functions:
| Symbols | Description |
| 0 and # | 0 forces display of digit places, padding with zeros if necessary; # shows digits only when needed. |
| ? | Placeholder for aligning numbers, leaves space but does not display anything if not used. |
| , and . | , serves as a thousands separator and can also indicate division by 1000; . is the decimal point. |
| % | Multiplies the number by 100 and adds a percent sign. |
| E+ / E- | Scientific notation, for positive and negative exponents respectively. |
| Currency ($, €, ¥, etc.) | Displays the respective currency symbol. |
| [Color] | Sets text color (e.g., [Red], [Blue]). |
| @ | Text placeholder, used to represent text in custom formats. |
| Date/Time (yyyy, mmmm, mm, dd, hh, ss, AM/PM) | Represent year, full month name, month, day, hour, minute, second, and 12-hour clock markers respectively. |
The detailed steps for setting number formats of Excel cells with Java are as follows:
- Create a Workbook object to create a new Excel workbook.
- Get the first default worksheet using the Workbook.getWorksheets().get() method.
- Add values using the CellRange.setValue() method or add numeric values using the CellRange.setNumberValue() method.
- Set the number formats using the CellRange.setNumberFormat() method.
- Save the workbook using the Workbook.saveToFile() method.
- Java
import com.spire.xls.*;

public class SetNumberFormat {
    public static void main(String[] args) {
        // Create a new workbook instance
        Workbook workbook = new Workbook();

        // Get the first worksheet
        Worksheet sheet = workbook.getWorksheets().get(0);

        // Add a title
        sheet.getCellRange("B1").setText("NUMBER FORMATTING");
        sheet.getCellRange("B1").getCellStyle().getExcelFont().isBold(true);
        sheet.getCellRange("B1:C1").merge(); // Merge cells B1 and C1
        sheet.getCellRange("B1:C1").setHorizontalAlignment(HorizontalAlignType.Center); // Center align the text

        // Add number format examples and corresponding values
        // Add positive number formats
        addNumberFormatExample(sheet, "B3", "C3", "0", "1234.5678");
        addNumberFormatExample(sheet, "B4", "C4", "0.00", "1234.5678");
        addNumberFormatExample(sheet, "B5", "C5", "#,##0.00", "1234.5678");
        addNumberFormatExample(sheet, "B6", "C6", "$#,##0.00", "1234.5678");

        // Add negative number formats
        addNumberFormatExample(sheet, "B7", "C7", "0;[Red]-0", "-1234.5678");
        addNumberFormatExample(sheet, "B8", "C8", "0.00;[Red]-0.00", "-1234.5678");

        // Add scientific notation and percentage formats
        addNumberFormatExample(sheet, "B9", "C9", "0.00E+00", "1234.5678");
        addNumberFormatExample(sheet, "B10", "C10", "0.00%", "0.5678");

        // Add date and time formats
        addNumberFormatExample(sheet, "B11", "C11", "yyyy-MM-dd", "44930.0"); // Excel date value for 2023-01-01
        addNumberFormatExample(sheet, "B12", "C12", "HH:mm:ss", "0.75"); // Excel time value for 18:00:00

        // Add text format
        addNumberFormatExample(sheet, "B13", "C13", "@", "Text Example");

        // Set the formatting
        sheet.getCellRange("B3:B13").getCellStyle().setKnownColor(ExcelColors.Gray25Percent);
        sheet.getCellRange("C3:C13").getCellStyle().setKnownColor(ExcelColors.Gray50Percent);
        sheet.setColumnWidth(2, 24); // Column B
        sheet.setColumnWidth(3, 24); // Column C

        // Save the workbook to a file
        workbook.saveToFile("output/SetExcelNumberFormat.xlsx", FileFormat.Version2016);
        workbook.dispose();
    }

        /**
        * Adds a number format example to the specified cells in the worksheet.
        *
        * @param sheet        The worksheet to modify.
        * @param textCell     The cell for displaying the number format string.
        * @param valueCell    The cell for displaying the formatted value.
        * @param format       The number format code.
        * @param value        The numeric value to format.
        */
        private static void addNumberFormatExample(Worksheet sheet, String textCell, String valueCell, String format, String value) {
            sheet.getCellRange(textCell).setText(format); // Display the number format code
            sheet.getCellRange(valueCell).setValue(value); // Add the value
            // sheet.getCellRange(valueCell).setNumberValue(Double); //  Or set numeric value with setNumberValue() method
            sheet.getCellRange(valueCell).setNumberFormat(format); // Apply the number format
    }
}

Add Values in Specified Number Formats to Excel Cells with Java
Spire.XLS for Java also supports directly adding data with specific number formats to Excel cells with methods under the CellRange class. The following table outlines the methods for adding data with common number formats to cells and their corresponding data types:
| Method | Description |
| setText(String text) | Sets a text value in a cell or range of cells. |
| setNumberValue(double numberValue) | Sets a numeric value in a cell or range of cells. |
| setBooleanValue(boolean booleanValue) | Sets a boolean value (true/false) in a cell or range of cells. |
| setDateTimeValue(java.util.Date dateTime) | Sets a date and time value in a cell or range of cells. |
| setHtmlString(String htmlCode) | Sets an HTML-formatted string in a cell or range of cells. |
The detailed steps for adding values with number formats to Excel cells are as follows:
- Create an instance of the Workbook class.
- Get the first worksheet using the Workbook.getWorksheets().get() method.
- Get a cell or cell range using the Worksheet.getCellRange() method.
- Add values in specific number formats using the methods under the CellRange class.
- Set the cell styles as needed.
- Save the workbook using the Workbook.saveToFile() method.
- Java
import com.spire.xls.*;
import java.util.Calendar;
import java.util.Date;
public class AddFormattedDataExcel {
public static void main(String[] args) {
// Create a new workbook instance
Workbook workbook = new Workbook();
// Get the first worksheet
Worksheet sheet = workbook.getWorksheets().get(0);
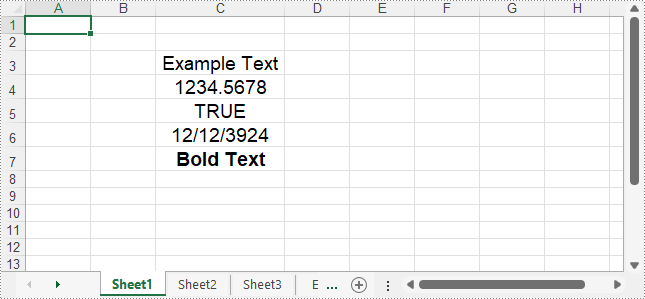
// Add a text value
sheet.getCellRange("C3").setText("Example Text");
// Add number value
sheet.getCellRange("C4").setNumberValue(1234.5678);
// Add boolean value
sheet.getCellRange("C5").setBooleanValue(true);
// Add date time value
sheet.getCellRange("C6").setDateTimeValue(new Date(2024, Calendar.DECEMBER, 12));
// Add HTML string
sheet.getCellRange("C7").setHtmlString("Bold Text");
// Format the cells
sheet.getCellRange("C3:C7").setHorizontalAlignment(HorizontalAlignType.Center);
sheet.getCellRange("C3:C7").setVerticalAlignment(VerticalAlignType.Center);
sheet.getCellRange("C3:C7").getCellStyle().getExcelFont().setSize(14);
for (int i = 3; i <= 7; i++) {
sheet.autoFitColumn(i);
}
// Save the workbook
workbook.saveToFile("output/AddFormattedDataExcel.xlsx", FileFormat.Version2016);
workbook.dispose();
}
}
Apply for a Temporary License
If you'd like to remove the evaluation message from the generated documents, or to get rid of the function limitations, please request a 30-day trial license for yourself.
Java: Apply Color to Alternate Rows in Excel Using Conditional Formatting
2022-09-14 07:45:00 Written by KoohjiApplying different background colors to alternate rows of Excel can improve the readability of data and make the spreadsheet appear more professional. There many ways to set row color, among which using conditional formatting is a good choice. It can not only set colors in batches, but also define more flexible rules, such as alternating every three rows. In this article, you will learn how to alternate row color in Excel using conditional formatting using Spire.XLS for Java.
Install Spire.XLS for Java
First, you're required to add the Spire.Xls.jar file as a dependency in your Java program. The JAR file can be downloaded from this link. If you use Maven, you can easily import the JAR file in your application by adding the following code to your project's pom.xml file.
<repositories>
    <repository>
        <id>com.e-iceblue</id>
        <name>e-iceblue</name>
        <url>https://repo.e-iceblue.com/nexus/content/groups/public/</url>
    </repository>
</repositories>
<dependencies>
    <dependency>
        <groupId>e-iceblue</groupId>
        <artifactId>spire.xls</artifactId>
        <version>16.6.5</version>
    </dependency>
</dependencies>
Apply Color to Alternate Rows in Excel Using Conditional Formatting
The following are the steps to add color to alternative rows in Excel using Spire.XLS for Java.
- Create a Workbook object.
- Load an Excel file using Workbook.loadFromFile() method.
- Get a specific worksheet from the workbook using Workbook.getWorsheets().get(index) method.
- Add a conditional formatting to the worksheet using Worksheet.getConditionalFormats().add() method and return an object of XlsConditionalFormats class.
- Set the cell range where the conditional formatting will be applied using XlsConditionalFormats.addRange() method.
- Add a condition using XlsConditionalFormats.addCondition() method, then set the conditional formula and the cell color of even rows.
- Add another condition to change the format of the cells of odd rows.
- Save the workbook to an Excel file using Workbook.saveToFile() method.
- Java
import com.spire.xls.ConditionalFormatType;
import com.spire.xls.ExcelVersion;
import com.spire.xls.Workbook;
import com.spire.xls.Worksheet;
import com.spire.xls.core.IConditionalFormat;
import com.spire.xls.core.spreadsheet.collections.XlsConditionalFormats;
import java.awt.*;
public class AlternateRowColors {
public static void main(String[] args) {
//Create a Workbook object
Workbook workbook = new Workbook();
//Load an Excel file
workbook.loadFromFile("C:\\Users\\Administrator\\Desktop\\sample.xlsx");
//Get the first worksheet
Worksheet sheet = workbook.getWorksheets().get(0);
//Add a conditional format to the worksheet
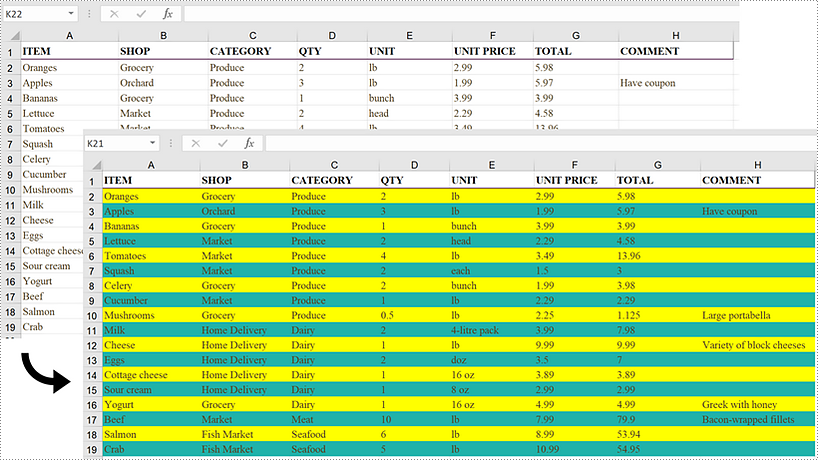
XlsConditionalFormats format = sheet.getConditionalFormats().add();
//Set the range where the conditional format will be applied
format.addRange(sheet.getRange().get(2,1,sheet.getLastRow(),sheet.getLastColumn()));
//Add a condition to change the format of the cells based on formula
IConditionalFormat condition1 = format.addCondition();
condition1.setFirstFormula("=MOD(ROW(),2)=0");
condition1.setFormatType(ConditionalFormatType.Formula);
condition1.setBackColor(Color.YELLOW);
//Add another condition to change the format of the cells based on formula
IConditionalFormat condition2 = format.addCondition();
condition2.setFirstFormula("=MOD(ROW(),2)=1");
condition2.setFormatType(ConditionalFormatType.Formula);
condition2.setBackColor(new Color(32,178, 170));
//Save the workbook to an Excel file
workbook.saveToFile("output/AlternateRowColors.xlsx", ExcelVersion.Version2016);
}
}
Apply for a Temporary License
If you'd like to remove the evaluation message from the generated documents, or to get rid of the function limitations, please request a 30-day trial license for yourself.
In Excel, the border is a line around a cell or a range of cells. Adding cell borders can help distinguish different sections, highlight summarized values, or separate specific data in a worksheet. In this article, you will learn how to add borders with different line styles and colors to Excel cells using Spire.XLS for Java.
Install Spire.XLS for Java
First, you're required to add the Spire.Xls.jar file as a dependency in your Java program. The JAR file can be downloaded from this link. If you use Maven, you can easily import the JAR file in your application by adding the following code to your project's pom.xml file.
<repositories>
    <repository>
        <id>com.e-iceblue</id>
        <name>e-iceblue</name>
        <url>https://repo.e-iceblue.com/nexus/content/groups/public/</url>
    </repository>
</repositories>
<dependencies>
    <dependency>
        <groupId>e-iceblue</groupId>
        <artifactId>spire.xls</artifactId>
        <version>16.6.5</version>
    </dependency>
</dependencies>
Add Cell Borders in Excel
Spire.XLS for Java provides the CellRange.borderInside() and CellRange.borderAround() methods to add inside and around borders to a specified cell range. To add top, bottom, left, right and diagonal borders, you can use the BordersCollection.getByBordersLineType(BordersLineType index).setLineStyle (LineStyleType lineStyleType) method. The detailed steps are as follows.
- Create a Workbook instance.
- Load a sample Excel document using Workbook.loadFromFile() method.
- Get a specified worksheet using Workbook.getWorksheets().get() method.
- Get a specified cell range using Worksheet.getCellRange() method.
- Add inside and around borders with specific line styles and colors to the specified range using CellRange.borderInside(LineStyleType borderLine, Color borderColor) and CellRange.borderAround (LineStyleType borderLine, Color borderColor) methods.
- Get a borders collection that represents the borders of the specified cell range using CellRange.getBorders() method.
- Set the border line style and color for the specified range using BordersCollection.setLineStyle() and BordersCollection.setColor() methods.
- Set the diagonal border line style for the specified range using BordersCollection.getByBordersLineType(BordersLineType index).setLineStyle (LineStyleType lineStyleType) method.
- Save the document to another file using Workbook.saveToFile() method.
- Java
import com.spire.xls.*;
import java.awt.*;
public class AddBorders {
public static void main(String[] args){
//Create a workbook instance
Workbook workbook = new Workbook();
//Load a sample Excel document
workbook.loadFromFile("D:\\Files\\Input.xlsx");
//Get the first worksheet
Worksheet sheet = workbook.getWorksheets().get(0);
//Add border to range "B2:F9"
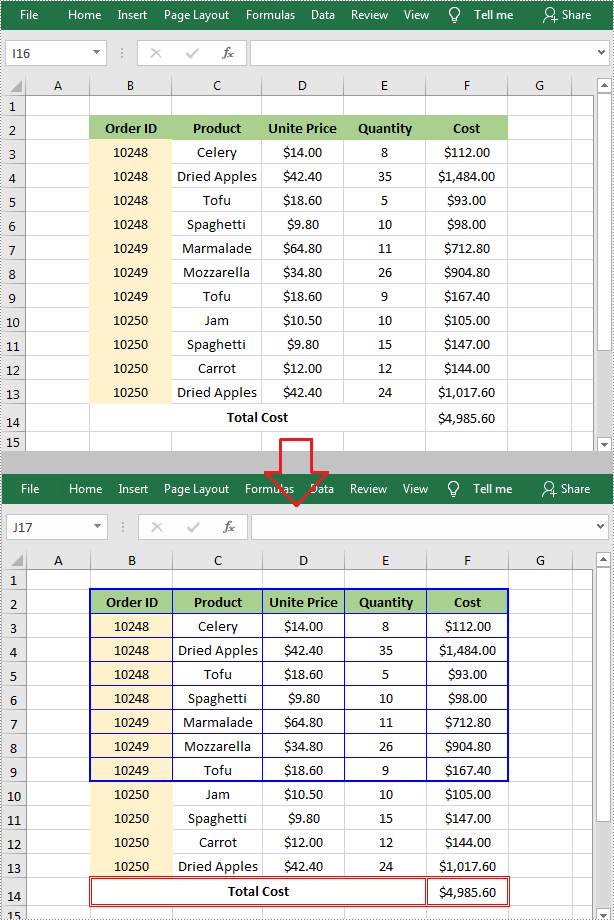
CellRange range1= sheet.getCellRange("B2:F9");
range1.borderInside(LineStyleType.Thin, Color.BLUE);
range1.borderAround(LineStyleType.Medium, Color.BLUE);
//Add border to range "B14:F14"
CellRange range2= sheet.getCellRange("B14:F14");
range2.getBorders().setLineStyle(LineStyleType.Double);
range2.getBorders().setColor(Color.RED);
//Set the diagonal border line style for range "B14:F14"
range2.getBorders().getByBordersLineType(BordersLineType.DiagonalDown).setLineStyle(LineStyleType.None);
range2.getBorders().getByBordersLineType(BordersLineType.DiagonalUp).setLineStyle(LineStyleType.None);
//Save the file
workbook.saveToFile("SetBorder.xlsx", ExcelVersion.Version2010);
}
}
Apply for a Temporary License
If you'd like to remove the evaluation message from the generated documents, or to get rid of the function limitations, please request a 30-day trial license for yourself.
Consistent text alignment and orientation throughout an Excel worksheet create a sense of order and professionalism. It makes the data presentation more organized and aesthetically pleasing, which is especially important when sharing a spreadsheet with others or presenting to clients. A well-designed worksheet with proper text formatting can leave a good impression and facilitate data reading and analyzing. In this article, you will learn how to set text alignment and orientation in Excel cells in Java using Spire.XLS for Java.
Install Spire.XLS for Java
First of all, you're required to add the Spire.Xls.jar file as a dependency in your Java program. The JAR file can be downloaded from this link. If you use Maven, you can easily import the JAR file in your application by adding the following code to your project's pom.xml file.
<repositories>
    <repository>
        <id>com.e-iceblue</id>
        <name>e-iceblue</name>
        <url>https://repo.e-iceblue.com/nexus/content/groups/public/</url>
    </repository>
</repositories>
<dependencies>
    <dependency>
        <groupId>e-iceblue</groupId>
        <artifactId>spire.xls</artifactId>
        <version>16.6.5</version>
    </dependency>
</dependencies>
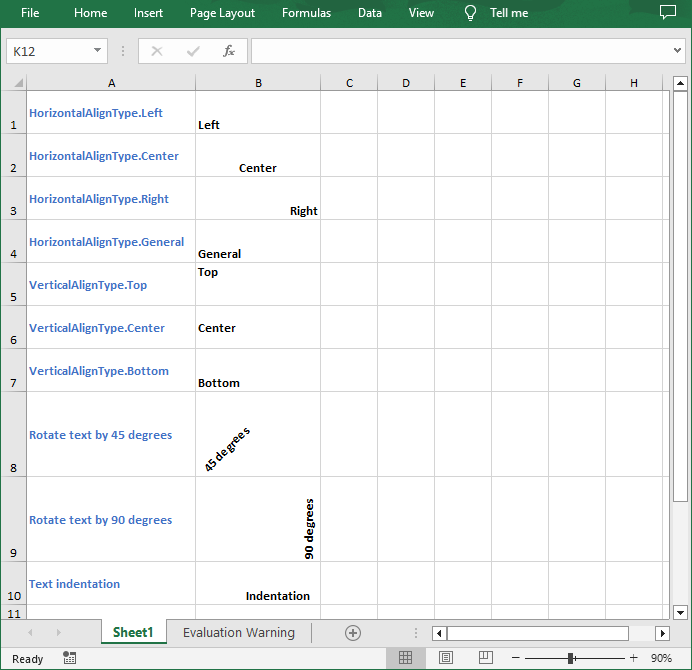
Set Text Alignment and Orientation in Excel in Java
The CellRange.getCellStyle().setHorizontalAlignment() and CellRange.getCellStyle().setVerticalAlignment() methods allows you to set the horizontal and vertical alignment of text in an Excel cell or cell range. To change the orientation of text, you can use the CellRange.getCellStyle().setRotation(int rotation) method. The following are the detailed steps.
- Create a Workbook object.
- Load an Excel file using Workbook.loadFromFile() method.
- Get a specified worksheet using Workbook.getWorksheets().get() method.
- Get a specified cell using Worksheet.getCellRange() method.
- Set the horizontal alignment of text in specified cell using CellRange.getCellStyle().setHorizontalAlignment() method.
- Set the vertical alignment of text in specified cell using CellRange.getCellStyle().setVerticalAlignment() method.
- Rotate the text in specific cell to a desired degree using CellRange.getCellStyle().setRotation() method.
- Set the indentation of text in specific cell using CellRange.getCellStyle().setIndentLevel() method.
- Save the result document using Workbook.saveToFile() method.
- Java
import com.spire.xls.*;

public class AlignText {
    public static void main(String[] args){
        // Create a Workbook object
        Workbook workbook = new Workbook();

        // Load an Excel file
        workbook.loadFromFile("Text.xlsx");

        // Get the first worksheet
        Worksheet sheet = workbook.getWorksheets().get(0);

        // Set the horizontal alignment of text in a specified cell to Left
        sheet.getCellRange("B1").getCellStyle().setHorizontalAlignment(HorizontalAlignType.Left);

        // Set the horizontal alignment of text in a specified cell to Center
        sheet.getCellRange("B2").getCellStyle().setHorizontalAlignment(HorizontalAlignType.Center);

        // Set the horizontal alignment of text in a specified cell to Right
        sheet.getCellRange("B3").getCellStyle().setHorizontalAlignment(HorizontalAlignType.Right);

        // Set the horizontal alignment of text in a specified cell to General
        sheet.getCellRange("B4").getCellStyle().setHorizontalAlignment(HorizontalAlignType.General);

        // Set the vertical alignment of text in a specified cell to Top
        sheet.getCellRange("B5").getCellStyle().setVerticalAlignment(VerticalAlignType.Top);

        // Set the vertical alignment of text in a specified cell to Center
        sheet.getCellRange("B6").getCellStyle().setVerticalAlignment(VerticalAlignType.Center);

        // Set the vertical alignment of text in a specified cell to Bottom
        sheet.getCellRange("B7").getCellStyle().setVerticalAlignment(VerticalAlignType.Bottom);

        // Rotate the text to specified degrees
        sheet.getCellRange("B8").getCellStyle().setRotation(45);
        sheet.getCellRange("B9").getCellStyle().setRotation(90);

        // Set the text indentation
        sheet.getCellRange("B10").getCellStyle().setIndentLevel(6);

        // Save the result file
        workbook.saveToFile("TextAlignment.xlsx", ExcelVersion.Version2016);
    }
}
Get a Free License
To fully experience the capabilities of Spire.XLS for Java without any evaluation limitations, you can request a free 30-day trial license.
We have already demonstrated how to protect the Excel file in Java; this article will show you how to unprotect the Excel workbook or a single worksheet in Java applications.
Unprotect the Excel workbook:
import com.spire.xls.*;

public class UnprotectExcel {
    public static void main(String[] args) {

        //Create a workbook
        Workbook workbook = new Workbook();

        //Use the password to open the sample document
        workbook.setOpenPassword("E-iceblue");
        workbook.loadFromFile("ProtectWorkbook.xlsx");

        //Unprotect the whole workbook
        workbook.unProtect();

        //Save the document to file
        workbook.saveToFile("UnprotectWb.xlsx");
        workbook.dispose();
    }
}
Unprotect a single Excel worksheet:
import com.spire.xls.*;

public class UnprotectExcel {
    public static void main(String[] args) {

        //Create a workbook and load a sample file with protected worksheet
        Workbook workbook = new Workbook();
        workbook.loadFromFile("ProtectWS.xlsx");

        //Get the first worksheet
        Worksheet sheet = workbook.getWorksheets().get(0);

        //Unprotect the first worksheet
        sheet.unprotect("iceblue");

        //Save the document to file
        workbook.saveToFile("Unprotectworksheet.xlsx");
        workbook.dispose();
    }
}
As you create or review a worksheet, you may want to change the font style in some cells to make them stand out. For example, you can apply a different font type, font color, and font size to text, as well as make text bold. In this article, you will learn how to apply font styles to Excel cells using Spire.XLS for Java.
Install Spire.XLS for Java
First of all, you’re required to add the Spire.Xls.jar file as a dependency in your Java program. The JAR file can be downloaded from this link. If you use Maven, you can easily import the JAR file in your application by adding the following code to your project's pom.xml file.
<repositories>
    <repository>
        <id>com.e-iceblue</id>
        <name>e-iceblue</name>
        <url>https://repo.e-iceblue.com/nexus/content/groups/public/</url>
    </repository>
</repositories>
<dependencies>
    <dependency>
        <groupId>e-iceblue</groupId>
        <artifactId>spire.xls</artifactId>
        <version>16.6.5</version>
    </dependency>
</dependencies>
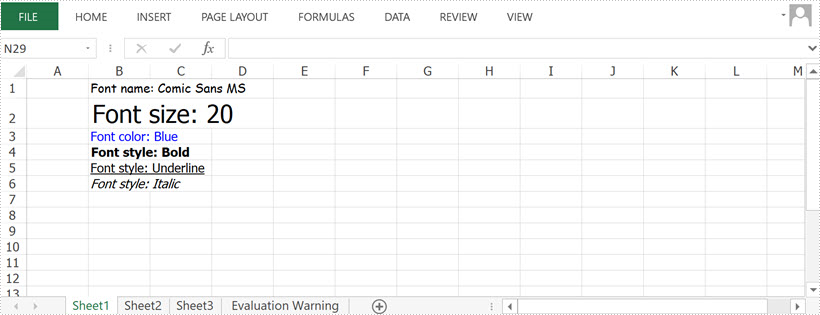
Apply Different Fonts to Different Cells
Spire.XLS provides the ExcelFont class which you can use to set or change the font name, color, size, and style in a cell easily. The following are the steps to apply a font style to a specific cell using Spire.XLS for Java.
- Create a Workbook object.
- Get a specific worksheet using Workbook.getWorksheets().get() method.
- Get a specific cell using Worksheet.getCellRange() method.
- Set the value of the cell using CellRange.setText() method.
- Set the font name, color, size and style of the cell value using setFontName(), setFontColor(), setFontSize(), isBlod() methods under the ExcelFont object.
- Save the workbook to an Excel file using Workbook.saveToFile() method.
- Java
import com.spire.xls.ExcelVersion;
import com.spire.xls.FontUnderlineType;
import com.spire.xls.Workbook;
import com.spire.xls.Worksheet;

import java.awt.*;

public class ApplyFontToCell {

    public static void main(String[] args) {

        //Create a workbook
        Workbook workbook = new Workbook();

        //Get the first sheet
        Worksheet sheet = workbook.getWorksheets().get(0);

        //Set font name
        sheet.getCellRange("B1").setText("Font name: Comic Sans MS");
        sheet.getCellRange("B1").getCellStyle().getExcelFont().setFontName("Comic Sans MS");

        //Set font size
        sheet.getCellRange("B2").setText("Font size: 20");
        sheet.getCellRange("B2").getCellStyle().getExcelFont().setSize(20);

        //Set font color
        sheet.getCellRange("B3").setText("Font color: Blue");
        sheet.getCellRange("B3").getCellStyle().getExcelFont().setColor(Color.blue);

        //Make text bold
        sheet.getCellRange("B4").setText("Font style: Bold");
        sheet.getCellRange("B4").getCellStyle().getExcelFont().isBold(true);

        //Make text italic
        sheet.getCellRange("B5").setText("Font style: Italic");
        sheet.getCellRange("B5").getCellStyle().getExcelFont().isItalic(true);

        //Underline text
        sheet.getCellRange("B6").setText("Font style: Underline");
        sheet.getCellRange("B6").getCellStyle().getExcelFont().setUnderline(FontUnderlineType.Single);

        //Strikethrough text
        sheet.getCellRange("B7").setText("Font style: Strikethrough");
        sheet.getCellRange("B7").getCellStyle().getExcelFont().isStrikethrough(true);

        //Save the result file
        workbook.saveToFile("output/ApplyFontToCell.xlsx", ExcelVersion.Version2016);
    }
}
Apply Multiple Fonts to a Single Cell
Mixing different font styles can help you emphasize some specific characters in a cell. The following are the steps to apply multiple fonts in a cell using Spire.XLS for Java.
- Create a Workbook object.
- Get a specific worksheet using Workbook.getWorksheets().get() method.
- Create two ExcelFont objects using Workbook.createFont() method.
- Get a specific cell using Worksheet.getCellRange() method, and set the rich text content of the cell using CellRange.getRichText().setText() method.
- Apply the two ExcelFont objects to the rich text using RichText.setFont() method.
- Save the workbook to an Excel file using Workbook.saveToFile() method.
- Java
import com.spire.xls.*;

import java.awt.*;

public class ApplyMultipleFontsToCell {

    public static void main(String[] args) {

        //Create a Workbook instance
        Workbook wb = new Workbook();

        //Get the first worksheet
        Worksheet sheet = wb.getWorksheets().get(0);

        //Create one Excel font
        ExcelFont font1 = wb.createFont();
        font1.setFontName("Arial Black");
        font1.setColor(Color.blue);
        font1.setSize(13f);
        font1.isBold(true);

        //Create another Excel font
        ExcelFont font2 = wb.createFont();
        font2.setFontName("Algerian");
        font2.setColor(Color.red);
        font2.setSize(15f);
        font2.isBold(true);
        font2.isItalic(true);

        //Insert text to cell B5
        RichText richText = sheet.getCellRange("B5").getRichText();
        richText.setText("Buy One, Get One Free");

        //Apply two fonts to the text in the cell B5
        richText.setFont(0, 8, font1);
        richText.setFont(9, 21, font2);

        //Save the document
        wb.saveToFile("output/ApplyMultipleFontsToCell.xlsx", ExcelVersion.Version2016);
    }
}

Apply for a Temporary License
If you'd like to remove the evaluation message from the generated documents, or to get rid of the function limitations, please request a 30-day trial license for yourself.
