Python: Rotate PDF Pages
If you receive or download a PDF file and find that some of the pages are displayed in the wrong orientation (e.g., sideways or upside down), rotating the PDF file allows you to correct the page orientation for easier reading and viewing. This article will demonstrate how to programmatically rotate PDF pages using Spire.PDF for Python.
Install Spire.PDF for Python
This scenario requires Spire.PDF for Python and plum-dispatch v1.7.4. They can be easily installed in your Windows through the following pip command.
pip install Spire.PDF
If you are unsure how to install, please refer to this tutorial: How to Install Spire.PDF for Python on Windows
Rotate a Specific Page in PDF in Python
Rotation is based on 90-degree increments. You can rotate a PDF page by 0/90/180/270 degrees. The following are the steps to rotate a PDF page:
- Create a PdfDocument object.
- Load a PDF document using PdfDocument.LoadFromFile() method.
- Get a specified page using PdfDocument.Pages[pageIndex] property.
- Get the original rotation angle of the page using PdfPageBase.Rotation.value property.
- Increase the original rotation angle by desired degrees.
- Apply the new rotation angle to the page using PdfPageBase.Rotation property
- Save the result document using PdfDocument.SaveToFile() method.
- Python
from spire.pdf.common import *
from spire.pdf import *

# Create a PdfDocument object
pdf = PdfDocument()

# Load a PDF document
pdf.LoadFromFile("Sample.pdf")

# Get the first page
page = doc.Pages.get_Item(0)

# Get the original rotation angle of the page
rotation = int(page.Rotation.value)

# Rotate the page 180 degrees clockwise based on the original rotation angle
rotation += int(PdfPageRotateAngle.RotateAngle180.value)
page.Rotation = PdfPageRotateAngle(rotation)

# Save the result document
pdf.SaveToFile("RotatePDFPage.pdf")
pdf.Close()
Rotate All Pages in PDF in Python
Spire.PDF for Python also allows you to loop through each page in a PDF file and then rotate them all. The following are the detailed steps.
- Create a PdfDocument object.
- Load a PDF document using PdfDocument.LoadFromFile() method.
- Loop through each page in the document.
- Get the original rotation angle of the page using PdfPageBase.Rotation.value property.
- Increase the original rotation angle by desired degrees.
- Apply the new rotation angle to the page using PdfPageBase.Rotation property.
- Save the result document using PdfDocument.SaveToFile() method.
- Python
from spire.pdf.common import *
from spire.pdf import *

# Create a PdfDocument object
pdf = PdfDocument()

# Load a PDF document
pdf.LoadFromFile("Input.pdf")

# Loop through each page in the document
for i in range(pdf.Pages.Count):
    page = pdf.Pages.get_Item(i)

    # Get the original rotation angle of the page
    rotation = int(page.Rotation.value)

    # Rotate the page 180 degrees clockwise based on the original rotation angle
    rotation += int(PdfPageRotateAngle.RotateAngle180.value)
    page.Rotation = PdfPageRotateAngle(rotation)

# Save the result document
pdf.SaveToFile("RotatePDF.pdf")
pdf.Close()
Apply for a Temporary License
If you'd like to remove the evaluation message from the generated documents, or to get rid of the function limitations, please request a 30-day trial license for yourself.
Convert PDF to Images in Python (PNG, JPG, BMP, SVG, TIFF)

Converting PDF files to images in Python is a common need for developers and professionals working with digital documents. Whether you want to generate thumbnails, create previews, extract specific content areas, or prepare files for printing, transforming a PDF into image formats gives you flexibility and compatibility across platforms.
This comprehensive guide demonstrates how to convert PDF files into popular image formats—such as PNG, JPG, BMP, SVG, and TIFF—in Python, using practical, easy-to-follow code examples.
Table of Contents
- Why Convert PDF to Image
- Python PDF-to-Image Converter Library
- Simple PDF to PNG, JPG, and BMP Conversion
- Advanced Conversion Options
- Generate Multi-Page TIFF from PDF
- Export PDF as SVG
- Conclusion
- FAQs
Why Convert PDF to Image?
Converting PDF to image formats offers several benefits:
- Cross-platform compatibility: Images are easier to embed in web pages, mobile apps, or presentations.
- Preview and thumbnail generation: Quickly create page snapshots without rendering the full PDF.
- Selective content extraction: Save specific areas of a PDF as images for focused analysis or reuse.
- Simplified sharing: Images can be easily emailed, uploaded, or displayed without special PDF readers.
Python PDF-to-Image Converter Library
Spire.PDF for Python is a powerful and easy-to-use library designed for handling PDF files. It enables developers to convert PDF pages into multiple image formats like PNG, JPG, BMP, SVG, and TIFF with excellent quality and performance.
Installation
You can easily install the library using pip. Simply open your terminal and run the following command:
pip install Spire.PDF
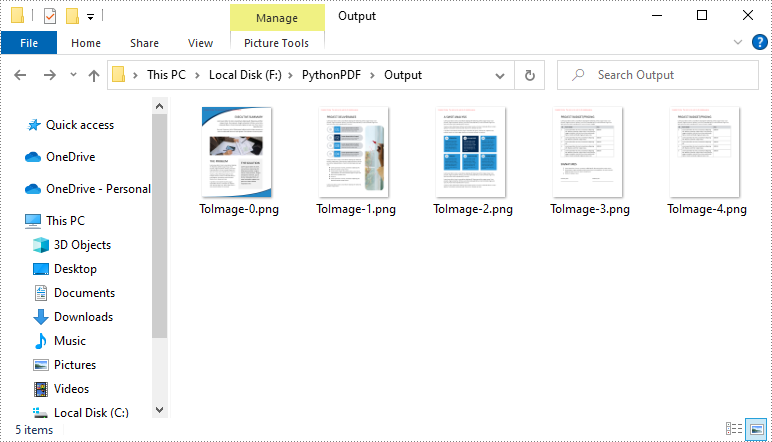
Simple PDF to PNG, JPG, and BMP Conversion
The SaveAsImage method of the PdfDocument class allows you to render each page of a PDF into an image format of your choice.
The code example below demonstrates how to load a PDF file, iterate through its pages, and save each one as a PNG image. You can easily adjust the file format to JPG or BMP by changing the file extension.
from spire.pdf import *

# Load the PDF file
pdf = PdfDocument()
pdf.LoadFromFile("template.pdf")

# Loop through pages and save as images
for i in range(pdf.Pages.Count):
    # Convert each page to image
    with pdf.SaveAsImage(i) as image:

        # Save in different formats as needed
        image.Save(f"Output/ToImage_{i}.png")
        # image.Save(f"Output/ToImage_{i}.jpg")
        # image.Save(f"Output/ToImage_{i}.bmp")

# Close the PDF document
pdf.Close()
Advanced Conversion Options
Enable Transparent Image Background
Transparent backgrounds help integrate images seamlessly into designs, avoiding unwanted borders or background colors.
To enable a transparent background during PDF-to-image conversion in Python, use the SetPdfToImageOptions() method with an alpha value of 0. This setting ensures that the background of the output image is fully transparent.
The following example demonstrates how to export each PDF page as a transparent PNG image.
from spire.pdf import *

# Load PDF document from file
pdf = PdfDocument()
pdf.LoadFromFile("template.pdf")

# Set the transparent value of the image's background to 0
pdf.ConvertOptions.SetPdfToImageOptions(0)

# Loop through all pages and save each as an image
for i in range(pdf.Pages.Count):
    # Convert each page to an image
    with pdf.SaveAsImage(i) as image:
        # Save the image to the output directory
        image.Save(f"Output/ToImage_{i}_transparent.png")

# Close the PDF document
pdf.Close()
Note: Transparency is supported in PNG but not in JPG or BMP formats.
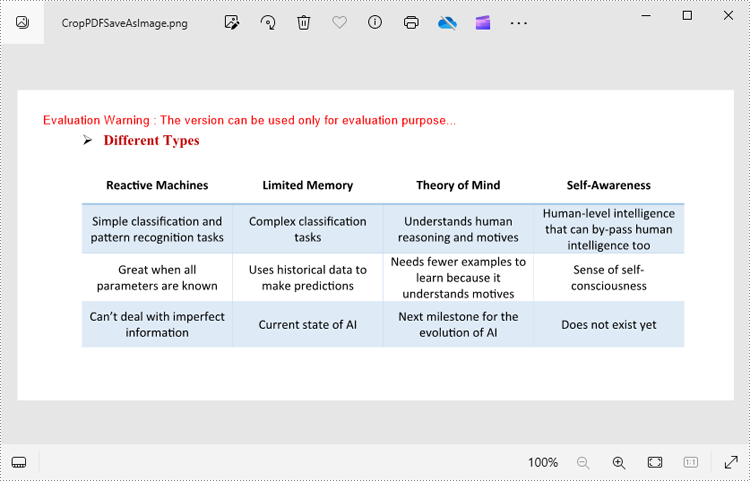
Crop Specific PDF Areas to Image
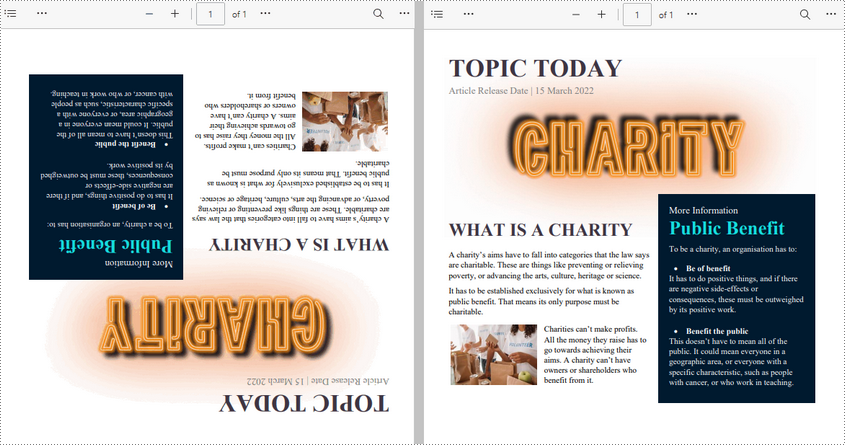
In some cases, you may only need to export a specific area of a PDF page—such as a chart, table, or block of text. This can be done by adjusting the page’s CropBox before rendering.
The CropBox property defines the visible region of the page used for display and printing. By setting it to a specific RectangleF(x, y, width, height) value, you can isolate and export only the desired portion of the content.
The example below demonstrates how to crop a rectangular area on the first page of a PDF and save that section as a PNG image.
from spire.pdf import *

# Load the PDF document from file
pdf = PdfDocument()
pdf.LoadFromFile("Sample.pdf")

# Access the first page of the PDF
page = doc.Pages.get_Item(0)

# Define the crop area of the page using a rectangle (x, y, width, height)
page.CropBox = RectangleF(0.0, 300.0, 600.0, 260.0)

# Convert the cropped page to an image
with pdf.SaveAsImage(0) as image:
    # Save the image to a PNG file
    image.Save("Output/CropPDFSaveAsImage.png")

# Close the PDF document
pdf.Close()
Note: You need to adjust the coordinates based on the location of your target content. Coordinates start from the top-left corner of the page.
Generate Multi-Page TIFF from PDF
The TIFF format supports multi-page documents, making it a popular choice for archival and printing purposes. Although Spire.PDF for Python doesn't natively create multi-page TIFFs, you can render individual pages as images and then use the Pillow library to merge them into one .tiff file.
Before proceeding, ensure Pillow is installed by running:
pip install Pillow
The following example illustrates how to:
- Load a PDF
- Convert each page to an image
- Combine all images into a single multi-page TIFF
from spire.pdf import *

from PIL import Image
from io import BytesIO

# Load the PDF document from file
pdf = PdfDocument()
pdf.LoadFromFile("Input.pdf")

# Create an empty list to store PIL Images
images = []

# Iterate through all pages in the document
for i in range(pdf.Pages.Count):

    # Convert a specific page to an image stream
    with pdf.SaveAsImage(i) as imageData:

        # Open the image stream as a PIL image
        img = Image.open(BytesIO(imageData.ToArray()))

        # Append the PIL image to list
        images.append(img)

# Save the PIL Images as a multi-page TIFF file
images[0].save("Output/ToTIFF.tiff", save_all=True, append_images=images[1:])

# Dispose resources
pdf.Dispose()
It’s also possible to convert TIFF files back to PDF. For detailed instructions on it, please refer to the tutorial: Python: Convert PDF to TIFF and TIFF to PDF.
Export PDF as SVG
SVG (Scalable Vector Graphics) is an ideal format for content that requires scaling without quality loss, such as charts, vector illustrations, and technical diagrams.
By using the SaveToFile() method with the FileFormat.SVG option, you can export PDF pages as SVG files. This conversion preserves the vector characteristics of the content, making it well-suited for web embedding, responsive design, and further editing in vector graphic tools.
The following example demonstrates how to export an entire PDF document to SVG format.
from spire.pdf import *

# Load the PDF document from file
pdf = PdfDocument()
pdf.LoadFromFile("Example.pdf")

# Save each page of the file to a separate SVG file
pdf.SaveToFile("PdfToSVG/ToSVG.svg", FileFormat.SVG)

# Close the PdfDocument object
pdf.Close()
Note: Each page in the PDF will be saved as a separate SVG file named ToSVG_i.svg, where i is the page number (1-based).
To export specific pages or customize the SVG output size, please refer to our detailed guide: Python: Convert PDF to SVG.
Conclusion
Converting PDF to images in formats like PNG, JPG, BMP, SVG, and TIFF provides flexibility for sharing, displaying, and processing digital documents. With Spire.PDF for Python, you can:
- Export high-quality images from PDFs in various formats
- Crop specific regions for focused content extraction
- Generate multi-page TIFF files for archival purposes
- Create scalable SVG vector graphics for diagrams and charts
By automating PDF to image conversion in Python, you can seamlessly integrate image export into your applications and workflows.
FAQs
Q1: Can I convert a range of pages from a PDF to images?
A1: Yes. You can convert specific pages by specifying their indices in a loop. For example, to export pages 1 to 3:
# Convert only pages 1-3
for i in range(0, 3):  # 0-based index
    with pdf.SaveAsImage(i) as img:
        img.Save(f"page_{i}.png")
Q2: Can I batch convert multiple PDF files to images?
A2: Yes, batch conversion is supported. You can iterate through a list of PDF file paths and convert each one within a loop.
pdf_files = ["a.pdf", "b.pdf", "c.pdf"]
for file in pdf_files:
    pdf = PdfDocument()
    pdf.LoadFromFile(file)
    for i in range(pdf.Pages.Count):
        with pdf.SaveAsImage(i) as img:
            img.Save(f"{file}_page_{i}.png")
Q3: Is it possible to convert password-protected PDFs to images?
A3: Yes, you can convert secured PDFs to images as long as you provide the correct password when loading the PDF document.
pdf = PdfDocument()
pdf.LoadFromFile("protected.pdf", "password")
Q4: Is it possible to extract embedded images from a PDF instead of rendering pages?
A4: Yes. Aside from rendering entire pages, the library also supports extracting images directly from the PDF.
Get a Free License
To fully experience the capabilities of Spire.PDF for Python without any evaluation limitations, you can request a free 30-day trial license.
Python: Add or Delete Table Rows and Columns in Word
Adding or removing rows and columns in a Word table allows you to adjust the table's structure to accommodate your data effectively. By adding rows and columns, you can effortlessly expand the table as your data grows, ensuring that all relevant information is captured and displayed in a comprehensive manner. On the other hand, removing unnecessary rows and columns allows you to streamline the table, eliminating any redundant or extraneous data that may clutter the document. In this article, we will demonstrate how to add or delete table rows and columns in Word in Python using Spire.Doc for Python.
- Add or Insert a Row into a Word Table in Python
- Add or Insert a Column into a Word Table in Python
- Delete a Row from a Word Table in Python
- Delete a Column from a Word Table in Python
Install Spire.Doc for Python
This scenario requires Spire.Doc for Python and plum-dispatch v1.7.4. They can be easily installed in your Windows through the following pip command.
pip install Spire.Doc
If you are unsure how to install, please refer to this tutorial: How to Install Spire.Doc for Python on Windows
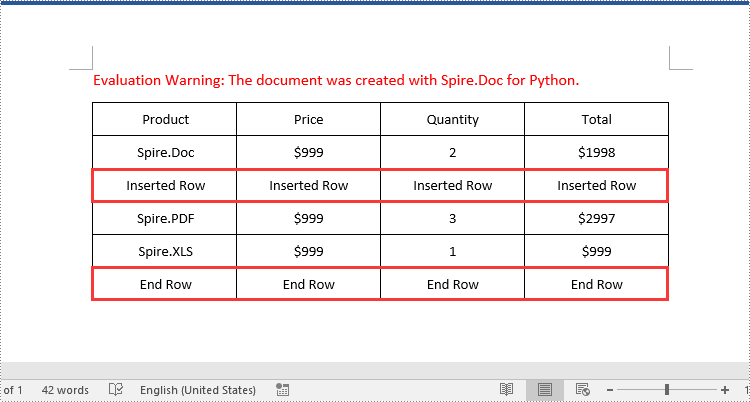
Add or Insert a Row into a Word Table in Python
You can add a row to the end of a Word table or insert a row at a specific location of a Word table using the Table.AddRow() or Table.InsertRow() method. The following are the detailed steps:
- Create a Document object.
- Load a Word document using Document.LoadFromFile() method.
- Get the first section of the document using Document.Sections[] property.
- Get the first table of the section using Section.Tables[] property.
- Insert a row at a specific location of the table using Table.Rows.Insert() method.
- Add data to the newly inserted row.
- Add a row to the end of the table using Table.AddRow() method.
- Add data to the newly added row.
- Save the resulting document using Document.SaveToFile() method.
- Python
from spire.doc import *
from spire.doc.common import *

# Create a Document object
document = Document()
# Load a Word document
document.LoadFromFile("Table1.docx")

# Get the first section of the document
section = document.Sections.get_Item(0)

# Get the first table of the first section
table = section.Tables.get_Item(0) if isinstance(section.Tables.get_Item(0), Table) else None

# Insert a row into the table as the third row
table.Rows.Insert(2, table.AddRow())
# Get the inserted row
insertedRow = table.Rows[2]
# Add data to the row
for i in range(insertedRow.Cells.Count):
    cell = insertedRow.Cells[i]
    paragraph = cell.AddParagraph()
    paragraph.AppendText("Inserted Row")
    paragraph.Format.HorizontalAlignment = HorizontalAlignment.Center
    cell.CellFormat.VerticalAlignment = VerticalAlignment.Middle

# Add a row at the end of the table
addedRow = table.AddRow()
# Add data to the row
for i in range(addedRow.Cells.Count):
    cell = addedRow.Cells[i]
    paragraph = cell.AddParagraph()
    paragraph.AppendText("End Row")
    paragraph.Format.HorizontalAlignment = HorizontalAlignment.Center
    cell.CellFormat.VerticalAlignment = VerticalAlignment.Middle

# Save the resulting document
document.SaveToFile("AddRows.docx", FileFormat.Docx2016)
document.Close()
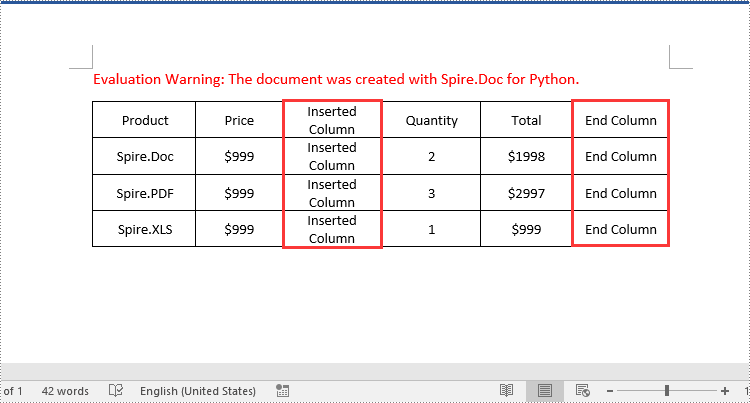
Add or Insert a Column into a Word Table in Python
Spire.Doc for Python doesn't offer a direct method to add or insert a column into a Word table. But you can achieve this by adding or inserting cells at a specific location of each table row using TableRow.Cells.Add() or TableRow.Cells.Insert() method. The detailed steps are as follows:
- Create a Document object.
- Load a Word document using Document.LoadFromFile() method.
- Get the first section of the document using Document.Sections[] property.
- Get the first table of the section using Section.Tables[] property.
- Loop through each row of the table.
- Create a TableCell object, then insert it at a specific location of each row using TableRow.Cells.Insert() method and set cell width.
- Add data to the cell and set text alignment.
- Add a cell to the end of each row using TableRow.AddCell() method and set cell width.
- Add data to the cell and set text alignment.
- Save the resulting document using Document.SaveToFile() method.
- Python
from spire.doc import *
from spire.doc.common import *

# Create a Document object
document = Document()
# Load a Word document
document.LoadFromFile("Table1.docx")

# Get the first section of the document
section = document.Sections.get_Item(0)

# Get the first table of the first section
table = section.Tables.get_Item(0) if isinstance(section.Tables.get_Item(0), Table) else None

# Loop through the rows of the table
for i in range(table.Rows.Count):
    row = table.Rows.get_Item(i)
    # Create a TableCell object
    cell = TableCell(document)
    # Insert the cell as the third cell of the row and set cell width
    row.Cells.Insert(2, cell)
    cell.Width = row.Cells[0].Width
    # Add data to the cell
    paragraph = cell.AddParagraph()
    paragraph.AppendText("Inserted Column")
    # Set text alignment
    paragraph.Format.HorizontalAlignment = HorizontalAlignment.Center
    cell.CellFormat.VerticalAlignment = VerticalAlignment.Middle

    # Add a cell to the end of the row and set cell width
    cell = row.AddCell()
    cell.Width = row.Cells[1].Width
    # Add data to the cell
    paragraph = cell.AddParagraph()
    paragraph.AppendText("End Column")
    # Set text alignment
    paragraph.Format.HorizontalAlignment = HorizontalAlignment.Center
    cell.CellFormat.VerticalAlignment = VerticalAlignment.Middle

# Save the resulting document
document.SaveToFile("AddColumns.docx", FileFormat.Docx2016)
document.Close()
Delete a Row from a Word Table in Python
To delete a specific row from a Word table, you can use the Table.Rows.RemoveAt() method. The detailed steps are as follows:
- Create a Document object.
- Load a Word document using Document.LoadFromFile() method.
- Get the first section of the document using Document.Sections[] property.
- Get the first table of the section using Section.Tables[] property.
- Remove a specific row from the table using Table.Rows.RemoveAt() method.
- Save the resulting document using Document.SaveToFile() method.
- Python
from spire.doc import *
from spire.doc.common import *

# Create a Document object
document = Document()
# Load a Word document
document.LoadFromFile("AddRows.docx")

# Get the first section of the document
section = document.Sections.get_Item(0)

# Get the first table of the first section
table = section.Tables.get_Item(0) if isinstance(section.Tables.get_Item(0), Table) else None

# Remove the third row
table.Rows.RemoveAt(2)
# Remove the last row
table.Rows.RemoveAt(table.Rows.Count - 1)

# Save the resulting document
document.SaveToFile("RemoveRows.docx", FileFormat.Docx2016)
document.Close()

Delete a Column from a Word Table in Python
To delete a specific column from a Word table, you need to remove the corresponding cell from each table row using the TableRow.Cells.RemoveAt() method. The detailed steps are as follows:
- Create a Document object.
- Load a Word document using Document.LoadFromFile() method.
- Get the first section of the document using Document.Sections[] property.
- Get the first table of the section using Section.Tables[] property.
- Loop through each row of the table.
- Remove a specific cell from each row using TableRow.Cells.RemoveAt() method.
- Save the resulting document using Document.SaveToFile() method.
- Python
from spire.doc import *
from spire.doc.common import *

# Create a Document object
document = Document()
# Load a Word document
document.LoadFromFile("AddColumns.docx")

# Get the first section of the document
section = document.Sections.get_Item(0)

# Get the first table of the first section
table = section.Tables.get_Item(0) if isinstance(section.Tables.get_Item(0), Table) else None

# Loop through the rows of the table
for i in range(table.Rows.Count):
    row = table.Rows.get_Item(i)
    # Remove the third cell from the row
    row.Cells.RemoveAt(2)
    # Remove the last cell from the row
    row.Cells.RemoveAt(row.Cells.Count - 1)

# Save the resulting document
document.SaveToFile("RemoveColumns.docx", FileFormat.Docx2016)
document.Close()

Apply for a Temporary License
If you'd like to remove the evaluation message from the generated documents, or to get rid of the function limitations, please request a 30-day trial license for yourself.
Python: Hide or Unhide Excel Worksheets
The Excel workbook is a powerful spreadsheet that enables the creation, manipulation, and analysis of data in a variety of ways. One of the useful features that workbooks offer is the ability to hide or unhide worksheets in a workbook. Hiding worksheets can help protect sensitive or confidential information, reduce clutter, or organize data more efficiently. And when users need to re-display the hidden worksheets, they can also unhide them with simple operations. This article is going to explain how to hide or unhide worksheets in Excel workbooks through Python programs using Sprie.XLS for Python.
Install Spire.XLS for Python
This scenario requires Spire.XLS for Python and plum-dispatch v1.7.4. They can be easily installed in your Windows through the following pip command.
pip install Spire.XLS
If you are unsure how to install, please refer to this tutorial: How to Install Spire.XLS for Python on Windows
Hide Excel Worksheets in Python
The Worksheet.Visibility property in Spire.XLS for Python can be used to set the visibility of a worksheet. By assigning WorksheetVisibility.Hidden or WorksheetVisibility.StrongHidden to this property, users can change the visibility of a worksheet to hidden or very hidden (completely not shown in Excel and can only be unhidden through code).
The detailed steps for hiding worksheets are as follows:
- Create an object of Workbook class.
- Load a workbook using Workbook.LoadFromFile() method.
- Change the status of the first worksheet to hidden by assigning WorksheetVisibility.Hidden to the Workbook.Worksheets[].Visibility property.
- Change the status of the second worksheet to very hidden by assigning WorksheetVisibility.StrongHidden to the Workbook.Worksheets[].Visibility property.
- Save the workbook using Workbook.SaveToFile() method.
- Python
from spire.xls import *

# Create an object of Workbook
workbook = Workbook()

# Load an Excel workbook
workbook.LoadFromFile("Sample.xlsx")

# Hide the first worksheet
workbook.Worksheets[0].Visibility = WorksheetVisibility.Hidden

# Change the second worksheet to very hidden
workbook.Worksheets[1].Visibility = WorksheetVisibility.StrongHidden

# Save the workbook
workbook.SaveToFile("output/HideWorksheets.xlsx")
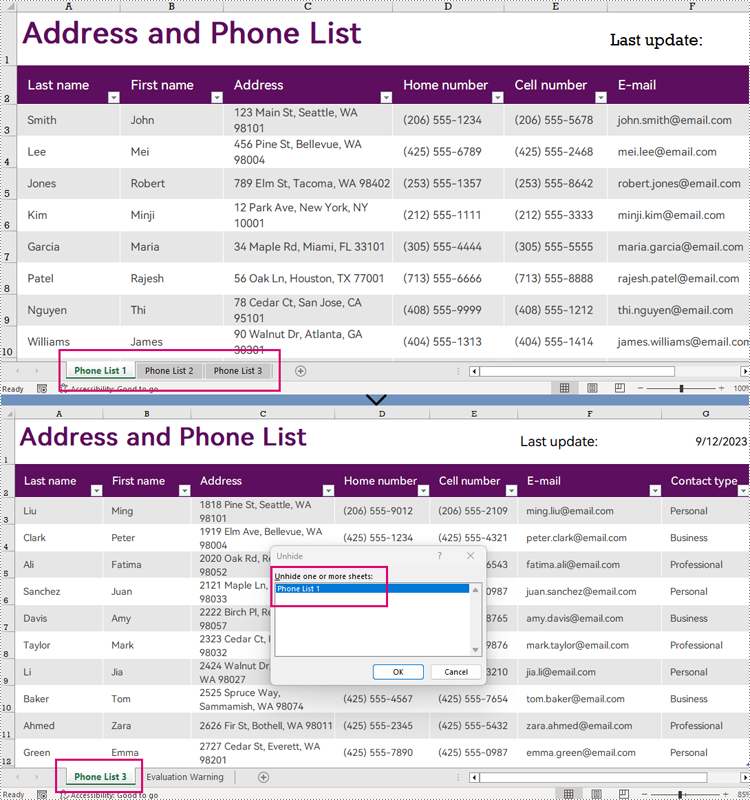
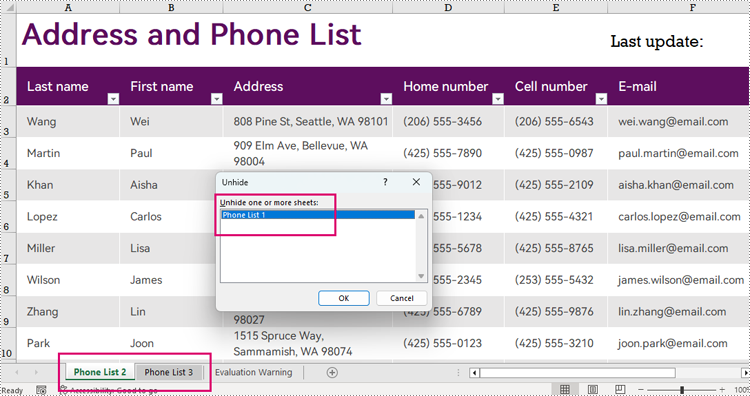
Unhide Excel Worksheets in Python
Unhiding a worksheet can be done by assigning WorksheetVisibility.Visible to the Workbook.Worksheets[].Visibility property. The detailed steps are as follows:
- Create an object of Workbook class.
- Load a workbook using Workbook.LoadFromFile() method.
- Unhide the very hidden worksheet by assigning WorksheetVisibility.Visible to the Workbook.Worksheets[].Visibility property.
- Save the workbook using Workbook.SaveToFile() method.
- Python
from spire.xls import *

# Create an object of Workbook
workbook = Workbook()

# Load an Excel workbook
workbook.LoadFromFile("output/HideWorksheets.xlsx")

# Unhide the second worksheet
workbook.Worksheets[0].Visibility = WorksheetVisibility.Visible

# Save the workbook
workbook.SaveToFile("output/UnhideWorksheet.xlsx")
Apply for a Temporary License
If you'd like to remove the evaluation message from the generated documents, or to get rid of the function limitations, please request a 30-day trial license for yourself.
Python: Add Comments in Excel
Comment in Excel is a function that allows users to add extra details or remarks as explanatory notes. Comments can be in the form of text or images. It enables users to provide additional information to explain or supplement the data in specified cells. After adding a comment, users can view the content of the comment by hovering the mouse over the cell with the comment. This feature enhances the readability and comprehensibility of the document, helping readers better understand and handle the data in Excel. In this article, we will show you how to add comments in Excel by using Spire.XLS for Python.
Install Spire.XLS for Python
This scenario requires Spire.XLS for Python and plum-dispatch v1.7.4. They can be easily installed in your Windows through the following pip command.
pip install Spire.XLS
If you are unsure how to install, please refer to this tutorial: How to Install Spire.XLS for Python on Windows
Add Comment with Text in Excel
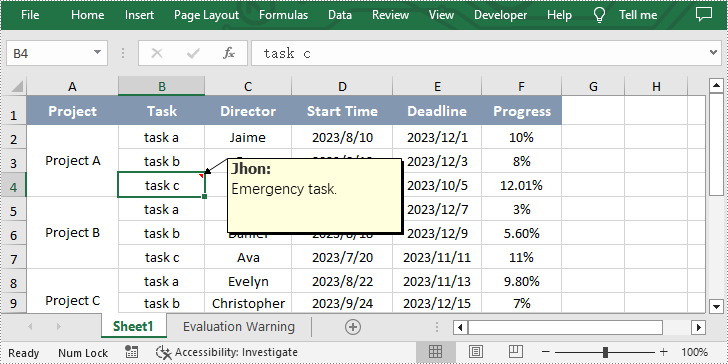
Spire.XLS for Python allows users to add comment with text in Excel by calling CellRange.AddComment() method. The following are detailed steps.
- Create an object of Workbook class.
- Load an Excel file using Workbook.LoadFromFile() method.
- Get the first worksheet of this file using Workbook.Worksheets[] property.
- Get the specified cell by using Worksheet.Range[] property.
- Set the author and content of the comment and add them to the obtained cell using CellRange.AddComment() method.
- Set the font of the comment.
- Save the result file using Workbook.SaveToFile() method.
- Python
from spire.xls import *
from spire.xls.common import *

inputFile = "sample.xlsx"
outputFile = "CommentWithAuthor.xlsx"

#Create an object of Workbook class
workbook = Workbook()

#Load the sample file from disk
workbook.LoadFromFile(inputFile)

#Get the first worksheet
sheet = workbook.Worksheets[0]

#Get the specified cell
range = sheet.Range["B4"]

#Set the author and content of the comment
author = "Jhon"
text = "Emergency task."

#Add comment to the obtained cell
comment = range.AddComment()
comment.Width = 200
comment.Visible = True
comment.Text = author + ":\n" + text

#Set the font of the comment
font = workbook.CreateFont()
font.FontName = "Tahoma"
font.KnownColor = ExcelColors.Black
font.IsBold = True
comment.RichText.SetFont(0, len(author), font)

#Save the result file
workbook.SaveToFile(outputFile, ExcelVersion.Version2013)
workbook.Dispose()
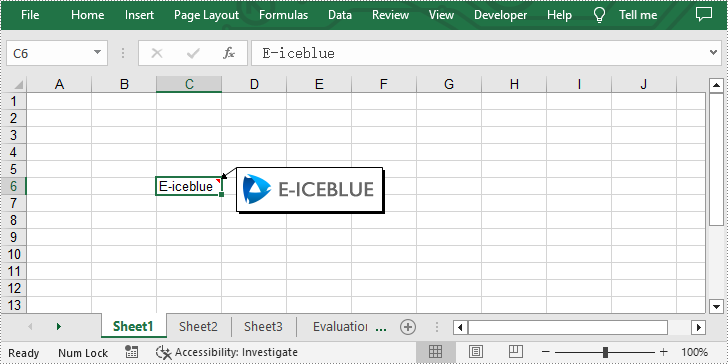
Add Comment with Picture in Excel
Additionally, Spire.XLS for Python also enable users to add comment with picture to the specified cell in Excel by using CellRange.AddComment() and ExcelCommentObject.Fill.CustomPicture() methods. The following are detailed steps.
- Create an object of Workbook class.
- Get the first worksheet using Workbook.Worksheets[] property.
- Get the specified cell by using Worksheet.Range[] property and set text for it.
- Add comment to the obtained cell by using CellRange.AddComment() method.
- Load an image and fill the comment with it by calling ExcelCommentObject.Fill.CustomPicture() method.
- Set the height and width of the comment.
- Save the result file using Workbook.SaveToFile() method.
- Python
from spire.xls import *
from spire.xls.common import *

inputFile = "logo.png"
outputFile = "CommentWithPicture.xlsx"

#Create an object of Workbook class
workbook = Workbook()

#Get the first worksheet
sheet = workbook.Worksheets[0]

#Get the specified cell and set text for it
range = sheet.Range["C6"]
range.Text = "E-iceblue"

#Add comment to the obtained cell
comment = range["C6"].AddComment()

#Load an image file and fill the comment with it
image = Image.FromFile(inputFile)
comment.Fill.CustomPicture(image, "logo.png")

#Set the height and width of the comment
comment.Height = image.Height
comment.Width = image.Width
comment.Visible = True

#Save the result file
workbook.SaveToFile(outputFile, ExcelVersion.Version2010)
workbook.Dispose()
Apply for a Temporary License
If you'd like to remove the evaluation message from the generated documents, or to get rid of the function limitations, please request a 30-day trial license for yourself.
Python: Extract Text and Images from Word Documents
By extracting text from Word documents, you can effortlessly obtain the written information contained within them. This allows for easier manipulation, analysis, and organization of textual content, enabling tasks such as text mining, sentiment analysis, and natural language processing. Extracting images, on the other hand, provides access to visual elements embedded within Word documents, which can be crucial for tasks like image recognition, content extraction, or creating image databases. In this article, you will learn how to extract text and images from a Word document in Python using Spire.Doc for Python.
- Extract Text from a Specific Paragraph in Python
- Extract Text from an Entire Word Document in Python
- Extract Images from an Entire Word Document in Python
Install Spire.Doc for Python
This scenario requires Spire.Doc for Python and plum-dispatch v1.7.4. They can be easily installed in your Windows through the following pip command.
pip install Spire.Doc
If you are unsure how to install, please refer to this tutorial: How to Install Spire.Doc for Python on Windows
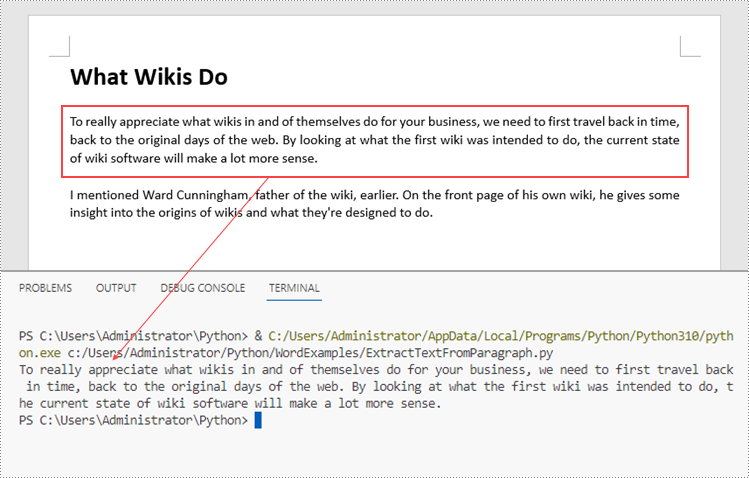
Extract Text from a Specific Paragraph in Python
To get a certain paragraph from a section, use Section.Paragraphs[index] property. Then, you can get the text of the paragraph through Paragraph.Text property. The detailed steps are as follows.
- Create a Document object.
- Load a Word file using Document.LoadFromFile() method.
- Get a specific section through Document.Sections[index] property.
- Get a specific paragraph through Section.Paragraphs[index] property.
- Get text from the paragraph through Paragraph.Text property.
- Python
from spire.doc import *
from spire.doc.common import *

# Create a Document object
doc = Document()

# Load a Word document
doc.LoadFromFile("C:\\Users\\Administrator\\Desktop\\input.docx")

# Get a specific section
section = doc.Sections.get_Item(0)

# Get a specific paragraph
paragraph = section.Paragraphs.get_Item(2)

# Get text from the paragraph
str = paragraph.Text

# Print result
print(str)
Extract Text from an Entire Word Document in Python
If you want to get text from a whole document, you can simply use Document.GetText() method. Below are the steps.
- Create a Document object.
- Load a Word file using Document.LoadFromFile() method.
- Get text from the document using Document.GetText() method.
- Python
from spire.doc import *
from spire.doc.common import *

# Create a Document object
doc = Document()

# Load a Word file
doc.LoadFromFile("C:\\Users\\Administrator\\Desktop\\input.docx")

# Get text from the entire document
str = doc.GetText()

# Print result
print(str)

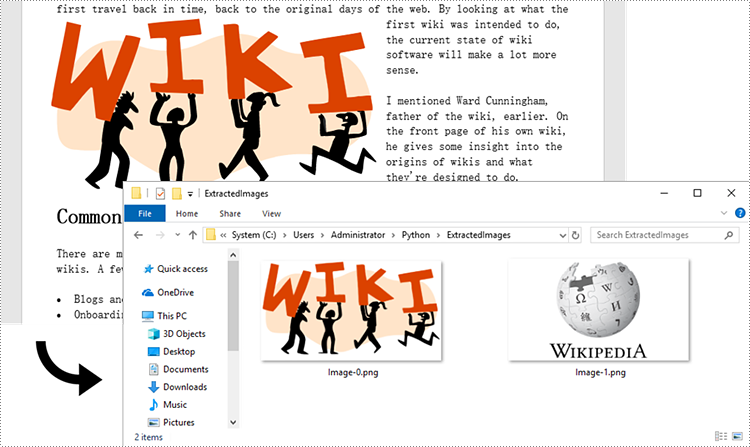
Extract Images from an Entire Word Document in Python
Spire.Doc for Python does not provide a straightforward method to get images from a Word document. You need to iterate through the child objects in the document, and determine if a certain a child object is a DocPicture. If yes, you get the image data using DocPicture.ImageBytes property and then save it as a popular image format file. The main steps are as follows.
- Create a Document object.
- Load a Word file using Document.LoadFromFile() method.
- Loop through the child objects in the document.
- Determine if a specific child object is a DocPicture. If yes, get the image data through DocPicture.ImageBytes property.
- Write the image data as a PNG file.
- Python
import queue
from spire.doc import *
from spire.doc.common import *

# Create a Document object
doc = Document()

# Load a Word file
doc.LoadFromFile("C:\\Users\\Administrator\\Desktop\\input.docx")

# Create a Queue object
nodes = queue.Queue()
nodes.put(doc)

# Create a list
images = []

while nodes.qsize() > 0:
    node = nodes.get()

    # Loop through the child objects in the document
    for i in range(node.ChildObjects.Count):
        child = node.ChildObjects.get_Item(i)

        # Determine if a child object is a picture
        if child.DocumentObjectType == DocumentObjectType.Picture:
            picture = child if isinstance(child, DocPicture) else None
            dataBytes = picture.ImageBytes

            # Add the image data to the list
            images.append(dataBytes)

        elif isinstance(child, ICompositeObject):
            nodes.put(child if isinstance(child, ICompositeObject) else None)

# Loop through the images in the list
for i, item in enumerate(images):
    fileName = "Image-{}.png".format(i)
    with open("ExtractedImages/"+fileName,'wb') as imageFile:

        # Write the image to a specified path
        imageFile.write(item)
doc.Close()
Apply for a Temporary License
If you'd like to remove the evaluation message from the generated documents, or to get rid of the function limitations, please request a 30-day trial license for yourself.
Python: Create, Read, or Update a Word Document
Creating, reading, and updating Word documents is a common need for many developers working with the Python programming language. Whether it's generating reports, manipulating existing documents, or automating document creation processes, having the ability to work with Word documents programmatically can greatly enhance productivity and efficiency. In this article, you will learn how to create, read, or update Word documents in Python using Spire.Doc for Python.
- Create a Word Document from Scratch in Python
- Read Text of a Word Document in Python
- Update a Word Document in Python
Install Spire.Doc for Python
This scenario requires Spire.Doc for Python and plum-dispatch v1.7.4. They can be easily installed in your Windows through the following pip command.
pip install Spire.Doc
If you are unsure how to install, please refer to this tutorial: How to Install Spire.Doc for Python on Windows
Create a Word Document from Scratch in Python
Spire.Doc for Python offers the Document class to represent a Word document model. A document must contain at least one section (represented by the Section class) and each section is a container for various elements such as paragraphs, tables, charts, and images. This example shows you how to create a simple Word document containing several paragraphs using Spire.Doc for Python.
- Create a Document object.
- Add a section using Document.AddSection() method.
- Set the page margins through Section.PageSetUp.Margins property.
- Add several paragraphs to the section using Section.AddParagraph() method.
- Add text to the paragraphs using Paragraph.AppendText() method.
- Create a ParagraphStyle object, and apply it to a specific paragraph using Paragraph.ApplyStyle() method.
- Save the document to a Word file using Document.SaveToFile() method.
- Python
from spire.doc import *
from spire.doc.common import *
# Create a Document object
doc = Document()
# Add a section
section = doc.AddSection()
# Set the page margins
section.PageSetup.Margins.All = 40
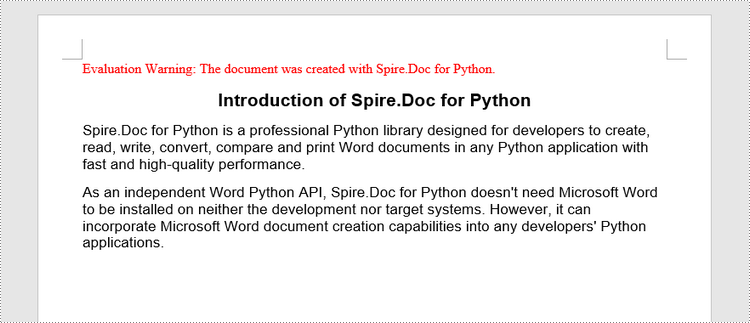
# Add a title
titleParagraph = section.AddParagraph()
titleParagraph.AppendText("Introduction of Spire.Doc for Python")
# Add two paragraphs
bodyParagraph_1 = section.AddParagraph()
bodyParagraph_1.AppendText("Spire.Doc for Python is a professional Python library designed for developers to " +
"create, read, write, convert, compare and print Word documents in any Python application " +
"with fast and high-quality performance.")
bodyParagraph_2 = section.AddParagraph()
bodyParagraph_2.AppendText("As an independent Word Python API, Spire.Doc for Python doesn't need Microsoft Word to " +
"be installed on neither the development nor target systems. However, it can incorporate Microsoft Word " +
"document creation capabilities into any developers' Python applications.")
# Apply heading1 to the title
titleParagraph.ApplyStyle(BuiltinStyle.Heading1)
# Create a style for the paragraphs
style2 = ParagraphStyle(doc)
style2.Name = "paraStyle"
style2.CharacterFormat.FontName = "Arial"
style2.CharacterFormat.FontSize = 13
doc.Styles.Add(style2)
bodyParagraph_1.ApplyStyle("paraStyle")
bodyParagraph_2.ApplyStyle("paraStyle")
# Set the horizontal alignment of the paragraphs
titleParagraph.Format.HorizontalAlignment = HorizontalAlignment.Center
bodyParagraph_1.Format.HorizontalAlignment = HorizontalAlignment.Left
bodyParagraph_2.Format.HorizontalAlignment = HorizontalAlignment.Left
# Set the after spacing
titleParagraph.Format.AfterSpacing = 10
bodyParagraph_1.Format.AfterSpacing = 10
# Save to file
doc.SaveToFile("output/WordDocument.docx", FileFormat.Docx2019)
Read Text of a Word Document in Python
To get the text of an entire Word document, you could simply use Document.GetText() method. The following are the detailed steps.
- Create a Document object.
- Load a Word document using Document.LoadFromFile() method.
- Get text from the entire document using Document.GetText() method.
- Python
from spire.doc import *
from spire.doc.common import *

# Create a Document object
doc = Document()

# Load a Word file
doc.LoadFromFile("C:\\Users\\Administrator\\Desktop\\WordDocument.docx")

# Get text from the entire document
text = doc.GetText()

# Print text
print(text)

Update a Word Document in Python
To access a specific paragraph, you can use the Section.Paragraphs[index] property. If you want to modify the text of the paragraph, you can reassign text to the paragraph through the Paragraph.Text property. The following are the detailed steps.
- Create a Document object.
- Load a Word document using Document.LoadFromFile() method.
- Get a specific section through Document.Sections[index] property.
- Get a specific paragraph through Section.Paragraphs[index] property.
- Change the text of the paragraph through Paragraph.Text property.
- Save the document to another Word file using Document.SaveToFile() method.
- Python
from spire.doc import *
from spire.doc.common import *
# Create a Document object
doc = Document()
# Load a Word file
doc.LoadFromFile("C:\\Users\\Administrator\\Desktop\\WordDocument.docx")
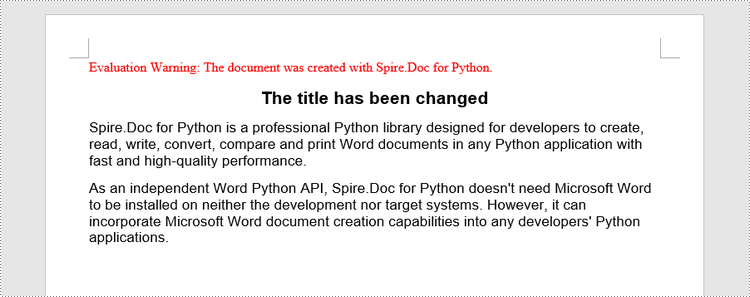
# Get a specific section
section = doc.Sections.get_Item(0)
# Get a specific paragraph
paragraph = section.Paragraphs.get_Item(1)
# Change the text of the paragraph
paragraph.Text = "The title has been changed"
# Save to file
doc.SaveToFile("output/Updated.docx", FileFormat.Docx2019)
Apply for a Temporary License
If you'd like to remove the evaluation message from the generated documents, or to get rid of the function limitations, please request a 30-day trial license for yourself.
C#/VB.NET: Change or Delete Hyperlinks in PDF
Hyperlinks in PDF documents allow users to jump to pages or open documents, making PDF files more interactive and easier to use. However, if the target site of the link has been changed or the link points to the wrong page, it may cause trouble or misunderstanding to the document users. Therefore, it is very important to change or remove wrong or invalid hyperlinks in PDF documents to ensure the accuracy and usability of the hyperlinks, so as to provide a better reading experience for users. This article will introduce how to change or remove hyperlinks in PDF documents through .NET programs using Spire.PDF for .NET.
Install Spire.PDF for .NET
To begin with, you need to add the DLL files included in the Spire.PDF for.NET package as references in your .NET project. The DLL files can be either downloaded from this link or installed via NuGet.
PM> Install-Package Spire.PDF
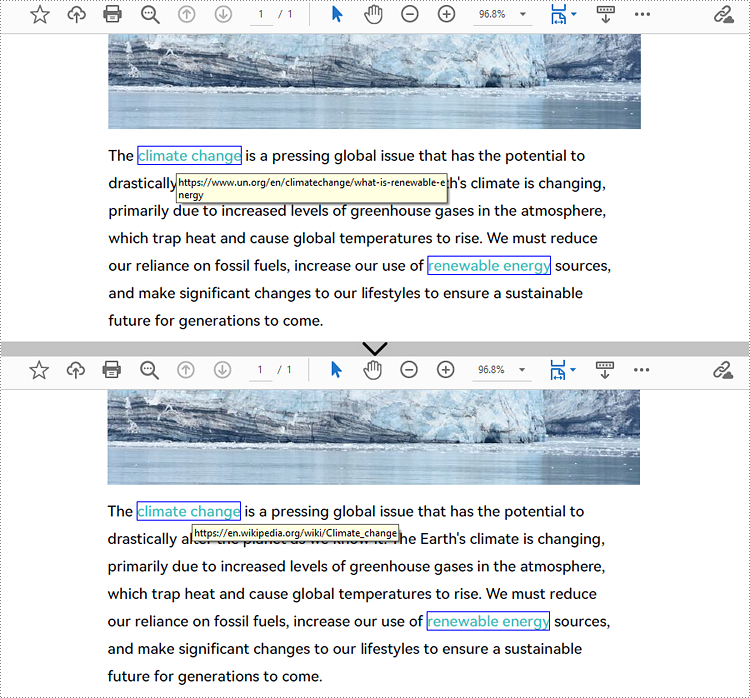
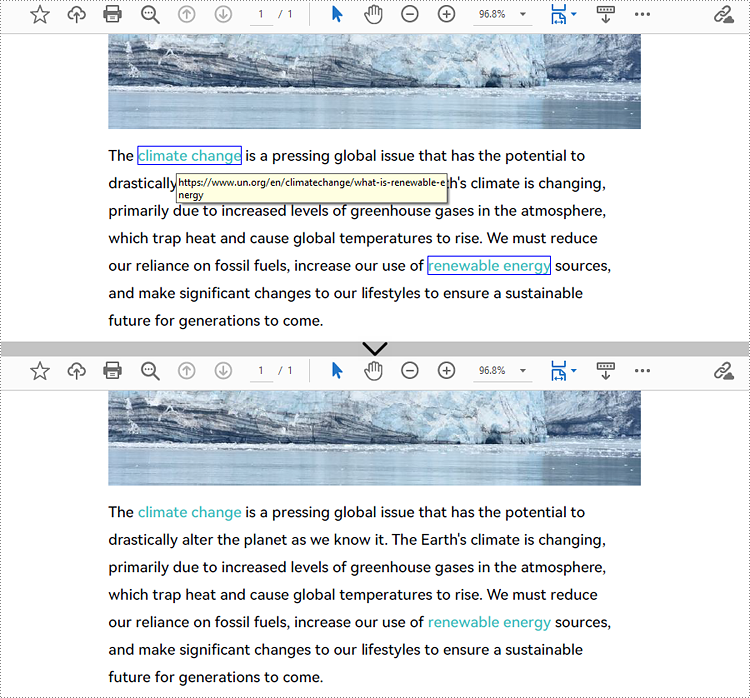
Change the URL of a Hyperlink in PDF
To change the URL of a hyperlink on a PDF page, it is necessary to get the hyperlink annotation widget and use the PdfUriAnnotationWidget.Uri property to reset the URL. The detailed steps are as follows:
- Create an object of PdfDocument class.
- Load a PDF file using PdfDocument.LoadFromFIle() method.
- Get the first page of the document using PdfDocument.Pages[] property.
- Get the first hyperlink widget on the page using PdfPageBase.AnnotationsWidget[] property.
- Reset the URL of the hyperlink using PdfUriAnnotationWidget.Uri property.
- Save the document using PdfDocument.SaveToFile() method.
- C#
- VB.NET
using Spire.Pdf;
using Spire.Pdf.Annotations;
using System;

namespace ChangeHyperlink
{
    internal class Program
    {
        static void Main(string[] args)
        {
            //Cretae an object of PdfDocument
            PdfDocument pdf = new PdfDocument();

            //Load a PDF file
            pdf.LoadFromFile("Sample.pdf");

            //Get the first page
            PdfPageBase page = pdf.Pages[0];

            //Get the first hyperlink
            PdfUriAnnotationWidget url = (PdfUriAnnotationWidget)page.Annotations[0];

            //Reset the url of the hyperlink
            url.Uri = "https://en.wikipedia.org/wiki/Climate_change";

            //Save the PDF file
            pdf.SaveToFile("ChangeHyperlink.pdf");
            pdf.Dispose();
        }
    }
}
Remove Hyperlinks from PDF
Spire.PDF for .NET provides the PdfPageBase.AnnotationsWidget.RemoveAt() method to remove a hyperlink on a PDF page by its index. Eliminating all hyperlinks from a PDF document requires iterating through the pages, obtaining the annotation widgets of each page, verifying whether an annotation is an instance of the PdfUriAnnotationWidget class, and deleting the annotation if it is. The following are the detailed steps:
- Create an object of PdfDocument class.
- Load a PDF document using PdfDocument.LoadFromFIle() method.
- To remove a specific hyperlink, get the page containing the hyperlink and remove the hyperlink by its index using PdfPageBase.AnnotationsWidget.RemoveAt() method.
- To remove all hyperlinks, loop through the pages in the document to get the annotation collection of each page using PdfPageBase.AnnotationsWidget property.
- Check if an annotation widget is an instance of PdfUriAnnotationWidget class and remove the annotation widget using PdfAnnotationCollection.Remove(PdfUriAnnotationWidget) method if it is.
- Save the document using PdfDocument.SaveToFIle() method.
- C#
- VB.NET
using Spire.Pdf;
using Spire.Pdf.Annotations;
using System;
using System.Dynamic;

namespace DeleteHyperlink
{
    internal class Program
    {
        static void Main(string[] args)
        {
            //Cretae an object of PdfDocument
            PdfDocument pdf = new PdfDocument();

            //Load a PDF file
            pdf.LoadFromFile("Sample.pdf");

            //Remove the second hyperlink in the fisrt page
            //PdfPageBase page = pdf.Pages[0];
            //page.AnnotationsWidget.RemoveAt(1);

            //Remove all hyperlinks in the document
            //Loop through pages in the document
            foreach (PdfPageBase page in pdf.Pages)
            {
                //Get the annotation collection of a page
                PdfAnnotationCollection collection = page.Annotations;
                for (int i = collection.Count - 1; i >= 0; i--)
                {
                    PdfAnnotation annotation = collection[i];
                    //Check if an annotation is an instance of PdfUriAnnotationWidget
                    if (annotation is PdfUriAnnotationWidget)
                    {
                        PdfUriAnnotationWidget url = (PdfUriAnnotationWidget)annotation;
                        //Remove the hyperlink
                        collection.Remove(url);
                    }
                }
            }

            //Save the document
            pdf.SaveToFile("DeleteHyperlink.pdf");
            pdf.Dispose();
        }
    }
}
Apply for a Temporary License
If you'd like to remove the evaluation message from the generated documents, or to get rid of the function limitations, please request a 30-day trial license for yourself.
How to Print Word Documents in C#: The Ultimate Guide
Printing Word documents programmatically in C# can streamline business workflows, automate reporting, and enhance document management systems. This comprehensive guide explores how to print Word documents in C# using Spire.Doc for .NET, covering everything from basic printing to advanced customization techniques. We'll walk through practical code examples for each scenario, ensuring you can implement these solutions in real-world applications.
- .NET Library for Printing Word Documents
- Print Word Documents in C#
- Customize Printing Options
- Silently Print Word Documents
- Print Multiple Pages on One Sheet
- Conclusion
- FAQs
.NET Library for Printing Word Documents
Spire.Doc for .NET is a robust, standalone library that supports comprehensive Word document processing without requiring Microsoft Office to be installed. It provides intuitive APIs for loading, editing, and printing Word files (DOC/DOCX) while maintaining perfect formatting fidelity.
To get started, install the library via NuGet Package Manager:
Install-Package Spire.DocAlternatively, you can download Spire.Doc for .NET from our official website and reference the DLL file manually.
Print Word Documents in C#
The foundation of Word document printing in C# involves three key steps demonstrated in the following code. First, we create a Document object to represent our Word file, then load the actual document, and finally access the printing functionality through the PrintDocument class.
- C#
using Spire.Doc;
using System.Drawing.Printing;

namespace PrintWordDocument
{
    internal class Program
    {
        static void Main(string[] args)
        {
            // Initialize a new Document instance
            Document doc = new Document();

            // Load the Word file from specified path
            doc.LoadFromFile("Input.docx");

            // Access the PrintDocument object for printing operations
            PrintDocument printDoc = doc.PrintDocument;

            // Send document to default printer
            printDoc.Print();
        }
    }
}
This basic implementation handles the entire printing process, from document loading to physical printing, with just a few lines of code. The PrintDocument object abstracts all the underlying printing operations, making the process straightforward for developers.
Customize Printing Options
Beyond basic printing, Spire.Doc offers extensive customization via the PrinterSettings class, providing developers with granular control over the printing process. These settings allow you to tailor the output to specific needs, such as selecting particular pages or configuring advanced printer features.
To obtain the PrinterSettings object associated with the current document, use the following line of code:
- C#
PrinterSettings settings = printDoc.PrinterSettings;Now, let’s explore the specific settings.
1. Specify the Printer Name
- C#
settings.PrinterName = "Your Printer Name";This code snippet demonstrates how to target a specific printer in environments with multiple installed printers. The PrinterName property accepts the exact name of the printer as it appears in the system's printer list.
2. Specify Pages to Print
- C#
settings.FromPage = 1;
settings.ToPage = 5;
These settings are particularly useful when dealing with large documents, allowing you to print only the relevant sections and conserve resources.
3. Specify Number of Copies to Print
- C#
settings.Copies = 2;The Copies property controls how many duplicates of the document will be printed, with the printer handling the duplication process efficiently.
4. Enable Duplex Printing
- C#
if (settings.CanDuplex)
{
    settings.Duplex = Duplex.Default;
}
This example first checks for duplex printing support before enabling two-sided printing, ensuring compatibility across different printer hardware.
5. Print on a Custom Paper Size
- C#
settings.DefaultPageSettings.PaperSize = new PaperSize("custom", 800, 500);Here we create a custom paper size (800x500 units) for specialized printing requirements, demonstrating Spire.Doc's flexibility in handling non-standard document formats.
6. Print Word to File
- C#
settings.PrintToFile = true;
settings.PrinterName = "Microsoft Print to PDF";
settings.PrintFileName = @"C:\Output.pdf";
This configuration uses the system's PDF virtual printer to create a PDF file instead of physical printing, showcasing how Spire.Doc can be used for document conversion as well.
Silently Print Word Documents
In automated environments, you may need to print documents without any user interaction or visible dialogs. The following implementation achieves silent printing by using the StandardPrintController.
- C#
using Spire.Doc;
using System.Drawing.Printing;

namespace SilentlyPrintWord
{
    class Program
    {
        static void Main(string[] args)
        {
            // Initialize a new Document instance
            Document doc = new Document();

            // Load the Word file from specified path
            doc.LoadFromFile("Input.docx");

            // Access the PrintDocument object for printing operations
            PrintDocument printDoc = doc.PrintDocument;

            // Disable the print dialog
            printDoc.PrintController = new StandardPrintController();

            // Exexute printing
            printDoc.Print();
        }
    }
}
The key to silent printing lies in assigning the StandardPrintController to the PrintController property, which suppresses all printing-related dialogs and progress indicators. This approach is ideal for server-side applications or batch processing scenarios where user interaction is not possible or desired.
Print Multiple Pages on One Sheet
For economizing paper usage or creating compact document versions, Spire.Doc supports printing multiple document pages on a single physical sheet. The PrintMultipageToOneSheet method simplifies this process with predefined layout options.
- C#
using Spire.Doc;
using Spire.Doc.Printing;
using System.Drawing.Printing;

namespace PrintMultiplePagesOnOneSheet
{
    internal class Program
    {
        static void Main(string[] args)
        {
            // Initialize a new Document instance
            Document doc = new Document();

            // Load the Word file from specified path
            doc.LoadFromFile("Input.docx");

            // Configure 2-page-per-sheet printing and execute printing
            doc.PrintMultipageToOneSheet(PagesPerSheet.TwoPages, false);
        }
    }
}
The PagesPreSheet enumeration offers several layout options (OnePage, TwoPages, FourPages, etc.), while the boolean parameter determines whether to include a page border on the printed sheet. This feature is particularly valuable for creating booklet layouts or draft versions of documents.
P.S. This scenario works only with .NET Framework versions earlier than 5.0.
Conclusion
This guide has demonstrated how Spire.Doc for .NET provides a comprehensive solution for Word document printing in C#. It simplifies the process with features such as:
- Basic & silent printing.
- Customizable print settings (printer selection, duplex, copies).
- Multi-page per sheet printing to reduce paper usage.
By integrating these techniques, developers can efficiently automate document printing in enterprise applications, enhancing productivity and reducing manual effort. Overall, Spire.Doc empowers developers to create robust printing solutions that meet diverse business requirements.
FAQs
Q1. Can I print encrypted or password-protected Word files?
A: Yes, Spire.Doc supports printing password-protected documents after loading them with the correct password:
- C#
doc.LoadFromFile("Protected.docx", FileFormat.Docx, "password");After successful loading, you can print it like any other document, with all the same customization options available.
Q2. How can I print only selected text from a Word document?
A: You can extract specific content by accessing document sections and paragraphs:
- C#
Section section = doc.Sections[0];
Paragraph paragraph = section.Paragraphs[0];
// Create new document with selected content
Document newDoc = new Document();
newDoc.Sections.Add(section.Clone());
newDoc.Print();
This approach gives you precise control over which document portions get printed.
Q3. Can I print documents in landscape mode or adjust margins programmatically?
A: Yes! Modify the DefaultPageSettings properties:
- C#
printDoc.DefaultPageSettings.Landscape = true;
printDoc.DefaultPageSettings.Margins = new Margins(50, 50, 50, 50);
Q4. Can I print other file formats (e.g., PDF, Excel) using Spire.Doc?
A: Spire.Doc is designed for Word files (DOC/DOCX). For PDFs, use Spire.PDF; for Excel, use Spire.XLS.
Get a Free License
To fully experience the capabilities of Spire.Doc for Python without any evaluation limitations, you can request a free 30-day trial license.
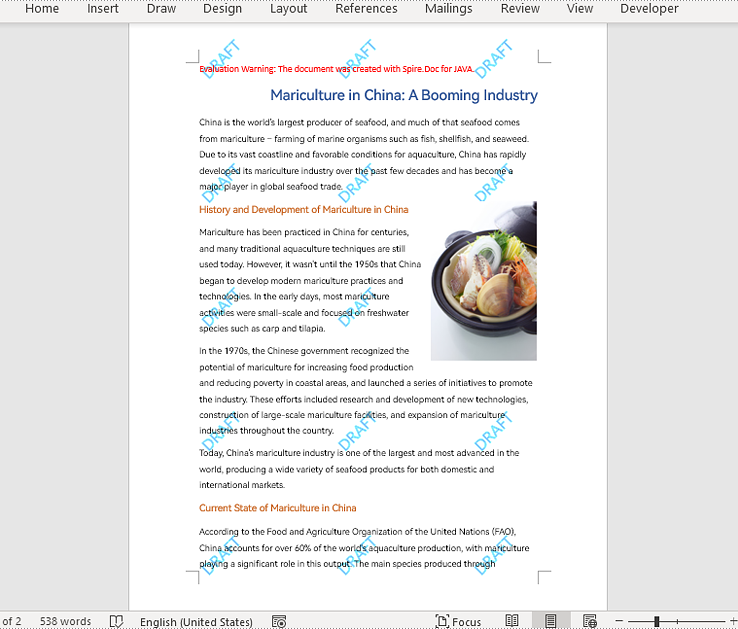
Java: Insert Repeating Watermarks into Word Documents
Repeating watermarks, also called multi-line watermarks, are a type of watermark that appears multiple times on a page of a Word document at regular intervals. Compared with single watermarks, repeating watermarks are more difficult to remove or obscure, thus offering a better deterrent to unauthorized copying and distribution. This article is going to show how to insert repeating text and image watermarks into Word documents programmatically using Spire.Doc for Java.
- Add Repeating Text Watermarks to Word Documents in Java
- Add Repeating Picture Watermarks to Word Documents in Java
Install Spire.Doc for Java
First of all, you're required to add the Spire.Doc.jar file as a dependency in your Java program. The JAR file can be downloaded from this link. If you use Maven, you can easily import the JAR file in your application by adding the following code to your project's pom.xml file.
<repositories>
    <repository>
        <id>com.e-iceblue</id>
        <name>e-iceblue</name>
        <url>https://repo.e-iceblue.com/nexus/content/groups/public/</url>
    </repository>
</repositories>
<dependencies>
    <dependency>
        <groupId>e-iceblue</groupId>
        <artifactId>spire.doc</artifactId>
        <version>14.7.0</version>
    </dependency>
</dependencies>
Add Repeating Text Watermarks to Word Documents in Java
We can insert repeating text watermarks to Word documents by adding repeating WordArt to the headers of a document at specified intervals. The detailed steps are as follows:
- Create an object of Document class.
- Load a Word document using Document.loadFromFile() method.
- Create an object of ShapeObject class and set the WordArt text using ShapeObject.getWordArt().setText() method.
- Specify the rotation angle and the number of vertical repetitions and horizontal repetitions.
- Set the format of the shape using methods under ShapeObject class.
- Loop through the sections in the document to insert repeating watermarks to each section by adding the WordArt shape to the header of each section multiple times at specified intervals using Paragraph.getChildObjects().add(ShapeObject) method.
- Save the document using Document.saveToFile() method.
- Java
import com.spire.doc.Document;
import com.spire.doc.HeaderFooter;
import com.spire.doc.Section;
import com.spire.doc.documents.Paragraph;
import com.spire.doc.documents.ShapeLineStyle;
import com.spire.doc.documents.ShapeType;
import com.spire.doc.fields.ShapeObject;

import java.awt.*;

public class insertRepeatingTextWatermark {
    public static void main(String[] args) {

        //Create an object of Document class
        Document doc = new Document();

        //Load a Word document
        doc.loadFromFile("Sample.docx");

        //Create an object of ShapeObject class and set the WordArt text
        ShapeObject shape = new ShapeObject(doc, ShapeType.Text_Plain_Text);
        shape.getWordArt().setText("DRAFT");

        //Specify the watermark rotating angle and the number of vertical repetitions and horizontal repetitions
        double rotation = 315;
        int ver = 5;
        int hor = 3;

        //Set the format of the WordArt shape
        shape.setWidth(60);
        shape.setHeight(20);
        shape.setVerticalPosition(30);
        shape.setHorizontalPosition(20);
        shape.setRotation(rotation);
        shape.setFillColor(Color.BLUE);
        shape.setLineStyle(ShapeLineStyle.Single);
        shape.setStrokeColor(Color.CYAN);
        shape.setStrokeWeight(1);

        //Loop through the sections in the document
        for (Section section : (Iterable<Section>) doc.getSections()) {
            //Get the header of a section
            HeaderFooter header = section.getHeadersFooters().getHeader();
            //Add paragraphs to the header
            Paragraph paragraph = header.addParagraph();
            for (int i = 0; i < ver; i++) {
                for (int j = 0; j < hor; j++) {
                    //Add the WordArt shape to the header
                    shape = (ShapeObject) shape.deepClone();
                    shape.setVerticalPosition((float) (section.getPageSetup().getPageSize().getHeight()/ver * i + Math.sin(rotation) * shape.getWidth()/2));
                    shape.setHorizontalPosition((float) ((section.getPageSetup().getPageSize().getWidth()/hor - shape.getWidth()/2) * j));
                    paragraph.getChildObjects().add(shape);
                }
            }
        }

        //Save the document
        doc.saveToFile("RepeatingTextWatermark.docx");
        doc.dispose();
    }
}
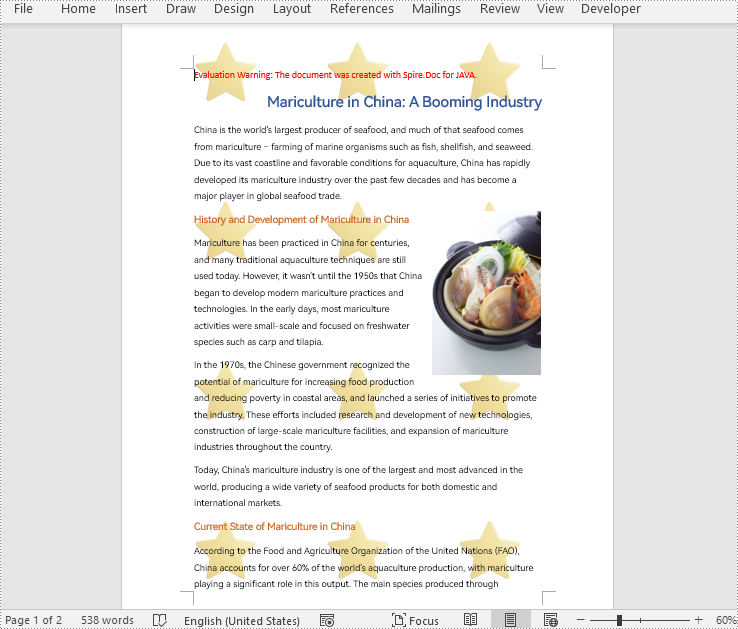
Add Repeating Picture Watermarks to Word Documents in Java
Similarly, we can insert repeating image watermarks into Word documents by adding repeating pictures to headers at regular intervals. The detailed steps are as follows:
- Create an object of Document class.
- Load a Word document using Document.loadFromFile() method.
- Load a picture using DocPicture.loadImage() method.
- Set the text wrapping style of the picture as Behind using DocPicture.setTextWrappingStyle(TextWrappingStyle.Behind) method.
- Specify the number of vertical repetitions and horizontal repetitions.
- Loop through the sections in the document to insert repeating picture watermarks to the document by adding a picture to the header of each section at specified intervals using Paragraph.getChildObjects().add(DocPicture) method.
- Save the document using Document.saveToFile() method.
- Java
import com.spire.doc.Document;
import com.spire.doc.FileFormat;
import com.spire.doc.HeaderFooter;
import com.spire.doc.Section;
import com.spire.doc.documents.Paragraph;
import com.spire.doc.documents.TextWrappingStyle;
import com.spire.doc.fields.DocPicture;

public class insertRepeatingPictureWatermark {
    public static void main(String[] args) {

        //Create an object of Document class
        Document doc = new Document();

        //Load a Word document
        doc.loadFromFile("Sample.docx");

        //Load a picture
        DocPicture pic = new DocPicture(doc);
        pic.loadImage("watermark.png");

        //Set the text wrapping style of the picture as Behind
        pic.setTextWrappingStyle(TextWrappingStyle.Behind);

        //Specify the number of vertical repetitions and horizontal repetitions
        int ver = 4;
        int hor = 3;

        //Loop through the sections in the document
        for (Section section : (Iterable<Section>) doc.getSections()) {
            //Get the header of a section
            HeaderFooter header = section.getHeadersFooters().getHeader();
            //Add a paragraph to the section
            Paragraph paragraph = header.addParagraph();
            for (int i = 0; i < ver; i++) {
                for (int j = 0; j < hor; j++) {
                    //Add the picture to the header
                    pic = (DocPicture) pic.deepClone();
                    pic.setVerticalPosition((float) ((section.getPageSetup().getPageSize().getHeight()/ver) * i));
                    pic.setHorizontalPosition((float) (section.getPageSetup().getPageSize().getWidth()/hor - pic.getWidth()/2) * j);
                    paragraph.getChildObjects().add(pic);
                }
            }
        }

        //Save the document
        doc.saveToFile("RepeatingPictureWatermark.docx", FileFormat.Auto);
        doc.dispose();
    }
}
Apply for a Temporary License
If you'd like to remove the evaluation message from the generated documents, or to get rid of the function limitations, please request a 30-day trial license for yourself.