Python: Add Annotations to PDF Documents
Adding annotations to PDFs is a common practice for adding comments, highlighting text, drawing shapes, and more. This feature is beneficial for collaborative document review, education, and professional presentations. It allows users to mark up documents digitally, enhancing communication and productivity.
In this article, you will learn how to add various types of annotations to a PDF document in Python using Spire.PDF for Python.
- Add a Text Markup Annotation to PDF
- Add a Free Text Annotation to PDF
- Add a Popup Annotation to PDF
- Add a Stamp Annotation to PDF
- Add a Shape Annotation to PDF
- Add a Web Link Annotation to PDF
- Add a File Link Annotation to PDF
- Add a Document Link Annotation to PDF
Install Spire.PDF for Python
This scenario requires Spire.PDF for Python and plum-dispatch v1.7.4. They can be easily installed in your Windows through the following pip command.
pip install Spire.PDF
If you are unsure how to install, please refer to this tutorial: How to Install Spire.PDF for Python on Windows
Add a Text Markup Annotation to PDF in Python
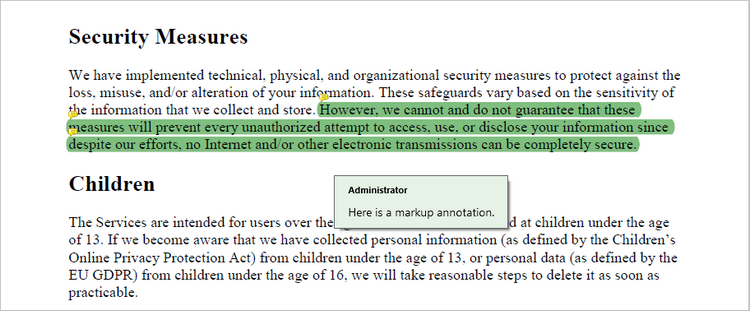
Text markup in PDF refers to the ability to emphasize important text by selecting and highlighting it. To add a text markup annotation to a PDF, you first need to locate the specific text within the document with the help of the PdfTextFinder class. Once the text is identified, you can create a PdfTextMarkupAnnotation object and apply it to the document.
The following are the steps to add a text markup annotation to PDF using Python:
- Create a PdfDocument object.
- Load a PDF file from the specified location.
- Get a page from the document.
- Find a specific piece of text within the page using PdfTextFinder class.
- Create a PdfTextMarkupAnnotation object based on the text found.
- Add the annotation to the page using PdfPageBase.AnnotationsWidget.Add() method.
- Save the modified document to a different PDF file.
- Python
from spire.pdf.common import *
from spire.pdf import *

# Create a PdfDocument object
doc = PdfDocument()

# Load a PDF file
doc.LoadFromFile("C:\\Users\\Administrator\\Desktop\\Input.pdf")

# Get a specific page
page = doc.Pages.get_Item(0)

# Create a PdfTextFinder object based on the page
finder = PdfTextFinder(page)

# Set the find options
finder.Options.Parameter = TextFindParameter.WholeWord
finder.Options.Parameter = TextFindParameter.IgnoreCase

# Find the instances of the specified text
fragments = finder.Find("However, we cannot and do not guarantee that these measures will prevent "+
                        "every unauthorized attempt to access, use, or disclose your information since "+
                         "despite our efforts, no Internet and/or other electronic transmissions can be completely secure.");

# Get the first instance
textFragment = fragments[0]

# Specify annotation text
text = "Here is a markup annotation."

# Iterate through the text bounds
for i in range(len(textFragment.Bounds)):

    # Get a specific bound
    rect = textFragment.Bounds[i]

    # Create a text markup annotation
    annotation = PdfTextMarkupAnnotation("Administrator", text, rect)

    # Set the markup color
    annotation.TextMarkupColor = PdfRGBColor(Color.get_Green())

    # Add the annotation to the collection of the annotations
    page.AnnotationsWidget.Add(annotation)

# Save result to file
doc.SaveToFile("output/MarkupAnnotation.pdf")

# Dispose resources
doc.Dispose()
Add a Free Text Annotation to PDF in Python
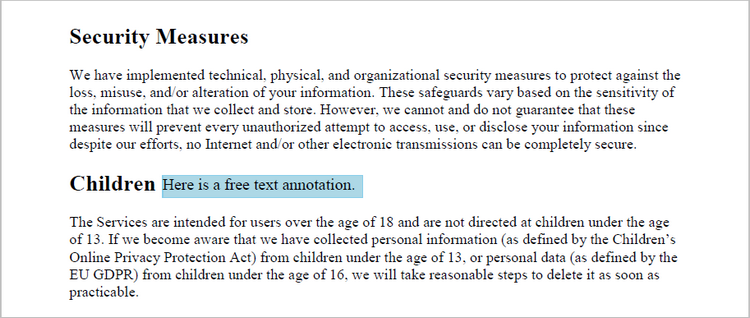
Free text annotations allow adding freeform text comments directly on a PDF. To add a free text annotation at a specific location, you can use the PdfTextFinder class to obtain the coordinate information of the searched text, then create a PdfFreeTextAnnotation object based on that coordinates and add it to the document.
The following are the steps to add a free text annotation to PDF using Python:
- Create a PdfDocument object.
- Load a PDF file from the specified location.
- Get a page from the document.
- Find a specific piece of text within the page using PdfTextFinder class.
- Create a PdfFreeTextAnnotation object based on the coordinate information of the text found.
- Set the annotation content using PdfFreeTextAnnotation.Text property.
- Add the annotation to the page using PdfPageBase.AnnotationsWidget.Add() method.
- Save the modified document to a different PDF file.
- Python
from spire.pdf.common import *
from spire.pdf import *

# Create a PdfDocument object
doc = PdfDocument()

# Load a PDF file
doc.LoadFromFile("C:\\Users\\Administrator\\Desktop\\Input.pdf")

# Get a specific page
page = doc.Pages.get_Item(0)

# Create a PdfTextFinder object based on the page
finder = PdfTextFinder(page)

# Set the find options
finder.Options.Parameter = TextFindParameter.WholeWord
finder.Options.Parameter = TextFindParameter.IgnoreCase

# Find the instances of the specified text
fragments = finder.Find("Children");

# Get the first instance
textFragment = fragments[0]

# Get the text bound
rect = textFragment.Bounds[0]

# Get the coordinates to add annotation
right = bound.Right
top = bound.Top

# Create a free text annotation
rectangle = RectangleF(right + 5, top + 2, 160.0, 18.0)
textAnnotation = PdfFreeTextAnnotation(rectangle)

# Set the content of the annotation
textAnnotation.Text = "Here is a free text annotation."

# Set other properties of annotation
font = PdfFont(PdfFontFamily.TimesRoman, 13.0, PdfFontStyle.Regular)
border = PdfAnnotationBorder(1.0)
textAnnotation.Font = font
textAnnotation.Border = border
textAnnotation.BorderColor = PdfRGBColor(Color.get_SkyBlue())
textAnnotation.Color = PdfRGBColor(Color.get_LightBlue())
textAnnotation.Opacity = 1.0

# Add the annotation to the collection of the annotations
page.AnnotationsWidget.Add(textAnnotation)

# Save result to file
doc.SaveToFile("output/FreeTextAnnotation.pdf")

# Dispose resources
doc.Dispose()
Add a Popup Annotation to PDF in Python
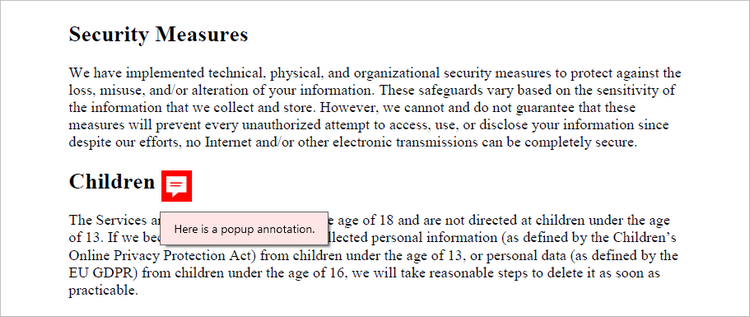
A popup annotation allows for the display of additional information or content in a pop-up window. To get a specific position to add a popup annotation, you can still use the PdfTextFinder class. Once the coordinate information is obtained, you can create a PdfPopupAnnotation object and add it to the document.
The steps to add a popup annotation to PDF using Python are as follows:
- Create a PdfDocument object.
- Load a PDF file from the specified location.
- Get a page from the document.
- Find a specific piece of text within the page using PdfTextFinder class.
- Create a PdfPopupAnnotation object based on the coordinate information of the text found.
- Set the annotation content using PdfPopupAnnotation.Text property.
- Add the annotation to the page using PdfPageBase.AnnotationsWidget.Add() method.
- Save the modified document to a different PDF file.
- Python
from spire.pdf.common import *
from spire.pdf import *

# Create a PdfDocument object
doc = PdfDocument()

# Load a PDF file
doc.LoadFromFile("C:\\Users\\Administrator\\Desktop\\Input.pdf")

# Get a specific page
page = doc.Pages.get_Item(0)

# Create a PdfTextFinder object based on the page
finder = PdfTextFinder(page)

# Set the find options
finder.Options.Parameter = TextFindParameter.WholeWord
finder.Options.Parameter = TextFindParameter.IgnoreCase

# Find the instances of the specified text
fragments = finder.Find("Children");

# Get the first instance
textFragment = fragments[0]

# Get the text bound
bound = textFragment.Bounds[0]

# Get the coordinates to add annotation
right = bound.Right
top = bound.Top

# Create a free text annotation
rectangle = RectangleF(right + 5, top, 30.0, 30.0)
popupAnnotation = PdfPopupAnnotation(rectangle)

# Set the content of the annotation
popupAnnotation.Text = "Here is a popup annotation."

# Set the icon and color of the annotation
popupAnnotation.Icon = PdfPopupIcon.Comment
popupAnnotation.Color = PdfRGBColor(Color.get_Red())

# Add the annotation to the collection of the annotations
page.AnnotationsWidget.Add(popupAnnotation)

# Save result to file
doc.SaveToFile("output/PopupAnnotation.pdf")

# Dispose resources
doc.Dispose()
Add a Stamp Annotation to PDF in Python
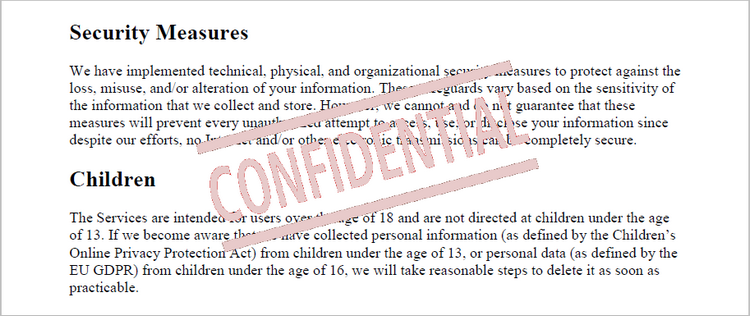
Stamp annotations in PDF documents are a type of annotation that allow users to add custom "stamps" or symbols to a PDF file. To define the appearance of a stamp annotation, use the PdfTemplate class. Then, create a PdfRubberStampAnnotation object and apply the previously defined template as its appearance. Finally, add the annotation to the PDF document.
The steps to add a stamp annotation to PDF using Python are as follows:
- Create a PdfDocument object.
- Load a PDF file from the specified location.
- Get a page from the document.
- Create a PdfTemplate object and draw an image on the template.
- Create a PdfRubberStampAnnotation object and apply the template as its appearance.
- Add the annotation to the page using PdfPageBase.AnnotationsWidget.Add() method.
- Save the modified document to a different PDF file.
- Python
from spire.pdf.common import *
from spire.pdf import *

# Create a PdfDocument object
doc = PdfDocument()

# Load a PDF document
doc.LoadFromFile("C:\\Users\\Administrator\\Desktop\\Input.pdf")

# Get a specific page
page = doc.Pages.get_Item(0)

# Load an image file
image = PdfImage.FromFile("C:\\Users\\Administrator\\Desktop\\confidential.png")

# Get the width and height of the image
width = (float)(image.Width)
height = (float)(image.Height)

# Create a PdfTemplate object based on the size of the image
template = PdfTemplate(width, height, True)

# Draw image on the template
template.Graphics.DrawImage(image, 0.0, 0.0, width, height)

# Create a rubber stamp annotation, specifying its location and position
rect = RectangleF((float) (page.ActualSize.Width/2 - width/2), 90.0, width, height)
stamp = PdfRubberStampAnnotation(rect)

# Create a PdfAppearance object
pdfAppearance = PdfAppearance(stamp)

# Set the template as the normal state of the appearance
pdfAppearance.Normal = template

# Apply the appearance to the stamp
stamp.Appearance = pdfAppearance

# Add the stamp annotation to PDF
page.AnnotationsWidget.Add(stamp)

# Save the file
doc.SaveToFile("output/StampAnnotation.pdf")

# Dispose resources
doc.Dispose()
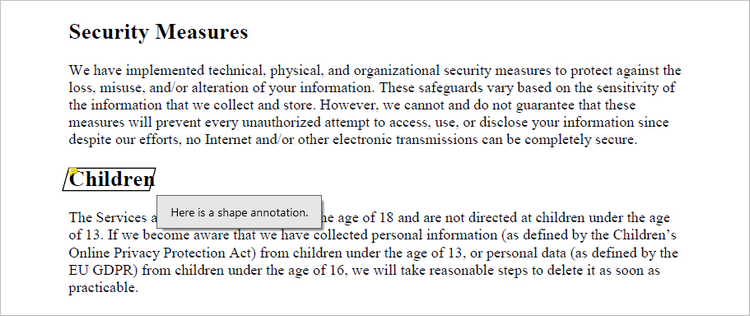
Add a Shape Annotation to PDF in Python
Shape annotations in PDF documents are a type of annotation that allow users to add various geometric shapes to the PDF file. Spire.PDF for Python offers the classes such as PdfPolyLineAnnotation, PdfLineAnnotation, and PdfPolygonAnnotation, allowing developers to add different types of shape annotations to PDF.
The steps to add a shape annotation to PDF using Python are as follows:
- Create a PdfDocument object.
- Load a PDF file from the specified location.
- Get a page from the document.
- Find a specific piece of text within the page using PdfTextFinder class.
- Create a PdfPolyLineAnnotation object based on the coordinate information of the text found.
- Set the annotation content using PdfPolyLineAnnotation.Text property.
- Add the annotation to the page using PdfPageBase.AnnotationsWidget.Add() method.
- Save the modified document to a different PDF file.
- Python
from spire.pdf.common import *
from spire.pdf import *

# Create a PdfDocument object
doc = PdfDocument()

# Load a PDF file
doc.LoadFromFile("C:\\Users\\Administrator\\Desktop\\Input.pdf")

# Get a specific page
page = doc.Pages.get_Item(0)

# Create a PdfTextFinder object based on the page
finder = PdfTextFinder(page)

# Set the find options
finder.Options.Parameter = TextFindParameter.WholeWord
finder.Options.Parameter = TextFindParameter.IgnoreCase

# Find the instances of the specified text
fragments = finder.Find("Children");

# Get the first instance
textFragment = fragments[0]

# Get the text bound
bound = textFragment.Bounds[0]

# Get the coordinates to add annotation
left = bound.Left
top = bound.Top
right = bound.Right
bottom = bound.Bottom

# Create a shape annotation
polyLineAnnotation = PdfPolyLineAnnotation(page, [PointF(left, top), PointF(right, top), PointF(right - 5, bottom), PointF(left - 5, bottom), PointF(left, top)])

# Set the annotation text
polyLineAnnotation.Text = "Here is a shape annotation."

# Add the annotation to the collection of the annotations
page.AnnotationsWidget.Add(polyLineAnnotation)

# Save result to file
doc.SaveToFile("output/ShapeAnnotation.pdf")

# Dispose resources
doc.Dispose()
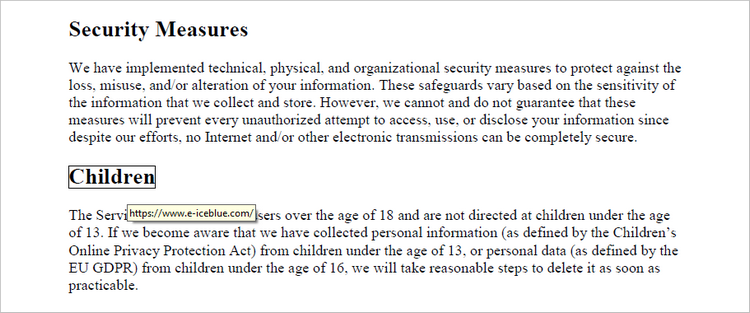
Add a Web Link Annotation to PDF in Python
Web link annotations in PDF documents enable users to embed clickable links to webpages, providing easy access to additional resources or related information online. You can use the PdfTextFinder class to find the specified text in a PDF document, and then create a PdfUriAnnotation object based on that text.
The following are the steps to add a web link annotation to PDF using Python:
- Create a PdfDocument object.
- Load a PDF file from the specified location.
- Get a page from the document.
- Find a specific piece of text within the page using PdfTextFinder class.
- Create a PdfUriAnnotation object based on the bound of the text.
- Add the annotation to the page using PdfPageBase.AnnotationsWidget.Add() method.
- Save the modified document to a different PDF file.
- Python
from spire.pdf.common import *
from spire.pdf import *

# Create a PdfDocument object
doc = PdfDocument()

# Load a PDF file
doc.LoadFromFile("C:\\Users\\Administrator\\Desktop\\Input.pdf")

# Get a specific page
page = doc.Pages.get_Item(0)

# Create a PdfTextFinder object based on the page
finder = PdfTextFinder(page)

# Set the find options
finder.Options.Parameter = TextFindParameter.WholeWord
finder.Options.Parameter = TextFindParameter.IgnoreCase

# Find the instances of the specified text
fragments = finder.Find("Children");

# Get the first instance
textFragment = fragments[0]

# Get the text bound
bound = textFragment.Bounds[0]

# Create a Url annotation
urlAnnotation = PdfUriAnnotation(bound, "https://www.e-iceblue.com/");

# Add the annotation to the collection of the annotations
page.AnnotationsWidget.Add(urlAnnotation)

# Save result to file
doc.SaveToFile("output/WebLinkAnnotation.pdf")

# Dispose resources
doc.Dispose()
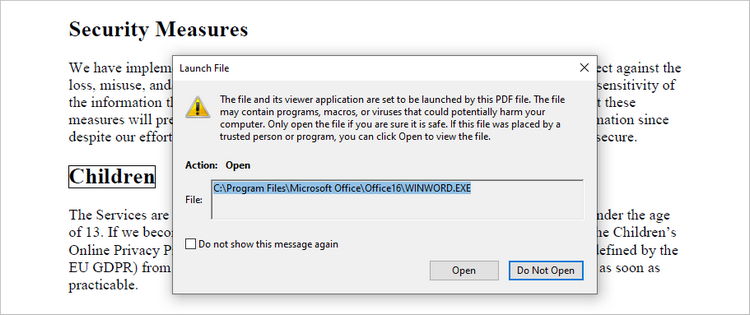
Add a File Link Annotation to PDF in Python
A file link annotation in a PDF document is a type of annotation that allows users to create a clickable link to an external file, such as another PDF, image, or document. Still, you can use the PdfTextFinder class to find the specified text in a PDF document, and then create a PdfFileLinkAnnotation object based on that text.
The following are the steps to add a file link annotation to PDF using Python:
- Create a PdfDocument object.
- Load a PDF file from the specified location.
- Get a page from the document.
- Find a specific piece of text within the page using PdfTextFinder class.
- Create a PdfFileLinkAnnotation object based on the bound of the text.
- Add the annotation to the page using PdfPageBase.AnnotationsWidget.Add() method.
- Save the modified document to a different PDF file.
- Python
from spire.pdf.common import *
from spire.pdf import *

# Create a PdfDocument object
doc = PdfDocument()

# Load a PDF file
doc.LoadFromFile("C:\\Users\\Administrator\\Desktop\\Input.pdf")

# Get a specific page
page = doc.Pages.get_Item(0)

# Create a PdfTextFinder object based on the page
finder = PdfTextFinder(page)

# Set the find options
finder.Options.Parameter = TextFindParameter.WholeWord
finder.Options.Parameter = TextFindParameter.IgnoreCase

# Find the instances of the specified text
fragments = finder.Find("Children");

# Get the first instance
textFragment = fragments[0]

# Get the text bound
bound = textFragment.Bounds[0]

# Create a file link annotation
fileLinkAnnotation = PdfFileLinkAnnotation(bound, "C:\\Users\\Administrator\\Desktop\\Report.docx")

# Add the annotation to the collection of the annotations
page.AnnotationsWidget.Add(fileLinkAnnotation)

# Save result to file
doc.SaveToFile("output/FileLinkAnnotation.pdf")

# Dispose resources
doc.Dispose()
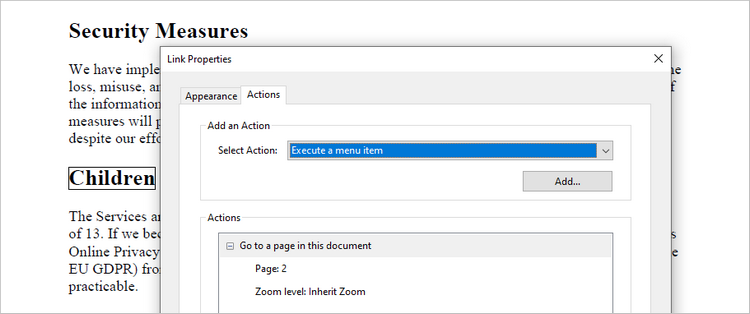
Add a Document Link Annotation to PDF in Python
A document link annotation in a PDF document is a type of annotation that creates a clickable link to a specific location within the same PDF file. To create a document link annotation, you can first use the PdfTextFinder class to identify the target text in the PDF document. Then, a PdfDocumentLinkAnnotation object is instantiated, and its destination property is configured to redirect the user to the specified location in the PDF.
The steps to add a document link annotation to PDF using Python are as follows:
- Create a PdfDocument object.
- Load a PDF file from the specified location.
- Get a page from the document.
- Find a specific piece of text within the page using PdfTextFinder class.
- Create a PdfDocumentLinkAnnotation object based on the bound of the text.
- Set the destination of the annotation using PdfDocumentLinkAnnotation.Destination property.
- Add the annotation to the page using PdfPageBase.AnnotationsWidget.Add() method.
- Save the modified document to a different PDF file.
- Python
from spire.pdf.common import *
from spire.pdf import *

# Create a PdfDocument object
doc = PdfDocument()

# Load a PDF file
doc.LoadFromFile("C:\\Users\\Administrator\\Desktop\\Input.pdf")

# Get a specific page
page = doc.Pages.get_Item(0)

# Create a PdfTextFinder object based on the page
finder = PdfTextFinder(page)

# Set the find options
finder.Options.Parameter = TextFindParameter.WholeWord
finder.Options.Parameter = TextFindParameter.IgnoreCase

# Find the instances of the specified text
fragments = finder.Find("Children");

# Get the first instance
textFragment = fragments[0]

# Get the text bound
bound = textFragment.Bounds[0]

# Create a document link annotation
documentLinkAnnotation = PdfDocumentLinkAnnotation(bound)

# Set the destination of the annotation
documentLinkAnnotation.Destination = PdfDestination(doc.Pages[1]);

# Add the annotation to the collection of the annotations
page.AnnotationsWidget.Add(documentLinkAnnotation)

# Save result to file
doc.SaveToFile("output/DocumentLinkAnnotation.pdf")

# Dispose resources
doc.Dispose()
Apply for a Temporary License
If you'd like to remove the evaluation message from the generated documents, or to get rid of the function limitations, please request a 30-day trial license for yourself.
C#: Set the Column Width of a Word Table
Setting the column width in Word tables is crucial for optimizing document readability and aesthetics. Appropriate column widths prevent long lines of text from hindering readability, particularly in text-dense tables. Word offers two approaches: percentages and fixed values. Setting column widths using percentage values allows tables to adapt to different screen sizes, keeping content neatly aligned and enhancing the reading experience. Using fixed values, on the other hand, precisely controls the structure of the table, ensuring consistency and professionalism, making it suitable for designs with strict data alignment requirements or complex layouts. This article will introduce how to set Word table column width based on percentage or fixed value settings using Spire.Doc for .NET in C# projects.
Install Spire.Doc for .NET
To begin with, you need to add the DLL files included in the Spire.Doc for .NET package as references in your .NET project. The DLL files can be either downloaded from this link or installed via NuGet.
PM> Install-Package Spire.Doc
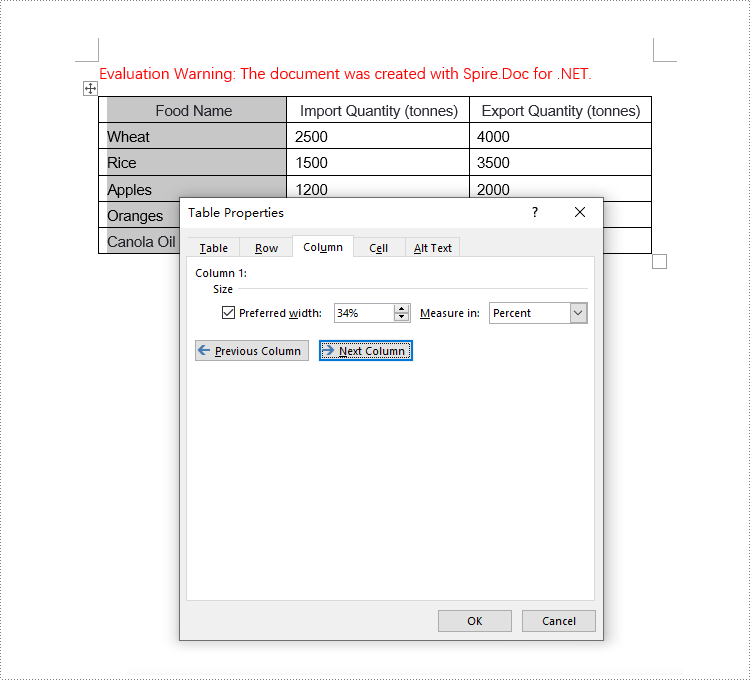
Set Column Width Based on Percentage in C#
When setting column widths in a Word table using percentage values, you first need to set the table's preferred width type to percentage. This is done with Table.PreferredWidth = new PreferredWidth(WidthType.Percentage, (short)100). Then, iterate through each column and set the width to the same or different percentage values as required. Here are the detailed steps:
- Create a Document object.
- Load a document using the Document.LoadFromFile() method.
- Retrieve the first section of the document using Document.Sections[0].
- Get the first table within the section using Section.Tables[0].
- Use a for loop to iterate through all rows in the table.
- Set the column width for cells in different columns to percentage values using the TableRow.Cells[index].SetCellWidth(value, CellWidthType.Percentage) method.
- Save the changes to the Word document using the Document.SaveToFile() method.
- C#
using Spire.Doc;

namespace SpireDocDemo
{
    internal class Program
    {
        static void Main(string[] args)
        {
            // Create a new Document object
            Document doc = new Document();

            // Load the document named "example.docx"
            doc.LoadFromFile("Sample.docx");

            // Get the first Section of the document
            Section section = doc.Sections[0];

            // Cast the first Table in the Section to Table type
            Table table = (Table)section.Tables[0];

            // Create a PreferredWidth object, set the width type to Percentage, and set the width value to 100%
            PreferredWidth percentageWidth = new PreferredWidth(WidthType.Percentage, (short)100);

            // Set the preferred width of the Table to the PreferredWidth object created above
            table.PreferredWidth = percentageWidth;

            // Define a variable of type TableRow
            TableRow tableRow;

            // Iterate through all rows in the Table
            for (int i = 0; i < table.Rows.Count; i++)
            {
                // Get the current row
                tableRow = table.Rows[i];

                // Set the width of the first column cell to 34%, with the type as Percentage
                tableRow.Cells[0].SetCellWidth(34, CellWidthType.Percentage);

                // Set the width of the second column cell to 33%, with the type as Percentage
                tableRow.Cells[1].SetCellWidth(33, CellWidthType.Percentage);

                // Set the width of the third column cell to 33%, with the type as Percentage
                tableRow.Cells[2].SetCellWidth(33, CellWidthType.Percentage);
            }

            // Save the modified document, specifying the file format as Docx2016
            doc.SaveToFile("set_column_width_by_percentage.docx", FileFormat.Docx2016);

            // Close the document
            doc.Close();
        }
    }
}
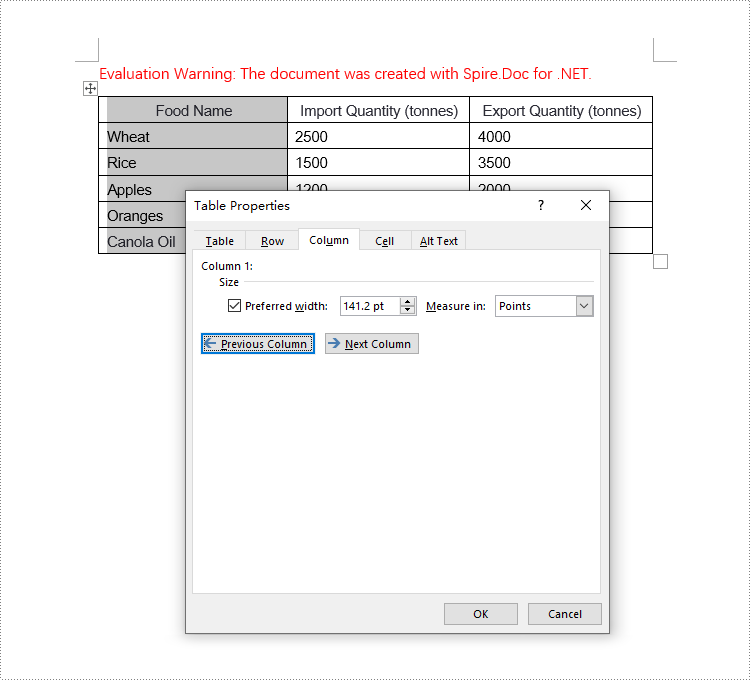
Set Column Width Based on Fixed Value in C#
When setting column widths in a Word table using fixed values, you first need to set the table's layout to fixed. This is done with Table.TableFormat.LayoutType = LayoutType.Fixed. Then, iterate through each column and set the width to the same or different fixed values as required. Here are the detailed steps:
- Create a Document object.
- Load a document using the Document.LoadFromFile() method.
- Retrieve the first section of the document using Document.Sections[0].
- Get the first table within the section using Section.Tables[0].
- Use a for loop to iterate through all rows in the table.
- Set the column width for cells in different columns to fixed values using the TableRow.Cells[index].SetCellWidth(value, CellWidthType.Point) method. Note that value should be replaced with the desired width in points.
- Save the changes to the Word document using the Document.SaveToFile() method.
- C#
using Spire.Doc;

namespace SpireDocDemo
{
    internal class Program
    {
        static void Main(string[] args)
        {
            // Create a new Document object
            Document doc = new Document();

            // Load the document
            doc.LoadFromFile("Sample.docx");

            // Get the first Section of the document
            Section section = doc.Sections[0];

            // Cast the first Table in the Section to Table type
            Table table = (Table)section.Tables[0];

            // Set the table layout type to Fixed
            table.Format.LayoutType = LayoutType.Fixed;

            // Get the left margin
            float leftMargin = section.PageSetup.Margins.Left;

            // Get the right margin
            float rightMargin = section.PageSetup.Margins.Right;

            // Calculate the page width minus the left and right margins
            double pageWidth = section.PageSetup.PageSize.Width - leftMargin - rightMargin;

            // Define a variable of type TableRow
            TableRow tableRow;

            // Loop through all rows in the Table
            for (int i = 0; i < table.Rows.Count; i++)
            {
                // Get the current row
                tableRow = table.Rows[i];

                // Set the width of the first column cell to 34% of the page width
                tableRow.Cells[0].SetCellWidth((float)(pageWidth * 0.34), CellWidthType.Point);

                // Set the width of the second column cell to 33% of the page width
                tableRow.Cells[1].SetCellWidth((float)(pageWidth * 0.33), CellWidthType.Point);

                // Set the width of the third column cell to 33% of the page width
                tableRow.Cells[2].SetCellWidth((float)(pageWidth * 0.33), CellWidthType.Point);
            }

            // Save the modified document, specifying the file format as Docx2016
            doc.SaveToFile("set_column_width_to_fixed_value.docx", FileFormat.Docx2016);

            // Close the document
            doc.Close();
        }
    }
}
Apply for a Temporary License
If you'd like to remove the evaluation message from the generated documents, or to get rid of the function limitations, please request a 30-day trial license for yourself.
C#: Extract Text from Images using the New Model of Spire.OCR for .NET
Spire.OCR for .NET offers developers a new model to extract text from images. In this article, we will demonstrate how to extract text from images in C# using the new model of Spire.OCR for .NET.
The detailed steps are as follows.
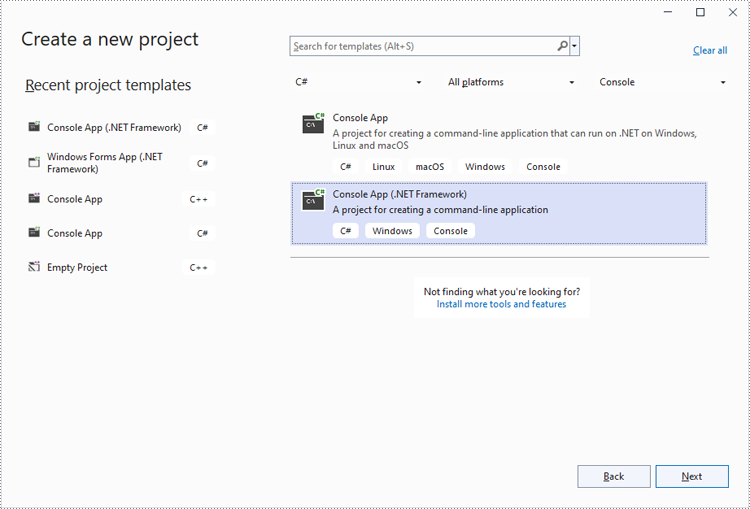
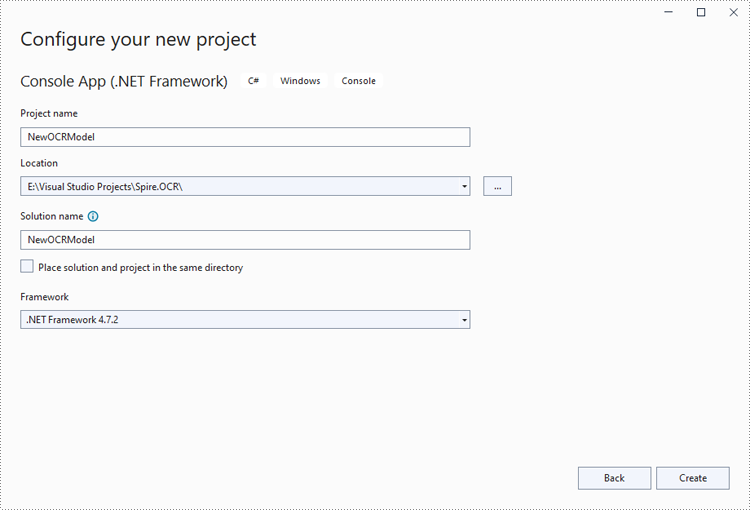
Step 1: Create a Console App (.NET Framework) in Visual Studio.
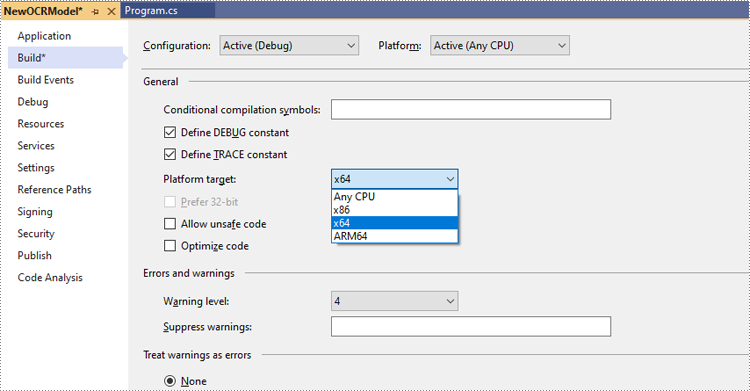
Step 2: Change the platform target of the application to x64.
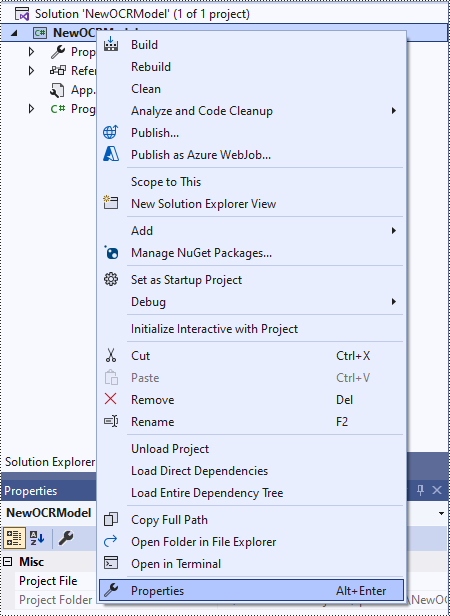
In the application's Solution Explorer, right-click on the project's name and then select "Properties".
Change the platform target of the application to x64. This step must be performed since Spire.OCR only supports 64-bit platforms.
Step 3: Install Spire.OCR for .NET in your application.
Install Spire.OCR for .NET through NuGet by executing the following command in the NuGet Package Manager Console:
Install-Package Spire.OCR
Step 4: Download the new model of Spire.OCR for .NET.
Download the model that fits in with your operating system from one of the following links.
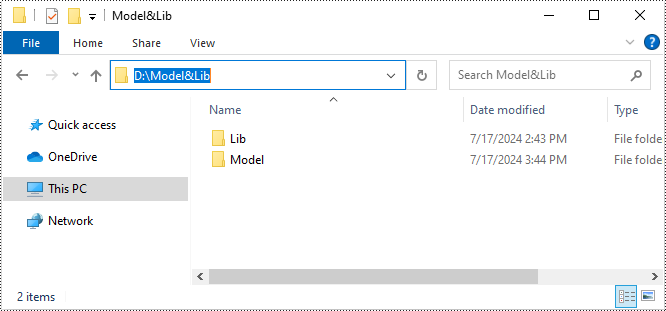
Then extract the package and save it to a specific directory on your computer. In this example, we saved the package to "D:\".
Step 5: Use the new model of Spire.OCR for .NET to extract text from images in C#.
The following code example shows how to extract text from an image using C# and the new model of Spire.OCR for .NET:
- C#
using Spire.OCR;
using System.IO;

namespace NewOCRModel
{
    internal class Program
    {
        static void Main(string[] args)
        {
            // Set license key
            // Spire.OCR.License.LicenseProvider.SetLicenseKey("your-license-key");

            // Create an instance of the OcrScanner class
            OcrScanner scanner = new OcrScanner();

            // Create an instance of the ConfigureOptions class to set up the scanner configuration
            ConfigureOptions configureOptions = new ConfigureOptions();

            // Set the path to the new model
            configureOptions.ModelPath = "D:\\win-x64";

            // Set the language for text recognition. The default is English.
            // Supported languages include English, Chinese, Chinesetraditional, French, German, Japanese, and Korean.
            configureOptions.Language = "English";

            // Apply the configuration options to the scanner
            scanner.ConfigureDependencies(configureOptions);

            // Extract text from an image
            scanner.Scan("test.png");

            //Save the extracted text to a text file
            string text = scanner.Text.ToString();
            File.WriteAllText("Output.txt", text);
        }
    }
}
Apply for a Temporary License
If you'd like to remove the evaluation message from the generated documents, or to get rid of the function limitations, please request a 30-day trial license for yourself.
C#: Add, Modify, or Remove Word Table Borders
Adding, modifying, and removing Word table borders can enhance the readability, aesthetics, and organization of data. Adding borders makes the content of the table clearer, distinguishing between different cells, which helps readers quickly identify information. Modifying border styles (such as line thickness, color, or pattern) can emphasize key data, guide visual flow, or conform to specific document styles and design requirements. Removing borders, in some cases, reduces visual clutter, making the content more compact and minimalist, especially suitable for data presentation where strict divisions are not needed or when you wish to downplay structural visibility. This article will introduce how to add, modify, or remove Word table borders in C# projects using Spire.Doc for .NET.
Install Spire.Doc for .NET
To begin with, you need to add the DLL files included in the Spire.Doc for .NET package as references in your .NET project. The DLL files can be either downloaded from this link or installed via NuGet.
PM> Install-Package Spire.Doc
C# Add Word Table Borders
To set borders for all cells in an entire Word table, you need to iterate over each cell and set its visual border properties. Here are the detailed steps:
- Create a Document object.
- Use the Document.LoadFromFile() method to load a document.
- Retrieve the first section of the document using Document.Sections[0].
- Get the first table in that section by using Section.Tables[0].
- Use a for loop to iterate through all the cells in the table.
- Set TableCell.CellFormat.Borders.BorderType to BorderStyle.Single, which sets the cell border to a single line style.
- Set TableCell.CellFormat.Borders.LineWidth to 1.5, defining the border width to be 1.5 points.
- Set TableCell.CellFormat.Borders.Color to Color.Black, setting the border color to black.
- Save the changes to the Word document using the Document.SaveToFile() method.
- C#
using Spire.Doc;

namespace SpireDocDemo
{
    internal class Program
    {
        static void Main(string[] args)
        {
            // Create a new Document object
            Document doc = new Document();

            // Load the document from a file
            doc.LoadFromFile("TableExample1.docx");

            // Get the first section of the document
            Section section = doc.Sections[0];

            // Get the first table in that section
            Table table = (Table)section.Tables[0];

            // Declare TableRow and TableCell variables for use within loops
            TableRow tableRow;
            TableCell tableCell;

            // Iterate through all rows in the table
            for (int i = 0; i < table.Rows.Count; i++)
            {
                // Get the current row
                tableRow = table.Rows[i];

                // Iterate through all cells in the current row
                for (int j = 0; j < tableRow.Cells.Count; j++)
                {
                    // Get the current cell
                    tableCell = tableRow.Cells[j];

                    // Set the border style of the current cell to single line
                    tableCell.CellFormat.Borders.BorderType = Spire.Doc.Documents.BorderStyle.Single;
                }
            }

            // Save the modified document as a new file
            doc.SaveToFile("AddBorders.docx", FileFormat.Docx2016);

            // Close the document to release resources
            doc.Close();
        }
    }
}
C# Modify Word Table Borders
Spire.Doc offers a range of border properties such as the border style TableCell.CellFormat.Borders.BorderType, border width TableCell.CellFormat.Borders.LineWidth, and border color TableCell.CellFormat.Borders.Color, among others. You can customize these properties to achieve the desired effects. Below are the detailed steps:
- Create a Document object.
- Load a document using the Document.LoadFromFile() method.
- Retrieve the first section of the document using Document.Sections[0].
- Get the first table in the section using Section.Tables[0].
- Use a for loop to iterate over the cells in the table whose border styles you wish to change.
- Change the bottom border color of the cell by setting TableCell.CellFormat.Borders.Bottom.Color to Color.PaleVioletRed.
- Change the bottom border style of the cell by setting TableCell.CellFormat.Borders.Bottom.BorderType to BorderStyle.DotDash.
- Change the bottom border width of the cell by setting TableCell.CellFormat.Borders.Bottom.LineWidth to 2 points.
- Save the changes to the document using the Document.SaveToFile() method.
- C#
using Spire.Doc;
using Spire.Doc.Documents;
using System.Drawing;

namespace SpireDocDemo
{
    internal class Program
    {
        static void Main(string[] args)
        {
            // Create a new Document object
            Document doc = new Document();

            // Load the document from a file
            doc.LoadFromFile("TableExample2.docx");

            // Get the first section of the document
            Section section = doc.Sections[0];

            // Get the first table in that section
            Table table = (Table)section.Tables[0];

            // Declare a TableRow to use within the loop
            TableRow tableRow;

            // Iterate through all rows of the table
            for (int i = 1; i < table.Rows.Count - 1; i++)
            {
                tableRow = table.Rows[i];

                // Set the border color of the current cell
                tableRow.Cells[1].CellFormat.Borders.Bottom.Color = Color.PaleVioletRed;

                // Set the border style of the current cell to DotDash
                tableRow.Cells[1].CellFormat.Borders.Bottom.BorderType = Spire.Doc.Documents.BorderStyle.DotDash;

                // Set the width of the border
                tableRow.Cells[1].CellFormat.Borders.Bottom.LineWidth = 2;
            }

            // Save the modified document as a new file
            doc.SaveToFile("ModifiedBorders.docx", FileFormat.Docx2016);

            // Close the document and release resources
            doc.Close();
        }
    }
}
C# Remove Word Table Borders
During the process of handling Word documents, not only can border styles be applied to entire tables, but customization can also be extended to individual cells. To completely remove all borders from a table, it is recommended to follow a two-step strategy: First, apply border removal settings to the table itself; second, visit each cell within the table individually to clear their border styles. Here are the detailed steps:
- Create a Document object.
- Load a document using the Document.LoadFromFile() method.
- Retrieve the first table in the section using Section.Tables[0].
- Use a for loop to iterate over all cells in the table.
- Set Table.TableFormat.Borders.BorderType = BorderStyle.None to remove borders from the table.
- Set TableCell.CellFormat.Borders.BorderType = BorderStyle.None to remove borders from each cell.
- Save the changes to the Word document using the Document.SaveToFile() method.
- C#
using Spire.Doc;
using Spire.Doc.Documents;
using System.Drawing;

namespace SpireDocDemo
{
    internal class Program
    {
        static void Main(string[] args)
        {
            // Create a new Document object
            Document doc = new Document();

            // Load the document from file
            doc.LoadFromFile("TableExample2.docx");

            // Get the first section of the document
            Section section = doc.Sections[0];

            // Get the first table in that section
            Table table = (Table)section.Tables[0];

            // Remove the borders set on the table
            table.Format.Borders.BorderType = BorderStyle.None;

            // Declare a TableRow to use in the loop
            TableRow tableRow;

            // Iterate through all rows in the table
            for (int i = 0; i < table.Rows.Count; i++)
            {
                tableRow = table.Rows[i];
                for (int j = 0; j < tableRow.Cells.Count; j++)
                {
                    // Remove all borders set on the cell
                    tableRow.Cells[j].CellFormat.Borders.BorderType = BorderStyle.None;
                }
            }

            // Save the modified document as a new file
            doc.SaveToFile("RemoveBorders.docx", FileFormat.Docx2016);

            // Close the document to release resources
            doc.Close();
        }
    }
}

Apply for a Temporary License
If you'd like to remove the evaluation message from the generated documents, or to get rid of the function limitations, please request a 30-day trial license for yourself.
Python: Change or Remove Borders for Tables in Word
Tables are a powerful formatting tool in Word, allowing you to organize and present data effectively. However, the default table borders may not always align with your document's style and purpose. By selectively changing or removing the borders, you can achieve a variety of visual effects to suit your requirements. In this article, we will explore how to change and remove borders for tables in Word documents in Python using Spire.Doc for Python.
Install Spire.Doc for Python
This scenario requires Spire.Doc for Python. It can be easily installed in your Windows through the following pip command.
pip install Spire.Doc
If you are unsure how to install, please refer to this tutorial: How to Install Spire.Doc for Python on Windows
Change Borders for a Table in Word in Python
Spire.Doc for Python empowers you to retrieve the borders collection of a table by using the Table.TableFormat.Borders property. Once retrieved, you can access individual borders (like top border, bottom border, left border, right border, horizontal border, and vertical border) from the collection and then modify them by adjusting their line style, width, and color. The detailed steps are as follows.
- Create an object of the Document class.
- Load a Word document using Document.LoadFromFile() method.
- Get a specific section using Document.Sections[index] property.
- Get a specific table using Section.Tables[index] property.
- Get the borders collection of the table using Table.TableFormat.Borders property.
- Get an individual border, such as the top border from the borders collection using Borders.Top property, and then change its line style, width and color.
- Refer to the above step to get other individual borders from the borders collection, and then change their line style, width and color.
- Save the resulting document using Document.SaveToFile() method.
- Python
from spire.doc import *
from spire.doc.common import *

# Create an object of the Document class
document = Document()
# Load a Word document
document.LoadFromFile("Table.docx")

# Add a section to the document
section = document.Sections.get_Item(0)

# Get the first table in the section
table = section.Tables.get_Item(0) if isinstance(section.Tables.get_Item(0), Table) else None

# Get the collection of the borders
borders = table.TableFormat.Borders

# Get the top border and change border style, line width, and color
topBorder = borders.Top
topBorder.BorderType = BorderStyle.Single
topBorder.LineWidth = 1.0
topBorder.Color = Color.get_YellowGreen()

# Get the left border and change border style, line width, and color
leftBorder = borders.Left
leftBorder.BorderType = BorderStyle.Single
leftBorder.LineWidth = 1.0
leftBorder.Color = Color.get_YellowGreen()

# Get the right border and change border style, line width, and color
rightBorder = borders.Right
rightBorder.BorderType = BorderStyle.Single
rightBorder.LineWidth = 1.0
rightBorder.Color = Color.get_YellowGreen()

# Get the bottom border and change border style, line width, and color
bottomBorder = borders.Bottom
bottomBorder.BorderType = BorderStyle.Single
bottomBorder.LineWidth = 1.0
bottomBorder.Color = Color.get_YellowGreen()

# Get the horizontal border and change border style, line width, and color
horizontalBorder = borders.Horizontal
horizontalBorder.BorderType = BorderStyle.Dot
horizontalBorder.LineWidth = 1.0
horizontalBorder.Color = Color.get_Orange()

# Get the vertical border and change border style, line width, and color
verticalBorder = borders.Vertical
verticalBorder.BorderType = BorderStyle.Dot
verticalBorder.LineWidth = 1.0
verticalBorder.Color = Color.get_CornflowerBlue()

# Save the resulting document
document.SaveToFile("ChangeBorders.docx", FileFormat.Docx2013)
document.Close()
Remove Borders from a Table in Word in Python
To remove borders from a table, you need to set the BorderType property of the borders to BorderStyle.none. The detailed steps are as follows.
- Create an object of the Document class.
- Load a Word document using Document.LoadFromFile() method.
- Get a specific section using Document.Sections[index] property.
- Get a specific table using Section.Tables[index] property.
- Get the borders collection of the table using Table.TableFormat.Borders property.
- Get an individual border, such as the top border from the borders collection using Borders.Top property. Then set the BorderType property of the top border to BorderStyle.none.
- Refer to the above step to get other individual borders from the borders collection and then set the BorderType property of the borders to BorderStyle.none.
- Save the resulting document using Document.SaveToFile() method.
- Python
from spire.doc import *
from spire.doc.common import *

# Initialize an instance of the Document class
document = Document()
document.LoadFromFile("ChangeBorders.docx")

# Add a section to the document
section = document.Sections.get_Item(0)

# Get the first table in the section
table = section.Tables.get_Item(0) if isinstance(section.Tables.get_Item(0), Table) else None

# Get the borders collection of the table
borders = table.TableFormat.Borders

# Remove top border
topBorder = borders.Top
topBorder.BorderType = BorderStyle.none

# Remove left border
leftBorder = borders.Left
leftBorder.BorderType = BorderStyle.none

# Remove right border
rightBorder = borders.Right
rightBorder.BorderType = BorderStyle.none

# Remove bottom border
bottomBorder = borders.Bottom
bottomBorder.BorderType = BorderStyle.none

# remove inside horizontal border
horizontalBorder = borders.Horizontal
horizontalBorder.BorderType = BorderStyle.none

# Remove inside vertical border
verticalBorder = borders.Vertical
verticalBorder.BorderType = BorderStyle.none

# Save the resulting document
document.SaveToFile("RemoveBorders.docx", FileFormat.Docx2013)
document.Close()
Apply for a Temporary License
If you'd like to remove the evaluation message from the generated documents, or to get rid of the function limitations, please request a 30-day trial license for yourself.
Python: Count Words, Pages, Characters, Paragraphs and Lines in Word
Various written documents, such as academic papers, reports, and legal materials, often have specific formatting guidelines that encompass word count, page count, and other essential metrics. Accurately measuring these elements is crucial as it ensures that your document adheres to the required standards and meets the expected quality benchmarks. In this article, we will explain how to count words, pages, characters, paragraphs, and lines in a Word document in Python using Spire.Doc for Python.
- Count Words, Pages, Characters, Paragraphs, and Lines in a Word Document in Python
- Count Words and Characters in a Specific Paragraph of a Word Document in Python
Install Spire.Doc for Python
This scenario requires Spire.Doc for Python. It can be easily installed in your Windows through the following pip commands.
pip install Spire.Doc
If you are unsure how to install, please refer to: How to Install Spire.Doc for Python on Windows
Count Words, Pages, Characters, Paragraphs, and Lines in a Word Document in Python
Spire.Doc for Python offers the BuiltinDocumentProperties class that empowers you to retrieve crucial information from your Word document. By utilizing this class, you can access a wealth of details, including the built-in document properties, as well as the number of words, pages, characters, paragraphs, and lines contained within the document.
The steps below explain how to get the number of words, pages, characters, paragraphs, and lines in a Word document in Python using Spire.Doc for Python:
- Create an object of the Document class.
- Load a Word document using the Document.LoadFromFile() method.
- Get the BuiltinDocumentProperties object using the Document.BuiltinDocumentProperties property.
- Get the number of words, characters, paragraphs, lines, and pages in the document using the WordCount, CharCount, ParagraphCount, LinesCount, PageCount properties of the BuiltinDocumentProperties class, and append the result to a list.
- Write the content of the list into a text file.
- Python
from spire.doc import *
from spire.doc.common import *

# Create an object of the Document class
doc = Document()
# Load a Word document
doc = Document("Input.docx")

# Create a list
sb = []

# Get the built-in properties of the document
properties = doc.BuiltinDocumentProperties

# Get the number of words, characters, paragraphs, lines, and pages and append the result to the list
sb.append("The number of words: " + str(properties.WordCount))
sb.append("The number of characters: " + str(properties.CharCount))
sb.append("The number of paragraphs: " + str(properties.ParagraphCount))
sb.append("The number of lines: " + str(properties.LinesCount))
sb.append("The number of pages: " + str(properties.PageCount))

# Save the data in the list to a text file
with open("result.txt", "w") as file:
file.write("\n".join(sb))

doc.Close()

Count Words and Characters in a Specific Paragraph of a Word Document in Python
In addition to retrieving the overall word count, page count, and other metrics for an entire Word document, you are also able to get the word count and character count for a specific paragraph by using the Paragraph.WordCount and Paragraph.CharCount properties.
The steps below explain how to get the number of words and characters of a paragraph in a Word document in Python using Spire.Doc for Python:
- Create an object of the Document class.
- Load a Word document using the Document.LoadFromFile() method.
- Get a specific paragraph using the Document.Sections[sectionIndex].Paragraphs[paragraphIndex] property.
- Get the number of words and characters in the paragraph using the Paragraph.WordCount and Paragraph.CharCount properties, and append the result to a list.
- Write the content of the list into a text file.
- Python
from spire.doc import *
from spire.doc.common import *

# Create an object of the Document class
doc = Document()
# Load a Word document
doc = Document("Input.docx")

# Get a specific paragraph
paragraph = doc.Sections.get_Item(0).Paragraphs.get_Item(0)

# Create a list
sb = []

# Get the number of words and characters in the paragraph and append the result to the list
sb.append("The number of words: " + str(paragraph.WordCount))
sb.append("The number of characters: " + str(paragraph.CharCount))

# Save the data in the list to a text file
with open("result.txt", "w") as file:
file.write("\n".join(sb))

doc.Close()

Apply for a Temporary License
If you'd like to remove the evaluation message from the generated documents, or to get rid of the function limitations, please request a 30-day trial license for yourself.
Python: Insert or Remove Section Breaks in Word
Section breaks in Word allow users to divide a document into sections, each with unique formatting options. This is especially useful when working with long documents where you want to apply different layouts, headers, footers, margins or page orientations within the same document. In this article, you will learn how to insert or remove section breaks in Word in Python using Spire.Doc for Python.
Install Spire.Doc for Python
This scenario requires Spire.Doc for Python and plum-dispatch v1.7.4. They can be easily installed in your Windows through the following pip commands.
pip install Spire.Doc
If you are unsure how to install, please refer to this tutorial: How to Install Spire.Doc for Python on Windows
Insert Section Breaks in Word in Python
Spire.Doc for Python provides the Paragraph.InsertSectionBreak(breakType: SectionBreakType) method to insert a specified type of section break to a paragraph. The following table provides an overview of the supported section break types, along with their corresponding Enums and descriptions:
| Section Break | Enum | Description |
| New page | SectionBreakType.New_Page | Start the new section on a new page. |
| Continuous | SectionBreakType.No_Break | Start the new section on the same page, allowing for continuous content flow. |
| Odd page | SectionBreakType.Odd_Page | Start the new section on the next odd-numbered page. |
| Even page | SectionBreakType.Even_Page | Start the new section on the next even-numbered page. |
| New column | SectionBreakType.New_Column | Start the new section in the next column if columns are enabled. |
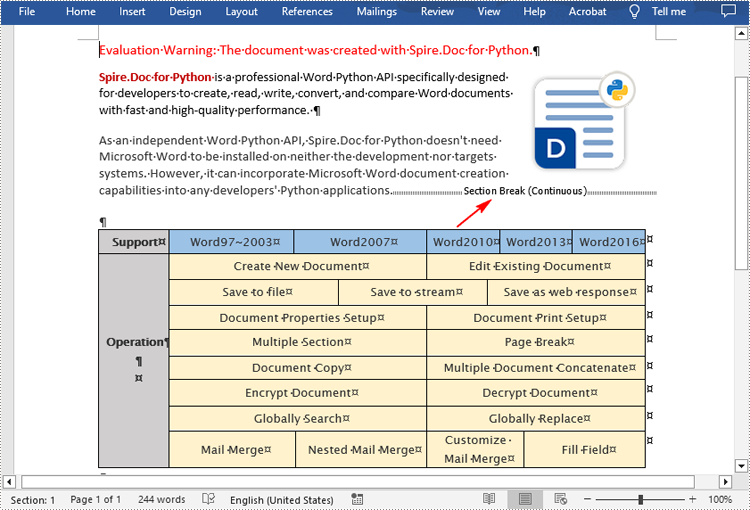
The following are the detailed steps to insert a continuous section break:
- Create a Document instance.
- Load a Word document using Document.LoadFromFile() method.
- Get a specified section using Document.Sections[] property.
- Get a specified paragraph of the section using Section.Paragraphs[] property.
- Add a section break to the end of the paragraph using Paragraph.InsertSectionBreak() method.
- Save the result document using Document.SaveToFile() method.
- Python
from spire.doc import *
from spire.doc.common import *

inputFile = "sample.docx"
outputFile = "InsertSectionBreak.docx"

# Create a Document instance
document = Document()

# Load a Word document
document.LoadFromFile(inputFile)

# Get a specific section
section = document.Sections.get_Item(0)

# Get a specific paragraph
paragraph = section.Paragraphs.get_Item(0)

# Insert a continuous section break
paragraph.InsertSectionBreak(SectionBreakType.NoBreak)

# Save the result document
document.SaveToFile(outputFile, FileFormat.Docx2016)
document.Close()
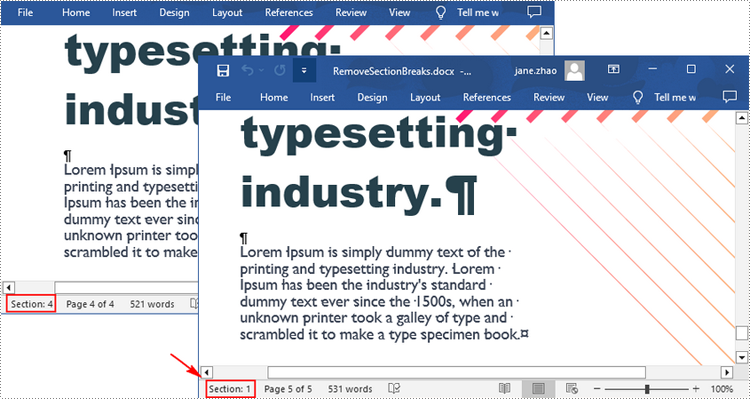
Remove Section Breaks in Word in Python
To delete all sections breaks in a Word document, we need to access the first section in the document, then copy the contents of the other sections to the first section and delete them. The following are the detailed steps:
- Create a Document instance.
- Load a Word document using Document.LoadFromFile() method.
- Get the first section using Document.Sections[] property.
- Iterate through other sections in the document.
- Get the second section, and then iterate through to get its child objects.
- Clone the child objects of the second section and add them to the first section using Section.Body.ChildObjects.Add() method.
- Delete the second section using Document.Sections.Remove() method.
- Repeat the process to copy and delete the remaining sections.
- Save the result document using Document.SaveToFile() method.
- Python
from spire.doc import *
from spire.doc.common import *

inputFile = "Report.docx"
outputFile = "RemoveSectionBreaks.docx"

# Create a Document instance
document = Document()

# Load a Word document
document.LoadFromFile(inputFile)

# Get a specific section
section = document.Sections.get_Item(0)

# Iterate through other sections in the document
for i in range(document.Sections.Count - 1):
    # Get the second section in the document
    section = document.Sections[1]

    # Iterate through all child objects of the second section
    for j in range(section.Body.ChildObjects.Count):
        # Get the child objects
        obj = section.Body.ChildObjects.get_Item(j)
        # Clone the child objects to the first section
        sec.Body.ChildObjects.Add(obj.Clone())
        # Remove the second section
        document.Sections.Remove(section)

# Save the result document
document.SaveToFile(outputFile, FileFormat.Docx2016)
document.Close()
Apply for a Temporary License
If you'd like to remove the evaluation message from the generated documents, or to get rid of the function limitations, please request a 30-day trial license for yourself.
Python: Extract Comments from Word
Comments in Word documents are often used for collaborative review and feedback purposes. They may contain text and images that provide valuable information to guide document improvements. Extracting the text and images from comments allows you to analyze and evaluate the feedback provided by reviewers, helping you gain a comprehensive understanding of the strengths, weaknesses, and suggestions related to the document. In this article, we will demonstrate how to extract text and images from Word comments in Python using Spire.Doc for Python.
Install Spire.Doc for Python
This scenario requires Spire.Doc for Python and plum-dispatch v1.7.4. They can be easily installed in your Windows through the following pip command.
pip install Spire.Doc
If you are unsure how to install, please refer to this tutorial: How to Install Spire.Doc for Python on Windows
Extract Text from Word Comments in Python
You can easily retrieve the author and text of a Word comment using the Comment.Format.Author and Comment.Body.Paragraphs[index].Text properties provided by Spire.Doc for Python. The detailed steps are as follows.
- Create an object of the Document class.
- Load a Word document using the Document.LoadFromFile() method.
- Create a list to store the extracted comment data.
- Iterate through the comments in the document.
- For each comment, iterate through the paragraphs of the comment body.
- For each paragraph, get the text using the Comment.Body.Paragraphs[index].Text property.
- Get the author of the comment using the Comment.Format.Author property.
- Add the text and author of the comment to the list.
- Save the content of the list to a text file.
- Python
from spire.doc import *
from spire.doc.common import *

# Create an object of the Document class
document = Document()
# Load a Word document containing comments
document.LoadFromFile("Comments.docx")

# Create a list to store the extracted comment data
comments = []

# Iterate through the comments in the document
for i in range(document.Comments.Count):
    comment = document.Comments[i]
    comment_text = ""

    # Iterate through the paragraphs in the comment body
    for j in range(comment.Body.Paragraphs.Count):
        paragraph = comment.Body.Paragraphs[j]
        comment_text += paragraph.Text + "\n"

    # Get the comment author
    comment_author = comment.Format.Author

    # Append the comment data to the list
    comments.append({
        "author": comment_author,
        "text": comment_text
    })

# Write the comment data to a file
with open("comment_data.txt", "w", encoding="utf-8") as file:
    for comment in comments:
        file.write(f"Author: {comment['author']}\nText: {comment['text']}\n\n")

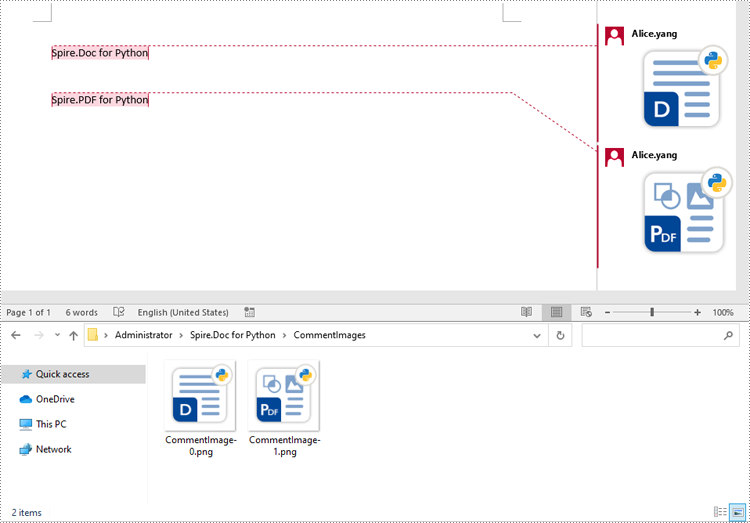
Extract Images from Word Comments in Python
To extract images from Word comments, you need to iterate through the child objects in the paragraphs of the comments to find the DocPicture objects, then get the image data using DocPicture.ImageBytes property, finally save the image data to image files.
- Create an object of the Document class.
- Load a Word document using the Document.LoadFromFile() method.
- Create a list to store the extracted image data.
- Iterate through the comments in the document.
- For each comment, iterate through the paragraphs of the comment body.
- For each paragraph, iterate through the child objects of the paragraph.
- Check if the object is a DocPicture object.
- If the object is a DocPicture, get the image data using the DocPicture.ImageBytes property and add it to the list.
- Save the image data in the list to individual image files.
- Python
from spire.doc import *
from spire.doc.common import *

# Create an object of the Document class
document = Document()
# Load a Word document containing comments
document.LoadFromFile("Comments.docx")

# Create a list to store the extracted image data
images = []

# Iterate through the comments in the document
for i in range(document.Comments.Count):
    comment = document.Comments.get_Item(i)
    # Iterate through the paragraphs in the comment body
    for j in range(comment.Body.Paragraphs.Count):
        paragraph = comment.Body.Paragraphs.get_Item(j)
        # Iterate through the child objects in the paragraph
        for o in range(paragraph.ChildObjects.Count):
            obj = paragraph.ChildObjects.get_Item(o)
            # Find the images
            if isinstance(obj, DocPicture):
                picture = obj
                # Get the image data and add it to the list
                data_bytes = picture.ImageBytes
                images.append(data_bytes)

# Save the image data to image files
for i, image_data in enumerate(images):
    file_name = f"CommentImage-{i}.png"
    with open(os.path.join("CommentImages/", file_name), 'wb') as image_file:
        image_file.write(image_data)
Apply for a Temporary License
If you'd like to remove the evaluation message from the generated documents, or to get rid of the function limitations, please request a 30-day trial license for yourself.
Python: Get Coordinates of the Specified Text or Image in PDF
Retrieving the coordinates of text or images within a PDF document can quickly locate specific elements, which is valuable for extracting content from PDFs. This capability also enables adding annotations, marks, or stamps to the desired locations in a PDF, allowing for more advanced document processing and manipulation.
In this article, you will learn how to get coordinates of the specified text or image in a PDF document using Spire.PDF for Python.
- Get Coordinates of the Specified Text in PDF in Python
- Get Coordinates of the Specified Image in PDF in Python
Install Spire.PDF for Python
This scenario requires Spire.PDF for Python and plum-dispatch v1.7.4. They can be easily installed in your Windows through the following pip command.
pip install Spire.PDF
If you are unsure how to install, please refer to this tutorial: How to Install Spire.PDF for Python on Windows
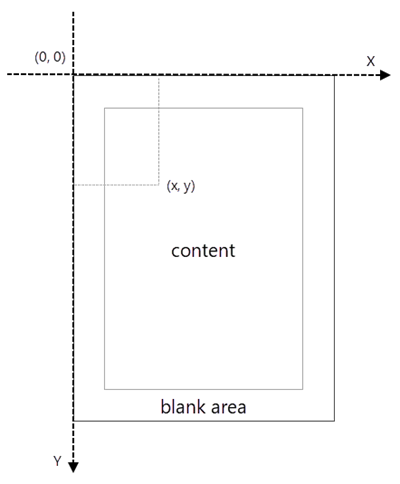
Coordinate System in Spire.PDF
When using Spire.PDF to process an existing PDF document, the origin of the coordinate system is located at the top left corner of the page. The X-axis extends horizontally from the origin to the right, and the Y-axis extends vertically downward from the origin (shown as below).
Get Coordinates of the Specified Text in PDF in Python
To find the coordinates of a specific piece of text within a PDF document, you must first use the PdfTextFinder.Find() method to locate all instances of the target text on a particular page. Once you have found these instances, you can then access the PdfTextFragment.Positions property to retrieve the precise (X, Y) coordinates for each instance of the text.
The steps to get coordinates of the specified text in PDF are as follows.
- Create a PdfDocument object.
- Load a PDF document from a specified path.
- Get a specific page from the document.
- Create a PdfTextFinder object.
- Specify find options through PdfTextFinder.Options property.
- Search for a string within the page using PdfTextFinder.Find() method.
- Get a specific instance of the search results.
- Get X and Y coordinates of the text through PdfTextFragment.Positions[0].X and PdfTextFragment.Positions[0].Y properties.
- Python
from spire.pdf.common import *
from spire.pdf import *
# Create a PdfDocument object
doc = PdfDocument()
# Load a PDF document
doc.LoadFromFile("C:\\Users\\Administrator\\Desktop\\Privacy Policy.pdf")
# Get a specific page
page = doc.Pages.get_Item(0)
# Create a PdfTextFinder object
textFinder = PdfTextFinder(page)
# Specify find options
findOptions = PdfTextFindOptions()
findOptions.Parameter = TextFindParameter.IgnoreCase
findOptions.Parameter = TextFindParameter.WholeWord
textFinder.Options = findOptions
# Search for the string "PRIVACY POLICY" within the page
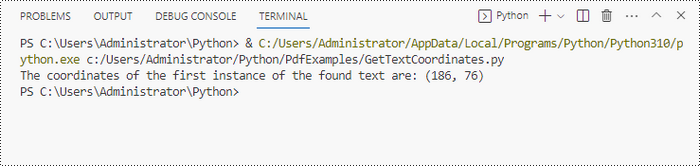
findResults = textFinder.Find("PRIVACY POLICY")
# Get the first instance of the results
result = findResults[0]
# Get X/Y coordinates of the found text
x = int(result.Positions[0].X)
y = int(result.Positions[0].Y)
print("The coordinates of the first instance of the found text are:", (x, y))
# Dispose resources
doc.Dispose()
Get Coordinates of the Specified Image in PDF in Python
Spire.PDF for Python provides the PdfImageHelper class, which allows users to extract image details from a specific page within a PDF file. By doing so, you can leverage the PdfImageInfo.Bounds property to retrieve the (X, Y) coordinates of an individual image.
The steps to get coordinates of the specified image in PDF are as follows.
- Create a PdfDocument object.
- Load a PDF document from a specified path.
- Get a specific page from the document.
- Create a PdfImageHelper object.
- Get the image information from the page using PdfImageHelper.GetImagesInfo() method.
- Get X and Y coordinates of a specific image through PdfImageInfo.Bounds property.
- Python
from spire.pdf.common import *
from spire.pdf import *
# Create a PdfDocument object
doc = PdfDocument()
# Load a PDF document
doc.LoadFromFile("C:\\Users\\Administrator\\Desktop\\Privacy Policy.pdf")
# Get a specific page
page = doc.Pages.get_Item(0)
# Create a PdfImageHelper object
imageHelper = PdfImageHelper()
# Get image information from the page
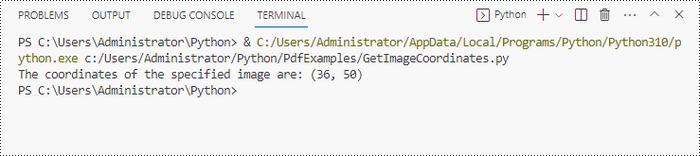
imageInformation = imageHelper.GetImagesInfo(page)
# Get X/Y coordinates of a specific image
x = int(imageInformation[0].Bounds.X)
y = int(imageInformation[0].Bounds.Y)
print("The coordinates of the specified image are:", (x, y))
# Dispose resources
doc.Dispose()
Apply for a Temporary License
If you'd like to remove the evaluation message from the generated documents, or to get rid of the function limitations, please request a 30-day trial license for yourself.
Python: Convert PDF to TIFF and TIFF to PDF
TIFF is a popular image format used in scanning and archiving due to its high quality and support for a wide range of color spaces. On the other hand, PDFs are widely used for document exchange because they preserve the layout and formatting of a document while compressing the file size. Conversion between these formats can be useful for various purposes such as archival, editing, or sharing documents.
In this article, you will learn how to convert PDF to TIFF and TIFF to PDF using the Spire.PDF for Python and Pillow libraries.
Install Spire.PDF for Python
This situation relies on the combination of Spire.PDF for Python and Pillow (PIL). Spire.PDF is used to read, create and convert PDF documents, while the PIL library is used for handling TIFF files and accessing their frames.
The libraries can be easily installed on your device through the following pip command.
pip install Spire.PDF
pip install pillow
Convert PDF to TIFF in Python
To complete the PDF to TIFF conversion, you first need to load the PDF document and convert the individual pages into image streams using Spire.PDF. Subsequently, these image streams are then merged together using the functionality of the PIL library, resulting in a consolidated TIFF image.
The following are the steps to convert PDF to TIFF using Python.
- Create a PdfDocument object.
- Load a PDF document from a specified file path.
- Iterate through the pages in the document.
- Convert each page into an image stream using PdfDocument.SaveAsImage() method.
- Convert the image stream into a PIL image.
- Combine these PIL images into a single TIFF image.
- Python
from spire.pdf.common import *
from spire.pdf import *

from PIL import Image
from io import BytesIO

# Create a PdfDocument object
doc = PdfDocument()

# Load a PDF document
doc.LoadFromFile("C:\\Users\\Administrator\\Desktop\\Input.pdf")

# Create an empty list to store PIL Images
images = []

# Iterate through all pages in the document
for i in range(doc.Pages.Count):

    # Convert a specific page to an image stream
    with doc.SaveAsImage(i) as imageData:

        # Open the image stream as a PIL image
        img = Image.open(BytesIO(imageData.ToArray()))

        # Append the PIL image to list
        images.append(img)

# Save the PIL Images as a multi-page TIFF file
images[0].save("Output/ToTIFF.tiff", save_all=True, append_images=images[1:])

# Dispose resources
doc.Dispose()
Convert TIFF to PDF in Python
With the assistance of the PIL library, you can load a TIFF file and transform each frame into distinct PNG files. Afterwards, you can utilize Spire.PDF to draw these PNG files onto pages within a PDF document.
To convert a TIFF image to a PDF document using Python, follow these steps.
- Create a PdfDocument object.
- Load a TIFF image.
- Iterate though the frames in the TIFF image.
- Get a specific frame, and save it as a PNG file.
- Add a page to the PDF document.
- Draw the image on the page at the specified location using PdfPageBase.Canvas.DrawImage() method.
- Save the document to a PDF file.
- Python
from spire.pdf.common import *
from spire.pdf import *

from PIL import Image
import io

# Create a PdfDocument object
doc = PdfDocument()

# Set the page margins to 0
doc.PageSettings.SetMargins(0.0)

# Load a TIFF image
tiff_image = Image.open("C:\\Users\\Administrator\\Desktop\\TIFF.tiff")

    # Go to the current frame
    tiff_image.seek(i)

    # Extract the image of the current frame
    frame_image = tiff_image.copy()

    # Save the image to a PNG file
    frame_image.save(f"temp/output_frame_{i}.png")

    # Load the image file to PdfImage
    image = PdfImage.FromFile(f"temp/output_frame_{i}.png")

    # Get image width and height
    width = image.PhysicalDimension.Width
    height = image.PhysicalDimension.Height

    # Add a page to the document
    page = doc.Pages.Add(SizeF(width, height))

    # Draw image at (0, 0) of the page
    page.Canvas.DrawImage(image, 0.0, 0.0, width, height)

# Save the document to a PDF file
doc.SaveToFile("Output/TiffToPdf.pdf",FileFormat.PDF)

# Dispose resources
doc.Dispose()
Apply for a Temporary License
If you'd like to remove the evaluation message from the generated documents, or to get rid of the function limitations, please request a 30-day trial license for yourself.