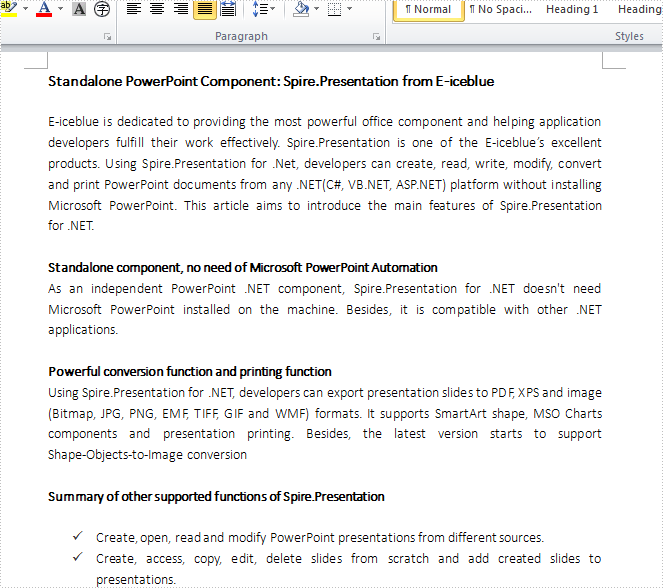
How to split text into two columns and add line between them
Columns are widely used to set page layout, for which could split text into two or more columns so that the text could flow from one column to the next on the same page. Using Spire.Doc, we could achieve this feature and add a line between columns at the same time. This article is going to introduce how to split text into two columns and add line between them.
Note: please download the latest version of Spire.Doc and add Spire.Doc .dll as reference of Visual Studio.
Step 1: Create a new document and load from file
Document document = new Document();
document.LoadFromFile("S.docx");
Step 2: Add a column to section one, set the width of columns and the spacing between columns. Here we set width as 100f and spacing as 20f.
document.Sections[0].AddColumn(100f, 20f);
Step 3: Add a line between the two columns
document.Sections[0].PageSetup.ColumnsLineBetween = true;
Step 4: Save the document and launch to see effects
document.SaveToFile("result.docx",FileFormat.Docx2013);
System.Diagnostics.Process.Start("result.docx");
Before adding the columns:
Effects:

Full Code:
using System;
using System.Collections.Generic;
using System.Linq;
using System.Text;
using Spire.Doc;

namespace Column
{
    class Program
    {
        static void Main(string[] args)
        {
            Document document = new Document();

            document.LoadFromFile("S.docx");

            document.Sections[0].AddColumn(100f, 20f);

            document.Sections[0].PageSetup.ColumnsLineBetween = true;

            document.SaveToFile("result.docx",FileFormat.Docx2013);
            System.Diagnostics.Process.Start("result.docx");

        }
    }
}
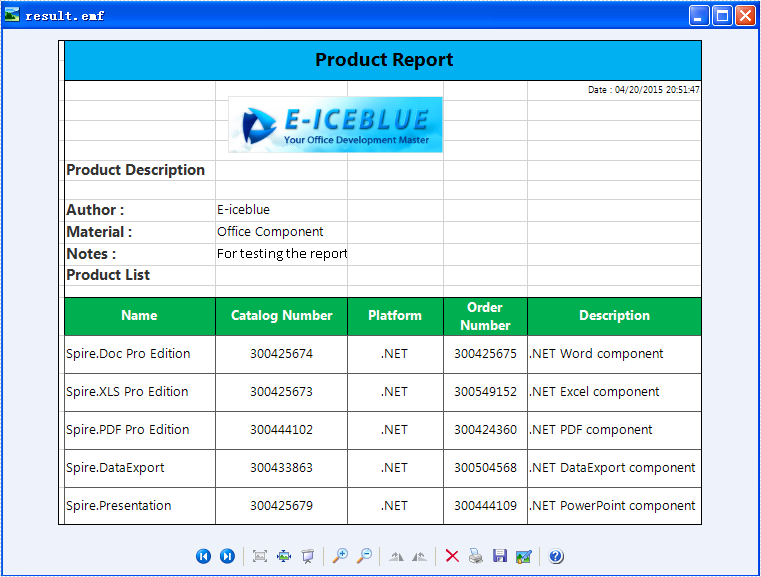
How to convert Excel worksheet to EMF image in C#
Spire.XLS has powerful functions to export Excel worksheets into different image file formats. In the previous articles, we have already shown you how to convert Excel worksheets into BMP, PNG, GIF, JPG, JPEG, TIFF. Now Spire.XLS newly starts to support exporting Excel worksheet into EMF image. With the help of Spire.XLS, you only need three lines of codes to finish the conversion function.
Make sure Spire.XLS (Version 7.6.43 or above) has been installed correctly and then add Spire.xls.dll as reference in the downloaded Bin folder though the below path: "..\Spire.Xls\Bin\NET4.0\ Spire. Xls.dll". Here comes to the details of how to convert excel worksheet to EMF image.
Step 1: Create an excel document and load the document from file.
Workbook workbook = new Workbook();
workbook.LoadFromFile("XLS2.xlsx");
Step 2: Get the first worksheet in excel workbook.
Worksheet sheet = workbook.Worksheets[0];
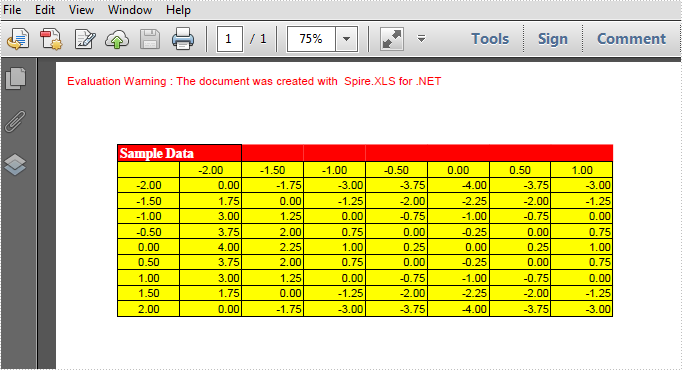
Step 3: Save excel worksheet into EMF image.
sheet.ToEMFStream(stream, 1, 1, 19, 6, EmfType.EmfPlusDual);
Effective screenshot:
Full codes:
using Spire.Xls;
using System.Drawing.Imaging;
using System.IO;

namespace XLStoEMF
{
    class Program
    {
        static void Main(string[] args)
        {
            Workbook workbook = new Workbook();
            workbook.LoadFromFile("XLS2.xlsx");

            Worksheet sheet = workbook.Worksheets[0];

            MemoryStream stream = new MemoryStream();
            sheet.ToEMFStream(stream, 1, 1, 19, 6, EmfType.EmfPlusDual);

            File.WriteAllBytes("result.emf", stream.ToArray());
        }
    }
}
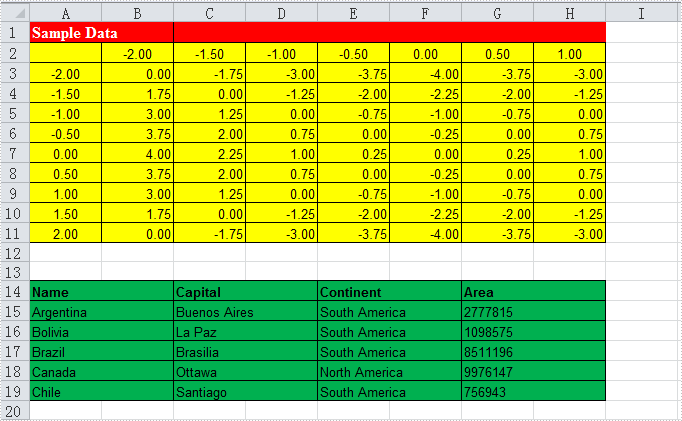
How to Convert Selected Range of Cells to PDF in C#, VB.NET
Using Spire.XLS, programmers are able to save the whole worksheet as PDF by calling the method SaveToPdf(). However, you may only want to save or export a part of worksheet as PDF. Since Spire.XLS doesn't provide a method to directly convert a range of cells to PDF, we can copy the selected ranges to a new worksheet and then save it as PDF file. This method seems complex, but it is still efficient with Spire.XLS.
Look at the test file below, we only want the cells from A1 to H11 converted as PDF. We will firstly create a new blank worksheet, copy the selected range to the new sheet using CellRange.Copy() method, then convert the new sheet as PDF.
Code Snippet:
Step 1: Create a new workbook and load the test file.
Workbook workbook = new Workbook();
workbook.LoadFromFile("test.xlsx", ExcelVersion.Version2010);
Step 2: Add a new worksheet to workbook.
workbook.Worksheets.Add("newsheet");
Step 3: Copy the selected range from where it stores to the new worksheet.
workbook.Worksheets[0].Range["A1:H11"].Copy(workbook.Worksheets[1].Range["A1:H11"]);
Step 4: Convert the new worksheet to PDF.
workbook.Worksheets[1].SaveToPdf("result.pdf");
Result:
Full Code:
using Spire.Xls;
namespace Convert
{
    class Program
    {
        static void Main(string[] args)
        {
            Workbook workbook = new Workbook();
            workbook.LoadFromFile("test.xlsx", ExcelVersion.Version2010);
            // add a new sheet to workbook
            workbook.Worksheets.Add("newsheet");
            //Copy your area to new sheet.
            workbook.Worksheets[0].Range["A1:H11"].Copy(workbook.Worksheets[1].Range["A1:H11"]);
            //convert new sheet to pdf
            workbook.Worksheets[1].SaveToPdf("result.pdf");

        }
    }
}
Imports Spire.Xls
Namespace Convert
	Class Program
		Private Shared Sub Main(args As String())
			Dim workbook As New Workbook()
			workbook.LoadFromFile("test.xlsx", ExcelVersion.Version2010)
			' add a new sheet to workbook
			workbook.Worksheets.Add("newsheet")
			'Copy your area to new sheet.
			workbook.Worksheets(0).Range("A1:H11").Copy(workbook.Worksheets(1).Range("A1:H11"))
			'convert new sheet to pdf
			workbook.Worksheets(1).SaveToPdf("result.pdf")

		End Sub

	End Class
End Namespace
How to Apply Conditional Formatting to a Data Range in C#
Conditional formatting in Microsoft Excel has a number of presets that enables users to apply predefined formatting such as colors, icons and data bars, to a range of cells based on the value of the cell or the value of a formula. Conditional formatting usually reveals the data trends or highlights the data that meets one or more formulas.
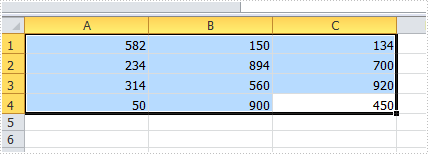
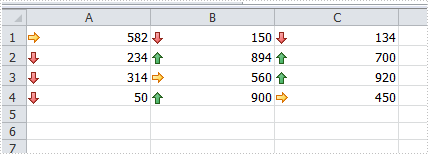
In this article, I made an example to explain how these conditional formatting types can be achieved programmatically using Spire.XLS in C#. First of all, let's see the worksheet that contains a group of data in selected range as below, we’d like see which cells’ value is bigger than 800. In order to quickly figure out similar things like this, we can create a conditional formatting rule by formula: “If the value is bigger than 800, color the cell with Red” to highlight the qualified cells.
Code Snippet for Creating Conditional Formatting Rules:
Step 1: Create a worksheet and insert data to cell range from A1 to C4.
Workbook workbook = new Workbook();
Worksheet sheet = workbook.Worksheets[0];

sheet.Range["A1"].NumberValue = 582;
sheet.Range["A2"].NumberValue = 234;
sheet.Range["A3"].NumberValue = 314;
sheet.Range["A4"].NumberValue = 50;
sheet.Range["B1"].NumberValue = 150;
sheet.Range["B2"].NumberValue = 894;
sheet.Range["B3"].NumberValue = 560;
sheet.Range["B4"].NumberValue = 900;
sheet.Range["C1"].NumberValue = 134;
sheet.Range["C2"].NumberValue = 700;
sheet.Range["C3"].NumberValue = 920;
sheet.Range["C4"].NumberValue = 450;
sheet.AllocatedRange.RowHeight = 15;
sheet.AllocatedRange.ColumnWidth = 17;
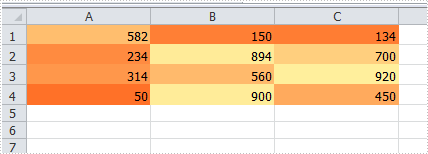
Step 2: To highlight cells based on their values, we create two conditional formatting rules: one for cells greater than 800, and another for cells less than 300.
XlsConditionalFormats xcfs1 = sheet.ConditionalFormats.Add();
xcfs1.AddRange(sheet.AllocatedRange);

IConditionalFormat cf1 = xcfs1.AddCondition();
cf1.FormatType = ConditionalFormatType.CellValue;
cf1.FirstFormula = "800";
cf1.Operator = ComparisonOperatorType.Greater;
cf1.FontColor = Color.Red;
cf1.BackColor = Color.LightSalmon;

Apply Data Bars:
IConditionalFormat cf3 = xcfs1.AddCondition();
cf3.FormatType = ConditionalFormatType.DataBar;
cf3.DataBar.BarColor = Color.CadetBlue;

Apply Icon Sets:
IConditionalFormat cf4 = xcfs1.AddCondition();
cf4.FormatType = ConditionalFormatType.IconSet;

Apply Color Scales:
IConditionalFormat cf5 = xcfs1.AddCondition();
cf5.FormatType = ConditionalFormatType.ColorScale;
Step 3: Save and launch the file
workbook.SaveToFile("sample.xlsx", ExcelVersion.Version2010);
System.Diagnostics.Process.Start("sample.xlsx");
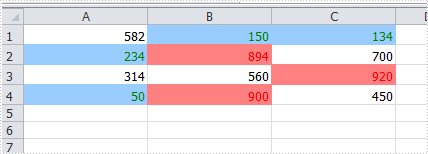
Result:
The cells with value bigger than 800 and smaller than 300, have been highlighted with defined text color and background color.
Apply the Other Three Conditional Formatting Types:
Spire.XLS also supports applying some other conditional formatting types which were predefined in MS Excel. Use the following code snippets to get more formatting effects.
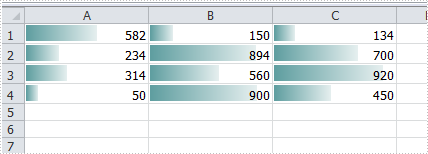
Apply Data Bars:
ConditionalFormatWrapper format = sheet.AllocatedRange.ConditionalFormats.AddCondition();
format.FormatType = ConditionalFormatType.DataBar;
format.DataBar.BarColor = Color.CadetBlue;
Apply Icon Sets:
ConditionalFormatWrapper format = sheet.AllocatedRange.ConditionalFormats.AddCondition();
format.FormatType = ConditionalFormatType.IconSet;
Apply Color Scales:
ConditionalFormatWrapper format = sheet.AllocatedRange.ConditionalFormats.AddCondition();
format.FormatType = ConditionalFormatType.ColorScale;
Full Code:
using Spire.Xls;
using Spire.Xls.Core;
using Spire.Xls.Core.Spreadsheet.Collections;
using System.Drawing;

namespace ApplyConditionalFormatting
{
    class Program
    {
        static void Main(string[] args)
        {
            // Create a new workbook and get the first worksheet
            Workbook workbook = new Workbook();
            Worksheet sheet = workbook.Worksheets[0];

            // Populate sample data in cells A1:C4
            sheet.Range["A1"].NumberValue = 582;
            sheet.Range["A2"].NumberValue = 234;
            sheet.Range["A3"].NumberValue = 314;
            sheet.Range["A4"].NumberValue = 50;
            sheet.Range["B1"].NumberValue = 150;
            sheet.Range["B2"].NumberValue = 894;
            sheet.Range["B3"].NumberValue = 560;
            sheet.Range["B4"].NumberValue = 900;
            sheet.Range["C1"].NumberValue = 134;
            sheet.Range["C2"].NumberValue = 700;
            sheet.Range["C3"].NumberValue = 920;
            sheet.Range["C4"].NumberValue = 450;
            sheet.AllocatedRange.RowHeight = 15;
            sheet.AllocatedRange.ColumnWidth = 17;

            // Create a conditional formatting rule set applied to the entire used range
            XlsConditionalFormats xcfs1 = sheet.ConditionalFormats.Add();
            xcfs1.AddRange(sheet.AllocatedRange);

            // Rule 1: Highlight cells with values greater than 800 in red text and light salmon background
            IConditionalFormat cf1 = xcfs1.AddCondition();
            cf1.FormatType = ConditionalFormatType.CellValue;
            cf1.FirstFormula = "800";
            cf1.Operator = ComparisonOperatorType.Greater;
            cf1.FontColor = Color.Red;
            cf1.BackColor = Color.LightSalmon;

            // Rule 2: Highlight cells with values less than 300 in green text and light blue background
            IConditionalFormat cf2 = xcfs1.AddCondition();
            cf2.FormatType = ConditionalFormatType.CellValue;
            cf2.FirstFormula = "300";
            cf2.Operator = ComparisonOperatorType.Less;
            cf2.FontColor = Color.Green;
            cf2.BackColor = Color.LightBlue;

            //// Rule 3: Add data bars
            //IConditionalFormat cf3 = xcfs1.AddCondition();
            //cf3.FormatType = ConditionalFormatType.DataBar;
            //cf3.DataBar.BarColor = Color.CadetBlue;

            //// Rule 4: Apply icon set
            //IConditionalFormat cf4 = xcfs1.AddCondition();
            //cf4.FormatType = ConditionalFormatType.IconSet;

            //// Rule 5: Apply color scale
            //IConditionalFormat cf5 = xcfs1.AddCondition();
            //cf5.FormatType = ConditionalFormatType.ColorScale;

            workbook.SaveToFile("sample.xlsx", ExcelVersion.Version2010);
            System.Diagnostics.Process.Start("sample.xlsx");
        }
    }
}
C#/VB.NET: Extract Attachments from PDF
PDF attachments allow users to see more details on a particular point by visiting attachments inside the PDF. Basically, there are two types of attachments in PDF: document level attachment and annotation attachment. Below are the differences between them.
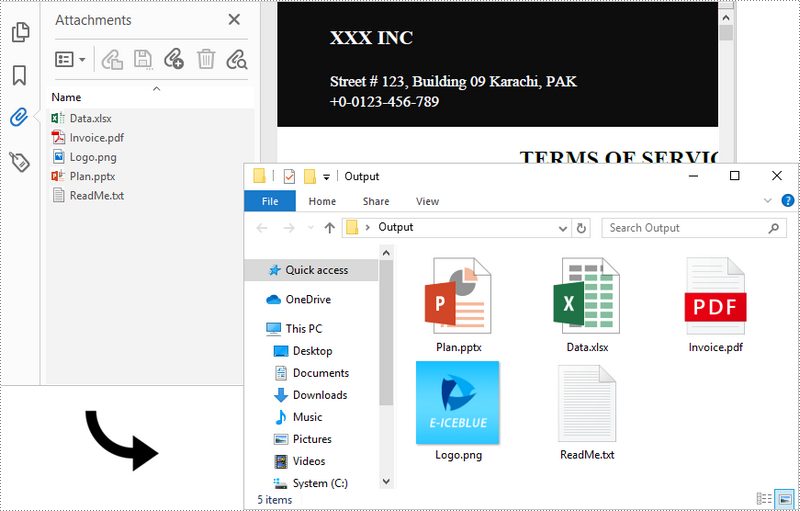
- Document Level Attachment (represented by PdfAttachment class): A file attached to a PDF at the document level won't appear on a page, but only appear in the PDF reader's "Attachments" panel.
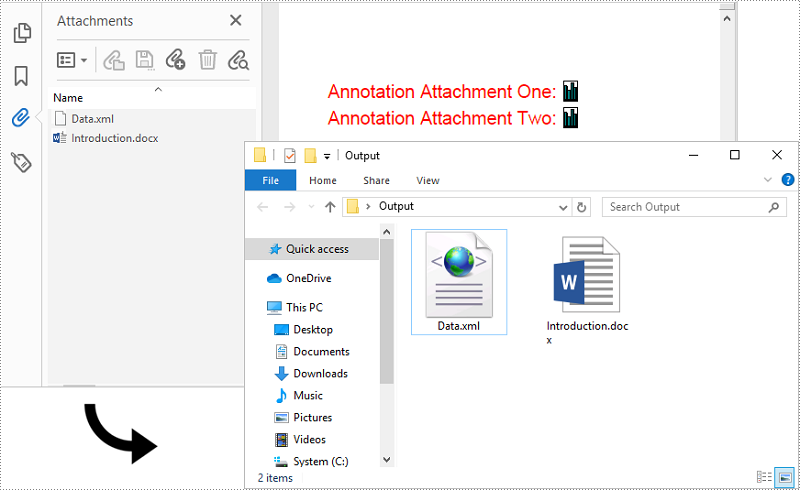
- Annotation Attachment (represented by PdfAttachmentAnnotation class): A file that is attached to a specific position of a page. Annotation attachments are shown as a paper clip icon on the page; reviewers can double-click the icon to open the file.
In this article, you will learn how to extract these two kinds of attachments from a PDF document in C# and VB.NET using Spire.PDF for .NET.
Install Spire.PDF for .NET
To begin with, you need to add the DLL files included in the Spire.PDF for.NET package as references in your .NET project. The DLL files can be either downloaded from this link or installed via NuGet.
PM> Install-Package Spire.PDF
Extract Attachments from PDF in C# and VB.NET
The document level attachments of a PDF document can be obtained through PdfDocument.Attachments property. The following steps illustrate how to extract all document level attachments from a PDF document and save them to a local folder.
- Create a PdfDocument object.
- Load a PDF file using PdfDocument.LoadFromFile() method.
- Get the attachment collection from the document through PdfDocument.Attachments property.
- Get the data of a specific attachment through PdfAttachment.Data property.
- Write the data to a file and save to a specified folder.
- C#
- VB.NET
using Spire.Pdf;
using Spire.Pdf.Attachments;
using System.Net.Mail;

namespace ExtractAttachments
{
    class Program
    {
        static void Main(string[] args)
        {
            //Create a PdfDocument object
            PdfDocument doc = new PdfDocument();

            //Load a PDF file that contains attachments
            doc.LoadFromFile("C:\\Users\\Administrator\\Desktop\\Attachments.pdf");

            //Get the attachment collection of the PDF document
            PdfAttachmentCollection attachments = doc.Attachments;

            //Specific output folder path
            string outputFolder = "C:\\Users\\Administrator\\Desktop\\output\\";

            //Loop through the collection
            for (int i = 0; i < attachments.Count; i++)
            {
	          //Write attachment to a file
                File.WriteAllBytes(outputFolder + attachments[i].FileName, attachments[i].Data);
            }
        }
    }
}
Extract Annotation Attachments from PDF in C# and VB.NET
Annotation attachment is a page-based element. To get annotations from a specific page, use PdfPageBase.AnnotationsWidget property. After that, you’ll need to determine if a specific annotation is an annotation attachment. The follows are the steps to extract annotation attachments from a PDF document and save them to a local folder.
- Create a PdfDocument object.
- Load a PDF file using PdfDocument.LoadFromFile() method.
- Get a specific page from the document through PdfDocument.Pages[] property.
- Get the annotation collection from the page through PdfPageBase.AnnotationsWidget property.
- Determine if a specific annotation is an instance of PdfAttachmentAnnotationWidget. If yes, write the annotation attachment to a file and save it to a specified folder.
- C#
- VB.NET
using Spire.Pdf;
using Spire.Pdf.Annotations;

namespace ExtractAnnotationAttachments
{
    class Program
    {
        static void Main(string[] args)
        {
            //Create a PdfDocument object
            PdfDocument doc = new PdfDocument();

            //Load a PDF file that contains attachments
            doc.LoadFromFile("C:\\Users\\Administrator\\Desktop\\AnnotationAttachments.pdf");

            //Specific output folder path
            string outputFolder = "C:\\Users\\Administrator\\Desktop\\Output\\";

            //Loop through the pages
            for (int i = 0; i < doc.Pages.Count; i++)
            {
                //Get the annotation collection
                PdfAnnotationCollection collection = doc.Pages[i].Annotations;

                //Loop through the annotations
                for (int j = 0; j < collection.Count; j++)
                {
                    //Determine if an annotation is an instance of PdfAttachmentAnnotationWidget
                    if (collection[j] is PdfAttachmentAnnotationWidget)
                    {
                        //Write annotation attachment to a file
                        PdfAttachmentAnnotationWidget attachmentAnnotation = (PdfAttachmentAnnotationWidget)collection[j];
                        String fileName = Path.GetFileName(attachmentAnnotation.FileName);
                        File.WriteAllBytes(outputFolder + fileName, attachmentAnnotation.Data);
                    }
                }
            }
        }
    }
}
Apply for a Temporary License
If you'd like to remove the evaluation message from the generated documents, or to get rid of the function limitations, please request a 30-day trial license for yourself.
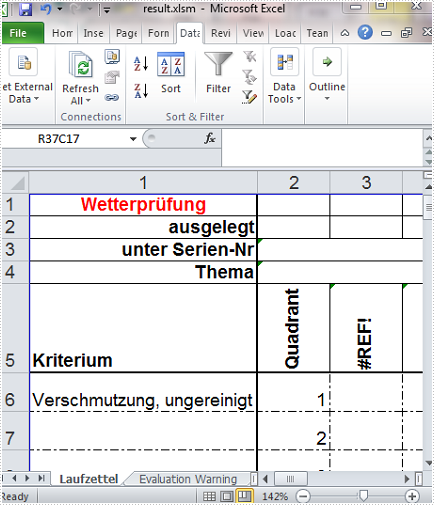
How to create vertical table at one side of the word document
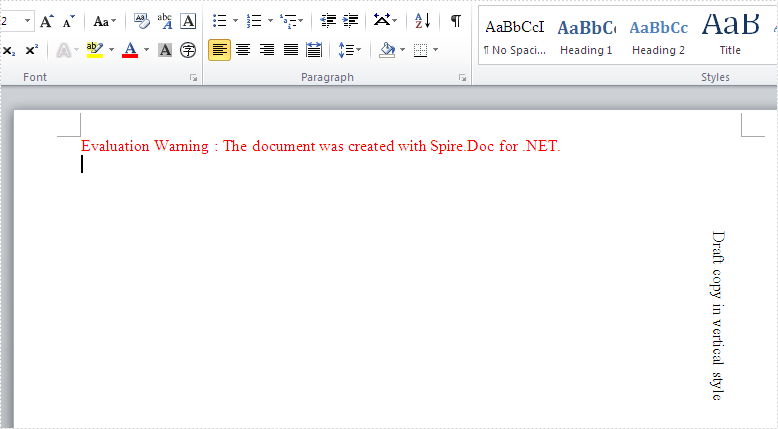
Spire.Doc can help developers to create word table with data and format cells easily and it also supports to add text watermark into the word documents. This article will show you how to create a vertical table at one side of the word document, which looks like the vertical watermark in the word document.
Firstly, please check the effective screenshot of the vertical table at the right of the word document added by Spire.Doc:
Here comes to the steps of how to create vertical table in C#.
Step 1: Create a new document and add a section to the document.
Document document = new Document();
Section section=document.AddSection();
Step 2: Add a table with rows and columns and set the text for the table.
Table table = section.AddTable();
table.ResetCells(1, 1);
TableCell cell = table.Rows[0].Cells[0];
table.Rows[0].Height = 150;
cell.AddParagraph().AppendText("Draft copy in vertical style");
Step 3: Set the TextDirection for the table to RightToLeftRotated.
cell.CellFormat.TextDirection = TextDirection.RightToLeftRotated;
Step 4: Set the table format.
table.TableFormat.WrapTextAround = true;
table.TableFormat.Positioning.VertRelationTo = VerticalRelation.Page;
table.TableFormat.Positioning.HorizRelationTo = HorizontalRelation.Page;
table.TableFormat.Positioning.HorizPosition = section.PageSetup.PageSize.Width- table.Width;
table.TableFormat.Positioning.VertPosition = 200;
Step 5: Save the document to file.
document.SaveToFile("result.docx",FileFormat.docx2013);
Full codes in C#:
using Spire.Doc;
using Spire.Doc.Documents;

namespace CreateVerticalTable
{
    class Program
    {
        static void Main(string[] args)
        {

            Document document = new Document();
            Section section=document.AddSection();
            Table table = section.AddTable();
            table.ResetCells(1, 1);
            TableCell cell = table.Rows[0].Cells[0];
            table.Rows[0].Height = 150;
            cell.AddParagraph().AppendText("Draft copy in vertical style");
            cell.CellFormat.TextDirection = TextDirection.RightToLeftRotated;
            table.Format.WrapTextAround = true;
            table.Format.Positioning.VertRelationTo = VerticalRelation.Page;
            table.Format.Positioning.HorizRelationTo = HorizontalRelation.Page;
            table.Format.Positioning.HorizPosition = section.PageSetup.PageSize.Width - table.Width;
            table.Format.Positioning.VertPosition = 200;

            document.SaveToFile(""result.docx"", FileFormat.Docx2013);

        }
    }
}
Insert an existing Table by cloning in C#
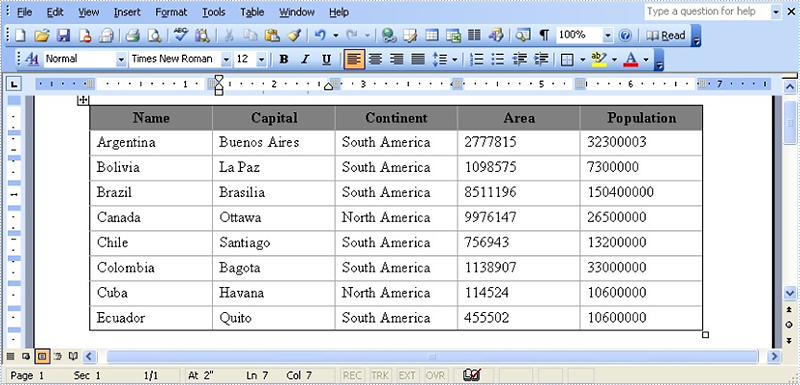
In some case, we need make some modifications in an existing table but don't want destroy the original data, so we would like to copy the existing table then make some changes in the new table. How could we get the copied table? The easiest method is clone. There would introduce a solution to copy table and modify some data then insert the new table after original table via Spire.Doc.
Spire.Doc for .NET, a stand-alone .NET Word component, provides a method, Table.clone() to allow users to copy an existing table.
The main steps of the solution:
Firstly: load the word document with a table.
Document doc = new Document();
doc.LoadFromFile(@"CopyTable.doc");
The original document effect screenshot:
Secondly: extract the existing table and call the table.clone () method to copy it.
Section se = doc.Sections[0];
Table original_Table =(Table) se.Tables[0];
Table copied_Table = original_Table.Clone();
Thirdly: extract the last row then traversal its cells to modify data.
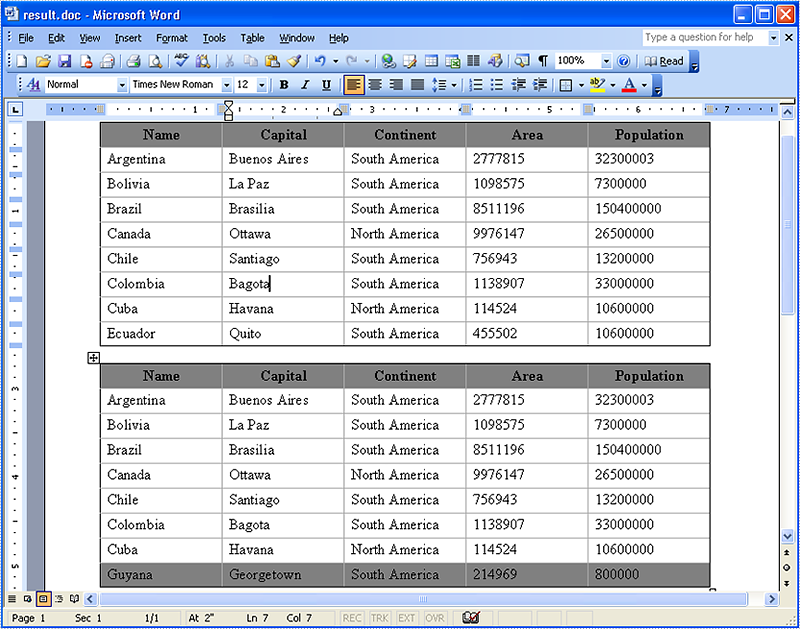
string[] st = new string[] { "Guyana", "Georgetown", "South America", "214969", "800000" };
//get the last row of copied table
TableRow lastRow = copied_Table.Rows[copied_Table.Rows.Count - 1];
//change lastRow data.
lastRow.Cells[i].CellFormat.Shading.BackgroundPatternColor = Color.Gray;
for (int i = 0; i < lastRow.Cells.Count; i++)
    {
    lastRow.Cells[i].Paragraphs[0].Text = st[i];
     }
Finally: call Section. tables.add() method to add the copied table in section and save this document.
se.Tables.Add(copied_Table);
doc.SaveToFile("result.doc", FileFormat.Doc);
The result document effect screenshot:
Full code:
using Spire.Doc;
using System.Drawing;

namespace InsertingaAnExistingTable
{
    class Program
    {
        static void Main(string[] args)
        {
//load a word document
            Document doc = new Document();
            doc.LoadFromFile(@"CopyTable.doc");

// extract the existing table
            Section se = doc.Sections[0];
            Table original_Table =(Table) se.Tables[0];

// copy the existing table to copied_Table via Table.clone()
            Table copied_Table = original_Table.Clone();
string[] st = new string[] { "Guyana", "Georgetown", "South America", "214969", "800000" };
            //get the last row of table
            TableRow lastRow = copied_Table.Rows[copied_Table.Rows.Count - 1];
            //change last row data.
            lastRow.Cells[i].CellFormat.Shading.BackgroundPatternColor = Color.Gray;
            for (int i = 0; i < lastRow.Cells.Count; i++)
            {
                lastRow.Cells[i].Paragraphs[0].Text = st[i];
            }
// add copied_Table in section
            se.Tables.Add(copied_Table);
            doc.SaveToFile("result.doc", FileFormat.Doc);
        }
    }
}
Get information of pagination in Excel document
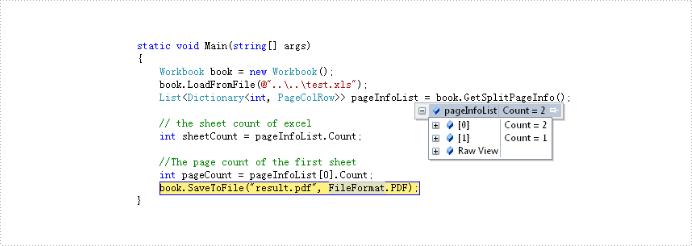
When we print Word and PDF documents which have regular page size, we can clearly know the pagination information for Word and PDF by delimiters. Excel document is different since Excel pagination is based on its content when we print Excel document or convert to Pdf. So get Excel pagination information is important to developer. Below would introduce a solution to get pagination information in Excel document.
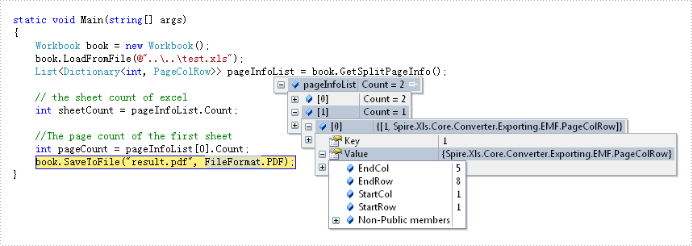
The solution call book.GetSplitPageInfo() method to obtain information of excel document and return this information to the List<Dictionary<int, PageColRow>> object via Spire.XLS. By the object we can get this information about: sheet count, page count and the start and end column and row of every page in excel document. Below is effect screenshots:
The main steps of the solution are:
Step 1: Create and load an excel document.
Workbook book = new Workbook();
book.LoadFromFile(@"test.xlsx");
Step 2: Call GetSplitPageInfo() method to Excel information.
List> pageInfoList = book.GetSplitPageInfo();
The full code:
using Spire.Xls;

namespace GetPageInformation
{
    class Program
    {
        static void Main(string[] args)
        {
            // create and load Excel document
            Workbook book = new Workbook();
            book.LoadFromFile(@"test.xlsx");
            // get the Excel document information and save in pageInfoList object
            var pageInfoList = book.GetSplitPageInfo();

            // the sheet count of excel
            int sheetCount = pageInfoList.Count;

            //The page count of the first sheet
            int pageCount = pageInfoList[0].Count;
            book.SaveToFile("result.pdf", FileFormat.PDF);
        }
    }
}
Imports Spire.Xls
Module Module1

    Sub Main()
        'create and load Excel document
        Dim book As New Workbook()
        book.LoadFromFile("test.xlsx")
        ' get the Excel document information and save in pageInfoList object
        Dim pageInfoList As List(Of Dictionary(Of Integer, PageColRow)) = book.GetSplitPageInfo()

        ' the sheet count of excel
        Dim sheetCount As Integer = pageInfoList.Count

        'The page count of the first sheet
        Dim pageCount As Integer = pageInfoList(0).Count
        book.SaveToFile("result.pdf", FileFormat.PDF)
    End Sub

End Module
Get alias, tag and id of content controls in a Word document in C#
Content controls provide a way for you to design documents. When you add a content control to a document, the control is identified by a border, a title, and temporary text that can provide instructions to the user. According to Microsoft, content controls mainly benefit from two features:
- Prevent users from editing or deleting protected sections of a document.
- Bind parts of a document or template to data. You can bind content controls to database fields, managed objects in the .NET Framework, XML elements that are stored in the document, and other data sources.
Therefore, it is necessary for developers to get the properties of content controls when dealing content controls at run time. This article illustrates how to get all controls and their properties including alias, id and tag via Spire.Doc.
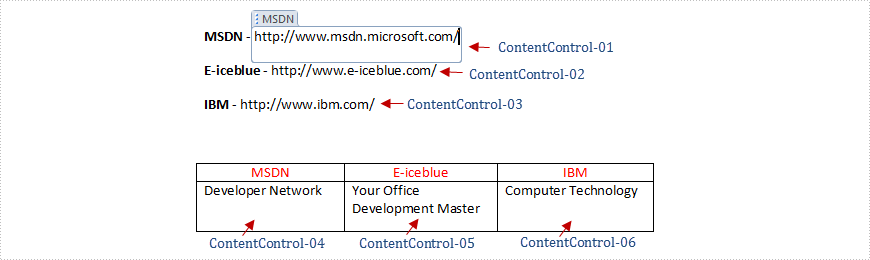
Firstly, check the test file that contains six content controls distributed in lines and a table. By default, the border and the title of the control do not appear if we don't click the protected section.
Test File:
Main Steps:
Step 1: Create a new Word document and load the test file.
Step 2: Create two lists to store tags which are distributed in lines and a table separately. Here, each content control will be identified by tag.
Step 3: Use foreach sentence to get all tags in the Word document.
Full Code:
static void Main(string[] args)
        {
            using (Document document = new Document(@"..\..\TestData\test.docx"))
            {
                StructureTags structureTags = GetAllTags(document);
                List<StructureDocumentTagInline> tagInlines = structureTags.tagInlines;

                string alias = tagInlines[0].SDTProperties.Alias;
                decimal id = tagInlines[0].SDTProperties.Id;
                string tag = tagInlines[0].SDTProperties.Tag;

                List<StructureDocumentTag> tags = structureTags.tags;
                alias = tags[0].SDTProperties.Alias;
                id = tags[0].SDTProperties.Id;
                tag = tags[0].SDTProperties.Tag;

            }
        }
       static StructureTags GetAllTags(Document document)
        {
            StructureTags structureTags = new StructureTags();
            foreach (Section section in document.Sections)
            {
                foreach (DocumentObject obj in section.Body.ChildObjects)
                {
                    if (obj.DocumentObjectType == DocumentObjectType.Paragraph)
                    {
                        foreach (DocumentObject pobj in (obj as Paragraph).ChildObjects)
                        {
                            if (pobj.DocumentObjectType == DocumentObjectType.StructureDocumentTagInline)
                            {
                                structureTags.tagInlines.Add(pobj as StructureDocumentTagInline);
                            }
                        }
                    }
                    else if (obj.DocumentObjectType == DocumentObjectType.Table)
                    {
                        foreach (TableRow row in (obj as Table).Rows)
                        {
                            foreach (TableCell cell in row.Cells)
                            {
                                foreach (DocumentObject cellChild in cell.ChildObjects)
                                {
                                    if (cellChild.DocumentObjectType == DocumentObjectType.StructureDocumentTag)
                                    {
                                        structureTags.tags.Add(cellChild as StructureDocumentTag);
                                    }
                                    else if (cellChild.DocumentObjectType == DocumentObjectType.Paragraph)
                                    {
                                        foreach (DocumentObject pobj in (cellChild as Paragraph).ChildObjects)
                                        {
                                            if (pobj.DocumentObjectType == DocumentObjectType.StructureDocumentTagInline)
                                            {
                                                structureTags.tagInlines.Add(pobj as StructureDocumentTagInline);
                                            }
                                        }
                                    }
                                }
                            }
                        }
                    }
                }
            }
            return structureTags;
        }
        public class StructureTags
           {
               List<StructureDocumentTagInline> m_tagInlines;
               public List<StructureDocumentTagInline> tagInlines
               {
                   get
                   {
                       if (m_tagInlines == null)
                           m_tagInlines = new List<StructureDocumentTagInline>();
                       return m_tagInlines;
                   }
                   set
                   {
                       m_tagInlines = value;
                   }
               }
               List<StructureDocumentTag> m_tags;
               public List<StructureDocumentTag> tags
               {
                   get
                   {
                       if (m_tags == null)
                           m_tags = new List<StructureDocumentTag>();
                       return m_tags;
                   }
                   set
                   {
                       m_tags = value;
                   }
               }
           }
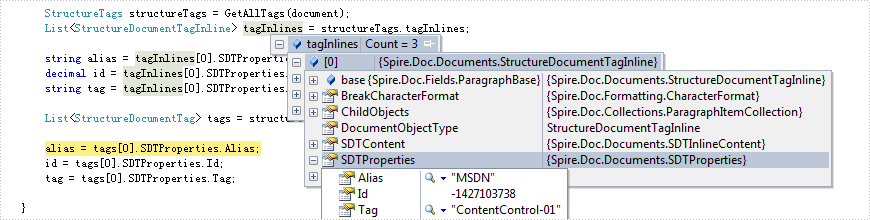
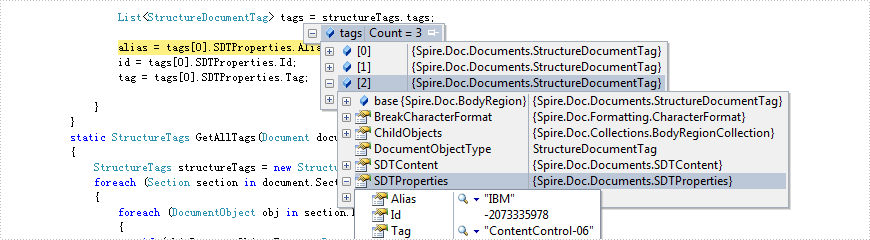
Effect Screenshot:
Content controls in lines
Content controls in table
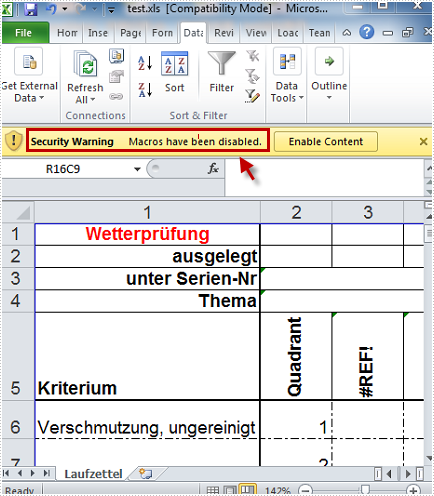
Convert XLS to XLSM and Maintain Macro in C#, VB.NET
A file with the XLSM extension is an Excel Macro-Enabled Workbook file. For security reasons, XLS file or XLSX file does not enable macros by default. Thus, if you want to execute macros in Excel file, you need to convert XLS or XLSX to XLSM at the first place. In this article, I’ll introduce you how to convert XLS to XLSM with the macro maintained using Spire.XLS.
Here is the method:
Step 1: Create a new instance of Spire.Xls.Workbook class.
Workbook workbook = new Workbook();
Step 2: Load the test file and imports its data to workbook.
workbook.LoadFromFile("test.xls", ExcelVersion.Version97to2003);
Step 3: Save the workbook as a new XLSM file.
workbook.SaveToFile("result.xlsm", FileFormat.Version2007);
Full Code:
using Spire.Xls;
namespace Convert
{
    class Program
    {
        static void Main(string[] args)
        {
            Workbook workbook = new Workbook();
            workbook.LoadFromFile("test.xls", ExcelVersion.Version97to2003);
            workbook.SaveToFile("result.xlsm", FileFormat.Version2007);
        }
    }
}
Imports Spire.Xls
Namespace Convert
	Class Program
		Private Shared Sub Main(args As String())
			Dim workbook As New Workbook()
			workbook.LoadFromFile("test.xls", ExcelVersion.Version97to2003)
			workbook.SaveToFile("result.xlsm", FileFormat.Version2007)
		End Sub

	End Class
End Namespace
Test File:
As is shown in the picture, Excel automatically disables macro in XLS file.
Result:
No security warning in the converted XLSM file.