C#/VB.NET: Create a Table of Contents (TOC) in PDF
The table of contents plays a critical role in enhancing the readability and navigability of a document. It provides readers with a clear overview of the document's structure and enables them to quickly locate and access specific sections or information they are interested in. This can be especially valuable for longer documents, such as reports, books, or academic papers, where readers may need to refer back to specific sections or chapters multiple times. In this article, we'll explore how to create a table of contents in a PDF document in C# and VB.NET using Spire.PDF for .NET.
Install Spire.PDF for .NET
To begin with, you need to add the DLL files included in the Spire.PDF for.NET package as references in your .NET project. The DLL files can be either downloaded from this link or installed via NuGet.
PM> Install-Package Spire.PDF
Create a Table of Contents in PDF in C# and VB.NET
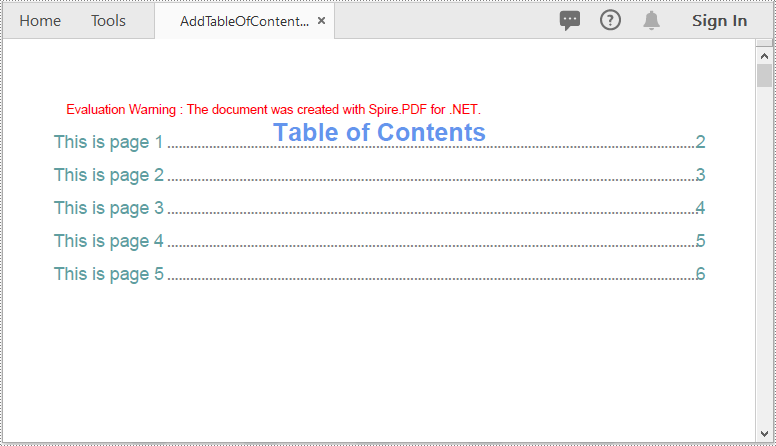
A table of contents mainly includes the TOC title (e.g. Table of Contents), TOC content, page numbers, and actions that will take you to the target pages when clicked on. To create a table of contents in PDF using Spire.PDF for .NET, you can follow these steps:
- Initialize an instance of the PdfDocument class.
- Load a PDF document using PdfDocument.LoadFromFile() method.
- Get the page count of the document using PdfDocument.Pages.Count property.
- Insert a new page into the PDF document as the first page using PdfDocument.Pages.Insert(0) method.
- Draw the TOC title, TOC content, and page numbers on the page using PdfPageBase.Canvas.DrawString() method.
- Create actions using PdfLinkAnnotation class and add the actions to the page using PdfNewPage.AnnotationsV2.Add() method.
- Save the result document using PdfDocument.SaveToFile() method.
- C#
- VB.NET
using Spire.Pdf;
using Spire.Pdf.Actions;
using Spire.Pdf.Interactive.Annotations;
using Spire.Pdf.Destinations;
using Spire.Pdf.Graphics;
using System;
using System.Drawing;

namespace TableOfContents
{
    internal class Program
    {
        static void Main(string[] args)
        {
            //Initialize an instance of the PdfDocument class
            PdfDocument doc = new PdfDocument();
            //Load a PDF document
            doc.LoadFromFile("Sample.PDF");

            //Get the page count of the document
            int pageCount = doc.Pages.Count;

            //Insert a new page into the pdf document as the first page
            PdfPageBase tocPage = doc.Pages.Insert(0);

            //Draw TOC title on the new page
            string title = "Table of Contents";
            PdfTrueTypeFont titleFont = new PdfTrueTypeFont(new Font("Arial", 20, FontStyle.Bold));
            PdfStringFormat centerAlignment = new PdfStringFormat(PdfTextAlignment.Center, PdfVerticalAlignment.Middle);
            PointF location = new PointF(tocPage.Canvas.ClientSize.Width / 2, titleFont.MeasureString(title).Height + 10);
            tocPage.Canvas.DrawString(title, titleFont, PdfBrushes.CornflowerBlue, location, centerAlignment);

            //Draw TOC content on the new page
            PdfTrueTypeFont titlesFont = new PdfTrueTypeFont(new Font("Arial", 14));
            String[] titles = new String[pageCount];
            for (int i = 0; i < titles.Length; i++)
            {
                titles[i] = string.Format("This is page {0}", i + 1);
            }
            float y = titleFont.MeasureString(title).Height + 10;
            float x = 0;

            //Draw page numbers of the target pages on the new page
            for (int i = 1; i <= pageCount; i++)
            {
                string text = titles[i - 1];
                SizeF titleSize = titlesFont.MeasureString(text);

                PdfPageBase navigatedPage = doc.Pages[i];

                string pageNumText = (i + 1).ToString();
                SizeF pageNumTextSize = titlesFont.MeasureString(pageNumText);
                tocPage.Canvas.DrawString(text, titlesFont, PdfBrushes.CadetBlue, 0, y);
                float dotLocation = titleSize.Width + 2 + x;
                float pageNumlocation = tocPage.Canvas.ClientSize.Width - pageNumTextSize.Width;
                for (float j = dotLocation; j < pageNumlocation; j++)
                {
                    if (dotLocation >= pageNumlocation)
                    {
                        break;
                    }
                    tocPage.Canvas.DrawString(".", titlesFont, PdfBrushes.Gray, dotLocation, y);
                    dotLocation += 3;
                }
                tocPage.Canvas.DrawString(pageNumText, titlesFont, PdfBrushes.CadetBlue, pageNumlocation, y);

                //Add actions that will take you to the target pages when clicked on to the new page
                location = new PointF(0, y);
                RectangleF titleBounds = new RectangleF(location, new SizeF(tocPage.Canvas.ClientSize.Width, titleSize.Height));
                PdfXYZExplicitDestination Dest = new PdfXYZExplicitDestination(navigatedPage, -doc.PageSettings.Margins.Top, -doc.PageSettings.Margins.Left);
                PdfLinkAnnotation action = new PdfLinkAnnotation(tocPage, titleBounds, new PdfGoToAction(Dest));
                action.Border.Width = 0;
                (tocPage as PdfNewPage).AnnotationsV2.Add(action);
                y += titleSize.Height + 10;
            }

            //Save the result pdf document
            doc.SaveToFile("AddTableOfContents.pdf");
            doc.Close();
        }
    }
}
Apply for a Temporary License
If you'd like to remove the evaluation message from the generated documents, or to get rid of the function limitations, please request a 30-day trial license for yourself.
C#/VB.NET: Convert Excel Data to Word Tables with Formatting
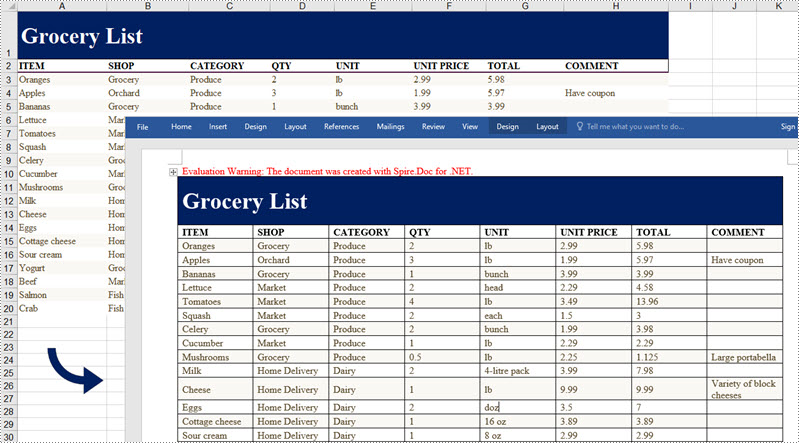
If you're creating a written report on a company's monthly expenditures, you might need to include a spreadsheet to show the financial figures and make them easier to read. This article demonstrates how to convert Excel data into a Word table maintaining the formatting in C# and VB.NET using Spire.Office for .NET.
Install Spire.Office for .NET
To begin with, you need to add the DLL files included in the Spire.Office for .NET package as references in your .NET project. The DLL files can be either downloaded from this link or installed via NuGet.
PM> Install-Package Spire.Office
Export Excel Data to a Word Table with Formatting
Below are the steps to convert Excel data to a Word table and keep the formatting using Spire.Office for .NET.
- Create a Workbook object and load a sample Excel file using Workbook.LoadFromFile() method.
- Get a specific worksheet through Workbook.Worksheets[index] property.
- Create a Document object, and add a section to it.
- Add a table using Section.AddTable() method.
- Detect the merged cells in the worksheet and merge the corresponding cells of the Word tale using the custom method MergeCells().
- Get value of a specific Excel cell through CellRange.Value property and add it to a cell of the Word table using TableCell.AddParagraph().AppendText() method.
- Copy the font style and cell style from Excel to the Word table using the custom method CopyStyle().
- Save the document to a Word file using Document.SaveToFile() method.
- C#
- VB.NET
using Spire.Doc;
using Spire.Doc.Documents;
using Spire.Doc.Fields;
using Spire.Xls;

namespace ConvertExcelToWord
{
    internal class Program
    {
        static void Main(string[] args)
        {

            //Load an Excel file
            Workbook workbook = new Workbook();
            workbook.LoadFromFile(@"C:\Users\Administrator\Desktop\sample.xlsx");

            //Get the first worksheet
            Worksheet sheet = workbook.Worksheets[0];

            //Create a Word document
            Document doc = new Document();
            Section section = doc.AddSection();
            section.PageSetup.Orientation = PageOrientation.Landscape;

            //Add a table
            Table table = section.AddTable(true);
            table.ResetCells(sheet.LastRow, sheet.LastColumn);

            //Merge cells
            MergeCells(sheet, table);

            for (int r = 1; r <= sheet.LastRow; r++)
            {
                //Set row Height
                table.Rows[r - 1].Height = (float)sheet.Rows[r - 1].RowHeight;

                for (int c = 1; c <= sheet.LastColumn; c++)
                {
                    CellRange xCell = sheet.Range[r, c];
                    TableCell wCell = table.Rows[r - 1].Cells[c - 1];

                    //Export data from Excel to Word table
                    TextRange textRange = wCell.AddParagraph().AppendText(xCell.NumberText);

                    //Copy font and cell style from Excel to Word
                    CopyStyle(textRange, xCell, wCell);
                }
            }

            //Save the document to a Word file
            doc.SaveToFile("ExportToWord.docx", Spire.Doc.FileFormat.Docx);
        }
        //Merge cells if any
        private static void MergeCells(Worksheet sheet, Table table)
        {
            if (sheet.HasMergedCells)
            {
                //Get merged cell ranges from Excel
                CellRange[] ranges = sheet.MergedCells;

                //Merge corresponding cells in Word table
                for (int i = 0; i < ranges.Length; i++)
                {
                    int startRow = ranges[i].Row;
                    int startColumn = ranges[i].Column;
                    int rowCount = ranges[i].RowCount;
                    int columnCount = ranges[i].ColumnCount;
                    if (rowCount > 1 && columnCount > 1)
                    {
                        for (int j = startRow; j <= startRow + rowCount; j++)
                        {
                            table.ApplyHorizontalMerge(j - 1, startColumn - 1, startColumn - 1 + columnCount - 1);
                        }
                        table.ApplyVerticalMerge(startColumn - 1, startRow - 1, startRow - 1 + rowCount - 1);
                    }
                    if (rowCount > 1 && columnCount == 1)
                    {
                        table.ApplyVerticalMerge(startColumn - 1, startRow - 1, startRow - 1 + rowCount - 1);
                    }
                    if (columnCount > 1 && rowCount == 1)
                    {
                        table.ApplyHorizontalMerge(startRow - 1, startColumn - 1, startColumn - 1 + columnCount - 1);
                    }
                }
            }
        }

        //Copy cell style of Excel to Word table
        private static void CopyStyle(TextRange wTextRange, CellRange xCell, TableCell wCell)
        {
            //Copy font style
            wTextRange.CharacterFormat.TextColor = xCell.Style.Font.Color;
            wTextRange.CharacterFormat.FontSize = (float)xCell.Style.Font.Size;
            wTextRange.CharacterFormat.FontName = xCell.Style.Font.FontName;
            wTextRange.CharacterFormat.Bold = xCell.Style.Font.IsBold;
            wTextRange.CharacterFormat.Italic = xCell.Style.Font.IsItalic;
            //Copy backcolor
            wCell.CellFormat.Shading.BackgroundPatternColor = xCell.Style.Color;
            //Copy horizontal alignment
            switch (xCell.HorizontalAlignment)
            {
                case HorizontalAlignType.Left:
                    wTextRange.OwnerParagraph.Format.HorizontalAlignment = HorizontalAlignment.Left;
                    break;
                case HorizontalAlignType.Center:
                    wTextRange.OwnerParagraph.Format.HorizontalAlignment = HorizontalAlignment.Center;
                    break;
                case HorizontalAlignType.Right:
                    wTextRange.OwnerParagraph.Format.HorizontalAlignment = HorizontalAlignment.Right;
                    break;
            }
            //Copy vertical alignment
            switch (xCell.VerticalAlignment)
            {
                case VerticalAlignType.Bottom:
                    wCell.CellFormat.VerticalAlignment = VerticalAlignment.Bottom;
                    break;
                case VerticalAlignType.Center:
                    wCell.CellFormat.VerticalAlignment = VerticalAlignment.Middle;
                    break;
                case VerticalAlignType.Top:
                    wCell.CellFormat.VerticalAlignment = VerticalAlignment.Top;
                    break;
            }
        }
    }
}
Apply for a Temporary License
If you'd like to remove the evaluation message from the generated documents, or to get rid of the function limitations, please request a 30-day trial license for yourself.
How to Align a Table in C#
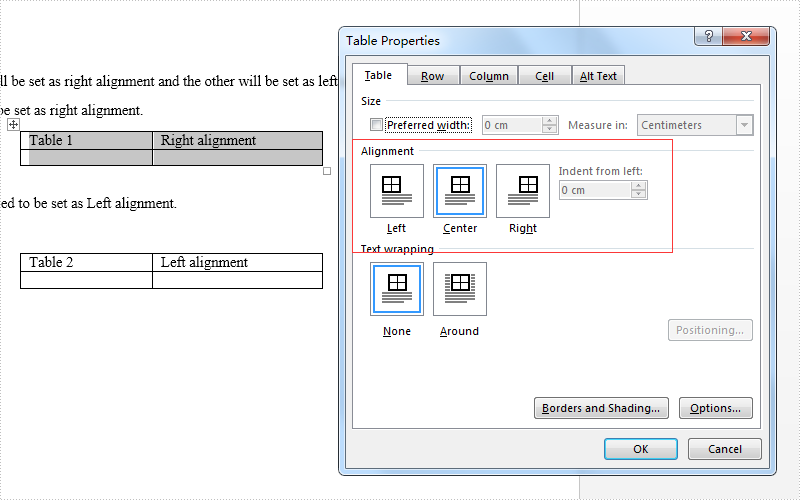
Usually there are three kinds of alignment style for a word table: left aligned, centered and right aligned. On Microsoft word, we can go to table properties to set the alignment for the whole table. Spire.Doc also offers a property table.TableFormat.HorizontalAlignment to enable developers to set the table alignment style easily in C#. This article will demonstrate how to align a table in C#.
Firstly, view the how to align a table for Microsoft word:
Here come to the code snippet of how Spire.Doc align a table.
Step 1: Create a word document and load from file.
Document doc = new Document();
doc.LoadFromFile("sample.docx");
Step 2: Get the first section and two tables from the word document.
Section section = doc.Sections[0];
Table table = section.Tables[0] as Table;
Table table1 = section.Tables[1] as Table;
Step 3: Set the different alignment properties for each table.
table.Format.HorizontalAlignment = RowAlignment.Right;
table.Format.LeftIndent = 34;

table1.Format.HorizontalAlignment = RowAlignment.Left;
table1.Format.LeftIndent = 34;
Step 4: Save the document to file:
doc.SaveToFile("result.docx", FileFormat.Docx);
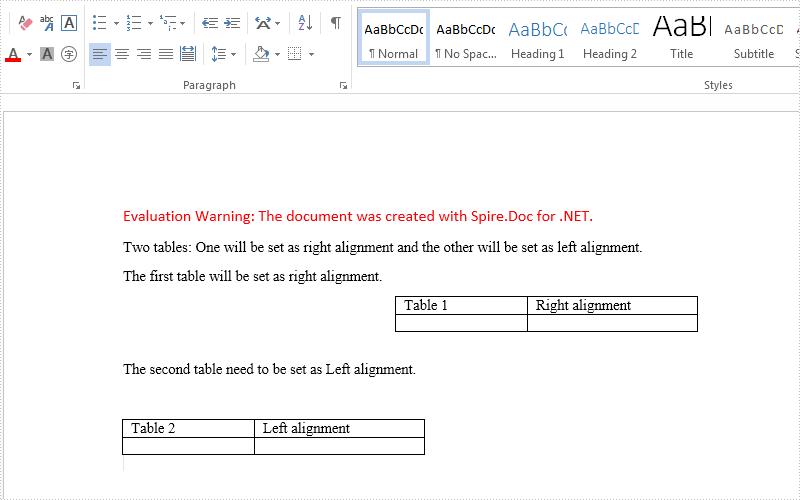
Effective screenshots after align the table format:
Full codes:
using Spire.Doc;
using Spire.Doc.Documents;
namespace AlignTable
{
    class Program
    {

        static void Main(string[] args)
        {

            Document doc = new Document();
            doc.LoadFromFile("sample.docx");

            Section section = doc.Sections[0];
            Table table = section.Tables[0] as Table;
            Table table1 = section.Tables[1] as Table;

            table.Format.HorizontalAlignment = RowAlignment.Right;
            table.Format.LeftIndent = 34;

            table1.Format.HorizontalAlignment = RowAlignment.Left;
            table1.Format.LeftIndent = 34;

            doc.SaveToFile("result.docx", FileFormat.Docx);
        }
    }
}
How to add report filter to Excel Pivot table in C#
To view the large amount of Excel data's easily, Spire.XLS for .NET supports create Pivot table and add excel table with filters. Spire.XLS also offers a method of pivotTable.ReportFilters.Add(); to enable developers to add the report filter to the pivot table.
This article will show you how to add a report filter to the Excel Pivot table in C#.
Note: Before Start, please download the latest version of Spire.XLS and add Spire.xls.dll in the bin folder as the reference of Visual Studio.
Firstly, please check the original screenshot of excel pivot table.
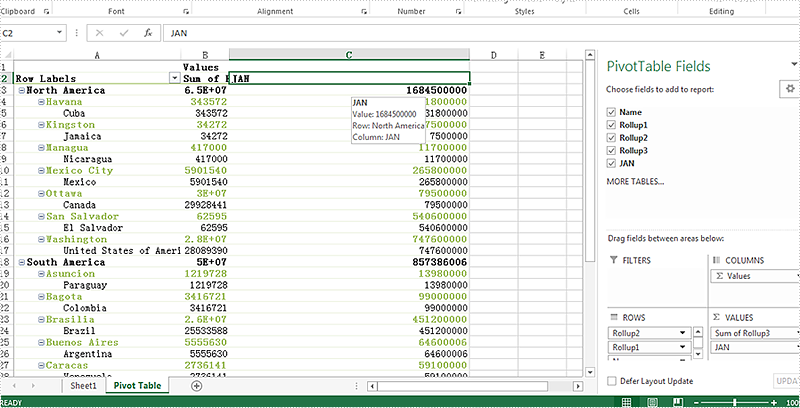
Step 1: Create a new workbook and load from file.
Workbook workbook = new Workbook();
workbook.LoadFromFile("Sample.xlsx");
Step 2: Get the PivotTable from the Excel worksheet.
Spire.Xls.Core.Spreadsheet.PivotTables.XlsPivotTable pivotTable = workbook.Worksheets["Pivot Table"].PivotTables[0] as Spire.Xls.Core.Spreadsheet.PivotTables.XlsPivotTable;
Step 3: Add a filter to the pivot table.
PivotReportFilter filter = new PivotReportFilter("JAN", true);
pivotTable.ReportFilters.Add(filter);
Step 4: Save the document to file and launch to preview it.
workbook.SaveToFile("Result.xlsx", ExcelVersion.Version2010);
System.Diagnostics.Process.Start("result.xlsx");
Effective screenshot after add a filter to the pivot table:
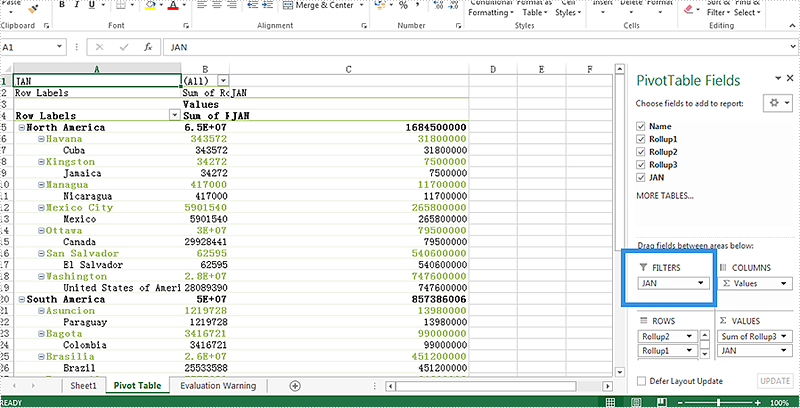
Full codes:
using Spire.Xls;
using Spire.Xls.Core.Spreadsheet.PivotTables;

namespace AddReportFilter
{
    class Program
    {
        static void Main(string[] args)
        {
            Workbook workbook = new Workbook();
            workbook.LoadFromFile("Sample.xlsx");

            Spire.Xls.Core.Spreadsheet.PivotTables.XlsPivotTable pivotTable = workbook.Worksheets["Pivot Table"].PivotTables[0] as Spire.Xls.Core.Spreadsheet.PivotTables.XlsPivotTable;

            PivotReportFilter filter = new PivotReportFilter("JAN", true);
            pivotTable.ReportFilters.Add(filter);

            workbook.SaveToFile("Result.xlsx", ExcelVersion.Version2010);
            System.Diagnostics.Process.Start("result.xlsx");
        }
    }
}
How to set the traffic lights icons in C# by Spire.XLS
By using Spire.XLS, developers can easily set the IconSetType of conditional formatting. This article will demonstrate how to set the traffic lights icons in C# with the help of Spire.XLS.
Note: Before Start, please download the latest version of Spire.XLS and add Spire.xls.dll in the bin folder as the reference of Visual Studio.
Here comes to the code snippets:
Step 1: Create a new excel document instance and get the first worksheet.
Workbook wb = new Workbook();
Worksheet sheet = wb.Worksheets[0];
Step 2: Add some data to the Excel sheet cell range and set the format for them.
sheet.Range["A1"].Text = "Traffic Lights";
sheet.Range["A2"].NumberValue = 0.95;
sheet.Range["A2"].NumberFormat = "0%";
sheet.Range["A3"].NumberValue = 0.5;
sheet.Range["A3"].NumberFormat = "0%";
sheet.Range["A4"].NumberValue = 0.1;
sheet.Range["A4"].NumberFormat = "0%";
sheet.Range["A5"].NumberValue = 0.9;
sheet.Range["A5"].NumberFormat = "0%";
sheet.Range["A6"].NumberValue = 0.7;
sheet.Range["A6"].NumberFormat = "0%";
sheet.Range["A7"].NumberValue = 0.6;
sheet.Range["A7"].NumberFormat = "0%";
Step 3: Set the height of row and width of column for Excel cell range.
sheet.AllocatedRange.RowHeight = 20;
sheet.AllocatedRange.ColumnWidth = 25;
Step 4: Add a conditional formatting of cell range and set its type to CellValue.
XlsConditionalFormats xcfs1 = sheet.ConditionalFormats.Add();
xcfs1.AddRange(sheet.AllocatedRange);
IConditionalFormat cf1 = xcfs1.AddCondition();
cf1.FormatType= ConditionalFormatType.CellValue;
cf1.FirstFormula = "300";
cf1.Operator = ComparisonOperatorType.Less;
cf1.FontColor = Color.Black;
cf1.BackColor = Color.LightSkyBlue;
Step 5: Add a conditional formatting of cell range and set its type to IconSet.
IConditionalFormat cf2 = xcfs1.AddCondition();
cf2.FormatType = ConditionalFormatType.IconSet;
cf2.IconSet.IconSetType = IconSetType.ThreeTrafficLights1;
Step 6: Save the document to file.
wb.SaveToFile("Light.xlsx", ExcelVersion.Version2010);"
Effective screenshots of the traffic lights icons set by Spire.XLS.

Set XMP Metadata of a PDF Document in C#/VB.NET
XMP is a file labeling technology that lets you embed metadata into files themselves during the content creation process. With an XMP enabled application, your workgroup can capture meaningful information about a project (such as titles and descriptions, searchable keywords, and up-to-date author and copyright information) in a format that is easily understood by your team as well as by software applications, hardware devices, and even file formats.
In the Spire.PDF Version 3.6.135 and above, we add a new feature to read, set and load an existing XMP data from XML documents. This article presents how to set XMP Metadata while creating a PDF document.
Code Snippet:
Step 1: Initialize a new instance of PdfDocument class.
string input = "..\\..\\..\\..\\..\\..\\Data\\SetXMPMetadata.pdf";

// Open a PDF document.
PdfDocument doc = new PdfDocument();
doc.LoadFromFile(input);

// Set XMP metadata for the document.
doc.DocumentInformation.Author = "E-iceblue";
doc.DocumentInformation.Creator = "Spire.PDF";
doc.DocumentInformation.Keywords = "XMP";
doc.DocumentInformation.Producer = "E-icenlue Co,.Ltd";
doc.DocumentInformation.Subject = "XMP Metadata";
doc.DocumentInformation.Title = "Set XMP Metadata in PDF";

// Specify the output file name for the modified PDF.
string output = "SetXMPMetadata.pdf";

// Save the PDF document with the updated XMP metadata.
doc.SaveToFile(output);
Output:
To view metadata in a PDF document, open it with Acrobat or Acrobat Reader and select ‘Document Properties’ in the File menu.
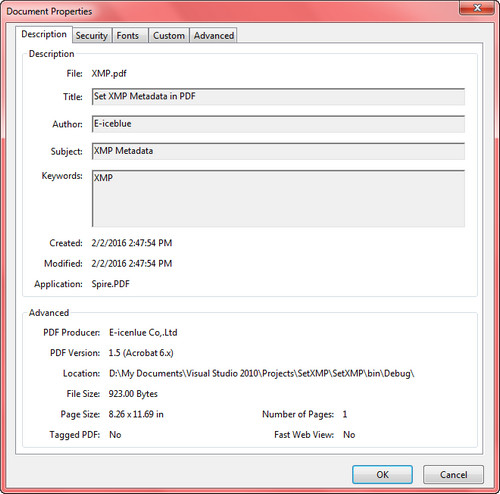
Full Code:
using Spire.Pdf;
using Spire.Pdf.Xmp;
using System;

namespace SetXMPMetadata
{
    class Program
    {
        static void Main(string[] args)
        {
            string input = "..\\..\\..\\..\\..\\..\\Data\\SetXMPMetadata.pdf";

            // Open a PDF document.
            PdfDocument doc = new PdfDocument();
            doc.LoadFromFile(input);

            // Set XMP metadata for the document.
            doc.DocumentInformation.Author = "E-iceblue";
            doc.DocumentInformation.Creator = "Spire.PDF";
            doc.DocumentInformation.Keywords = "XMP";
            doc.DocumentInformation.Producer = "E-icenlue Co,.Ltd";
            doc.DocumentInformation.Subject = "XMP Metadata";
            doc.DocumentInformation.Title = "Set XMP Metadata in PDF";

            // Specify the output file name for the modified PDF.
            string output = "SetXMPMetadata.pdf";

            // Save the PDF document with the updated XMP metadata.
            doc.SaveToFile(output);
        }
    }
}
Imports Spire.Pdf
Imports Spire.Pdf.Xmp

Namespace SetXMPMetadata
	Class Program
		Private Shared Sub Main(args As String())
            Load the input PDF file
            Dim input As String = "..\..\..\..\..\..\Data\SetXMPMetadata.pdf"

            ' Create a new PdfDocument object
            Dim doc As New PdfDocument()

            ' Load the PDF document from the input file
            doc.LoadFromFile(input)

            ' Set the author information in the document properties
            doc.DocumentInformation.Author = "E-iceblue"

            ' Set the creator information in the document properties
            doc.DocumentInformation.Creator = "Spire.PDF"

            ' Set the keywords information in the document properties
            doc.DocumentInformation.Keywords = "XMP"

            ' Set the producer information in the document properties
            doc.DocumentInformation.Producer = "E-icenlue Co,.Ltd"

            ' Set the subject information in the document properties
            doc.DocumentInformation.Subject = "XMP Metadata"

            ' Set the title information in the document properties
            doc.DocumentInformation.Title = "Set XMP Metadata in PDF"

            ' Specify the output file name
            Dim output As String = "SetXMPMetadata.pdf"

            ' Save the modified document to the output file
            doc.SaveToFile(output)
	   End Sub
	End Class
End Namespace
How to delete layer in PDF
With the help of Spire.PDF, we can add several kinds of layers such as line, image, string, ellipse, rectangle and pie to any page of a new or an existing pdf document. At the same time, it also supports us to delete specific layer from a pdf document.
In this section, we're going to demonstrate how to delete layer in PDF using Spire.PDF for .NET. To add layer to PDF, please check this article: How to add layers to PDF file in C#.
Below is the screenshot of the original PDF document which contains three layers: a red line layer and two image layers.
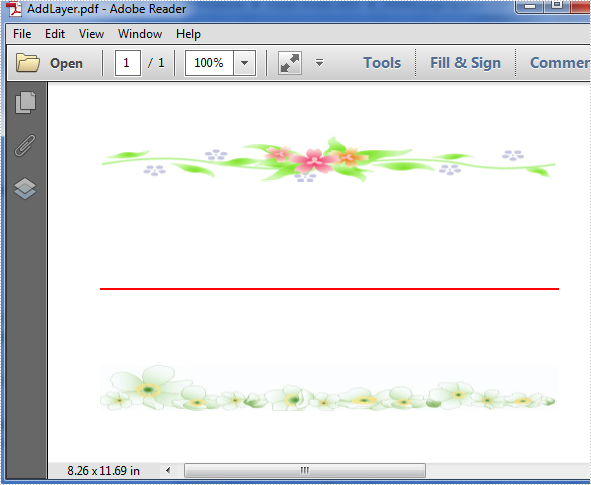
Before start, download Spire.PDF and install it correctly, next add the corresponding dll file from the installation folder as reference of your project.
Detail steps:
Step 1: Initialize a new instance of PdfDocument class and load the sample document from file.
PdfDocument doc = new PdfDocument();
doc.LoadFromFile("AddLayer.pdf");
Step 2: Get its first page and delete the specific layer by name from page one.
doc.Layers.RemoveLayer("red line");
Step 3: Save and launch the file.
doc.SaveToFile("delete.pdf");
System.Diagnostics.Process.Start("delete.pdf");
Effective screenshot after deleting:

Full codes:
using Spire.Pdf;

namespace Delete_page_layer_in_PDF
{
    class Program
    {
        static void Main(string[] args)
        {
            // Load the document from disk
            PdfDocument doc = new PdfDocument();
            doc.LoadFromFile(@"..\..\..\..\..\..\Data\DeleteLayer.pdf");

            // Remove the "red line" layer from the document
            doc.Layers.RemoveLayer("red line");

            // Save the modified document to a new file
            doc.SaveToFile("Output.pdf");

            // View the Pdf file
            PDFDocumentViewer("Output.pdf");
        }
    }
}
C#: Add a Stamp to a PDF Document
Adding a stamp to a PDF document can enhance its visual appeal and convey important information, such as approval, confidentiality, or urgency. This simple process allows users to mark documents with customized images or text, making it easier to communicate key messages. Whether for professional use or personal projects, stamping PDFs ensures clarity and adds a professional touch.
In this article, you will learn how to add a stamp to a PDF document using C# with Spire.PDF for .NET.
Install Spire.PDF for .NET
To begin with, you need to add the DLL files included in the Spire.PDF for .NET package as references in your .NET project. The DLL files can be either downloaded from this link or installed via NuGet.
PM> Install-Package Spire.PDF
Prerequisite Knowledge
In a PDF, a stamp is an annotation or graphical element that adds supplementary information to a document. Spire.PDF for .NET includes the PdfRubberStampAnnotation class, which represents a rubber stamp. To create the appearance for the rubber stamp, you can use the PdfTemplate class, which serves as a canvas for drawing text, images, shapes, and date/time elements.
Add a Dynamic Stamp to PDF in C#
A dynamic stamp is a customizable annotation added to a PDF document to convey specific statuses, approvals, or other information. Unlike static stamps, dynamic stamps include variables or fields that can be updated in real time, such as the current date, time, username, or other custom data.
Here are the steps to add a dynamic stamp to a PDF using Spire.PDF for .NET:
- Create a PdfDocument object.
- Load a PDF file using PdfDocument.LoadFromFile() method.
- Create a PdfTemplate object with the desired size.
- Draw strings, including dynamic information like date and time, on the template using PdfTemplate.Graphics.DrawString().
- Create a PdfRubberStampAnnotation object and set the template as its appearance.
- Add the stamp to a specific PDF page using PdfPageBase.AnnotationsV2.Add() method.
- Save the document to a different PDF file.
- C#
//Example 1: Add a dynamic stamp to a PDF document
using System.Drawing;
using Spire.Pdf;
using Spire.Pdf.Graphics;
using Spire.Pdf.Interactive.Annotations;

namespace AddDynamicStamp
{
    class Program
    {
        static void Main(string[] args)
        {
            // Create a PdfDocument object
            PdfDocument doc = new PdfDocument();

            // Load a PDF document
            doc.LoadFromFile("C:\\Users\\Administrator\\Desktop\\input.pdf");

            // Get a specific page
            PdfPageBase page = doc.Pages[1];

            // Create a PdfTemplate object
            PdfTemplate template = new PdfTemplate(220, 50);

            // Create two fonts
            PdfTrueTypeFont font1 = new PdfTrueTypeFont(new Font("Elephant", 16f, FontStyle.Bold), true);
            PdfTrueTypeFont font2 = new PdfTrueTypeFont(new Font("Times New Roman", 10f, FontStyle.Bold), true);

            // Create a solid brush and a gradient brush
            PdfSolidBrush solidBrush = new PdfSolidBrush(Color.Blue);
            RectangleF rectangle1 = new RectangleF(new PointF(0, 0), template.Size);
            PdfLinearGradientBrush linearGradientBrush = new PdfLinearGradientBrush(rectangle1, new PdfRGBColor(Color.White), new PdfRGBColor(Color.Blue), PdfLinearGradientMode.Horizontal);

            // Create a pen
            PdfPen pen = new PdfPen(solidBrush);

            // Create a rounded rectangle path
            int CornerRadius = 10;
            PdfPath path = new PdfPath();
            path.AddArc(template.GetBounds().X, template.GetBounds().Y, CornerRadius, CornerRadius, 180, 90);
            path.AddArc(template.GetBounds().X + template.Width - CornerRadius, template.GetBounds().Y, CornerRadius, CornerRadius, 270, 90);
            path.AddArc(template.GetBounds().X + template.Width - CornerRadius, template.GetBounds().Y + template.Height - CornerRadius, CornerRadius, CornerRadius, 0, 90);
            path.AddArc(template.GetBounds().X, template.GetBounds().Y + template.Height - CornerRadius, CornerRadius, CornerRadius, 90, 90);
            path.AddLine(template.GetBounds().X, template.GetBounds().Y + template.Height - CornerRadius, template.GetBounds().X, template.GetBounds().Y + CornerRadius / 2);

            // Draw path on the template
            template.Graphics.DrawPath(pen, path);
            template.Graphics.DrawPath(linearGradientBrush, path);

            // Draw text on the template
            String string1 = "APPROVED\n";
            String string2 = "By Marketing Manager at " + DateTime.Now.ToString("HH:mm, MMM dd, yyyy");
            template.Graphics.DrawString(string1, font1, solidBrush, new PointF(5, 5));
            template.Graphics.DrawString(string2, font2, solidBrush, new PointF(2, 28));

            // Create a rubber stamp, specifying its size and location
            RectangleF rectangle2 = new RectangleF(55, page.ActualSize.Height - 55 - 70, 240, 55);
            PdfRubberStampAnnotation stamp = new PdfRubberStampAnnotation(page, rectangle2);

            // Create a PdfAppearance object and set the template as its normal appearance
            PdfAppearance apprearance = new PdfAppearance(template);
            stamp.Appearances.SetNormalAppearance(apprearance);

            // Add the stamp annotation to the annotation collection
            page.AnnotationsV2.Add(stamp);

            // Save the file
            doc.SaveToFile("DynamicStamp.pdf", FileFormat.PDF);

            // Dispose resources
            doc.Dispose();
        }
    }
}

Add an Image Stamp to PDF in C#
An image stamp in a PDF is a graphical element that is added to a document as an annotation or overlay. This stamp typically consists of an image that can be positioned at a specific location on a PDF page.
Here are the steps to add an image stamp to a PDF using Spire.PDF for .NET:
- Create a PdfDocument object.
- Load a PDF file using PdfDocument.LoadFromFile() method.
- Create a PdfTemplate object with the desired size.
- Draw strings, including dynamic information like date and time, on the template using PdfTemplate.Graphics.DrawString().
- Create a PdfRubberStampAnnotation object and set the template as its appearance.
- Add the stamp to a specific PDF page using PdfPageBase.AnnotationsV2.Add() method.
- Save the document to a different PDF file.
- C#
//Example 2: Add an image stamp to a PDF document
using Spire.Pdf;
using Spire.Pdf.Interactive.Annotations;
using Spire.Pdf.Graphics;
using System.Drawing;

namespace AddImageStamp
{
    class Program
    {
        static void Main(string[] args)
        {
            // Create a PdfDocument object
            PdfDocument doc = new PdfDocument();

            // Load a PDF document
            doc.LoadFromFile("C:\\Users\\Administrator\\Desktop\\input.pdf");

            // Get a specific page
            PdfPageBase page = doc.Pages[1];

            // Load an image file
            PdfImage image = PdfImage.FromFile("C:\\Users\\Administrator\\Desktop\\confidential.png");

            // Get the width and height of the image
            int width = image.Width;
            int height = image.Height;

            // Create a PdfTemplate object based on the size of the image
            PdfTemplate template = new PdfTemplate(width, height, true);

            // Draw image on the template
            template.Graphics.DrawImage(image, 0, 0, width, height);

            // Create a rubber stamp annotation, specifying its location and position
            RectangleF rect = new RectangleF(page.ActualSize.Width - width - 50, page.ActualSize.Height - height - 50, width, height);
            PdfRubberStampAnnotation stamp = new PdfRubberStampAnnotation(page, rect);

            // Create a PdfAppearance object and set the template as its normal appearance
            PdfAppearance pdfAppearance = new PdfAppearance(template);
            stamp.Appearances.SetNormalAppearance(pdfAppearance);

            // Add the stamp annotation to the annotation collection
            page.AnnotationsV2.Add(stamp);

            // Save the file
            doc.SaveToFile("ImageStamp.pdf");

            // Dispose resources
            doc.Dispose();
        }
    }
}

Apply for a Temporary License
If you'd like to remove the evaluation message from the generated documents, or to get rid of the function limitations, please request a 30-day trial license for yourself.
How to add layers to PDF file in C#
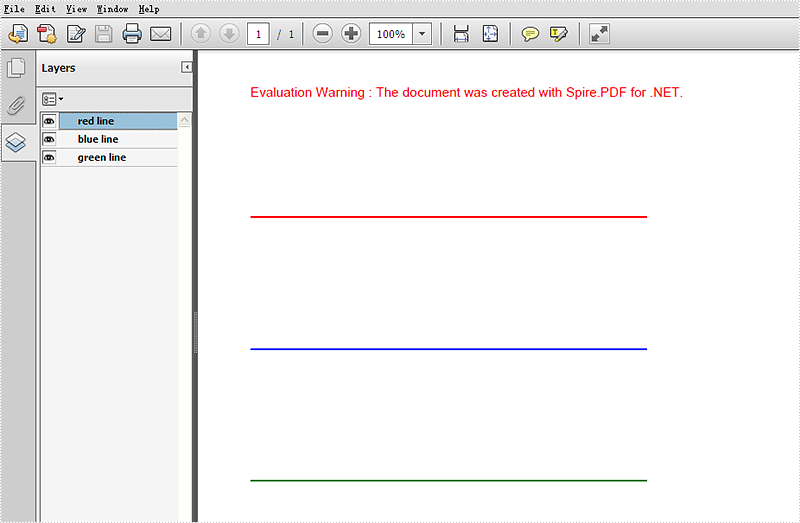
Developers can use PDF layer to set some content to be visible and others to be invisible in the same PDF file. It makes the PDF Layer widely be used to deal with related contents within the same PDF. Now developers can easily add page layers by using class PdfPageLayer offered by Spire.PDF. This article will focus on showing how to add layers to a PDF file in C# with the help of Spire.PDF.
Note: Before Start, please download the latest version of Spire.PDF and add Spire.PDF.dll in the bin folder as the reference of Visual Studio.
Here comes to the details:
Step 1: Create a new PDF document
PdfDocument pdfdoc = new PdfDocument();
Step 2: Add a new page to the PDF document.
PdfPageBase page = pdfdoc.Pages.Add();
Step 3: Add a layer named "red line" to the PDF page.
PdfLayer layer = doc.Layers.AddLayer("red line", PdfVisibility.On);
Step 4: Draw a red line to the added layer.
// Create a graphics context for drawing on the specified page's canvas using the created layer
 PdfCanvas pcA = layer.CreateGraphics(page.Canvas);

 // Draw a red line on the graphics context using a pen with thickness 2, starting from (100, 350) to (300, 350)
 pcA.DrawLine(new PdfPen(PdfBrushes.Red, 2), new PointF(100, 350), new PointF(300, 350));
Step 5: Use the same method above to add the other two layers to the PDF page.
layer = doc.Layers.AddLayer("blue line");
PdfCanvas pcB = layer.CreateGraphics(doc.Pages[0].Canvas);
pcB.DrawLine(new PdfPen(PdfBrushes.Blue, 2), new PointF(100, 400), new PointF(300, 400));
layer = doc.Layers.AddLayer("green line");
PdfCanvas pcC = layer.CreateGraphics(doc.Pages[0].Canvas);
pcC.DrawLine(new PdfPen(PdfBrushes.Green, 2), new PointF(100, 450), new PointF(300, 450));
Step 6: Save the document to file.
pdfdoc.SaveToFile("AddLayers.pdf", FileFormat.PDF);
Effective screenshot:
Full codes:
using Spire.Pdf;
using Spire.Pdf.Graphics;
using System.Drawing;

namespace AddLayer
{
    class Program
    {
        static void Main(string[] args)
        {
  // Create a new PdfDocument object
  PdfDocument doc = new PdfDocument();

  // Load an existing PDF document from the specified file path
  doc.LoadFromFile(@"..\..\..\..\..\..\Data\AddLayers.pdf");

  // Get the first page of the loaded document
  PdfPageBase page = doc.Pages[0];

  // Create a new layer named "red line" with visibility set to "On"
  PdfLayer layer = doc.Layers.AddLayer("red line", PdfVisibility.On);

  // Create a graphics context for drawing on the specified page's canvas using the created layer
  PdfCanvas pcA = layer.CreateGraphics(page.Canvas);

  // Draw a red line on the graphics context using a pen with thickness 2, starting from (100, 350) to (300, 350)
  pcA.DrawLine(new PdfPen(PdfBrushes.Red, 2), new PointF(100, 350), new PointF(300, 350));

  // Create a new layer named "blue line" without specifying visibility (default is "Off")
  layer = doc.Layers.AddLayer("blue line");

  // Create a graphics context for drawing on the first page's canvas using the newly created layer
  PdfCanvas pcB = layer.CreateGraphics(doc.Pages[0].Canvas);

  // Draw a blue line on the graphics context using a pen with thickness 2, starting from (100, 400) to (300, 400)
  pcB.DrawLine(new PdfPen(PdfBrushes.Blue, 2), new PointF(100, 400), new PointF(300, 400));

  // Create a new layer named "green line" without specifying visibility (default is "Off")
  layer = doc.Layers.AddLayer("green line");

  // Create a graphics context for drawing on the first page's canvas using the newly created layer
  PdfCanvas pcC = layer.CreateGraphics(doc.Pages[0].Canvas);

  // Draw a green line on the graphics context using a pen with thickness 2, starting from (100, 450) to (300, 450)
  pcC.DrawLine(new PdfPen(PdfBrushes.Green, 2), new PointF(100, 450), new PointF(300, 450));

  // Specify the output file name for the modified PDF
  string output = "AddLayers.pdf";

  // Save the modified PDF document to the specified output file
  doc.SaveToFile(output);
        }
    }
}
How to set internal margin for Word text box in C#
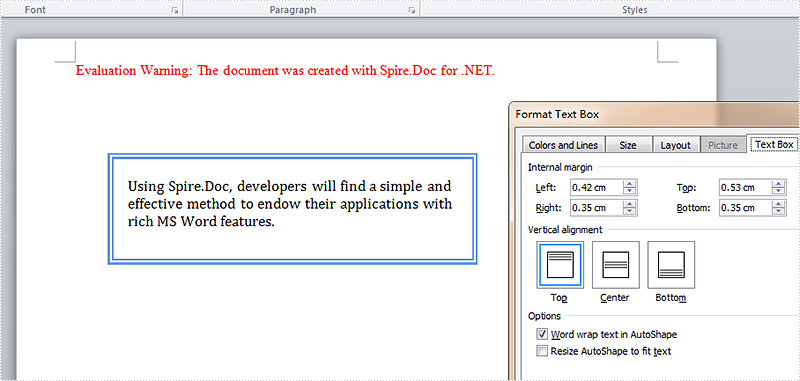
In our tutorials, there are articles introducing the method to insert, remove, position text box and extract text from text box. This article is going to give the documentation of how to set the internal margin for textbox with the position and line style settings included using Spire.Doc.
Note: before start, please download the latest version of Spire.Doc and add the .dll in the bin folder as the reference of Visual Studio.
Step 1: Create a Word document and add a section.
Document document = new Document();
Section sec = document.AddSection();
Step 2: Add a text box and append sample text.
TextBox TB = document.Sections[0].AddParagraph().AppendTextBox(310, 90);
Paragraph para = TB.Body.AddParagraph();
TextRange TR = para.AppendText("Using Spire.Doc, developers will find a simple and effective method to endow their applications with rich MS Word features. ");
TR.CharacterFormat.FontName = "Cambria ";
TR.CharacterFormat.FontSize = 13;
Step 3: Set exact position for the text box.
TB.Format.HorizontalOrigin = HorizontalOrigin.Page;
TB.Format.HorizontalPosition = 80;
TB.Format.VerticalOrigin = VerticalOrigin.Page;
TB.Format.VerticalPosition = 100;
Step 4: Set line style for the text box.
TB.Format.LineStyle = TextBoxLineStyle.Double;
TB.Format.LineColor = Color.CornflowerBlue;
TB.Format.LineDashing = LineDashing.DashDotDot;
TB.Format.LineWidth = 5;
Step 5: Set internal margin for the text box:
TB.Format.InternalMargin.Top = 15;
TB.Format.InternalMargin.Bottom = 10;
TB.Format.InternalMargin.Left = 12;
TB.Format.InternalMargin.Right = 10;
Step 6: Save the document and launch to see effects.
document.SaveToFile("result.docx", FileFormat.Docx2013);
System.Diagnostics.Process.Start("result.docx");
Effects:
Full Codes:
using System;
using System.Collections.Generic;
using System.Linq;
using System.Text;
using Spire.Doc;
using Spire.Doc.Documents;
using Spire.Doc.Fields;
using System.Drawing;

namespace Demo
{
    class Program
    {
        static void Main(string[] args)
        {

            Document document = new Document();
            Section sec = document.AddSection();

            TextBox TB = document.Sections[0].AddParagraph().AppendTextBox(310, 90);
            Paragraph para = TB.Body.AddParagraph();
            TextRange TR = para.AppendText("Using Spire.Doc, developers will find a simple and effective method to endow their applications with rich MS Word features. ");
            TR.CharacterFormat.FontName = "Cambria ";
            TR.CharacterFormat.FontSize = 13;

            TB.Format.HorizontalOrigin = HorizontalOrigin.Page;
            TB.Format.HorizontalPosition = 80;
            TB.Format.VerticalOrigin = VerticalOrigin.Page;
            TB.Format.VerticalPosition = 100;

            TB.Format.LineStyle = TextBoxLineStyle.Double;
            TB.Format.LineColor = Color.CornflowerBlue;
            TB.Format.LineDashing = LineDashing.DashDotDot;
            TB.Format.LineWidth = 5;

            TB.Format.InternalMargin.Top = 15;
            TB.Format.InternalMargin.Bottom = 10;
            TB.Format.InternalMargin.Left = 12;
            TB.Format.InternalMargin.Right = 10;

            document.SaveToFile("result.docx", FileFormat.Docx2013);
            System.Diagnostics.Process.Start("result.docx");
        }
    }
}