Insert a footnote in a paragraph
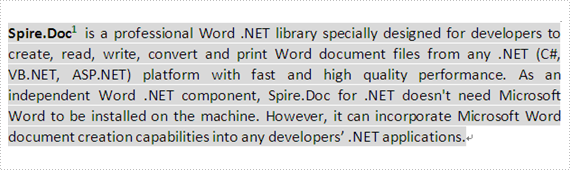
This article shows how to place a footnote in a paragraph using Spire.Doc for .NET, for example, after the word "Spire.Doc" in the following example:

Step 1: Load a word document, Sample.docx.
Document document1 = new Document();
document1.LoadFromFile("D:\\Sample.docx",FileFormat.Docx2010);
Step 2: Get the first paragraph of the first section of Sample.docx.
Paragraph paragraph1 = document1.Sections[0].Paragraphs[0];
Step 3: Add a footnote for paragraph1.
Footnote footnote1 = paragraph1.AppendFootnote(FootnoteType.Footnote);
Step 4: Find the word "Spire.Doc" and insert footnote1 after it.
DocumentObject obj=null;
for (int i = 0; i < paragraph1.ChildObjects.Count; i++)
{
   obj=paragraph1.ChildObjects[i];
   if (obj.DocumentObjectType == DocumentObjectType.TextRange)
   {
      TextRange textRange = obj as TextRange;
// Find the word "Spire.Doc" in paragraph1
if (textRange.Text == "Spire.Doc")
{
//Set bold format for the word "Spire.Doc"
textRange.CharacterFormat.Bold = true;
//Insert footnote1 after the word "Spire.Doc"
paragraph1.ChildObjects.Insert(i + 1, footnote1);
break;
}
     }
 }
Step 5: Type the footnote1 text and set the text's FontName, FontSize and Color.
TextRange text = footnote1.TextBody.AddParagraph().AppendText("Welcome to evaluate Spire.Doc");
text.CharacterFormat.FontName = "Arial Black";
text.CharacterFormat.FontSize = 10;
text.CharacterFormat.TextColor = Color.DarkGray;
Step 6: Set FontName, FontSize, Bold and Color for the footnote1 number.
footnote1.MarkerCharacterFormat.FontName = "Calibri";
footnote1.MarkerCharacterFormat.FontSize = 12;
footnote1.MarkerCharacterFormat.Bold = true;
footnote1.MarkerCharacterFormat.TextColor = Color.DarkGreen;
Step 7: Save Sample.docx to a new document, Footnote.docx.
document1.SaveToFile("D:\\ Footnote.docx"", FileFormat.Docx2010);
Full code:
Document document1 = new Document();
document1.LoadFromFile("D:\\Sample.docx" ,FileFormat.Docx2010);
Paragraph paragraph1= document1.Sections[0].Paragraphs[0];
Footnote footnote1 = paragraph1.AppendFootnote(FootnoteType.Footnote);
DocumentObject obj=null;
for (int i = 0; i < paragraph1.ChildObjects.Count; i++)
{
obj=paragraph1.ChildObjects[i];
if (obj.DocumentObjectType == DocumentObjectType.TextRange)
{
TextRange textRange = obj as TextRange;
// Find the word "Spire.Doc" in paragraph1
if (textRange.Text == "Spire.Doc")
{
//Set bold format for the word "Spire.Doc"
textRange.CharacterFormat.Bold = true;
//Insert footnote1 after the word "Spire.Doc"
paragraph1.ChildObjects.Insert(i + 1, footnote1);
break;
}
}
}
TextRange text = footnote1.TextBody.AddParagraph().AppendText("Welcome to evaluate Spire.Doc");
text.CharacterFormat.FontName = "Arial Black";
text.CharacterFormat.FontSize = 10;
text.CharacterFormat.TextColor = Color.DarkGray;

footnote1.MarkerCharacterFormat.FontName = "Calibri";
footnote1.MarkerCharacterFormat.FontSize = 12;
footnote1.MarkerCharacterFormat.Bold = true;
footnote1.MarkerCharacterFormat.TextColor = Color.DarkGreen;
document1.SaveToFile("Footnote.docx",FileFormat.Docx2010);
Live Demo

Welcome to E-iceblue Live Demos!
Live Demo gives you something quite different; taking you through individual pieces of E-iceblue products' functionality. You can use your own documents and get to see the result straight away by alerting the tabs at the top of the page.
If you don't find the function you want, please request a free demo from us. Make sure the demo you want meets the following requirements:
- It is a small project that implements a particular scenario.
- It relates to our libraries stored on E-iceblue online store.
- It costs less than 2 hours for us to complete it.
- It is not a bug report.
- It is not a feature request.
Recently Updated
Most Viewed
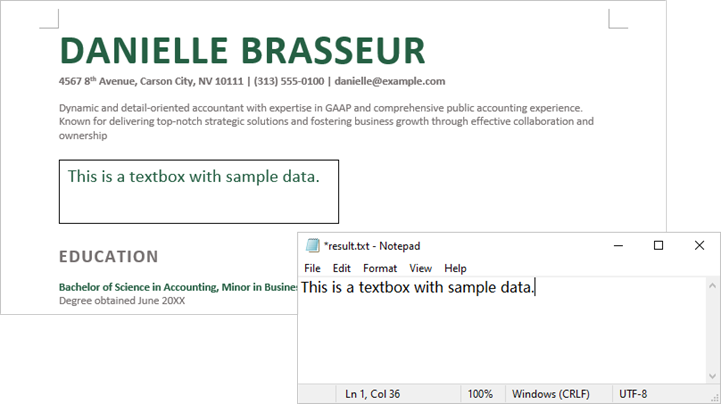
C#: Extract or Update Text in Textbox in Word
Textboxes in Microsoft Word are versatile tools that enhance document layout and design. They allow users to position text independently of the main text flow, making it easier to create visually appealing documents. In some cases, you may need to extract text from textboxes for repurposing, or update the text inside a textbox to ensure clarity and relevance.
In this article, you will learn how to extract or update text in a textbox in a Word document using C# with Spire.Doc for .NET.
Install Spire.Doc for .NET
To begin with, you need to add the DLL files included in the Spire.Doc for .NET package as references in your .NET project. The DLL files can be either downloaded from this link or installed via NuGet.
PM> Install-Package Spire.Doc
Extract Text from Textbox in a Word Document
Using Spire.Doc for .NET, you can access a specific text box in a document with the Document.TextBoxes[index] property. Iterate through the text box's child objects to check if each one is a paragraph or a table. For paragraphs, retrieve the text using the Paragraph.Text property. For tables, loop through the cells to extract text from each cell.
The steps to extract text from a textbox in a Word document are as follows:
- Create a Document object.
- Load a Word file using Document.LoadFromFile() method.
- Get a specific textbox using Document.TextBoxes[index] property
- Iterate through the child objects of the textbox.
- Determine if a child object if a paragraph. If yes, get the text from the paragraph using Paragraph.Text property.
- Determine if a child object if a table. If yes, get the text from the table using ExtractTextFromTable() method.
- C#
using Spire.Doc;
using Spire.Doc.Documents;
using Spire.Doc.Fields;

namespace ExtractTextFromTextbox
{
    class Program
    {
        static void Main(string[] args)
        {
            // Create a Document object
            Document document = new Document();

            // Load a Word file
            document.LoadFromFile("C:\\Users\\Administrator\\Desktop\\Input.docx");

            // Get a specific textbox
            TextBox textBox = document.TextBoxes[0];

            // Create a StreamWriter to write extracted text to a txt file
            using (StreamWriter sw = File.CreateText("result.txt"))
            {
                // Iterate though child objects of the textbox
                foreach (DocumentObject objt in textBox.ChildObjects)
                {
                    // Determine if the child object is a paragraph
                    if (objt.DocumentObjectType == DocumentObjectType.Paragraph)
                    {
                        // Write paragraph text to the txt file
                        sw.Write((objt as Paragraph).Text);
                    }

                    // Determine if the child object is a table
                    if (objt.DocumentObjectType == DocumentObjectType.Table)
                    {
                        // Extract text from table to the txt file
                        ExtractTextFromTable(objt as Table, sw);
                    }
                }

            }

        }

        // Extract text from a table
        static void ExtractTextFromTable(Table table, StreamWriter sw)
        {
            for (int i = 0; i < table.Rows.Count; i++)
            {
                TableRow row = table.Rows[i];
                for (int j = 0; j < row.Cells.Count; j++)
                {
                    TableCell cell = row.Cells[j];
                    foreach (Paragraph paragraph in cell.Paragraphs)
                    {
                        sw.Write(paragraph.Text);
                    }
                }
            }
        }
    }
}
Update a Textbox in a Word Document
To update a text box, first clear its existing content using the TextBox.ChildObjects.Clear() method. Then, add a new paragraph and set its text.
The steps to update a textbox in a Word document are as follows:
- Create a Document object.
- Load a Word file using Document.LoadFromFile() method.
- Get a specific textbox using Document.TextBoxes[index] property
- Remove existing content of the textbox using TextBox.ChildObjects.Clear() method.
- Add a paragraph to the textbox using TextBox.Body.AddParagraph() method.
- Add text to the paragraph using Paragraph.AppendText() method.
- Save the document to a different Word file.
- C#
using Spire.Doc;
using Spire.Doc.Documents;
using Spire.Doc.Fields;

namespace UpdateTextbox
{
    class Program
    {
        static void Main(string[] args)
        {
            // Create a Document object
            Document document = new Document();

            // Load a Word file
            document.LoadFromFile("C:\\Users\\Administrator\\Desktop\\Input.docx");

            // Get a specific textbox
            TextBox textBox = document.TextBoxes[0];

            // Remove child objects of the textbox
            textBox.ChildObjects.Clear();

            // Add a new paragraph to the textbox
            Paragraph paragraph = textBox.Body.AddParagraph();

            // Set line spacing
            paragraph.Format.LineSpacing = 15f;

            // Add text to the paragraph
            TextRange textRange = paragraph.AppendText("The text in this textbox has been updated.");

            // Set font size
            textRange.CharacterFormat.FontSize = 15f;

            // Save the document to a different Word file
            document.SaveToFile("UpdateTextbox.docx", FileFormat.Docx2019);

            // Dispose resources
            document.Dispose();
        }

    }

}

Apply for a Temporary License
If you'd like to remove the evaluation message from the generated documents, or to get rid of the function limitations, please request a 30-day trial license for yourself.
Unhide the Excel Row and Column in C#
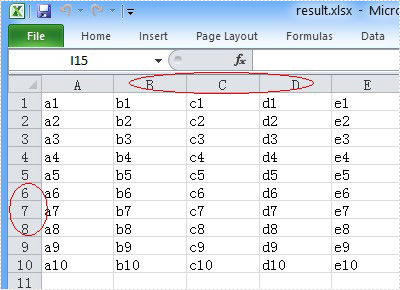
You can hide the Excel row or column by using the c# code, but a row or column also becomes hidden when you want to show the full Excel worksheet. You can unhide the Excel row and column by using the c# code. This article aims at introducing the method sheet.ShowRow and sheet.ShowColumn in the Excel .NET component Spire.Xls to show the hidden row and column.
First, let’s preview the hidden row and column.

Here comes to the steps of the process.
Step 1: Create an instance of Spire.XLS.Workbook.
Workbook workbook = new Workbook();
Step 2: Load the existing Excel file that hidden the row and column in the specified path.
workbook.LoadFromFile("hide.xlsx");
Step 3: Get the first worksheet of the Excel file.
Worksheet sheet = workbook.Worksheets[0];
Step 4: Unhide the hidden row and column.
sheet.ShowRow(7);
sheet.ShowColumn(3);
Step 5: Generate the new Excel file.
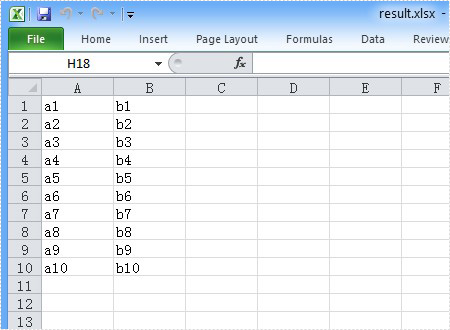
workbook.SaveToFile("result.xlsx", ExcelVersion.Version2010);
Now let's preview the effect screenshot.
Here is the full code.
using Spire.Xls;
namespace UnhideExcelRow
{
    class Program
    {
        static void Main(string[] args)
        {
            Workbook workbook = new Workbook();
            workbook.LoadFromFile("hide.xlsx");
            Worksheet sheet = workbook.Worksheets[0];
            // unhide the hidden row and column of the worksheet.
            sheet.ShowRow(7);
            sheet.ShowColumn(3);
            workbook.SaveToFile("result.xlsx", ExcelVersion.Version2010);
        }
    }
}
Add Image Header/Footer in C#
Excel header and footer gives additional information of a spreadsheet. And it can be in text and image. We have already shows you the text header and footer in excel worksheet, this guide focuses on introducing how to insert image header and footer for Excel files in C# by using Spire.XLS for .NET.
Firstly, Download Spire.XLS for .NET (or Spire.Office for .NET) and install it on your system. The Spire.XLS installation is clean, professional and wrapped up in a MSI installer.
Then, adds Spire.XLS.dll as reference in the downloaded Bin folder thought the below path: "..\Spire.XLS\Bin\NET4.0\ Spire.XLS.dll".
Now it comes to the details of how to add image header and footer in C#:
Step 1: Create a new excel document and load from the file.
Workbook workbook = new Workbook();
workbook.LoadFromFile(@"..\..\XLS1.xlsx");
Step 2: Get a first worksheet.
Worksheet sheet = workbook.Worksheets[0];
Step 3: Load the image and set header and footer style.
Image image = Image.FromFile(@"..\..\logo.png");

//Set Header format
sheet.PageSetup.LeftHeaderImage = image;
sheet.PageSetup.LeftHeader = "&G";

//Set Footer format
sheet.PageSetup.CenterFooterImage = image;
sheet.PageSetup.CenterFooter = "&G";
Step 4: Save the document to file.
workbook.SaveToFile(@"..\..\result.xlsx", ExcelVersion.Version2010);
Effected screenshot:
The full codes:
using Spire.Xls;
using System.Drawing;
namespace AddImageHeaderandFooter
{
    class Program
    {
        static void Main(string[] args)
        {
            Workbook workbook = new Workbook();
            workbook.LoadFromFile(@"..\..\XLS1.xlsx");
            Worksheet sheet = workbook.Worksheets[0];
            Image image = Image.FromFile(@"..\..\logo.png");

            sheet.PageSetup.LeftHeaderImage = image;
            sheet.PageSetup.LeftHeader = "&G";

            sheet.PageSetup.CenterFooterImage = image;
            sheet.PageSetup.CenterFooter = "&G";

            workbook.SaveToFile(@"..\..\result.xlsx", ExcelVersion.Version2010);
        }
    }
}
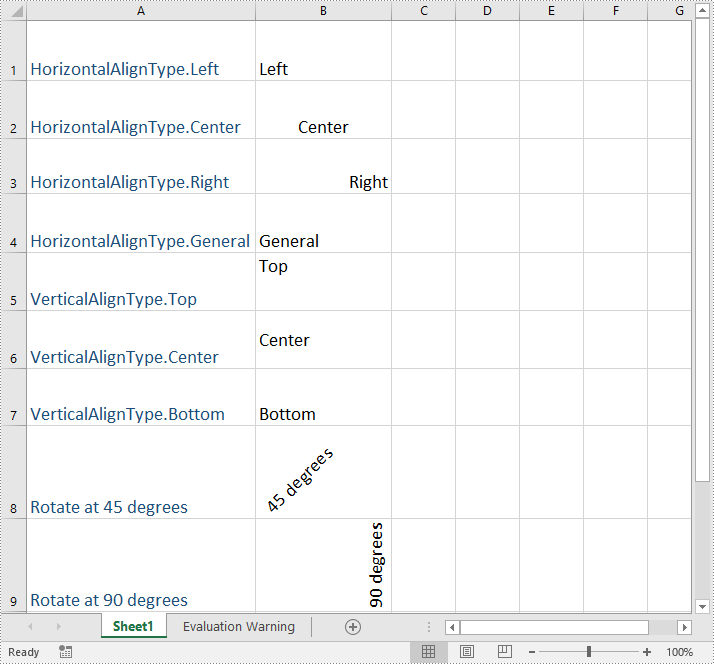
C#/VB.NET: Set Text Alignment and Orientation in Excel
Text alignment and orientation are essential formatting features in Excel that allow you to position and orient text within cells according to your specific needs. By adjusting text alignment and orientation, you can enhance the readability and aesthetics of your spreadsheet. In this article, we will explain how to set text alignment and orientation in Excel in C# and VB.NET using Spire.XLS for .NET.
Install Spire.XLS for .NET
To begin with, you need to add the DLL files included in the Spire.XLS for.NET package as references in your .NET project. The DLL files can be either downloaded from this link or installed via NuGet.
PM> Install-Package Spire.XLS
Set Text Alignment and Orientation in Excel in C# and VB.NET
You can set the horizontal or vertical alignment of text in individual cells or a range of cells using the CellRange.Style.HorizontalAlignment or CellRange.Style.VerticalAlignment properties. In addition, you are also able to change the orientation of text by assigning a rotation value to the corresponding cell or cells using the CellRange.Style.Rotation property. The detailed steps are as follows:
- Create a Workbook object.
- Load an Excel file using Workbook.LoadFromFile() method.
- Get a specific worksheet using Workbook.Worksheets[int index] property.
- Access specific cells in the worksheet using Worksheet.Range[string name] property and then set the horizontal alignment of text in them using CellRange.Style.HorizontalAlignment property.
- Access specific cells in the worksheet using Worksheet.Range[string name] property and then set the vertical alignment of text in them using CellRange.Style.VerticalAlignment property.
- Access specific cells in the worksheet using Worksheet.Range[string name] property and then change their text orientation using CellRange.Style.Rotation property.
- Save the result file using Workbook.SaveToFile() method.
- C#
- VB.NET
using Spire.Xls;

namespace TextAlignmentAndRotation
{
    internal class Program
    {
        static void Main(string[] args)
        {
            //Create a Workbook object
            Workbook workbook = new Workbook();

            //Load an Excel file
            workbook.LoadFromFile(@"Sample.xlsx");

            //Get the first worksheet
            Worksheet sheet = workbook.Worksheets[0];

            //Set the horizontal alignment for text in a specific cell to Left
            sheet.Range["B1"].Style.HorizontalAlignment = HorizontalAlignType.Left;

            //Set the horizontal alignment for text in a specific cell to Center
            sheet.Range["B2"].Style.HorizontalAlignment = HorizontalAlignType.Center;

            //Set the horizontal alignment for text in a specific cell to Right
            sheet.Range["B3"].Style.HorizontalAlignment = HorizontalAlignType.Right;

            //Set the horizontal alignment for text in a specific cell to General
            sheet.Range["B4"].Style.HorizontalAlignment = HorizontalAlignType.General;

            //Set the vertical alignment for text in a specific cell to Top
            sheet.Range["B5"].Style.VerticalAlignment = VerticalAlignType.Top;

            //Set the vertical alignment for text in a specific cell to Center
            sheet.Range["B6"].Style.VerticalAlignment = VerticalAlignType.Center;

            //Set the vertical alignment for text in a specific cell to Bottom
            sheet.Range["B7"].Style.VerticalAlignment = VerticalAlignType.Bottom;

            //Change the text orientation in specific cells by assigning a rotation value
            sheet.Range["B8"].Style.Rotation = 45;
            sheet.Range["B9"].Style.Rotation = 90;

            //Set the row height for specific cells
            sheet.Range["B8:C9"].RowHeight = 70;

            //Save the result file
            workbook.SaveToFile("TextAlignmentAndOrientation.xlsx", ExcelVersion.Version2016);
            workbook.Dispose();
        }
    }
}
Apply for a Temporary License
If you'd like to remove the evaluation message from the generated documents, or to get rid of the function limitations, please request a 30-day trial license for yourself.
C#: Apply Shading to Word Paragraphs or Text
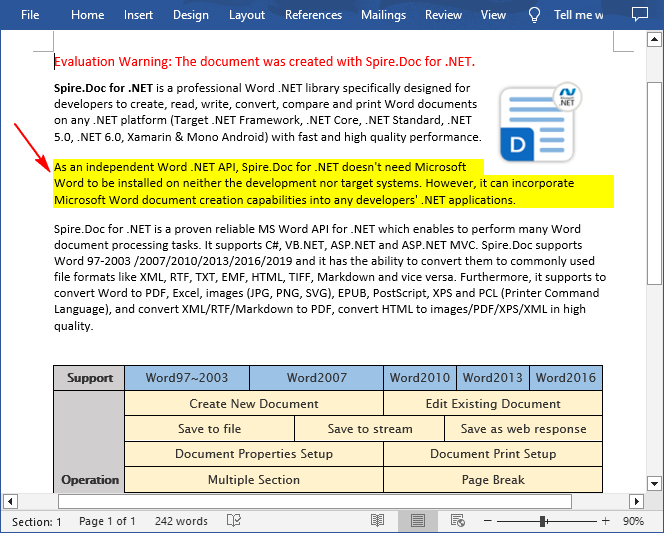
Shading is a powerful feature in MS Word that adds a background color to specified text or paragraphs in a document. This not only enhances the visual appeal of the document, but also helps to differentiate between different sections and makes the content more readable. In this article, you will learn how to apply shading to a paragraph or text in Word in C# using Spire.Doc for .NET.
Install Spire.Doc for .NET
To begin with, you need to add the DLL files included in the Spire.Doc for.NET package as references in your .NET project. The DLL files can be either downloaded from this link or installed via NuGet.
PM> Install-Package Spire.Doc
Apply Paragraph Shading in Word in C#
Spire.Doc for .NET provides developers with the Paragraph.Format.BackColor property to apply a background color to a specified paragraph in Word. The following are the detailed steps:
- Create a Document instance.
- Load a Word document using Document.LoadFromFile() method.
- Get a specified section using Document.Sections[] property.
- Get a specified paragraph using Section.Paragraphs[] property.
- Set a background color for the paragraph using Paragraph.Format.BackColor property.
- Save the result document using Document.SaveToFile() method.
- C#
using Spire.Doc;
using Spire.Doc.Documents;
using System.Drawing;

namespace WordParagrahShade
{
    class Program
    {
        static void Main(string[] args)
        {
            // Create a Document instance
            Document document = new Document();

            // Load a Word document
            document.LoadFromFile("Sample.docx");

            // Get the first section
            Section section = document.Sections[0];

            // Get the second paragraph
            Paragraph paragaph = section.Paragraphs[1];

            // Set a background color for the paragraph
            paragaph.Format.BackColor = Color.Yellow;

            // Save the result document
            document.SaveToFile("ParagraphBackground.docx", FileFormat.Docx);
        }
    }
}
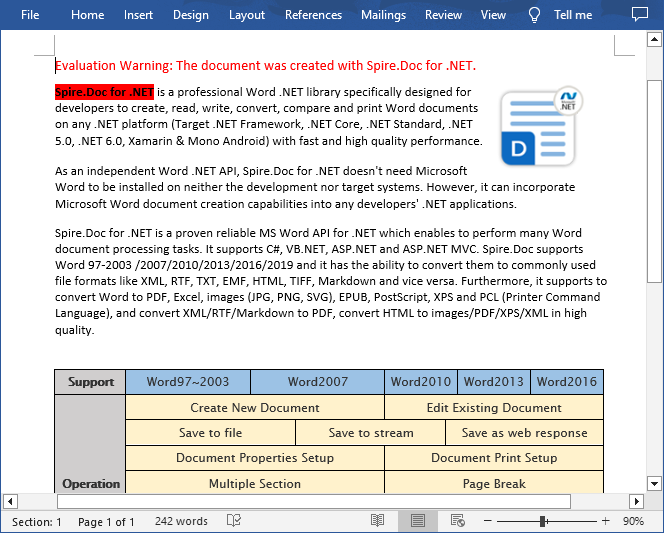
Apply Shading to Specified Text in Word in C#
If you only need to apply shading to specified text, you can first find the specific text through the Paragraph.Find() method, get its text range and then set a background color for the text range through the TextRange.CharacterFormat.TextBackgroundColor property. The following are the detailed steps:
- Create a Document instance.
- Load a Word document using Document.LoadFromFile() method.
- Get a specified section using Document.Sections[] property.
- Get a specified paragraph using Section.Paragraphs[] property.
- Find a specified text in the paragraph Paragraph.Find() method.
- Get the text range of the found text using TextSelection.GetAsOneRange() method.
- Set a background color for the text range using TextRange.CharacterFormat.TextBackgroundColor property.
- Save the document using Document.SaveToFile() method.
- C#
using Spire.Doc;
using Spire.Doc.Documents;
using Spire.Doc.Fields;
using System.Drawing;

namespace ShadeText
{
    class Program
    {
        static void Main(string[] args)
        {
            // Create a Document instance
            Document document = new Document();

            // Load a Word document
            document.LoadFromFile("Sample.docx");

            // Get the first section
            Section section = document.Sections[0];

            // Get the first paragraph
            Paragraph paragaph = section.Paragraphs[0];

            // Find a specified text in the paragraph
            TextSelection selection = paragaph.Find("Spire.Doc for .NET", true, false);

            // Get the text range of the found text
            TextRange range = selection.GetAsOneRange();

            // Set a background color for the text range
            range.CharacterFormat.TextBackgroundColor = Color.Red;

            // Save the result document
            document.SaveToFile("TextBackground.docx", FileFormat.Docx);
        }
    }
}
Apply for a Temporary License
If you'd like to remove the evaluation message from the generated documents, or to get rid of the function limitations, please request a 30-day trial license for yourself.
How to Ungroup Excel Cells in C#
Group the Excel cells is to tie a range of cells together so that they can be collapsed or expanded. But usually, we also need to ungroup the Excel cells. Consequently, the articles aims at introducing how to ungroup Excel cells in C#, through a professional Excel .NET Component Spire.Xls.
Just as its name implies, ungroup Excel cells is to ungroup a range of cells that were previously grouped. Before ungroup Excel cells, we should complete the preparatory work:
- Download the Spire.XLS and install it on your machine.
- Add the Spire.XLS.dll files as reference.
- Open bin folder and select the three dll files under .NET 4.0.
- Right click property and select properties in its menu.
- Set the target framework as .NET 4.
- Add Spire.XLS as namespace.
Then here comes to the explanation of the code:
Step 1: Create an instance of Spire.XLS.Workbook.
Workbook workbook = new Workbook();
Step 2: Load the file base on a specified file path.
workbook.LoadFromFile(@"group.xlsx");
Step 3: Get the first worksheet.
Worksheet sheet = workbook.Worksheets[0];
Step 4: Ungroup the first 5 row cells.
sheet.UngroupByRows(1, 5);
Step 5: Save as the generated file.
workbook.SaveToFile(@"result.xlsx", ExcelVersion.Version2010);
Full code:
using Spire.Xls;
namespace UngroupCell
{
    class Program
    {

        static void Main(string[] args)
        {

            Workbook workbook = new Workbook();
            workbook.LoadFromFile(@"group.xlsx");
            Worksheet sheet = workbook.Worksheets[0];
            sheet.UngroupByRows(1, 5);
            workbook.SaveToFile(@"..\..\result.xlsx", ExcelVersion.Version2010);

        }
    }
}
Please preview the original group effect screenshot:
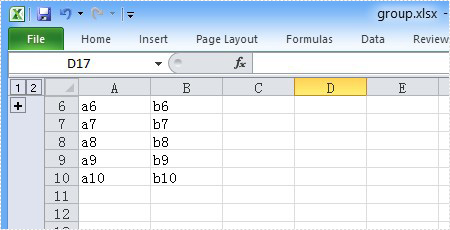
And the generated ungroup effect screenshot:
Apply PDF Page Transitions in C#
Page transitions display a decorative effect such as a dissolve or wipe when you’re turning pages in a document that is exported to PDF format. Page transitions are especially useful when you create a slideshow in PDF format. And Spire.PDF, a powerful .NET component specially designed for developers enables you to apply page transitions to PDF file.
A solution is introduced here to show how to apply page transitions to PDF using Spire.PDF. Spire.PDF provides you a class called PdfSection. PdfSection has a property called PageSettings. And PageSettings has a property called Transition. You can use this property to apply page transitions.
Step 1: Create a new section.
PdfSection section = doc.Sections.Add();
section.PageSettings.Size = PdfPageSize.A4;
Step 2: Create a new PdfPageTransition instance.
section.PageSettings.Transition = new PdfPageTransition();
Step 3: Set the style of page transition.
section.PageSettings.Transition.Style = PdfTransitionStyle.Fade;
You can assign any value that is defined in PdfTransitionStyle to Style.
Step 4: Set the duration of transition effect in seconds.
section.PageSettings.Transition.Duration = 3;
Step 5: Set the page's display duration.
section.PageSettings.Transition.PageDuration = 2;
Step 6: Add more sections and apply more page transitions.
section = doc.Sections.Add();
section.PageSettings.Size = PdfPageSize.A4;
section.PageSettings.Transition = new PdfPageTransition();
section.PageSettings.Transition.Style = PdfTransitionStyle.Box;
section.PageSettings.Transition.Motion = PdfTransitionMotion.Outward;
section.PageSettings.Transition.Duration = 3;
section.PageSettings.Transition.PageDuration = 2;
You can combine the type of PdfPageTransition with the property Direction and the property Dimension of PdfPageTransition to create new and flexible page transition. For example, in this step, the Style of page transition is PdfTransitionStyle.Box and the Motion of page transition is PdfTransitionMotion.Outward.
At last, save the file.
doc.SaveToFile("result.pdf");
To see page transitions in the PDF, open the PDF file in Full Screen.


Here comes to the full code:
using Spire.Pdf;
using Spire.Pdf.Graphics;
using System.Drawing;


namespace PageTransitions
{
    class Program
    {
        static void Main(string[] args)
        {
            PdfDocument doc = new PdfDocument();

            PdfSection section = doc.Sections.Add();
            section.PageSettings.Size = PdfPageSize.A4;
            section.PageSettings.Transition = new PdfPageTransition();
            section.PageSettings.Transition.Style = PdfTransitionStyle.Fade;
            section.PageSettings.Transition.Duration = 3;
            section.PageSettings.Transition.PageDuration = 2;

            PdfNewPage page = section.Pages.Add();
            page.BackgroundColor = Color.Blue;
            page.Canvas.DrawString("This is Page One.", new PdfFont(PdfFontFamily.Helvetica, 20f), new PdfSolidBrush(Color.Black), 10, 10);

            page = section.Pages.Add();
            page.BackgroundColor = Color.Green;
            page.Canvas.DrawString("This is Page Two.", new PdfFont(PdfFontFamily.Helvetica, 20f), new PdfSolidBrush(Color.Black), 10, 10);

            section = doc.Sections.Add();
            section.PageSettings.Size = PdfPageSize.A4;
            section.PageSettings.Transition = new PdfPageTransition();
            section.PageSettings.Transition.Style = PdfTransitionStyle.Box;
            section.PageSettings.Transition.Motion = PdfTransitionMotion.Outward;
            section.PageSettings.Transition.Duration = 3;
            section.PageSettings.Transition.PageDuration = 2;

            page = section.Pages.Add();
            page.BackgroundColor = Color.Orange;
            page.Canvas.DrawString("This is Page Three.", new PdfFont(PdfFontFamily.Helvetica, 20f), new PdfSolidBrush(Color.Black), 10, 10);

            page = section.Pages.Add();
            page.BackgroundColor = Color.Brown;
            page.Canvas.DrawString("This is Page Four.", new PdfFont(PdfFontFamily.Helvetica, 20f), new PdfSolidBrush(Color.Black), 10, 10);

            section = doc.Sections.Add();
            section.PageSettings.Size = PdfPageSize.A4;
            section.PageSettings.Transition = new PdfPageTransition();
            section.PageSettings.Transition.Duration = 3;
            section.PageSettings.Transition.Style = PdfTransitionStyle.Dissolve;
            section.PageSettings.Transition.PageDuration = 2;

            page = section.Pages.Add();
            page.BackgroundColor = Color.Orange;
            page.Canvas.DrawString("This is Page Five.", new PdfFont(PdfFontFamily.Helvetica, 20f), new PdfSolidBrush(Color.Black), 10, 10);

            page = section.Pages.Add();
            page.BackgroundColor = Color.Navy;
            page.Canvas.DrawString("This is Page Six.", new PdfFont(PdfFontFamily.Helvetica, 20f), new PdfSolidBrush(Color.Black), 10, 10);

            doc.SaveToFile("result.pdf");
            doc.Close();
        }
    }
}
How to Add PDF Text Watermark in WPF
Watermark is a recognizable text or image that appears under document text. A watermark is useful in the examination of paper because it can be widely used for trademarks, locations and so on. This article aims at introducing how to add PDF text watermark for WPF through a simple WPF PDF API Spire.PDF for WPF. Also it can implement PDF watermark by image.
First we need to complete the preparatory work:
- Download the latest Spire.PDF and install it on your machine.
- Add the Spire.PDF.WPF.dll files as reference.
- Open bin folder and select the three dll files under .NET 4.0.
- Right click property and select properties in its menu.
- Set the target framework as .NET 4.
- Add Spire.PDF as namespace.
Here comes to the explanation of the code.
Step 1: Create an instance of Spire.PDF.Document
PdfDocument doc = new PdfDocument();
Step 2: Load the file base on a specified file path
doc.LoadFromFile(@"..\..\Sample1.pdf");
Step 3: Add the text watermark to the first page
PdfPageBase page = doc.Pages[0];
PdfTilingBrush brush = new PdfTilingBrush(new SizeF(page.Canvas.ClientSize.Width/2, page.Canvas.ClientSize.Height/3));
brush.Graphics.SetTransparency(0.3f);
brush.Graphics.Save();
brush.Graphics.TranslateTransform(brush.Size.Width / 2, brush.Size.Height / 2);
brush.Graphics.RotateTransform(-45);
brush.Graphics.DrawString("Spire.Pdf Demo",new PdfFont(PdfFontFamily.Helvetica, 24), PdfBrushes.Violet, 0, 0,new PdfStringFormat(PdfTextAlignment.Center));
brush.Graphics.Restore();
brush.Graphics.SetTransparency(1);
page.Canvas.DrawRectangle(brush, new RectangleF(new PointF(0, 0), page.Canvas.ClientSize));
Step 4: Save the PDF file
doc.SaveToFile("TextWaterMark.pdf");
Full code:
private void button1_Click(object sender, RoutedEventArgs e)
 {
  PdfDocument doc = new PdfDocument();
  doc.LoadFromFile(@"..\..\Sample1.pdf");
  PdfPageBase page = doc.Pages[0];
  PdfTilingBrush brush = new PdfTilingBrush(new SizeF(page.Canvas.ClientSize.Width/2, page.Canvas.ClientSize.Height/3));
  brush.Graphics.SetTransparency(0.3f);
  brush.Graphics.Save();
  brush.Graphics.TranslateTransform(brush.Size.Width / 2, brush.Size.Height / 2);
  brush.Graphics.RotateTransform(-45);
  brush.Graphics.DrawString("Spire.Pdf Demo",new PdfFont(PdfFontFamily.Helvetica, 24), PdfBrushes.Violet, 0, 0, new PdfStringFormat(PdfTextAlignment.Center));
  brush.Graphics.Restore();
  brush.Graphics.SetTransparency(1);
  page.Canvas.DrawRectangle(brush, new RectangleF(new PointF(0, 0), page.Canvas.ClientSize));
  doc.SaveToFile("TextWaterMark.pdf");
 }
Effect screenshot: