Convert PDF to SVG with Custom Width and Height in C#, VB.NET
We've have demonstrated how to convert PDF page to SVG file format in the previous post. This guidance shows you how we can specify the width and height of output file using the latest version of Spire.PDF with C# and VB.NET.
Step 1: Load a sample PDF document to PdfDocument instance.
PdfDocument document = new PdfDocument();
document.LoadFromFile("pdf-sample.pdf");
Step 2: Specify the output file size through ConvertOptions.SetPdfToSvgOptions() method.
PdfToSvgConverter converter = new PdfToSvgConverter(inputFile);
    converter.SvgOptions.ScaleX = (float)0.5;
    converter.SvgOptions.ScaleY = (float)0.5;
    converter.Convert(outputFile);
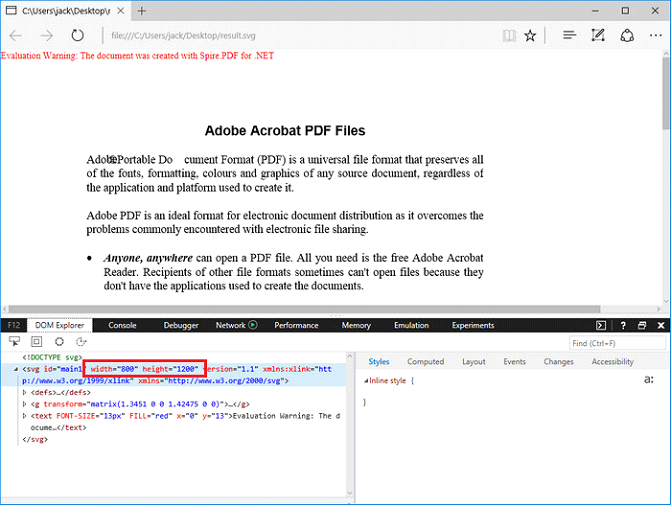
Step 3: Save PDF to SVG file format.
document.SaveToFile("result.svg", FileFormat.SVG);
Output:
Full Code:
using Spire.Pdf;
using Spire.Pdf.Conversion;

namespace ConvertPDFtoSVG
{
    class Program
    {
        static void Main(string[] args)
        {
            PdfDocument document = new PdfDocument();
            PdfToSvgConverter converter = new PdfToSvgConverter(inputFile);
            converter.SvgOptions.ScaleX = (float)0.5;
            converter.SvgOptions.ScaleY = (float)0.5;
            converter.Convert(outputFile);
        }
    }
}
Imports Spire.Pdf
Imports Spire.Pdf.Conversion

Namespace ConvertPDFtoSVG
    Class Program
        Private Shared Sub Main(args As String())
            Dim document As New PdfDocument()
            document.LoadFromFile("pdf-sample.pdf")
            ' Specify the width And height of output SVG file
            Dim Converter As New PdfToSvgConverter(inputFile)
            Converter.SvgOptions.ScaleX = CSng(0.5)
            Converter.SvgOptions.ScaleY = CSng(0.5)
            Converter.Convert(outputFile)
            document.SaveToFile("result.svg", FileFormat.SVG)
        End Sub
    End Class
End Namespace
How to toggle the visibility of PDF layer in C#
We have already demonstrated how to use Spire.PDF to add multiple layers to PDF file and delete layer in PDF in C#. We can also toggle the visibility of a PDF layer while creating a new page layer with the help of Spire.PDF. In this section, we're going to demonstrate how to toggle the visibility of layers in new PDF document in C#.
Step 1: Create a new PDF document and add a new page to the PDF document.
PdfDocument pdf = new PdfDocument();
PdfPageBase page = pdf.Pages.Add();
Step 2: Add a layer named "Blue line" to the PDF page and set the layer invisible.
PdfLayer layer = pdf.Layers.AddLayer(""Green line"", PdfVisibility.Off);
PdfPen pen = new PdfPen(Color.Green, 1f);
PdfCanvas pcA = layer.CreateGraphics(page.Canvas);
pcA.DrawLine(pen, new PointF(0, 30), new PointF(300, 30));
Step 3: Add a layer named "Ellipse" to the PDF page and set the layer visible.
layer = pdf.Layers.AddLayer(""Ellipse"", PdfVisibility.On);
 PdfPen pen2 = new PdfPen(Color.Green, 1f);
 PdfBrush brush2 = new PdfSolidBrush(Color.Green);
 PdfCanvas pcB = layer.CreateGraphics(page.Canvas);
 pcB.DrawEllipse(pen2, brush2, 50, 70, 200, 60);
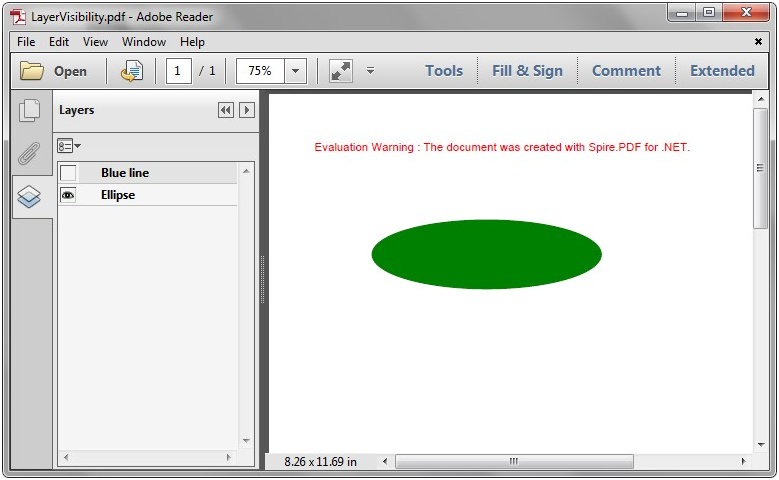
Step 4: Save the document to file.
pdf.SaveToFile("LayerVisibility.pdf", FileFormat.PDF);
Effective screenshot after toggle the visibility of PDF layer:
Full codes:
using Spire.Pdf;
using Spire.Pdf.Graphics;
using System.Drawing;


namespace LayerVisibility
{
    class Program
    {
        static void Main(string[] args)
        {
            PdfDocument pdf = new PdfDocument();
            PdfPageBase page = pdf.Pages.Add();

            PdfLayer layer = pdf.Layers.AddLayer("Green line", PdfVisibility.Off);
            PdfPen pen = new PdfPen(Color.Green, 1f);
            PdfCanvas pcA = layer.CreateGraphics(page.Canvas);
            pcA.DrawLine(pen,new PointF(0, 30), new PointF(300, 30));

            layer = pdf.Layers.AddLayer("Ellipse", PdfVisibility.On);
            PdfPen pen2 = new PdfPen(Color.Green, 1f);
            PdfBrush brush2 = new PdfSolidBrush(Color.Green);
            PdfCanvas pcB = layer.CreateGraphics(page.Canvas);
            pcB.DrawEllipse(pen2, brush2, 50, 70, 200, 60);


            pdf.SaveToFile("LayerVisibility.pdf", FileFormat.PDF);
        }
    }
}
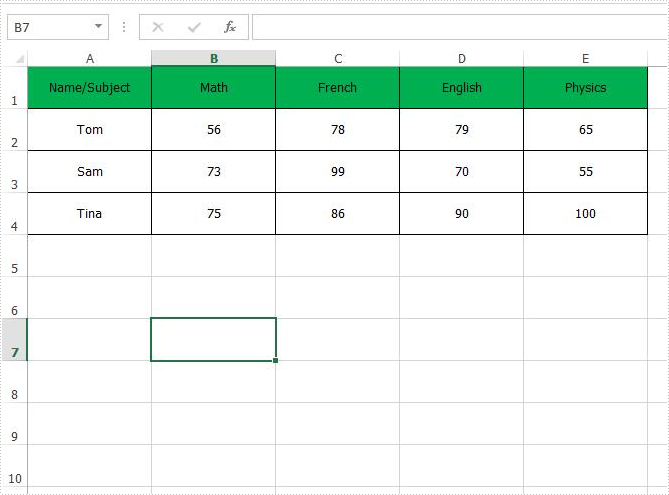
Remove conditional format from Excel in C#
With the help of Spire.XLS, we can set the conditional format the Excel cell in C# and VB.NET. We can also use Spire.XLS to remove the conditional format from a specific cell or the entire Excel worksheet. This article will demonstrate how to remove conditional format from Excel in C#.
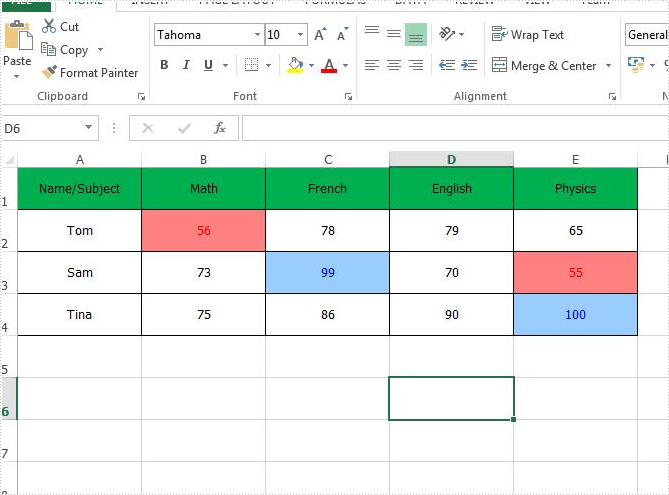
Firstly, view the original Excel worksheet with conditional formats:
Step 1: Create an instance of Excel workbook and load the document from file.
Workbook workbook = new Workbook();
workbook.LoadFromFile("Sample.xlsx");
Step 2: Get the first worksheet from the workbook.
Worksheet sheet = workbook.Worksheets[0];
Step 3: Remove the first conditional format.
sheet.ConditionalFormats.RemoveAt(0);
Step 4: Remove all the conditional formats from the whole Excel worksheet.
for (int i = sheet.ConditionalFormats.Count-1; i >= 0; i--)
{
sheet.ConditionalFormats.RemoveAt(i);
}
Step 5: Save the document to file.
workbook.SaveToFile("Result.xlsx", ExcelVersion.Version2010);
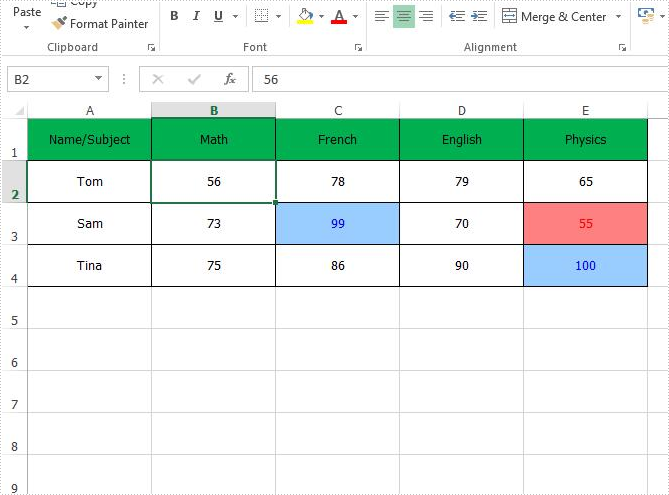
Remove the conditional format from a special Excel range B2:
Remove all the conditional formats from the entire Excel worksheet:
Full codes of how to remove the conditional formats from Excel worksheet:
using Spire.Xls;

namespace RemoveConditionalFormat
{
    class Program
    {
        static void Main(string[] args)
        {
            Workbook workbook = new Workbook();
            workbook.LoadFromFile("Sample.xlsx");

            Worksheet sheet = workbook.Worksheets[0];

            // Remove the first conditional format
            //sheet.ConditionalFormats.RemoveAt(0);

            // Remove all conditional formats
            for (int i = sheet.ConditionalFormats.Count-1; i >= 0; i--)
            {
                sheet.ConditionalFormats.RemoveAt(i);
            }

            workbook.SaveToFile("Result.xlsx", ExcelVersion.Version2010);
        }
    }
}
C#: Convert PDF to HTML
PDF documents have been a popular choice for sharing information due to their cross-platform compatibility and ability to preserve the original layout and formatting. However, as the web continues to evolve, there is an increasing demand for content that can be easily integrated into websites and other online platforms. In this context, converting PDF to HTML format has become highly valuable. By converting PDF files to more flexible and accessible HTML, users gain the ability to better utilize, share, and reuse PDF-based information within the web environment. In this article, we will demonstrate how to convert PDF files to HTML format in C# using Spire.PDF for .NET.
- Convert PDF to HTML in C#
- Set Conversion Options When Converting PDF to HTML in C#
- Convert PDF to HTML Stream in C#
Install Spire.PDF for .NET
To begin with, you need to add the DLL files included in the Spire.PDF for.NET package as references in your .NET project. The DLL files can be either downloaded from this link or installed via NuGet.
PM> Install-Package Spire.PDF
Convert PDF to HTML in C#
To convert a PDF document to HTML format, you can use the PdfDocument.SaveToFile(string fileName, FileFormat.HTML) method provided by Spire.PDF for .NET. The detailed steps are as follows.
- Create an instance of the PdfDocument class.
- Load a PDF document using the PdfDocument.LoadFromFile(string fileName) method.
- Save the PDF document to HTML format using the PdfDocument.SaveToFile(string fileName, FileFormat.HTML) method.
- C#
using Spire.Pdf;

namespace ConvertPdfToHtml
{
    internal class Program
    {
        static void Main(string[] args)
        {
            // Create an instance of the PdfDocument class
            PdfDocument doc = new PdfDocument();

            // Load a PDF document
            doc.LoadFromFile("Sample.pdf");

            // Save the PDF document to HTML format
            doc.SaveToFile("PdfToHtml.html", FileFormat.HTML);
            doc.Close();
        }
    }
}
Set Conversion Options When Converting PDF to HTML in C#
The PdfConvertOptions.SetPdfToHtmlOptions() method allows you to customize the conversion options when transforming PDF files to HTML. This method takes several parameters that you can use to configure the conversion process, such as:
- useEmbeddedSvg (bool): Indicates whether to embed SVG in the resulting HTML file.
- useEmbeddedImg (bool): Indicates whether to embed images in the resulting HTML file. This option is applicable only when useEmbeddedSvg is set to false.
- maxPageOneFile (int): Specifies the maximum number of pages to be included per HTML file. This option is applicable only when useEmbeddedSvg is set to false.
- useHighQualityEmbeddedSvg (bool): Indicates whether to use high-quality embedded SVG in the resulting HTML file. This option is applicable when useEmbeddedSvg is set to true.
The following steps explain how to customize the conversion options when transforming a PDF to HTML using Spire.PDF for .NET.
- Create an instance of the PdfDocument class.
- Load a PDF document using the PdfDocument.LoadFromFile(string fileName) method.
- Get the PdfConvertOptions object using the PdfDocument.ConvertOptions property.
- Set the PDF to HTML conversion options using PdfConvertOptions.SetPdfToHtmlOptions(bool useEmbeddedSvg, bool useEmbeddedImg, int maxPageOneFile, bool useHighQualityEmbeddedSvg) method.
- Save the PDF document to HTML format using PdfDocument.SaveToFile(string fileName, FileFormat.HTML) method.
- C#
using Spire.Pdf;

namespace ConvertPdfToHtmlWithCustomOptions
{
    internal class Program
    {
        static void Main(string[] args)
        {
            // Create an instance of the PdfDocument class
            PdfDocument doc = new PdfDocument();

            // Load a PDF document
            doc.LoadFromFile("Sample.pdf");

            // Set the conversion options to embed images in the resulting HTML and limit one page per HTML file
            PdfConvertOptions pdfToHtmlOptions = doc.ConvertOptions;
            pdfToHtmlOptions.SetPdfToHtmlOptions(false, true, 1);

            // Save the PDF document to HTML format
            doc.SaveToFile("PdfToHtmlWithCustomOptions.html", FileFormat.HTML);
            doc.Close();
        }
    }
}
Convert PDF to HTML Stream in C#
Instead of saving a PDF document to an HTML file, you can save it to an HTML stream by using the PdfDocument.SaveToStream(Stream stream, FileFormat.HTML) method. The detailed steps are as follows.
- Create an instance of the PdfDocument class.
- Load a PDF document using the PdfDocument.LoadFromFile(string fileName) method.
- Create an instance of the MemoryStream class.
- Save the PDF document to an HTML stream using the PdfDocument.SaveToStream(Stream stream, FileFormat.HTML) method.
- C#
using Spire.Pdf;
using System.IO;

namespace ConvertPdfToHtmlStream
{
    internal class Program
    {
        static void Main(string[] args)
        {
            // Create an instance of the PdfDocument class
            PdfDocument doc = new PdfDocument();

            // Load a PDF document
            doc.LoadFromFile("Sample.pdf");

            // Save the PDF document to HTML stream
            using (var fileStream = new MemoryStream())
            {
                doc.SaveToStream(fileStream, FileFormat.HTML);

                // You can now do something with the HTML stream, such as Write it to a file
                using (var outputFile = new FileStream("PdfToHtmlStream.html", FileMode.Create))
                {
                    fileStream.Seek(0, SeekOrigin.Begin);
                    fileStream.CopyTo(outputFile);
                }
            }

            doc.Close();
        }
    }
}
Apply for a Temporary License
If you'd like to remove the evaluation message from the generated documents, or to get rid of the function limitations, please request a 30-day trial license for yourself.
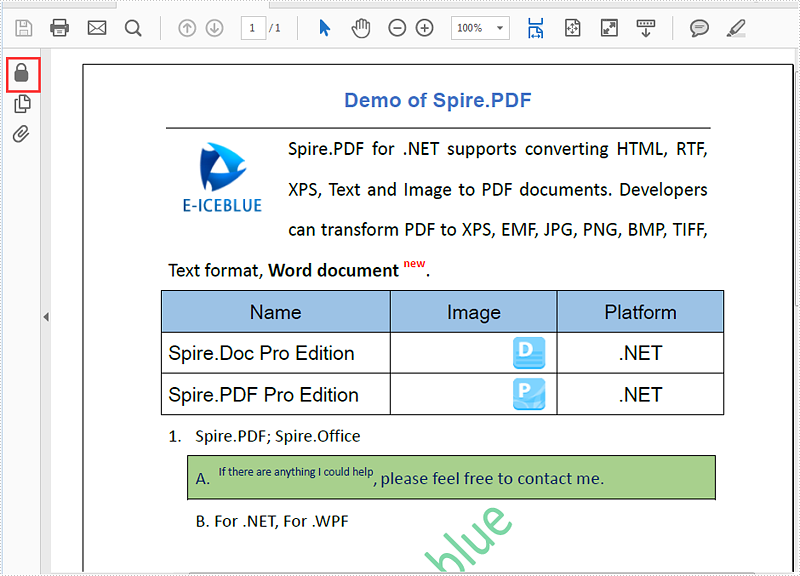
Remove password from the encrypted PDF document
With Spire.PDF for .NET, we can easily set the password to encrypt the PDF document by password. We can also use Spire.PDF to remove the password from the encrypted PDF document in C# and VB.NET. We need to load the encrypted PDF file with password by calling the method PdfDocument.LoadFromFile (string filename, string password) and then set the password as empty to remove the password.
Firstly, view the PDF with user password:
Step 1: Load the password protected PDF document.
PdfDocument pdf = new PdfDocument();
pdf.LoadFromFile("Sample.pdf", "e-iceblue");
Step 2: Set the password as empty to remove the user password.
string UserPassword = string.Empty;
string OwnerPassword = string.Empty;
PdfSecurityPolicy securityPolicy = new PdfPasswordSecurityPolicy(UserPassword, OwnerPassword);
pdf.Encrypt(securityPolicy);
Step 3: Save the document to file.
pdf.SaveToFile("Decrypted.pdf");
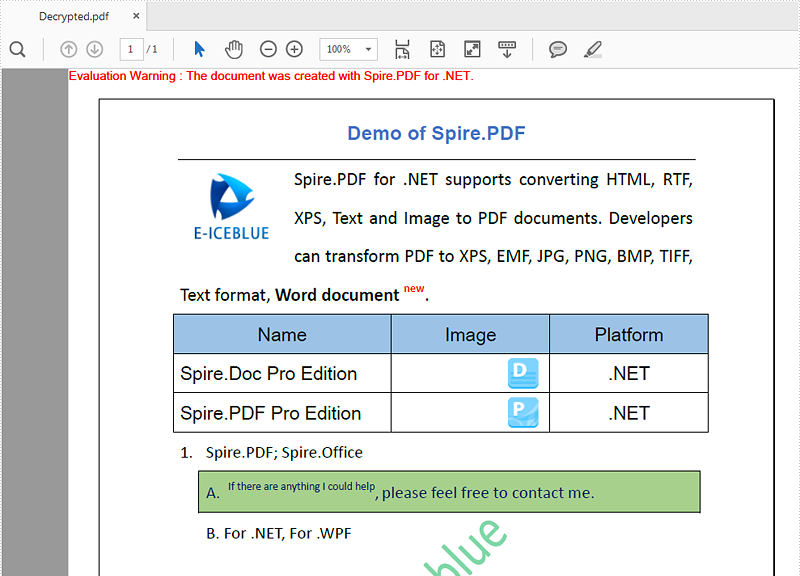
Effective screenshot after removing the password from the PDF document:
Full codes:
using Spire.Pdf;

namespace RemovePassword
{
    class Program
    {
        static void Main(string[] args)
        {
            PdfDocument pdf = new PdfDocument();
            pdf.LoadFromFile("Sample.pdf", "e-iceblue");

            string UserPassword = string.Empty;
            string OwnerPassword = string.Empty;
            PdfSecurityPolicy securityPolicy = new PdfPasswordSecurityPolicy(UserPassword, OwnerPassword);
            pdf.Encrypt(securityPolicy);
            pdf.Encrypt(securityPolicy);

            pdf.SaveToFile("Decrypted.pdf");
        }
    }
}
Imports Spire.Pdf

Namespace RemovePassword
	Class Program
		Private Shared Sub Main(args As String())
			Dim pdf As New PdfDocument()
			pdf.LoadFromFile("Sample.pdf", "e-iceblue")
			Dim UserPassword As String = String.Empty
			Dim OwnerPassword As String = String.Empty
			Dim securityPolicy As PdfSecurityPolicy = New PdfPasswordSecurityPolicy(UserPassword, OwnerPassword)
			pdf.Encrypt(securityPolicy)
			pdf.SaveToFile("Decrypted.pdf")
		End Sub
	End Class
End Namespace
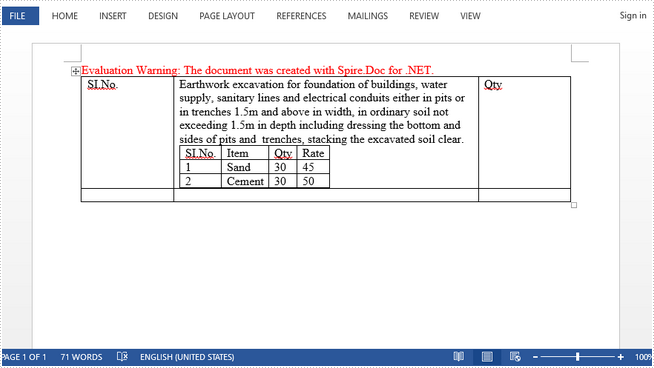
How to Create a Nested Table in Word in C#
A nested table is one table placed inside of another, where the larger table functions as a container for the smaller one. Nested tables allow you to arrange different sets of data in groups to show clients.
This article presents how we can create a nested table using Spire.Doc in C#.
Step 1: Create a new PDF document and add a section to it.
Document doc = new Document();
Section section = doc.AddSection();
Step 2: Add a table to the section.
Table table = section.AddTable(true);
table.ResetCells(2, 3);
Step 3: Adjust the column with.
table.Rows[0].Cells[0].Width = table.Rows[0].Cells[2].Width = 50F;
table.Rows[1].Cells[0].Width = table.Rows[1].Cells[2].Width = 50F;
table.AutoFitBehavior(AutoFitBehaviorType.wdAutoFitWindow);
Step 4: Insert content to the cells of the table.
table[0, 0].AddParagraph().AppendText("SI.No.");
string text = "Earthwork excavation for foundation of buildings, water supply, "
             + "sanitary lines and electrical conduits either in pits or in "
             + "trenches 1.5m and above in width, in ordinary soil not exceeding "
             + "1.5m in depth including dressing the bottom and sides of pits and  "
             + "trenches, stacking the excavated soil clear.";
table[0, 1].AddParagraph().AppendText(text);
table[0, 2].AddParagraph().AppendText("Qty");
Step 5: Insert a nested table to the cell (first row, second column).
Table nestedTable= table[0, 1].AddTable(true);
nestedTable.ResetCells(3, 4);
nestedTable.AutoFitBehavior(AutoFitBehaviorType.wdAutoFitContents);
Step 6: Add content to nested cells.
nestedTable[0, 0].AddParagraph().AppendText("SI.No.");
nestedTable[0, 1].AddParagraph().AppendText("Item");
nestedTable[0, 2].AddParagraph().AppendText("Qty");
nestedTable[0, 3].AddParagraph().AppendText("Rate");
nestedTable[1, 0].AddParagraph().AppendText("1");
nestedTable[1, 1].AddParagraph().AppendText("Sand");
nestedTable[1, 2].AddParagraph().AppendText("30");
nestedTable[1, 3].AddParagraph().AppendText("45");
nestedTable[2, 0].AddParagraph().AppendText("2");
nestedTable[2, 1].AddParagraph().AppendText("Cement");
nestedTable[2, 2].AddParagraph().AppendText("30");
nestedTable[2, 3].AddParagraph().AppendText("50");
Step 7: Save the file.
doc.SaveToFile("Nested_Table.docx", FileFormat.Docx2013);
Output:
Full Code:
//create a new pdf document
Document doc = new Document();
Section section = doc.AddSection();

//add a table
Table table = section.AddTable(true);
table.ResetCells(2, 3);

//set column width
table.Rows[0].Cells[0].SetCellWidth(50F,CellWidthType.Point);
table.Rows[0].Cells[2].SetCellWidth(50F, CellWidthType.Point);
table.Rows[1].Cells[0].SetCellWidth(50F, CellWidthType.Point);
table.Rows[1].Cells[2].SetCellWidth(50F, CellWidthType.Point);
table.AutoFit(AutoFitBehaviorType.AutoFitToWindow);
nestedTable.AutoFit(AutoFitBehaviorType.AutoFitToContents);

//insert content to cells
table[0, 0].AddParagraph().AppendText("SI.No.");
string text = "Earthwork excavation for foundation of buildings, water supply, "
             + "sanitary lines and electrical conduits either in pits or in "
             + "trenches 1.5m and above in width, in ordinary soil not exceeding "
             + "1.5m in depth including dressing the bottom and sides of pits and  "
             + "trenches, stacking the excavated soil clear.";
table[0, 1].AddParagraph().AppendText(text);
table[0, 2].AddParagraph().AppendText("Qty");

//add a nested table to cell(first row, second column)
Table nestedTable= table[0, 1].AddTable(true);
nestedTable.ResetCells(3, 4);
nestedTable.AutoFitBehavior(AutoFitBehaviorType.wdAutoFitContents);

//add content to nested cells
nestedTable[0, 0].AddParagraph().AppendText("SI.No.");
nestedTable[0, 1].AddParagraph().AppendText("Item");
nestedTable[0, 2].AddParagraph().AppendText("Qty");
nestedTable[0, 3].AddParagraph().AppendText("Rate");
nestedTable[1, 0].AddParagraph().AppendText("1");
nestedTable[1, 1].AddParagraph().AppendText("Sand");
nestedTable[1, 2].AddParagraph().AppendText("30");
nestedTable[1, 3].AddParagraph().AppendText("45");
nestedTable[2, 0].AddParagraph().AppendText("2");
nestedTable[2, 1].AddParagraph().AppendText("Cement");
nestedTable[2, 2].AddParagraph().AppendText("30");
nestedTable[2, 3].AddParagraph().AppendText("50");

//save
doc.SaveToFile("Nested_Table.docx", FileFormat.Docx2013);
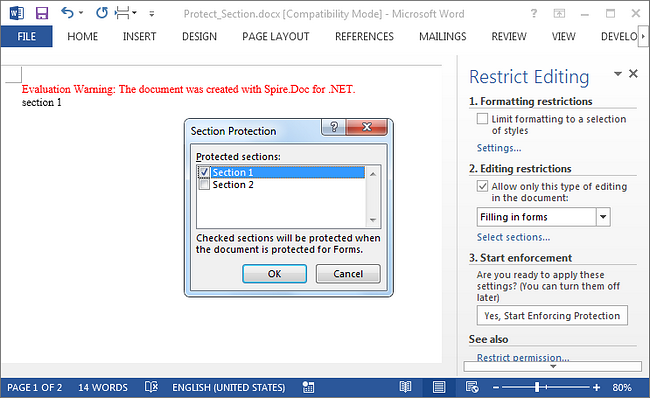
Lock Specified Sections of Word Documents in C#, VB.NET
Section protection allows users to be able to edit only the forms (if any) rather than any other content within it. When we protect a document, we can specify that the specific sections of the document be protected. This is useful in case we want to protect parts of a Word document.
Following code snippets demonstrate the same.
Step 1: Initialize an instance of Document class.
Document doc = new Document();
Step 2: Add two sections to the document.
Section s1 = doc.AddSection();
Section s2 = doc.AddSection();
Step 3: Append some text to section 1 and section 2.
s1.AddParagraph().AppendText("section 1");
s2.AddParagraph().AppendText("section 2");
Step 4: Protect the document with AllowOnlyFormFields protection type.
doc.Protect(ProtectionType.AllowOnlyFormFields, "123");
Step 5: Unprotect section 2.
s2.ProtectForm = false;
Step 6: Save the document.
doc.SaveToFile("Protect_Section.docx");
Result:
Run the program, we should get the file in which section 1 is protected to allow only editing in form fields while section 2 can be edited freely.
Full Code:
using Spire.Doc;
namespace LockSection
{
    class Program
    {
        static void Main(string[] args)
        {
            Document doc = new Document();
            Section s1 = doc.AddSection();
            Section s2 = doc.AddSection();

            s1.AddParagraph().AppendText("section 1");
            s2.AddParagraph().AppendText("section 2");

            //protect all sections
            doc.Protect(ProtectionType.AllowOnlyFormFields, "123");
            //unprotect section 2
            s2.ProtectForm = false;

            doc.SaveToFile("Protect_Section.docx");
        }
    }
}
Imports Spire.Doc
Namespace LockSection
	Class Program
		Private Shared Sub Main(args As String())
			Dim doc As New Document()
			Dim s1 As Section = doc.AddSection()
			Dim s2 As Section = doc.AddSection()

			s1.AddParagraph().AppendText("section 1")
			s2.AddParagraph().AppendText("section 2")

			'protect all sections
			doc.Protect(ProtectionType.AllowOnlyFormFields, "123")
			'unprotect section 2
			s2.ProtectForm = False

			doc.SaveToFile("Protect_Section.docx")
		End Sub
	End Class
End Namespace
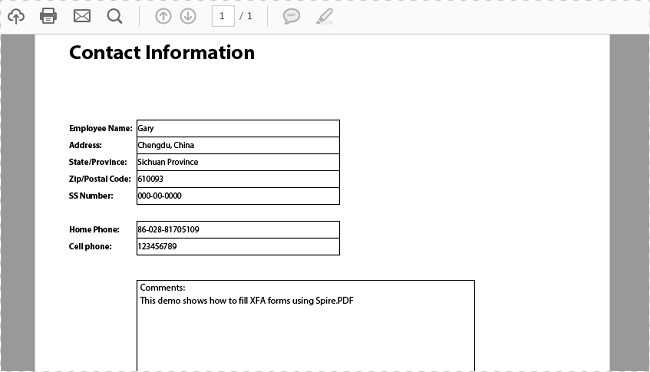
Fill XFA Form Fields in C#/VB.NET
XFA forms are XML-based forms created by Adobe's LiveCycle Designer tool, which offer enhanced features over the old AcroForms, like changeable text fields and support for running JavaScript. Spire.PDF supports to access the XFA forms in an existing PDF file and fill the fields with data.
Step 1: Initialize an instance of PdfDocument class and load a sample PDF file containing dynamic XFA forms.
PdfDocument doc = new PdfDocument();
doc.LoadFromFile("DynamicXFA.pdf");
Step 2: Get all form widgets from the document.
PdfFormWidget formWidget = doc.Form as PdfFormWidget;
Step 3: Get a list of XFA Fields.
List<XfaField> xfafields = formWidget.XFAForm.XfaFields;
Step 4: Traverse each XfaField in the list and judge if it is an XfaTextField, if yes, convert the type of XfaField as an XfaTextField and then assign value to the field based on the field name.
foreach (XfaField xfaField in xfaFields)
{
    if (xfaField is XfaTextField)
    {
        XfaTextField xf = xfaField as XfaTextField;
        switch (xfaField.Name)
        {
            case "EmployeeName":
                xf.Value = "Gary";
                break;
            case "Address":
                xf.Value = "Chengdu, China";
                break;
            case "StateProv":
                xf.Value = "Sichuan Province";
                break;
            case "ZipCode":
                xf.Value = "610093";
                break;
            case "SSNumber":
                xf.Value = "000-00-0000";
                break;
            case "HomePhone":
                xf.Value = "86-028-81705109";
                break;
            case "CellPhone":
                xf.Value = "123456789";
                break;
            case "Comments":
                xf.Value = "This demo shows how to fill XFA forms using Spire.PDF";
                break;
            default:
                break;
        }
    }
}
Step 5: Save the file.
doc.SaveToFile("FillXfaField.pdf",FileFormat.PDF);
Output:
Full Code:
using Spire.Pdf;
using Spire.Pdf.Widget;
using System.Collections;
using System.Collections.Generic;

namespace FillXFAFormFields
{
    class Program
    {
        private static IEnumerable xfaFields;
        static void Main(string[] args)
        {
            PdfDocument doc = new PdfDocument();
            doc.LoadFromFile("DynamicXFA.pdf");

            PdfFormWidget formWidget = doc.Form as PdfFormWidget;
            List <xfafields> = formWidget.XFAForm.XfaFields;
            foreach (XfaField xfaField in xfafields)
            {
                if (xfaField is XfaTextField)
                {
                    XfaTextField xf = xfaField as XfaTextField;
                    switch (xfaField.Name)
                    {
                        case "EmployeeName":
                            xf.Value = "Gary";
                            break;
                        case "Address":
                            xf.Value = "Chengdu, China";
                            break;
                        case "StateProv":
                            xf.Value = "Sichuan Province";
                            break;
                        case "ZipCode":
                            xf.Value = "610093";
                            break;
                        case "SSNumber":
                            xf.Value = "000-00-0000";
                            break;
                        case "HomePhone":
                            xf.Value = "86-028-81705109";
                            break;
                        case "CellPhone":
                            xf.Value = "123456789";
                            break;
                        case "Comments":
                            xf.Value = "This demo shows how to fill XFA forms using Spire.PDF";
                            break;
                        default:
                            break;
                    }
                }
            }
            doc.SaveToFile("FillXfaField.pdf", FileFormat.PDF);
        }
    }
}
Imports Spire.Pdf
Imports Spire.Pdf.Widget
Imports System.Collections.Generic


Namespace FillXFAFormFields
	Class Program
		Private Shared xfaFields As IEnumerable(Of XfaField)
		Private Shared Sub Main(args As String())
			Dim doc As New PdfDocument()
			doc.LoadFromFile("DynamicXFA.pdf")

			Dim formWidget As PdfFormWidget = TryCast(doc.Form, PdfFormWidget)
			Dim xfafields__1 As List(Of XfaField) = formWidget.XFAForm.XfaFields
			For Each xfaField As XfaField In xfaFields
				If TypeOf xfaField Is XfaTextField Then
					Dim xf As XfaTextField = TryCast(xfaField, XfaTextField)
					Select Case xfaField.Name
						Case "EmployeeName"
							xf.Value = "Gary"
							Exit Select
						Case "Address"
							xf.Value = "Chengdu, China"
							Exit Select
						Case "StateProv"
							xf.Value = "Sichuan Province"
							Exit Select
						Case "ZipCode"
							xf.Value = "610093"
							Exit Select
						Case "SSNumber"
							xf.Value = "000-00-0000"
							Exit Select
						Case "HomePhone"
							xf.Value = "86-028-81705109"
							Exit Select
						Case "CellPhone"
							xf.Value = "123456789"
							Exit Select
						Case "Comments"
							xf.Value = "This demo shows how to fill XFA forms using Spire.PDF"
							Exit Select
						Case Else
							Exit Select
					End Select
				End If
			Next
			doc.SaveToFile("FillXfaField.pdf", FileFormat.PDF)
		End Sub
	End Class
End Namespace
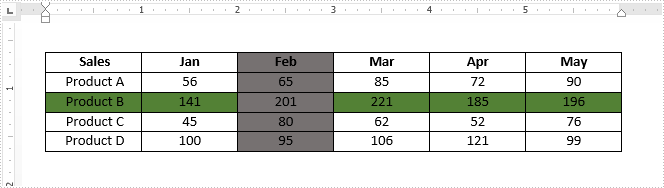
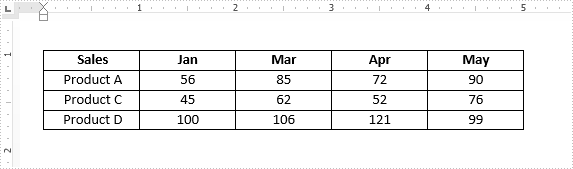
How to Delete Rows and Columns from a Word Table in C#, VB.NET
Adding rows and columns are common tasks in Word table processing, on the contrary, sometimes we also have the requirement of deleting rows or columns from a table. This article demonstrates how to delete a row and a column from an existing Word table using Spire.Doc.
Below is the screenshot of the original table. Afterwards, we will remove the colored row and column from the table.
Detail steps:
Step 1: Instantiate a Document object and load the Word document.
Document doc = new Document();
doc.LoadFromFile("Sample.docx");
Step 2: Get the table from the document.
Table table = doc.Sections[0].Tables[0] as Table;
Step 3: Delete the third row from the table.
table.Rows.RemoveAt(2);
Step 4: Delete the third column from the table.
for (int i = 0; i < table.Rows.Count; i++)
{
    table.Rows[i].Cells.RemoveAt(2);
}
Step 5: Save the document.
doc.SaveToFile("result.docx", FileFormat.Docx2013);
Output:
Full code:
using Spire.Doc;

namespace Delete_Rows_and_Columns
{
    class Program
    {
        static void Main(string[] args)
        {
            Document doc = new Document();
            doc.LoadFromFile("Sample.docx");
            Table table = doc.Sections[0].Tables[0] as Table;
            table.Rows.RemoveAt(2);
            for (int i = 0; i < table.Rows.Count; i++)
            {
                table.Rows[i].Cells.RemoveAt(2);
            }
            doc.SaveToFile("result.docx", FileFormat.Docx2013);
        }
    }
}
Imports Spire.Doc

Namespace Delete_Rows_and_Columns
	Class Program
		Private Shared Sub Main(args As String())
			Dim doc As New Document()
			doc.LoadFromFile("Sample.docx")
			Dim table As Table = TryCast(doc.Sections(0).Tables(0), Table)
			table.Rows.RemoveAt(2)
			For i As Integer = 0 To table.Rows.Count - 1
				table.Rows(i).Cells.RemoveAt(2)
			Next
		        doc.SaveToFile("result.docx", FileFormat.Docx2013);
		End Sub
	End Class
End Namespace
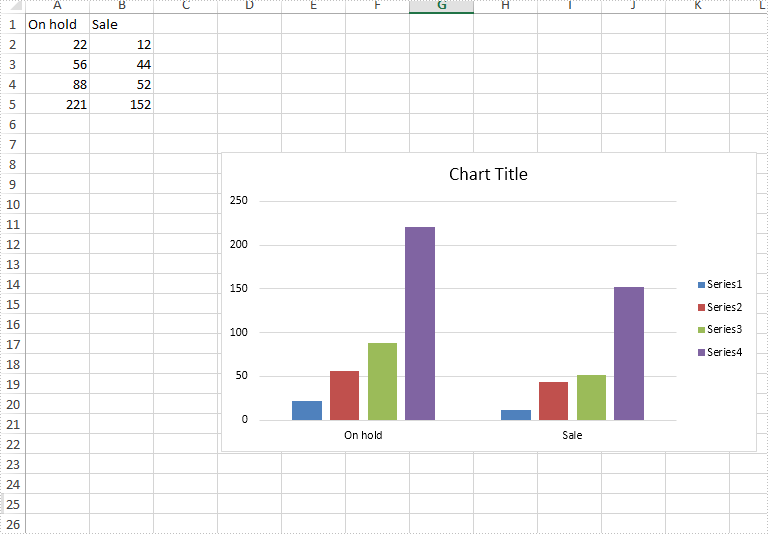
Set font for the text on Chart title and Chart Axis in C#
Spire.XLS offers multiple functions to enable developers to set the font for the text for Excel chart. We have already demonstrated how to set the font for the text on legend and datalable in Excel chart by using the SetFont() in C#. This article will focus on showing how to set font for the text on Chart title and Chart Axis.
Firstly, please view the Excel worksheet with chart which the font will be changed later:
Note: Before Start, please download the latest version of Spire.XLS and add Spire.Xls.dll in the bin folder as the reference of Visual Studio.
Step 1: Create a new Excel workbook and load from file.
Workbook workbook = new Workbook();
workbook.LoadFromFile("Sample.xlsx");
Step 2: Get the first worksheet from workbook.
Worksheet worksheet = workbook.Worksheets[0];
Spire.Xls.Chart chart = worksheet.Charts[0];
Step 3: Format the font for the chart title.
chart.ChartTitleArea.Font.Color = Color.Blue;
chart.ChartTitleArea.Font.Size = 20.0;
Step 4: Format the font for the chart Axis.
chart.PrimaryValueAxis.Font.Color = Color.Gold;
chart.PrimaryValueAxis.Font.Size = 10.0;

chart.PrimaryCategoryAxis.Font.Color = Color.Red;
chart.PrimaryCategoryAxis.Font.Size = 20.0;
Step 5: Save the document to file.
workbook.SaveToFile("result.xlsx", FileFormat.Version2010);
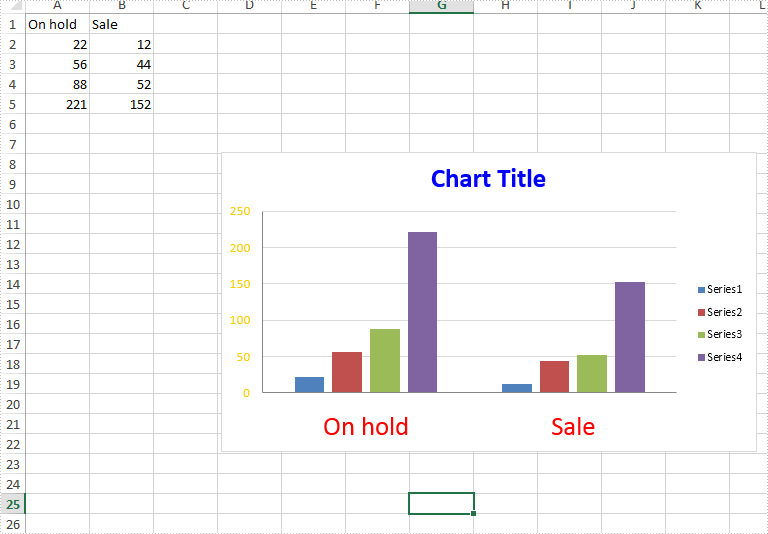
Effective screenshot after formatting the font for the chart title and chart axis.
Full codes:
using Spire.Xls;
using System.Drawing;

namespace SetFont
{
    class Program
    {
        static void Main(string[] args)
        {
            Workbook workbook = new Workbook();
            workbook.LoadFromFile("Sample.xlsx");

            Worksheet worksheet = workbook.Worksheets[0];
            Spire.Xls.Chart chart = worksheet.Charts[0];

            chart.ChartTitleArea.Color = Color.Blue;
            chart.ChartTitleArea.Size = 20.0;

            chart.PrimaryValueAxis.Font.Color = Color.Gold;
            chart.PrimaryValueAxis.Font.Size = 10.0;

            chart.PrimaryCategoryAxis.Font.Color = Color.Red;
            chart.PrimaryCategoryAxis.Font.Size = 20.0;

            workbook.SaveToFile("result.xlsx", FileFormat.Version2010);
        }
    }
}