MailMerge
| Agreement Start Date: | |
| Agreement End Date: | |
| Agreement Extension Date: | |
| Documentation Start Date: | |
| Documentation End Date: | |
|
downloads
|
|
- Demo
- Java
- C# source
import com.spire.doc.Document;
import com.spire.doc.FileFormat;

import java.text.SimpleDateFormat;
import java.util.ArrayList;

public class MailMargeDemo {

     public void mailMerge(String docFile, String resultFilePath) throws Exception {
        Document doc = new Document();
        doc.loadFromFile(docFile);

        SimpleDateFormat format=new SimpleDateFormat("yyyy-MM-dd");
        Calendar calendar=Calendar.getInstance();

        ArrayList dateList=new ArrayList<>();
        int []offset={-5,5,6,-2,2};
        for(int data:offset){
            calendar.setTime(new Date());
            calendar.add(Calendar.YEAR,data);
            dateList.add(format.format(calendar.getTime()));
        }
        String[] values =new String[dateList.size()];
        dateList.toArray(values);

        String []fields={
                "SubGrantPAStartDateValue",
                "SubGrantPAEndDateValue",
                "SubGrantPAExtensionDateValue",
                "SubGrantPSStartDateValue",
                "SubGrantPSEndDateValue"
        };
        doc.getMailMerge().execute(fields,values);
        doc.saveToFile(resultFilePath, FileFormat.Docx);
    }
}
Table
Data
| Name | Capital | Continent | Area | Population | Flag |
| Argentina | Buenos Aires | South America | 2777815 | 32300003 |  |
| Bolivia | La Paz | South America | 1098575 | 7300000 |  |
| Brazil | Brasilia | South America | 8511196 | 150400000 |  |
| Canada | Ottawa | North America | 9976147 | 26500000 |  |
| Chile | Santiago | South America | 756943 | 13200000 |  |
| Colombia | Bagota | South America | 1138907 | 33000000 |  |
| Cuba | Havana | North America | 114524 | 10600000 |  |
| Ecuador | Quito | South America | 455502 | 10600000 |  |
| El Salvador | San Salvador | North America | 20865 | 5300000 |  |
| Guyana | Georgetown | South America | 214969 | 800000 |  |
Option
- Demo
- Java
- C# source
HeaderAndFooter
Word Document
 Click here to browse files.
Page Size
Page Header
| Header Text: | Header Image: |
Click here to browse files
|
||
| Header Font: | Font Size: | |||
| Color: | Alignment : |
Page Footer
| Footer Text: | Footer Image: |
Click here to browse files
|
||
| Footer Font: | Font Size: | |||
| Color: | Alignment: |
- Demo
- Java
- C# source
FindAndHighlight
Upload
Click here to browse files.Convert to
- Demo
- Java
- C# source
import com.spire.doc.Document;
import com.spire.doc.FileFormat;
import com.spire.doc.documents.TextSelection;

import java.awt.*;


public class FindHighlightDemo {
    public void findHeighlight(String docFile, String findText, String resultFilePath){
        Document doc = new Document();
        doc.loadFromFile(docFile);
        TextSelection[] textSelections = doc.findAllString(findText, false, true);
		if(textSelections!=null){
			for (TextSelection selection : textSelections) {
				selection.getAsOneRange().getCharacterFormat().setHighlightColor(Color.YELLOW);
			}
		}
        doc.saveToFile(resultFilePath, FileFormat.Docx);
    }
}
Conversion
Upload
Click here to browse files.Convert to
- Demo
- Java
- C# source
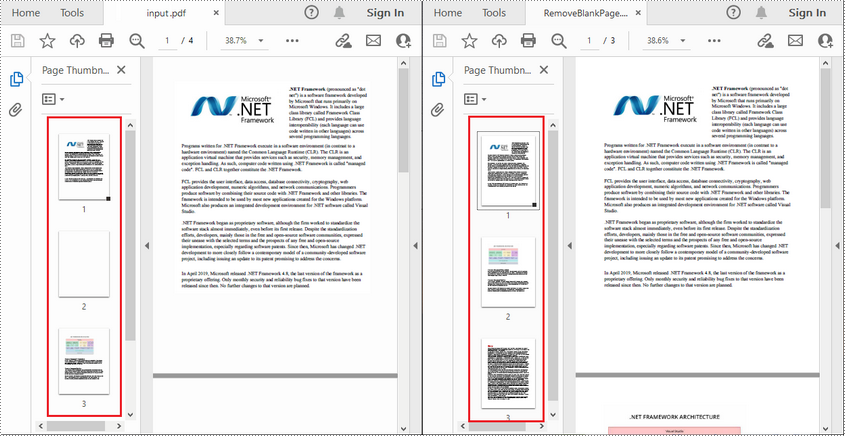
C#/VB.NET: Find and Remove Blank Pages from PDF
Blank pages in PDFs are not uncommon to find because they may have been left intentionally by the author or added accidentally when manipulating documents. These blank pages can be annoying when you are reading or printing the document, so it may be quite necessary to remove them. In this article you will learn how to programmatically find and remove blank pages from PDF documents using Spire.PDF for .NET.
Install Spire.PDF for .NET
To begin with, you need to add the DLL files included in the Spire.PDF for.NET package as references in your .NET project. The DLLs files can be either downloaded from this link or installed via NuGet.
PM> Install-Package Spire.PDF
Find and Delete Blank Pages from a PDF Document
Spire.PDF for .NET provides a method PdfPageBase.IsBlank() to detect if a PDF page is absolutely blank. But some pages that look blank actually contain white images, these pages won't be deemed as blank using the PdfPageBase.IsBlank() method. Therefore, it is necessary to create a custom method IsImageBlank() to be used in conjunction with PdfPageBase.IsBlank() method to detect these white but non-blank pages.
Note: This solution will convert PDF pages into images and detect if an image is blank. It is necessary to apply a license to remove the evaluation message in the converted images. Otherwise, this method won't work properly. If you do not have a license, contact sales@e-iceblue.com for a temporary one for evaluation purpose.
The detailed steps are as follows:
- Create a PdfDocument instance.
- Load a PDF document using PdfDocument.LoadFromFile() method.
- Loop through the pages in the PDF document to detect if the pages are blank using PdfPageBase.IsBlank() method.
- For absolutely blank pages, delete them using PdfDocument.Pages.RemoveAt() method.
- For pages that are not absolutely blank, save them as images using PdfDocument.SaveAsImage() method. Then detect if the converted images are blank using custom method IsImageBlank() and remove the pages that are "blank" using PdfDocument.Pages.RemoveAt() method.
- Save the result document using PdfDocument.SaveToFile() method.
- C#
- VB.NET
using Spire.Pdf;
using Spire.Pdf.Graphics;
using System.Drawing;

namespace DeleteBlankPage
{
    class Program
    {
        static void Main(string[] args)
        {
            //Apply license by license key
            Spire.Pdf.License.LicenseProvider.SetLicenseKey("your license key");

            //Create a PdfDocument instance
            PdfDocument document = new PdfDocument();

            //Load a sample PDF document
            document.LoadFromFile("input.pdf");

            //Loop through all pages in the PDF
            for (int i = document.Pages.Count - 1; i >= 0; i--)
            {
                //Detect if a page is blank
                if (document.Pages[i].IsBlank())
                {
                    //Remove the absolutely blank page
                    document.Pages.RemoveAt(i);
                }
                else
                {
                    //Save PDF page as image
                    Image image = document.SaveAsImage(i, PdfImageType.Bitmap);

                    //Detect if the converted image is blank
                    if (IsImageBlank(image))
                    {
                        //Remove the page
                        document.Pages.RemoveAt(i);
                    }
                }
            }

            //Save the result document
            document.SaveToFile("RemoveBlankPage.pdf", FileFormat.PDF);
        }

        //Detect if an image is blank
        public static bool IsImageBlank(Image image)
        {
            Bitmap bitmap = new Bitmap(image);
            for (int i = 0; i < bitmap.Width; i++)
            {
                for (int j = 0; j < bitmap.Height; j++)
                {
                    Color pixel = bitmap.GetPixel(i, j);
                    if (pixel.R < 240 || pixel.G < 240 || pixel.B < 240)
                    {
                        return false;
                    }
                }
            }
            return true;
        }
    }
}
Apply for a Temporary License
If you'd like to remove the evaluation message from the generated documents, or to get rid of the function limitations, please request a 30-day trial license for yourself.
Set border and shading in PowerPoint document in C#, VB.NET
Suppose you want your doc document more attract and prominent your content. You would use a kind of border and shading style to beatify your document and give prominence to the key points. AS well as doc document the PPT document also can set shape to as border and shading.
Spire.Presentation for .NET, a professional .NET PPT component to allow users to manipulate PPT documents without automation. It can set kinds of shape types which can help users to beatify their document as their expectation
Below demonstrate the effect by a screenshot which shows a shape type in PPT document with C#, VB.NET via Spire.Presentation for .NET.
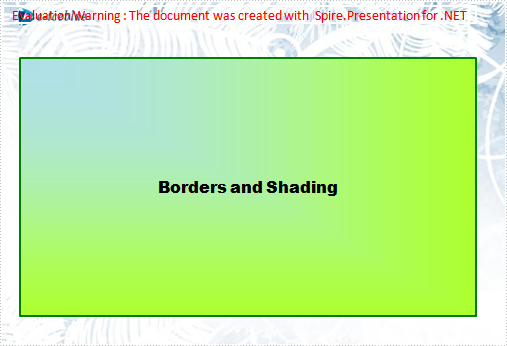
There is a guide to introduce a method to set shape type to achieve above screenshot with C#, VB.NET via Spire.Presentation for .NET.
This method is:
First, new a PPT document and set its slide. Then, new a shape and set its line color and gradient color. Last set the font and fill style for the paragraph. Now Download and install Spire.Presentation for .NET and use below code to experience this method to set shape type in PPT document.
The full code:
using System;
using System.Drawing;
using Spire.Presentation;
using Spire.Presentation.Drawing;

namespace BorderAndShading
{
    class Program
    {
        static void Main(string[] args)
        {
            Presentation presentation = new Presentation();

            //set background Image
            string ImageFile = @" bg.png";
            RectangleF rect = new RectangleF(0, 0, presentation.SlideSize.Size.Width, presentation.SlideSize.Size.Height);
            presentation.Slides[0].Shapes.AppendEmbedImage(ShapeType.Rectangle, ImageFile, rect);
            presentation.Slides[0].Shapes[0].Line.FillFormat.SolidFillColor.Color = Color.FloralWhite;

            //append new shape
            IAutoShape shape = presentation.Slides[0].Shapes.AppendShape(ShapeType.Rectangle,
                new RectangleF(120, 70, 450, 300));

            //set the LineColor
            shape.ShapeStyle.LineColor.Color = Color.Green;

            //set the gradient color of shape
            shape.Fill.FillType = Spire.Presentation.Drawing.FillFormatType.Gradient;
            shape.Fill.Gradient.GradientShape = Spire.Presentation.Drawing.GradientShapeType.Rectangle;
            shape.Fill.Gradient.GradientStyle = Spire.Presentation.Drawing.GradientStyle.FromTopLeftCorner;
            shape.Fill.Gradient.GradientStops.Append(1f, KnownColors.GreenYellow);
            shape.Fill.Gradient.GradientStops.Append(0, KnownColors.PowderBlue);
            shape.AppendTextFrame("Borders and Shading");

            //set the Font
            shape.TextFrame.Paragraphs[0].TextRanges[0].LatinFont = new TextFont("Arial Black");
            shape.TextFrame.Paragraphs[0].TextRanges[0].Fill.FillType = FillFormatType.Solid;
            shape.TextFrame.Paragraphs[0].TextRanges[0].Fill.SolidColor.Color = Color.Black;

            //save the document
            presentation.SaveToFile("BordersAndShading.pptx", FileFormat.Pptx2007);
            System.Diagnostics.Process.Start("BordersAndShading.pptx");
        }
    }
}
Imports System.Text
Imports System.Drawing
Imports Spire.Presentation
Imports Spire.Presentation.Drawing

Module Module1

    Sub Main()
        'create PPT document
        Dim presentation As New Presentation()

        'set background Image
        Dim ImageFile As String = "bg.png"
        Dim rect As New RectangleF(0, 0, presentation.SlideSize.Size.Width, presentation.SlideSize.Size.Height)
        presentation.Slides(0).Shapes.AppendEmbedImage(ShapeType.Rectangle, ImageFile, rect)
        presentation.Slides(0).Shapes(0).Line.FillFormat.SolidFillColor.Color = Color.FloralWhite

        'append new shape
        Dim shape As IAutoShape = presentation.Slides(0).Shapes.AppendShape(ShapeType.Rectangle, New RectangleF(30, 70, 550, 300))

        'set the LineColor
        shape.ShapeStyle.LineColor.Color = Color.Green

        'set the gradient color of shape
        shape.Fill.FillType = Spire.Presentation.Drawing.FillFormatType.Gradient
        shape.Fill.Gradient.GradientShape = Spire.Presentation.Drawing.GradientShapeType.Rectangle
        shape.Fill.Gradient.GradientStyle = Spire.Presentation.Drawing.GradientStyle.FromTopLeftCorner
        shape.Fill.Gradient.GradientStops.Append(1.0F, KnownColors.GreenYellow)

        shape.Fill.Gradient.GradientStops.Append(0, KnownColors.PowderBlue)
        shape.AppendTextFrame("Borders and Shading")

        'set the Font
        shape.TextFrame.Paragraphs(0).TextRanges(0).LatinFont = New TextFont("Arial Black")
        shape.TextFrame.Paragraphs(0).TextRanges(0).Fill.FillType = FillFormatType.Solid
        shape.TextFrame.Paragraphs(0).TextRanges(0).Fill.SolidColor.Color = Color.Black

        'save the document
        presentation.SaveToFile("BordersAndShading.pptx", FileFormat.Pptx2007)
        System.Diagnostics.Process.Start("BordersAndShading.pptx")

    End Sub

End Module
C#/VB.NET: Convert PowerPoint to Images (PNG, JPG, TIFF, EMF, SVG)
You may need to convert PowerPoint documents to images for various purposes, such as preventing other users from editing the contents of the PowerPoint documents, generating thumbnails for the PowerPoint documents, or sharing the PowerPoint documents on social media. In this article, you will learn how to convert PowerPoint documents to various image formats in C# and VB.NET using Spire.Presentation for .NET.
- Convert PowerPoint Documents to JPG or PNG Images
- Convert PowerPoint Documents to TIFF Images
- Convert PowerPoint Documents to EMF Images
- Convert PowerPoint Documents to SVG Images
Install Spire.Presentation for .NET
To begin with, you need to add the DLL files included in the Spire.Presentation for.NET package as references in your .NET project. The DLL files can be either downloaded from this link or installed via NuGet.
PM> Install-Package Spire.Presentation
Convert PowerPoint Documents to JPG or PNG Images in C# and VB.NET
The following are the main steps to convert a PowerPoint document to JPG or PNG image:
- Initialize an instance of Presentation class.
- Load a PowerPoint document using Presentation.LoadFromFile() method.
- Iterate through all slides in the PowerPoint document.
- Save each slide as System.Drawing.Image object using ISlide.SaveAsImage() method.
- Save the image object to PNG or JPG file using Image.Save() method.
- C#
- VB.NET
using Spire.Presentation;
using System.Drawing;

namespace ConvertPowerPointToJpgOrPngImage
{
    class Program
    {
        static void Main(string[] args)
        {
            //Create a Presentation instance
            Presentation presentation = new Presentation();
            //Load a PowerPoint document
            presentation.LoadFromFile(@"Sample.pptx");

            int i = 0;
            //Iterate through all slides in the PowerPoint document
            foreach(ISlide slide in presentation.Slides)
            {
                //Save each slide as PNG image
                Image image = slide.SaveAsImage();
                string fileName = string.Format("ToImage-img-{0}.png", i);
                image.Save(fileName, System.Drawing.Imaging.ImageFormat.Png);
                i++;
            }
        }
    }
}

Convert PowerPoint Documents to TIFF Images in C# and VB.NET
The following are the steps to convert a PowerPoint document to TIFF image:
- Initialize an instance of Presentation class.
- Load a PowerPoint document using Presentation.LoadFromFile() method.
- Convert the PowerPoint document to TIFF image using Presentation.SaveToFile(string, FileFormat) method.
- C#
- VB.NET
using Spire.Presentation;

namespace ConvertPowerPointToTiffImage
{
    class Program
    {
        static void Main(string[] args)
        {
            //Create a Presentation instance
            Presentation presentation = new Presentation();
            //Load a PowerPoint document
            presentation.LoadFromFile(@"Sample.pptx");

            //Convert the PowerPoint document to TIFF image
            presentation.SaveToFile("toTIFF.tiff", FileFormat.Tiff);
        }
    }
}

Convert PowerPoint Documents to EMF Images in C# and VB.NET
The following are the steps to convert a PowerPoint document to EMF image:
- Initialize an instance of Presentation class.
- Load a PowerPoint document using Presentation.LoadFromFile() method.
- Iterate through all slides in the PowerPoint document.
- Save each slide to EMF image using ISlide.SaveAsEMF() method.
- C#
- VB.NET
using Spire.Presentation;

namespace ConvertPowerPointToEmfImage
{
    class Program
    {
        static void Main(string[] args)
        {
            //Create a Presentation instance
            Presentation presentation = new Presentation();
            //Load a PowerPoint document
            presentation.LoadFromFile(@"Sample.pptx");

            int i = 0;
            //Iterate through all slides in the PowerPoint document
            foreach (ISlide slide in presentation.Slides)
            {
                string fileName = string.Format("ToEmf-{0}.emf", i);
                //Save each slide to EMF image
                slide.SaveAsEMF(fileName);
                //Save each slide to EMF image with specified width and height
                //slide.SaveAsEMF(fileName, 1075, 710);
                i++;
            }
        }
    }
}

Convert PowerPoint Documents to SVG Images in C# and VB.NET
The following are the steps to convert a PowerPoint document to SVG images:
- Initialize an instance of Presentation class.
- Load a PowerPoint document using Presentation.LoadFromFile() method.
- Convert the PowerPoint document to SVG and save the results into a queue of byte arrays using Presentation.SaveToSVG() method.
- Iterate through the byte arrays in the queue.
- At each iteration, remove and return the byte array at the beginning of the queue using Queue.Dequeue() method.
- Initialize an instance of FileStream class and save the byte array to an SVG file using FileStream.Write() method.
- C#
- VB.NET
using Spire.Presentation;
using System.Collections.Generic;
using System.IO;

namespace ConvertPowerPointToSvgImage
{
    class Program
    {
        static void Main(string[] args)
        {
            //Create a Presentation instance
            Presentation presentation = new Presentation();
            //Load a PowerPoint document
            presentation.LoadFromFile(@"Sample.pptx");

            //Convert the PowerPoint document to SVG and save the results into a queue of byte arrays
            Queue<byte[]> svgBytes = presentation.SaveToSVG();
            int count = svgBytes.Count;
            //Iterate through the byte arrays in the queue
            for (int i = 0; i < count; i++)
            {
                //Remove and return the byte array at the beginning of the queue
                byte[] bt = svgBytes.Dequeue();
                //Specify the output file name
                string fileName = string.Format("ToSVG-{0}.svg", i);
                //Create a FileStream instance
                FileStream fs = new FileStream(fileName, FileMode.Create);
                //Save the byte array to a SVG file
                fs.Write(bt, 0, bt.Length);
            }
        }
    }
}

Apply for a Temporary License
If you'd like to remove the evaluation message from the generated documents, or to get rid of the function limitations, please request a 30-day trial license for yourself.
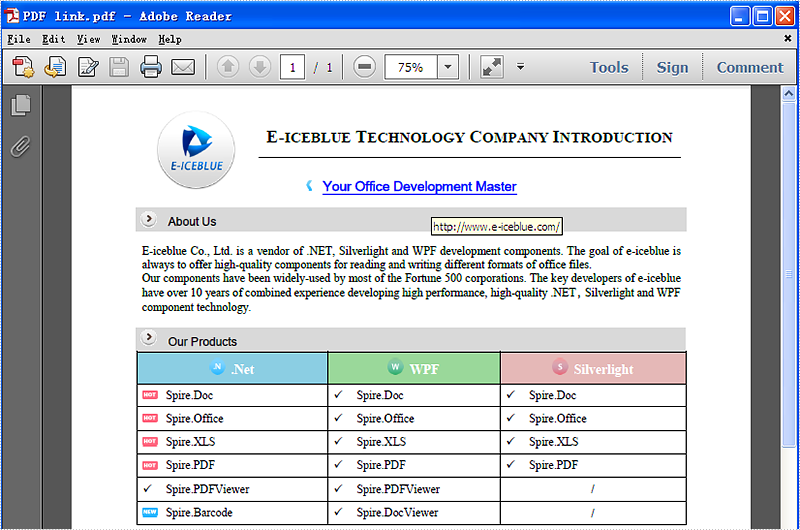
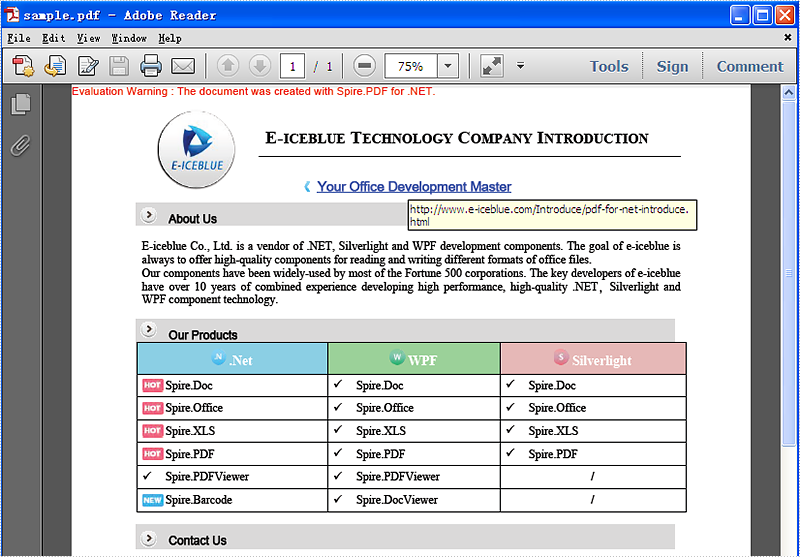
Extract and Update link from a PDF file
Spire.PDF for .NET is a PDF library which enables users to handle the whole PDF document with wide range of tasks in C#, VB.NET. Spire.PDF supports to create PDF links, extract PDF links, update PDF links and remove PDF links from a PDF file. This article mainly shows how to extract and update link from a PDF file in C#.
Before the steps and codes, please check the original PDF file at first:
Firstly we need to create a new Document object and load a PDF file which needs to extract and update the links. The links are represented as annotations in a PDF file. Before extract and update the link from a PDF file, we need to extract all the AnnotationsWidget objects.
The following code snippet shows you how to extract links from the PDF file.
//Load an existing PDF file
PdfDocument document = new PdfDocument();
document.LoadFromFile(@"..\..\output.pdf");

//Get the first page
PdfPageBase page = document.Pages[0];

//Get the annotation collection
PdfAnnotationCollection widgetCollection = page.Annotations;

//Verify whether widgetCollection is not null or not
if (widgetCollection.Count > 0)
            {
                foreach (var obj in widgetCollection)
                {

//Get the TextWebLink Annotation
if (obj is PdfTextWebLinkAnnotationWidget)
   {
     PdfTextWebLinkAnnotationWidget link = obj as PdfTextWebLinkAnnotationWidget;
The following code snippet shows you how to update the link in PDF file
//Change the url of TextWebLink Annotation
link.Url = "http://www.e-iceblue.com/Introduce/pdf-for-net-introduce.html";

//Saves PDF document to file.
document.SaveToFile("sample.pdf");
This picture will show you the link has been updated in the PDF file.
Create PDF/A and insert hyperlink to image in C#
PDF/A is widely used for long term archiving for PDF format. By using Spire.PDF, you can create PDF/A file directly. This article mainly shows how to set up PDF/A file; it will also demonstrate how to add image and insert hyperlink to image in C#.
Make sure Spire.PDF for .NET (version 2.9.43 or above) has been installed correctly and then add Spire.Pdf.dll as reference in the downloaded Bin folder though the below path: "..\Spire.Pdf\Bin\NET4.0\ Spire.Pdf.dll".
Here comes to the steps:
Step 1: Create a PDF/A document.
// Create a PdfDocument instance
PdfDocument document = new PdfDocument();
PdfPageBase page = document.Pages.Add();
page.Canvas.DrawString("Hello World", new PdfFont(PdfFontFamily.Helvetica, 30f), new PdfSolidBrush(Color.Black), 10, 10);
Step 2: Load an image from file and insert to the PDF.
//insert an image
PdfImage image = PdfImage.FromFile(@"D:\PDF.png");
Step 3: Add a hyper link to the image.
//Add a link to image
PointF location = new PointF(100, 100);
RectangleF linkBounds = new RectangleF(location, new SizeF(image.Width, image.Height));
Spire.Pdf.Annotations.PdfUriAnnotation link = new Spire.Pdf.Annotations.PdfUriAnnotation(linkBounds, "http://www.e-iceblue.com/Introduce/pdf-for-net-introduce.html");
link.Border = new PdfAnnotationBorder(0);
page.Canvas.DrawImage(image, linkBounds);
page.Annotations.Add(link);
Step 4: Save the PDF document.
//Save the document to file in PDF format
String output1 = @"..\..\..\..\..\..\Data\ToPDF.pdf";
document.SaveToFile(output1);

// Create an instance of the PdfStandardsConverter class, passing the input PDF file path as a parameter.
PdfStandardsConverter converter = new PdfStandardsConverter(output1);

// Specify the desired file name for the resulting PDFA-1b compliant PDF.
String output2 = @"..\..\..\..\..\..\Data\ToPDFA.pdf";

// Convert the input PDF file to PDFA-1b format and save it using the specified output file name.
converter.ToPdfA1B(output2);
Effective screenshot:
