5 einfache Methoden, Zeilen und Spalten in Excel einzufrieren
```html
Inhaltsverzeichnis
- Methode 1. Schnelle Fixierungsvoreinstellungen verwenden (Oberste Zeile / Erste Spalte)
- Methode 2. Beliebige Zeilen und Spalten mit „Fenster fixieren“ fixieren
- Methode 3. Tastenkombination verwenden (Alt + W + F + …)
- Methode 4. VBA-Automatisierung verwenden
- Methode 5. Python-Automatisierung verwenden (Spire.XLS)
- Vergleichstabelle: Wählen Sie den richtigen Weg
- Zusammenfassung
- FAQs zum Fixieren von Fenstern in Excel
Die Arbeit mit großen Datensätzen in Excel bedeutet oft, durch Hunderte oder sogar Tausende von Zeilen zu scrollen. Dabei verliert man leicht den Überblick über Kopfzeilen oder wichtige Referenzbezeichnungen, was die Analyse verlangsamt und die Fehlerwahrscheinlichkeit erhöht. Wichtige Zeilen und Spalten sichtbar zu halten, kann Ihre Effizienz und Genauigkeit drastisch verbessern.
Glücklicherweise bietet Excel mehrere integrierte Werkzeuge, mit denen Sie bestimmte Teile Ihres Arbeitsblatts fixieren können. Ob Sie eine Kopfzeile an Ort und Stelle halten, eine wichtige Identifikationsspalte sperren oder eine Kombination aus fixierten Abschnitten erstellen müssen, Excel bietet flexible Optionen für jedes Szenario.
In diesem Leitfaden werden wir fünf einfache Methoden zum Fixieren von Zeilen und Spalten in Excel durchgehen – von einfachen Ein-Klick-Voreinstellungen bis hin zu vollautomatisierten Lösungen mit VBA und Python (Spire.XLS). Am Ende werden Sie genau wissen, welche Methode zu Ihrem Arbeitsablauf passt und wie Sie sie sicher anwenden können.
Methodenübersicht:
- Methode 1. Schnelle Fixierungsvoreinstellungen verwenden (Oberste Zeile / Erste Spalte)
- Methode 2. Beliebige Zeilen und Spalten mit „Fenster fixieren“ fixieren
- Methode 3. Tastenkombination verwenden (Alt + W + F + …)
- Methode 4. VBA-Automatisierung verwenden
- Methode 5. Python-Automatisierung verwenden (Spire.XLS)
Methode 1. Schnelle Fixierungsvoreinstellungen verwenden (Oberste Zeile / Erste Spalte)
Excel bietet zwei sofortige Voreinstellungen, mit denen Sie die am häufigsten verwendeten Bereiche fixieren können – die oberste Zeile und die erste Spalte. Diese Optionen sind ideal, wenn Ihr Datensatz eine einzelne Kopfzeile oder -spalte verwendet.
So verwenden Sie schnelle Fixierungsvoreinstellungen
-
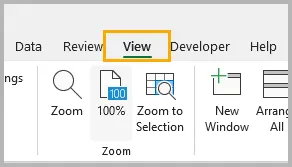
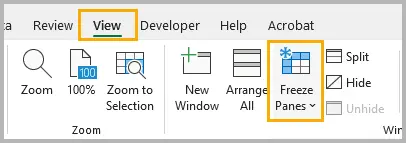
Gehen Sie zum Tab Ansicht im Menüband.
-
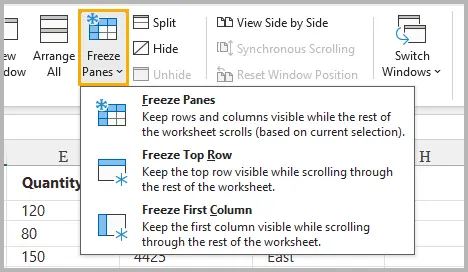
Klicken Sie auf Fenster fixieren.
-
Wählen Sie eine der folgenden Optionen:
- Oberste Zeile fixieren – hält Zeile 1 beim Scrollen nach unten sichtbar.
- Erste Spalte fixieren – hält Spalte A beim horizontalen Scrollen sichtbar.
Nach der Auswahl fügt Excel eine dünne Linie (horizontal oder vertikal) hinzu, die anzeigt, dass die Zeile oder Spalte fixiert ist.
Wann diese Voreinstellungen zu verwenden sind
- Ihr Datensatz hat eine einzelne Kopfzeile, die sichtbar bleiben muss.
- Ihre Schlüsselidentifikatoren (z. B. ID, Name, SKU) befinden sich in der ersten Spalte.
- Sie möchten den schnellstmöglichen Weg, um Inhalte zu fixieren, ohne Zellen auszuwählen.
Diese Optionen decken die häufigsten Fixierungsszenarien ab und sind ideal für eine schnelle Navigation im Arbeitsblatt.
Methode 2. Beliebige Zeilen und Spalten mit „Fenster fixieren“ fixieren
Obwohl die schnellen Voreinstellungen praktisch sind, müssen Sie manchmal mehrere Zeilen, mehrere Spalten oder beides gleichzeitig fixieren. Hier kommt die volle Funktion Fenster fixieren ins Spiel.
Wie es funktioniert
Excel fixiert:
- Alles über der ausgewählten Zelle
- Alles links von der ausgewählten Zelle
Dies ermöglicht es, komplexe Kopfzeilen oder kombinierte Zeilen-/Spaltenstrukturen zu fixieren.
Beispiel: Zeilen 1–2 und Spalte A fixieren
-
Wählen Sie die Zelle B3 aus (weil sie unter Zeile 2 und rechts von Spalte A liegt).

-
Gehen Sie zu Ansicht → Fenster fixieren.
-
Wählen Sie Fenster fixieren.

Jetzt sind die Zeilen 1–2 und Spalte A fixiert, während der Rest des Blattes scrollbar bleibt.
Weitere Beispiele
- Nur Zeilen 1–3 fixieren: Wählen Sie A4 → Fenster fixieren.
- Nur Spalten A–B fixieren: Wählen Sie C1 → Fenster fixieren.
- Oberste 2 Zeilen und erste 3 Spalten fixieren: Wählen Sie D3 → Fenster fixieren.
Wann diese Methode am besten ist
- Ihr Datensatz enthält mehrstufige Kopfzeilen.
- Sie benötigen Flexibilität.
- Sie müssen sowohl Zeilen als auch Spalten gleichzeitig fixieren.
Dies ist der leistungsstärkste manuelle Ansatz und derjenige, der am häufigsten in professionellen Berichten verwendet wird.
Methode 3. Tastenkombination verwenden (Alt + W + F + …)
Wenn Sie es vorziehen, Ihre Hände auf der Tastatur zu lassen, kann die Verwendung der integrierten Tastenkombinationssequenz von Excel eine schnellere Alternative sein. Diese Tastenkombinationen ahmen die im Menüband ausgelösten Schritte nach und ermöglichen einen schnellen Zugriff.
Tastenkombinationssequenzen
- Alt → A → F → F = Fenster fixieren
- Alt → A → F → O = Oberste Zeile fixieren
- Alt → A → F → E = Erste Spalte fixieren
Dies sind sequentielle Tastenkombinationen (nicht gleichzeitig gedrückt). Sie funktionieren in allen modernen Versionen von Excel für Windows.
Warum Tastenkombinationen wichtig sind
- Schnellerer Arbeitsablauf für intensive Excel-Benutzer
- Nützlich bei der Datenbereinigung und -analyse
- Spart Zeit beim wiederholten Ein- und Ausschalten der Fixierung
Wenn Sie Ihre Excel-Fähigkeiten für professionelle Tabellenkalkulationsarbeit ausbauen, lohnt es sich, diese Tastenkombinationen auswendig zu lernen.
Methode 4. VBA-Automatisierung verwenden
Wenn Sie regelmäßig Vorlagen, Berichte oder Datenexporte vorbereiten, kann die Automatisierung der Fensterfixierung mit VBA erheblich Zeit sparen. Ein einziges Makro kann bestimmte Bereiche über mehrere Blätter oder Arbeitsmappen hinweg fixieren.
So wenden Sie VBA-Code zum Fixieren von Fenstern an
-
Drücken Sie Alt + F11, um den VBA-Editor zu öffnen.
-
Klicken Sie im linken Bereich mit der rechten Maustaste auf VBAProject (IhreArbeitsmappe) und wählen Sie Einfügen → Modul.
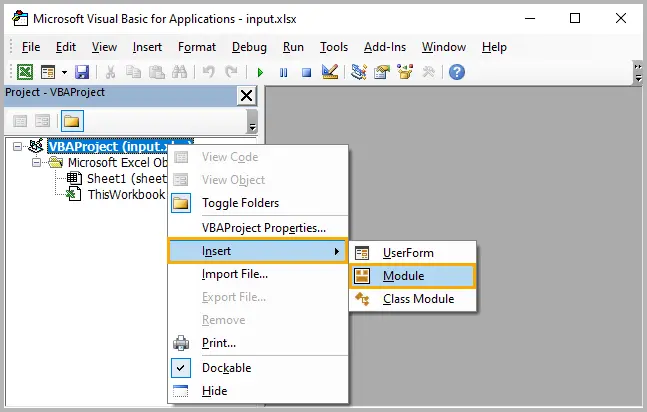
-
Kopieren Sie den VBA-Codeausschnitt und fügen Sie ihn in das Modul ein.
-
Schließen Sie den VBA-Editor.
-
Drücken Sie Alt + F8, wählen Sie das Makro (z. B.
ObersteZeileFixieren) und klicken Sie auf Ausführen.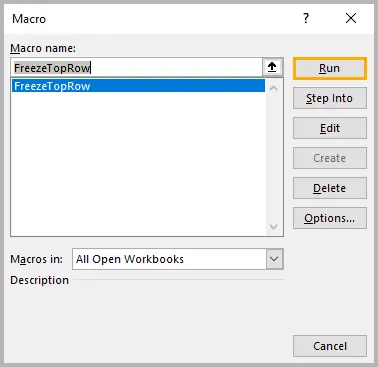
-
Kehren Sie zum Arbeitsblatt zurück und bestätigen Sie, dass die Einstellungen für die Fensterfixierung angewendet wurden.
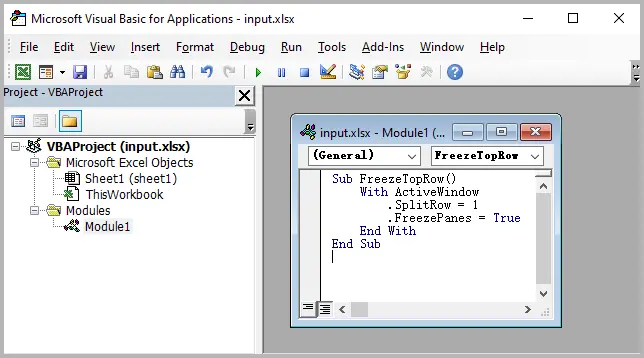
Beispiel 1: Oberste Zeile fixieren
Sub ObersteZeileFixieren()
    With ActiveWindow
        .SplitRow = 1
        .FreezePanes = True
    End With
End Sub
Beispiel 2: Zeilen 1–2 und Spalte A fixieren
Sub BenutzerdefiniertFixieren()
    With ActiveWindow
        .SplitRow = 2
        .SplitColumn = 1
        .FreezePanes = True
    End With
End Sub
Beispiel 3: Fixierung aufheben
Sub FixierungAufheben()
    ActiveWindow.FreezePanes = False
End Sub
Wann VBA-Automatisierung nützlich ist
- Sie erstellen Berichte für mehrere Abteilungen.
- Sie arbeiten mit standardisierten Arbeitsmappenstrukturen.
- Sie benötigen eine automatische Anwendung der Fensterfixierung beim Öffnen einer Datei.
- Sie erstellen Excel-basierte Werkzeuge oder Vorlagen, die teamübergreifend genutzt werden.
VBA macht Ihre Formatierung wiederholbar, zuverlässig und konsistent.
Methode 5. Python-Automatisierung verwenden (Spire.XLS)
Für Entwickler, die automatisierte Berichtssysteme erstellen – insbesondere in Unternehmensumgebungen – bietet das Fixieren von Fenstern mit Python eine skalierbare, code-gesteuerte Lösung. Die Bibliothek Spire.XLS for Python ermöglicht es Ihnen, Excel-Dateien zu bearbeiten, ohne dass Excel installiert sein muss.
Spire.XLS installieren
pip install spire.xls
Beispiel: Zeilen 1–2 und Spalte A fixieren
from spire.xls import *

workbook = Workbook()
workbook.LoadFromFile("input.xlsx")

sheet = workbook.Worksheets[0]
sheet.FreezePanes(3, 2)  # Fixiert über Zeile 3 und links von Spalte 2

workbook.SaveToFile("output.xlsx", ExcelVersion.Version2016)
Nur die oberste Zeile fixieren
sheet.FreezePanes(2, 1)
Fixierung aufheben
sheet.UnfreezePanes()
Lesen Sie weiter: Fenster in Excel mit Python fixieren oder Fixierung aufheben
Wann Python-Automatisierung ideal ist
- Sie generieren automatisch Hunderte von Excel-Berichten.
- Ihr Arbeitsablauf ist in Webanwendungen oder Backend-Systeme integriert.
- Sie müssen konsistente Fixierungseinstellungen programmatisch anwenden.
- Sie möchten Excel-Automatisierung ohne Abhängigkeit von COM oder Windows.
Spire.XLS bietet umfassende Excel-Funktionen, einschließlich erweiterter Zellenformatierung, Anpassung von Schriftarten und Stilen, Formelautomatisierung, Datenvalidierung und Berichterstellung, was es zu einem leistungsstarken Werkzeug für die Excel-Automatisierung auf Unternehmensebene und die Optimierung von Arbeitsabläufen macht.
Vergleichstabelle: Wählen Sie den richtigen Weg
| Methode | Fähigkeitslevel | Am besten für | Unterstützt Zeilenfixierung | Unterstützt Spaltenfixierung | Automatisierung | Geschwindigkeit |
|---|---|---|---|---|---|---|
| Schnelle Fixierungsvoreinstellungen | Anfänger | Einfache Kopfzeilenfixierung | ✔ Oberste Zeile | ✔ Erste Spalte | ✘ | ★★★★★ |
| Fenster fixieren (Benutzerdefiniert) | Anfänger–Mittel | Flexible Fixierung (Zeilen & Spalten) | ✔ | ✔ | ✘ | ★★★★☆ |
| Tastenkombination | Mittel | Schnelle manuelle Arbeit | ✔ | ✔ | ✘ | ★★★★★ |
| VBA-Automatisierung | Mittel–Fortgeschritten | Wiederholte Fixierungen in Vorlagen | ✔ | ✔ | ✔ | ★★★★☆ |
| Python (Spire.XLS) | Entwickler | Groß angelegte Automatisierung & Backend-Berichterstattung | ✔ | ✔ | ✔ | ★★★★★ |
Zusammenfassung
Das Fixieren von Zeilen und Spalten ist für die Navigation in großen Excel-Arbeitsblättern unerlässlich, und Excel bietet dafür mehrere einfache und flexible Werkzeuge. Die Schnellfixierungs-Voreinstellungen sind perfekt für gängige Aufgaben, während Fenster fixieren Ihnen die volle Kontrolle darüber gibt, welche Teile Ihres Arbeitsblatts sichtbar bleiben. Tastenkombinationen sind ideal für schnelle manuelle Arbeitsabläufe, und für fortgeschrittene Benutzer bieten VBA- und Python-Automatisierung Möglichkeiten, Fixierungen über viele Blätter oder automatisch generierte Dateien hinweg anzuwenden.
Ob Sie Analyst, Entwickler, Buchhalter oder Datenprofi sind, die Wahl der richtigen Methode wird Ihnen helfen, effizienter zu arbeiten und Ihre Daten leichter interpretierbar zu halten.
FAQs zum Fixieren von Fenstern in Excel
F1. Warum ist „Fenster fixieren“ in Excel ausgegraut?
Dies geschieht normalerweise, wenn:
- Sie gerade eine Zelle bearbeiten.
- Das Arbeitsblatt geschützt ist.
- Sie sich in der Seitenlayout-Ansicht befinden (wechseln Sie zur Normalansicht).
F2. Kann ich Fenster in Excel Online fixieren?
Ja, Excel Online unterstützt das Fixieren der obersten Zeile und der ersten Spalte sowie benutzerdefinierte Fensterfixierungen.
F3. Kann ich mehr als eine Zeile oder Spalte fixieren?
Ja. Verwenden Sie die volle Funktion „Fenster fixieren“ und wählen Sie die richtige Zellreferenz unter/neben den Zeilen und Spalten aus, die Sie fixieren möchten.
F4. Werden die Einstellungen für die Fensterfixierung mit der Datei gespeichert?
Ja. Sobald Sie die Arbeitsmappe speichern, bleiben die Fixierungseinstellungen beim nächsten Öffnen aktiv.
F5. Kann ich Fenster auf mehreren Blättern gleichzeitig fixieren?
Nicht manuell. Sie müssen die Fixierungsaktion auf jedem Blatt wiederholen oder sie mit VBA oder Python automatisieren.
Das könnte Sie auch interessieren
```
5 простых способов закрепить строки и столбцы в Excel
Содержание
- Метод 1. Использовать быстрые предустановки закрепления (верхняя строка / первый столбец)
- Метод 2. Закрепить любые строки и столбцы с помощью функции "Закрепить области"
- Метод 3. Использовать сочетание клавиш (Alt + W + F + ...)
- Метод 4. Использовать автоматизацию VBA
- Метод 5. Использовать автоматизацию Python (Spire.XLS)
- Сравнительная таблица: выберите правильный способ
- Краткое изложение
- Часто задаваемые вопросы о закреплении областей в Excel
Работа с большими наборами данных в Excel часто означает прокрутку сотен или даже тысяч строк. Когда это происходит, легко потерять из виду заголовки или ключевые метки, что замедляет анализ и увеличивает вероятность ошибок. Сохранение видимости важных строк и столбцов может значительно повысить вашу эффективность и точность.
К счастью, Excel предоставляет несколько встроенных инструментов, которые позволяют закреплять определенные части вашего листа. Независимо от того, нужно ли вам закрепить строку заголовка, заблокировать ключевой столбец-идентификатор или создать комбинацию закрепленных областей, у Excel есть гибкие опции для любого сценария.
В этом руководстве мы рассмотрим пять простых методов **закрепления строк и столбцов в Excel** — от простых предустановок в один клик до полностью автоматизированных решений с использованием VBA и Python (Spire.XLS). К концу вы будете точно знать, какой метод подходит для вашего рабочего процесса и как уверенно его применять.
Обзор методов:
- Метод 1. Использовать быстрые предустановки закрепления (верхняя строка / первый столбец)
- Метод 2. Закрепить любые строки и столбцы с помощью функции "Закрепить области"
- Метод 3. Использовать сочетание клавиш (Alt + W + F + ...)
- Метод 4. Использовать автоматизацию VBA
- Метод 5. Использовать автоматизацию Python (Spire.XLS)
Метод 1. Использовать быстрые предустановки закрепления (верхняя строка / первый столбец)
Excel предоставляет две мгновенные предустановки, которые позволяют закреплять наиболее часто используемые области — **верхнюю строку** и **первый столбец**. Эти опции идеальны, когда ваш набор данных использует одну строку или столбец заголовков.
Как использовать быстрые предустановки закрепления
-
Перейдите на вкладку **Вид** на ленте.
-
Нажмите **Закрепить области**.
-
Выберите один из следующих вариантов:
- **Закрепить верхнюю строку** – сохраняет видимость строки 1 при прокрутке вниз.
- **Закрепить первый столбец** – сохраняет видимость столбца A при горизонтальной прокрутке.
После выбора Excel добавляет тонкую линию (горизонтальную или вертикальную), указывающую, что строка или столбец заблокированы.
Когда использовать эти предустановки
- Ваш набор данных имеет одну строку заголовка, которая должна оставаться видимой.
- Ваши ключевые идентификаторы (например, ID, Имя, SKU) находятся в первом столбце.
- Вы хотите максимально быстрый способ закрепить содержимое без выбора каких-либо ячеек.
Эти опции охватывают наиболее распространенные сценарии закрепления и идеально подходят для быстрой навигации по листу.
Метод 2. Закрепить любые строки и столбцы с помощью функции "Закрепить области"
Хотя быстрые предустановки удобны, иногда вам нужно закрепить **несколько строк**, **несколько столбцов** или **и то, и другое одновременно**. Вот где на помощь приходит полная функция **Закрепить области**.
Как это работает
Excel закрепляет:
- Все, что **выше** выбранной ячейки
- Все, что **слева** от выбранной ячейки
Это позволяет закреплять сложные заголовки или комбинированные структуры строк/столбцов.
Пример: закрепить строки 1–2 и столбец A
-
Выберите ячейку **B3** (потому что она находится ниже строки 2 и справа от столбца A).
-
Перейдите в **Вид → Закрепить области**.
-
Выберите **Закрепить области**.
Теперь строки 1–2 и столбец A заблокированы, а остальная часть листа остается прокручиваемой.
Больше примеров
- Закрепить только строки 1–3: выберите **A4** → Закрепить области.
- Закрепить только столбцы A–B: выберите **C1** → Закрепить области.
- Закрепить верхние 2 строки и первые 3 столбца: выберите **D3** → Закрепить области.
Когда этот метод лучше всего подходит
- Ваш набор данных содержит многоуровневые заголовки.
- Вам нужна гибкость.
- Вам нужно закрепить и строки, и столбцы одновременно.
Это самый мощный ручной подход, который чаще всего используется в профессиональных отчетах.
Метод 3. Использовать сочетание клавиш (Alt + W + F + ...)
Если вы предпочитаете держать руки на клавиатуре, использование встроенной последовательности сочетаний клавиш Excel может быть более быстрой альтернативой. Эти сочетания имитируют шаги, выполняемые на ленте, обеспечивая быстрый доступ.
Последовательности сочетаний клавиш
- **Alt → W → F → F** = Закрепить области
- **Alt → W → F → T** = Закрепить верхнюю строку
- **Alt → W → F → C** = Закрепить первый столбец
Это последовательные сочетания клавиш (нажимаются не одновременно). Они работают во всех современных версиях Excel для Windows.
Почему важны сочетания клавиш
- Более быстрый рабочий процесс для активных пользователей Excel
- Полезно при очистке и анализе данных
- Экономит время при многократном переключении закрепления/открепления
Если вы развиваете навыки работы с Excel для профессиональной работы с электронными таблицами, запоминание этих сочетаний клавиш стоит затраченных усилий.
Метод 4. Использовать автоматизацию VBA
Если вы регулярно готовите шаблоны, отчеты или экспортируете данные, автоматизация закрепления областей с помощью VBA может сэкономить значительное время. Один макрос может закреплять определенные диапазоны на нескольких листах или в нескольких книгах.
Как применить код VBA для закрепления областей
-
Нажмите **Alt + F11**, чтобы открыть редактор VBA.
-
На левой панели щелкните правой кнопкой мыши **VBAProject (ВашаКнига)** и выберите **Insert → Module**.
-
Скопируйте и вставьте фрагмент кода VBA в модуль.
-
Закройте редактор VBA.
-
Нажмите **Alt + F8**, выберите макрос (например,
FreezeTopRow) и нажмите **Выполнить**. -
Вернитесь на лист и убедитесь, что настройки закрепления областей применены.
Пример 1: Закрепить верхнюю строку
Sub FreezeTopRow()
    With ActiveWindow
        .SplitRow = 1
        .FreezePanes = True
    End With
End Sub
Пример 2: Закрепить строки 1–2 и столбец A
Sub FreezeCustom()
    With ActiveWindow
        .SplitRow = 2
        .SplitColumn = 1
        .FreezePanes = True
    End With
End Sub
Пример 3: Открепить области
Sub UnfreezePanes()
    ActiveWindow.FreezePanes = False
End Sub
Когда полезна автоматизация VBA
- Вы создаете отчеты для нескольких отделов.
- Вы работаете со стандартизированными структурами книг.
- Вам нужно, чтобы закрепление областей применялось автоматически при открытии файла.
- Вы создаете инструменты или шаблоны на основе Excel для совместного использования командами.
VBA делает ваше форматирование повторяемым, надежным и последовательным.
Метод 5. Использовать автоматизацию Python (Spire.XLS)
Для разработчиков, создающих автоматизированные системы отчетности, особенно в корпоративных средах, закрепление областей с помощью Python предоставляет масштабируемое, управляемое кодом решение. Библиотека Spire.XLS for Python позволяет манипулировать файлами Excel без необходимости установки самого Excel.
Установить Spire.XLS
pip install spire.xls
Пример: закрепить строки 1–2 и столбец A
from spire.xls import *

workbook = Workbook()
workbook.LoadFromFile("input.xlsx")

sheet = workbook.Worksheets[0]
sheet.FreezePanes(3, 2)  # Freeze above row 3 and left of column 2

workbook.SaveToFile("output.xlsx", ExcelVersion.Version2016)
Закрепить только верхнюю строку
sheet.FreezePanes(2, 1)
Открепить
sheet.UnfreezePanes()
Читать далее: Закрепление и открепление областей в Excel с помощью Python
Когда автоматизация на Python идеальна
- Вы автоматически генерируете сотни отчетов Excel.
- Ваш рабочий процесс интегрирован с веб-приложениями или серверными системами.
- Вам необходимо программно применять последовательные настройки закрепления.
- Вы хотите автоматизировать Excel, не полагаясь на COM или Windows.
Spire.XLS предлагает широкие возможности Excel, включая расширенное форматирование ячеек, настройку шрифтов и стилей, автоматизацию формул, проверку данных и создание отчетов, что делает его мощным инструментом для автоматизации Excel на уровне предприятия и оптимизации рабочих процессов.
Сравнительная таблица: выберите правильный способ
| Метод | Уровень навыков | Лучше всего подходит для | Поддерживает закрепление строк | Поддерживает закрепление столбцов | Автоматизация | Скорость |
|---|---|---|---|---|---|---|
| Быстрые предустановки закрепления | Начинающий | Простое закрепление заголовков | ✔ Верхняя строка | ✔ Первый столбец | ✘ | ★★★★★ |
| Закрепить области (пользовательский) | Начинающий–Средний | Гибкое закрепление (строки и столбцы) | ✔ | ✔ | ✘ | ★★★★☆ |
| Сочетание клавиш | Средний | Быстрая ручная работа | ✔ | ✔ | ✘ | ★★★★★ |
| Автоматизация VBA | Средний–Продвинутый | Повторяющееся закрепление в шаблонах | ✔ | ✔ | ✔ | ★★★★☆ |
| Python (Spire.XLS) | Разработчик | Крупномасштабная автоматизация и серверная отчетность | ✔ | ✔ | ✔ | ★★★★★ |
Краткое изложение
Закрепление строк и столбцов необходимо для навигации по большим листам Excel, и Excel предоставляет несколько простых и гибких инструментов для этого. Предустановки **быстрого закрепления** идеально подходят для обычных задач, в то время как **"Закрепить области"** дает вам полный контроль над тем, какие части вашего листа остаются видимыми. Сочетания клавиш идеально подходят для быстрых ручных рабочих процессов, а для более продвинутых пользователей **автоматизация с помощью VBA и Python** предоставляет способы применения закрепления на многих листах или в автоматически создаваемых файлах.
Независимо от того, являетесь ли вы аналитиком, разработчиком, бухгалтером или специалистом по данным, выбор правильного метода поможет вам работать более эффективно и сделает ваши данные более легкими для интерпретации.
Часто задаваемые вопросы о закреплении областей в Excel
В1. Почему опция "Закрепить области" неактивна в Excel?
Обычно это происходит, когда:
- Вы в данный момент редактируете ячейку.
- Лист защищен.
- Вы находитесь в режиме "Разметка страницы" (переключитесь в обычный режим).
В2. Могу ли я закрепить области в Excel Online?
Да, Excel Online поддерживает закрепление верхней строки и первого столбца, а также пользовательское закрепление областей.
В3. Могу ли я закрепить более одной строки или столбца?
Да. Используйте полную функцию "Закрепить области" и выберите правильную ссылку на ячейку ниже/рядом со строками и столбцами, которые вы хотите закрепить.
В4. Сохраняются ли настройки закрепления областей вместе с файлом?
Да. После сохранения книги настройки закрепления остаются активными при следующем ее открытии.
В5. Могу ли я закрепить области на нескольких листах одновременно?
Не вручную. Вы должны повторить действие закрепления на каждом листе или автоматизировать его с помощью VBA или Python.
Вам также может быть интересно
5 Easy Methods to Freeze Rows and Columns in Excel
Table of Contents
- Method 1. Use Quick Freeze Presets (Top Row / First Column)
- Method 2. Freeze Any Rows and Columns Using Freeze Panes
- Method 3. Use Keyboard Shortcut (Alt + W + F + …)
- Method 4. Use VBA Automation
- Method 5. Use Python Automation (Spire.XLS)
- Comparison Table: Choose the Right Way
- Summary
- FAQs About Freezing Panes in Excel
Working with large datasets in Excel often means scrolling through hundreds or even thousands of rows. When this happens, it’s easy to lose track of your headers or key reference labels, which slows down analysis and increases the chance of mistakes. Keeping important rows and columns visible can dramatically improve your efficiency and accuracy.
Fortunately, Excel provides several built-in tools that allow you to freeze specific parts of your worksheet. Whether you need to keep a header row in place, lock a key identifier column, or create a combination of frozen sections, Excel has flexible options for every scenario.
In this guide, we’ll walk through five easy methods to freeze rows and columns in Excel—from simple one-click presets to fully automated solutions using VBA and Python (Spire.XLS). By the end, you'll know exactly which method fits your workflow and how to apply it with confidence.
Method overview:
- Method 1. Use Quick Freeze Presets (Top Row / First Column)
- Method 2. Freeze Any Rows and Columns Using Freeze Panes
- Method 3. Use Keyboard Shortcut (Alt + W + F + …)
- Method 4. Use VBA Automation
- Method 5. Use Python Automation (Spire.XLS)
Method 1. Use Quick Freeze Presets (Top Row / First Column)
Excel provides two instant presets that allow you to freeze the most commonly used areas—the top row and the first column. These options are ideal when your dataset uses a single header row or column.
How to Use Quick Freeze Presets
-
Go to the View tab on the ribbon.
-
Click Freeze Panes .
-
Choose one of the following options:
- Freeze Top Row – keeps Row 1 visible when scrolling down.
- Freeze First Column – keeps Column A visible when scrolling horizontally.
Once selected, Excel adds a thin line (horizontal or vertical) indicating that the row or column is locked in place.
When to Use These Presets
- Your dataset has a single header row that must remain visible.
- Your key identifiers (e.g., ID, Name, SKU) are in the first column.
- You want the fastest possible way to freeze content without selecting any cells.
These options cover the most common freezing scenarios and are ideal for quick worksheet navigation.
Method 2. Freeze Any Rows and Columns Using Freeze Panes
While the quick presets are convenient, sometimes you need to freeze multiple rows, multiple columns, or both at once. That’s where the full Freeze Panes feature comes in.
How it Works
Excel freezes:
- Everything above the selected cell
- Everything to the left of the selected cell
This makes it possible to freeze complex headers or combined row/column structures.
Example: Freeze Rows 1–2 and Column A
-
Select the cell B3 (because it is below Row 2 and to the right of Column A).
-
Go to View → Freeze Panes .
-
Choose Freeze Panes .
Now Rows 1–2 and Column A are locked in place while the rest of the sheet remains scrollable.
More Examples
- Freeze only rows 1–3: Select A4 → Freeze Panes.
- Freeze only columns A–B: Select C1 → Freeze Panes.
- Freeze top 2 rows and first 3 columns: Select D3 → Freeze Panes.
When This Method Is Best
- Your dataset contains multi-level headers.
- You need flexibility.
- You need both rows and columns frozen at the same time.
This is the most powerful manual approach and the one used most often in professional reports.
Method 3. Use Keyboard Shortcut (Alt + W + F + …)
If you prefer to keep your hands on the keyboard, using Excel’s built-in shortcut sequence can be a faster alternative. These shortcuts mimic the steps triggered in the ribbon, allowing for quick access.
Shortcut Sequences
- Alt → W → F → F = Freeze Panes
- Alt → W → F → T = Freeze Top Row
- Alt → W → F → C = Freeze First Column
These are sequential shortcuts (not pressed at once). They work on all modern versions of Excel for Windows.
Why Shortcuts Matter
- Faster workflow for heavy Excel users
- Useful during data cleaning and analysis
- Saves time when toggling freeze/unfreeze repeatedly
If you're building Excel skills for professional spreadsheet work, memorizing these shortcuts is worth the effort.
Method 4. Use VBA Automation
If you regularly prepare templates, reports, or data exports, automating freeze panes with VBA can save significant time. A single macro can freeze specific ranges across multiple sheets or workbooks.
How to Apply VBA Code to Freeze Panes
-
Press Alt + F11 to open the VBA editor.
-
In the left panel, right-click VBAProject (YourWorkbook) and choose Insert → Module .
-
Copy and paste the VBA code snippet into the module.
-
Close the VBA editor.
-
Press Alt + F8 , select the macro (e.g.,
FreezeTopRow), and click Run . -
Return to the worksheet and confirm that the freeze panes settings have been applied.
Example 1: Freeze the Top Row
Sub FreezeTopRow()
    With ActiveWindow
        .SplitRow = 1
        .FreezePanes = True
    End With
End Sub
Example 2: Freeze Rows 1–2 and Column A
Sub FreezeCustom()
    With ActiveWindow
        .SplitRow = 2
        .SplitColumn = 1
        .FreezePanes = True
    End With
End Sub
Example 3: Unfreeze Panes
Sub UnfreezePanes()
    ActiveWindow.FreezePanes = False
End Sub
When VBA Automation Is Useful
- You generate reports for multiple departments.
- You work with standardized workbook structures.
- You need freeze panes applied automatically upon opening a file.
- You create Excel-based tools or templates shared across teams.
VBA makes your formatting repeatable, reliable, and consistent.
Method 5. Use Python Automation (Spire.XLS)
For developers building automated reporting systems—especially in enterprise environments—freezing panes with Python provides a scalable, code-driven solution. The Spire.XLS for Python library allows you to manipulate Excel files without needing Excel installed.
Install Spire.XLS
pip install spire.xls
Example: Freeze Rows 1–2 and Column A
from spire.xls import *

workbook = Workbook()
workbook.LoadFromFile("input.xlsx")

sheet = workbook.Worksheets[0]
sheet.FreezePanes(3, 2)  # Freeze above row 3 and left of column 2

workbook.SaveToFile("output.xlsx", ExcelVersion.Version2016)
Freeze only the top row
sheet.FreezePanes(2, 1)
Unfreeze
sheet.UnfreezePanes()
Read further: Freeze or Unfreeze Panes in Excel Using Python
When Python Automation Is Ideal
- You generate hundreds of Excel reports automatically.
- Your workflow is integrated with web applications or backend systems.
- You need to apply consistent freeze settings programmatically.
- You want Excel automation without relying on COM or Windows.
Spire.XLS offers broad Excel capabilities, including advanced cell formatting, font and style customization, formula automation, data validation, and report generation, making it a powerful tool for enterprise-level Excel automation and workflow optimization.
Comparison Table: Choose the Right Way
| Method | Skill Level | Best For | Supports Freeze Rows | Supports Freeze Columns | Automation | Speed |
|---|---|---|---|---|---|---|
| Quick Freeze Presets | Beginner | Simple header freezing | ✔ Top row | ✔ First column | ✘ | ★★★★★ |
| Freeze Panes (Custom) | Beginner–Intermediate | Flexible freezing (rows & columns) | ✔ | ✔ | ✘ | ★★★★☆ |
| Keyboard Shortcut | Intermediate | Fast manual work | ✔ | ✔ | ✘ | ★★★★★ |
| VBA Automation | Intermediate–Advanced | Repeated freezes in templates | ✔ | ✔ | ✔ | ★★★★☆ |
| Python (Spire.XLS) | Developer | Large-scale automation & backend reporting | ✔ | ✔ | ✔ | ★★★★★ |
Summary
Freezing rows and columns is essential for navigating large Excel worksheets, and Excel provides several easy and flexible tools for doing so. The Quick Freeze Presets are perfect for common tasks, while Freeze Panes gives you full control over which parts of your worksheet remain visible. Keyboard shortcuts are ideal for fast manual workflows, and for more advanced users, VBA and Python automation provide ways to apply freezes across many sheets or automatically generated files.
Whether you're an analyst, developer, accountant, or data professional, choosing the right method will help you work more efficiently and keep your data easier to interpret.
FAQs About Freezing Panes in Excel
Q1. Why is “Freeze Panes” greyed out in Excel?
This usually happens when:
- You are currently editing a cell.
- The worksheet is protected.
- You are in Page Layout view (switch to Normal view).
Q2. Can I freeze panes in Excel Online?
Yes, Excel Online supports freezing the top row and first column, as well as custom freeze panes.
Q3. Can I freeze more than one row or column?
Yes. Use the full Freeze Panes function and select the correct cell reference below/next to the rows and columns you want to freeze.
Q4. Do freeze pane settings save with the file?
Yes. Once you save the workbook, the freeze settings remain active the next time you open it.
Q5. Can I freeze panes on multiple sheets at once?
Not manually. You must repeat the freeze action on each sheet, or automate it with VBA or Python.
You May Also Be Interested In
C# Salva file Excel — Salva Excel in XLSX, PDF e altro
Salvare file Excel in C# è un'attività comune in molte applicazioni .NET, specialmente quando si generano report, si esportano dati analitici o si automatizzano i log di sistema. Che si lavori con riepiloghi finanziari o dati operativi giornalieri, essere in grado di creare e salvare file Excel programmaticamente può migliorare significativamente l'efficienza e l'accuratezza.
In C#, gli sviluppatori possono gestire i file Excel in diversi modi: creando nuove cartelle di lavoro, scrivendo dati e salvandoli in vari formati come XLSX, CSV o PDF. Con l'aiuto di librerie Excel dedicate, queste operazioni possono essere automatizzate in modo efficiente senza dipendere da Microsoft Excel o da interventi manuali.
In questo articolo, esploreremo come:
- Preparare il tuo ambiente di sviluppo
- Salvare dati da DataTable o DataGridView in Excel
- Salvare file Excel in diversi formati di foglio di calcolo (CSV, XLS, ecc.)
- Esportare file Excel in formati di documento (PDF, HTML, ecc.)
- Salvare cartelle di lavoro Excel in un MemoryStream per app web
- Aprire e salvare nuovamente file Excel esistenti
Prepara l'Ambiente di Sviluppo
Prima di immergersi nel codice, imposta il tuo ambiente di sviluppo con una libreria Excel che supporti la creazione, la lettura e il salvataggio di file in .NET. In questo tutorial, useremo Free Spire.XLS for .NET.
Passaggio 1: Installa Spire.XLS tramite NuGet
Install-Package FreeSpire.XLS
Passaggio 2: Importa lo Spazio dei Nomi Richiesto
using Spire.Xls;
Passaggio 3: Crea, Scrivi e Salva un Semplice File Excel
// Crea una nuova cartella di lavoro e ottieni il primo foglio di lavoro
Workbook workbook = new Workbook();
Worksheet sheet = workbook.Worksheets[0];

// Scrivi "Ciao Mondo!" nella cella A1
sheet.Range["A1"].Text = "Ciao Mondo!";

// Salva la cartella di lavoro in un file
workbook.SaveToFile("HelloWorld.xlsx", ExcelVersion.Version2016);
Questo semplice esempio mostra il flusso di lavoro di base: creare una cartella di lavoro, scrivere dati in una cella e salvare il file.
Successivamente, puoi esplorare classi e metodi chiave come:
- Workbook – rappresenta l'intero file Excel.
- Worksheet – rappresenta un singolo foglio all'interno della cartella di lavoro.
- Range – consente l'accesso a celle specifiche per l'input, la formattazione o lo stile.
- Workbook.SaveToFile() – salva la cartella di lavoro su disco nel formato Excel specificato.
Salva Dati in un File Excel in C#
Salvare dati strutturati come DataTable o DataGridView in un file Excel è una delle attività più pratiche nello sviluppo C#. Che la tua applicazione produca risultati di database, contenuti di griglie UI o report automatizzati, esportare questi set di dati in Excel offre una migliore leggibilità e compatibilità.
Esempio 1: Salva DataTable in Excel
using Spire.Xls;
using System.Data;

Workbook workbook = new Workbook();
Worksheet sheet = workbook.Worksheets[0];
sheet.Name = "DatiDipendenti";

DataTable table = new DataTable();
table.Columns.Add("IDDipendente");
table.Columns.Add("NomeCompleto");
table.Columns.Add("Dipartimento");
table.Columns.Add("DataAssunzione");
table.Columns.Add("Stipendio");

// Aggiungi righe di esempio
table.Rows.Add("E001", "Alice Johnson", "Finanza", "2020-03-12", "7500");
table.Rows.Add("E002", "Bob Williams", "Risorse Umane", "2019-08-05", "6800");
table.Rows.Add("E003", "Catherine Lee", "IT", "2021-01-20", "8200");
table.Rows.Add("E004", "David Smith", "Marketing", "2018-11-30", "7100");
table.Rows.Add("E005", "Emily Davis", "Vendite", "2022-06-15", "6900");

// Inserisci il DataTable nel foglio di lavoro
sheet.InsertDataTable(table, true, 1, 1);

// Applica formati predefiniti
sheet.AllocatedRange.Rows[0].BuiltInStyle = BuiltInStyles.Heading1;
for (int i = 1; i < sheet.AllocatedRange.Rows.Count(); i++)
{
    sheet.AllocatedRange.Rows[i].BuiltInStyle = BuiltInStyles.Accent1;
}
sheet.AllocatedRange.AutoFitColumns();
sheet.AllocatedRange.AutoFitRows();

// Salva in Excel
workbook.SaveToFile("EsportazioneDatiDipendenti.xlsx", FileFormat.Version2016);
Come funziona:
- InsertDataTable() inserisce i dati a partire da una cella specifica.
- L'argomento true include le intestazioni di colonna.
- SaveToFile() salva la cartella di lavoro su disco; il secondo parametro specifica la versione del formato Excel.
- FileFormat.Version2016 specifica la versione del formato Excel.
Di seguito è riportato un output di esempio che mostra come appare il DataTable esportato in Excel:
Esempio 2: Salva DataGridView in Excel
Workbook workbook = new Workbook();
Worksheet sheet = workbook.Worksheets[0];

sheet.InsertDataTable(((DataTable)dataGridView1.DataSource), true, 1, 1);
workbook.SaveToFile("EsportazioneGridView.xlsx", FileFormat.Version2016);
Suggerimento: prima di salvare, assicurati che l'origine dati del tuo DataGridView sia correttamente convertita in un DataTable. Ciò garantisce che la struttura esportata corrisponda al layout della griglia dell'interfaccia utente.
Se vuoi imparare come creare file Excel con più tipi di dati, formattazione e altri elementi, puoi esplorare l'articolo Come Creare File Excel in C#.
Salva File Excel come CSV o XLS in C#
Sistemi e piattaforme diversi richiedono formati di fogli di calcolo diversi. Sebbene XLSX sia ora lo standard, CSV, XLS e altri formati rimangono comuni negli ambienti aziendali. L'esportazione in formati diversi consente di condividere, elaborare o importare i dati di Excel da varie applicazioni.
Esempio 1: Salva Excel come CSV
CSV (Comma-Separated Values) è un semplice formato basato su testo, ideale per lo scambio di dati con database, applicazioni web o altri sistemi che supportano file di testo semplice.
Workbook workbook = new Workbook();
workbook.LoadFromFile("EsportazioneDatiDipendenti.xlsx");
workbook.SaveToFile("Report.csv", ",", FileFormat.CSV);
Esempio 2: Salva Excel come XLS (Formato Legacy)
XLS (formato Excel 97–2003) è un formato binario legacy ancora utilizzato in sistemi o applicazioni meno recenti che non supportano XLSX. Il salvataggio in XLS garantisce la compatibilità con i flussi di lavoro aziendali legacy.
Workbook workbook = new Workbook();
workbook.LoadFromFile("EsportazioneDatiDipendenti.xlsx");
workbook.SaveToFile("Report_legacy.xls", ExcelVersion.Version97to2003);
Formati di Foglio di Calcolo Aggiuntivi Supportati
Oltre ai formati CSV, XLS e XLSX di uso comune, la libreria supporta anche molti altri formati di fogli di calcolo e modelli. La tabella seguente elenca questi formati insieme ai loro corrispondenti valori di enumerazione FileFormat per un facile riferimento durante il salvataggio programmatico dei file.
| Formato | Descrizione | Enum Corrispondente (FileFormat) |
|---|---|---|
| ODS | Foglio di Calcolo OpenDocument | FileFormat.ODS |
| XLSM | Cartella di lavoro Excel con attivazione macro | FileFormat.Xlsm |
| XLSB | Cartella di lavoro Excel binaria | FileFormat.Xlsb2007 / FileFormat.Xlsb2010 |
| XLT | Modello Excel 97–2003 | FileFormat.XLT |
| XLTX | Modello Excel Open XML | FileFormat.XLTX |
| XLTM | Modello Excel con attivazione macro | FileFormat.XLTM |
Questi formati aggiuntivi sono utili per le organizzazioni che lavorano con sistemi legacy, standard di documenti aperti o flussi di lavoro di automazione basati su macro/modelli.
Salva Excel come PDF o HTML in C#
In molti casi, i file Excel devono essere convertiti in formati di documento o web per facilitare la pubblicazione, la stampa o la condivisione.
L'esportazione in PDF è ideale per report con layout fisso e per la stampa, while HTML è adatto per visualizzare i dati di Excel in un browser web.
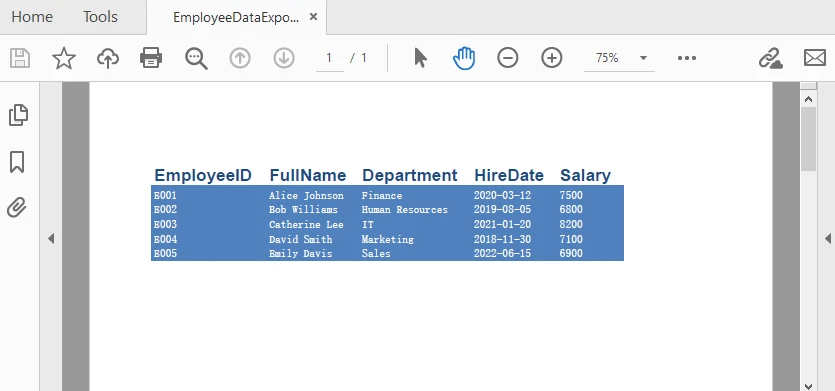
Esempio 1: Salva Excel come PDF
L'esempio seguente mostra come salvare una cartella di lavoro di Excel come file PDF utilizzando C#. Ciò è utile per generare report che preservano il layout e la formattazione.
Workbook workbook = new Workbook();
workbook.LoadFromFile("EsportazioneDatiDipendenti.xlsx");
workbook.SaveToFile("EsportazioneDatiDipendenti.pdf", FileFormat.PDF);
Ecco un esempio del file PDF generato dopo l'esportazione da Excel:
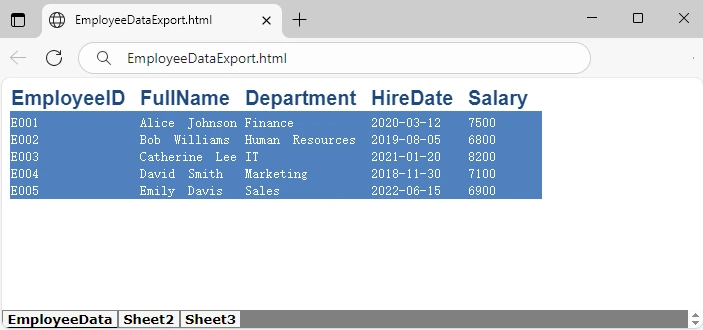
Esempio 2: Salva Excel come HTML
Questo esempio dimostra come salvare una cartella di lavoro di Excel come file HTML, rendendo facile il rendering dei dati in un browser web o l'integrazione con applicazioni web.
Workbook workbook = new Workbook();
workbook.LoadFromFile("EsportazioneDatiDipendenti.xlsx");
workbook.SaveToFile("EsportazioneDatiDipendenti.html", FileFormat.HTML);
Di seguito un'anteprima del file HTML esportato e visualizzato in un browser:
Formati di Documenti e Web Aggiuntivi Supportati
Oltre a PDF e HTML, la libreria supporta diversi altri formati adatti a documenti e al web. La tabella seguente mostra questi formati insieme ai loro valori di enumerazione FileFormat per un facile riferimento.
| Formato | Descrizione | Enum Corrispondente (FileFormat) |
|---|---|---|
| XML | Dati Excel esportati come XML | FileFormat.XML |
| Bitmap / Immagine | Esporta Excel come Bitmap o altri formati di immagine | FileFormat.Bitmap |
| XPS | Documento XML Paper Specification | FileFormat.XPS |
| PostScript | Documento PostScript | FileFormat.PostScript |
| OFD | Formato Open Fixed-layout Document | FileFormat.OFD |
| PCL | File Printer Command Language | FileFormat.PCL |
| Markdown | Formato file Markdown | FileFormat.Markdown |
Questi formati offrono ulteriore flessibilità per la distribuzione di contenuti Excel su diverse piattaforme e flussi di lavoro, sia per la stampa, la pubblicazione web o l'automazione.
Salva un File Excel in MemoryStream in C#
Nelle applicazioni web o nei servizi cloud, salvare i file Excel direttamente su disco potrebbe non essere ideale per motivi di sicurezza o prestazioni. L'uso di MemoryStream consente di generare file Excel in memoria e di inviarli direttamente ai client per il download. Spire.XLS for .NET supporta anche sia il caricamento che il salvataggio di cartelle di lavoro tramite MemoryStream, rendendo facile la gestione dei file Excel interamente in memoria.
Workbook workbook = new Workbook();
Worksheet sheet = workbook.Worksheets[0];
sheet.Range["A1"].Text = "Esporta su Stream";

using (MemoryStream stream = new MemoryStream())
{
    workbook.SaveToStream(stream, ExcelVersion.Version2016);
    byte[] bytes = stream.ToArray();

    // Esempio: invia i byte al client per il download in ASP.NET
    // Response.BinaryWrite(bytes);
}
Questo approccio è particolarmente utile per ASP.NET, Web API o servizi cloud, dove si desidera servire file Excel in modo dinamico senza creare file temporanei sul server.
Apri e Salva di Nuovo File Excel in C#
In molte applicazioni, potrebbe essere necessario caricare una cartella di lavoro Excel esistente, applicare aggiornamenti o modifiche e quindi salvarla nuovamente su disco o convertirla in un formato diverso. Questo è comune quando si aggiornano report, si modificano dati esportati o si automatizzano i flussi di lavoro dei file Excel.
Esempio: Apri e Aggiorna un File Excel
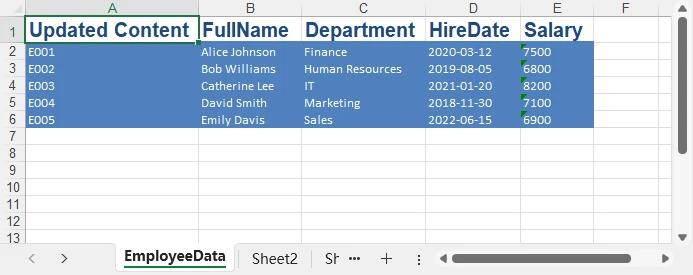
Il seguente codice C# carica la cartella di lavoro precedente, aggiorna la prima cella e salva le modifiche:
Workbook workbook = new Workbook();
workbook.LoadFromFile("EsportazioneDatiDipendenti.xlsx");

Worksheet sheet = workbook.Worksheets[0];
sheet.Range["A1"].Text = "Contenuto Aggiornato"; // Aggiorna il valore della cella
sheet.Range["A1"].AutoFitColumns(); // Adatta automaticamente la larghezza della colonna

// Salva la cartella di lavoro aggiornata
workbook.Save(); // Salva nel file originale
workbook.SaveToFile("CopiaAggiornata.xlsx", ExcelVersion.Version2016); // Salva come nuovo file
Lo screenshot seguente mostra il foglio Excel aggiornato dopo aver modificato e salvato il file:
Puoi anche consultare la guida dettagliata sulla modifica di file Excel utilizzando C# per scenari più avanzati.
Migliori Pratiche per il Salvataggio di File Excel
-
Evita di Sovrascrivere i File
Verifica se il file di destinazione esiste prima di salvare per prevenire la perdita accidentale di dati.
-
Gestisci Correttamente Permessi e Percorsi
Assicurati che la tua applicazione abbia i permessi di scrittura nella cartella di destinazione, specialmente in ambienti web o cloud.
-
Scegli il Formato Giusto
Usa XLSX per la compatibilità moderna, CSV per lo scambio di dati e PDF per la stampa o la condivisione di report.
Conclusione
Salvare file Excel in C# copre una vasta gamma di operazioni, dalla scrittura di set di dati strutturati, all'esportazione in diversi formati di fogli di calcolo, alla conversione in PDF/HTML, fino alla gestione dei flussi di file nelle applicazioni web.
Con la flessibilità offerta da librerie come Spire.XLS for .NET, gli sviluppatori possono implementare potenti flussi di lavoro di automazione Excel con facilità.
FAQ
D1: Come si salva un file Excel in C#?
Usa SaveToFile() con l'appropriato ExcelVersion o FileFormat:
workbook.SaveToFile("Report.xlsx", ExcelVersion.Version2016);
D2: Come si apre e si modifica un file Excel esistente?
Carica la cartella di lavoro usando LoadFromFile(), apporta le modifiche, quindi salva:
Workbook workbook = new Workbook();
workbook.LoadFromFile("FileEsistente.xlsx");
workbook.Worksheets[0].Range["A1"].Text = "Contenuto Aggiornato";
workbook.SaveToFile("FileAggiornato.xlsx", ExcelVersion.Version2016);
D3: Come si salva in formato CSV o PDF?
Specifica il FileFormat desiderato in SaveToFile():
workbook.SaveToFile("Report.csv", ",", FileFormat.CSV);
workbook.SaveToFile("Report.pdf", FileFormat.PDF);
D4: Posso salvare Excel in memoria invece che su disco?
Sì. Usa SaveToStream() per scrivere su un MemoryStream, utile in applicazioni web o cloud:
using (MemoryStream stream = new MemoryStream())
{
    workbook.SaveToStream(stream, ExcelVersion.Version2016);
    byte[] bytes = stream.ToArray();
}
Vedi Anche
C# Salvar arquivo Excel — Salvar Excel em XLSX, PDF e mais
Salvar arquivos Excel em C# é uma tarefa comum em muitas aplicações .NET, especialmente ao gerar relatórios, exportar dados analíticos ou automatizar logs do sistema. Esteja você trabalhando com resumos financeiros ou dados de operações diárias, ser capaz de criar e salvar arquivos Excel programaticamente pode mejorar significativamente a eficiência e a precisão.
Em C#, os desenvolvedores podem manipular arquivos Excel de várias maneiras — criando novas pastas de trabalho, escrevendo dados e salvando-os em vários formatos, como XLSX, CSV ou PDF. Com a ajuda de bibliotecas dedicadas ao Excel, essas operações podem ser automatizadas eficientemente sem depender do Microsoft Excel ou de intervenção manual.
Neste artigo, exploraremos como:
- Preparar seu ambiente de desenvolvimento
- Salvar dados de DataTable ou DataGridView no Excel
- Salvar arquivos Excel em diferentes formatos de planilha (CSV, XLS, etc.)
- Exportar arquivos Excel para formatos de documento (PDF, HTML, etc.)
- Salvar pastas de trabalho do Excel em um MemoryStream para aplicativos da web
- Abrir e salvar novamente arquivos Excel existentes
Prepare o Ambiente de Desenvolvimento
Antes de mergulhar no código, configure seu ambiente de desenvolvimento com uma biblioteca Excel que suporte a criação, leitura e salvamento de arquivos em .NET. Neste tutorial, usaremos o Free Spire.XLS for .NET.
Passo 1: Instale o Spire.XLS via NuGet
Install-Package FreeSpire.XLS
Passo 2: Importe o Namespace Necessário
using Spire.Xls;
Passo 3: Crie, Escreva e Salve um Arquivo Excel Simples
// Crie uma nova pasta de trabalho e obtenha a primeira planilha
Workbook workbook = new Workbook();
Worksheet sheet = workbook.Worksheets[0];

// Escreva "Olá Mundo!" na célula A1
sheet.Range["A1"].Text = "Olá Mundo!";

// Salve a pasta de trabalho em um arquivo
workbook.SaveToFile("HelloWorld.xlsx", ExcelVersion.Version2016);
Este exemplo simples mostra o fluxo de trabalho básico: criar uma pasta de trabalho, escrever dados em uma célula e salvar o arquivo.
Depois disso, você pode explorar classes e métodos chave como:
- Workbook – representa o arquivo Excel inteiro.
- Worksheet – representa uma única planilha dentro da pasta de trabalho.
- Range – permite acesso a células específicas para entrada, formatação ou estilização.
- Workbook.SaveToFile() – salva a pasta de trabalho no disco no formato Excel especificado.
Salvar Dados em um Arquivo Excel em C#
Salvar dados estruturados como DataTable ou DataGridView em um arquivo Excel é uma das tarefas mais práticas no desenvolvimento em C#. Se sua aplicação produz resultados de banco de dados, conteúdo de grade de interface do usuário ou relatórios automatizados, exportar esses conjuntos de dados para o Excel oferece melhor legibilidade e compatibilidade.
Exemplo 1: Salvar DataTable no Excel
using Spire.Xls;
using System.Data;
Workbook workbook = new Workbook();
Worksheet sheet = workbook.Worksheets[0];
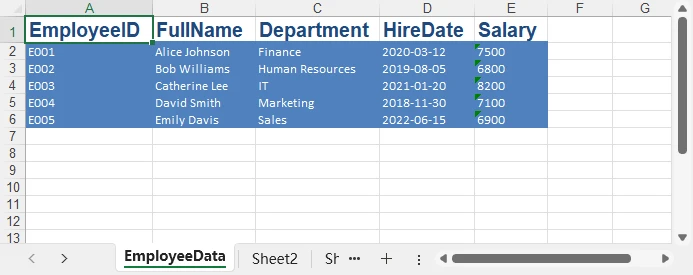
sheet.Name = "EmployeeData";
DataTable table = new DataTable();
table.Columns.Add("EmployeeID");
table.Columns.Add("FullName");
table.Columns.Add("Department");
table.Columns.Add("HireDate");
table.Columns.Add("Salary");
// Adicionar linhas de exemplo
table.Rows.Add("E001", "Alice Johnson", "Finance", "2020-03-12", "7500");
table.Rows.Add("E002", "Bob Williams", "Human Resources", "2019-08-05", "6800");
table.Rows.Add("E003", "Catherine Lee", "IT", "2021-01-20", "8200");
table.Rows.Add("E004", "David Smith", "Marketing", "2018-11-30", "7100");
table.Rows.Add("E005", "Emily Davis", "Sales", "2022-06-15", "6900");
// Inserir o DataTable na planilha
sheet.InsertDataTable(table, true, 1, 1);
// Aplicar formatos incorporados
sheet.AllocatedRange.Rows[0].BuiltInStyle = BuiltInStyles.Heading1;
for (int i = 1; i < sheet.AllocatedRange.Rows.Count(); i++)
{
sheet.AllocatedRange.Rows[i].BuiltInStyle = BuiltInStyles.Accent1;
}
sheet.AllocatedRange.AutoFitColumns();
sheet.AllocatedRange.AutoFitRows();
// Salvar no Excel
workbook.SaveToFile("EmployeeDataExport.xlsx", FileFormat.Version2016);
Como funciona:
- InsertDataTable() insere dados a partir de uma célula específica.
- O argumento true inclui os cabeçalhos das colunas.
- SaveToFile() salva a pasta de trabalho no disco; o segundo parâmetro especifica a versão do formato Excel.
- FileFormat.Version2016 especifica a versão do formato Excel.
Abaixo está um exemplo de saída mostrando como o DataTable exportado aparece no Excel:
Exemplo 2: Salvar DataGridView no Excel
Workbook workbook = new Workbook();
Worksheet sheet = workbook.Worksheets[0];

sheet.InsertDataTable(((DataTable)dataGridView1.DataSource), true, 1, 1);
workbook.SaveToFile("GridViewExport.xlsx", FileFormat.Version2016);
Dica: Antes de salvar, certifique-se de que a fonte de dados do seu DataGridView seja convertida corretamente para um DataTable. Isso garante que a estrutura exportada corresponda ao layout da grade da interface do usuário.
Se você quiser aprender como criar arquivos Excel com mais tipos de dados, formatação e outros elementos, pode explorar o artigo Como Criar Arquivos Excel em C#.
Salvar Arquivo Excel como CSV ou XLS em C#
Diferentes sistemas e plataformas exigem diferentes formatos de planilha. Embora o XLSX seja agora o padrão, CSV, XLS e outros formatos permanecem comuns em ambientes empresariais. Exportar para diferentes formatos permite que os dados do Excel sejam compartilhados, processados ou importados por várias aplicações.
Exemplo 1: Salvar Excel como CSV
CSV (Valores Separados por Vírgula) é um formato simples baseado em texto, ideal para trocar dados com bancos de dados, aplicações web ou outros sistemas que suportam arquivos de texto simples.
Workbook workbook = new Workbook();
workbook.LoadFromFile("EmployeeDataExport.xlsx");
workbook.SaveToFile("Report.csv", ",", FileFormat.CSV);
Exemplo 2: Salvar Excel como XLS (Formato Legado)
XLS (formato Excel 97–2003) é um formato binário legado ainda usado em sistemas ou aplicações mais antigas que não suportam XLSX. Salvar em XLS garante compatibilidade com fluxos de trabalho empresariais legados.
Workbook workbook = new Workbook();
workbook.LoadFromFile("EmployeeDataExport.xlsx");
workbook.SaveToFile("Report_legacy.xls", ExcelVersion.Version97to2003);
Formatos de Planilha Adicionais Suportados
Além dos formatos CSV, XLS e XLSX comumente usados, a biblioteca também suporta vários outros formatos de planilha e modelo. A tabela abaixo lista esses formatos juntamente com seus valores de enumeração FileFormat correspondentes para fácil referência ao salvar arquivos programaticamente.
| Formato | Descrição | Enum Correspondente (FileFormat) |
|---|---|---|
| ODS | Planilha OpenDocument | FileFormat.ODS |
| XLSM | Pasta de trabalho do Excel habilitada para macro | FileFormat.Xlsm |
| XLSB | Pasta de trabalho binária do Excel | FileFormat.Xlsb2007 / FileFormat.Xlsb2010 |
| XLT | Modelo do Excel 97–2003 | FileFormat.XLT |
| XLTX | Modelo Excel Open XML | FileFormat.XLTX |
| XLTM | Modelo do Excel habilitado para macro | FileFormat.XLTM |
Esses formatos adicionais são úteis para organizações que trabalham com sistemas legados, padrões de documentos abertos ou fluxos de trabalho de automação baseados em macro/modelo.
Salvar Excel como PDF ou HTML em C#
Em muitos casos, os arquivos do Excel precisam ser convertidos em formatos de documento ou web para facilitar a publicação, impressão ou compartilhamento.
Exportar para PDF é ideal para relatórios de layout fixo e impressão, enquanto HTML é adequado para visualizar dados do Excel em um navegador da web.
Exemplo 1: Salvar Excel como PDF
O exemplo a seguir mostra como salvar uma pasta de trabalho do Excel como um arquivo PDF usando C#. Isso é útil para gerar relatórios que preservam o layout e a formatação.
Workbook workbook = new Workbook();
workbook.LoadFromFile("EmployeeDataExport.xlsx");
workbook.SaveToFile("EmployeeDataExport.pdf", FileFormat.PDF);
Aqui está um exemplo do arquivo PDF gerado após a exportação do Excel:
Exemplo 2: Salvar Excel como HTML
Este exemplo demonstra como salvar uma pasta de trabalho do Excel como um arquivo HTML, facilitando a renderização dos dados em um navegador da web ou a integração com aplicações web.
Workbook workbook = new Workbook();
workbook.LoadFromFile("EmployeeDataExport.xlsx");
workbook.SaveToFile("EmployeeDataExport.html", FileFormat.HTML);
Abaixo está uma prévia do arquivo HTML exportado renderizado em um navegador:
Formatos Adicionais de Documento e Web Suportados
Além de PDF e HTML, a biblioteca suporta vários outros formatos amigáveis para documentos e web. A tabela abaixo mostra esses formatos juntamente com seus valores de enumeração FileFormat para fácil referência.
| Formato | Descrição | Enum Correspondente (FileFormat) |
|---|---|---|
| XML | Dados do Excel exportados como XML | FileFormat.XML |
| Bitmap / Imagem | Exportar Excel como Bitmap ou outros formatos de imagem | FileFormat.Bitmap |
| XPS | Documento de Especificação de Papel XML | FileFormat.XPS |
| PostScript | Documento PostScript | FileFormat.PostScript |
| OFD | Formato de Documento de Layout Fixo Aberto | FileFormat.OFD |
| PCL | Arquivo de Linguagem de Comando de Impressora | FileFormat.PCL |
| Markdown | Formato de arquivo Markdown | FileFormat.Markdown |
Esses formatos fornecem flexibilidade adicional para distribuir conteúdo do Excel em diferentes plataformas e fluxos de trabalho, seja para impressão, publicação na web ou automação.
Salvar um Arquivo Excel em MemoryStream em C#
Em aplicações web ou serviços em nuvem, salvar arquivos Excel diretamente no disco pode não ser ideal por razões de segurança ou desempenho. Usar MemoryStream permite gerar arquivos Excel na memória e entregá-los diretamente aos clientes para download. O Spire.XLS for .NET também suporta tanto o carregamento quanto o salvamento de pastas de trabalho através do MemoryStream, facilitando o manuseio de arquivos Excel inteiramente na memória.
Workbook workbook = new Workbook();
Worksheet sheet = workbook.Worksheets[0];
sheet.Range["A1"].Text = "Export to Stream";

using (MemoryStream stream = new MemoryStream())
{
    workbook.SaveToStream(stream, ExcelVersion.Version2016);
    byte[] bytes = stream.ToArray();

    // Exemplo: enviar bytes para o cliente para download no ASP.NET
    // Response.BinaryWrite(bytes);
}
Esta abordagem é particularly útil para ASP.NET, Web API ou serviços em nuvem, onde você deseja servir arquivos Excel dinamicamente sem criar arquivos temporários no servidor.
Abrir e Salvar Novamente Arquivos Excel em C#
Em muitas aplicações, pode ser necessário carregar uma pasta de trabalho do Excel existente, aplicar atualizações ou modificações e, em seguida, salvá-la de volta no disco ou convertê-la para um formato diferente. Isso é comum ao atualizar relatórios, modificar dados exportados ou automatizar fluxos de trabalho de arquivos Excel.
Exemplo: Abrir e Atualizar um Arquivo Excel
O código C# a seguir carrega a pasta de trabalho anterior, atualiza a primeira célula e salva as alterações:
Workbook workbook = new Workbook();
workbook.LoadFromFile("EmployeeDataExport.xlsx");

Worksheet sheet = workbook.Worksheets[0];
sheet.Range["A1"].Text = "Updated Content"; // Atualizar o valor da célula
sheet.Range["A1"].AutoFitColumns(); // Ajustar automaticamente a largura da coluna

// Salvar a pasta de trabalho atualizada
workbook.Save(); // Salva no arquivo original
workbook.SaveToFile("UpdatedCopy.xlsx", ExcelVersion.Version2016); // Salvar como novo arquivo
A captura de tela abaixo mostra a planilha do Excel atualizada após modificar e salvar o arquivo:
Você também pode conferir o guia detalhado sobre edição de arquivos Excel usando C# para cenários mais avançados.
Melhores Práticas ao Salvar Arquivos Excel
-
Evite Sobrescrever Arquivos
Verifique se o arquivo de destino existe antes de salvar para evitar a perda acidental de dados.
-
Gerencie Permissões e Caminhos Adequadamente
Garanta que sua aplicação tenha permissão de escrita na pasta de destino, especialmente em ambientes web ou na nuvem.
-
Escolha o Formato Correto
Use XLSX para compatibilidade moderna, CSV para troca de dados e PDF para imprimir ou compartilhar relatórios.
Conclusão
Salvar arquivos Excel em C# abrange uma ampla gama de operações — desde a escrita de conjuntos de dados estruturados, exportação para diferentes formatos de planilha, conversão para PDF/HTML, até o manuseio de fluxos de arquivos em aplicações web.
Com a flexibilidade oferecida por bibliotecas como o Spire.XLS for .NET, os desenvolvedores podem implementar poderosos fluxos de trabalho de automação do Excel com facilidade.
Perguntas Frequentes
P1: Como salvo um arquivo Excel em C#?
Use SaveToFile() com o ExcelVersion ou FileFormat apropriado:
workbook.SaveToFile("Report.xlsx", ExcelVersion.Version2016);
P2: Como abro e modifico um arquivo Excel existente?
Carregue a pasta de trabalho usando LoadFromFile(), faça as alterações e salve:
Workbook workbook = new Workbook();
workbook.LoadFromFile("ExistingFile.xlsx");
workbook.Worksheets[0].Range["A1"].Text = "Updated Content";
workbook.SaveToFile("UpdatedFile.xlsx", ExcelVersion.Version2016);
P3: Como salvo como CSV ou PDF?
Especifique o FileFormat desejado em SaveToFile():
workbook.SaveToFile("Report.csv", ",", FileFormat.CSV);
workbook.SaveToFile("Report.pdf", FileFormat.PDF);
P4: Posso salvar o Excel na memória em vez do disco?
Sim. Use SaveToStream() para enviar a saída para um MemoryStream, útil em aplicações web ou na nuvem:
using (MemoryStream stream = new MemoryStream())
{
    workbook.SaveToStream(stream, ExcelVersion.Version2016);
    byte[] bytes = stream.ToArray();
}
Veja Também
C# Excel 파일 저장 — Excel을 XLSX, PDF 등으로 저장하기
```html
C#에서 Excel 파일 저장하기는 많은 .NET 애플리케이션에서 일반적인 작업이며, 특히 보고서 생성, 분석 데이터 내보내기 또는 시스템 로그 자동화 시에 그렇습니다. 재무 요약이나 일일 운영 데이터를 다루든, 프로그래밍 방식으로 Excel 파일을 생성하고 저장할 수 있으면 효율성과 정확성을 크게 향상시킬 수 있습니다.
C#에서 개발자는 새 통합 문서 만들기, 데이터 쓰기, XLSX, CSV 또는 PDF와 같은 다양한 형식으로 저장하는 등 여러 가지 방법으로 Excel 파일을 처리할 수 있습니다. 전용 Excel 라이브러리를 사용하면 Microsoft Excel이나 수동 개입 없이 이러한 작업을 효율적으로 자동화할 수 있습니다.
이 기사에서는 다음 방법을 살펴보겠습니다.
- 개발 환경 준비
- DataTable 또는 DataGridView 데이터를 Excel에 저장
- Excel 파일을 다른 스프레드시트 형식으로 저장 (CSV, XLS 등)
- Excel 파일을 문서 형식으로 내보내기 (PDF, HTML 등)
- 웹 앱용 Excel 통합 문서를 MemoryStream에 저장
- 기존 Excel 파일 열기 및 다시 저장
개발 환경 준비
코드를 살펴보기 전에 .NET에서 파일 생성, 읽기 및 저장을 지원하는 Excel 라이브러리로 개발 환경을 설정하세요. 이 튜토리얼에서는 .NET용 무료 Spire.XLS를 사용합니다.
1단계: NuGet을 통해 Spire.XLS 설치
Install-Package FreeSpire.XLS
2단계: 필요한 네임스페이스 가져오기
using Spire.Xls;
3단계: 간단한 Excel 파일 생성, 작성 및 저장
// 새 통합 문서를 만들고 첫 번째 워크시트를 가져옵니다.
Workbook workbook = new Workbook();
Worksheet sheet = workbook.Worksheets[0];

// A1 셀에 "Hello World!"를 씁니다.
sheet.Range["A1"].Text = "Hello World!";

// 통합 문서를 파일에 저장합니다.
workbook.SaveToFile("HelloWorld.xlsx", ExcelVersion.Version2016);
이 간단한 예는 통합 문서 만들기, 셀에 데이터 쓰기, 파일 저장과 같은 기본 워크플로를 보여줍니다.
그런 다음 다음과 같은 주요 클래스 및 메서드를 탐색할 수 있습니다.
- Workbook – 전체 Excel 파일을 나타냅니다.
- Worksheet – 통합 문서 내의 단일 시트를 나타냅니다.
- Range – 입력, 서식 지정 또는 스타일링을 위해 특정 셀에 액세스할 수 있습니다.
- Workbook.SaveToFile() – 지정된 Excel 형식으로 통합 문서를 디스크에 저장합니다.
C#에서 Excel 파일에 데이터 저장
DataTable 또는 DataGridView와 같은 구조화된 데이터를 Excel 파일에 저장하는 것은 C# 개발에서 가장 실용적인 작업 중 하나입니다. 애플리케이션이 데이터베이스 결과, UI 그리드 콘텐츠 또는 자동화된 보고서를 생성하든, 이러한 데이터 세트를 Excel로 내보내면 가독성과 호환성이 향상됩니다.
예제 1: DataTable을 Excel에 저장
using Spire.Xls;
using System.Data;

Workbook workbook = new Workbook();
Worksheet sheet = workbook.Worksheets[0];
sheet.Name = "EmployeeData";

DataTable table = new DataTable();
table.Columns.Add("EmployeeID");
table.Columns.Add("FullName");
table.Columns.Add("Department");
table.Columns.Add("HireDate");
table.Columns.Add("Salary");

// 샘플 행 추가
table.Rows.Add("E001", "Alice Johnson", "Finance", "2020-03-12", "7500");
table.Rows.Add("E002", "Bob Williams", "Human Resources", "2019-08-05", "6800");
table.Rows.Add("E003", "Catherine Lee", "IT", "2021-01-20", "8200");
table.Rows.Add("E004", "David Smith", "Marketing", "2018-11-30", "7100");
table.Rows.Add("E005", "Emily Davis", "Sales", "2022-06-15", "6900");

// DataTable을 워크시트에 삽입
sheet.InsertDataTable(table, true, 1, 1);

// 기본 제공 형식 적용
sheet.AllocatedRange.Rows[0].BuiltInStyle = BuiltInStyles.Heading1;
for (int i = 1; i < sheet.AllocatedRange.Rows.Count(); i++)
{
    sheet.AllocatedRange.Rows[i].BuiltInStyle = BuiltInStyles.Accent1;
}
sheet.AllocatedRange.AutoFitColumns();
sheet.AllocatedRange.AutoFitRows();

// Excel에 저장
workbook.SaveToFile("EmployeeDataExport.xlsx", FileFormat.Version2016);
작동 방식:
- InsertDataTable()은 특정 셀부터 데이터를 삽입합니다.
- true 인수는 열 머리글을 포함합니다.
- SaveToFile()은 통합 문서를 디스크에 저장합니다. 두 번째 매개변수는 Excel 형식 버전을 지정합니다.
- FileFormat.Version2016은 Excel 형식 버전을 지정합니다.
아래는 내보낸 DataTable이 Excel에서 어떻게 보이는지 보여주는 샘플 출력입니다.
예제 2: DataGridView를 Excel에 저장
Workbook workbook = new Workbook();
Worksheet sheet = workbook.Worksheets[0];

sheet.InsertDataTable(((DataTable)dataGridView1.DataSource), true, 1, 1);
workbook.SaveToFile("GridViewExport.xlsx", FileFormat.Version2016);
팁: 저장하기 전에 DataGridView의 데이터 소스가 DataTable로 올바르게 캐스팅되었는지 확인하세요. 이렇게 하면 내보낸 구조가 UI 그리드 레이아웃과 일치하게 됩니다.
더 많은 데이터 유형, 서식 및 기타 요소를 사용하여 Excel 파일을 만드는 방법을 배우고 싶다면 C#에서 Excel 파일을 만드는 방법 문서를 참조하세요.
C#에서 Excel 파일을 CSV 또는 XLS로 저장
시스템과 플랫폼마다 다른 스프레드시트 형식이 필요합니다. XLSX가 이제 표준이지만 CSV, XLS 및 기타 형식은 엔터프라이즈 환경에서 여전히 일반적입니다. 다른 형식으로 내보내면 다양한 애플리케이션에서 Excel 데이터를 공유, 처리 또는 가져올 수 있습니다.
예제 1: Excel을 CSV로 저장
CSV(쉼표로 구분된 값)는 데이터베이스, 웹 애플리케이션 또는 일반 텍스트 파일을 지원하는 기타 시스템과 데이터를 교환하는 데 이상적인 간단한 텍스트 기반 형식입니다.
Workbook workbook = new Workbook();
workbook.LoadFromFile("EmployeeDataExport.xlsx");
workbook.SaveToFile("Report.csv", ",", FileFormat.CSV);
예제 2: Excel을 XLS(레거시 형식)로 저장
XLS(Excel 97–2003 형식)는 XLSX를 지원하지 않는 이전 시스템이나 애플리케이션에서 여전히 사용되는 레거시 이진 형식입니다. XLS로 저장하면 레거시 엔터프라이즈 워크플로와의 호환성이 보장됩니다.
Workbook workbook = new Workbook();
workbook.LoadFromFile("EmployeeDataExport.xlsx");
workbook.SaveToFile("Report_legacy.xls", ExcelVersion.Version97to2003);
추가 지원되는 스프레드시트 형식
일반적으로 사용되는 CSV, XLS 및 XLSX 형식 외에도 라이브러리는 여러 다른 스프레드시트 및 템플릿 형식도 지원합니다. 아래 표에는 프로그래밍 방식으로 파일을 저장할 때 쉽게 참조할 수 있도록 해당 FileFormat 열거형 값과 함께 이러한 형식이 나열되어 있습니다.
| 형식 | 설명 | 해당 열거형(FileFormat) |
|---|---|---|
| ODS | OpenDocument 스프레드시트 | FileFormat.ODS |
| XLSM | 매크로 사용 Excel 통합 문서 | FileFormat.Xlsm |
| XLSB | 이진 Excel 통합 문서 | FileFormat.Xlsb2007 / FileFormat.Xlsb2010 |
| XLT | Excel 97–2003 서식 파일 | FileFormat.XLT |
| XLTX | Excel Open XML 서식 파일 | FileFormat.XLTX |
| XLTM | 매크로 사용 Excel 서식 파일 | FileFormat.XLTM |
이러한 추가 형식은 레거시 시스템, 개방형 문서 표준 또는 매크로/템플릿 기반 자동화 워크플로를 사용하는 조직에 유용합니다.
C#에서 Excel을 PDF 또는 HTML로 저장
많은 경우 Excel 파일은 게시, 인쇄 또는 공유를 용이하게 하기 위해 문서 또는 웹 형식으로 변환해야 합니다.
PDF로 내보내는 것은 고정 레이아웃 보고서 및 인쇄에 이상적이며, HTML은 웹 브라우저에서 Excel 데이터를 보는 데 적합합니다.
예제 1: Excel을 PDF로 저장
다음 예제는 C#을 사용하여 Excel 통합 문서를 PDF 파일로 저장하는 방법을 보여줍니다. 이는 레이아웃과 서식을 유지하는 보고서를 생성하는 데 유용합니다.
Workbook workbook = new Workbook();
workbook.LoadFromFile("EmployeeDataExport.xlsx");
workbook.SaveToFile("EmployeeDataExport.pdf", FileFormat.PDF);
다음은 Excel에서 내보낸 후 생성된 PDF 파일의 예입니다.
예제 2: Excel을 HTML로 저장
이 예제는 Excel 통합 문서를 HTML 파일로 저장하여 웹 브라우저에서 데이터를 렌더링하거나 웹 애플리케이션과 통합하기 쉽게 만드는 방법을 보여줍니다.
Workbook workbook = new Workbook();
workbook.LoadFromFile("EmployeeDataExport.xlsx");
workbook.SaveToFile("EmployeeDataExport.html", FileFormat.HTML);
아래는 브라우저에서 렌더링된 내보낸 HTML 파일의 미리보기입니다.
추가 지원되는 문서 및 웹 형식
PDF 및 HTML 외에도 라이브러리는 여러 다른 문서 및 웹 친화적인 형식을 지원합니다. 아래 표에는 쉽게 참조할 수 있도록 FileFormat 열거형 값과 함께 이러한 형식이 나와 있습니다.
| 형식 | 설명 | 해당 열거형(FileFormat) |
|---|---|---|
| XML | XML로 내보낸 Excel 데이터 | FileFormat.XML |
| Bitmap / Image | Excel을 비트맵 또는 다른 이미지 형식으로 내보내기 | FileFormat.Bitmap |
| XPS | XML Paper Specification 문서 | FileFormat.XPS |
| PostScript | PostScript 문서 | FileFormat.PostScript |
| OFD | 개방형 고정 레이아웃 문서 형식 | FileFormat.OFD |
| PCL | 프린터 명령 언어 파일 | FileFormat.PCL |
| Markdown | Markdown 파일 형식 | FileFormat.Markdown |
이러한 형식은 인쇄, 웹 게시 또는 자동화를 위해 다양한 플랫폼과 워크플로에서 Excel 콘텐츠를 배포하는 데 추가적인 유연성을 제공합니다.
C#에서 Excel 파일을 MemoryStream에 저장
웹 애플리케이션이나 클라우드 서비스에서는 보안 또는 성능상의 이유로 Excel 파일을 디스크에 직접 저장하는 것이 이상적이지 않을 수 있습니다. MemoryStream을 사용하면 메모리에서 Excel 파일을 생성하여 클라이언트에 직접 전달하여 다운로드할 수 있습니다. .NET용 Spire.XLS는 또한 MemoryStream을 통한 통합 문서 로드 및 저장을 모두 지원하므로 메모리에서 Excel 파일을 완전히 처리하기가 쉽습니다.
Workbook workbook = new Workbook();
Worksheet sheet = workbook.Worksheets[0];
sheet.Range["A1"].Text = "Export to Stream";

using (MemoryStream stream = new MemoryStream())
{
    workbook.SaveToStream(stream, ExcelVersion.Version2016);
    byte[] bytes = stream.ToArray();

    // 예: ASP.NET에서 다운로드를 위해 클라이언트에 바이트 보내기
    // Response.BinaryWrite(bytes);
}
이 접근 방식은 서버에 임시 파일을 만들지 않고 동적으로 Excel 파일을 제공하려는 ASP.NET, Web API 또는 클라우드 서비스에 특히 유용합니다.
C#에서 Excel 파일 열기 및 다시 저장
많은 애플리케이션에서 기존 Excel 통합 문서를 로드하고, 업데이트나 수정을 적용한 다음, 다시 디스크에 저장하거나 다른 형식으로 변환해야 할 수 있습니다. 이는 보고서를 업데이트하거나, 내보낸 데이터를 수정하거나, Excel 파일 워크플로를 자동화할 때 일반적입니다.
예제: Excel 파일 열기 및 업데이트
다음 C# 코드는 이전 통합 문서를 로드하고, 첫 번째 셀을 업데이트하고, 변경 사항을 저장합니다.
Workbook workbook = new Workbook();
workbook.LoadFromFile("EmployeeDataExport.xlsx");

Worksheet sheet = workbook.Worksheets[0];
sheet.Range["A1"].Text = "Updated Content"; // 셀 값 업데이트
sheet.Range["A1"].AutoFitColumns(); // 열 너비 자동 맞춤

// 업데이트된 통합 문서 저장
workbook.Save(); // 원본 파일에 저장
workbook.SaveToFile("UpdatedCopy.xlsx", ExcelVersion.Version2016); // 새 파일로 저장
아래 스크린샷은 파일을 수정하고 저장한 후 업데이트된 Excel 시트를 보여줍니다.
더 고급 시나리오에 대해서는 C#을 사용하여 Excel 파일 편집에 대한 자세한 가이드를 확인할 수도 있습니다.
Excel 파일 저장 시 모범 사례
-
파일 덮어쓰기 방지
실수로 인한 데이터 손실을 방지하기 위해 저장하기 전에 대상 파일이 있는지 확인하세요.
-
권한 및 경로를 올바르게 처리
특히 웹 또는 클라우드 환경에서 애플리케이션이 대상 폴더에 대한 쓰기 액세스 권한을 가지고 있는지 확인하세요.
-
올바른 형식 선택
최신 호환성을 위해서는 XLSX를, 데이터 교환을 위해서는 CSV를, 보고서 인쇄 또는 공유를 위해서는 PDF를 사용하세요.
결론
C#에서 Excel 파일 저장은 구조화된 데이터 세트 작성, 다른 스프레드시트 형식으로 내보내기, PDF/HTML로 변환, 웹 애플리케이션에서 파일 스트림 처리 등 광범위한 작업을 다룹니다.
.NET용 Spire.XLS와 같은 라이브러리가 제공하는 유연성을 통해 개발자는 강력한 Excel 자동화 워크플로를 쉽게 구현할 수 있습니다.
자주 묻는 질문
Q1: C#에서 Excel 파일을 어떻게 저장하나요?
적절한 ExcelVersion 또는 FileFormat과 함께 SaveToFile()을 사용하세요.
workbook.SaveToFile("Report.xlsx", ExcelVersion.Version2016);
Q2: 기존 Excel 파일을 어떻게 열고 수정하나요?
LoadFromFile()을 사용하여 통합 문서를 로드하고, 변경한 다음, 저장하세요.
Workbook workbook = new Workbook();
workbook.LoadFromFile("ExistingFile.xlsx");
workbook.Worksheets[0].Range["A1"].Text = "Updated Content";
workbook.SaveToFile("UpdatedFile.xlsx", ExcelVersion.Version2016);
Q3: CSV 또는 PDF로 어떻게 저장하나요?
SaveToFile()에서 원하는 FileFormat을 지정하세요.
workbook.SaveToFile("Report.csv", ",", FileFormat.CSV);
workbook.SaveToFile("Report.pdf", FileFormat.PDF);
Q4: Excel을 디스크 대신 메모리에 저장할 수 있나요?
예. SaveToStream()을 사용하여 MemoryStream으로 출력하면 웹 또는 클라우드 애플리케이션에서 유용합니다.
using (MemoryStream stream = new MemoryStream())
{
    workbook.SaveToStream(stream, ExcelVersion.Version2016);
    byte[] bytes = stream.ToArray();
}
참고 항목
```
C# Enregistrer un fichier Excel — Enregistrer Excel en XLSX, PDF et plus
L'enregistrement de fichiers Excel en C# est une tâche courante dans de nombreuses applications .NET, en particulier lors de la génération de rapports, de l'exportation de données analytiques ou de l'automatisation des journaux système. Que vous travailliez avec des résumés financiers ou des données d'opérations quotidiennes, être capable de créer et d'enregistrer des fichiers Excel par programmation peut améliorer considérablement l'efficacité et la précision.
En C#, les développeurs peuvent gérer les fichiers Excel de plusieurs manières : créer de nouveaux classeurs, écrire des données et les enregistrer dans divers formats tels que XLSX, CSV ou PDF. Avec l'aide de bibliothèques Excel dédiées, ces opérations peuvent être automatisées efficacement sans dépendre de Microsoft Excel ou d'une intervention manuelle.
Dans cet article, nous explorerons comment :
- Préparer votre environnement de développement
- Enregistrer des données DataTable ou DataGridView dans Excel
- Enregistrer des fichiers Excel dans différents formats de feuille de calcul (CSV, XLS, etc.)
- Exporter des fichiers Excel vers des formats de document (PDF, HTML, etc.)
- Enregistrer des classeurs Excel dans un MemoryStream pour les applications web
- Ouvrir et ré-enregistrer des fichiers Excel existants
Préparer l'environnement de développement
Avant de plonger dans le code, configurez votre environnement de développement avec une bibliothèque Excel qui prend en charge la création, la lecture et l'enregistrement de fichiers en .NET. Dans ce tutoriel, nous utiliserons Free Spire.XLS for .NET.
Étape 1 : Installer Spire.XLS via NuGet
Install-Package FreeSpire.XLS
Étape 2 : Importer l'espace de noms requis
using Spire.Xls;
Étape 3 : Créer, écrire et enregistrer un fichier Excel simple
// Créer un nouveau classeur et obtenir la première feuille de calcul
Workbook workbook = new Workbook();
Worksheet sheet = workbook.Worksheets[0];

// Écrire "Hello World!" dans la cellule A1
sheet.Range["A1"].Text = "Hello World!";

// Enregistrer le classeur dans un fichier
workbook.SaveToFile("HelloWorld.xlsx", ExcelVersion.Version2016);
Cet exemple simple montre le flux de travail de base : créer un classeur, écrire des données dans une cellule et enregistrer le fichier.
Après cela, vous pouvez explorer les classes et méthodes clés telles que :
- Workbook – représente l'ensemble du fichier Excel.
- Worksheet – représente une seule feuille dans le classeur.
- Range – permet d'accéder à des cellules spécifiques pour la saisie, le formatage ou le style.
- Workbook.SaveToFile() – enregistre le classeur sur le disque dans le format Excel spécifié.
Enregistrer des données dans un fichier Excel en C#
L'enregistrement de données structurées comme DataTable ou DataGridView dans un fichier Excel est l'une des tâches les plus pratiques du développement C#. Que votre application produise des résultats de base de données, du contenu de grille d'interface utilisateur ou des rapports automatisés, l'exportation de ces ensembles de données vers Excel offre une meilleure lisibilité et compatibilité.
Exemple 1 : Enregistrer DataTable dans Excel
using Spire.Xls;
using System.Data;

Workbook workbook = new Workbook();
Worksheet sheet = workbook.Worksheets[0];
sheet.Name = "EmployeeData";

DataTable table = new DataTable();
table.Columns.Add("EmployeeID");
table.Columns.Add("FullName");
table.Columns.Add("Department");
table.Columns.Add("HireDate");
table.Columns.Add("Salary");

// Ajouter des lignes d'exemple
table.Rows.Add("E001", "Alice Johnson", "Finance", "2020-03-12", "7500");
table.Rows.Add("E002", "Bob Williams", "Human Resources", "2019-08-05", "6800");
table.Rows.Add("E003", "Catherine Lee", "IT", "2021-01-20", "8200");
table.Rows.Add("E004", "David Smith", "Marketing", "2018-11-30", "7100");
table.Rows.Add("E005", "Emily Davis", "Sales", "2022-06-15", "6900");

// Insérer le DataTable dans la feuille de calcul
sheet.InsertDataTable(table, true, 1, 1);

// Appliquer les formats intégrés
sheet.AllocatedRange.Rows[0].BuiltInStyle = BuiltInStyles.Heading1;
for (int i = 1; i < sheet.AllocatedRange.Rows.Count(); i++)
{
    sheet.AllocatedRange.Rows[i].BuiltInStyle = BuiltInStyles.Accent1;
}
sheet.AllocatedRange.AutoFitColumns();
sheet.AllocatedRange.AutoFitRows();

// Enregistrer dans Excel
workbook.SaveToFile("EmployeeDataExport.xlsx", FileFormat.Version2016);
Comment ça marche :
- InsertDataTable() insère des données à partir d'une cellule spécifique.
- L'argument true inclut les en-têtes de colonne.
- SaveToFile() enregistre le classeur sur le disque ; le deuxième paramètre spécifie la version du format Excel.
- FileFormat.Version2016 spécifie la version du format Excel.
Voici un exemple de sortie montrant à quoi ressemble le DataTable exporté dans Excel :
Exemple 2 : Enregistrer DataGridView dans Excel
Workbook workbook = new Workbook();
Worksheet sheet = workbook.Worksheets[0];

sheet.InsertDataTable(((DataTable)dataGridView1.DataSource), true, 1, 1);
workbook.SaveToFile("GridViewExport.xlsx", FileFormat.Version2016);
Conseil : Avant d'enregistrer, assurez-vous que la source de données de votre DataGridView est correctement convertie en DataTable. Cela garantit que la structure exportée correspond à la disposition de la grille de l'interface utilisateur.
Si vous souhaitez apprendre à créer des fichiers Excel avec plus de types de données, de formatage et d'autres éléments, vous pouvez explorer l'article Comment créer des fichiers Excel en C#.
Enregistrer un fichier Excel en CSV ou XLS en C#
Différents systèmes et plates-formes nécessitent différents formats de feuille de calcul. Bien que XLSX soit maintenant la norme, CSV, XLS et d'autres formats restent courants dans les environnements d'entreprise. L'exportation vers différents formats permet de partager, de traiter ou d'importer des données Excel par diverses applications.
Exemple 1 : Enregistrer Excel en CSV
CSV (Comma-Separated Values) est un format texte simple, idéal pour échanger des données avec des bases de données, des applications Web ou d'autres systèmes prenant en charge les fichiers texte brut.
Workbook workbook = new Workbook();
workbook.LoadFromFile("EmployeeDataExport.xlsx");
workbook.SaveToFile("Report.csv", ",", FileFormat.CSV);
Exemple 2 : Enregistrer Excel en XLS (format hérité)
XLS (format Excel 97–2003) est un format binaire hérité encore utilisé dans les anciens systèmes ou applications qui ne prennent pas en charge XLSX. L'enregistrement au format XLS garantit la compatibilité avec les flux de travail d'entreprise hérités.
Workbook workbook = new Workbook();
workbook.LoadFromFile("EmployeeDataExport.xlsx");
workbook.SaveToFile("Report_legacy.xls", ExcelVersion.Version97to2003);
Formats de feuille de calcul supplémentaires pris en charge
En plus des formats CSV, XLS et XLSX couramment utilisés, la bibliothèque prend également en charge plusieurs autres formats de feuille de calcul et de modèle. Le tableau ci-dessous répertorie ces formats ainsi que leurs valeurs d'énumération FileFormat correspondantes pour une référence facile lors de l'enregistrement de fichiers par programmation.
| Format | Description | Énumération correspondante (FileFormat) |
|---|---|---|
| ODS | Feuille de calcul OpenDocument | FileFormat.ODS |
| XLSM | Classeur Excel avec macros | FileFormat.Xlsm |
| XLSB | Classeur Excel binaire | FileFormat.Xlsb2007 / FileFormat.Xlsb2010 |
| XLT | Modèle Excel 97–2003 | FileFormat.XLT |
| XLTX | Modèle Excel Open XML | FileFormat.XLTX |
| XLTM | Modèle Excel avec macros | FileFormat.XLTM |
Ces formats supplémentaires sont utiles pour les organisations qui travaillent avec des systèmes hérités, des normes de documents ouverts ou des flux de travail d'automatisation basés sur des macros/modèles.
Enregistrer Excel en PDF ou HTML en C#
Dans de nombreux cas, les fichiers Excel doivent être convertis en formats de document ou Web pour faciliter la publication, l'impression ou le partage.
L'exportation au format PDF est idéale pour les rapports à mise en page fixe et l'impression, tandis que le HTML convient à l'affichage des données Excel dans un navigateur Web.
Exemple 1 : Enregistrer Excel en PDF
L'exemple suivant montre comment enregistrer un classeur Excel en tant que fichier PDF en utilisant C#. Ceci est utile pour générer des rapports qui préservent la mise en page et le formatage.
Workbook workbook = new Workbook();
workbook.LoadFromFile("EmployeeDataExport.xlsx");
workbook.SaveToFile("EmployeeDataExport.pdf", FileFormat.PDF);
Voici un exemple du fichier PDF généré après l'exportation depuis Excel :
Exemple 2 : Enregistrer Excel en HTML
Cet exemple montre comment enregistrer un classeur Excel en tant que fichier HTML, ce qui facilite le rendu des données dans un navigateur Web ou leur intégration dans des applications Web.
Workbook workbook = new Workbook();
workbook.LoadFromFile("EmployeeDataExport.xlsx");
workbook.SaveToFile("EmployeeDataExport.html", FileFormat.HTML);
Voici un aperçu du fichier HTML exporté rendu dans un navigateur :
Formats de document et Web supplémentaires pris en charge
En plus de PDF et HTML, la bibliothèque prend en charge plusieurs autres formats de documents et compatibles avec le Web. Le tableau ci-dessous présente ces formats ainsi que leurs valeurs d'énumération FileFormat pour une référence facile.
| Format | Description | Énumération correspondante (FileFormat) |
|---|---|---|
| XML | Données Excel exportées en XML | FileFormat.XML |
| Bitmap / Image | Exporter Excel en Bitmap ou autres formats d'image | FileFormat.Bitmap |
| XPS | Document XML Paper Specification | FileFormat.XPS |
| PostScript | Document PostScript | FileFormat.PostScript |
| OFD | Format de document à mise en page fixe ouvert | FileFormat.OFD |
| PCL | Fichier Printer Command Language | FileFormat.PCL |
| Markdown | Format de fichier Markdown | FileFormat.Markdown |
Ces formats offrent une flexibilité supplémentaire pour la distribution de contenu Excel sur différentes plates-formes et flux de travail, que ce soit pour l'impression, la publication Web ou l'automatisation.
Enregistrer un fichier Excel dans MemoryStream en C#
Dans les applications Web ou les services cloud, l'enregistrement de fichiers Excel directement sur le disque peut ne pas être idéal pour des raisons de sécurité ou de performances. L'utilisation de MemoryStream vous permet de générer des fichiers Excel en mémoire et de les livrer directement aux clients pour téléchargement. Spire.XLS for .NET prend également en charge le chargement et l'enregistrement de classeurs via MemoryStream, ce qui facilite la gestion des fichiers Excel entièrement en mémoire.
Workbook workbook = new Workbook();
Worksheet sheet = workbook.Worksheets[0];
sheet.Range["A1"].Text = "Export to Stream";

using (MemoryStream stream = new MemoryStream())
{
    workbook.SaveToStream(stream, ExcelVersion.Version2016);
    byte[] bytes = stream.ToArray();

    // Exemple : envoyer des octets au client pour téléchargement en ASP.NET
    // Response.BinaryWrite(bytes);
}
Cette approche est particulièrement utile pour les services ASP.NET, Web API ou cloud, où vous souhaitez servir des fichiers Excel de manière dynamique sans créer de fichiers temporaires sur le serveur.
Ouvrir et ré-enregistrer des fichiers Excel en C#
Dans de nombreuses applications, vous devrez peut-être charger un classeur Excel existant, appliquer des mises à jour ou des modifications, puis le ré-enregistrer sur le disque ou le convertir dans un format différent. Ceci est courant lors de la mise à jour de rapports, de la modification de données exportées ou de l'automatisation des flux de travail de fichiers Excel.
Exemple : Ouvrir et mettre à jour un fichier Excel
Le code C# suivant charge le classeur précédent, met à jour la première cellule et enregistre les modifications :
Workbook workbook = new Workbook();
workbook.LoadFromFile("EmployeeDataExport.xlsx");

Worksheet sheet = workbook.Worksheets[0];
sheet.Range["A1"].Text = "Updated Content"; // Mettre à jour la valeur de la cellule
sheet.Range["A1"].AutoFitColumns(); // Ajuster automatiquement la largeur de la colonne

// Enregistrer le classeur mis à jour
workbook.Save(); // Enregistre dans le fichier d'origine
workbook.SaveToFile("UpdatedCopy.xlsx", ExcelVersion.Version2016); // Enregistrer comme nouveau fichier
La capture d'écran ci-dessous montre la feuille Excel mise à jour après modification et enregistrement du fichier :
Vous pouvez également consulter le guide détaillé sur l'édition de fichiers Excel en C# pour des scénarios plus avancés.
Meilleures pratiques lors de l'enregistrement de fichiers Excel
-
Éviter l'écrasement de fichiers
Vérifiez si le fichier cible existe avant d'enregistrer pour éviter toute perte de données accidentelle.
-
Gérer correctement les autorisations et les chemins
Assurez-vous que votre application dispose des autorisations d'écriture sur le dossier cible, en particulier dans les environnements Web ou cloud.
-
Choisir le bon format
Utilisez XLSX pour une compatibilité moderne, CSV pour l'échange de données et PDF pour l'impression ou le partage de rapports.
Conclusion
L'enregistrement de fichiers Excel en C# couvre un large éventail d'opérations, de l'écriture d'ensembles de données structurés à l'exportation vers différents formats de feuille de calcul, en passant par la conversion en PDF/HTML et la gestion des flux de fichiers dans les applications Web.
Avec la flexibilité offerte par des bibliothèques telles que Spire.XLS for .NET, les développeurs peuvent mettre en œuvre facilement de puissants flux de travail d'automatisation Excel.
FAQ
Q1 : Comment enregistrer un fichier Excel en C# ?
Utilisez SaveToFile() avec la ExcelVersion ou le FileFormat approprié :
workbook.SaveToFile("Report.xlsx", ExcelVersion.Version2016);
Q2 : Comment ouvrir et modifier un fichier Excel existant ?
Chargez le classeur à l'aide de LoadFromFile(), apportez des modifications, puis enregistrez :
Workbook workbook = new Workbook();
workbook.LoadFromFile("ExistingFile.xlsx");
workbook.Worksheets[0].Range["A1"].Text = "Updated Content";
workbook.SaveToFile("UpdatedFile.xlsx", ExcelVersion.Version2016);
Q3 : Comment enregistrer en CSV ou PDF ?
Spécifiez le FileFormat souhaité dans SaveToFile() :
workbook.SaveToFile("Report.csv", ",", FileFormat.CSV);
workbook.SaveToFile("Report.pdf", FileFormat.PDF);
Q4 : Puis-je enregistrer Excel en mémoire au lieu du disque ?
Oui. Utilisez SaveToStream() pour écrire dans un MemoryStream, ce qui est utile dans les applications Web ou cloud :
using (MemoryStream stream = new MemoryStream())
{
    workbook.SaveToStream(stream, ExcelVersion.Version2016);
    byte[] bytes = stream.ToArray();
}
Voir aussi
C# Guardar archivo de Excel — Guardar Excel como XLSX, PDF y más
Tabla de Contenidos
Guardar archivos de Excel en C# es una tarea común en muchas aplicaciones .NET, especially when generating reports, exporting analytical data, or automating system logs. Ya sea que esté trabajando con resúmenes financieros o datos de operaciones diarias, poder crear y guardar archivos de Excel mediante programación puede mejorar significativamente la eficiencia y la precisión.
En C#, los desarrolladores pueden manejar archivos de Excel de múltiples maneras: creando nuevos libros de trabajo, escribiendo datos y guardándolos en varios formatos como XLSX, CSV o PDF. Con la ayuda de bibliotecas de Excel dedicadas, estas operaciones se pueden automatizar de manera eficiente sin depender de Microsoft Excel o de una intervención manual.
En este artículo, exploraremos cómo:
- Preparar su entorno de desarrollo
- Guardar datos de DataTable o DataGridView en Excel
- Guardar archivos de Excel en diferentes formatos de hoja de cálculo (CSV, XLS, etc.)
- Exportar archivos de Excel a formatos de documento (PDF, HTML, etc.)
- Guardar libros de Excel en un MemoryStream para aplicaciones web
- Abrir y volver a guardar archivos de Excel existentes
Preparar el Entorno de Desarrollo
Antes de sumergirse en el código, configure su entorno de desarrollo con una biblioteca de Excel que admita la creación, lectura y guardado de archivos en .NET. En este tutorial, usaremos Free Spire.XLS for .NET.
Paso 1: Instalar Spire.XLS a través de NuGet
Install-Package FreeSpire.XLS
Paso 2: Importar el Espacio de Nombres Requerido
using Spire.Xls;
Paso 3: Crear, Escribir y Guardar un Archivo de Excel Simple
// Crear un nuevo libro de trabajo y obtener la primera hoja de cálculo
Workbook workbook = new Workbook();
Worksheet sheet = workbook.Worksheets[0];

// Escribir "¡Hola Mundo!" en la celda A1
sheet.Range["A1"].Text = "¡Hola Mundo!";

// Guardar el libro de trabajo en un archivo
workbook.SaveToFile("HelloWorld.xlsx", ExcelVersion.Version2016);
Este sencillo ejemplo muestra el flujo de trabajo básico: crear un libro de trabajo, escribir datos en una celda y guardar el archivo.
Después de esto, puede explorar clases y métodos clave como:
- Workbook – representa todo el archivo de Excel.
- Worksheet – representa una sola hoja dentro del libro de trabajo.
- Range – permite el acceso a celdas específicas para entrada, formato o estilo.
- Workbook.SaveToFile() – guarda el libro de trabajo en el disco en el formato de Excel especificado.
Guardar Datos en un Archivo de Excel en C#
Guardar datos estructurados como DataTable o DataGridView en un archivo de Excel es una de las tareas más prácticas en el desarrollo de C#. Ya sea que su aplicación produzca resultados de base de datos, contenido de cuadrícula de interfaz de usuario o informes automatizados, exportar estos conjuntos de datos a Excel proporciona una mejor legibilidad y compatibilidad.
Ejemplo 1: Guardar DataTable en Excel
using Spire.Xls;
using System.Data;

Workbook workbook = new Workbook();
Worksheet sheet = workbook.Worksheets[0];
sheet.Name = "EmployeeData";

DataTable table = new DataTable();
table.Columns.Add("EmployeeID");
table.Columns.Add("FullName");
table.Columns.Add("Department");
table.Columns.Add("HireDate");
table.Columns.Add("Salary");

// Agregar filas de muestra
table.Rows.Add("E001", "Alice Johnson", "Finance", "2020-03-12", "7500");
table.Rows.Add("E002", "Bob Williams", "Human Resources", "2019-08-05", "6800");
table.Rows.Add("E003", "Catherine Lee", "IT", "2021-01-20", "8200");
table.Rows.Add("E004", "David Smith", "Marketing", "2018-11-30", "7100");
table.Rows.Add("E005", "Emily Davis", "Sales", "2022-06-15", "6900");

// Insertar el DataTable en la hoja de cálculo
sheet.InsertDataTable(table, true, 1, 1);

// Aplicar formatos incorporados
sheet.AllocatedRange.Rows[0].BuiltInStyle = BuiltInStyles.Heading1;
for (int i = 1; i < sheet.AllocatedRange.Rows.Count(); i++)
{
    sheet.AllocatedRange.Rows[i].BuiltInStyle = BuiltInStyles.Accent1;
}
sheet.AllocatedRange.AutoFitColumns();
sheet.AllocatedRange.AutoFitRows();

// Guardar en Excel
workbook.SaveToFile("EmployeeDataExport.xlsx", FileFormat.Version2016);
Cómo funciona:
- InsertDataTable() inserta datos a partir de una celda específica.
- El argumento true incluye los encabezados de las columnas.
- SaveToFile() guarda el libro de trabajo en el disco; el segundo parámetro especifica la versión del formato de Excel.
- FileFormat.Version2016 especifica la versión del formato de Excel.
A continuación se muestra una salida de ejemplo que muestra cómo se ve el DataTable exportado en Excel:
Ejemplo 2: Guardar DataGridView en Excel
Workbook workbook = new Workbook();
Worksheet sheet = workbook.Worksheets[0];

sheet.InsertDataTable(((DataTable)dataGridView1.DataSource), true, 1, 1);
workbook.SaveToFile("GridViewExport.xlsx", FileFormat.Version2016);
Consejo: Antes de guardar, asegúrese de que el origen de datos de su DataGridView se convierta correctamente a un DataTable. Esto garantiza que la estructura exportada coincida con el diseño de la cuadrícula de la interfaz de usuario.
Si desea aprender a crear archivos de Excel con más tipos de datos, formato y otros elementos, puede explorar el artículo Cómo Crear Archivos de Excel en C#.
Guardar Archivo de Excel como CSV o XLS en C#
Diferentes sistemas y plataformas requieren diferentes formatos de hoja de cálculo. Si bien XLSX es ahora el estándar, CSV, XLS y otros formatos siguen siendo comunes en entornos empresariales. Exportar a diferentes formatos permite que los datos de Excel se compartan, procesen o importen por diversas aplicaciones.
Ejemplo 1: Guardar Excel como CSV
CSV (Valores Separados por Comas) es un formato simple basado en texto ideal para intercambiar datos con bases de datos, aplicaciones web u otros sistemas que admiten archivos de texto sin formato.
Workbook workbook = new Workbook();
workbook.LoadFromFile("EmployeeDataExport.xlsx");
workbook.SaveToFile("Report.csv", ",", FileFormat.CSV);
Ejemplo 2: Guardar Excel como XLS (Formato Heredado)
XLS (formato Excel 97–2003) es un formato binario heredado que todavía se usa en sistemas o aplicaciones más antiguos que no admiten XLSX. Guardar en XLS garantiza la compatibilidad con los flujos de trabajo empresariales heredados.
Workbook workbook = new Workbook();
workbook.LoadFromFile("EmployeeDataExport.xlsx");
workbook.SaveToFile("Report_legacy.xls", ExcelVersion.Version97to2003);
Formatos de Hoja de Cálculo Adicionales Compatibles
Además de los formatos CSV, XLS y XLSX de uso común, la biblioteca también admite varios otros formatos de hoja de cálculo y plantilla. La siguiente tabla enumera estos formatos junto con sus valores de enumeración FileFormat correspondientes para una fácil referencia al guardar archivos mediante programación.
| Formato | Descripción | Enumeración Correspondiente (FileFormat) |
|---|---|---|
| ODS | Hoja de Cálculo OpenDocument | FileFormat.ODS |
| XLSM | Libro de Excel habilitado para macros | FileFormat.Xlsm |
| XLSB | Libro de Excel binario | FileFormat.Xlsb2007 / FileFormat.Xlsb2010 |
| XLT | Plantilla de Excel 97–2003 | FileFormat.XLT |
| XLTX | Plantilla XML abierta de Excel | FileFormat.XLTX |
| XLTM | Plantilla de Excel habilitada para macros | FileFormat.XLTM |
Estos formatos adicionales son útiles para organizaciones que trabajan con sistemas heredados, estándares de documentos abiertos o flujos de trabajo de automatización basados en macros/plantillas.
Guardar Excel como PDF o HTML en C#
En muchos casos, los archivos de Excel deben convertirse a formatos de documento o web para facilitar su publicación, impresión o uso compartido.
Exportar a PDF es ideal para informes de diseño fijo e impresión, mientras que HTML es adecuado para ver datos de Excel en un navegador web.
Ejemplo 1: Guardar Excel como PDF
El siguiente ejemplo muestra cómo guardar un libro de Excel como un archivo PDF usando C#. Esto es útil para generar informes que conservan el diseño y el formato.
Workbook workbook = new Workbook();
workbook.LoadFromFile("EmployeeDataExport.xlsx");
workbook.SaveToFile("EmployeeDataExport.pdf", FileFormat.PDF);
Aquí hay un ejemplo del archivo PDF generado después de exportarlo desde Excel:
Ejemplo 2: Guardar Excel como HTML
Este ejemplo demuestra cómo guardar un libro de Excel como un archivo HTML, lo que facilita la representación de los datos en un navegador web o la integración con aplicaciones web.
Workbook workbook = new Workbook();
workbook.LoadFromFile("EmployeeDataExport.xlsx");
workbook.SaveToFile("EmployeeDataExport.html", FileFormat.HTML);
A continuación se muestra una vista previa del archivo HTML exportado renderizado en un navegador:
Formatos de Documento y Web Adicionales Compatibles
Además de PDF y HTML, la biblioteca admite varios otros formatos amigables para documentos y web. La siguiente tabla muestra estos formatos junto con sus valores de enumeración FileFormat para una fácil referencia.
| Formato | Descripción | Enumeración Correspondiente (FileFormat) |
|---|---|---|
| XML | Datos de Excel exportados como XML | FileFormat.XML |
| Bitmap / Image | Exportar Excel como mapa de bits u otros formatos de imagen | FileFormat.Bitmap |
| XPS | Documento de especificación de papel XML | FileFormat.XPS |
| PostScript | Documento PostScript | FileFormat.PostScript |
| OFD | Formato de documento de diseño fijo abierto | FileFormat.OFD |
| PCL | Archivo de lenguaje de comandos de impresora | FileFormat.PCL |
| Markdown | Formato de archivo Markdown | FileFormat.Markdown |
Estos formatos brindan flexibilidad adicional para distribuir contenido de Excel en diferentes plataformas y flujos de trabajo, ya sea para impresión, publicación web o automatización.
Guardar un Archivo de Excel en MemoryStream en C#
En aplicaciones web o servicios en la nube, guardar archivos de Excel directamente en el disco puede no ser ideal por razones de seguridad o rendimiento. El uso de MemoryStream le permite generar archivos de Excel en la memoria y entregarlos directamente a los clientes para su descarga. Spire.XLS for .NET también admite tanto la carga como el guardado de libros de trabajo a través de MemoryStream, lo que facilita el manejo de archivos de Excel completamente en la memoria.
Workbook workbook = new Workbook();
Worksheet sheet = workbook.Worksheets[0];
sheet.Range["A1"].Text = "Export to Stream";

using (MemoryStream stream = new MemoryStream())
{
    workbook.SaveToStream(stream, ExcelVersion.Version2016);
    byte[] bytes = stream.ToArray();

    // Ejemplo: enviar bytes al cliente para su descarga en ASP.NET
    // Response.BinaryWrite(bytes);
}
Este enfoque es particularly useful for ASP.NET, Web API, or cloud services, donde desea servir archivos de Excel dinámicamente sin crear archivos temporales en el servidor.
Abrir y Volver a Guardar Archivos de Excel en C#
En muchas aplicaciones, es posible que deba cargar un libro de Excel existente, aplicar actualizaciones o modificaciones y luego guardarlo de nuevo en el disco o convertirlo a un formato diferente. Esto es común al actualizar informes, modificar datos exportados o automatizar flujos de trabajo de archivos de Excel.
Ejemplo: Abrir y Actualizar un Archivo de Excel
El siguiente código C# carga el libro de trabajo anterior, actualiza la primera celda y guarda los cambios:
Workbook workbook = new Workbook();
workbook.LoadFromFile("EmployeeDataExport.xlsx");

Worksheet sheet = workbook.Worksheets[0];
sheet.Range["A1"].Text = "Updated Content"; // Actualizar el valor de la celda
sheet.Range["A1"].AutoFitColumns(); // Autoajustar el ancho de la columna

// Guardar el libro de trabajo actualizado
workbook.Save(); // Guarda en el archivo original
workbook.SaveToFile("UpdatedCopy.xlsx", ExcelVersion.Version2016); // Guardar como archivo nuevo
La siguiente captura de pantalla muestra la hoja de Excel actualizada después de modificar y guardar el archivo:
También puede consultar la guía detallada sobre cómo editar archivos de Excel usando C# para escenarios más avanzados.
Mejores Prácticas al Guardar Archivos de Excel
-
Evitar Sobrescribir Archivos
Verifique si el archivo de destino existe antes de guardar para evitar la pérdida accidental de datos.
-
Manejar Permisos y Rutas Correctamente
Asegúrese de que su aplicación tenga acceso de escritura a la carpeta de destino, especialmente en entornos web o en la nube.
-
Elegir el Formato Correcto
Use XLSX para compatibilidad moderna, CSV para intercambio de datos y PDF para imprimir o compartir informes.
Conclusión
Guardar archivos de Excel en C# cubre una amplia gama de operaciones, desde escribir conjuntos de datos estructurados, exportar a diferentes formatos de hoja de cálculo, convertir a PDF/HTML, hasta manejar flujos de archivos en aplicaciones web.
Con la flexibilidad que ofrecen bibliotecas como Spire.XLS for .NET, los desarrolladores pueden implementar potentes flujos de trabajo de automatización de Excel con facilidad.
Preguntas Frecuentes
P1: ¿Cómo guardo un archivo de Excel en C#?
Use SaveToFile() con la ExcelVersion o FileFormat apropiada:
workbook.SaveToFile("Report.xlsx", ExcelVersion.Version2016);
P2: ¿Cómo abro y modifico un archivo de Excel existente?
Cargue el libro de trabajo usando LoadFromFile(), realice cambios y luego guarde:
Workbook workbook = new Workbook();
workbook.LoadFromFile("ExistingFile.xlsx");
workbook.Worksheets[0].Range["A1"].Text = "Updated Content";
workbook.SaveToFile("UpdatedFile.xlsx", ExcelVersion.Version2016);
P3: ¿Cómo guardo como CSV o PDF?
Especifique el FileFormat deseado en SaveToFile():
workbook.SaveToFile("Report.csv", ",", FileFormat.CSV);
workbook.SaveToFile("Report.pdf", FileFormat.PDF);
P4: ¿Puedo guardar Excel en la memoria en lugar del disco?
Sí. Use SaveToStream() para enviar la salida a un MemoryStream, útil en aplicaciones web o en la nube:
using (MemoryStream stream = new MemoryStream())
{
    workbook.SaveToStream(stream, ExcelVersion.Version2016);
    byte[] bytes = stream.ToArray();
}
Ver También
C# Excel-Datei speichern – Excel in XLSX, PDF und mehr speichern
Das Speichern von Excel-Dateien in C# ist eine häufige Aufgabe in vielen .NET-Anwendungen, insbesondere beim Erstellen von Berichten, Exportieren von Analysedaten oder Automatisieren von Systemprotokollen. Ob Sie mit Finanzzusammenfassungen oder täglichen Betriebsdaten arbeiten, die Fähigkeit, Excel-Dateien programmgesteuert zu erstellen und zu speichern, kann die Effizienz und Genauigkeit erheblich verbessern.
In C# können Entwickler Excel-Dateien auf vielfältige Weise handhaben – neue Arbeitsmappen erstellen, Daten schreiben und sie in verschiedenen Formaten wie XLSX, CSV oder PDF speichern. Mit Hilfe dedizierter Excel-Bibliotheken können diese Vorgänge effizient automatisiert werden, ohne auf Microsoft Excel oder manuelle Eingriffe angewiesen zu sein.
In diesem Artikel werden wir untersuchen, wie Sie:
- Ihre Entwicklungsumgebung vorbereiten
- DataTable- oder DataGridView-Daten in Excel speichern
- Excel-Dateien in verschiedenen Tabellenkalkulationsformaten speichern (CSV, XLS usw.)
- Excel-Dateien in Dokumentformate exportieren (PDF, HTML usw.)
- Excel-Arbeitsmappen in einem MemoryStream speichern für Web-Apps
- Bestehende Excel-Dateien öffnen und erneut speichern
Die Entwicklungsumgebung vorbereiten
Bevor Sie in den Code eintauchen, richten Sie Ihre Entwicklungsumgebung mit einer Excel-Bibliothek ein, die das Erstellen, Lesen und Speichern von Dateien in .NET unterstützt. In diesem Tutorial verwenden wir Kostenloses Spire.XLS für .NET.
Schritt 1: Spire.XLS über NuGet installieren
Install-Package FreeSpire.XLS
Schritt 2: Den erforderlichen Namespace importieren
using Spire.Xls;
Schritt 3: Eine einfache Excel-Datei erstellen, beschreiben und speichern
// Eine neue Arbeitsmappe erstellen und das erste Arbeitsblatt abrufen
Workbook workbook = new Workbook();
Worksheet sheet = workbook.Worksheets[0];

// "Hallo Welt!" in Zelle A1 schreiben
sheet.Range["A1"].Text = "Hallo Welt!";

// Die Arbeitsmappe in einer Datei speichern
workbook.SaveToFile("HelloWorld.xlsx", ExcelVersion.Version2016);
Dieses einfache Beispiel zeigt den grundlegenden Arbeitsablauf: Erstellen einer Arbeitsmappe, Schreiben von Daten in eine Zelle und Speichern der Datei.
Danach können Sie wichtige Klassen und Methoden wie zum Beispiel erkunden:
- Workbook – repräsentiert die gesamte Excel-Datei.
- Worksheet – repräsentiert ein einzelnes Blatt innerhalb der Arbeitsmappe.
- Range – ermöglicht den Zugriff auf bestimmte Zellen zur Eingabe, Formatierung oder Gestaltung.
- Workbook.SaveToFile() – speichert die Arbeitsmappe im angegebenen Excel-Format auf der Festplatte.
Daten in einer Excel-Datei in C# speichern
Das Speichern strukturierter Daten wie DataTable oder DataGridView in eine Excel-Datei ist eine der praktischsten Aufgaben in der C#-Entwicklung. Ob Ihre Anwendung Datenbankergebnisse, Inhalte von UI-Gittern oder automatisierte Berichte erzeugt, der Export dieser Datensätze nach Excel sorgt für bessere Lesbarkeit und Kompatibilität.
Beispiel 1: DataTable in Excel speichern
using Spire.Xls;
using System.Data;

Workbook workbook = new Workbook();
Worksheet sheet = workbook.Worksheets[0];
sheet.Name = "EmployeeData";

DataTable table = new DataTable();
table.Columns.Add("EmployeeID");
table.Columns.Add("FullName");
table.Columns.Add("Department");
table.Columns.Add("HireDate");
table.Columns.Add("Salary");

// Beispielzeilen hinzufügen
table.Rows.Add("E001", "Alice Johnson", "Finance", "2020-03-12", "7500");
table.Rows.Add("E002", "Bob Williams", "Human Resources", "2019-08-05", "6800");
table.Rows.Add("E003", "Catherine Lee", "IT", "2021-01-20", "8200");
table.Rows.Add("E004", "David Smith", "Marketing", "2018-11-30", "7100");
table.Rows.Add("E005", "Emily Davis", "Sales", "2022-06-15", "6900");

// Die DataTable in das Arbeitsblatt einfügen
sheet.InsertDataTable(table, true, 1, 1);

// Integrierte Formate anwenden
sheet.AllocatedRange.Rows[0].BuiltInStyle = BuiltInStyles.Heading1;
for (int i = 1; i < sheet.AllocatedRange.Rows.Count(); i++)
{
    sheet.AllocatedRange.Rows[i].BuiltInStyle = BuiltInStyles.Accent1;
}
sheet.AllocatedRange.AutoFitColumns();
sheet.AllocatedRange.AutoFitRows();

// In Excel speichern
workbook.SaveToFile("EmployeeDataExport.xlsx", FileFormat.Version2016);
Wie es funktioniert:
- InsertDataTable() fügt Daten ab einer bestimmten Zelle ein.
- Das true-Argument schließt Spaltenüberschriften ein.
- SaveToFile() speichert die Arbeitsmappe auf der Festplatte; der zweite Parameter gibt die Version des Excel-Formats an.
- FileFormat.Version2016 gibt die Version des Excel-Formats an.
Unten sehen Sie eine Beispielausgabe, die zeigt, wie die exportierte DataTable in Excel aussieht:
Beispiel 2: DataGridView in Excel speichern
Workbook workbook = new Workbook();
Worksheet sheet = workbook.Worksheets[0];

sheet.InsertDataTable(((DataTable)dataGridView1.DataSource), true, 1, 1);
workbook.SaveToFile("GridViewExport.xlsx", FileFormat.Version2016);
Tipp: Stellen Sie vor dem Speichern sicher, dass die Datenquelle Ihres DataGridView ordnungsgemäß in eine DataTable umgewandelt wird. Dadurch wird sichergestellt, dass die exportierte Struktur dem Layout des UI-Gitters entspricht.
Wenn Sie lernen möchten, wie Sie Excel-Dateien mit mehr Datentypen, Formatierungen und anderen Elementen erstellen, können Sie den Artikel Wie man Excel-Dateien in C# erstellt erkunden.
Excel-Datei als CSV oder XLS in C# speichern
Unterschiedliche Systeme und Plattformen erfordern unterschiedliche Tabellenkalkulationsformate. Während XLSX mittlerweile der Standard ist, bleiben CSV, XLS und andere Formate in Unternehmensumgebungen weiterhin üblich. Der Export in verschiedene Formate ermöglicht es, Excel-Daten von verschiedenen Anwendungen gemeinsam zu nutzen, zu verarbeiten oder zu importieren.
Beispiel 1: Excel als CSV speichern
CSV (Comma-Separated Values) ist ein einfaches textbasiertes Format, das sich ideal für den Datenaustausch mit Datenbanken, Webanwendungen oder anderen Systemen eignet, die reine Textdateien unterstützen.
Workbook workbook = new Workbook();
workbook.LoadFromFile("EmployeeDataExport.xlsx");
workbook.SaveToFile("Report.csv", ",", FileFormat.CSV);
Beispiel 2: Excel als XLS (Legacy-Format) speichern
XLS (Excel 97–2003-Format) ist ein altes Binärformat, das immer noch in älteren Systemen oder Anwendungen verwendet wird, die XLSX nicht unterstützen. Das Speichern im XLS-Format gewährleistet die Kompatibilität mit älteren Unternehmens-Workflows.
Workbook workbook = new Workbook();
workbook.LoadFromFile("EmployeeDataExport.xlsx");
workbook.SaveToFile("Report_legacy.xls", ExcelVersion.Version97to2003);
Zusätzlich unterstützte Tabellenkalkulationsformate
Zusätzlich zu den häufig verwendeten Formaten CSV, XLS und XLSX unterstützt die Bibliothek auch mehrere andere Tabellenkalkulations- und Vorlagenformate. Die folgende Tabelle listet diese Formate zusammen mit ihren entsprechenden FileFormat-Enumeration-Werten auf, um das programmgesteuerte Speichern von Dateien zu erleichtern.
| Format | Beschreibung | Entsprechende Enum (FileFormat) |
|---|---|---|
| ODS | OpenDocument-Tabellenkalkulation | FileFormat.ODS |
| XLSM | Excel-Arbeitsmappe mit Makros | FileFormat.Xlsm |
| XLSB | Binäre Excel-Arbeitsmappe | FileFormat.Xlsb2007 / FileFormat.Xlsb2010 |
| XLT | Excel 97–2003-Vorlage | FileFormat.XLT |
| XLTX | Excel Open XML-Vorlage | FileFormat.XLTX |
| XLTM | Excel-Vorlage mit Makros | FileFormat.XLTM |
Diese zusätzlichen Formate sind nützlich für Organisationen, die mit Altsystemen, offenen Dokumentenstandards oder makro-/vorlagenbasierten Automatisierungs-Workflows arbeiten.
Excel als PDF oder HTML in C# speichern
In vielen Fällen müssen Excel-Dateien zur einfacheren Veröffentlichung, zum Drucken oder zur gemeinsamen Nutzung in Dokument- oder Webformate konvertiert werden.
Der Export nach PDF ist ideal für Berichte mit festem Layout und zum Drucken, während HTML sich zum Anzeigen von Excel-Daten in einem Webbrowser eignet.
Beispiel 1: Excel als PDF speichern
Das folgende Beispiel zeigt, wie man eine Excel-Arbeitsmappe mit C# als PDF-Datei speichert. Dies ist nützlich, um Berichte zu erstellen, die Layout und Formatierung beibehalten.
Workbook workbook = new Workbook();
workbook.LoadFromFile("EmployeeDataExport.xlsx");
workbook.SaveToFile("EmployeeDataExport.pdf", FileFormat.PDF);
Hier ist ein Beispiel der generierten PDF-Datei nach dem Export aus Excel:
Beispiel 2: Excel als HTML speichern
Dieses Beispiel zeigt, wie man eine Excel-Arbeitsmappe als HTML-Datei speichert, was es einfach macht, die Daten in einem Webbrowser darzustellen oder in Webanwendungen zu integrieren.
Workbook workbook = new Workbook();
workbook.LoadFromFile("EmployeeDataExport.xlsx");
workbook.SaveToFile("EmployeeDataExport.html", FileFormat.HTML);
Unten sehen Sie eine Vorschau der exportierten HTML-Datei, wie sie in einem Browser dargestellt wird:
Zusätzlich unterstützte Dokument- & Web-Formate
Zusätzlich zu PDF und HTML unterstützt die Bibliothek mehrere andere dokumenten- und webfreundliche Formate. Die folgende Tabelle zeigt diese Formate zusammen mit ihren FileFormat-Enumeration-Werten zur einfachen Referenz.
| Format | Beschreibung | Entsprechende Enum (FileFormat) |
|---|---|---|
| XML | Als XML exportierte Excel-Daten | FileFormat.XML |
| Bitmap / Bild | Excel als Bitmap oder andere Bildformate exportieren | FileFormat.Bitmap |
| XPS | XML Paper Specification-Dokument | FileFormat.XPS |
| PostScript | PostScript-Dokument | FileFormat.PostScript |
| OFD | Open Fixed-layout Document-Format | FileFormat.OFD |
| PCL | Printer Command Language-Datei | FileFormat.PCL |
| Markdown | Markdown-Dateiformat | FileFormat.Markdown |
Diese Formate bieten zusätzliche Flexibilität für die Verteilung von Excel-Inhalten auf verschiedenen Plattformen und in unterschiedlichen Arbeitsabläufen, sei es für den Druck, die Web-Veröffentlichung oder die Automatisierung.
Eine Excel-Datei in MemoryStream in C# speichern
In Webanwendungen oder Cloud-Diensten ist das direkte Speichern von Excel-Dateien auf der Festplatte aus Sicherheits- oder Leistungsgründen möglicherweise nicht ideal. Die Verwendung von MemoryStream ermöglicht es Ihnen, Excel-Dateien im Speicher zu erstellen und sie direkt an Clients zum Download zu liefern. Spire.XLS für .NET unterstützt auch sowohl das Laden und Speichern von Arbeitsmappen über MemoryStream, was die Handhabung von Excel-Dateien vollständig im Speicher erleichtert.
Workbook workbook = new Workbook();
Worksheet sheet = workbook.Worksheets[0];
sheet.Range["A1"].Text = "Export to Stream";

using (MemoryStream stream = new MemoryStream())
{
    workbook.SaveToStream(stream, ExcelVersion.Version2016);
    byte[] bytes = stream.ToArray();

    // Beispiel: Bytes zum Herunterladen an den Client in ASP.NET senden
    // Response.BinaryWrite(bytes);
}
Dieser Ansatz ist besonders nützlich für ASP.NET, Web API oder Cloud-Dienste, bei denen Sie Excel-Dateien dynamisch bereitstellen möchten, ohne temporäre Dateien auf dem Server zu erstellen.
Excel-Dateien in C# öffnen und erneut speichern
In vielen Anwendungen müssen Sie möglicherweise eine bestehende Excel-Arbeitsmappe laden, Aktualisierungen oder Änderungen anwenden und sie dann wieder auf der Festplatte speichern oder in ein anderes Format konvertieren. Dies ist üblich beim Aktualisieren von Berichten, Ändern exportierter Daten oder Automatisieren von Excel-Datei-Workflows.
Beispiel: Eine Excel-Datei öffnen und aktualisieren
Der folgende C#-Code lädt die vorherige Arbeitsmappe, aktualisiert die erste Zelle und speichert die Änderungen:
Workbook workbook = new Workbook();
workbook.LoadFromFile("EmployeeDataExport.xlsx");

Worksheet sheet = workbook.Worksheets[0];
sheet.Range["A1"].Text = "Updated Content"; // Den Zellwert aktualisieren
sheet.Range["A1"].AutoFitColumns(); // Die Spaltenbreite automatisch anpassen

// Die aktualisierte Arbeitsmappe speichern
workbook.Save(); // Speichert in der Originaldatei
workbook.SaveToFile("UpdatedCopy.xlsx", ExcelVersion.Version2016); // Als neue Datei speichern
Der folgende Screenshot zeigt das aktualisierte Excel-Blatt nach dem Ändern und Speichern der Datei:
Sie können sich auch die detaillierte Anleitung zum Bearbeiten von Excel-Dateien mit C# für fortgeschrittenere Szenarien ansehen.
Beste Praktiken beim Speichern von Excel-Dateien
-
Dateiüberschreibungen vermeiden
Überprüfen Sie vor dem Speichern, ob die Zieldatei vorhanden ist, um versehentlichen Datenverlust zu vermeiden.
-
Berechtigungen und Pfade korrekt behandeln
Stellen Sie sicher, dass Ihre Anwendung Schreibzugriff auf den Zielordner hat, insbesondere in Web- oder Cloud-Umgebungen.
-
Das richtige Format wählen
Verwenden Sie XLSX für moderne Kompatibilität, CSV für den Datenaustausch und PDF zum Drucken oder Teilen von Berichten.
Fazit
Das Speichern von Excel-Dateien in C# deckt eine breite Palette von Operationen ab – vom Schreiben strukturierter Datensätze über den Export in verschiedene Tabellenkalkulationsformate und die Konvertierung in PDF/HTML bis hin zur Handhabung von Dateiströmen in Webanwendungen.
Mit der Flexibilität, die Bibliotheken wie Spire.XLS für .NET bieten, können Entwickler leistungsstarke Excel-Automatisierungs-Workflows mühelos implementieren.
FAQ
F1: Wie speichere ich eine Excel-Datei in C#?
Verwenden Sie SaveToFile() mit der entsprechenden ExcelVersion oder FileFormat:
workbook.SaveToFile("Report.xlsx", ExcelVersion.Version2016);
F2: Wie öffne und ändere ich eine vorhandene Excel-Datei?
Laden Sie die Arbeitsmappe mit LoadFromFile(), nehmen Sie Änderungen vor und speichern Sie dann:
Workbook workbook = new Workbook();
workbook.LoadFromFile("ExistingFile.xlsx");
workbook.Worksheets[0].Range["A1"].Text = "Updated Content";
workbook.SaveToFile("UpdatedFile.xlsx", ExcelVersion.Version2016);
F3: Wie speichere ich als CSV oder PDF?
Geben Sie das gewünschte FileFormat in SaveToFile() an:
workbook.SaveToFile("Report.csv", ",", FileFormat.CSV);
workbook.SaveToFile("Report.pdf", FileFormat.PDF);
F4: Kann ich Excel im Speicher anstatt auf der Festplatte speichern?
Ja. Verwenden Sie SaveToStream(), um in einen MemoryStream auszugeben, was in Web- oder Cloud-Anwendungen nützlich ist:
using (MemoryStream stream = new MemoryStream())
{
    workbook.SaveToStream(stream, ExcelVersion.Version2016);
    byte[] bytes = stream.ToArray();
}
Siehe auch
C# Сохранить файл Excel — Сохранить Excel в XLSX, PDF и другие форматы
Сохранение файлов Excel в C# — это обычная задача во многих .NET-приложениях, особенно при создании отчетов, экспорте аналитических данных или автоматизации системных журналов. Независимо от того, работаете ли вы с финансовыми сводками или данными о ежедневных операциях, возможность программно создавать и сохранять файлы Excel может значительно повысить эффективность и точность.
В C# разработчики могут работать с файлами Excel несколькими способами: создавать новые книги, записывать данные и сохранять их в различных форматах, таких как XLSX, CSV или PDF. С помощью специализированных библиотек для Excel эти операции можно эффективно автоматизировать, не полагаясь на Microsoft Excel или ручное вмешательство.
В этой статье мы рассмотрим, как:
- Подготовить среду разработки
- Сохранять данные из DataTable или DataGridView в Excel
- Сохранять файлы Excel в различных форматах электронных таблиц (CSV, XLS и т. д.)
- Экспортировать файлы Excel в форматы документов (PDF, HTML и т. д.)
- Сохранять книги Excel в MemoryStream для веб-приложений
- Открывать и повторно сохранять существующие файлы Excel
Подготовьте среду разработки
Прежде чем углубляться в код, настройте свою среду разработки с помощью библиотеки Excel, которая поддерживает создание, чтение и сохранение файлов в .NET. В этом руководстве мы будем использовать Free Spire.XLS для .NET.
Шаг 1: Установите Spire.XLS через NuGet
Install-Package FreeSpire.XLS
Шаг 2: Импортируйте необходимое пространство имен
using Spire.Xls;
Шаг 3: Создайте, запишите и сохраните простой файл Excel
// Создать новую книгу и получить первый лист
Workbook workbook = new Workbook();
Worksheet sheet = workbook.Worksheets[0];

// Записать "Hello World!" в ячейку A1
sheet.Range["A1"].Text = "Hello World!";

// Сохранить книгу в файл
workbook.SaveToFile("HelloWorld.xlsx", ExcelVersion.Version2016);
Этот простой пример показывает основной рабочий процесс: создание книги, запись данных в ячейку и сохранение файла.
После этого вы можете изучить ключевые классы и методы, такие как:
- Workbook – представляет весь файл Excel.
- Worksheet – представляет один лист в книге.
- Range – позволяет получать доступ к определенным ячейкам для ввода, форматирования или стилизации.
- Workbook.SaveToFile() – сохраняет книгу на диск в указанном формате Excel.
Сохранение данных в файл Excel на C#
Сохранение структурированных данных, таких как DataTable или DataGridView, в файл Excel — одна из самых практичных задач в разработке на C#. Независимо от того, создает ли ваше приложение результаты базы данных, содержимое сетки пользовательского интерфейса или автоматизированные отчеты, экспорт этих наборов данных в Excel обеспечивает лучшую читаемость и совместимость.
Пример 1: Сохранение DataTable в Excel
using Spire.Xls;
using System.Data;

Workbook workbook = new Workbook();
Worksheet sheet = workbook.Worksheets[0];
sheet.Name = "EmployeeData";

DataTable table = new DataTable();
table.Columns.Add("EmployeeID");
table.Columns.Add("FullName");
table.Columns.Add("Department");
table.Columns.Add("HireDate");
table.Columns.Add("Salary");

// Add sample rows
table.Rows.Add("E001", "Alice Johnson", "Finance", "2020-03-12", "7500");
table.Rows.Add("E002", "Bob Williams", "Human Resources", "2019-08-05", "6800");
table.Rows.Add("E003", "Catherine Lee", "IT", "2021-01-20", "8200");
table.Rows.Add("E004", "David Smith", "Marketing", "2018-11-30", "7100");
table.Rows.Add("E005", "Emily Davis", "Sales", "2022-06-15", "6900");

// Вставить DataTable в лист
sheet.InsertDataTable(table, true, 1, 1);

// Применить встроенные форматы
sheet.AllocatedRange.Rows[0].BuiltInStyle = BuiltInStyles.Heading1;
for (int i = 1; i < sheet.AllocatedRange.Rows.Count(); i++)
{
    sheet.AllocatedRange.Rows[i].BuiltInStyle = BuiltInStyles.Accent1;
}
sheet.AllocatedRange.AutoFitColumns();
sheet.AllocatedRange.AutoFitRows();

// Сохранить в Excel
workbook.SaveToFile("EmployeeDataExport.xlsx", FileFormat.Version2016);
Как это работает:
- InsertDataTable() вставляет данные, начиная с определенной ячейки.
- Аргумент true включает заголовки столбцов.
- SaveToFile() сохраняет книгу на диск; второй параметр указывает версию формата Excel.
- FileFormat.Version2016 указывает версию формата Excel.
Ниже приведен пример вывода, показывающий, как экспортированный DataTable выглядит в Excel:
Пример 2: Сохранение DataGridView в Excel
Workbook workbook = new Workbook();
Worksheet sheet = workbook.Worksheets[0];

sheet.InsertDataTable(((DataTable)dataGridView1.DataSource), true, 1, 1);
workbook.SaveToFile("GridViewExport.xlsx", FileFormat.Version2016);
Совет: Перед сохранением убедитесь, что источник данных вашего DataGridView правильно приведен к DataTable. Это гарантирует, что экспортированная структура будет соответствовать макету сетки пользовательского интерфейса.
Если вы хотите узнать, как создавать файлы Excel с большим количеством типов данных, форматированием и другими элементами, вы можете изучить статью Как создавать файлы Excel на C#.
Сохранение файла Excel в формате CSV или XLS на C#
Различные системы и платформы требуют разных форматов электронных таблиц. Хотя XLSX сейчас является стандартом, CSV, XLS и другие форматы остаются распространенными в корпоративных средах. Экспорт в различные форматы позволяет обмениваться данными Excel, обрабатывать их или импортировать в различные приложения.
Пример 1: Сохранение Excel в формате CSV
CSV (значения, разделенные запятыми) — это простой текстовый формат, идеально подходящий для обмена данными с базами данных, веб-приложениями или другими системами, поддерживающими обычные текстовые файлы.
Workbook workbook = new Workbook();
workbook.LoadFromFile("EmployeeDataExport.xlsx");
workbook.SaveToFile("Report.csv", ",", FileFormat.CSV);
Пример 2: Сохранение Excel в формате XLS (устаревший формат)
XLS (формат Excel 97–2003) — это устаревший двоичный формат, который до сих пор используется в старых системах или приложениях, не поддерживающих XLSX. Сохранение в XLS обеспечивает совместимость с устаревшими корпоративными рабочими процессами.
Workbook workbook = new Workbook();
workbook.LoadFromFile("EmployeeDataExport.xlsx");
workbook.SaveToFile("Report_legacy.xls", ExcelVersion.Version97to2003);
Дополнительные поддерживаемые форматы электронных таблиц
В дополнение к часто используемым форматам CSV, XLS и XLSX, библиотека также поддерживает несколько других форматов электронных таблиц и шаблонов. В таблице ниже перечислены эти форматы вместе с соответствующими им значениями перечисления FileFormat для удобства при программном сохранении файлов.
| Формат | Описание | Соответствующий Enum (FileFormat) |
|---|---|---|
| ODS | Электронная таблица OpenDocument | FileFormat.ODS |
| XLSM | Книга Excel с поддержкой макросов | FileFormat.Xlsm |
| XLSB | Двоичная книга Excel | FileFormat.Xlsb2007 / FileFormat.Xlsb2010 |
| XLT | Шаблон Excel 97–2003 | FileFormat.XLT |
| XLTX | Шаблон Excel Open XML | FileFormat.XLTX |
| XLTM | Шаблон Excel с поддержкой макросов | FileFormat.XLTM |
Эти дополнительные форматы полезны для организаций, которые работают с устаревшими системами, стандартами открытых документов или рабочими процессами автоматизации на основе макросов/шаблонов.
Сохранение Excel в формате PDF или HTML на C#
Во многих случаях файлы Excel необходимо преобразовывать в форматы документов или веб-форматы для упрощения публикации, печати или обмена.
Экспорт в PDF идеально подходит для отчетов с фиксированным макетом и печати, в то время как HTML подходит для просмотра данных Excel в веб-браузере.
Пример 1: Сохранение Excel в формате PDF
В следующем примере показано, как сохранить книгу Excel в виде файла PDF с помощью C#. Это полезно для создания отчетов, сохраняющих макет и форматирование.
Workbook workbook = new Workbook();
workbook.LoadFromFile("EmployeeDataExport.xlsx");
workbook.SaveToFile("EmployeeDataExport.pdf", FileFormat.PDF);
Вот пример сгенерированного PDF-файла после экспорта из Excel:
Пример 2: Сохранение Excel в формате HTML
Этот пример демонстрирует, как сохранить книгу Excel в виде HTML-файла, что упрощает отображение данных в веб-браузере или интеграцию с веб-приложениями.
Workbook workbook = new Workbook();
workbook.LoadFromFile("EmployeeDataExport.xlsx");
workbook.SaveToFile("EmployeeDataExport.html", FileFormat.HTML);
Ниже приведен предварительный просмотр экспортированного HTML-файла, отображенного в браузере:
Дополнительные поддерживаемые форматы документов и веб-форматы
Помимо PDF и HTML, библиотека поддерживает несколько других форматов, удобных для документов и веба. В таблице ниже показаны эти форматы вместе с их значениями перечисления FileFormat для удобства.
| Формат | Описание | Соответствующий Enum (FileFormat) |
|---|---|---|
| XML | Данные Excel, экспортированные в формате XML | FileFormat.XML |
| Растровое изображение / Изображение | Экспорт Excel в растровое изображение или другие форматы изображений | FileFormat.Bitmap |
| XPS | Документ XML Paper Specification | FileFormat.XPS |
| PostScript | Документ PostScript | FileFormat.PostScript |
| OFD | Формат документа с фиксированным макетом Open Fixed-layout | FileFormat.OFD |
| PCL | Файл языка команд принтера | FileFormat.PCL |
| Markdown | Формат файла Markdown | FileFormat.Markdown |
Эти форматы обеспечивают дополнительную гибкость для распространения содержимого Excel на различных платформах и в рабочих процессах, будь то для печати, веб-публикации или автоматизации.
Сохранение файла Excel в MemoryStream на C#
В веб-приложениях или облачных сервисах сохранение файлов Excel непосредственно на диск может быть нецелесообразным по соображениям безопасности или производительности. Использование MemoryStream позволяет создавать файлы Excel в памяти и доставлять их непосредственно клиентам для загрузки. Spire.XLS для .NET также поддерживает как загрузку, так и сохранение книг через MemoryStream, что упрощает обработку файлов Excel полностью в памяти.
Workbook workbook = new Workbook();
Worksheet sheet = workbook.Worksheets[0];
sheet.Range["A1"].Text = "Export to Stream";

using (MemoryStream stream = new MemoryStream())
{
    workbook.SaveToStream(stream, ExcelVersion.Version2016);
    byte[] bytes = stream.ToArray();

    // Пример: отправить байты клиенту для загрузки в ASP.NET
    // Response.BinaryWrite(bytes);
}
Этот подход особенно полезен для ASP.NET, Web API или облачных сервисов, где вы хотите динамически обслуживать файлы Excel, не создавая временных файлов на сервере.
Открытие и повторное сохранение файлов Excel на C#
Во многих приложениях вам может понадобиться загрузить существующую книгу Excel, применить обновления или изменения, а затем сохранить ее обратно на диск или преобразовать в другой формат. Это часто встречается при обновлении отчетов, изменении экспортированных данных или автоматизации рабочих процессов с файлами Excel.
Пример: открытие и обновление файла Excel
Следующий код C# загружает предыдущую книгу, обновляет первую ячейку и сохраняет изменения:
Workbook workbook = new Workbook();
workbook.LoadFromFile("EmployeeDataExport.xlsx");

Worksheet sheet = workbook.Worksheets[0];
sheet.Range["A1"].Text = "Updated Content"; // Обновить значение ячейки
sheet.Range["A1"].AutoFitColumns(); // Автоподбор ширины столбца

// Сохранить обновленную книгу
workbook.Save(); // Сохраняет в исходный файл
workbook.SaveToFile("UpdatedCopy.xlsx", ExcelVersion.Version2016); // Сохранить как новый файл
На скриншоте ниже показан обновленный лист Excel после изменения и сохранения файла:
Вы также можете ознакомиться с подробным руководством по редактированию файлов Excel с использованием C# для более сложных сценариев.
Лучшие практики при сохранении файлов Excel
-
Избегайте перезаписи файлов
Проверяйте, существует ли целевой файл, перед сохранением, чтобы предотвратить случайную потерю данных.
-
Правильно управляйте разрешениями и путями
Убедитесь, что у вашего приложения есть права на запись в целевую папку, особенно в веб- или облачных средах.
-
Выберите правильный формат
Используйте XLSX для современной совместимости, CSV для обмена данными и PDF для печати или обмена отчетами.
Заключение
Сохранение файлов Excel в C# охватывает широкий спектр операций — от записи структурированных наборов данных, экспорта в различные форматы электронных таблиц, преобразования в PDF/HTML до обработки файловых потоков в веб-приложениях.
Благодаря гибкости, предлагаемой такими библиотеками, как Spire.XLS для .NET, разработчики могут с легкостью реализовывать мощные рабочие процессы автоматизации Excel.
Часто задаваемые вопросы
В1: Как сохранить файл Excel на C#?
Используйте SaveToFile() с соответствующим ExcelVersion или FileFormat:
workbook.SaveToFile("Report.xlsx", ExcelVersion.Version2016);
В2: Как открыть и изменить существующий файл Excel?
Загрузите книгу с помощью LoadFromFile(), внесите изменения, затем сохраните:
Workbook workbook = new Workbook();
workbook.LoadFromFile("ExistingFile.xlsx");
workbook.Worksheets[0].Range["A1"].Text = "Updated Content";
workbook.SaveToFile("UpdatedFile.xlsx", ExcelVersion.Version2016);
В3: Как сохранить в формате CSV или PDF?
Укажите желаемый FileFormat в SaveToFile():
workbook.SaveToFile("Report.csv", ",", FileFormat.CSV);
workbook.SaveToFile("Report.pdf", FileFormat.PDF);
В4: Могу ли я сохранить Excel в память, а не на диск?
Да. Используйте SaveToStream() для вывода в MemoryStream, что полезно в веб- или облачных приложениях:
using (MemoryStream stream = new MemoryStream())
{
    workbook.SaveToStream(stream, ExcelVersion.Version2016);
    byte[] bytes = stream.ToArray();
}