C# Guardar archivo de Excel — Guardar Excel como XLSX, PDF y más
Tabla de Contenidos
Guardar archivos de Excel en C# es una tarea común en muchas aplicaciones .NET, especially when generating reports, exporting analytical data, or automating system logs. Ya sea que esté trabajando con resúmenes financieros o datos de operaciones diarias, poder crear y guardar archivos de Excel mediante programación puede mejorar significativamente la eficiencia y la precisión.
En C#, los desarrolladores pueden manejar archivos de Excel de múltiples maneras: creando nuevos libros de trabajo, escribiendo datos y guardándolos en varios formatos como XLSX, CSV o PDF. Con la ayuda de bibliotecas de Excel dedicadas, estas operaciones se pueden automatizar de manera eficiente sin depender de Microsoft Excel o de una intervención manual.
En este artículo, exploraremos cómo:
- Preparar su entorno de desarrollo
- Guardar datos de DataTable o DataGridView en Excel
- Guardar archivos de Excel en diferentes formatos de hoja de cálculo (CSV, XLS, etc.)
- Exportar archivos de Excel a formatos de documento (PDF, HTML, etc.)
- Guardar libros de Excel en un MemoryStream para aplicaciones web
- Abrir y volver a guardar archivos de Excel existentes
Preparar el Entorno de Desarrollo
Antes de sumergirse en el código, configure su entorno de desarrollo con una biblioteca de Excel que admita la creación, lectura y guardado de archivos en .NET. En este tutorial, usaremos Free Spire.XLS for .NET.
Paso 1: Instalar Spire.XLS a través de NuGet
Install-Package FreeSpire.XLS
Paso 2: Importar el Espacio de Nombres Requerido
using Spire.Xls;
Paso 3: Crear, Escribir y Guardar un Archivo de Excel Simple
// Crear un nuevo libro de trabajo y obtener la primera hoja de cálculo
Workbook workbook = new Workbook();
Worksheet sheet = workbook.Worksheets[0];

// Escribir "¡Hola Mundo!" en la celda A1
sheet.Range["A1"].Text = "¡Hola Mundo!";

// Guardar el libro de trabajo en un archivo
workbook.SaveToFile("HelloWorld.xlsx", ExcelVersion.Version2016);
Este sencillo ejemplo muestra el flujo de trabajo básico: crear un libro de trabajo, escribir datos en una celda y guardar el archivo.
Después de esto, puede explorar clases y métodos clave como:
- Workbook – representa todo el archivo de Excel.
- Worksheet – representa una sola hoja dentro del libro de trabajo.
- Range – permite el acceso a celdas específicas para entrada, formato o estilo.
- Workbook.SaveToFile() – guarda el libro de trabajo en el disco en el formato de Excel especificado.
Guardar Datos en un Archivo de Excel en C#
Guardar datos estructurados como DataTable o DataGridView en un archivo de Excel es una de las tareas más prácticas en el desarrollo de C#. Ya sea que su aplicación produzca resultados de base de datos, contenido de cuadrícula de interfaz de usuario o informes automatizados, exportar estos conjuntos de datos a Excel proporciona una mejor legibilidad y compatibilidad.
Ejemplo 1: Guardar DataTable en Excel
using Spire.Xls;
using System.Data;

Workbook workbook = new Workbook();
Worksheet sheet = workbook.Worksheets[0];
sheet.Name = "EmployeeData";

DataTable table = new DataTable();
table.Columns.Add("EmployeeID");
table.Columns.Add("FullName");
table.Columns.Add("Department");
table.Columns.Add("HireDate");
table.Columns.Add("Salary");

// Agregar filas de muestra
table.Rows.Add("E001", "Alice Johnson", "Finance", "2020-03-12", "7500");
table.Rows.Add("E002", "Bob Williams", "Human Resources", "2019-08-05", "6800");
table.Rows.Add("E003", "Catherine Lee", "IT", "2021-01-20", "8200");
table.Rows.Add("E004", "David Smith", "Marketing", "2018-11-30", "7100");
table.Rows.Add("E005", "Emily Davis", "Sales", "2022-06-15", "6900");

// Insertar el DataTable en la hoja de cálculo
sheet.InsertDataTable(table, true, 1, 1);

// Aplicar formatos incorporados
sheet.AllocatedRange.Rows[0].BuiltInStyle = BuiltInStyles.Heading1;
for (int i = 1; i < sheet.AllocatedRange.Rows.Count(); i++)
{
    sheet.AllocatedRange.Rows[i].BuiltInStyle = BuiltInStyles.Accent1;
}
sheet.AllocatedRange.AutoFitColumns();
sheet.AllocatedRange.AutoFitRows();

// Guardar en Excel
workbook.SaveToFile("EmployeeDataExport.xlsx", FileFormat.Version2016);
Cómo funciona:
- InsertDataTable() inserta datos a partir de una celda específica.
- El argumento true incluye los encabezados de las columnas.
- SaveToFile() guarda el libro de trabajo en el disco; el segundo parámetro especifica la versión del formato de Excel.
- FileFormat.Version2016 especifica la versión del formato de Excel.
A continuación se muestra una salida de ejemplo que muestra cómo se ve el DataTable exportado en Excel:
Ejemplo 2: Guardar DataGridView en Excel
Workbook workbook = new Workbook();
Worksheet sheet = workbook.Worksheets[0];

sheet.InsertDataTable(((DataTable)dataGridView1.DataSource), true, 1, 1);
workbook.SaveToFile("GridViewExport.xlsx", FileFormat.Version2016);
Consejo: Antes de guardar, asegúrese de que el origen de datos de su DataGridView se convierta correctamente a un DataTable. Esto garantiza que la estructura exportada coincida con el diseño de la cuadrícula de la interfaz de usuario.
Si desea aprender a crear archivos de Excel con más tipos de datos, formato y otros elementos, puede explorar el artículo Cómo Crear Archivos de Excel en C#.
Guardar Archivo de Excel como CSV o XLS en C#
Diferentes sistemas y plataformas requieren diferentes formatos de hoja de cálculo. Si bien XLSX es ahora el estándar, CSV, XLS y otros formatos siguen siendo comunes en entornos empresariales. Exportar a diferentes formatos permite que los datos de Excel se compartan, procesen o importen por diversas aplicaciones.
Ejemplo 1: Guardar Excel como CSV
CSV (Valores Separados por Comas) es un formato simple basado en texto ideal para intercambiar datos con bases de datos, aplicaciones web u otros sistemas que admiten archivos de texto sin formato.
Workbook workbook = new Workbook();
workbook.LoadFromFile("EmployeeDataExport.xlsx");
workbook.SaveToFile("Report.csv", ",", FileFormat.CSV);
Ejemplo 2: Guardar Excel como XLS (Formato Heredado)
XLS (formato Excel 97–2003) es un formato binario heredado que todavía se usa en sistemas o aplicaciones más antiguos que no admiten XLSX. Guardar en XLS garantiza la compatibilidad con los flujos de trabajo empresariales heredados.
Workbook workbook = new Workbook();
workbook.LoadFromFile("EmployeeDataExport.xlsx");
workbook.SaveToFile("Report_legacy.xls", ExcelVersion.Version97to2003);
Formatos de Hoja de Cálculo Adicionales Compatibles
Además de los formatos CSV, XLS y XLSX de uso común, la biblioteca también admite varios otros formatos de hoja de cálculo y plantilla. La siguiente tabla enumera estos formatos junto con sus valores de enumeración FileFormat correspondientes para una fácil referencia al guardar archivos mediante programación.
| Formato | Descripción | Enumeración Correspondiente (FileFormat) |
|---|---|---|
| ODS | Hoja de Cálculo OpenDocument | FileFormat.ODS |
| XLSM | Libro de Excel habilitado para macros | FileFormat.Xlsm |
| XLSB | Libro de Excel binario | FileFormat.Xlsb2007 / FileFormat.Xlsb2010 |
| XLT | Plantilla de Excel 97–2003 | FileFormat.XLT |
| XLTX | Plantilla XML abierta de Excel | FileFormat.XLTX |
| XLTM | Plantilla de Excel habilitada para macros | FileFormat.XLTM |
Estos formatos adicionales son útiles para organizaciones que trabajan con sistemas heredados, estándares de documentos abiertos o flujos de trabajo de automatización basados en macros/plantillas.
Guardar Excel como PDF o HTML en C#
En muchos casos, los archivos de Excel deben convertirse a formatos de documento o web para facilitar su publicación, impresión o uso compartido.
Exportar a PDF es ideal para informes de diseño fijo e impresión, mientras que HTML es adecuado para ver datos de Excel en un navegador web.
Ejemplo 1: Guardar Excel como PDF
El siguiente ejemplo muestra cómo guardar un libro de Excel como un archivo PDF usando C#. Esto es útil para generar informes que conservan el diseño y el formato.
Workbook workbook = new Workbook();
workbook.LoadFromFile("EmployeeDataExport.xlsx");
workbook.SaveToFile("EmployeeDataExport.pdf", FileFormat.PDF);
Aquí hay un ejemplo del archivo PDF generado después de exportarlo desde Excel:
Ejemplo 2: Guardar Excel como HTML
Este ejemplo demuestra cómo guardar un libro de Excel como un archivo HTML, lo que facilita la representación de los datos en un navegador web o la integración con aplicaciones web.
Workbook workbook = new Workbook();
workbook.LoadFromFile("EmployeeDataExport.xlsx");
workbook.SaveToFile("EmployeeDataExport.html", FileFormat.HTML);
A continuación se muestra una vista previa del archivo HTML exportado renderizado en un navegador:
Formatos de Documento y Web Adicionales Compatibles
Además de PDF y HTML, la biblioteca admite varios otros formatos amigables para documentos y web. La siguiente tabla muestra estos formatos junto con sus valores de enumeración FileFormat para una fácil referencia.
| Formato | Descripción | Enumeración Correspondiente (FileFormat) |
|---|---|---|
| XML | Datos de Excel exportados como XML | FileFormat.XML |
| Bitmap / Image | Exportar Excel como mapa de bits u otros formatos de imagen | FileFormat.Bitmap |
| XPS | Documento de especificación de papel XML | FileFormat.XPS |
| PostScript | Documento PostScript | FileFormat.PostScript |
| OFD | Formato de documento de diseño fijo abierto | FileFormat.OFD |
| PCL | Archivo de lenguaje de comandos de impresora | FileFormat.PCL |
| Markdown | Formato de archivo Markdown | FileFormat.Markdown |
Estos formatos brindan flexibilidad adicional para distribuir contenido de Excel en diferentes plataformas y flujos de trabajo, ya sea para impresión, publicación web o automatización.
Guardar un Archivo de Excel en MemoryStream en C#
En aplicaciones web o servicios en la nube, guardar archivos de Excel directamente en el disco puede no ser ideal por razones de seguridad o rendimiento. El uso de MemoryStream le permite generar archivos de Excel en la memoria y entregarlos directamente a los clientes para su descarga. Spire.XLS for .NET también admite tanto la carga como el guardado de libros de trabajo a través de MemoryStream, lo que facilita el manejo de archivos de Excel completamente en la memoria.
Workbook workbook = new Workbook();
Worksheet sheet = workbook.Worksheets[0];
sheet.Range["A1"].Text = "Export to Stream";

using (MemoryStream stream = new MemoryStream())
{
    workbook.SaveToStream(stream, ExcelVersion.Version2016);
    byte[] bytes = stream.ToArray();

    // Ejemplo: enviar bytes al cliente para su descarga en ASP.NET
    // Response.BinaryWrite(bytes);
}
Este enfoque es particularly useful for ASP.NET, Web API, or cloud services, donde desea servir archivos de Excel dinámicamente sin crear archivos temporales en el servidor.
Abrir y Volver a Guardar Archivos de Excel en C#
En muchas aplicaciones, es posible que deba cargar un libro de Excel existente, aplicar actualizaciones o modificaciones y luego guardarlo de nuevo en el disco o convertirlo a un formato diferente. Esto es común al actualizar informes, modificar datos exportados o automatizar flujos de trabajo de archivos de Excel.
Ejemplo: Abrir y Actualizar un Archivo de Excel
El siguiente código C# carga el libro de trabajo anterior, actualiza la primera celda y guarda los cambios:
Workbook workbook = new Workbook();
workbook.LoadFromFile("EmployeeDataExport.xlsx");

Worksheet sheet = workbook.Worksheets[0];
sheet.Range["A1"].Text = "Updated Content"; // Actualizar el valor de la celda
sheet.Range["A1"].AutoFitColumns(); // Autoajustar el ancho de la columna

// Guardar el libro de trabajo actualizado
workbook.Save(); // Guarda en el archivo original
workbook.SaveToFile("UpdatedCopy.xlsx", ExcelVersion.Version2016); // Guardar como archivo nuevo
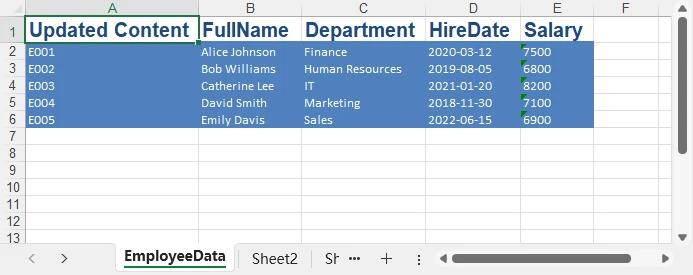
La siguiente captura de pantalla muestra la hoja de Excel actualizada después de modificar y guardar el archivo:
También puede consultar la guía detallada sobre cómo editar archivos de Excel usando C# para escenarios más avanzados.
Mejores Prácticas al Guardar Archivos de Excel
-
Evitar Sobrescribir Archivos
Verifique si el archivo de destino existe antes de guardar para evitar la pérdida accidental de datos.
-
Manejar Permisos y Rutas Correctamente
Asegúrese de que su aplicación tenga acceso de escritura a la carpeta de destino, especialmente en entornos web o en la nube.
-
Elegir el Formato Correcto
Use XLSX para compatibilidad moderna, CSV para intercambio de datos y PDF para imprimir o compartir informes.
Conclusión
Guardar archivos de Excel en C# cubre una amplia gama de operaciones, desde escribir conjuntos de datos estructurados, exportar a diferentes formatos de hoja de cálculo, convertir a PDF/HTML, hasta manejar flujos de archivos en aplicaciones web.
Con la flexibilidad que ofrecen bibliotecas como Spire.XLS for .NET, los desarrolladores pueden implementar potentes flujos de trabajo de automatización de Excel con facilidad.
Preguntas Frecuentes
P1: ¿Cómo guardo un archivo de Excel en C#?
Use SaveToFile() con la ExcelVersion o FileFormat apropiada:
workbook.SaveToFile("Report.xlsx", ExcelVersion.Version2016);
P2: ¿Cómo abro y modifico un archivo de Excel existente?
Cargue el libro de trabajo usando LoadFromFile(), realice cambios y luego guarde:
Workbook workbook = new Workbook();
workbook.LoadFromFile("ExistingFile.xlsx");
workbook.Worksheets[0].Range["A1"].Text = "Updated Content";
workbook.SaveToFile("UpdatedFile.xlsx", ExcelVersion.Version2016);
P3: ¿Cómo guardo como CSV o PDF?
Especifique el FileFormat deseado en SaveToFile():
workbook.SaveToFile("Report.csv", ",", FileFormat.CSV);
workbook.SaveToFile("Report.pdf", FileFormat.PDF);
P4: ¿Puedo guardar Excel en la memoria en lugar del disco?
Sí. Use SaveToStream() para enviar la salida a un MemoryStream, útil en aplicaciones web o en la nube:
using (MemoryStream stream = new MemoryStream())
{
    workbook.SaveToStream(stream, ExcelVersion.Version2016);
    byte[] bytes = stream.ToArray();
}
Ver También
C# Excel-Datei speichern – Excel in XLSX, PDF und mehr speichern
Das Speichern von Excel-Dateien in C# ist eine häufige Aufgabe in vielen .NET-Anwendungen, insbesondere beim Erstellen von Berichten, Exportieren von Analysedaten oder Automatisieren von Systemprotokollen. Ob Sie mit Finanzzusammenfassungen oder täglichen Betriebsdaten arbeiten, die Fähigkeit, Excel-Dateien programmgesteuert zu erstellen und zu speichern, kann die Effizienz und Genauigkeit erheblich verbessern.
In C# können Entwickler Excel-Dateien auf vielfältige Weise handhaben – neue Arbeitsmappen erstellen, Daten schreiben und sie in verschiedenen Formaten wie XLSX, CSV oder PDF speichern. Mit Hilfe dedizierter Excel-Bibliotheken können diese Vorgänge effizient automatisiert werden, ohne auf Microsoft Excel oder manuelle Eingriffe angewiesen zu sein.
In diesem Artikel werden wir untersuchen, wie Sie:
- Ihre Entwicklungsumgebung vorbereiten
- DataTable- oder DataGridView-Daten in Excel speichern
- Excel-Dateien in verschiedenen Tabellenkalkulationsformaten speichern (CSV, XLS usw.)
- Excel-Dateien in Dokumentformate exportieren (PDF, HTML usw.)
- Excel-Arbeitsmappen in einem MemoryStream speichern für Web-Apps
- Bestehende Excel-Dateien öffnen und erneut speichern
Die Entwicklungsumgebung vorbereiten
Bevor Sie in den Code eintauchen, richten Sie Ihre Entwicklungsumgebung mit einer Excel-Bibliothek ein, die das Erstellen, Lesen und Speichern von Dateien in .NET unterstützt. In diesem Tutorial verwenden wir Kostenloses Spire.XLS für .NET.
Schritt 1: Spire.XLS über NuGet installieren
Install-Package FreeSpire.XLS
Schritt 2: Den erforderlichen Namespace importieren
using Spire.Xls;
Schritt 3: Eine einfache Excel-Datei erstellen, beschreiben und speichern
// Eine neue Arbeitsmappe erstellen und das erste Arbeitsblatt abrufen
Workbook workbook = new Workbook();
Worksheet sheet = workbook.Worksheets[0];

// "Hallo Welt!" in Zelle A1 schreiben
sheet.Range["A1"].Text = "Hallo Welt!";

// Die Arbeitsmappe in einer Datei speichern
workbook.SaveToFile("HelloWorld.xlsx", ExcelVersion.Version2016);
Dieses einfache Beispiel zeigt den grundlegenden Arbeitsablauf: Erstellen einer Arbeitsmappe, Schreiben von Daten in eine Zelle und Speichern der Datei.
Danach können Sie wichtige Klassen und Methoden wie zum Beispiel erkunden:
- Workbook – repräsentiert die gesamte Excel-Datei.
- Worksheet – repräsentiert ein einzelnes Blatt innerhalb der Arbeitsmappe.
- Range – ermöglicht den Zugriff auf bestimmte Zellen zur Eingabe, Formatierung oder Gestaltung.
- Workbook.SaveToFile() – speichert die Arbeitsmappe im angegebenen Excel-Format auf der Festplatte.
Daten in einer Excel-Datei in C# speichern
Das Speichern strukturierter Daten wie DataTable oder DataGridView in eine Excel-Datei ist eine der praktischsten Aufgaben in der C#-Entwicklung. Ob Ihre Anwendung Datenbankergebnisse, Inhalte von UI-Gittern oder automatisierte Berichte erzeugt, der Export dieser Datensätze nach Excel sorgt für bessere Lesbarkeit und Kompatibilität.
Beispiel 1: DataTable in Excel speichern
using Spire.Xls;
using System.Data;

Workbook workbook = new Workbook();
Worksheet sheet = workbook.Worksheets[0];
sheet.Name = "EmployeeData";

DataTable table = new DataTable();
table.Columns.Add("EmployeeID");
table.Columns.Add("FullName");
table.Columns.Add("Department");
table.Columns.Add("HireDate");
table.Columns.Add("Salary");

// Beispielzeilen hinzufügen
table.Rows.Add("E001", "Alice Johnson", "Finance", "2020-03-12", "7500");
table.Rows.Add("E002", "Bob Williams", "Human Resources", "2019-08-05", "6800");
table.Rows.Add("E003", "Catherine Lee", "IT", "2021-01-20", "8200");
table.Rows.Add("E004", "David Smith", "Marketing", "2018-11-30", "7100");
table.Rows.Add("E005", "Emily Davis", "Sales", "2022-06-15", "6900");

// Die DataTable in das Arbeitsblatt einfügen
sheet.InsertDataTable(table, true, 1, 1);

// Integrierte Formate anwenden
sheet.AllocatedRange.Rows[0].BuiltInStyle = BuiltInStyles.Heading1;
for (int i = 1; i < sheet.AllocatedRange.Rows.Count(); i++)
{
    sheet.AllocatedRange.Rows[i].BuiltInStyle = BuiltInStyles.Accent1;
}
sheet.AllocatedRange.AutoFitColumns();
sheet.AllocatedRange.AutoFitRows();

// In Excel speichern
workbook.SaveToFile("EmployeeDataExport.xlsx", FileFormat.Version2016);
Wie es funktioniert:
- InsertDataTable() fügt Daten ab einer bestimmten Zelle ein.
- Das true-Argument schließt Spaltenüberschriften ein.
- SaveToFile() speichert die Arbeitsmappe auf der Festplatte; der zweite Parameter gibt die Version des Excel-Formats an.
- FileFormat.Version2016 gibt die Version des Excel-Formats an.
Unten sehen Sie eine Beispielausgabe, die zeigt, wie die exportierte DataTable in Excel aussieht:
Beispiel 2: DataGridView in Excel speichern
Workbook workbook = new Workbook();
Worksheet sheet = workbook.Worksheets[0];

sheet.InsertDataTable(((DataTable)dataGridView1.DataSource), true, 1, 1);
workbook.SaveToFile("GridViewExport.xlsx", FileFormat.Version2016);
Tipp: Stellen Sie vor dem Speichern sicher, dass die Datenquelle Ihres DataGridView ordnungsgemäß in eine DataTable umgewandelt wird. Dadurch wird sichergestellt, dass die exportierte Struktur dem Layout des UI-Gitters entspricht.
Wenn Sie lernen möchten, wie Sie Excel-Dateien mit mehr Datentypen, Formatierungen und anderen Elementen erstellen, können Sie den Artikel Wie man Excel-Dateien in C# erstellt erkunden.
Excel-Datei als CSV oder XLS in C# speichern
Unterschiedliche Systeme und Plattformen erfordern unterschiedliche Tabellenkalkulationsformate. Während XLSX mittlerweile der Standard ist, bleiben CSV, XLS und andere Formate in Unternehmensumgebungen weiterhin üblich. Der Export in verschiedene Formate ermöglicht es, Excel-Daten von verschiedenen Anwendungen gemeinsam zu nutzen, zu verarbeiten oder zu importieren.
Beispiel 1: Excel als CSV speichern
CSV (Comma-Separated Values) ist ein einfaches textbasiertes Format, das sich ideal für den Datenaustausch mit Datenbanken, Webanwendungen oder anderen Systemen eignet, die reine Textdateien unterstützen.
Workbook workbook = new Workbook();
workbook.LoadFromFile("EmployeeDataExport.xlsx");
workbook.SaveToFile("Report.csv", ",", FileFormat.CSV);
Beispiel 2: Excel als XLS (Legacy-Format) speichern
XLS (Excel 97–2003-Format) ist ein altes Binärformat, das immer noch in älteren Systemen oder Anwendungen verwendet wird, die XLSX nicht unterstützen. Das Speichern im XLS-Format gewährleistet die Kompatibilität mit älteren Unternehmens-Workflows.
Workbook workbook = new Workbook();
workbook.LoadFromFile("EmployeeDataExport.xlsx");
workbook.SaveToFile("Report_legacy.xls", ExcelVersion.Version97to2003);
Zusätzlich unterstützte Tabellenkalkulationsformate
Zusätzlich zu den häufig verwendeten Formaten CSV, XLS und XLSX unterstützt die Bibliothek auch mehrere andere Tabellenkalkulations- und Vorlagenformate. Die folgende Tabelle listet diese Formate zusammen mit ihren entsprechenden FileFormat-Enumeration-Werten auf, um das programmgesteuerte Speichern von Dateien zu erleichtern.
| Format | Beschreibung | Entsprechende Enum (FileFormat) |
|---|---|---|
| ODS | OpenDocument-Tabellenkalkulation | FileFormat.ODS |
| XLSM | Excel-Arbeitsmappe mit Makros | FileFormat.Xlsm |
| XLSB | Binäre Excel-Arbeitsmappe | FileFormat.Xlsb2007 / FileFormat.Xlsb2010 |
| XLT | Excel 97–2003-Vorlage | FileFormat.XLT |
| XLTX | Excel Open XML-Vorlage | FileFormat.XLTX |
| XLTM | Excel-Vorlage mit Makros | FileFormat.XLTM |
Diese zusätzlichen Formate sind nützlich für Organisationen, die mit Altsystemen, offenen Dokumentenstandards oder makro-/vorlagenbasierten Automatisierungs-Workflows arbeiten.
Excel als PDF oder HTML in C# speichern
In vielen Fällen müssen Excel-Dateien zur einfacheren Veröffentlichung, zum Drucken oder zur gemeinsamen Nutzung in Dokument- oder Webformate konvertiert werden.
Der Export nach PDF ist ideal für Berichte mit festem Layout und zum Drucken, während HTML sich zum Anzeigen von Excel-Daten in einem Webbrowser eignet.
Beispiel 1: Excel als PDF speichern
Das folgende Beispiel zeigt, wie man eine Excel-Arbeitsmappe mit C# als PDF-Datei speichert. Dies ist nützlich, um Berichte zu erstellen, die Layout und Formatierung beibehalten.
Workbook workbook = new Workbook();
workbook.LoadFromFile("EmployeeDataExport.xlsx");
workbook.SaveToFile("EmployeeDataExport.pdf", FileFormat.PDF);
Hier ist ein Beispiel der generierten PDF-Datei nach dem Export aus Excel:
Beispiel 2: Excel als HTML speichern
Dieses Beispiel zeigt, wie man eine Excel-Arbeitsmappe als HTML-Datei speichert, was es einfach macht, die Daten in einem Webbrowser darzustellen oder in Webanwendungen zu integrieren.
Workbook workbook = new Workbook();
workbook.LoadFromFile("EmployeeDataExport.xlsx");
workbook.SaveToFile("EmployeeDataExport.html", FileFormat.HTML);
Unten sehen Sie eine Vorschau der exportierten HTML-Datei, wie sie in einem Browser dargestellt wird:
Zusätzlich unterstützte Dokument- & Web-Formate
Zusätzlich zu PDF und HTML unterstützt die Bibliothek mehrere andere dokumenten- und webfreundliche Formate. Die folgende Tabelle zeigt diese Formate zusammen mit ihren FileFormat-Enumeration-Werten zur einfachen Referenz.
| Format | Beschreibung | Entsprechende Enum (FileFormat) |
|---|---|---|
| XML | Als XML exportierte Excel-Daten | FileFormat.XML |
| Bitmap / Bild | Excel als Bitmap oder andere Bildformate exportieren | FileFormat.Bitmap |
| XPS | XML Paper Specification-Dokument | FileFormat.XPS |
| PostScript | PostScript-Dokument | FileFormat.PostScript |
| OFD | Open Fixed-layout Document-Format | FileFormat.OFD |
| PCL | Printer Command Language-Datei | FileFormat.PCL |
| Markdown | Markdown-Dateiformat | FileFormat.Markdown |
Diese Formate bieten zusätzliche Flexibilität für die Verteilung von Excel-Inhalten auf verschiedenen Plattformen und in unterschiedlichen Arbeitsabläufen, sei es für den Druck, die Web-Veröffentlichung oder die Automatisierung.
Eine Excel-Datei in MemoryStream in C# speichern
In Webanwendungen oder Cloud-Diensten ist das direkte Speichern von Excel-Dateien auf der Festplatte aus Sicherheits- oder Leistungsgründen möglicherweise nicht ideal. Die Verwendung von MemoryStream ermöglicht es Ihnen, Excel-Dateien im Speicher zu erstellen und sie direkt an Clients zum Download zu liefern. Spire.XLS für .NET unterstützt auch sowohl das Laden und Speichern von Arbeitsmappen über MemoryStream, was die Handhabung von Excel-Dateien vollständig im Speicher erleichtert.
Workbook workbook = new Workbook();
Worksheet sheet = workbook.Worksheets[0];
sheet.Range["A1"].Text = "Export to Stream";

using (MemoryStream stream = new MemoryStream())
{
    workbook.SaveToStream(stream, ExcelVersion.Version2016);
    byte[] bytes = stream.ToArray();

    // Beispiel: Bytes zum Herunterladen an den Client in ASP.NET senden
    // Response.BinaryWrite(bytes);
}
Dieser Ansatz ist besonders nützlich für ASP.NET, Web API oder Cloud-Dienste, bei denen Sie Excel-Dateien dynamisch bereitstellen möchten, ohne temporäre Dateien auf dem Server zu erstellen.
Excel-Dateien in C# öffnen und erneut speichern
In vielen Anwendungen müssen Sie möglicherweise eine bestehende Excel-Arbeitsmappe laden, Aktualisierungen oder Änderungen anwenden und sie dann wieder auf der Festplatte speichern oder in ein anderes Format konvertieren. Dies ist üblich beim Aktualisieren von Berichten, Ändern exportierter Daten oder Automatisieren von Excel-Datei-Workflows.
Beispiel: Eine Excel-Datei öffnen und aktualisieren
Der folgende C#-Code lädt die vorherige Arbeitsmappe, aktualisiert die erste Zelle und speichert die Änderungen:
Workbook workbook = new Workbook();
workbook.LoadFromFile("EmployeeDataExport.xlsx");

Worksheet sheet = workbook.Worksheets[0];
sheet.Range["A1"].Text = "Updated Content"; // Den Zellwert aktualisieren
sheet.Range["A1"].AutoFitColumns(); // Die Spaltenbreite automatisch anpassen

// Die aktualisierte Arbeitsmappe speichern
workbook.Save(); // Speichert in der Originaldatei
workbook.SaveToFile("UpdatedCopy.xlsx", ExcelVersion.Version2016); // Als neue Datei speichern
Der folgende Screenshot zeigt das aktualisierte Excel-Blatt nach dem Ändern und Speichern der Datei:
Sie können sich auch die detaillierte Anleitung zum Bearbeiten von Excel-Dateien mit C# für fortgeschrittenere Szenarien ansehen.
Beste Praktiken beim Speichern von Excel-Dateien
-
Dateiüberschreibungen vermeiden
Überprüfen Sie vor dem Speichern, ob die Zieldatei vorhanden ist, um versehentlichen Datenverlust zu vermeiden.
-
Berechtigungen und Pfade korrekt behandeln
Stellen Sie sicher, dass Ihre Anwendung Schreibzugriff auf den Zielordner hat, insbesondere in Web- oder Cloud-Umgebungen.
-
Das richtige Format wählen
Verwenden Sie XLSX für moderne Kompatibilität, CSV für den Datenaustausch und PDF zum Drucken oder Teilen von Berichten.
Fazit
Das Speichern von Excel-Dateien in C# deckt eine breite Palette von Operationen ab – vom Schreiben strukturierter Datensätze über den Export in verschiedene Tabellenkalkulationsformate und die Konvertierung in PDF/HTML bis hin zur Handhabung von Dateiströmen in Webanwendungen.
Mit der Flexibilität, die Bibliotheken wie Spire.XLS für .NET bieten, können Entwickler leistungsstarke Excel-Automatisierungs-Workflows mühelos implementieren.
FAQ
F1: Wie speichere ich eine Excel-Datei in C#?
Verwenden Sie SaveToFile() mit der entsprechenden ExcelVersion oder FileFormat:
workbook.SaveToFile("Report.xlsx", ExcelVersion.Version2016);
F2: Wie öffne und ändere ich eine vorhandene Excel-Datei?
Laden Sie die Arbeitsmappe mit LoadFromFile(), nehmen Sie Änderungen vor und speichern Sie dann:
Workbook workbook = new Workbook();
workbook.LoadFromFile("ExistingFile.xlsx");
workbook.Worksheets[0].Range["A1"].Text = "Updated Content";
workbook.SaveToFile("UpdatedFile.xlsx", ExcelVersion.Version2016);
F3: Wie speichere ich als CSV oder PDF?
Geben Sie das gewünschte FileFormat in SaveToFile() an:
workbook.SaveToFile("Report.csv", ",", FileFormat.CSV);
workbook.SaveToFile("Report.pdf", FileFormat.PDF);
F4: Kann ich Excel im Speicher anstatt auf der Festplatte speichern?
Ja. Verwenden Sie SaveToStream(), um in einen MemoryStream auszugeben, was in Web- oder Cloud-Anwendungen nützlich ist:
using (MemoryStream stream = new MemoryStream())
{
    workbook.SaveToStream(stream, ExcelVersion.Version2016);
    byte[] bytes = stream.ToArray();
}
Siehe auch
C# Сохранить файл Excel — Сохранить Excel в XLSX, PDF и другие форматы
Сохранение файлов Excel в C# — это обычная задача во многих .NET-приложениях, особенно при создании отчетов, экспорте аналитических данных или автоматизации системных журналов. Независимо от того, работаете ли вы с финансовыми сводками или данными о ежедневных операциях, возможность программно создавать и сохранять файлы Excel может значительно повысить эффективность и точность.
В C# разработчики могут работать с файлами Excel несколькими способами: создавать новые книги, записывать данные и сохранять их в различных форматах, таких как XLSX, CSV или PDF. С помощью специализированных библиотек для Excel эти операции можно эффективно автоматизировать, не полагаясь на Microsoft Excel или ручное вмешательство.
В этой статье мы рассмотрим, как:
- Подготовить среду разработки
- Сохранять данные из DataTable или DataGridView в Excel
- Сохранять файлы Excel в различных форматах электронных таблиц (CSV, XLS и т. д.)
- Экспортировать файлы Excel в форматы документов (PDF, HTML и т. д.)
- Сохранять книги Excel в MemoryStream для веб-приложений
- Открывать и повторно сохранять существующие файлы Excel
Подготовьте среду разработки
Прежде чем углубляться в код, настройте свою среду разработки с помощью библиотеки Excel, которая поддерживает создание, чтение и сохранение файлов в .NET. В этом руководстве мы будем использовать Free Spire.XLS для .NET.
Шаг 1: Установите Spire.XLS через NuGet
Install-Package FreeSpire.XLS
Шаг 2: Импортируйте необходимое пространство имен
using Spire.Xls;
Шаг 3: Создайте, запишите и сохраните простой файл Excel
// Создать новую книгу и получить первый лист
Workbook workbook = new Workbook();
Worksheet sheet = workbook.Worksheets[0];

// Записать "Hello World!" в ячейку A1
sheet.Range["A1"].Text = "Hello World!";

// Сохранить книгу в файл
workbook.SaveToFile("HelloWorld.xlsx", ExcelVersion.Version2016);
Этот простой пример показывает основной рабочий процесс: создание книги, запись данных в ячейку и сохранение файла.
После этого вы можете изучить ключевые классы и методы, такие как:
- Workbook – представляет весь файл Excel.
- Worksheet – представляет один лист в книге.
- Range – позволяет получать доступ к определенным ячейкам для ввода, форматирования или стилизации.
- Workbook.SaveToFile() – сохраняет книгу на диск в указанном формате Excel.
Сохранение данных в файл Excel на C#
Сохранение структурированных данных, таких как DataTable или DataGridView, в файл Excel — одна из самых практичных задач в разработке на C#. Независимо от того, создает ли ваше приложение результаты базы данных, содержимое сетки пользовательского интерфейса или автоматизированные отчеты, экспорт этих наборов данных в Excel обеспечивает лучшую читаемость и совместимость.
Пример 1: Сохранение DataTable в Excel
using Spire.Xls;
using System.Data;

Workbook workbook = new Workbook();
Worksheet sheet = workbook.Worksheets[0];
sheet.Name = "EmployeeData";

DataTable table = new DataTable();
table.Columns.Add("EmployeeID");
table.Columns.Add("FullName");
table.Columns.Add("Department");
table.Columns.Add("HireDate");
table.Columns.Add("Salary");

// Add sample rows
table.Rows.Add("E001", "Alice Johnson", "Finance", "2020-03-12", "7500");
table.Rows.Add("E002", "Bob Williams", "Human Resources", "2019-08-05", "6800");
table.Rows.Add("E003", "Catherine Lee", "IT", "2021-01-20", "8200");
table.Rows.Add("E004", "David Smith", "Marketing", "2018-11-30", "7100");
table.Rows.Add("E005", "Emily Davis", "Sales", "2022-06-15", "6900");

// Вставить DataTable в лист
sheet.InsertDataTable(table, true, 1, 1);

// Применить встроенные форматы
sheet.AllocatedRange.Rows[0].BuiltInStyle = BuiltInStyles.Heading1;
for (int i = 1; i < sheet.AllocatedRange.Rows.Count(); i++)
{
    sheet.AllocatedRange.Rows[i].BuiltInStyle = BuiltInStyles.Accent1;
}
sheet.AllocatedRange.AutoFitColumns();
sheet.AllocatedRange.AutoFitRows();

// Сохранить в Excel
workbook.SaveToFile("EmployeeDataExport.xlsx", FileFormat.Version2016);
Как это работает:
- InsertDataTable() вставляет данные, начиная с определенной ячейки.
- Аргумент true включает заголовки столбцов.
- SaveToFile() сохраняет книгу на диск; второй параметр указывает версию формата Excel.
- FileFormat.Version2016 указывает версию формата Excel.
Ниже приведен пример вывода, показывающий, как экспортированный DataTable выглядит в Excel:
Пример 2: Сохранение DataGridView в Excel
Workbook workbook = new Workbook();
Worksheet sheet = workbook.Worksheets[0];

sheet.InsertDataTable(((DataTable)dataGridView1.DataSource), true, 1, 1);
workbook.SaveToFile("GridViewExport.xlsx", FileFormat.Version2016);
Совет: Перед сохранением убедитесь, что источник данных вашего DataGridView правильно приведен к DataTable. Это гарантирует, что экспортированная структура будет соответствовать макету сетки пользовательского интерфейса.
Если вы хотите узнать, как создавать файлы Excel с большим количеством типов данных, форматированием и другими элементами, вы можете изучить статью Как создавать файлы Excel на C#.
Сохранение файла Excel в формате CSV или XLS на C#
Различные системы и платформы требуют разных форматов электронных таблиц. Хотя XLSX сейчас является стандартом, CSV, XLS и другие форматы остаются распространенными в корпоративных средах. Экспорт в различные форматы позволяет обмениваться данными Excel, обрабатывать их или импортировать в различные приложения.
Пример 1: Сохранение Excel в формате CSV
CSV (значения, разделенные запятыми) — это простой текстовый формат, идеально подходящий для обмена данными с базами данных, веб-приложениями или другими системами, поддерживающими обычные текстовые файлы.
Workbook workbook = new Workbook();
workbook.LoadFromFile("EmployeeDataExport.xlsx");
workbook.SaveToFile("Report.csv", ",", FileFormat.CSV);
Пример 2: Сохранение Excel в формате XLS (устаревший формат)
XLS (формат Excel 97–2003) — это устаревший двоичный формат, который до сих пор используется в старых системах или приложениях, не поддерживающих XLSX. Сохранение в XLS обеспечивает совместимость с устаревшими корпоративными рабочими процессами.
Workbook workbook = new Workbook();
workbook.LoadFromFile("EmployeeDataExport.xlsx");
workbook.SaveToFile("Report_legacy.xls", ExcelVersion.Version97to2003);
Дополнительные поддерживаемые форматы электронных таблиц
В дополнение к часто используемым форматам CSV, XLS и XLSX, библиотека также поддерживает несколько других форматов электронных таблиц и шаблонов. В таблице ниже перечислены эти форматы вместе с соответствующими им значениями перечисления FileFormat для удобства при программном сохранении файлов.
| Формат | Описание | Соответствующий Enum (FileFormat) |
|---|---|---|
| ODS | Электронная таблица OpenDocument | FileFormat.ODS |
| XLSM | Книга Excel с поддержкой макросов | FileFormat.Xlsm |
| XLSB | Двоичная книга Excel | FileFormat.Xlsb2007 / FileFormat.Xlsb2010 |
| XLT | Шаблон Excel 97–2003 | FileFormat.XLT |
| XLTX | Шаблон Excel Open XML | FileFormat.XLTX |
| XLTM | Шаблон Excel с поддержкой макросов | FileFormat.XLTM |
Эти дополнительные форматы полезны для организаций, которые работают с устаревшими системами, стандартами открытых документов или рабочими процессами автоматизации на основе макросов/шаблонов.
Сохранение Excel в формате PDF или HTML на C#
Во многих случаях файлы Excel необходимо преобразовывать в форматы документов или веб-форматы для упрощения публикации, печати или обмена.
Экспорт в PDF идеально подходит для отчетов с фиксированным макетом и печати, в то время как HTML подходит для просмотра данных Excel в веб-браузере.
Пример 1: Сохранение Excel в формате PDF
В следующем примере показано, как сохранить книгу Excel в виде файла PDF с помощью C#. Это полезно для создания отчетов, сохраняющих макет и форматирование.
Workbook workbook = new Workbook();
workbook.LoadFromFile("EmployeeDataExport.xlsx");
workbook.SaveToFile("EmployeeDataExport.pdf", FileFormat.PDF);
Вот пример сгенерированного PDF-файла после экспорта из Excel:
Пример 2: Сохранение Excel в формате HTML
Этот пример демонстрирует, как сохранить книгу Excel в виде HTML-файла, что упрощает отображение данных в веб-браузере или интеграцию с веб-приложениями.
Workbook workbook = new Workbook();
workbook.LoadFromFile("EmployeeDataExport.xlsx");
workbook.SaveToFile("EmployeeDataExport.html", FileFormat.HTML);
Ниже приведен предварительный просмотр экспортированного HTML-файла, отображенного в браузере:
Дополнительные поддерживаемые форматы документов и веб-форматы
Помимо PDF и HTML, библиотека поддерживает несколько других форматов, удобных для документов и веба. В таблице ниже показаны эти форматы вместе с их значениями перечисления FileFormat для удобства.
| Формат | Описание | Соответствующий Enum (FileFormat) |
|---|---|---|
| XML | Данные Excel, экспортированные в формате XML | FileFormat.XML |
| Растровое изображение / Изображение | Экспорт Excel в растровое изображение или другие форматы изображений | FileFormat.Bitmap |
| XPS | Документ XML Paper Specification | FileFormat.XPS |
| PostScript | Документ PostScript | FileFormat.PostScript |
| OFD | Формат документа с фиксированным макетом Open Fixed-layout | FileFormat.OFD |
| PCL | Файл языка команд принтера | FileFormat.PCL |
| Markdown | Формат файла Markdown | FileFormat.Markdown |
Эти форматы обеспечивают дополнительную гибкость для распространения содержимого Excel на различных платформах и в рабочих процессах, будь то для печати, веб-публикации или автоматизации.
Сохранение файла Excel в MemoryStream на C#
В веб-приложениях или облачных сервисах сохранение файлов Excel непосредственно на диск может быть нецелесообразным по соображениям безопасности или производительности. Использование MemoryStream позволяет создавать файлы Excel в памяти и доставлять их непосредственно клиентам для загрузки. Spire.XLS для .NET также поддерживает как загрузку, так и сохранение книг через MemoryStream, что упрощает обработку файлов Excel полностью в памяти.
Workbook workbook = new Workbook();
Worksheet sheet = workbook.Worksheets[0];
sheet.Range["A1"].Text = "Export to Stream";

using (MemoryStream stream = new MemoryStream())
{
    workbook.SaveToStream(stream, ExcelVersion.Version2016);
    byte[] bytes = stream.ToArray();

    // Пример: отправить байты клиенту для загрузки в ASP.NET
    // Response.BinaryWrite(bytes);
}
Этот подход особенно полезен для ASP.NET, Web API или облачных сервисов, где вы хотите динамически обслуживать файлы Excel, не создавая временных файлов на сервере.
Открытие и повторное сохранение файлов Excel на C#
Во многих приложениях вам может понадобиться загрузить существующую книгу Excel, применить обновления или изменения, а затем сохранить ее обратно на диск или преобразовать в другой формат. Это часто встречается при обновлении отчетов, изменении экспортированных данных или автоматизации рабочих процессов с файлами Excel.
Пример: открытие и обновление файла Excel
Следующий код C# загружает предыдущую книгу, обновляет первую ячейку и сохраняет изменения:
Workbook workbook = new Workbook();
workbook.LoadFromFile("EmployeeDataExport.xlsx");

Worksheet sheet = workbook.Worksheets[0];
sheet.Range["A1"].Text = "Updated Content"; // Обновить значение ячейки
sheet.Range["A1"].AutoFitColumns(); // Автоподбор ширины столбца

// Сохранить обновленную книгу
workbook.Save(); // Сохраняет в исходный файл
workbook.SaveToFile("UpdatedCopy.xlsx", ExcelVersion.Version2016); // Сохранить как новый файл
На скриншоте ниже показан обновленный лист Excel после изменения и сохранения файла:
Вы также можете ознакомиться с подробным руководством по редактированию файлов Excel с использованием C# для более сложных сценариев.
Лучшие практики при сохранении файлов Excel
-
Избегайте перезаписи файлов
Проверяйте, существует ли целевой файл, перед сохранением, чтобы предотвратить случайную потерю данных.
-
Правильно управляйте разрешениями и путями
Убедитесь, что у вашего приложения есть права на запись в целевую папку, особенно в веб- или облачных средах.
-
Выберите правильный формат
Используйте XLSX для современной совместимости, CSV для обмена данными и PDF для печати или обмена отчетами.
Заключение
Сохранение файлов Excel в C# охватывает широкий спектр операций — от записи структурированных наборов данных, экспорта в различные форматы электронных таблиц, преобразования в PDF/HTML до обработки файловых потоков в веб-приложениях.
Благодаря гибкости, предлагаемой такими библиотеками, как Spire.XLS для .NET, разработчики могут с легкостью реализовывать мощные рабочие процессы автоматизации Excel.
Часто задаваемые вопросы
В1: Как сохранить файл Excel на C#?
Используйте SaveToFile() с соответствующим ExcelVersion или FileFormat:
workbook.SaveToFile("Report.xlsx", ExcelVersion.Version2016);
В2: Как открыть и изменить существующий файл Excel?
Загрузите книгу с помощью LoadFromFile(), внесите изменения, затем сохраните:
Workbook workbook = new Workbook();
workbook.LoadFromFile("ExistingFile.xlsx");
workbook.Worksheets[0].Range["A1"].Text = "Updated Content";
workbook.SaveToFile("UpdatedFile.xlsx", ExcelVersion.Version2016);
В3: Как сохранить в формате CSV или PDF?
Укажите желаемый FileFormat в SaveToFile():
workbook.SaveToFile("Report.csv", ",", FileFormat.CSV);
workbook.SaveToFile("Report.pdf", FileFormat.PDF);
В4: Могу ли я сохранить Excel в память, а не на диск?
Да. Используйте SaveToStream() для вывода в MemoryStream, что полезно в веб- или облачных приложениях:
using (MemoryStream stream = new MemoryStream())
{
    workbook.SaveToStream(stream, ExcelVersion.Version2016);
    byte[] bytes = stream.ToArray();
}
Смотрите также
Convertire Excel in XML: strumenti gratuiti + automazione Python
Se lavori con dati che devono essere condivisi tra software, API o siti web, la conversione da Excel a XML è un'abilità fondamentale. XML (Extensible Markup Language) è un formato universale e leggibile dalle macchine, ideale per lo scambio di dati, mentre Excel eccelle nell'organizzazione di fogli di calcolo. Colmare il divario tra i due consente ai tuoi dati di fluire senza interruzioni tra le piattaforme.
Che tu sia un principiante alla ricerca di una soluzione rapida, un analista che garantisce l'integrità dei dati o uno sviluppatore che crea una pipeline automatizzata, questa guida ti illustrerà tre metodi di conversione da Excel a XML efficaci e privi di errori.
- Metodo 1: Conversione manuale da Excel a XML (scheda Sviluppo integrata)
- Metodo 2: Convertitori online gratuiti da Excel a XML
- Metodo 3: Automatizzare la conversione da Excel a XML in Python
Perché convertire Excel in XML?
Il valore principale della conversione da Excel a XML risiede in:
- Compatibilità multipiattaforma: XML funziona con API, piattaforme CMS (WordPress, Shopify), strumenti aziendali (SAP, Salesforce) e linguaggi di programmazione (Python, Java).
- Dati strutturati: XML conserva le righe/colonne di Excel come elementi con tag (ad es.
<prodotto><nome>Laptop</nome><prezzo>999</prezzo></prodotto>), rendendolo facile da analizzare per il software. - Integrità dei dati: XML evita problemi di formattazione che affliggono i file Excel (ad es. formule interrotte, celle unite) quando condivisi tra sistemi.
- Casi d'uso: feed di prodotti per l'e-commerce, esportazioni di dati da API, importazioni di contenuti CMS e integrazione di dati aziendali.
Strutturare i dati di Excel per una conversione di successo
Il primo e più critico passaggio avviene in Excel. Un foglio di origine ben strutturato garantisce una conversione senza problemi.
- Utilizza intestazioni di colonna uniche e brevi (senza spazi/caratteri speciali, ad es. "NomeProdotto" invece di "Nome Prodotto").
- Rimuovi righe/colonne vuote (causano errori di convalida XML).
- Garantisci tipi di dati coerenti (ad es. tutti i prezzi come numeri, date in un formato uniforme).
- Evita celle unite o formule complesse; utilizza invece dati grezzi.
Metodo 1: Conversione manuale da Excel a XML (scheda Sviluppo integrata)
La scheda Sviluppo integrata di Excel fornisce supporto nativo per le attività XML, rendendola accessibile agli utenti di Excel senza conoscenze di programmazione.
Guida passo passo:
Passaggio 1: prepara i tuoi dati Excel
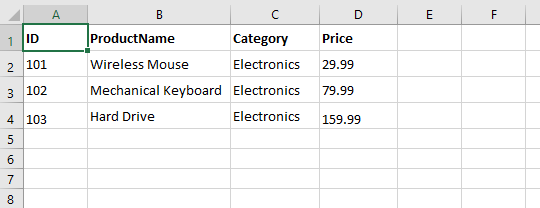
Struttura i tuoi dati in un formato tabellare chiaro. La prima riga dovrebbe contenere le intestazioni delle colonne, che diventeranno i tuoi tag XML. Per questo esempio, usiamo un semplice elenco di prodotti:
Passaggio 2: crea uno schema XML
Uno schema XML (file .xsd) definisce la struttura del tuo output XML. Specifica quali tag utilizzare e come si relazionano tra loro.
Schema di esempio (salvalo come "products.xsd" sul tuo computer):
<?xml version="1.0" encoding="UTF-8"?>
<xs:schema xmlns:xs="http://www.w3.org/2001/XMLSchema">
  <xs:element name="Catalog">
    <xs:complexType>
      <xs:sequence>
        <xs:element name="Product" maxOccurs="unbounded">
          <xs:complexType>
            <xs:sequence>
              <xs:element name="ID" type="xs:integer"/>
              <xs:element name="ProductName" type="xs:string"/>
              <xs:element name="Category" type="xs:string"/>
              <xs:element name="Price" type="xs:decimal"/>
            </xs:sequence>
          </xs:complexType>
        </xs:element>
      </xs:sequence>
    </xs:complexType>
  </xs:element>
</xs:schema>
- Regola gli attributi `name` in modo che corrispondano alle intestazioni delle colonne di Excel (sensibile alle maiuscole).
- Usa tipi appropriati (ad es. xsd:integer per i numeri, xsd:string per il testo).
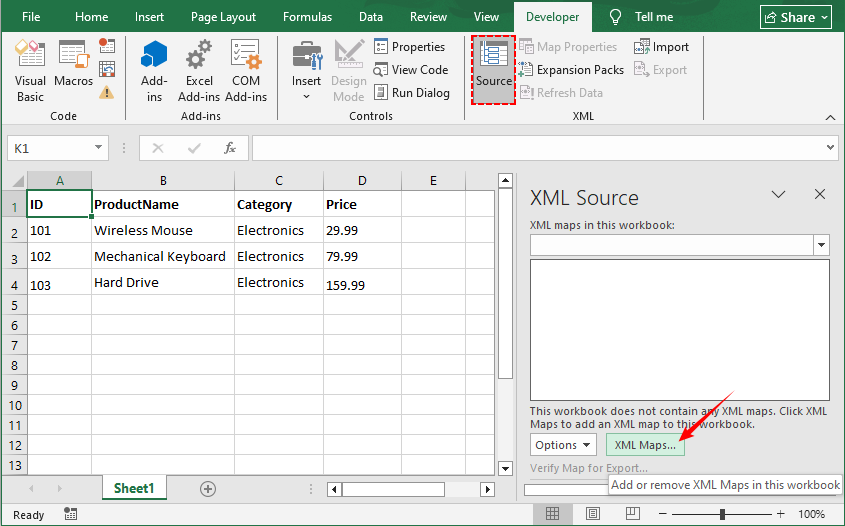
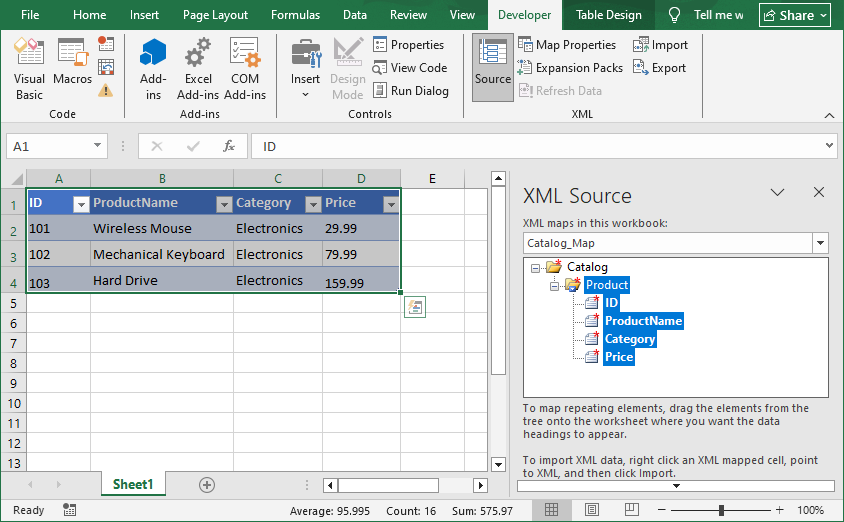
Passaggio 3: aggiungi lo schema a Excel
- Apri il tuo file Excel.
- Vai alla scheda Sviluppo. (Se non la vedi, vai su File > Opzioni > Personalizza barra multifunzione, seleziona "Sviluppo" e fai clic su "OK".)
- Nella scheda Sviluppo, fai clic su Origine per aprire il riquadro Origine XML.
- Fai clic su Mappe XML... e poi su Aggiungi....
- Allega il file di schema .xsd che hai creato utilizzando la finestra di dialogo Mappe XML
Passaggio 4: mappa gli elementi XML alle tue celle
- Nel riquadro Origine XML, vedrai i tuoi elementi ("Catalogo", "Prodotto", "ID", ecc.).
- Trascina l'elemento "Prodotto" e rilascialo sulla cella A1. Excel creerà una tabella ben formattata.
- Gli elementi verranno ora mappati. I tuoi dati sono ora pronti per l'esportazione.
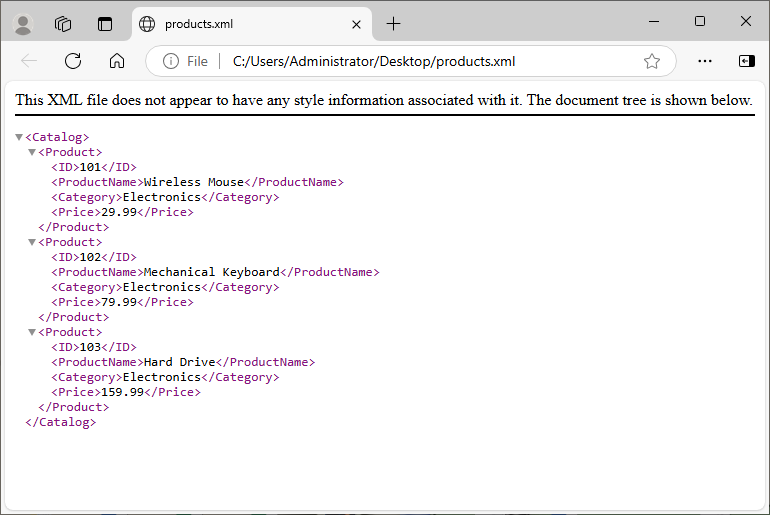
Passaggio 5: esporta in XML
- Con i dati mappati selezionati, torna alla scheda Sviluppo.
- Fai clic su Esporta.
- Scegli una posizione e un nome per il tuo nuovo file XML e fai clic su OK.
Il file XML esportato corrisponderà al tuo schema, in questo modo:
Potrebbe piacerti anche: Converti facilmente XLS/XLSX in HTML — Mantieni intatta la formattazione di Excel
Metodo 2: Convertitori online gratuiti da Excel a XML
Se hai bisogno di una conversione rapida e una tantum senza la configurazione tecnica, gli strumenti online sono i tuoi migliori amici.
I migliori strumenti per convertire Excel in XML online (100% gratuiti, senza registrazione):
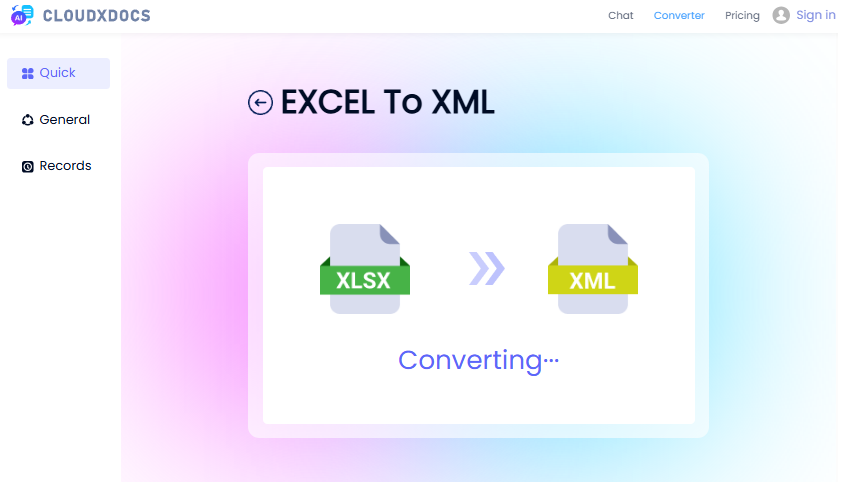
1. CloudxDocs (il più facile da usare)
- Vai al convertitore CloudxDocs DA EXCEL A XML.
- Carica il tuo file Excel (supporta XLS, XLSX, XLSB).
- Attendi il completamento della conversione e scarica il tuo file XML.
Questo convertitore produce per impostazione predefinita un file Foglio di calcolo XML che preserva la formattazione di Excel.
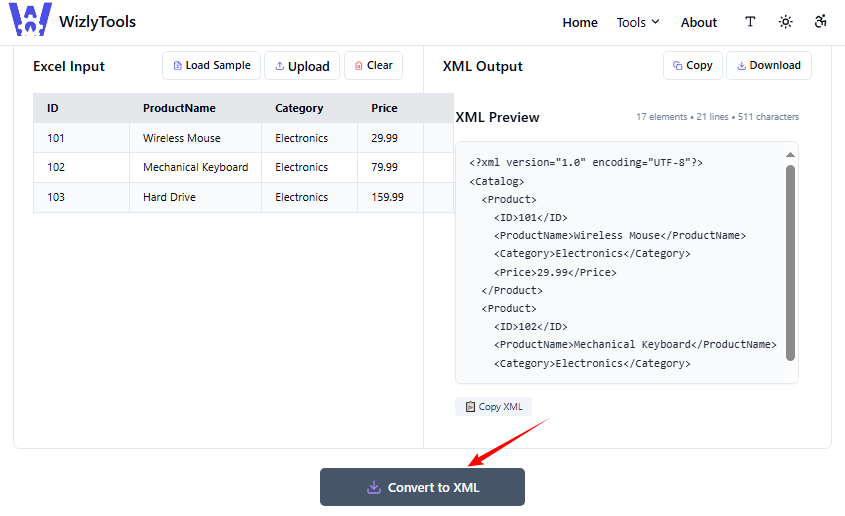
2. WizlyTools (supporta XML personalizzato)
- Vai al convertitore WizlyTools da Excel a XML.
- Carica un file Excel (.xlsx, .xls).
- Inserisci il nome dell'elemento radice e il nome dell'elemento riga.
- Seleziona una dimensione di rientro per il tuo output XML.
- Fai clic su "Converti in XML" e quindi copia o scarica l'XML risultante
Questo convertitore ti dà un maggiore controllo sulla struttura XML, come la definizione di un elemento radice specifico, un elemento riga e ti consente di visualizzare l'anteprima dell'XML prima di scaricarlo
Nota: evita di caricare dati sensibili (ad es. registri finanziari) su strumenti online. Utilizza metodi manuali per i file riservati.
Metodo 3: Automatizzare la conversione da Excel a XML in Python
Per sviluppatori e professionisti IT che lavorano in Python, Spire.XLS for Python fornisce una soluzione solida e basata su codice per convertire fogli di calcolo Excel in XML senza richiedere l'installazione di Microsoft Excel. Questo è ideale per l'automazione lato server e l'integrazione di applicazioni.
Passaggio 1: installazione
Innanzitutto, è necessario installare la libreria Spire.XLS for Python. È disponibile tramite PyPI.
pip install Spire.XLS
Passaggio 2: scrivi lo script Python
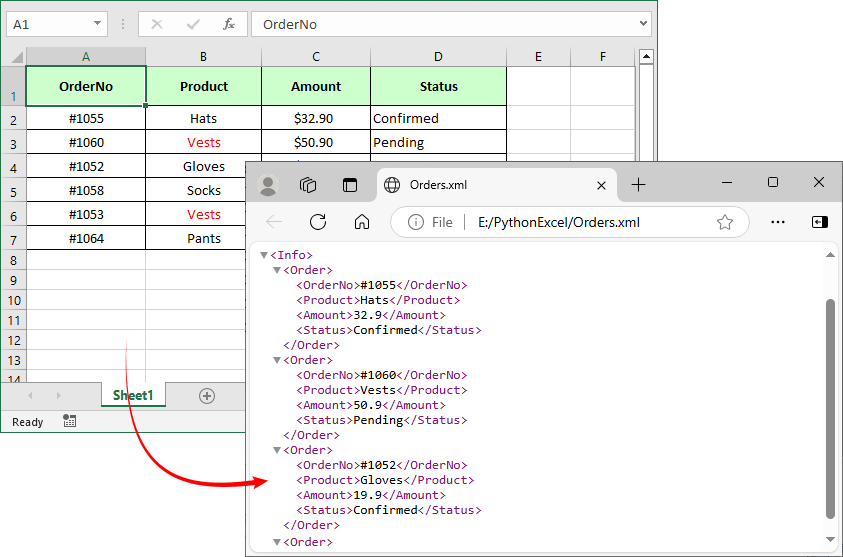
Questo script utilizza Spire.XLS per leggere i dati di Excel, quindi genera XML con i moduli integrati di Python xml.etree.ElementTree (per la struttura) e minidom (per una formattazione gradevole).
from spire.xls import *
import xml.etree.ElementTree as ET
from xml.dom import minidom

# Load the Excel file
workbook = Workbook()
workbook.LoadFromFile("Orders.xlsx")

# Get the first worksheet
worksheet = workbook.Worksheets[0]

# Get row and column counts (Spire.XLS uses 1-based indexing)
max_row = worksheet.LastRow
max_col = worksheet.LastColumn

# Check if data exists (headers in row 1, data in row 2+)
if max_row < 2:
    raise ValueError("No data found! Ensure headers are in row 1 and data starts in row 2.")

# Create XML root element
root = ET.Element("Info")

# Loop through data rows (skip row 1: headers)
for row in range(2, max_row + 1):
    # Create a row element (e.g., <Order>)
    row_element = ET.SubElement(root, "Order")

    # Loop through columns to get headers and values
    for col in range(1, max_col + 1):
        # Get header (XML tag)
        header = worksheet.Range[1, col].Value

        # Get cell value (data for the XML tag)
        cell_value = worksheet.Range[row, col].Value

        # Create sub-element and add value
        ET.SubElement(row_element, header).text = str(cell_value)

# Pretty-print XML (add indentation for readability)
rough_string = ET.tostring(root, 'utf-8')
reparsed = minidom.parseString(rough_string)
pretty_xml = reparsed.toprettyxml(indent="  ")

# Save to XML file
with open("Orders.xml", 'w', encoding='utf-8') as f:
    f.write(pretty_xml)

# Close the workbook
workbook.Dispose()
Spiegazione del codice:
- Carica file Excel: utilizza Spire.XLS per aprire un file Excel e accedere al suo primo foglio di lavoro.
- Definisci intervallo di dati: trova l'ultima riga e colonna con dati (indicizzazione basata su 1 in Spire.XLS) per conoscere i limiti dei dati.
- Crea struttura XML:
- Crea un elemento radice XML
<Info>. - Scorre ogni riga di dati (a partire dalla riga 2), creando un elemento
<Order>per ciascuna. - Per ogni colonna nella riga: utilizza l'intestazione dalla riga 1 come tag XML e il valore della cella come contenuto del tag.
- Crea un elemento radice XML
- Salva XML: formatta l'XML con rientro (per leggibilità) e lo salva in un file XML.
XML di output di esempio
Spire.XLS for Python fornisce anche un metodo diretto SaveAsXml() per convertire Excel in formato Open XML.
Considerazioni finali
La conversione da Excel a XML è un'abilità fondamentale che sblocca il vero potenziale dei tuoi dati, consentendo loro di fluire senza problemi in applicazioni web, file di configurazione e altri sistemi aziendali. Comprendendo i metodi disponibili, dalla potenza controllata delle Mappe XML di Excel alla rapidità degli strumenti online e alla forza industriale dello scripting Python, puoi scegliere lo strumento giusto per ogni lavoro.
Domande frequenti sulla conversione da Excel a XML
D1: Come posso convertire in batch più file Excel in XML contemporaneamente?
La conversione batch consente di risparmiare tempo per più di 10 file: utilizza questi metodi in base al tuo livello di abilità:
- Strumenti online: Zamzar supporta fino a 50 file per batch (carica tutti i file Excel, seleziona "XML" come output e ottieni uno zip di XML).
- Spire.XLS for Python: estendi lo script fornito per scorrere una cartella
import os
from spire.xls import *
import xml.etree.ElementTree as ET
from xml.dom import minidom

input_folder = "C:/Excel_Batch"
output_folder = "C:/XML_Batch"
os.makedirs(output_folder, exist_ok=True)

for filename in os.listdir(input_folder):
    if filename.endswith((".xlsx", ".xls")):
        workbook = Workbook()
        workbook.LoadFromFile(os.path.join(input_folder, filename))
        # Add conversion logic (same as single file) here
        workbook.Dispose()
D2: Posso personalizzare la struttura XML (ad es. modificare i tag radice/riga)?
Sì, tutti i metodi supportano la personalizzazione:
- Manuale: modifica il file dello schema XML (.xsd) per modificare i tag radice (ad es.
<Catalogo>) o riga (ad es.<Prodotto>). - Online: strumenti come WizlyTools ti consentono di impostare i nomi degli elementi radice/riga nelle impostazioni.
- Python: modifica le righe ET.Element("NomeRadice") e ET.SubElement(root, "NomeRiga") dello script in base alle tue esigenze.
D3: I miei dati contengono formule. L'output XML conterrà la formula o il valore calcolato?
In quasi tutti i casi, l'esportazione XML conterrà il valore calcolato (il risultato della formula), non la formula stessa. XML è principalmente un formato per rappresentare i dati, non la logica o i calcoli dietro di essi. Il processo di conversione legge i valori visibili delle celle.
D4: Il mio file XML sembra disordinato quando lo apro. Come posso formattarlo correttamente?
L'XML generato da questi metodi è spesso in un formato compresso senza interruzioni di riga o rientri. Questo è ancora un XML valido. Per visualizzarlo in un formato leggibile:
- Apri il file in un browser web moderno (Chrome, Firefox, Edge), che lo formatterà e lo visualizzerà automaticamente in modo ordinato.
- Usa un editor di codice come VS Code, Notepad++ o Sublime Text, che dispongono di formattazione XML integrata o plug-in per re-indentare il codice.
Vedi anche
Converter Excel para XML: ferramentas gratuitas + automação com Python
Se você está trabalhando com dados que precisam ser compartilhados entre softwares, APIs ou sites, converter Excel para XML é uma habilidade crucial. XML (Extensible Markup Language) é um formato universal e legível por máquina, ideal para intercâmbio de dados, enquanto o Excel se destaca na organização de planilhas. Superar a lacuna entre eles permite que seus dados fluam perfeitamente entre plataformas.
Seja você um iniciante em busca de uma solução rápida, um analista garantindo a integridade dos dados ou um desenvolvedor construindo um pipeline automatizado, este guia o guiará por três métodos eficazes e sem erros de conversão de Excel para XML.
- Método 1: Conversão Manual de Excel para XML (Guia de Desenvolvedor Integrada)
- Método 2: Conversores Online Gratuitos de Excel para XML
- Método 3: Automatizar a Conversão de Excel para XML em Python
Por que converter Excel para XML?
O valor principal da conversão de Excel para XML reside em:
- Compatibilidade entre Plataformas: O XML funciona com APIs, plataformas de CMS (WordPress, Shopify), ferramentas empresariais (SAP, Salesforce) e linguagens de programação (Python, Java).
- Dados Estruturados: O XML preserva as linhas/colunas do Excel como elementos marcados (por exemplo,
<produto><nome>Laptop</nome><preco>999</preco></produto>), facilitando a análise por software. - Integridade dos Dados: O XML evita problemas de formatação que afetam os arquivos do Excel (por exemplo, fórmulas quebradas, células mescladas) quando compartilhados entre sistemas.
- Casos de Uso: Feeds de produtos de e-commerce, exportações de dados de API, importações de conteúdo de CMS e integração de dados empresariais.
Estruturando Dados do Excel para uma Conversão Bem-Sucedida
O primeiro e mais crítico passo acontece no Excel. Uma planilha de origem bem estruturada garante uma conversão tranquila.
- Use cabeçalhos de coluna curtos e únicos (sem espaços/caracteres especiais — por exemplo, "NomeProduto" em vez de "Nome do Produto").
- Remova linhas/colunas vazias (elas causam erros de validação XML).
- Garanta tipos de dados consistentes (por exemplo, todos os preços como números, datas em um formato uniforme).
- Evite células mescladas ou fórmulas complexas; use dados brutos em vez disso.
Método 1: Conversão Manual de Excel para XML (Guia de Desenvolvedor Integrada)
A Guia de Desenvolvedor integrada do Excel oferece suporte nativo para tarefas XML, tornando-a acessível a usuários do Excel sem conhecimento de programação.
Guia Passo a Passo:
Passo 1: Prepare Seus Dados do Excel
Estruture seus dados em um formato tabular claro. A primeira linha deve conter os cabeçalhos das colunas, que se tornarão suas tags XML. Para este exemplo, vamos usar uma lista de produtos simples:
Passo 2: Crie um Esquema XML
Um esquema XML (arquivo .xsd) define a estrutura da sua saída XML. Ele especifica quais tags usar e como elas se relacionam.
Exemplo de Esquema (salve como “produtos.xsd” no seu computador):
<?xml version="1.0" encoding="UTF-8"?>
<xs:schema xmlns:xs="http://www.w3.org/2001/XMLSchema">
  <xs:element name="Catalog">
    <xs:complexType>
      <xs:sequence>
        <xs:element name="Product" maxOccurs="unbounded">
          <xs:complexType>
            <xs:sequence>
              <xs:element name="ID" type="xs:integer"/>
              <xs:element name="ProductName" type="xs:string"/>
              <xs:element name="Category" type="xs:string"/>
              <xs:element name="Price" type="xs:decimal"/>
            </xs:sequence>
          </xs:complexType>
        </xs:element>
      </xs:sequence>
    </xs:complexType>
  </xs:element>
</xs:schema>
- Ajuste os atributos de nome para corresponder aos cabeçalhos das colunas do Excel (sensível a maiúsculas e minúsculas).
- Use tipos apropriados (por exemplo, xsd:integer para números, xsd:string para texto).
Passo 3: Adicione o Esquema ao Excel
- Abra seu arquivo do Excel.
- Vá para a guia Desenvolvedor. (Se não a vir, vá para Arquivo > Opções > Personalizar Faixa de Opções, marque "Desenvolvedor" e clique em "OK".)
- Na guia Desenvolvedor, clique em Fonte para abrir o painel Fonte XML.
- Clique em Mapas XML... e depois em Adicionar....
- Anexe o arquivo de esquema .xsd que você criou usando a caixa de diálogo Mapas XML
Passo 4: Mapeie os Elementos XML para Suas Células
- No painel Fonte XML, você verá seus elementos (“Catalogo”, “Produto”, “ID”, etc.).
- Arraste o elemento “Produto” e solte-o na célula A1. O Excel criará uma tabela bem formatada.
- Os elementos agora estarão mapeados. Seus dados estão prontos para exportação.
Passo 5: Exporte para XML
- Com seus dados mapeados selecionados, volte para a guia Desenvolvedor.
- Clique em Exportar.
- Escolha um local e um nome para o seu novo arquivo XML e clique em OK.
O arquivo XML exportado corresponderá ao seu esquema, assim:
Você também pode gostar: Converta XLS/XLSX para HTML Facilmente — Mantenha a Formatação do Excel Intacta
Método 2: Conversores Online Gratuitos de Excel para XML
Se você precisa de uma conversão rápida e única sem a configuração técnica, as ferramentas online são suas melhores amigas.
Principais ferramentas para converter Excel em XML online (100% grátis, sem necessidade de inscrição):
1. CloudxDocs (Mais Amigável)
- Acesse o conversor CloudxDocs EXCEL PARA XML.
- Envie seu arquivo do Excel (suporta XLS, XLSX, XLSB).
- Aguarde a conclusão da conversão e baixe seu arquivo XML.
Este conversor produz por padrão um arquivo de Planilha XML que preserva a formatação do Excel.
2. WizlyTools (Suporta XML Personalizado)
- Acesse o conversor de Excel para XML da WizlyTools.
- Envie um arquivo do Excel (.xlsx, .xls).
- Insira o nome do elemento raiz e o nome do elemento de linha.
- Selecione o tamanho da indentação para sua saída XML.
- Clique em "Converter para XML" e copie ou baixe o XML resultante
Este conversor oferece mais controle sobre a estrutura XML, como definir um elemento raiz específico, um elemento de linha e permite visualizar o XML antes de baixar
Nota: Evite enviar dados sensíveis (por exemplo, registros financeiros) para ferramentas online. Use métodos manuais para arquivos confidenciais.
Método 3: Automatizar a Conversão de Excel para XML em Python
Para desenvolvedores e profissionais de TI que trabalham com Python, o Spire.XLS for Python oferece uma solução robusta e orientada por código para converter planilhas do Excel em XML sem a necessidade de instalar o Microsoft Excel. Isso é ideal para automação do lado do servidor e integração de aplicativos.
Passo 1: Instalação
Primeiro, você precisa instalar a biblioteca Spire.XLS for Python. Ela está disponível via PyPI.
pip install Spire.XLS
Passo 2: Escreva o Script Python
Este script usa o Spire.XLS para ler dados do Excel e, em seguida, gera XML com o xml.etree.ElementTree (para estrutura) e o minidom (para formatação bonita) integrados do Python.
from spire.xls import *
import xml.etree.ElementTree as ET
from xml.dom import minidom

# Load the Excel file
workbook = Workbook()
workbook.LoadFromFile("Orders.xlsx")

# Get the first worksheet
worksheet = workbook.Worksheets[0]

# Get row and column counts (Spire.XLS uses 1-based indexing)
max_row = worksheet.LastRow
max_col = worksheet.LastColumn

# Check if data exists (headers in row 1, data in row 2+)
if max_row < 2:
    raise ValueError("No data found! Ensure headers are in row 1 and data starts in row 2.")

# Create XML root element
root = ET.Element("Info")

# Loop through data rows (skip row 1: headers)
for row in range(2, max_row + 1):
    # Create a row element (e.g., <Order>)
    row_element = ET.SubElement(root, "Order")

    # Loop through columns to get headers and values
    for col in range(1, max_col + 1):
        # Get header (XML tag)
        header = worksheet.Range[1, col].Value

        # Get cell value (data for the XML tag)
        cell_value = worksheet.Range[row, col].Value

        # Create sub-element and add value
        ET.SubElement(row_element, header).text = str(cell_value)

# Pretty-print XML (add indentation for readability)
rough_string = ET.tostring(root, 'utf-8')
reparsed = minidom.parseString(rough_string)
pretty_xml = reparsed.toprettyxml(indent="  ")

# Save to XML file
with open("Orders.xml", 'w', encoding='utf-8') as f:
    f.write(pretty_xml)

# Close the workbook
workbook.Dispose()
Explicação do Código:
- Carregar Arquivo Excel: Usa o Spire.XLS para abrir um arquivo do Excel e acessar sua primeira planilha.
- Definir Intervalo de Dados: Encontra a última linha e coluna com dados (indexação baseada em 1 no Spire.XLS) para saber os limites dos dados.
- Construir Estrutura XML:
- Cria um elemento XML raiz
<Info>. - Percorre cada linha de dados (a partir da linha 2), criando um elemento
<Pedido>para cada uma. - Para cada coluna na linha: Use o cabeçalho da linha 1 como a tag XML e o valor da célula como o conteúdo da tag.
- Cria um elemento XML raiz
- Salvar XML: Formata o XML com indentação (para legibilidade) e o salva em um arquivo XML.
Exemplo de Saída XML
O Spire.XLS for Python também fornece um método direto SaveAsXml() para converter Excel para o formato Open XML.
Considerações Finais
Converter Excel para XML é uma habilidade fundamental que libera o verdadeiro potencial dos seus dados, permitindo que eles fluam perfeitamente para aplicativos da web, arquivos de configuração e outros sistemas de negócios. Ao entender os métodos disponíveis, desde o poder controlado dos Mapas XML do Excel até a facilidade rápida das ferramentas online e a força industrial do scripting em Python, você pode escolher a ferramenta certa para cada trabalho.
Perguntas Frequentes Sobre a Conversão de Excel para XML
P1: Como faço para converter em lote vários arquivos do Excel para XML de uma só vez?
A conversão em lote economiza tempo para mais de 10 arquivos — use estes métodos com base no seu nível de habilidade:
- Ferramentas online: O Zamzar suporta até 50 arquivos por lote (envie todos os arquivos do Excel, selecione “XML” como saída e obtenha um zip dos XMLs).
- Spire.XLS for Python: Estenda o script fornecido para percorrer uma pasta
import os
from spire.xls import *
import xml.etree.ElementTree as ET
from xml.dom import minidom

input_folder = "C:/Excel_Batch"
output_folder = "C:/XML_Batch"
os.makedirs(output_folder, exist_ok=True)

for filename in os.listdir(input_folder):
    if filename.endswith((".xlsx", ".xls")):
        workbook = Workbook()
        workbook.LoadFromFile(os.path.join(input_folder, filename))
        # Add conversion logic (same as single file) here
        workbook.Dispose()
P2: Posso personalizar a estrutura XML (por exemplo, alterar as tags raiz/linha)?
Sim, todos os métodos suportam personalização:
- Manual: Edite o esquema XML (arquivo .xsd) para alterar as tags raiz (por exemplo,
<Catalogo>) ou de linha (por exemplo,<Produto>). - Online: Ferramentas como o WizlyTools permitem que você defina os nomes dos elementos raiz/linha nas configurações.
- Python: Modifique as linhas ET.Element("NomeRaiz") e ET.SubElement(root, "NomeLinha") do script para atender às suas necessidades.
P3: Meus dados têm fórmulas. A saída XML conterá a fórmula ou o valor calculado?
Em quase todos os casos, a exportação XML conterá o valor calculado (o resultado da fórmula), não a fórmula em si. O XML é principalmente um formato para representar dados, não a lógica ou os cálculos por trás deles. O processo de conversão lê os valores visíveis das células.
P4: Meu arquivo XML parece bagunçado quando o abro. Como posso formatá-lo corretamente?
O XML gerado por esses métodos geralmente está em um formato compactado, sem quebras de linha ou indentação. Isso ainda é um XML válido. Para visualizá-lo em um formato legível:
- Abra o arquivo em um navegador da web moderno (Chrome, Firefox, Edge), que o formatará e exibirá automaticamente de forma organizada.
- Use um editor de código como VS Code, Notepad++, ou Sublime Text, que possuem formatação XML integrada ou plugins para reindentar o código.
Veja Também
Excel을 XML로 변환: 무료 도구 + Python 자동화
소프트웨어, API 또는 웹사이트 간에 공유해야 하는 데이터로 작업하는 경우 Excel을 XML로 변환하는 것은 중요한 기술입니다. XML(Extensible Markup Language)은 데이터 교환에 이상적인 보편적이고 기계가 읽을 수 있는 형식이며, Excel은 스프레드시트 구성에 탁월합니다. 이 둘 사이의 격차를 해소하면 데이터가 플랫폼 간에 원활하게 흐를 수 있습니다.
빠른 해결책을 찾는 초보자, 데이터 무결성을 보장하는 분석가, 또는 자동화된 파이프라인을 구축하는 개발자이든, 이 가이드는 세 가지 효과적이고 오류 없는 Excel을 XML로 변환 방법을 안내합니다.
Excel을 XML로 변환하는 이유는 무엇입니까?
Excel을 XML로 변환하는 핵심 가치는 다음과 같습니다:
- 플랫폼 간 호환성: XML은 API, CMS 플랫폼(WordPress, Shopify), 엔터프라이즈 도구(SAP, Salesforce) 및 프로그래밍 언어(Python, Java)와 함께 작동합니다.
- 구조화된 데이터: XML은 Excel의 행/열을 태그가 지정된 요소(예:
<product><name>Laptop</name><price>999</price></product>)로 보존하여 소프트웨어가 쉽게 구문 분석할 수 있도록 합니다. - 데이터 무결성: XML은 시스템 간에 공유될 때 Excel 파일에서 발생하는 서식 문제(예: 깨진 수식, 병합된 셀)를 방지합니다.
- 사용 사례: 전자 상거래 제품 피드, API 데이터 내보내기, CMS 콘텐츠 가져오기 및 엔터프라이즈 데이터 통합.
성공적인 변환을 위한 Excel 데이터 구조화
가장 중요하고 첫 번째 단계는 Excel에서 발생합니다. 잘 구조화된 소스 시트는 원활한 변환을 보장합니다.
- 고유하고 짧은 열 머리글을 사용하십시오(공백/특수 문자 없음—예: "Product Name" 대신 "ProductName").
- 빈 행/열을 제거하십시오(XML 유효성 검사 오류를 유발함).
- 일관된 데이터 유형을 확인하십시오(예: 모든 가격은 숫자, 날짜는 균일한 형식).
- 병합된 셀이나 복잡한 수식을 피하고 원시 데이터를 사용하십시오.
방법 1: 수동 Excel을 XML로 변환 (내장 개발자 탭)
Excel의 내장 개발자 탭은 XML 작업을 위한 기본 지원을 제공하여 프로그래밍 지식이 없는 Excel 사용자도 접근할 수 있습니다.
단계별 가이드:
1단계: Excel 데이터 준비
데이터를 명확하고 표 형식으로 구성하십시오. 첫 번째 행에는 XML 태그가 될 열 머리글이 포함되어야 합니다. 이 예에서는 간단한 제품 목록을 사용하겠습니다:
2단계: XML 스키마 생성
XML 스키마(.xsd 파일)는 XML 출력의 구조를 정의합니다. 사용할 태그와 서로 어떻게 관련되는지를 지정합니다.
예제 스키마 (컴퓨터에 "products.xsd"로 저장):
<?xml version="1.0" encoding="UTF-8"?>
<xs:schema xmlns:xs="http://www.w3.org/2001/XMLSchema">
  <xs:element name="Catalog">
    <xs:complexType>
      <xs:sequence>
        <xs:element name="Product" maxOccurs="unbounded">
          <xs:complexType>
            <xs:sequence>
              <xs:element name="ID" type="xs:integer"/>
              <xs:element name="ProductName" type="xs:string"/>
              <xs:element name="Category" type="xs:string"/>
              <xs:element name="Price" type="xs:decimal"/>
            </xs:sequence>
          </xs:complexType>
        </xs:element>
      </xs:sequence>
    </xs:complexType>
  </xs:element>
</xs:schema>
- Excel 열 머리글과 일치하도록 name 속성을 조정하십시오(대소문자 구분).
- 적절한 유형을 사용하십시오(예: 숫자는 xsd:integer, 텍스트는 xsd:string).
3단계: Excel에 스키마 추가
- Excel 파일을 엽니다.
- 개발자 탭으로 이동합니다. (보이지 않으면 파일 > 옵션 > 리본 사용자 지정으로 이동하여 "개발자"를 선택하고 "확인"을 클릭하십시오.)
- 개발자 탭에서 소스를 클릭하여 XML 소스 창을 엽니다.
- XML 맵...을 클릭한 다음 추가...를 클릭합니다.
- XML 맵 대화 상자를 사용하여 생성한 .xsd 스키마 파일을 첨부합니다.
4단계: XML 요소를 셀에 매핑
- XML 소스 창에서 요소("Catalog", "Product", "ID" 등)를 볼 수 있습니다.
- "Product" 요소를 끌어다 셀 A1에 놓습니다. Excel이 멋지게 서식이 지정된 테이블을 만듭니다.
- 이제 요소가 매핑되었습니다. 데이터가 내보낼 준비가 되었습니다.
5단계: XML로 내보내기
- 매핑된 데이터를 선택한 상태에서 개발자 탭으로 돌아갑니다.
- 내보내기를 클릭합니다.
- 새 XML 파일의 위치와 이름을 선택하고 확인을 클릭합니다.
내보낸 XML 파일은 다음과 같이 스키마와 일치합니다:
관심 있을 만한 내용: XLS/XLSX를 HTML로 쉽게 변환 — Excel 서식 유지
방법 2: 무료 온라인 Excel을 XML로 변환기
기술적인 설정 없이 빠른 일회성 변환이 필요한 경우 온라인 도구가 가장 좋은 친구입니다.
Excel을 XML로 온라인 변환하는 최고의 도구 (100% 무료, 가입 불필요):
1. CloudxDocs (가장 사용자 친화적)
- CloudxDocs EXCEL TO XML 변환기로 이동합니다.
- Excel 파일을 업로드합니다 (XLS, XLSX, XLSB 지원).
- 변환이 완료될 때까지 기다린 다음 XML 파일을 다운로드합니다.
이 변환기는 기본적으로 Excel의 서식을 유지하는 XML 스프레드시트 파일을 생성합니다.
2. WizlyTools (사용자 지정 XML 지원)
- WizlyTools Excel to XML converter로 이동합니다.
- Excel 파일(.xlsx, .xls)을 업로드합니다.
- 루트 요소 이름과 행 요소 이름을 입력합니다.
- XML 출력의 들여쓰기 크기를 선택합니다.
- "XML로 변환"을 클릭한 다음 결과 XML을 복사하거나 다운로드합니다.
이 변환기는 특정 루트 요소, 행 요소를 정의하는 등 XML 구조에 대한 더 많은 제어권을 제공하며 다운로드하기 전에 XML을 미리 볼 수 있습니다.
참고: 민감한 데이터(예: 금융 기록)를 온라인 도구에 업로드하지 마십시오. 기밀 파일에는 수동 방법을 사용하십시오.
방법 3: Python에서 Excel을 XML로 변환 자동화
Python으로 작업하는 개발자 및 IT 전문가를 위해 Spire.XLS for Python은 Microsoft Excel을 설치할 필요 없이 Excel 스프레드시트를 XML로 변환하는 강력한 코드 기반 솔루션을 제공합니다. 이는 서버 측 자동화 및 애플리케이션 통합에 이상적입니다.
1단계: 설치
먼저 Spire.XLS for Python 라이브러리를 설치해야 합니다. PyPI를 통해 사용할 수 있습니다.
pip install Spire.XLS
2단계: Python 스크립트 작성
이 스크립트는 Spire.XLS를 사용하여 Excel 데이터를 읽은 다음 Python의 내장 xml.etree.ElementTree(구조용) 및 minidom(예쁜 서식용)으로 XML을 생성합니다.
from spire.xls import *
import xml.etree.ElementTree as ET
from xml.dom import minidom

# Excel 파일 로드
workbook = Workbook()
workbook.LoadFromFile("Orders.xlsx")

# 첫 번째 워크시트 가져오기
worksheet = workbook.Worksheets[0]

# 행 및 열 수 가져오기 (Spire.XLS는 1 기반 인덱싱 사용)
max_row = worksheet.LastRow
max_col = worksheet.LastColumn

# 데이터 존재 여부 확인 (헤더는 1행, 데이터는 2행 이상)
if max_row < 2:
    raise ValueError("데이터를 찾을 수 없습니다! 헤더가 1행에 있고 데이터가 2행에서 시작하는지 확인하십시오.")

# XML 루트 요소 생성
root = ET.Element("Info")

# 데이터 행 반복 (1행: 헤더 건너뛰기)
for row in range(2, max_row + 1):
    # 행 요소 생성 (예: )
    row_element = ET.SubElement(root, "Order")

    # 열을 반복하여 헤더와 값 가져오기
    for col in range(1, max_col + 1):
        # 헤더 가져오기 (XML 태그)
        header = worksheet.Range[1, col].Value

        # 셀 값 가져오기 (XML 태그의 데이터)
        cell_value = worksheet.Range[row, col].Value

        # 하위 요소 생성 및 값 추가
        ET.SubElement(row_element, header).text = str(cell_value)

# XML 예쁘게 인쇄 (가독성을 위해 들여쓰기 추가)
rough_string = ET.tostring(root, 'utf-8')
reparsed = minidom.parseString(rough_string)
pretty_xml = reparsed.toprettyxml(indent="  ")

# XML 파일에 저장
with open("Orders.xml", 'w', encoding='utf-8') as f:
    f.write(pretty_xml)

# 통합 문서 닫기
workbook.Dispose()
코드 설명:
- Excel 파일 로드: Spire.XLS를 사용하여 Excel 파일을 열고 첫 번째 워크시트에 액세스합니다.
- 데이터 범위 정의: 데이터가 있는 마지막 행과 열을 찾아(Spire.XLS에서 1 기반 인덱싱) 데이터의 범위를 파악합니다.
- XML 구조 빌드:
- 루트 XML 요소
<Info>를 생성합니다. - 각 데이터 행을 반복하여(2행부터 시작) 각 행에 대해
<Order>요소를 만듭니다. - 행의 각 열에 대해: 1행의 헤더를 XML 태그로 사용하고 셀 값을 태그의 내용으로 사용합니다.
- 루트 XML 요소
- XML 저장: XML을 들여쓰기로 서식을 지정하고(가독성을 위해) XML 파일에 저장합니다.
예제 출력 XML
Spire.XLS for Python은 또한 SaveAsXml() 메서드를 직접 제공하여 Excel을 Open XML 형식으로 변환합니다.
마지막 생각
Excel을 XML로 변환하는 것은 데이터의 진정한 잠재력을 발휘하여 웹 애플리케이션, 구성 파일 및 기타 비즈니스 시스템으로 원활하게 흐르도록 하는 기본 기술입니다. Excel의 XML 맵의 제어된 기능부터 온라인 도구의 빠른 용이성, Python 스크립팅의 산업적 강점에 이르기까지 사용 가능한 방법을 이해함으로써 모든 작업에 적합한 도구를 선택할 수 있습니다.
Excel을 XML로 변환에 대한 FAQ
Q1: 여러 Excel 파일을 한 번에 XML로 일괄 변환하려면 어떻게 해야 합니까?
일괄 변환은 10개 이상의 파일에 대해 시간을 절약합니다. 기술 수준에 따라 다음 방법을 사용하십시오:
- 온라인 도구: Zamzar는 일괄 처리당 최대 50개의 파일을 지원합니다(모든 Excel 파일을 업로드하고 출력으로 "XML"을 선택하면 XML의 zip 파일을 얻을 수 있습니다).
- Spire.XLS for Python: 제공된 스크립트를 확장하여 폴더를 반복합니다.
import os
from spire.xls import *
import xml.etree.ElementTree as ET
from xml.dom import minidom

input_folder = "C:/Excel_Batch"
output_folder = "C:/XML_Batch"
os.makedirs(output_folder, exist_ok=True)

for filename in os.listdir(input_folder):
    if filename.endswith((".xlsx", ".xls")):
        workbook = Workbook()
        workbook.LoadFromFile(os.path.join(input_folder, filename))
        # 여기에 변환 로직 추가 (단일 파일과 동일)
        workbook.Dispose()
Q2: XML 구조를 사용자 지정할 수 있습니까(예: 루트/행 태그 변경)?
예, 모든 방법이 사용자 지정을 지원합니다:
- 수동: XML 스키마(.xsd 파일)를 편집하여 루트(예:
<Catalog>) 또는 행(예:<Product>) 태그를 변경합니다. - 온라인: WizlyTools와 같은 도구를 사용하면 설정에서 루트/행 요소 이름을 설정할 수 있습니다.
- Python: 스크립트의 ET.Element("RootName") 및 ET.SubElement(root, "RowName") 줄을 필요에 맞게 수정합니다.
Q3: 내 데이터에 수식이 있습니다. XML 출력에 수식이 포함됩니까, 아니면 계산된 값이 포함됩니까?
거의 모든 경우에 XML 내보내기에는 수식 자체가 아닌 계산된 값(수식의 결과)이 포함됩니다. XML은 주로 데이터 표현을 위한 형식이며 그 뒤에 있는 논리나 계산을 위한 것이 아닙니다. 변환 프로세스는 보이는 셀 값을 읽습니다.
Q4: XML 파일을 열면 지저분해 보입니다. 어떻게 제대로 서식을 지정할 수 있습니까?
이러한 방법으로 생성된 XML은 종종 줄 바꿈이나 들여쓰기 없이 압축된 형식입니다. 이것은 여전히 유효한 XML입니다. 읽기 쉬운 형식으로 보려면:
- 최신 웹 브라우저(Chrome, Firefox, Edge)에서 파일을 열면 자동으로 서식이 지정되어 깔끔하게 표시됩니다.
- VS Code, Notepad++ 또는 Sublime Text와 같은 코드 편집기를 사용하십시오. 이러한 편집기에는 코드를 다시 들여쓰기 위한 내장 XML 서식 지정 또는 플러그인이 있습니다.
참고 항목
Convertir Excel en XML : Outils gratuits + Automatisation Python
Si vous travaillez avec des données qui doivent être partagées entre des logiciels, des API ou des sites web, la conversion d'Excel en XML est une compétence essentielle. Le XML (Extensible Markup Language) est un format universel, lisible par machine, idéal pour l'échange de données, tandis qu'Excel excelle dans l'organisation des feuilles de calcul. Combler le fossé entre les deux permet à vos données de circuler de manière transparente sur toutes les plateformes.
Que vous soyez un débutant à la recherche d'une solution rapide, un analyste garantissant l'intégrité des données ou un développeur créant un pipeline automatisé, ce guide vous présentera trois méthodes de conversion Excel vers XML efficaces et sans erreur.
- Méthode 1 : Conversion manuelle d'Excel en XML (onglet Développeur intégré)
- Méthode 2 : Convertisseurs en ligne gratuits d'Excel en XML
- Méthode 3 : Automatiser la conversion d'Excel en XML en Python
Pourquoi convertir Excel en XML ?
La valeur fondamentale de la conversion d'Excel en XML réside dans :
- Compatibilité multiplateforme : XML fonctionne avec les API, les plateformes CMS (WordPress, Shopify), les outils d'entreprise (SAP, Salesforce) et les langages de programmation (Python, Java).
- Données structurées : XML préserve les lignes/colonnes d'Excel en tant qu'éléments balisés (par exemple,
<produit><nom>OrdinateurPortable</nom><prix>999</prix></produit>), ce qui facilite l'analyse par les logiciels. - Intégrité des données : XML évite les problèmes de formatage qui affectent les fichiers Excel (par exemple, formules rompues, cellules fusionnées) lorsqu'ils sont partagés entre systèmes.
- Cas d'utilisation : Flux de produits de commerce électronique, exportations de données d'API, importations de contenu de CMS et intégration de données d'entreprise.
Structuration des données Excel pour une conversion réussie
La première étape, la plus critique, se déroule dans Excel. Une feuille source bien structurée garantit une conversion en douceur.
- Utilisez des en-têtes de colonne uniques et courts (sans espaces ni caractères spéciaux, par exemple, "NomProduit" au lieu de "Nom du produit").
- Supprimez les lignes/colonnes vides (elles provoquent des erreurs de validation XML).
- Assurez-vous que les types de données sont cohérents (par exemple, tous les prix en tant que nombres, les dates dans un format uniforme).
- Évitez les cellules fusionnées ou les formules complexes ; utilisez plutôt des données brutes.
Méthode 1 : Conversion manuelle d'Excel en XML (onglet Développeur intégré)
L'onglet Développeur intégré d'Excel offre un support natif pour les tâches XML, le rendant accessible aux utilisateurs d'Excel sans connaissances en programmation.
Guide étape par étape :
Étape 1 : Préparez vos données Excel
Structurez vos données dans un format tabulaire clair. La première ligne doit contenir vos en-têtes de colonne, qui deviendront vos balises XML. Pour cet exemple, utilisons une simple liste de produits :
Étape 2 : Créez un schéma XML
Un schéma XML (fichier .xsd) définit la structure de votre sortie XML. Il spécifie quelles balises utiliser et comment elles sont liées les unes aux autres.
Exemple de schéma (enregistrez-le sous le nom de « products.xsd » sur votre ordinateur) :
<?xml version="1.0" encoding="UTF-8"?>
<xs:schema xmlns:xs="http://www.w3.org/2001/XMLSchema">
  <xs:element name="Catalog">
    <xs:complexType>
      <xs:sequence>
        <xs:element name="Product" maxOccurs="unbounded">
          <xs:complexType>
            <xs:sequence>
              <xs:element name="ID" type="xs:integer"/>
              <xs:element name="ProductName" type="xs:string"/>
              <xs:element name="Category" type="xs:string"/>
              <xs:element name="Price" type="xs:decimal"/>
            </xs:sequence>
          </xs:complexType>
        </xs:element>
      </xs:sequence>
    </xs:complexType>
  </xs:element>
</xs:schema>
- Ajustez les attributs name pour qu'ils correspondent aux en-têtes de vos colonnes Excel (sensible à la casse).
- Utilisez les types appropriés (par exemple, xsd:integer pour les nombres, xsd:string pour le texte).
Étape 3 : Ajoutez le schéma à Excel
- Ouvrez votre fichier Excel.
- Allez dans l'onglet Développeur. (Si vous ne le voyez pas, allez dans Fichier > Options > Personnaliser le ruban, cochez « Développeur » et cliquez sur « OK ».)
- Dans l'onglet Développeur, cliquez sur Source pour ouvrir le volet Source XML.
- Cliquez sur Mappages XML... puis sur Ajouter....
- Joignez le fichier de schéma .xsd que vous avez créé à l'aide de la boîte de dialogue Mappages XML
Étape 4 : Mappez les éléments XML à vos cellules
- Dans le volet Source XML, vous verrez vos éléments (« Catalog », « Product », « ID », etc.).
- Faites glisser l'élément « Product » et déposez-le sur la cellule A1. Excel créera un tableau bien formaté.
- Les éléments seront maintenant mappés. Vos données sont prêtes pour l'exportation.
Étape 5 : Exporter en XML
- Avec vos données mappées sélectionnées, retournez à l'onglet Développeur.
- Cliquez sur Exporter.
- Choisissez un emplacement et un nom pour votre nouveau fichier XML et cliquez sur OK.
Le fichier XML exporté correspondra à votre schéma, comme ceci :
Vous aimerez peut-être aussi : Convertir facilement XLS/XLSX en HTML — Conserver intact le formatage Excel
Méthode 2 : Convertisseurs en ligne gratuits d'Excel en XML
Si vous avez besoin d'une conversion rapide et ponctuelle sans configuration technique, les outils en ligne sont vos meilleurs alliés.
Meilleurs outils pour convertir Excel en XML en ligne (100 % gratuits, sans inscription) :
1. CloudxDocs (Le plus convivial)
- Allez sur le convertisseur CloudxDocs EXCEL TO XML.
- Téléchargez votre fichier Excel (prend en charge XLS, XLSX, XLSB).
- Attendez la fin de la conversion et téléchargez votre fichier XML.
Ce convertisseur produit par défaut un fichier de feuille de calcul XML qui préserve le formatage d'Excel.
2. WizlyTools (Prend en charge le XML personnalisé)
- Allez sur le convertisseur Excel vers XML de WizlyTools.
- Téléchargez un fichier Excel (.xlsx, .xls).
- Entrez le nom de l'élément racine et le nom de l'élément de ligne.
- Sélectionnez une taille d'indentation pour votre sortie XML.
- Cliquez sur « Convertir en XML » puis copiez ou téléchargez le XML résultant
Ce convertisseur vous donne plus de contrôle sur la structure XML, comme la définition d'un élément racine spécifique, d'un élément de ligne, et vous permet de prévisualiser le XML avant de le télécharger
Remarque : Évitez de télécharger des données sensibles (par exemple, des dossiers financiers) sur des outils en ligne. Utilisez des méthodes manuelles pour les fichiers confidentiels.
Méthode 3 : Automatiser la conversion d'Excel en XML en Python
Pour les développeurs et les professionnels de l'informatique travaillant en Python, Spire.XLS for Python fournit une solution robuste, pilotée par le code, pour convertir des feuilles de calcul Excel en XML sans nécessiter l'installation de Microsoft Excel. C'est idéal pour l'automatisation côté serveur et l'intégration d'applications.
Étape 1 : Installation
Tout d'abord, vous devez installer la bibliothèque Spire.XLS for Python. Elle est disponible via PyPI.
pip install Spire.XLS
Étape 2 : Écrire le script Python
Ce script utilise Spire.XLS pour lire les données Excel, puis génère du XML avec les modules intégrés de Python xml.etree.ElementTree (pour la structure) et minidom (pour un formatage élégant).
from spire.xls import *
import xml.etree.ElementTree as ET
from xml.dom import minidom

# Load the Excel file
workbook = Workbook()
workbook.LoadFromFile("Orders.xlsx")

# Get the first worksheet
worksheet = workbook.Worksheets[0]

# Get row and column counts (Spire.XLS uses 1-based indexing)
max_row = worksheet.LastRow
max_col = worksheet.LastColumn

# Check if data exists (headers in row 1, data in row 2+)
if max_row < 2:
    raise ValueError("No data found! Ensure headers are in row 1 and data starts in row 2.")

# Create XML root element
root = ET.Element("Info")

# Loop through data rows (skip row 1: headers)
for row in range(2, max_row + 1):
    # Create a row element (e.g., <Order>)
    row_element = ET.SubElement(root, "Order")

    # Loop through columns to get headers and values
    for col in range(1, max_col + 1):
        # Get header (XML tag)
        header = worksheet.Range[1, col].Value

        # Get cell value (data for the XML tag)
        cell_value = worksheet.Range[row, col].Value

        # Create sub-element and add value
        ET.SubElement(row_element, header).text = str(cell_value)

# Pretty-print XML (add indentation for readability)
rough_string = ET.tostring(root, 'utf-8')
reparsed = minidom.parseString(rough_string)
pretty_xml = reparsed.toprettyxml(indent="  ")

# Save to XML file
with open("Orders.xml", 'w', encoding='utf-8') as f:
    f.write(pretty_xml)

# Close the workbook
workbook.Dispose()
Explication du code :
- Charger le fichier Excel : Utilise Spire.XLS pour ouvrir un fichier Excel et accéder à sa première feuille de calcul.
- Définir la plage de données : Trouve la dernière ligne et la dernière colonne avec des données (indexation basée sur 1 dans Spire.XLS) pour connaître les limites des données.
- Construire la structure XML :
- Crée un élément racine XML
<Info>. - Parcourt chaque ligne de données (à partir de la ligne 2), en créant un élément
<Order>pour chacune. - Pour chaque colonne de la ligne : Utilisez l'en-tête de la ligne 1 comme balise XML et la valeur de la cellule comme contenu de la balise.
- Crée un élément racine XML
- Enregistrer le XML : Formate le XML avec une indentation (pour la lisibilité) et l'enregistre dans un fichier XML.
Exemple de sortie XML
Spire.XLS for Python fournit également une méthode directe SaveAsXml() pour convertir Excel au format Open XML.
Réflexions finales
La conversion d'Excel en XML est une compétence fondamentale qui libère le véritable potentiel de vos données, leur permettant de s'intégrer de manière transparente dans les applications web, les fichiers de configuration et d'autres systèmes d'entreprise. En comprenant les méthodes disponibles, de la puissance contrôlée des Mappages XML d'Excel à la facilité ultra-rapide des outils en ligne et à la robustesse industrielle du scripting Python, vous pouvez choisir le bon outil pour chaque tâche.
FAQ sur la conversion d'Excel en XML
Q1 : Comment puis-je convertir par lots plusieurs fichiers Excel en XML en une seule fois ?
La conversion par lots permet de gagner du temps pour plus de 10 fichiers. Utilisez ces méthodes en fonction de votre niveau de compétence :
- Outils en ligne : Zamzar prend en charge jusqu'à 50 fichiers par lot (téléchargez tous les fichiers Excel, sélectionnez « XML » comme sortie et obtenez un zip de fichiers XML).
- Spire.XLS for Python : Étendez le script fourni pour parcourir un dossier
import os
from spire.xls import *
import xml.etree.ElementTree as ET
from xml.dom import minidom

input_folder = "C:/Excel_Batch"
output_folder = "C:/XML_Batch"
os.makedirs(output_folder, exist_ok=True)

for filename in os.listdir(input_folder):
    if filename.endswith((".xlsx", ".xls")):
        workbook = Workbook()
        workbook.LoadFromFile(os.path.join(input_folder, filename))
        # Add conversion logic (same as single file) here
        workbook.Dispose()
Q2 : Puis-je personnaliser la structure XML (par exemple, changer les balises racine/ligne) ?
Oui, toutes les méthodes prennent en charge la personnalisation :
- Manuel : Modifiez le schéma XML (fichier .xsd) pour changer les balises racine (par exemple,
<Catalog>) ou de ligne (par exemple,<Product>). - En ligne : Des outils comme WizlyTools vous permettent de définir les noms des éléments racine/ligne dans les paramètres.
- Python : Modifiez les lignes ET.Element("NomRacine") et ET.SubElement(root, "NomLigne") du script pour répondre à vos besoins.
Q3 : Mes données contiennent des formules. La sortie XML contiendra-t-elle la formule ou la valeur calculée ?
Dans presque tous les cas, l'exportation XML contiendra la valeur calculée (le résultat de la formule), et non la formule elle-même. Le XML est avant tout un format de représentation des données, et non de la logique ou des calculs qui les sous-tendent. Le processus de conversion lit les valeurs visibles des cellules.
Q4 : Mon fichier XML semble désordonné lorsque je l'ouvre. Comment puis-je le formater correctement ?
Le XML généré par ces méthodes est souvent dans un format compressé sans sauts de ligne ni indentation. Il s'agit toujours d'un XML valide. Pour le visualiser dans un format lisible :
- Ouvrez le fichier dans un navigateur web moderne (Chrome, Firefox, Edge), qui le formatera et l'affichera automatically de manière soignée.
- Utilisez un éditeur de code comme VS Code, Notepad++ ou Sublime Text, qui disposent d'un formatage XML intégré ou de plugins pour réindenter le code.
Voir aussi
Convertir Excel a XML: herramientas gratuitas + automatización con Python
Si trabajas con datos que necesitan ser compartidos entre software, APIs o sitios web, convertir Excel a XML es una habilidad fundamental. XML (Lenguaje de Marcado Extensible) es un formato universal y legible por máquina, ideal para el intercambio de datos, mientras que Excel destaca en la organización de hojas de cálculo. Superar la brecha entre ambos permite que tus datos fluyan sin problemas entre plataformas.
Tanto si eres un principiante que busca una solución rápida, un analista que garantiza la integridad de los datos o un desarrollador que construye una canalización automatizada, esta guía te mostrará tres métodos eficaces y sin errores para la conversión de Excel a XML.
- Método 1: Conversión Manual de Excel a XML (Pestaña de Desarrollador Integrada)
- Método 2: Conversores Gratuitos de Excel a XML en Línea
- Método 3: Automatizar la Conversión de Excel a XML en Python
¿Por Qué Convertir Excel a XML?
El valor principal de convertir Excel a XML radica en:
- Compatibilidad Multiplataforma: XML funciona con APIs, plataformas CMS (WordPress, Shopify), herramientas empresariales (SAP, Salesforce) y lenguajes de programación (Python, Java).
- Datos Estructurados: XML conserva las filas/columnas de Excel como elementos etiquetados (p. ej.,
<producto><nombre>Portátil</nombre><precio>999</precio></producto>), lo que facilita su análisis por parte del software. - Integridad de los Datos: XML evita problemas de formato que afectan a los archivos de Excel (p. ej., fórmulas rotas, celdas combinadas) cuando se comparten entre sistemas.
- Casos de Uso: Feeds de productos de comercio electrónico, exportaciones de datos de API, importaciones de contenido de CMS e integración de datos empresariales.
Estructuración de Datos de Excel para una Conversión Exitosa
El primer y más crítico paso ocurre en Excel. Una hoja de origen bien estructurada garantiza una conversión sin problemas.
- Usa encabezados de columna únicos y cortos (sin espacios ni caracteres especiales, p. ej., "NombreProducto" en lugar de "Nombre del Producto").
- Elimina filas/columnas vacías (causan errores de validación XML).
- Asegura tipos de datos consistentes (p. ej., todos los precios como números, fechas en un formato uniforme).
- Evita celdas combinadas o fórmulas complejas; utiliza datos brutos en su lugar.
Método 1: Conversión Manual de Excel a XML (Pestaña de Desarrollador Integrada)
La pestaña de Desarrollador integrada de Excel proporciona soporte nativo para tareas XML, lo que la hace accesible para usuarios de Excel sin conocimientos de programación.
Guía Paso a Paso:
Paso 1: Prepara Tus Datos de Excel
Estructura tus datos en un formato tabular claro. La primera fila debe contener los encabezados de las columnas, que se convertirán en tus etiquetas XML. Para este ejemplo, usemos una lista de productos simple:
Paso 2: Crea un Esquema XML
Un esquema XML (archivo .xsd) define la estructura de tu salida XML. Especifica qué etiquetas usar y cómo se relacionan entre sí.
Esquema de Ejemplo (guarda esto como "products.xsd" en tu computadora):
<?xml version="1.0" encoding="UTF-8"?>
<xs:schema xmlns:xs="http://www.w3.org/2001/XMLSchema">
  <xs:element name="Catalog">
    <xs:complexType>
      <xs:sequence>
        <xs:element name="Product" maxOccurs="unbounded">
          <xs:complexType>
            <xs:sequence>
              <xs:element name="ID" type="xs:integer"/>
              <xs:element name="ProductName" type="xs:string"/>
              <xs:element name="Category" type="xs:string"/>
              <xs:element name="Price" type="xs:decimal"/>
            </xs:sequence>
          </xs:complexType>
        </xs:element>
      </xs:sequence>
    </xs:complexType>
  </xs:element>
</xs:schema>
- Ajusta los atributos de nombre para que coincidan con los encabezados de tus columnas de Excel (sensible a mayúsculas y minúsculas).
- Usa los tipos apropiados (p. ej., xsd:integer para números, xsd:string para texto).
Paso 3: Agrega el Esquema a Excel
- Abre tu archivo de Excel.
- Ve a la pestaña Desarrollador. (Si no la ves, ve a Archivo > Opciones > Personalizar cinta de opciones, marca "Desarrollador" y haz clic en "Aceptar").
- En la pestaña Desarrollador, haz clic en Origen para abrir el panel Origen XML.
- Haz clic en Mapas XML... y luego en Agregar....
- Adjunta el archivo de esquema .xsd que creaste usando el diálogo Mapas XML
Paso 4: Mapea los Elementos XML a Tus Celdas
- En el panel Origen XML, verás tus elementos ("Catalog", "Product", "ID", etc.).
- Arrastra el elemento "Product" y suéltalo en la celda A1. Excel creará una tabla con un formato agradable.
- Los elementos ahora estarán mapeados. Tus datos están listos para ser exportados.
Paso 5: Exportar a XML
- Con tus datos mapeados seleccionados, vuelve a la pestaña Desarrollador.
- Haz clic en Exportar.
- Elige una ubicación y un nombre para tu nuevo archivo XML y haz clic en Aceptar.
El archivo XML exportado coincidirá con tu esquema, así:
También te puede interesar: Convierte XLS/XLSX a HTML Fácilmente — Mantén Intacto el Formato de Excel
Método 2: Conversores Gratuitos de Excel a XML en Línea
Si necesitas una conversión rápida y única sin la configuración técnica, las herramientas en línea son tu mejor opción.
Principales herramientas para convertir Excel a XML en línea (100% gratis, sin registro):
1. CloudxDocs (El más fácil de usar)
- Ve al conversor CloudxDocs EXCEL TO XML.
- Sube tu archivo de Excel (compatible con XLS, XLSX, XLSB).
- Espera a que se complete la conversión y descarga tu archivo XML.
Este conversor produce por defecto un archivo de hoja de cálculo XML que conserva el formato de Excel.
2. WizlyTools (Admite XML Personalizado)
- Ve al conversor de Excel a XML de WizlyTools.
- Sube un archivo de Excel (.xlsx, .xls).
- Introduce el nombre del elemento raíz y el nombre del elemento de fila.
- Selecciona un tamaño de sangría para tu salida XML.
- Haz clic en "Convertir a XML" y luego copia o descarga el XML resultante
Este conversor te da más control sobre la estructura XML, como definir un elemento raíz específico, un elemento de fila y te permite previsualizar el XML antes de descargarlo
Nota: Evita subir datos sensibles (p. ej., registros financieros) a herramientas en línea. Usa métodos manuales para archivos confidenciales.
Método 3: Automatizar la Conversión de Excel a XML en Python
Para desarrolladores y profesionales de TI que trabajan en Python, Spire.XLS for Python proporciona una solución robusta y basada en código para convertir hojas de cálculo de Excel a XML sin necesidad de tener Microsoft Excel instalado. Esto es ideal para la automatización del lado del servidor y la integración de aplicaciones.
Paso 1: Instalación
Primero, necesitas instalar la biblioteca Spire.XLS for Python. Está disponible a través de PyPI.
pip install Spire.XLS
Paso 2: Escribe el Script de Python
Este script utiliza Spire.XLS para leer datos de Excel y luego genera XML con las bibliotecas integradas de Python xml.etree.ElementTree (para la estructura) y minidom (para un formato legible).
from spire.xls import *
import xml.etree.ElementTree as ET
from xml.dom import minidom

# Cargar el archivo de Excel
workbook = Workbook()
workbook.LoadFromFile("Orders.xlsx")

# Obtener la primera hoja de trabajo
worksheet = workbook.Worksheets[0]

# Obtener el número de filas y columnas (Spire.XLS utiliza indexación basada en 1)
max_row = worksheet.LastRow
max_col = worksheet.LastColumn

# Comprobar si existen datos (encabezados en la fila 1, datos a partir de la fila 2)
if max_row < 2:
    raise ValueError("¡No se encontraron datos! Asegúrate de que los encabezados estén en la fila 1 y los datos comiencen en la fila 2.")

# Crear el elemento raíz XML
root = ET.Element("Info")

# Recorrer las filas de datos (omitir la fila 1: encabezados)
for row in range(2, max_row + 1):
    # Crear un elemento de fila (p. ej., <Order>)
    row_element = ET.SubElement(root, "Order")

    # Recorrer las columnas para obtener encabezados y valores
    for col in range(1, max_col + 1):
        # Obtener encabezado (etiqueta XML)
        header = worksheet.Range[1, col].Value

        # Obtener el valor de la celda (datos para la etiqueta XML)
        cell_value = worksheet.Range[row, col].Value

        # Crear subelemento y agregar valor
        ET.SubElement(row_element, header).text = str(cell_value)

# Imprimir XML con formato (agregar sangría para legibilidad)
rough_string = ET.tostring(root, 'utf-8')
reparsed = minidom.parseString(rough_string)
pretty_xml = reparsed.toprettyxml(indent="  ")

# Guardar en archivo XML
with open("Orders.xml", 'w', encoding='utf-8') as f:
    f.write(pretty_xml)

# Cerrar el libro de trabajo
workbook.Dispose()
Explicación del Código:
- Cargar Archivo de Excel: Utiliza Spire.XLS para abrir un archivo de Excel y acceder a su primera hoja de trabajo.
- Definir Rango de Datos: Encuentra la última fila y columna con datos (indexación basada en 1 en Spire.XLS) para conocer los límites de los datos.
- Construir Estructura XML:
- Crea un elemento raíz XML
<Info>. - Recorre cada fila de datos (a partir de la fila 2), creando un elemento
<Order>para cada una. - Para cada columna en la fila: Usa el encabezado de la fila 1 como la etiqueta XML y el valor de la celda como el contenido de la etiqueta.
- Crea un elemento raíz XML
- Guardar XML: Formatea el XML con sangría (para legibilidad) y lo guarda en un archivo XML.
Ejemplo de Salida XML
Spire.XLS for Python también proporciona un método directo SaveAsXml() para convertir Excel al formato Open XML.
Conclusiones Finales
Convertir Excel a XML es una habilidad fundamental que libera el verdadero potencial de tus datos, permitiendo que fluyan sin problemas hacia aplicaciones web, archivos de configuración y otros sistemas empresariales. Al comprender los métodos disponibles, desde el poder controlado de los Mapas XML de Excel hasta la facilidad rápida de las herramientas en línea y la robustez industrial de los scripts de Python, puedes elegir la herramienta adecuada para cada trabajo.
Preguntas Frecuentes Sobre la Conversión de Excel a XML
P1: ¿Cómo convierto por lotes varios archivos de Excel a XML a la vez?
La conversión por lotes ahorra tiempo para más de 10 archivos; utiliza estos métodos según tu nivel de habilidad:
- Herramientas en línea: Zamzar admite hasta 50 archivos por lote (sube todos los archivos de Excel, selecciona "XML" como salida y obtén un zip con los XML).
- Spire.XLS for Python: Extiende el script proporcionado para recorrer una carpeta
import os
from spire.xls import *
import xml.etree.ElementTree as ET
from xml.dom import minidom

input_folder = "C:/Excel_Batch"
output_folder = "C:/XML_Batch"
os.makedirs(output_folder, exist_ok=True)

for filename in os.listdir(input_folder):
    if filename.endswith((".xlsx", ".xls")):
        workbook = Workbook()
        workbook.LoadFromFile(os.path.join(input_folder, filename))
        # Agrega aquí la lógica de conversión (igual que para un solo archivo)
        workbook.Dispose()
P2: ¿Puedo personalizar la estructura XML (p. ej., cambiar las etiquetas raíz/fila)?
Sí, todos los métodos admiten personalización:
- Manual: Edita el archivo de esquema XML (.xsd) para cambiar las etiquetas raíz (p. ej.,
<Catalog>) o de fila (p. ej.,<Product>). - En línea: Herramientas como WizlyTools te permiten establecer los nombres de los elementos raíz/fila en la configuración.
- Python: Modifica las líneas ET.Element("NombreRaiz") y ET.SubElement(root, "NombreFila") del script para que coincidan con tus necesidades.
P3: Mis datos tienen fórmulas. ¿La salida XML contendrá la fórmula o el valor calculado?
En casi todos los casos, la exportación XML contendrá el valor calculado (el resultado de la fórmula), no la fórmula en sí. XML es principalmente un formato para representar datos, no la lógica o los cálculos detrás de ellos. El proceso de conversión lee los valores visibles de las celdas.
P4: Mi archivo XML se ve desordenado cuando lo abro. ¿Cómo puedo formatearlo correctamente?
El XML generado por estos métodos a menudo está en un formato comprimido sin saltos de línea ni sangría. Sigue siendo un XML válido. Para verlo en un formato legible:
- Abre el archivo en un navegador web moderno (Chrome, Firefox, Edge), que lo formateará y mostrará automáticamente de forma ordenada.
- Usa un editor de código como VS Code, Notepad++, o Sublime Text, que tienen formato XML integrado o complementos para volver a sangrar el código.
Ver También
Excel in XML umwandeln: Kostenlose Tools + Python-Automatisierung
Wenn Sie mit Daten arbeiten, die über Software, APIs oder Websites hinweg gemeinsam genutzt werden müssen, ist die Konvertierung von Excel in XML eine entscheidende Fähigkeit. XML (Extensible Markup Language) ist ein universelles, maschinenlesbares Format, das sich ideal für den Datenaustausch eignet, während Excel sich hervorragend zum Organisieren von Tabellenkalkulationen eignet. Die Überbrückung der Lücke zwischen ihnen ermöglicht einen nahtlosen Datenfluss über Plattformen hinweg.
Egal, ob Sie ein Anfänger sind, der eine schnelle Lösung sucht, ein Analyst, der die Datenintegrität sicherstellt, oder ein Entwickler, der eine automatisierte Pipeline erstellt, dieser Leitfaden führt Sie durch drei effektive und fehlerfreie Methoden zur Excel-zu-XML-Konvertierung.
- Methode 1: Manuelle Excel-zu-XML-Konvertierung (integrierte Entwicklerregisterkarte)
- Methode 2: Kostenlose Online-Konverter von Excel zu XML
- Methode 3: Automatisieren der Excel-zu-XML-Konvertierung in Python
Warum Excel in XML konvertieren?
Der Kernwert der Konvertierung von Excel in XML liegt in:
- Plattformübergreifende Kompatibilität: XML funktioniert mit APIs, CMS-Plattformen (WordPress, Shopify), Unternehmens-Tools (SAP, Salesforce) und Programmiersprachen (Python, Java).
- Strukturierte Daten: XML behält die Zeilen/Spalten von Excel als getaggte Elemente bei (z. B.
<product><name>Laptop</name><price>999</price></product>), was das Parsen durch Software erleichtert. - Datenintegrität: XML vermeidet Formatierungsprobleme, die bei Excel-Dateien auftreten (z. B. fehlerhafte Formeln, verbundene Zellen), wenn sie systemübergreifend geteilt werden.
- Anwendungsfälle: E-Commerce-Produkt-Feeds, API-Datenexporte, CMS-Content-Importe und Unternehmensdatenintegration.
Strukturieren von Excel-Daten für eine erfolgreiche Konvertierung
Der erste und wichtigste Schritt findet in Excel statt. Ein gut strukturiertes Quellblatt garantiert eine reibungslose Konvertierung.
- Verwenden Sie eindeutige, kurze Spaltenüberschriften (keine Leerzeichen/Sonderzeichen – z. B. „ProduktName“ anstelle von „Produktname“).
- Entfernen Sie leere Zeilen/Spalten (sie verursachen XML-Validierungsfehler).
- Stellen Sie konsistente Datentypen sicher (z. B. alle Preise als Zahlen, Daten in einem einheitlichen Format).
- Vermeiden Sie verbundene Zellen oder komplexe Formeln; verwenden Sie stattdessen Rohdaten.
Methode 1: Manuelle Excel-zu-XML-Konvertierung (integrierte Entwicklerregisterkarte)
Die integrierte Entwicklerregisterkarte von Excel bietet native Unterstützung für XML-Aufgaben und ist somit für Excel-Benutzer ohne Programmierkenntnisse zugänglich.
Schritt-für-Schritt-Anleitung:
Schritt 1: Bereiten Sie Ihre Excel-Daten vor
Strukturieren Sie Ihre Daten in einem klaren, tabellarischen Format. Die erste Zeile sollte Ihre Spaltenüberschriften enthalten, die zu Ihren XML-Tags werden. Für dieses Beispiel verwenden wir eine einfache Produktliste:
Schritt 2: Erstellen Sie ein XML-Schema
Ein XML-Schema (.xsd-Datei) definiert die Struktur Ihrer XML-Ausgabe. Es gibt an, welche Tags verwendet werden sollen und wie sie zueinander in Beziehung stehen.
Beispielschema (speichern Sie dies als „products.xsd“ auf Ihrem Computer):
<?xml version="1.0" encoding="UTF-8"?>
<xs:schema xmlns:xs="http://www.w3.org/2001/XMLSchema">
  <xs:element name="Catalog">
    <xs:complexType>
      <xs:sequence>
        <xs:element name="Product" maxOccurs="unbounded">
          <xs:complexType>
            <xs:sequence>
              <xs:element name="ID" type="xs:integer"/>
              <xs:element name="ProductName" type="xs:string"/>
              <xs:element name="Category" type="xs:string"/>
              <xs:element name="Price" type="xs:decimal"/>
            </xs:sequence>
          </xs:complexType>
        </xs:element>
      </xs:sequence>
    </xs:complexType>
  </xs:element>
</xs:schema>
- Passen Sie die Namensattribute an Ihre Excel-Spaltenüberschriften an (Groß-/Kleinschreibung beachten).
- Verwenden Sie geeignete Typen (z. B. xsd:integer für Zahlen, xsd:string für Text).
Schritt 3: Fügen Sie das Schema zu Excel hinzu
- Öffnen Sie Ihre Excel-Datei.
- Gehen Sie zur Registerkarte Entwickler. (Wenn Sie sie nicht sehen, gehen Sie zu Datei > Optionen > Menüband anpassen, aktivieren Sie „Entwickler“ und klicken Sie auf „OK“.)
- Klicken Sie auf der Registerkarte „Entwickler“ auf Quelle, um den Bereich „XML-Quelle“ zu öffnen.
- Klicken Sie auf XML-Zuordnungen... und dann auf Hinzufügen....
- Hängen Sie die von Ihnen erstellte .xsd-Schemadatei über den Dialog XML-Zuordnungen an
Schritt 4: Ordnen Sie XML-Elemente Ihren Zellen zu
- Im Bereich XML-Quelle sehen Sie Ihre Elemente („Katalog“, „Produkt“, „ID“ usw.).
- Ziehen Sie das Element „Produkt“ und legen Sie es auf Zelle A1 ab. Excel erstellt eine gut formatierte Tabelle.
- Die Elemente werden nun zugeordnet. Ihre Daten sind jetzt für den Export bereit.
Schritt 5: Nach XML exportieren
- Gehen Sie bei ausgewählten zugeordneten Daten zurück zur Registerkarte Entwickler.
- Klicken Sie auf Exportieren.
- Wählen Sie einen Speicherort und einen Namen für Ihre neue XML-Datei und klicken Sie auf OK.
Die exportierte XML-Datei entspricht Ihrem Schema, wie folgt:
Das könnte Ihnen auch gefallen: XLS/XLSX einfach in HTML konvertieren – Excel-Formatierung beibehalten
Methode 2: Kostenlose Online-Konverter von Excel zu XML
Wenn Sie eine schnelle, einmalige Konvertierung ohne technische Einrichtung benötigen, sind Online-Tools Ihr bester Freund.
Top-Tools zur Online-Konvertierung von Excel in XML (100 % kostenlos, keine Anmeldung):
1. CloudxDocs (Benutzerfreundlichste)
- Gehen Sie zum CloudxDocs EXCEL TO XML Konverter.
- Laden Sie Ihre Excel-Datei hoch (unterstützt XLS, XLSX, XLSB).
- Warten Sie, bis die Konvertierung abgeschlossen ist, und laden Sie Ihre XML-Datei herunter.
Dieser Konverter erstellt standardmäßig eine XML-Tabellenkalkulationsdatei, die die Formatierung von Excel beibehält.
2. WizlyTools (Unterstützt benutzerdefiniertes XML)
- Gehen Sie zum WizlyTools Excel to XML Konverter.
- Laden Sie eine Excel-Datei hoch (.xlsx, .xls).
- Geben Sie den Namen des Stammelements und den Namen des Zeilenelements ein.
- Wählen Sie eine Einrückungsgröße für Ihre XML-Ausgabe.
- Klicken Sie auf „In XML konvertieren“ und kopieren oder laden Sie dann die resultierende XML-Datei herunter
Dieser Konverter gibt Ihnen mehr Kontrolle über die XML-Struktur, z. B. das Definieren eines bestimmten Stammelements, Zeilenelements und ermöglicht Ihnen eine Vorschau der XML-Datei vor dem Herunterladen
Hinweis: Vermeiden Sie das Hochladen sensibler Daten (z. B. Finanzunterlagen) in Online-Tools. Verwenden Sie manuelle Methoden für vertrauliche Dateien.
Methode 3: Automatisieren der Excel-zu-XML-Konvertierung in Python
Für Entwickler und IT-Experten, die in Python arbeiten, bietet Spire.XLS for Python eine robuste, code-gesteuerte Lösung zum Konvertieren von Excel-Tabellen in XML, ohne dass Microsoft Excel installiert sein muss. Dies ist ideal für die serverseitige Automatisierung und Anwendungsintegration.
Schritt 1: Installation
Zuerst müssen Sie die Spire.XLS for Python-Bibliothek installieren. Sie ist über PyPI verfügbar.
pip install Spire.XLS
Schritt 2: Schreiben Sie das Python-Skript
Dieses Skript verwendet Spire.XLS zum Lesen von Excel-Daten und generiert dann XML mit dem integrierten xml.etree.ElementTree von Python (für die Struktur) und minidom (für eine ansprechende Formatierung).
from spire.xls import *
import xml.etree.ElementTree as ET
from xml.dom import minidom

# Load the Excel file
workbook = Workbook()
workbook.LoadFromFile("Orders.xlsx")

# Get the first worksheet
worksheet = workbook.Worksheets[0]

# Get row and column counts (Spire.XLS uses 1-based indexing)
max_row = worksheet.LastRow
max_col = worksheet.LastColumn

# Check if data exists (headers in row 1, data in row 2+)
if max_row < 2:
    raise ValueError("No data found! Ensure headers are in row 1 and data starts in row 2.")

# Create XML root element
root = ET.Element("Info")

# Loop through data rows (skip row 1: headers)
for row in range(2, max_row + 1):
    # Create a row element (e.g., <Order>)
    row_element = ET.SubElement(root, "Order")

    # Loop through columns to get headers and values
    for col in range(1, max_col + 1):
        # Get header (XML tag)
        header = worksheet.Range[1, col].Value

        # Get cell value (data for the XML tag)
        cell_value = worksheet.Range[row, col].Value

        # Create sub-element and add value
        ET.SubElement(row_element, header).text = str(cell_value)

# Pretty-print XML (add indentation for readability)
rough_string = ET.tostring(root, 'utf-8')
reparsed = minidom.parseString(rough_string)
pretty_xml = reparsed.toprettyxml(indent="  ")

# Save to XML file
with open("Orders.xml", 'w', encoding='utf-8') as f:
    f.write(pretty_xml)

# Close the workbook
workbook.Dispose()
Code-Erklärung:
- Excel-Datei laden: Verwendet Spire.XLS, um eine Excel-Datei zu öffnen und auf ihr erstes Arbeitsblatt zuzugreifen.
- Datenbereich definieren: Findet die letzte Zeile und Spalte mit Daten (1-basierte Indizierung in Spire.XLS), um die Grenzen der Daten zu kennen.
- XML-Struktur erstellen:
- Erstellt ein Stamm-XML-Element
<Info>. - Durchläuft jede Datenzeile (beginnend mit Zeile 2) und erstellt für jede ein
<Order>-Element. - Für jede Spalte in der Zeile: Verwenden Sie die Kopfzeile aus Zeile 1 als XML-Tag und den Zellwert als Inhalt des Tags.
- Erstellt ein Stamm-XML-Element
- XML speichern: Formatiert die XML-Datei mit Einrückung (zur besseren Lesbarkeit) und speichert sie in einer XML-Datei.
Beispiel-Ausgabe-XML
Spire.XLS for Python bietet auch eine direkte SaveAsXml()-Methode zum Konvertieren von Excel in das Open XML-Format.
Abschließende Gedanken
Die Konvertierung von Excel in XML ist eine grundlegende Fähigkeit, die das wahre Potenzial Ihrer Daten freisetzt und es ermöglicht, dass sie nahtlos in Webanwendungen, Konfigurationsdateien und andere Geschäftssysteme fließen. Indem Sie die verfügbaren Methoden verstehen, von der kontrollierten Leistung von Excel-XML-Zuordnungen über die blitzschnelle Einfachheit von Online-Tools bis hin zur industriellen Stärke von Python-Skripting, können Sie für jede Aufgabe das richtige Werkzeug auswählen.
Häufig gestellte Fragen zur Excel-zu-XML-Konvertierung
F1: Wie konvertiere ich mehrere Excel-Dateien gleichzeitig stapelweise in XML?
Die Stapelkonvertierung spart Zeit bei mehr als 10 Dateien – verwenden Sie diese Methoden je nach Ihrem Kenntnisstand:
- Online-Tools: Zamzar unterstützt bis zu 50 Dateien pro Stapel (laden Sie alle Excel-Dateien hoch, wählen Sie „XML“ als Ausgabe und erhalten Sie eine ZIP-Datei mit den XMLs).
- Spire.XLS for Python: Erweitern Sie das bereitgestellte Skript, um einen Ordner zu durchlaufen
import os
from spire.xls import *
import xml.etree.ElementTree as ET
from xml.dom import minidom

input_folder = "C:/Excel_Batch"
output_folder = "C:/XML_Batch"
os.makedirs(output_folder, exist_ok=True)

for filename in os.listdir(input_folder):
    if filename.endswith((".xlsx", ".xls")):
        workbook = Workbook()
        workbook.LoadFromFile(os.path.join(input_folder, filename))
        # Add conversion logic (same as single file) here
        workbook.Dispose()
F2: Kann ich die XML-Struktur anpassen (z. B. Stamm-/Zeilen-Tags ändern)?
Ja, alle Methoden unterstützen die Anpassung:
- Manuell: Bearbeiten Sie die XML-Schemadatei (.xsd), um die Stamm- (z. B.
<Catalog>) oder Zeilen- (z. B.<Product>) Tags zu ändern. - Online: Tools wie WizlyTools ermöglichen es Ihnen, die Namen der Stamm-/Zeilenelemente in den Einstellungen festzulegen.
- Python: Ändern Sie die Zeilen ET.Element("RootName") und ET.SubElement(root, "RowName") des Skripts entsprechend Ihren Anforderungen.
F3: Meine Daten enthalten Formeln. Enthält die XML-Ausgabe die Formel oder den berechneten Wert?
In fast allen Fällen enthält der XML-Export den berechneten Wert (das Ergebnis der Formel), nicht die Formel selbst. XML ist in erster Linie ein Format zur Darstellung von Daten, nicht der Logik oder den Berechnungen dahinter. Der Konvertierungsprozess liest die sichtbaren Zellwerte.
F4: Meine XML-Datei sieht beim Öffnen unordentlich aus. Wie kann ich sie richtig formatieren?
Die von diesen Methoden generierte XML-Datei liegt oft in einem komprimierten Format ohne Zeilenumbrüche oder Einrückungen vor. Dies ist immer noch gültiges XML. So zeigen Sie es in einem lesbaren Format an:
- Öffnen Sie die Datei in einem modernen Webbrowser (Chrome, Firefox, Edge), der sie automatisch formatiert und übersichtlich anzeigt.
- Verwenden Sie einen Code-Editor wie VS Code, Notepad++, oder Sublime Text, die über eine integrierte XML-Formatierung oder Plugins zum erneuten Einrücken des Codes verfügen.
Siehe auch
Конвертировать Excel в XML: бесплатные инструменты + автоматизация на Python
Если вы работаете с данными, которые необходимо совместно использовать в программном обеспечении, API или на веб-сайтах, преобразование Excel в XML является важным навыком. XML (расширяемый язык разметки) — это универсальный, машиночитаемый формат, идеально подходящий для обмена данными, в то время как Excel отлично справляется с организацией электронных таблиц. Преодоление разрыва между ними позволяет вашим данным беспрепятственно перемещаться между платформами.
Независимо от того, являетесь ли вы новичком, ищущим быстрое решение, аналитиком, обеспечивающим целостность данных, или разработчиком, создающим автоматизированный конвейер, это руководство проведет вас через три эффективных и безошибочных метода преобразования Excel в XML.
- Метод 1: Ручное преобразование Excel в XML (встроенная вкладка "Разработчик")
- Метод 2: Бесплатные онлайн-конвертеры Excel в XML
- Метод 3: Автоматизация преобразования Excel в XML на Python
Зачем конвертировать Excel в XML?
Основная ценность преобразования Excel в XML заключается в следующем:
- Межплатформенная совместимость: XML работает с API, платформами CMS (WordPress, Shopify), корпоративными инструментами (SAP, Salesforce) и языками программирования (Python, Java).
- Структурированные данные: XML сохраняет строки/столбцы Excel в виде тегированных элементов (например,
<product><name>Laptop</name><price>999</price></product>), что упрощает анализ программным обеспечением. - Целостность данных: XML позволяет избежать проблем с форматированием, которые возникают в файлах Excel (например, неработающие формулы, объединенные ячейки) при совместном использовании в разных системах.
- Сферы применения: фиды товаров для электронной коммерции, экспорт данных API, импорт контента CMS и интеграция корпоративных данных.
Структурирование данных Excel для успешного преобразования
Первый и самый важный шаг происходит в Excel. Хорошо структурированный исходный лист гарантирует плавное преобразование.
- Используйте уникальные, короткие заголовки столбцов (без пробелов/специальных символов, например, "ProductName" вместо "Product Name").
- Удалите пустые строки/столбцы (они вызывают ошибки проверки XML).
- Обеспечьте согласованность типов данных (например, все цены в виде чисел, даты в едином формате).
- Избегайте объединенных ячеек или сложных формул; вместо этого используйте необработанные данные.
Метод 1: Ручное преобразование Excel в XML (встроенная вкладка "Разработчик")
Встроенная вкладка "Разработчик" в Excel обеспечивает встроенную поддержку задач XML, что делает ее доступной для пользователей Excel без знаний программирования.
Пошаговое руководство:
Шаг 1: Подготовьте данные в Excel
Структурируйте свои данные в четком табличном формате. Первая строка должна содержать заголовки столбцов, которые станут вашими тегами XML. В этом примере давайте используем простой список продуктов:
Шаг 2: Создайте схему XML
Схема XML (файл .xsd) определяет структуру вашего вывода XML. Она указывает, какие теги использовать и как они связаны друг с другом.
Пример схемы (сохраните это как “products.xsd” на своем компьютере):
<?xml version="1.0" encoding="UTF-8"?>
<xs:schema xmlns:xs="http://www.w3.org/2001/XMLSchema">
  <xs:element name="Catalog">
    <xs:complexType>
      <xs:sequence>
        <xs:element name="Product" maxOccurs="unbounded">
          <xs:complexType>
            <xs:sequence>
              <xs:element name="ID" type="xs:integer"/>
              <xs:element name="ProductName" type="xs:string"/>
              <xs:element name="Category" type="xs:string"/>
              <xs:element name="Price" type="xs:decimal"/>
            </xs:sequence>
          </xs:complexType>
        </xs:element>
      </xs:sequence>
    </xs:complexType>
  </xs:element>
</xs:schema>
- Отрегулируйте атрибуты name, чтобы они соответствовали заголовкам столбцов Excel (с учетом регистра).
- Используйте соответствующие типы (например, xsd:integer для чисел, xsd:string для текста).
Шаг 3: Добавьте схему в Excel
- Откройте ваш файл Excel.
- Перейдите на вкладку Разработчик. (Если вы ее не видите, перейдите в Файл > Параметры > Настроить ленту, установите флажок "Разработчик," и нажмите "ОК".)
- На вкладке "Разработчик" нажмите Источник чтобы открыть панель "Источник XML".
- Нажмите Карты XML... а затем Добавить....
- Прикрепите созданный вами файл схемы .xsd с помощью диалогового окна Карты XML
Шаг 4: Сопоставьте элементы XML с вашими ячейками
- В панели Источник XML вы увидите свои элементы (“Catalog”, “Product”, “ID”, и т.д.).
- Перетащите элемент “Product” и бросьте его на ячейку A1. Excel создаст красиво отформатированную таблицу.
- Теперь элементы сопоставлены. Ваши данные готовы к экспорту.
Шаг 5: Экспорт в XML
- Выделив сопоставленные данные, вернитесь на вкладку Разработчик.
- Нажмите Экспорт.
- Выберите местоположение и имя для вашего нового XML-файла и нажмите ОК.
Экспортированный XML-файл будет соответствовать вашей схеме, вот так:
Вам также может понравиться: Легко конвертируйте XLS/XLSX в HTML — сохраняя форматирование Excel
Метод 2: Бесплатные онлайн-конвертеры Excel в XML
Если вам нужно быстрое, одноразовое преобразование без технической настройки, онлайн-инструменты — ваш лучший друг.
Лучшие инструменты для онлайн-конвертации Excel в XML (100% бесплатно, без регистрации):
1. CloudxDocs (самый удобный)
- Перейдите в конвертер CloudxDocs EXCEL TO XML.
- Загрузите свой файл Excel (поддерживает XLS, XLSX, XLSB).
- Дождитесь завершения преобразования и загрузите свой XML-файл.
Этот конвертер по умолчанию создает файл XML Spreadsheet, который сохраняет форматирование Excel.
2. WizlyTools (поддерживает пользовательский XML)
- Перейдите в конвертер WizlyTools Excel в XML.
- Загрузите файл Excel (.xlsx, .xls).
- Введите имя корневого элемента и имя элемента строки.
- Выберите размер отступа для вашего вывода XML.
- Нажмите "Конвертировать в XML" а затем скопируйте или загрузите полученный XML
Этот конвертер дает вам больше контроля над структурой XML, например, позволяет определить конкретный корневой элемент, элемент строки и предварительно просмотреть XML перед загрузкой
Примечание: Избегайте загрузки конфиденциальных данных (например, финансовых отчетов) в онлайн-инструменты. Используйте ручные методы для конфиденциальных файлов.
Метод 3: Автоматизация преобразования Excel в XML на Python
Для разработчиков и ИТ-специалистов, работающих на Python, Spire.XLS for Python предоставляет надежное, управляемое кодом решение для преобразования электронных таблиц Excel в XML без необходимости установки Microsoft Excel. Это идеально подходит для автоматизации на стороне сервера и интеграции приложений.
Шаг 1: Установка
Сначала вам нужно установить библиотеку Spire.XLS for Python. Она доступна через PyPI.
pip install Spire.XLS
Шаг 2: Напишите скрипт на Python
Этот скрипт использует Spire.XLS для чтения данных Excel, а затем генерирует XML с помощью встроенных в Python xml.etree.ElementTree (для структуры) и minidom (для красивого форматирования).
from spire.xls import *
import xml.etree.ElementTree as ET
from xml.dom import minidom

# Load the Excel file
workbook = Workbook()
workbook.LoadFromFile("Orders.xlsx")

# Get the first worksheet
worksheet = workbook.Worksheets[0]

# Get row and column counts (Spire.XLS uses 1-based indexing)
max_row = worksheet.LastRow
max_col = worksheet.LastColumn

# Check if data exists (headers in row 1, data in row 2+)
if max_row < 2:
    raise ValueError("No data found! Ensure headers are in row 1 and data starts in row 2.")

# Create XML root element
root = ET.Element("Info")

# Loop through data rows (skip row 1: headers)
for row in range(2, max_row + 1):
    # Create a row element (e.g., <Order>)
    row_element = ET.SubElement(root, "Order")

    # Loop through columns to get headers and values
    for col in range(1, max_col + 1):
        # Get header (XML tag)
        header = worksheet.Range[1, col].Value

        # Get cell value (data for the XML tag)
        cell_value = worksheet.Range[row, col].Value

        # Create sub-element and add value
        ET.SubElement(row_element, header).text = str(cell_value)

# Pretty-print XML (add indentation for readability)
rough_string = ET.tostring(root, 'utf-8')
reparsed = minidom.parseString(rough_string)
pretty_xml = reparsed.toprettyxml(indent="  ")

# Save to XML file
with open("Orders.xml", 'w', encoding='utf-8') as f:
    f.write(pretty_xml)

# Close the workbook
workbook.Dispose()
Объяснение кода:
- Загрузка файла Excel: Использует Spire.XLS для открытия файла Excel и доступа к его первому листу.
- Определение диапазона данных: Находит последнюю строку и столбец с данными (индексация с 1 в Spire.XLS), чтобы определить границы данных.
- Построение структуры XML:
- Создает корневой элемент XML
<Info>. - Проходит по каждой строке данных (начиная со 2-й строки), создавая для каждой элемент
<Order>. - Для каждого столбца в строке: Используйте заголовок из строки 1 в качестве тега XML, а значение ячейки — в качестве содержимого тега.
- Создает корневой элемент XML
- Сохранение XML: Форматирует XML с отступами (для удобочитаемости) и сохраняет его в XML-файл.
Пример выходного XML
Spire.XLS for Python также предоставляет прямой SaveAsXml() метод для преобразования Excel в формат Open XML.
Заключительные мысли
Преобразование Excel в XML — это фундаментальный навык, который раскрывает истинный потенциал ваших данных, позволяя им беспрепятственно поступать в веб-приложения, файлы конфигурации и другие бизнес-системы. Понимая доступные методы, от контролируемой мощи карт XML в Excel до молниеносной простоты онлайн-инструментов и промышленной мощи скриптов на Python, вы можете выбрать правильный инструмент для каждой задачи.
Часто задаваемые вопросы о преобразовании Excel в XML
В1: Как мне пакетно преобразовать несколько файлов Excel в XML за один раз?
Пакетное преобразование экономит время для 10+ файлов — используйте эти методы в зависимости от вашего уровня навыков:
- Онлайн-инструменты: Zamzar поддерживает до 50 файлов в пакете (загрузите все файлы Excel, выберите “XML” в качестве вывода и получите zip-архив с XML-файлами).
- Spire.XLS for Python: Расширьте предоставленный скрипт для перебора файлов в папке
import os
from spire.xls import *
import xml.etree.ElementTree as ET
from xml.dom import minidom

input_folder = "C:/Excel_Batch"
output_folder = "C:/XML_Batch"
os.makedirs(output_folder, exist_ok=True)

for filename in os.listdir(input_folder):
    if filename.endswith((".xlsx", ".xls")):
        workbook = Workbook()
        workbook.LoadFromFile(os.path.join(input_folder, filename))
        # Add conversion logic (same as single file) here
        workbook.Dispose()
В2: Могу ли я настроить структуру XML (например, изменить теги корня/строки)?
Да, все методы поддерживают настройку:
- Вручную: отредактируйте файл схемы XML (.xsd file) чтобы изменить корневые (например,
<Catalog>) или строковые (например,<Product>) теги. - Онлайн: Инструменты, такие как WizlyTools, позволяют вам устанавливать имена корневых/строковых элементов в настройках.
- Python: Измените строки скрипта ET.Element("RootName") и ET.SubElement(root, "RowName") в соответствии с вашими потребностями.
В3: В моих данных есть формулы. Будет ли вывод XML содержать формулу или вычисленное значение?
Почти во всех случаях экспорт в XML будет содержать вычисленное значение (результат формулы), а не саму формулу. XML — это в первую очередь формат для представления данных, а не логики или вычислений, стоящих за ними. Процесс преобразования считывает видимые значения ячеек.
В4: Мой XML-файл выглядит беспорядочно, когда я его открываю. Как я могу его правильно отформатировать?
XML, сгенерированный этими методами, часто находится в сжатом формате без разрывов строк или отступов. Это все еще действительный XML. Чтобы просмотреть его в читаемом формате:
- Откройте файл в современном веб-браузере (Chrome, Firefox, Edge), который автоматически отформатирует и аккуратно отобразит его.
- Используйте редактор кода, такой как VS Code, Notepad++, или Sublime Text, в которых есть встроенное форматирование XML или плагины для повторного отступа кода.