
Java (485)
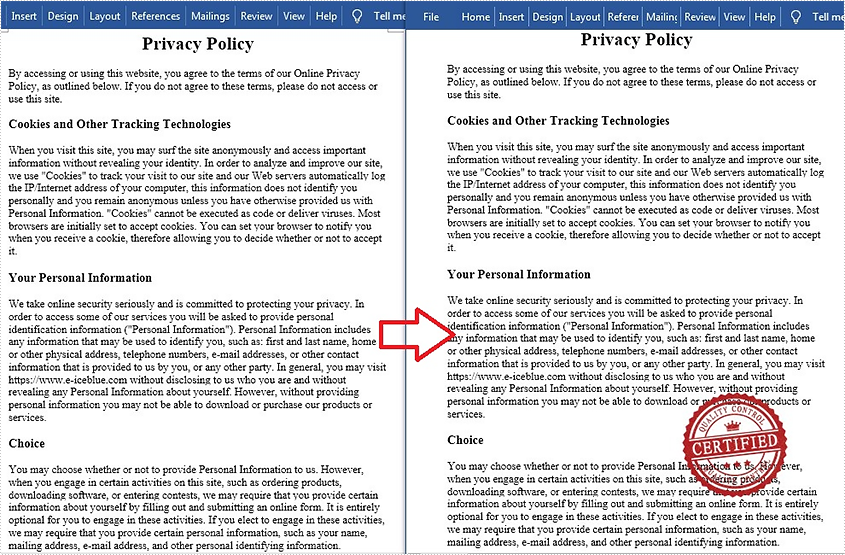
Stamps can guarantee the authenticity and validity of a document and also make the document look more professional. Since Microsoft Word doesn't provide a built-in stamp feature, you can add an image to your Word documents to mimic the stamp effect. This is useful when the document will be printed to paper or PDF. In this article, you will learn how to add a "stamp" to a Word document using Spire.Doc for Java.
Install Spire.Doc for Java
First of all, you're required to add the Spire.Doc.jar file as a dependency in your Java program. The JAR file can be downloaded from this link. If you use Maven, you can easily import the JAR file in your application by adding the following code to your project's pom.xml file.
<repositories>
    <repository>
        <id>com.e-iceblue</id>
        <name>e-iceblue</name>
        <url>https://repo.e-iceblue.com/nexus/content/groups/public/</url>
    </repository>
</repositories>
<dependencies>
    <dependency>
        <groupId>e-iceblue</groupId>
        <artifactId>spire.doc</artifactId>
        <version>14.7.0</version>
    </dependency>
</dependencies>
Add an Image Stamp to Word Document
Spire.Doc for Java allow developers to use the core classes and method listed in the below table to add and format an image to make it look like a stamp in the Word document.
| Name | Description |
| DocPicture Class | Represents a picture in a Word document. |
| Paragraph.appendPicture() Method | Appends an image to end of paragraph. |
| DocPicture.setHorizontalPosition() Method | Sets absolute horizontal position of the picture. |
| DocPicture.setVerticalPosition() Method | Sets absolute vertical position of the picture. |
| DocPicture.setWidth() Method | Sets picture width. |
| DocPicture.setHeight Method | Sets picture height. |
| DocPicture.setTextWrappingStyle() Method | Sets text wrapping type of the picture. |
The detailed steps are as follows:
- Create a Document instance.
- Load a Word document using Document.loadFromFile() method.
- Get the specific paragraph using ParagraphCollection.get() method.
- Add an image to the Word document using Paragraph.appendPicture() method.
- Set position, size and wrapping style of the image using the methods offered by DocPicture class.
- Save the document to another file using Document.saveToFile() method.
- Java
import com.spire.doc.*;
import com.spire.doc.documents.Paragraph;
import com.spire.doc.documents.TextWrappingStyle;
import com.spire.doc.fields.DocPicture;

public class AddStamp {
    public static void main(String[] args) {
        //Create a Document instance
        Document doc = new Document();

        //Load a Word document
        doc.loadFromFile("test.docx");

        //Get the specific paragraph
        Section section = doc.getSections().get(0);
        Paragraph paragraph = section.getParagraphs().get(4);

        //Add an image
        DocPicture picture = paragraph.appendPicture("cert.png");

        //Set the position of the image
        picture.setHorizontalPosition(240f);
        picture.setVerticalPosition(120f);

        //Set width and height of the image
        picture.setWidth(150);
        picture.setHeight(150);

        //Set wrapping style of the image to In_Front_Of_Text, so that it looks like a stamp
        picture.setTextWrappingStyle(TextWrappingStyle.In_Front_Of_Text);

        //Save the document to file
        doc.saveToFile("AddStamp.docx", FileFormat.Docx);
        doc.dispose();
    }
}
Apply for a Temporary License
If you'd like to remove the evaluation message from the generated documents, or to get rid of the function limitations, please request a 30-day trial license for yourself.
Table is one of the most commonly used formatting elements in PDF. In some cases, you may need to extract data from PDF tables to perform further analysis. In this article, you will learn how to achieve this task programmatically in Java using Spire.PDF for Java.
Install Spire.PDF for Java
First of all, you're required to add the Spire.PDF.jar file as a dependency in your Java program. The JAR file can be downloaded from this link. If you use Maven, you can easily import the JAR file in your application by adding the following code to your project's pom.xml file.
<repositories>
    <repository>
        <id>com.e-iceblue</id>
        <name>e-iceblue</name>
        <url>https://repo.e-iceblue.com/nexus/content/groups/public/</url>
    </repository>
</repositories>
<dependencies>
    <dependency>
        <groupId>e-iceblue</groupId>
        <artifactId>spire.pdf</artifactId>
        <version>12.7.0</version>
    </dependency>
</dependencies>
Extract Table Data from PDF Document
Spire.PDF for Java uses the PdfTableExtractor.extractTable(int pageIndex) method to detect and extract tables from a desired PDF page.
The following are the steps to extract table data from a PDF file:
- Load a sample PDF document using PdfDocument class.
- Create a StringBuilder instance and a PdfTableExtractor instance.
- Loop through the pages in the PDF, extract tables from each page into a PdfTable array using PdfTableExtractor.extractTable(int pageIndex) method.
- Loop through the tables in the array.
- Loop through the rows and columns in each table, after that extract data from each table cell using PdfTable.getText(int rowIndex, int columnIndex) method, then append the data to the StringBuilder instance using StringBuilder.append() method.
- Write the extracted data to a txt document using Writer.write() method.
- Java
import com.spire.pdf.PdfDocument;
import com.spire.pdf.utilities.PdfTable;
import com.spire.pdf.utilities.PdfTableExtractor;

import java.io.FileWriter;

public class ExtractTableData {
    public static void main(String []args) throws Exception {

        //Load a sample PDF document
        PdfDocument pdf = new PdfDocument("Sample.pdf");

        //Create a StringBuilder instance
        StringBuilder builder = new StringBuilder();
        //Create a PdfTableExtractor instance
        PdfTableExtractor extractor = new PdfTableExtractor(pdf);

        //Loop through the pages in the PDF
        for (int pageIndex = 0; pageIndex < pdf.getPages().getCount(); pageIndex++) {
            //Extract tables from the current page into a PdfTable array
            PdfTable[] tableLists = extractor.extractTable(pageIndex);

            //If any tables are found
            if (tableLists != null && tableLists.length > 0) {
                //Loop through the tables in the array
                for (PdfTable table : tableLists) {
                    //Loop through the rows in the current table
                    for (int i = 0; i < table.getRowCount(); i++) {
                        //Loop through the columns in the current table
                        for (int j = 0; j < table.getColumnCount(); j++) {
                            //Extract data from the current table cell and append to the StringBuilder
                            String text = table.getText(i, j);
                            builder.append(text + " | ");
                        }
                        builder.append("\r\n");
                    }
                }
            }
        }

        //Write data into a .txt document
        FileWriter fw = new FileWriter("ExtractTable.txt");
        fw.write(builder.toString());
        fw.flush();
        fw.close();
    }
}
The input PDF:

The output .txt document with extracted table data:

Apply for a Temporary License
If you'd like to remove the evaluation message from the generated documents, or to get rid of the function limitations, please request a 30-day trial license for yourself.
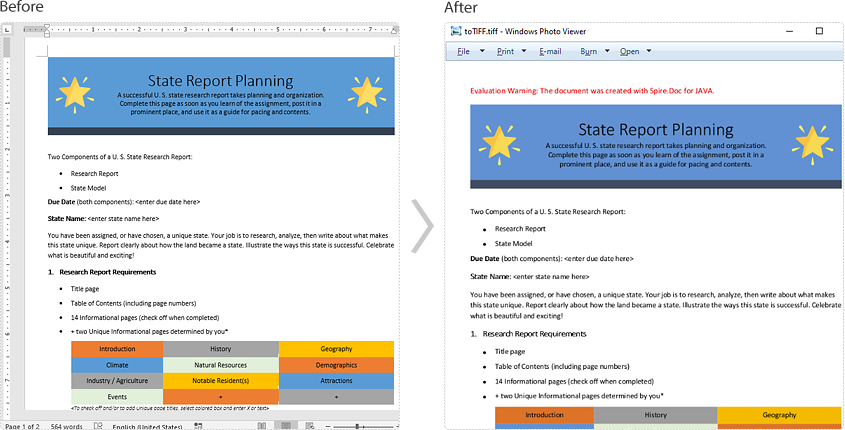
TIFF (Tagged Image File Format) is a flexible file format for storing raster graphics images. It's popular and widely supported by image-manipulation, scanning, faxing and word processing applications etc. The ability to store image data in a lossless format makes a TIFF file to be a useful image archive. In some cases, developers may need to convert documents in other format like Word to TIFF. In this article, we will describe how to achieve this task in Java using Spire.Doc for Java.
Install Spire.Doc for Java
First of all, you're required to add the Spire.Doc.jar file as a dependency in your Java program. The JAR file can be downloaded from this link. If you use Maven, you can easily import the JAR file in your application by adding the following code to your project's pom.xml file.
<repositories>
    <repository>
        <id>com.e-iceblue</id>
        <name>e-iceblue</name>
        <url>https://repo.e-iceblue.com/nexus/content/groups/public/</url>
    </repository>
</repositories>
<dependencies>
    <dependency>
        <groupId>e-iceblue</groupId>
        <artifactId>spire.doc</artifactId>
        <version>14.7.0</version>
    </dependency>
</dependencies>
Convert Word to TIFF
Spire.Doc for Java provides the Document.saveToTiff() method for converting Word to TIFF. This method accepts a String parameter which specifies the file path of the converted TIFF.
You can follow the steps below to convert a Word document to TIFF format:
- Create a Document instance.
- Load a Word document using Document.loadFromFile() method.
- Save the document to TIFF using Document.saveToTiff() method.
- Java
import com.spire.doc.Document;

public class ConvertWordToTiff {
    public static void main(String[] args){

        //Create a Document instance
        Document document = new Document();
        //Load a Word document
        document.loadFromFile("Sample.docx");

        //Save the document as multi-page TIFF
        document.saveToTiff("toTIFF.tiff");
    }
}
Apply for a Temporary License
If you'd like to remove the evaluation message from the generated documents, or to get rid of the function limitations, please request a 30-day trial license for yourself.
