When managing data with many rows and columns, such as project plans or financial reports, you often need to group some rows (Group / Outline) so that they can be collapsed into a layered structure, letting you view only the summary rows or the content of a certain phase. When the structure is no longer needed, you can remove the groups at any time to restore the flat layout of the rows. Spire.XLS for JavaScript completes this directly in the browser based on WebAssembly, and manages input/output files through a virtual file system (VFS), with no backend service required.
This article covers two core features:
For installation and project configuration, refer to Integrating Spire.XLS for JavaScript in a React Project. The examples below assume Spire.XLS is installed and the WebAssembly module is initialized.
Create Multi-level (Nested) Groups
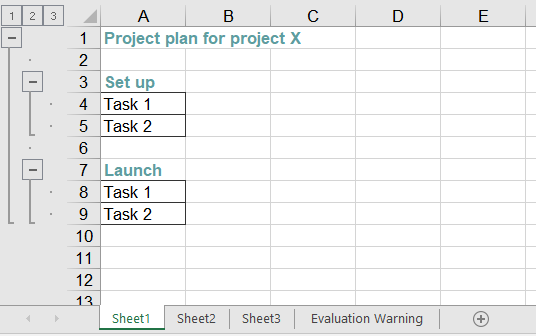
A multi-level group consists of an "outer group" plus "inner groups". For example, in a project plan, the whole execution phase (several rows) can be one level of group, while the detail rows of each sub-phase are the second level of group. When creating it, you should call GroupByRows() on the larger outer range first, and then on the smaller inner ranges, so that Excel generates the collapse buttons of different levels. The main steps are as follows:
- Create a
Workbookobject and get the first worksheet. - Add a named style and set its font (used for titles and similar cells).
- Set
Worksheet.PageSetup.IsSummaryRowBelow = falseso that the summary rows are shown above the detail rows. - Write the sample data into the cells.
- Call
GroupByRows()on the outer row range (rows 2-9) first, then callGroupByRows()on the nested inner row ranges (rows 4-5 and rows 8-9). - Save the workbook with the
Workbook.SaveToFile()method.
Here is a complete code example showing how to create two-level (nested) row groups for a worksheet in React:
function App() {
  const createNestedGroup = async () => {
    // Get the Spire.XLS WASM module
    const xlsModule = window.wasmModule?.spirexls;

    // Check whether the module is ready
    if (!xlsModule) {
      alert('Spire.Xls is not ready yet');
      return;
    }

    // Load the font into the VFS for text measurement
    await window.spire.FetchFileToVFS('ARIAL.TTF', '/Library/Fonts/', `${process.env.PUBLIC_URL}/font/`);

    // Create a new workbook and get the first worksheet
    const workbook = new xlsModule.Workbook();
    const sheet = workbook.Worksheets.get(0);

    // Add a named style for the title rows
    const style = workbook.Styles.Add("style");
    style.Font.Color = xlsModule.Color.get_CadetBlue();
    style.Font.IsBold = true;

    // Make the summary rows appear above the detail rows
    sheet.PageSetup.IsSummaryRowBelow = false;

    // Write the sample data
    sheet.Range.get("A1").Value = "Project plan for project X";
    sheet.Range.get("A1").CellStyleName = style.Name;

    sheet.Range.get("A3").Value = "Set up";
    sheet.Range.get("A3").CellStyleName = style.Name;
    sheet.Range.get("A4").Value = "Task 1";
    sheet.Range.get("A5").Value = "Task 2";
    sheet.Range.get("A4:A5").BorderAround(xlsModule.LineStyleType.Thin);
    sheet.Range.get("A4:A5").BorderInside(xlsModule.LineStyleType.Thin);

    sheet.Range.get("A7").Value = "Launch";
    sheet.Range.get("A7").CellStyleName = style.Name;
    sheet.Range.get("A8").Value = "Task 1";
    sheet.Range.get("A9").Value = "Task 2";
    sheet.Range.get("A8:A9").BorderAround(xlsModule.LineStyleType.Thin);
    sheet.Range.get("A8:A9").BorderInside(xlsModule.LineStyleType.Thin);

    // Group the outer rows first, then the nested inner rows, to form multi-level groups
    sheet.GroupByRows(2, 9, false);
    sheet.GroupByRows(4, 5, false);
    sheet.GroupByRows(8, 9, false);

    // Save the document
    const outputFileName = 'MultiLevelGroup.xlsx';
    workbook.SaveToFile({ fileName: outputFileName, version: xlsModule.ExcelVersion.Version2010 });

    // Release resources
    workbook.Dispose();

    // Read the converted file from the VFS and trigger a download
    const fileArray = window.dotnetRuntime.Module.FS.readFile(outputFileName);
    const blob = new Blob([fileArray], { type: 'application/vnd.openxmlformats-officedocument.spreadsheetml.sheet' });
    const url = URL.createObjectURL(blob);
    const a = document.createElement('a');
    a.href = url;
    a.download = outputFileName;
    a.click();
    URL.revokeObjectURL(url);
  };

  return (
    <div style={{ textAlign: 'center', height: '300px' }}>
      <h1>Create Nested Group</h1>
      <button onClick={createNestedGroup}>
        Start
      </button>
    </div>
  );
}

export default App;
Effect of creating multi-level groups
Remove (Delete) Multi-level Groups
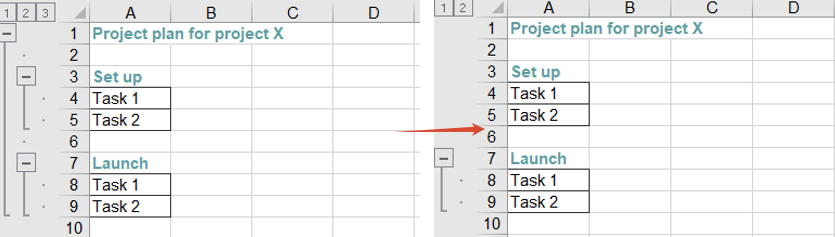
When a workbook already contains multi-level groups and you need to remove a particular outer "large group" or inner "small group", you can load the file and call the Worksheet.UngroupByRows() method on the corresponding range. Grouping only affects the collapsed display of rows; removing a group never deletes any cell content. After the outer large group is removed, the inner small groups that were nested inside it remain as independent single-level groups and can be removed one by one. The main steps are as follows:
- Create a
Workbookobject and load the workbook that already contains multi-level groups with theWorkbook.LoadFromFile()method. - Get the worksheet with the
Workbook.Worksheets.get()method. - Call
UngroupByRows()on the outer row range (rows 2-9) to remove the large group. - Call
UngroupByRows()on the inner row range (rows 4-5) to remove the small group. - Save the workbook with the
Workbook.SaveToFile()method.
Here is a complete code example showing how to load an already-grouped Excel file in React and remove a large group and a small group:
function App() {
  const ungroupRows = async () => {
    // Get the Spire.XLS WASM module
    const xlsModule = window.wasmModule?.spirexls;

    // Check whether the module is ready
    if (!xlsModule) {
      alert('Spire.Xls is not ready yet');
      return;
    }

    // Load the font into the VFS for text measurement
    await window.spire.FetchFileToVFS('ARIAL.TTF', '/Library/Fonts/', `${process.env.PUBLIC_URL}/font/`);

    // Load the Excel file that already contains multi-level groups
    const inputFileName = 'MultiLevelGroup.xlsx';
    await window.spire.FetchFileToVFS(inputFileName, '', `${process.env.PUBLIC_URL}data/`);

    // Create a Workbook object and load the workbook
    const workbook = new xlsModule.Workbook();
    workbook.LoadFromFile({ fileName: inputFileName });

    // Get the first worksheet
    const sheet = workbook.Worksheets.get(0);

    // Remove the outer large group (rows 2-9)
    sheet.UngroupByRows(2, 9);

    // Remove the inner small group (rows 4-5)
    sheet.UngroupByRows(4, 5);

    // Save the document
    const outputFileName = 'UngroupRows_output.xlsx';
    workbook.SaveToFile({ fileName: outputFileName, version: xlsModule.ExcelVersion.Version2010 });

    // Release resources
    workbook.Dispose();

    // Read the converted file from the VFS and trigger a download
    const fileArray = window.dotnetRuntime.Module.FS.readFile(outputFileName);
    const blob = new Blob([fileArray], { type: 'application/vnd.openxmlformats-officedocument.spreadsheetml.sheet' });
    const url = URL.createObjectURL(blob);
    const a = document.createElement('a');
    a.href = url;
    a.download = outputFileName;
    a.click();
    URL.revokeObjectURL(url);
  };

  return (
    <div style={{ textAlign: 'center', height: '300px' }}>
      <h1>Ungroup Rows</h1>
      <button onClick={ungroupRows}>
        Start
      </button>
    </div>
  );
}

export default App;
Effect of removing multi-level groups
FAQ
Why does calling GroupByRows several times not produce multi-level groups
Cause: A multi-level group requires the range of the inner group to be completely contained within the range of the outer group. If two grouped ranges do not contain each other, Excel treats them as two groups of the same level instead of nested multi-level groups.
Solution: Call GroupByRows() on the larger outer range first, and then on the smaller inner range, for example call GroupByRows(2, 9, false) first and then GroupByRows(4, 5, false).
How can I make a group collapsed by default (or keep it expanded)?
Cause: The third Boolean parameter of GroupByRows(startRow, endRow, isCollapsed) decides whether the detail rows of a group are collapsed by default after the group is created. true collapses them by default, while false keeps them expanded (the examples in this article use false). When the saved file is opened, it is shown in that state.
Solution: Set the third parameter to true to collapse the group by default, for example sheet.GroupByRows(4, 5, true). To collapse or expand a group at runtime, call CollapseGroup() / ExpandGroup() on the grouped range.
Obtain a Free License
Spire.XLS for JavaScript offers a 30-day full-featured free trial license with no functional limitations. Apply here to evaluate before purchasing.